Nesco KLEAN PLUS NC-5417 User manual


1
!ไม่ควรให้บุคคลทุพพลภาพ(รวมถึงเด็ก), บุคคลไร้ความสามารถทั้งทางด้านร่างกายและจิตใจ, ผู้ที่ไม่มี
ความรู้ความเข้าใจเกี่ยวกับวิธีการใช้งาน ใช้งานเครื่องทำความสะอาดนี้ ยกเว้นเป็นการใช้งานภายใต้การ
ควบคุมดูแลและแนะนำโดยผู้ใหญ่ซึ่งมีหน้าที่รับผิดชอบต่อความปลอดภัยของบุคคลเหล่านั้น
!ไม่ควรให้เด็กนำเครื่องทำความสะอาดนี้ไปเป็นของเล่น
!ไม่ควรใช้งานเครื่องหากปลั๊กและสายไฟชำรุดควรส่งเครื่องไปยังศูนย์บริการเพื่อให้ช่างผู้มีความชำนาญ
เป็นผู้ซ่อมแซมเพื่อป้องกันอันตรายที่อาจเกิดขึ้น
!ไม่ควรฉีดพ่นไอน้ำไปในบริเวณที่มีคน สัตว์เลี้ยง หรือเครื่องใช้ไฟฟ้าและควรระวังความร้อนจากไอน้ำ

เครื่องทำความสะอาดแรงดันไอน้ำ
รุ่น คลีน พลัส NC-5417
1200 วัตต์220-240 โวลต์50 เฮิร์ซ
- ไม่ควรใช้งานกลางแจ้ง ควรใช้งานภายในครัว
เรือนเท่านั้น
- ไม่ควรเสียบปลั๊กเครื่องทิ้งไว้ควรถอดปลั๊กเครื่อง
ออกทุกครั้งเมื่อไม่ใช้งาน ก่อนนำไปทำความ
สะอาดและก่อนซ่อมเครื่อง
- ห้ามนำไปเป็นของเล่น ควรดูแลอย่างใกล้ชิดเมื่อ
ต้องใช้งานใกล้เด็กสัตว์เลี้ยงหรือพืช
- ไม่ควรฉีดพ่นไอน้ำไปในบริเวณที่มีคนสัตว์เลี้ยง
- ควรใช้เฉพาะอุปกรณ์ที่มากับเครื่องหรืออุปกรณ์ที่
ผู้ผลิตแนะนำให้ใช้กับเครื่องหรือใช้ตามคำแนะนำ
ในคู่มือการใช้เท่านั้น
- ไม่ควรใช้งานเครื่องทำความสะอาดในขณะที่
สายไฟหรือปลั๊กไฟชำรุดหรือในกรณีที่เครื่องทำงาน
ผิดปกติหรือเครื่องตกหล่น ชำรุด ถูกทิ้งไว้กลางแจ้ง
หรือตกน้ำ ควรนำส่งยังศูนย์บริการเพื่อตรวจสอบ
เครื่องก่อนนำมาใช้
- ห้ามดึงหรือหิ้วสายไฟ หรือใช้สายไฟเป็นหูหิ้ว
เครื่องหรือปิดประตูทับสายไฟหรือนำสายไฟพาด
ขอบหรือมุมที่มีความคม เก็บสายไฟให้ห่างจาก
บริเวณที่มีความร้อน
- ห้ามใช้ปลั๊กต่อพ่วงหรือเต้ารับ ที่ไม่สามารถ
รองรับกระแสไฟของเครื่องได้
- ไม่ควรถอดปลั๊กโดยดึงที่สายไฟ ควรจับที่
หัวปลั๊กแล้วดึงออก
- ห้ามใช้งานเครื่อง หรือจับเครื่อง หรือปลั๊กไฟ
ในขณะที่มือเปียก ห้ามใช้งานเครื่องในขณะ
ไม่ใส่รองเท้า
- หากสายไฟชำรุดควรส่งให้ผู้ผลิตหรือศูนย์บริการ
ของผู้จัดจำหน่าย หรือช่างที่มีความชำนาญ
เป็นผู้เปลี่ยนสายไฟเพื่อป้องกันไฟฟ้าลัดวงจร
ฝาปิดนิรภัย
ปุ่มกดฉีดไอน้ำ
ตัวเครื่อง
ไฟแสดงสถานะการทำงาน
ปลั๊กและสายไฟ
หัวฉีดยาวส่งไอน้ำ
หัวต่อแบนทำความสะอาดกระจก
หัวต่อสำหรับรีดผ้า
หัวฉีดข้องอ
หัวแปรงกลม
ผ้าหุ้มหัวแปรงรีดผ้า
กรวยเติมน้ำ
ถ้วยตวงปริมาตรน้ำ
ปุ่มเปิดใช้น้ำผงซักฟอก
ปุ่มปลดแท็งก์ใส่น้ำผงซักฟอก
แท็งก์ใส่น้ำผงซักฟอก
A.
B.
C.
D.
E.
F.
G.
H.
I.
J.
K.
L.
M.
N.
O.
P.
ส่วนประกอบ
ภาษาไทย
ขอขอบคุณทุกท่านที่วางใจเลือกใช้ผลิตภัณฑ์
ของ เนสโก้ด้วยประสบการณ์และการออกแบบที่
ทันสมัยและโดดเด่นของผลิตภัณฑ์ที่มากด้วยคุณ-
ประโยชน์ในการใช้งานจะสามารถตอบสนองความ
พึงพอใจในการใช้งานของท่านได้อย่างคุ้มค่า
คำเตือนเพื่อความปลอดภัย
- ห้ามนำวัตถุใดๆ ใส่ลงไปในเครื่อง และห้ามใช้
งานเครื่องในขณะที่มีวัตถุใดๆ เข้าไปขวาง
- ควรเก็บเครื่องทำความสะอาดไว้ในอาคาร
บริเวณที่แห้งและไม่สัมผัสความร้อน
- ในขณะใช้งานเครื่องทำความสะอาด ควรมีแสง
สว่างพอเพียงในบริเวณพื้นที่ทำงาน
- ในขณะที่กำลังฉีดพ่นไอน้ำ ไม่ควรหมุนให้
เครื่องทำมุมกับพื้นมากกว่า 45 องศาในแนวตั้ง
- ห้ามฉีดพ่นไอน้ำโดยตรงเข้าหาคน, สัตว์, พืชหรือ
อุปกรณ์ใดๆ ที่มีส่วนประกอบของอุปกรณ์ไฟฟ้า
- ห้ามนำเครื่องทำความสะอาดใส่ลงในน้ำหรือของ
2เหลวชนิดใดๆควรถอดปลั๊กออกจากเต้ารับ
หรือเครื่องใช้ไฟฟ้า
- อ่านและทำความเข้าใจคู่มือฉบับนี้ให้ละเอียดก่อน
ใช้งานและเก็บคู่มือไว้เพื่อการใช้งานในครั้งต่อไป

- ห้ามเติมสารละลายตะกอนตะกรัน น้ำมันหอม
ผงซักฟอก หรือสารเคมีใดๆลงในหม้อต้มของ
เครื่องทำความสะอาด เพราะ จะทำให้เครื่อง ชำรุด
เสียหายและเป็นอันตรายต่อผู้ใช้ได้
- ควรให้ช่างที่มีความชำนาญเท่านั้นเป็นผู้ซ่อม
เครื่องหรือเปลี่ยนสายไฟ
- ควรปิดฝาปิดนิรภัยให้สนิทในขณะใช้งานเครื่อง
ทำความสะอาด
- ห้ามใช้งานเครื่องทำความสะอาดในสระว่ายน้ำ
ขณะที่มีในน้ำในสระ
- ก่อนเติมน้ำลงในเครื่องทำความสะอาด ปฏิบัติ
ตามขั้นตอนต่อไปนี้
คุณสมบัติของผลิตภัณฑ์
เทคโนโลยีอันทันสมัยและมากด้วยประสบการณ์
เครื่องทำความสะอาดแรงดันไอน้ำถูกออกแบบมาโดย
การใช้ไอน้ำร้อนที่มีแรงดันสูงในการทำความสะอาด
พื้นหน้าต่างหรือเสื้อผ้าโดยสามารถฆ่าเชื้อโรคและ
ขจัดฝุ่น เครื่องทำความสะอาดแรงดันไอน้ำมี
ระบบควบคุมความร้อนอัตโนมัติเพื่อสร้างไอน้ำอย่าง
ต่อเนื่องในการทำความสะอาดทำงานโดยใช้ไอน้ำ
ร้อนแรงดันสูง ทั้งยังสามารถใช้งานร่วมกับ
ผงซักฟอกในการทำความสะอาดคราบฝังแน่น
ทำงานเมื่อเครื่องถูกเสียบปลั๊กในขณะที่น้ำในหม้อต้ม
เหลือน้อยเกินไป เครื่องทำความสะอาดยังมีระบบ
ควบคุม อุณหภูมิของไอน้ำให้สม่ำเสมอที่ 130 ํC
และช่วยฆ่าเชื้อโรคในขณะเดียวกัน นอกจากนี้
เครื่องมีระบบควบคุมแรงดันอัตโนมัติหากแรงดัน
ภายในหม้อต้มสูงเกินไปเครื่องจะปล่อยแรงดันออกมา
โดยอัตโนมัติ สายไฟของเครื่องถูกห่อหุ้มด้วยฉนวน
สองชั้นที่สามารถกันน้ำและฝุ่นละอองต่างๆ
หม้อต้มภายในผลิตจากอลูมินัมอัลลอยด์ซึ่งทำให้
เครื่องทำความสะอาดนี้ปลอดภัยและสามารถรองรับ
แรงดันสูง วัสดุภายนอกเป็น PPคุณภาพดีทำให้
ผลิตภัณฑ์สามารถทนต่อการใช้งานหนักและไม่กลาย
สภาพ
ทนทาน
ประหยัด
3
เครื่องทำความสะอาดแรงดันไอน้ำมีระบบตัดไฟ
อัตโนมัติเพื่อป้องกันความร้อนเกิน ระบบตัดไฟจะ
ปลอดภัย
- สายรัดข้อต่อบริเวณท่อส่งไอน้ำทำด้วยโลหะมี
ความร้อนในขณะที่เครื่องกำลังทำงาน ไม่ควร
สัมผัสบริเวณที่มีความร้อน ควรรอให้เย็นลงก่อน
ที่จะทำการถอดหรือเปลี่ยนอุปกรณ์
4.กดปุ่มฉีดไอน้ำอีกครั้งเพื่อปล่อยแรงดันที่ค้างภายใน
5. ค่อยๆ หมุนคลายเกลียวฝาปิดนิรภัยออกและ
1. ถอดปลั๊กเครื่องทำ ความสะอาดออกจากเต้ารับ
2. ปล่อยแรงดันออกจากเครื่องโดยกดปุ่มฉีดไอน้ำ
3. ปล่อยให้เครื่องทำความสะอาดเย็นลงประมาณ3
นาที
- เครื่องใช้ไฟฟ้านี้ไม่ได้ถูกออกแบบมาให้บุคคล
(รวมถึงเด็ก) ผู้ทุพพลภาพ บุคคลไร้ความ สามารถ
ทั้งด้านร่างกายหรือจิตใจ,บุคคลผู้ขาดความรู้และ
ความเข้าใจเกี่ยวกับผลิตภัณฑ์เป็นผู้ใช้งานยกเว้นอยู่
ภายใต้การดูแลและแนะนำของผู้ที่มีหน้าที่รับผิดชอบ
ต่อความปลอดภัยของบุคคลเหล่านั้น
- ไม่ควรสัมผัสบริเวณที่มีความร้อนของเครื่อง
หรือบริเวณหัวฉีดไอน้ำรวมถึงไม่ควรสัมผัสไอน้ำ
ร้อนหรือฉีดพ่นไอน้ำร้อนไปยังบริเวณที่มีคนหรือ
สัตว์เนื่องจากจะทำให้เกิดอันตรายจากความร้อนได้
- ไม่ควรใช้งานในที่ที่มีวัตถุไวไฟหรือวัตถุเชื้อเพลิง
อื่นๆ
ด้วยการออกแบบเป็นพิเศษของขดลวดทำความร้อน
ทำให้ระบบการทำความร้อนสมดุลมีประสิทธิภาพ
และประหยัดพลังงานและโครงสร้างสองชั้นของตัว
รอประมาณ 5 วินาทีก่อนเปิดฝา
ทุกครั้งเมื่อต้องการเติมน้ำลงในแท็งก์น้ำ
เครื่องยังช่วยรักษาความร้อนไว้ภายในเพื่อช่วยใน
การประหยัดพลังงาน
สะดวกสบาย
เครื่องทำความสะอาดใช้งานง่าย เพียงเสียบปลั๊ก
เข้ากับเต้ารับระบบทำความร้อนจะเริ่มทำงานทันที
จนกระทั่งถึงอุณหภูมิระดับที่สร้างไอน้ำร้อน
นอกจากนี้ยังมีอุปกรณ์หลากหลายให้เลือกใช้งาน
ตามความเหมาะสมของแต่ละพื้นที่ทุกชิ้นส่วนถอด
ประกอบง่าย
ข้อมูลจำเพาะของผลิตภัณฑ์
คุณสมบัติการใช้งานเครื่องในรูปแบบต่างๆ
ทำความสะอาดผ้า
กับแรงดันไฟฟ้าของเครื่องโดยตรวจสอบจากฉลาก
ใต้เครื่อง แล้วจึงเสียบปลั๊กเข้ากับเต้ารับ
6. ไอน้ำพร้อมใช้ภายในเวลา 3-5 นาทีหลังจาก
เสียบปลั๊ก กดปุ่มฉีดไอน้ำเบาๆเพื่อตรวจสอบว่า
เครื่องทำความสะอาดพร้อมใช้งาน ถ้ามีไอน้ำออก
จากเครื่องแสดงว่าพร้อมใช้งานแล้ว
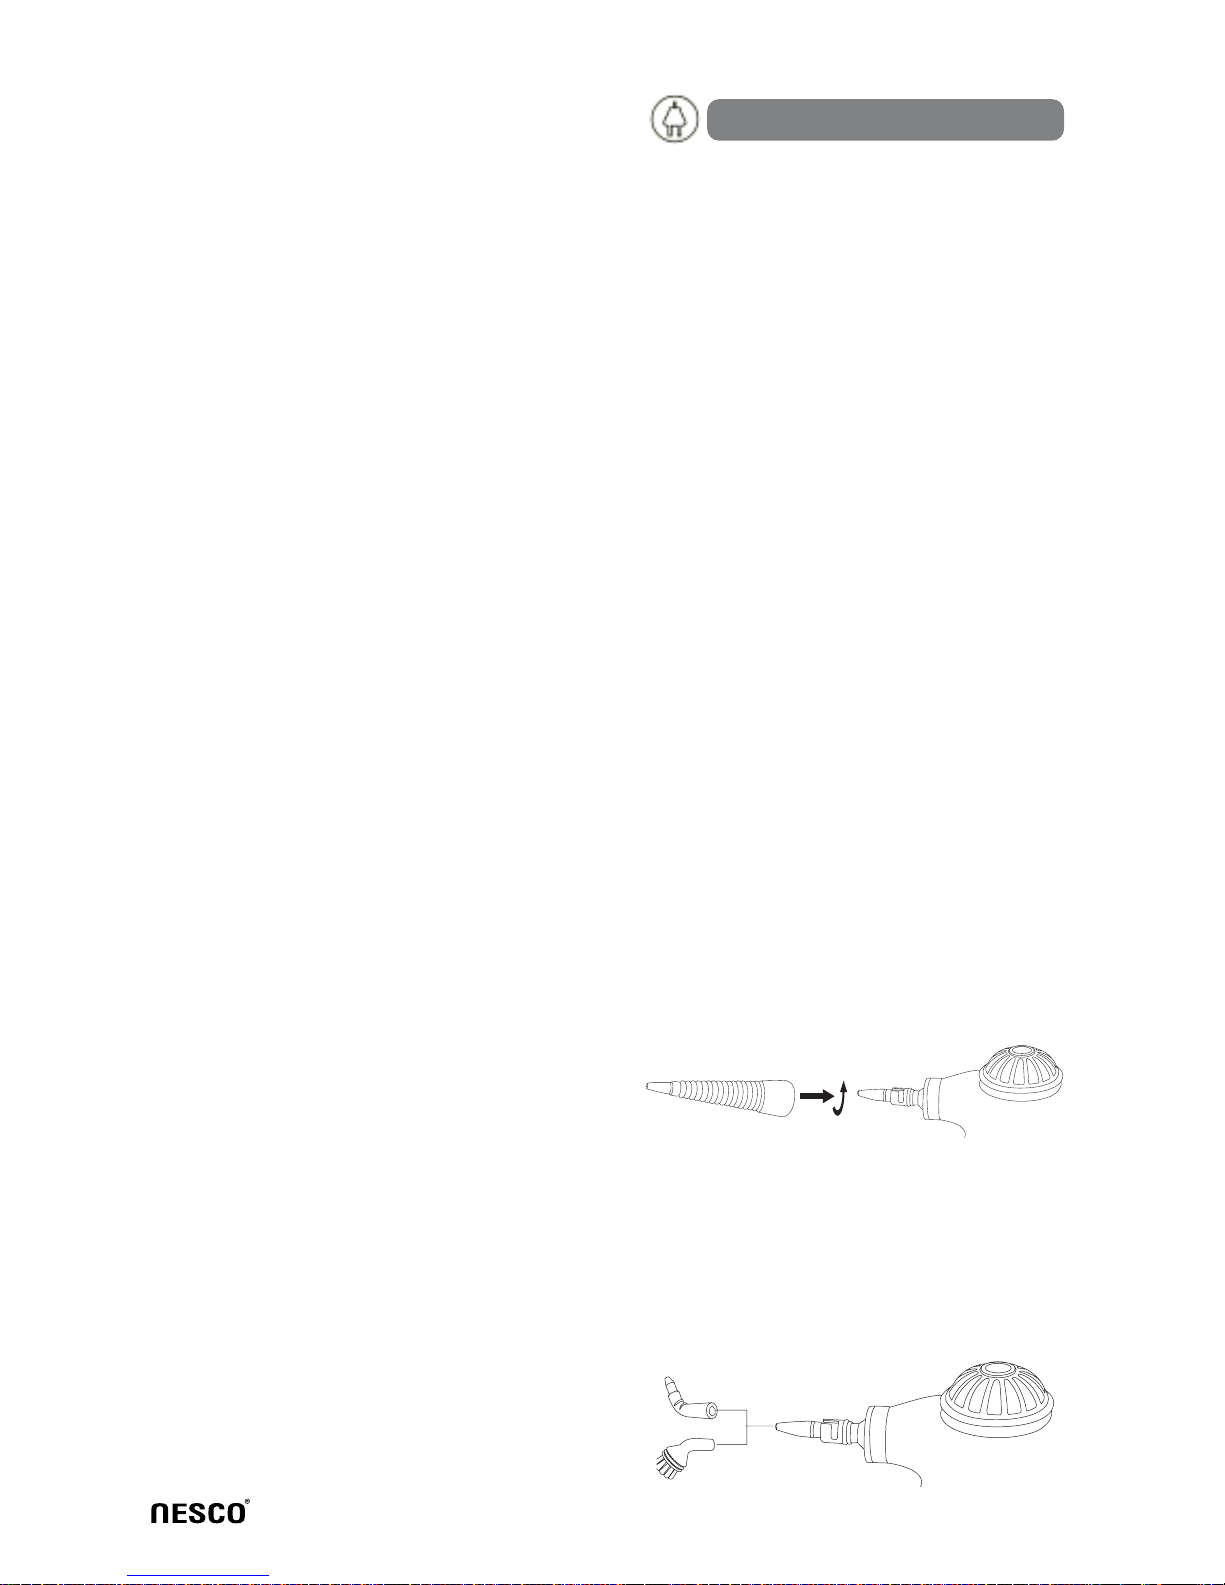
ประกอบหัวฉีดยาวส่งไอน้ำเข้ากับตัวเครื่องในทิศ
ตามลูกศร หมุนหัวฉีดยาวตามเข็มนาฬิกาให้ตรง
ล็อคการถอดท่อยาวทำได้โดยหมุนทวนเข็มนาฬิกา
การประกอบหัวฉีดยาวส่งไอน้ำ
การประกอบชิ้นส่วนและอุปกรณ์ต่างๆ
วิธีการใช้งาน
1. เปิดฝาบรรจุภัณฑ์ตรวจสอบเครื่องทำความ
สะอาด อุปกรณ์ต่างๆ และคู่มือการใช้ให้ครบถ้วน
ตรวจดูให้มั่นใจว่าอุปกรณ์ทุกชิ้นอยู่ในสภาพดี
2.อ่านและทำความเข้าใจคู่มือการใช้ก่อนการใช้งาน
ผลิตภัณฑ์นี้ถูกออกแบบมาเพื่อใช้งานภายในครัว
เรือนเท่านั้น
3.วางเครื่องทำความสะอาดลงบนโต๊ะหรือพื้นเรียบ
เปิดฝานิรภัยออกและใส่กรวยเติมน้ำลงในช่องเติมน้ำ
4. ใช้ถ้วยตวงน้ำ ปริมาณ 300 มิลลิลิตร เติมลงใน
แทงค์น้ำ นำกรวย ออกแล้วปิดฝานิรภัยให้สนิท
5. ตรวจสอบแรงดันไฟฟ้าในบ้านของท่านให้ตรง
4
แรงดันไฟฟ้า 220-240 โวลต์50Hz
ความจุแทงค์น้ำ 480 มล.
กำลังไฟ 1200วัตต์
ฆ่าเชื้อโรคและกำจัดเชื้อแบคทีเรีย
ประกอบหัวฉีดส่งไอน้ำเข้ากับตัวเครื่องแล้วกดปุ่ม
ฉีดไอน้ำไปยังบริเวณที่ต้องการทำความสะอาดเพื่อ
ฆ่าเชื้อโรค
ประกอบหัวฉีดยาวส่งไอน้ำเข้ากับตัวเครื่อง
นำผ้าหุ้มหัวแปรงหุ้มบนหัวต่อ แล้วกดปุ่มฉีดไอน้ำ
ไปบน เสื้อผ้า เพื่อทำความสะอาดรอยเปื้อน
ทำความสะอาดกระจก
ประกอบหัวต่อทำความสะอาดกระจกเข้ากับตัวเครื่อง
กดด้านกว้างของหัวต่อเบาๆให้แนบกับกระจก
แล้วกดปุ่มฉีดไอน้ำแล้วเลื่อนทำความสะอาดไปยัง
บริเวณที่ต้องการทำความสะอาด
ทำความสะอาดพื้น
ประกอบหัวฉีดยาวส่งไอน้ำเข้ากับตัวเครื่องแล้ว
ประกอบหัวต่อข้องอหรือหัวต่อกลมแล้วกดปุ่มฉีด
ไอน้ำไปยัง บริเวณ พื้นที่ต้องการทำความสะอาด
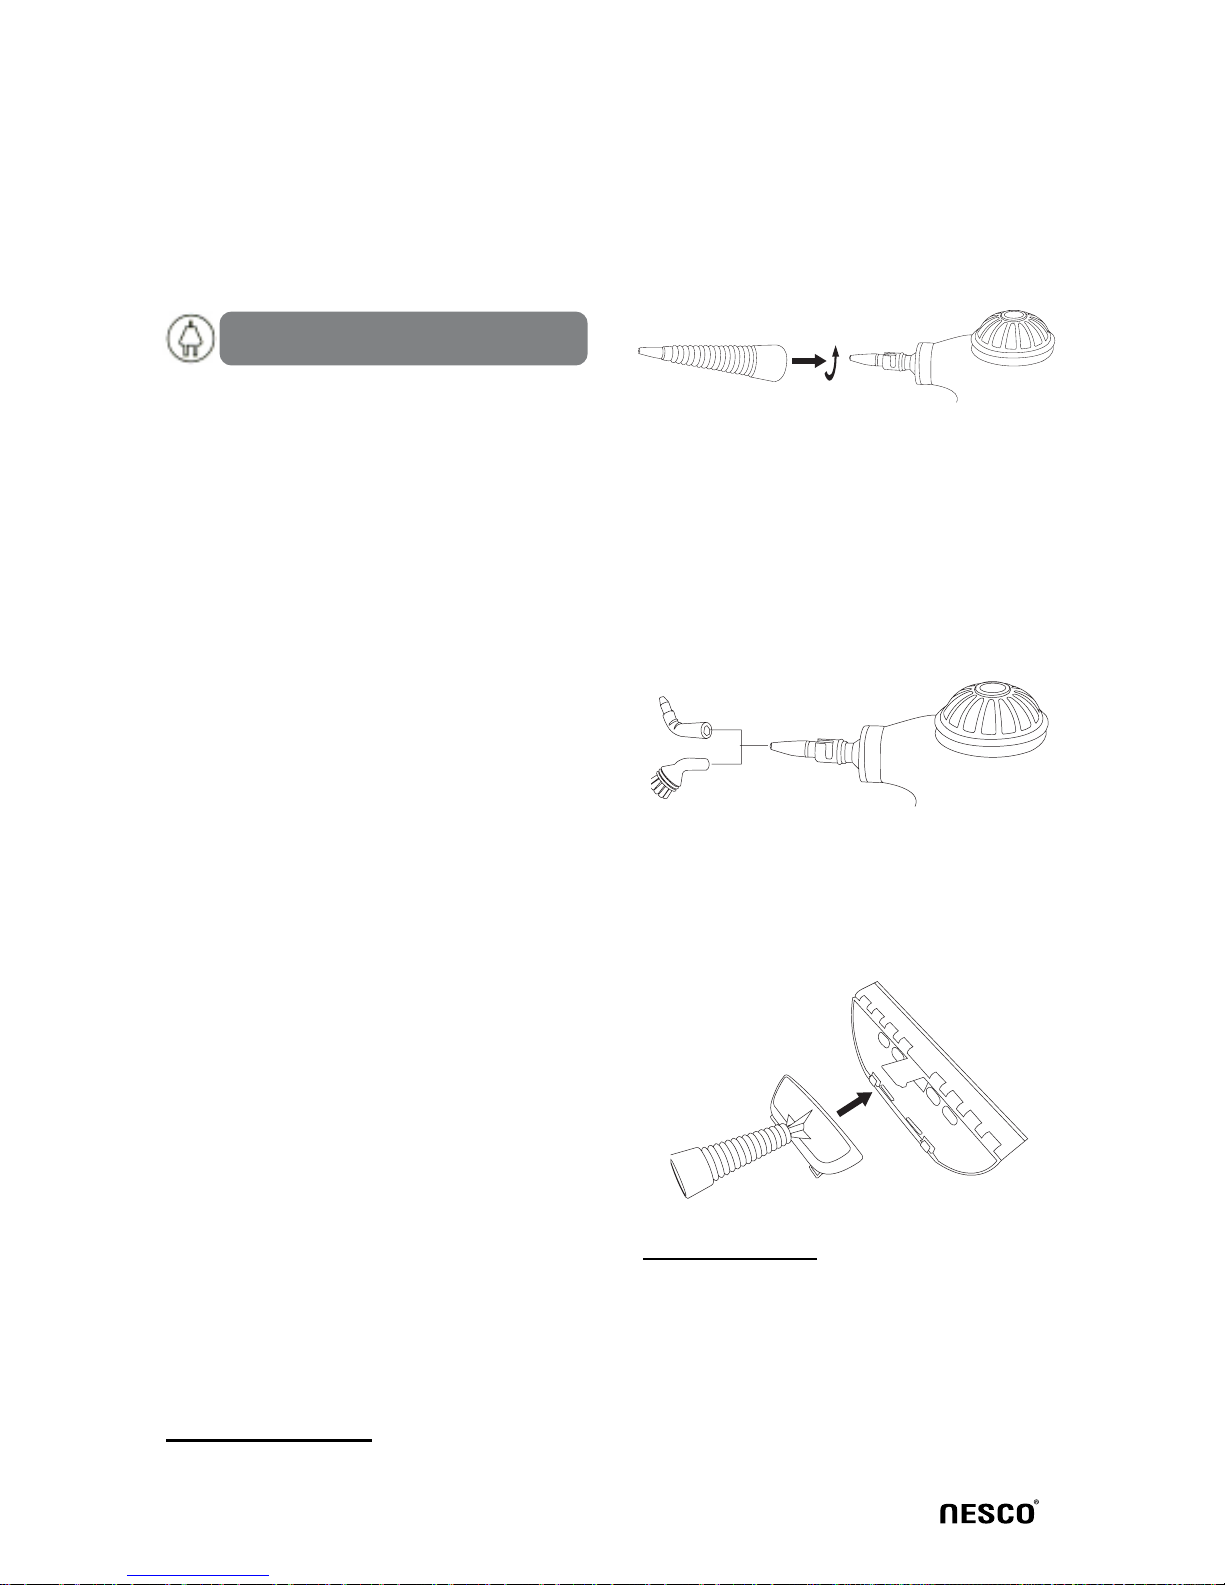
การประกอบหัวต่อกลมหรือหัวต่อข้องอ
สวมหัวต่อกลมหรือหัวต่อข้องอเข้ากับหัวฉีดไอน้ำโดย
ตรง โดยปฏิบัติตามคำแนะนำในภาพ หมุนหัวต่อ
ไปตามทิศหรือมุมที่ต้องการ

การเติมน้ำ
1. ปิดกระแสไฟเข้าเครื่องจากนั้นถอดปลั๊กออกจาก
เต้ารับ
2. กดปุ่มฉีดไอน้ำเพื่อปล่อยไอน้ำออกจากเครื่อง
จน กระทั่งไม่มีไอน้ำออกมาอีก
3. ค่อย ๆหมุนคลายฝาปิดนิรภัย ปล่อยไอน้ำที่อาจ
ค้างอยู่ภายใน วางเครื่องทำความสะอาดในบริเวณ
ที่ไม่ร้อนประมาณ5 นาทีแล้วค่อยเปิดฝาเครื่องออก
4. ใช้กรวยและถ้วยตวงน้ำเติมน้ำเย็นหรือน้ำอุ่น ลง
ในแทงค์น้ำ
5. ปิดฝาปิดนิรภัยโดยหมุนให้ปิดแน่นสนิท หลังการใช้งาน
1. เมื่อใช้งานเสร็จแล้วให้ปิดกระแสไฟเข้าเครื่อง
และถอดปลั๊กออกจากเต้ารับ
2. กดปุ่มฉีดไอน้ำเพื่อปล่อยไอน้ำออกจากเครื่อง
จนกระทั่งไม่มีไอน้ำออกมาอีก
3. ค่อยๆ หมุนคลายฝาปิดนิรภัย ปล่อยไอน้ำที่
อาจค้างอยู่ภายใน วางเครื่องทำความสะอาด ใน
บริเวณที่ไม่ร้อนประมาณ 5 นาทีแล้วค่อยเปิดฝา
5
- แท็งก์เติมน้ำผงซักฟอก แยกส่วนต่างหาก
บริเวณด้านล่างของเครื่อง ท่านสามารถใช้งานโดย
กดปุ่ม ปลดแท็งก์(O)เพื่อนำแท็งก์ออกมาจาก
ตัวเครื่อง
การเติมน้ำผงซักฟอก
*ในการใช้แรงดันไอน้ำกับน้ำผงซักฟอกร่วมกัน
เพื่อทำความสะอาดและฆ่าเชื้อโรคให้เลื่อนปุ่มฉีด
น้ำผงซักฟอก(N)บนที่จับลงก่อนที่จะกดปุ่ม
กดฉีดไอน้ำ (B)
คำแนะนำ
โปรดทราบว่าเมื่อปุ่มฉีดน้ำผงซักฟอก (N) อยู่ใน
ตำแหน่งเปิด(ตำแหน่งเลื่อนลง)แรงดันไอน้ำที่ออกมา
จะชื้นกว่าเดิมถือว่าเป็นเรื่องปกติเพราะไอน้ำร้อน
ได้รับการผสมกับผลิตภัณฑ์ทำความสะอาดและเป็น
ผลให้ไอน้ำที่ออกมาจะมีปริมาณหนาแน่นมากขึ้น
-คุณสามารถเลือกใช้งานได้ตามความต้องการ
ทั้งทำความสะอาดด้วยไอน้ำบริสุทธิ์โดยไม่ใช้สาร
เคมีหร ือเพิ่มประสิทธิภาพในการการฆ่าเชื้อและ
ขจัดคราบฝังแน่นด้วยการเติมน้ำผงซักฟอก
คำแนะนำที่เป็นประโยชน์
- หมุนปิดฝาปิดแท็งก์และประกอบแท็งก์เข้าไปที่
ด้านล่างของเครื่องทำความสะอาดในตำแหน่งเดิม
- หมุนคลายเกลียวฝาปิดแท็งก์และเติมน้ำผงซัก
ฟอกลงไปในแท็งก์
- ถ้าน้ำที่ใช้ในบ้านของท่านมีความหนาแน่นของ
ตะกอน มากให้ใช้น้ำกลั่นแทนเพื่อยืดอายุการ
ใช้งานของเครื่อง
เครื่องออก
4.เทน้ำที่ยังเหลืออยู่ในแท็งก์ทิ้งจนหมด เช็ดทำ-
ความสะอาดด้านนอกของเครื่อง(ระวังความร้อน
จากน้ำร้อน)
5. ปิดฝาเครื่องทำความสะอาด
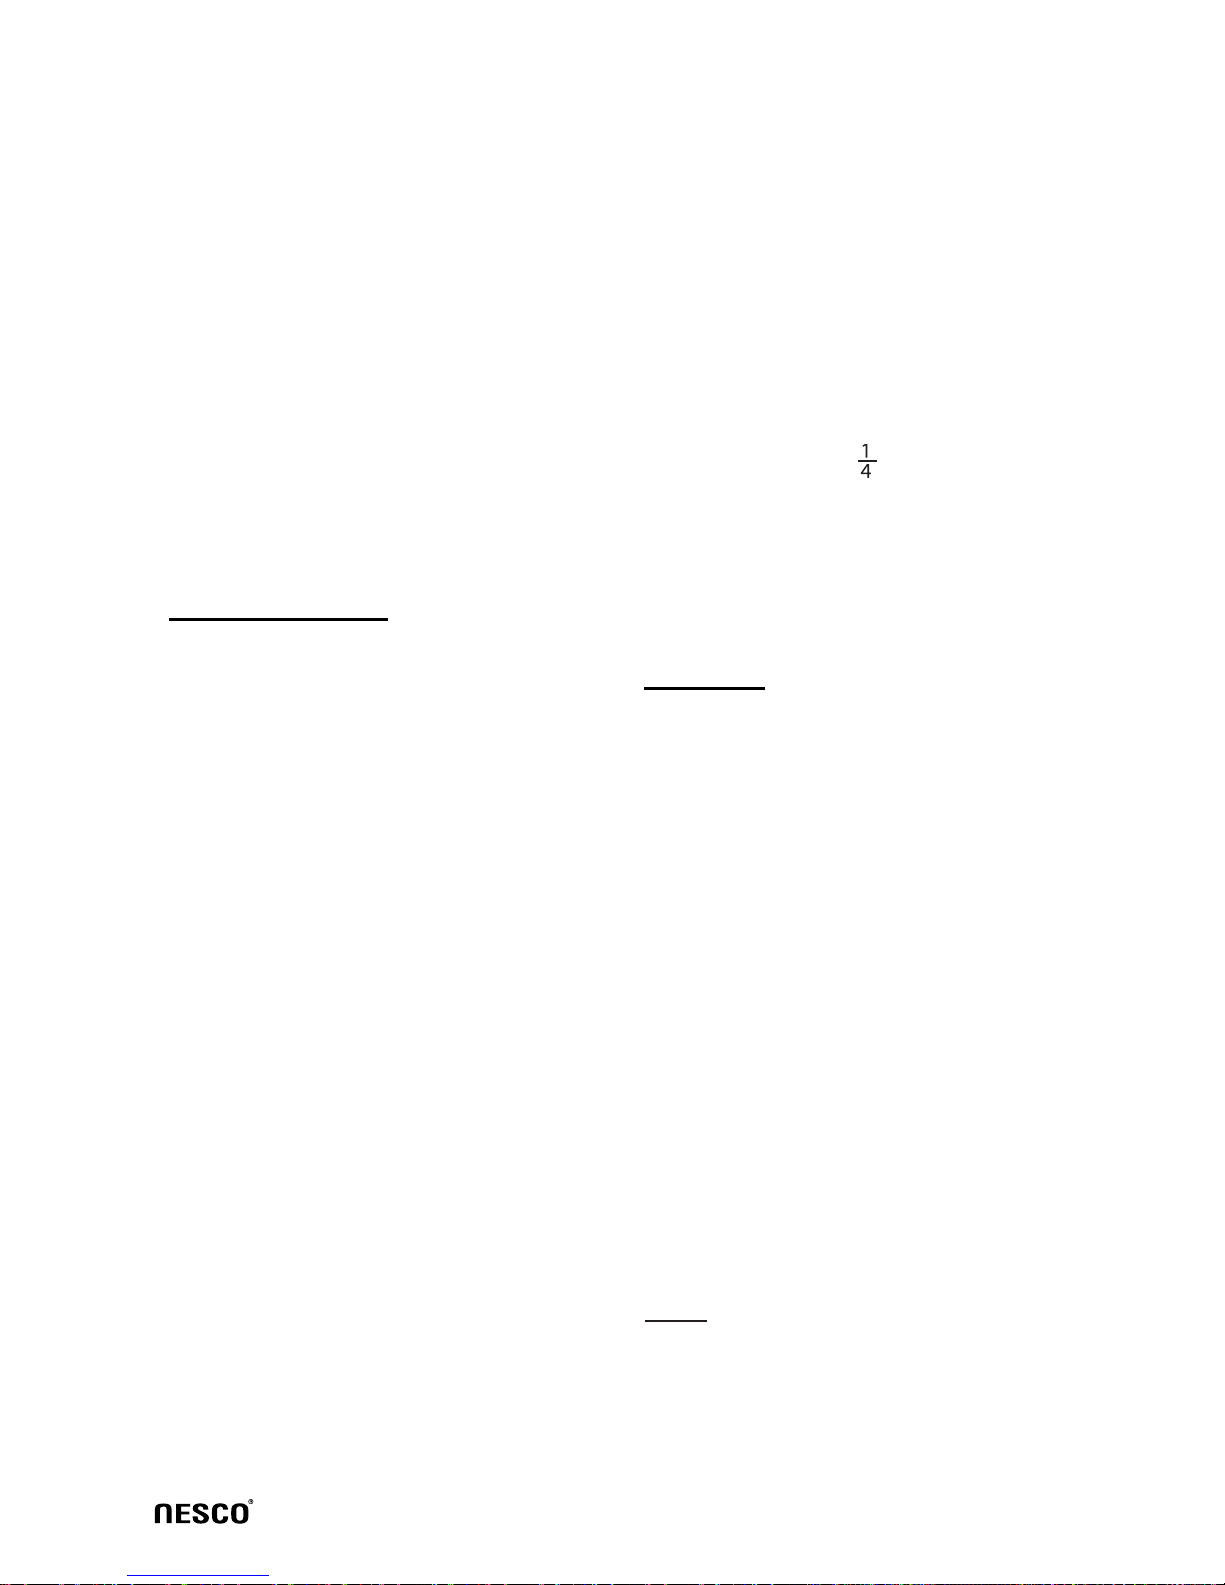
สวมหัวต่อสำหรับทำความสะอาดกระจกตามคำแนะนำ
ในภาพ
การประกอบหัวต่อทำความสะอาดกระจก
สวมหัวต่อสำหรับรีดผ้าเข้ากับหัวฉีดไอน้ำหลังจากนั้น
- สำหรับคราบฝังแน่นหรือโดยเฉพาะอย่างยิ่ง
คราบสกปรกหนักให้ถือเครื่องทำความสะอาดโดยให้
ปลายหัวฉีดพ่นไอน้ำอยู่ห่างจากจุดที่ต้องการทำความ
สะอาด นิ้วและกดฉีดไอน้ำค้างไว้สักพักจนคราบ
หลุดออก

หมายเหตุ
1.ไฟแสดงสถานะจะติดตลอดเวลาที่เสียบปลั๊กไว้
และมีกระแสไฟฟ้าเข้าเครื่อง
2.ควรตรวจสอบให้มั่นใจว่าปิดฝาเครื่องทำความ
สะอาดแน่นเมื่อใช้งาน
การทำความสะอาดตัวเครื่องภายนอก
- ปิดสวิทช์กระแสไฟเข้าเครื่องถอดปลั๊กออกจาก
เต้ารับก่อนนำไปทำความสะอาด
- เช็ดทำความสะอาดตัวเครื่องภายนอกด้วยผ้านุ่ม
ชุบน้ำหมาดๆ อาจใช้น้ำยาหรือผงซักฟอก จาง ๆ
ร่วมด้วยแล้วจึงเช็ดด้วยผ้าแห้งอีกครั้งกรณีที่ใช้
น้ำยาควรเช็ดน้ำยาออกให้หมด
-ไม่ควรใช้สารเคมีอื่นๆในการทำความสะอาดและ
ควรเช็ดด้านนอกให้แห้งหลังจากทำความสะอาดแล้ว
การทำความสะอาดแท็งก์บรรจุน้ำ
- ปิดสวิทช์กระแสไฟเข้าเครื่องถอดปลั๊กออกจาก
เต้ารับก่อนนำไปทำความสะอาด
- ควรทำความสะอาดแท็งก์น้ำทุก 3 เดือน
- เปิดฝานิรภัยออก เติมน้ำสะอาดปริมาณสูงสุดลง
ในแท็งก์น้ำ ล้างภายในแท็งก์แล้วเทน้ำทิ้ง
ทำซ้ำกันประมาณ 2-3 ครั้ง
หมายเหตุ
- ไม่ควรผสมสารเคมีหรือของเหลวที่มีส่วนผสม
ของสารเคมีอื่นๆในน้ำที่ล้างทำความสะอาดแท็งก์
ขั้นตอนการดูแลรักษา
- หากเครื่องของท่านเกิดความเสียหายแล้วอยู่ใน
เงื่อนไขการรับประกันท่านสามารถส่งเครื่องตรวจ
เช็คยัง ศูนย์ตัวแทนจัดจำหน่ายได้โดยบรรจุหีบห่อ
ผลิตภัณฑ์ให้เรียบร้อยแล้วเขียน ชื่อ ที่อยู่ เบอร์
โทรศัพท์และเขียนสาเหตุที่ส่งเครื่องมาว่าเป็นเพราะ
เหตุใดพร้อมแนบสัญญาการรับประกันมาด้วย
สินค้าจะหลุดพ้นจากการรับประกันเมื่อ
-รับประกันเฉพาะในพื้นที่รับประกันเท่านั้น ( รับ
ประกันเฉพาะฮีตเตอร์)
- เสียหายจากการขนส่ง
หมายเหตุ
เงื่อนไขการรับประกันสินค้า
- สัญญาการรับประกันมีระยะเวลา 1ปีนับจาก
วันที่ซื้อสินค้า
- การรับประกันจะมีผลกับความบกพร่องที่เกิดจาก
ความผิดพลาดของบริษัทเท่านั้นทางบริษัทจะไม่รับ
ประกันสินค้าที่เสียหายจากการที่ท่านไม่ปฏิบัติตามคำ
แนะนำในคู่มือนี้เด็ดขาดรวมถึงการตกแตกการสึกหรอ
จากการใช้งาน
- หากท่านดัดแปลงเปลี่ยนชิ้นส่วนใดๆที่ไม่ใช่
อุปกรณ์ที่มาเป็นชุดของผลิตภัณฑ์การรับประกัน
สินค้าถือว่าเป็นโมฆะทันที
- เสียหายจากการใช้งานไม่ถูกต้อง (ไม่ปฏิบัติตาม
คู่มือ) หรือดัดแปลงสินค้า
- เสียหายจากการใช้งานเป็นประจำหรือขาดการดูแล
รักษาเครื่อง
- เสียหายจากการสูญหาย หรือชิ้นส่วน บางอย่าง
หายไปจากการถอดประกอบสินค้า
6
การทำความสะอาดอุปกรณ์ต่างๆ
- ล้างทำความสะอาดอุปกรณ์ทุกชิ้นภายหลังจาก
การใช้งานเช็ดให้แห้งแล้วนำไปเก็บลงในกล่อง
โดยเก็บในบริเวณที่แห้งและอากาศเย็น
- เพื่อเป็นการปรับปรุงคุณภาพสินค้า บริษัทฯ
ขอสงวนสิทธิ์ที่จะเปลี่ยนแปลงรายละเอียดโดยไม่ต้อง
แจ้งให้ทราบล่วงหน้า

7
!This appliance is not intended for use by persons (including children) with
reduced physical, sensory or mental capabilities, or lack of experience and
knowledge,unless they havebeengiven supervision orinstructionconcerning
use of the appliance by a person responsible for their safety.
!Children should be supervised to ensure thatthey do not play with the
appliance.
!If the supply cord is damaged, it must be replaced by the manufacturer, its
service agent or similarly qualified persons in order to avoid a hazard.
!Avoid steam flow in the direction of people, animal or other electronic
appliance. For the steam, be care of hurt.

STEAM CLEANER
KLEAN PLUS
MODEL : NC-5417
1200 W 220-240 V 50 Hz
Dear Customer
Thank you for choosing a NESCO
appliance.The experience, design, fea-
ture and technology of this appliance,
as well as the strict quality controls
used during manufacture, will provide
full satisfaction for many years.
Description
A.
B.
C.
D.
E.
F.
G.
H.
I.
J.
K.
L.
M.
N.
O.
P.
Safety cap
Steam release button
Body of the appliance
Pilotlight
Power cord
Big steam nozzle
Glass brush
Clothingironing brush
Anglenozzle
Nylon round brush
Cloth cover
Funnel
Measuring cup
Detergent release button
Detergent tank release button
Detergent tank
- Do not use outdoors, for household
use only.
-Do not leave steam cleaner when
pluggedin. Unplug theelectricalcord
Tip&safety precautions
- Do not allow to be used as a toy.
Close attention is necessary when
used near children, pets and plants.
- Avoid steam flow in the direction
of people, animal or other electronic
appliance.
- Use only ad described in this
manual. Use only manufacturer’s
recommended accessories.
- Do not use with damaged cord or
plug. If steam clean is not working
as it should, has been dropped,
damaged, left outdoors, or drop ped
intowater,returnittoa service center
before using.
- Do not pull or carry by cord, use
cordasa handle, close adooroncord,
or pull cord around sharp edges or
corners.Keepcordawayfromheated
surfaces.
- Do not use extension cords or
outlets with inadequate current
carrying capacity.
- Do not unplug by pulling on cord.
Tounplug, grasptheplug,notthecord
-Do not handle plug or steam cleaner
with wet hands or operate without
shoes.
- If the supply cord is damaged, it
must be replaced by the
manufacturer or its service agent or
8
English
when not in use and before servicing
or cleaning.
- Read all instructions before using
your steam cleaner.

delivery button. 3.Allow steamer to
cool down for three minutes. 4.
Relieve any built up pressure again
by depressing steam delivery button.
5. Slowly unscrew safety cap and
wait 5 seconds before removing.
- Store your steam cleaner indoor in
a cool, dry area.
- Keep your work area well lighted.
- Never turn the appliance over or
on its side more than 45 degree in
respect to vertical axis when using
steam.
- Never direct steam towards people,
animals, plants and equipment with
electrical components.
- Do not immerse the steam cleaner
into water or other liquids. Always
unplug the power cord from the
electrical socket when filling the
steam cleaner.
- Never put descaling, aromatic or
detergent products into the steam
cleaner, as this may damage it or
make it unsafe for use.
- Metal tips on nozzles will get hot
during use. Do not touch hot surfaces.
Allow the attachments to cool down
before replacing them while the
appliance is being used.
- Any repair work, including the
replacement of the power cord must
only be carried out by a qualified
technician.
- The cover must be locked when
using this product.
- Do not use in swimming pools
containing water.
- Before filling, proceed as follows:
1. Unplug the power supply. 2.
Relievepressure by depressing steam
Product features
Sophisticated technologies
Steam cleaner has the special patent
which using hot and high-pressure
steam for cleaning floors, windows
and clothes. It can kill the bacteria
and remove the dust. It has an auto-
matic heating control system to con 9
-Donotputany object into openings.
Do not use with any opening blocked
- This item is not intended for use by
persons(including children) with
reduced physical, sendory or mental
capabilities, or lack of experience and
knowledge, unless they have been
given supervision or instruction
concerning use of the appliance by a
person responsible for their safety.
- Burns can occur from touching hot
metal parts, hot water or steam. Use
as there may be hot water in the unit.
Never direct steam at any person. The
steam is very hot and can cause burns.
- Do not operate in the presence of
explosive and/or flammable fumes.
a similarly qualified person in order
to avoid hazard.

Durable usage
Steam cleaner is made of aluminum
metal alloy with extreme sick inside
pipe; this feature makes the steam
cleaner safer and bear to press. The
exterioris made of good imported PP
material, and this makes the product
with high intensity and bear to de-
cay.
Economic
Steam cleaner has a special designed
heating pipe and provides balanced,
efficient and economic heating en-
ergy. The double-layered construc
Convenient
Steam cleaner is easy to use. Once
the plug is switched on, the heating
system starts working, and it will
reach the needed temperature to
produce hot steam. The steam
cleaner has different cleaning parts
for different usage; parts can be
installed or removed easily.
Technical specification
Tank capacity: 480 ml (max)
Rates voltage/Frequency:
Functions
Sterilizing and anti-bacteria
function Insertthelongsprayer;aim
at the place that needs cleaning;
pressthesteam button to kill bacteria.
Clothes cleaning function
Insert the brush sprayer, secure the
towelholder;aim at the clothes; press
the steam button; move the cleaner
to clear dirty on the clothes.
Window cleaning function
Insert the brush and flat sprayer; aim
at the window; press the steam
button; move the cleaner to clean the
window.
10
Safety
Steam cleaner has an automatic
safety cut off for protection against
overheating.It will operate ifthetank
is switched on when containing in-
sufficient water. It has a central sys-
tem to keep the steam temperature
constantly, and kills the bacteria at
the same time. Steam cleaner has the
automatic pressure release function.
When the pressure of the tank is too
high; it will automatically released.
Rated power: 1200W
220-240v, 50Hz Alternate current
with cable connected with ground.
Rated electric current more than 5A
Steam cleaner has a longer double
layer insulated cable, which can pre-
venttheproduct from water and dust.
pure water or you can use together
with a detergent to clean the stains
persist
tion of this product can prevent heat-
ing releasing to save energy.
tinue producing steam for cleaning.
Steam cleaner uses high-pressure
cup), add into tank, put back the
safety cover and secure it firmly.
5. Check the electricity and plug,
make sure they match the require-
ment of manual, and insert the plug.
6. The steam will be ready after 3-5
minutes heating. Press the steam
button slightly to see if the steam
starts to release.
7. Release the button; insert different
parts according to different usage.
8. Press the steam button again; start
cleaning.
Part installation
Brush sprayer installation
Insert the Brush sprayer to the body;
follow the arrow to secure the
Round or bend sprayer installa-
tion
Insert round or bend sprayer to the
short sprayer directly; follow the
instruction shows on Figure 3; adjust
the direction of the sprayer.
Flat sprayer installation
Insert brush sprayer to the short
sprayer; follow the figure 4 and 5 to
secure the brush sprayer.
Adding water
1. Remove the plug; cut off the elec-
tricity
2. Press the steam to release the
pressureuntil no steam is comingout.
3. Slightly open the safety cover; re
11
4. Use measuring cup to get 300 ml
water (about one and a half
sprayer in a clockwise way. The
sprayer can be removed in an
opposite way.
Operating Instruction
1. Open the package, check all parts
and manuals, and make sure no com-
ponent is missing in the package.
2. Please read the manual before
usingtheproduct.Thisproductisonly
for household using.
3. Put the steam cleaner on the table,
remove the safety cover, insert
funnel.
brush sprayer; aim at the floor; press
the steam button to remove dirty on
the ground.
Floor cleaning function
Insertlongsprayerandbendorround
4. Dry the remaining water in the
tank; clean the surface of the steam
cleaner.
5. Put back the safety cover and se-
cure it firmly.
1.Theindicatorlightwillbe on when
the electricity is switched on.
2. Please secure the safety cover
firmly.
Note
3. Slightly open the safety cover; re-
lease the remaining steam ; place the
steam cleaner in a cool place for 5
minutes; open the safety cover com-
pletely.
12
4. Use funnel and measuring cup to
add some cool or warm water.
5. Put back the safety cover and se-
cure it firmly
After use
1. Remove the plug after using; cut
off the electricity
2. Press the steam button to release
the remaining steam.
- Caution: Do not overfill, or it will
cause unnecessary steam pressure
and influence the creation of steam.
Filling detergent
- The separate detergent tank can be
filledby depressing thereleasebutton
- Unscrew the cap and fill with
detergent, you can fill the reservoir
to the top.
- Replace the cap and re-attach the
tank to the bottom of the steam
cleaner.
* To engage the steam/detergent
cleaningand disinfecting power,slide
the button on the handle to the down
position before pressing the steam
lever.
Hint: Please be aware that when the
detergent is on the “On” position, the
steam output may appear more
“humid”; that is normal because the
hot steam gets mixed with the clean
detergent product.And as a result the
HELPFUL TIPS
- Keep in mind you can choose, on-
demand, to either clean with chemi-
cal free pure steam or add the power
of detergent to disinfect and sanitize.
- For especially stubborn stains or
heavy soiling, hold the end of the
bayonet tip about ” above the area
and hold for several seconds.
- If your water is hard, always use
distilled water to extend the life and
power of your appliance.
and detected the tank.
minutes; open the safety cover com-
pletely.
steam will appear “thicker”
lease the remaining steam; place the
steam cleaner in a cool place for 5

Maintenance &Cleaning
Surface cleaning
- Switch off the electricity and un-
plug from the outlet before cleaning.
- Wipe the cleaner with a soft, damp
clothwith mild liquid detergent; then
clean it with a dry cloth.
- Do not use other chemical liquid to
clean the product, and keep the sur-
face dry.
Tank cleaning
- Switch off the electricity and un-
plug from the outlet before cleaning
Clean the tank every 3 months
- Remove the safety cover; fill the
tank up to maximum with clean wa-
ter; risen the inside of the tank and
pour the water out. Repeat the above
steps 2-3 times; the tank will be
cleaned.
Note
Do not add any other chemical liquid
to the water for cleaning
Parts cleaning
Wash all parts after using, put them
into boxes and keep cool and dry.
Warranty
-Damage or defect from
misunderstand how to use or service
from non authorized people.
-Damage or defective from
manufacturer, dealer & service.
-1 year warranty for house hold use
only.
Warranty is expired When (void
ofwarranty)
-Use according to this instruction
carefully.
-Electrical shock or any electrical
problem.
-Lost or damage some part by accident
or natural damage.
Waranty Heater only
13
-Warranty only in service area.
Note
- Company reserved the right to
change all details before notice.
- This instruction may be changed
with out prior notice.
Table of contents
Languages:
Other Nesco Steam Cleaner manuals


