Nesco Steam Pro Professional NC-5610 User manual
1
คำเตือน!ห้ามฉีดพ่นไอน้ำโดยตรงเข้าหาคนหรือสัตว์และห้ามพ่นรีดเสื้อผ้าในขณะสวมใส่
เครื่องพ่นรีดไอน้ำ
รุ่น NC-5610 Steam Pro professional
1750 W 230 V 50Hz
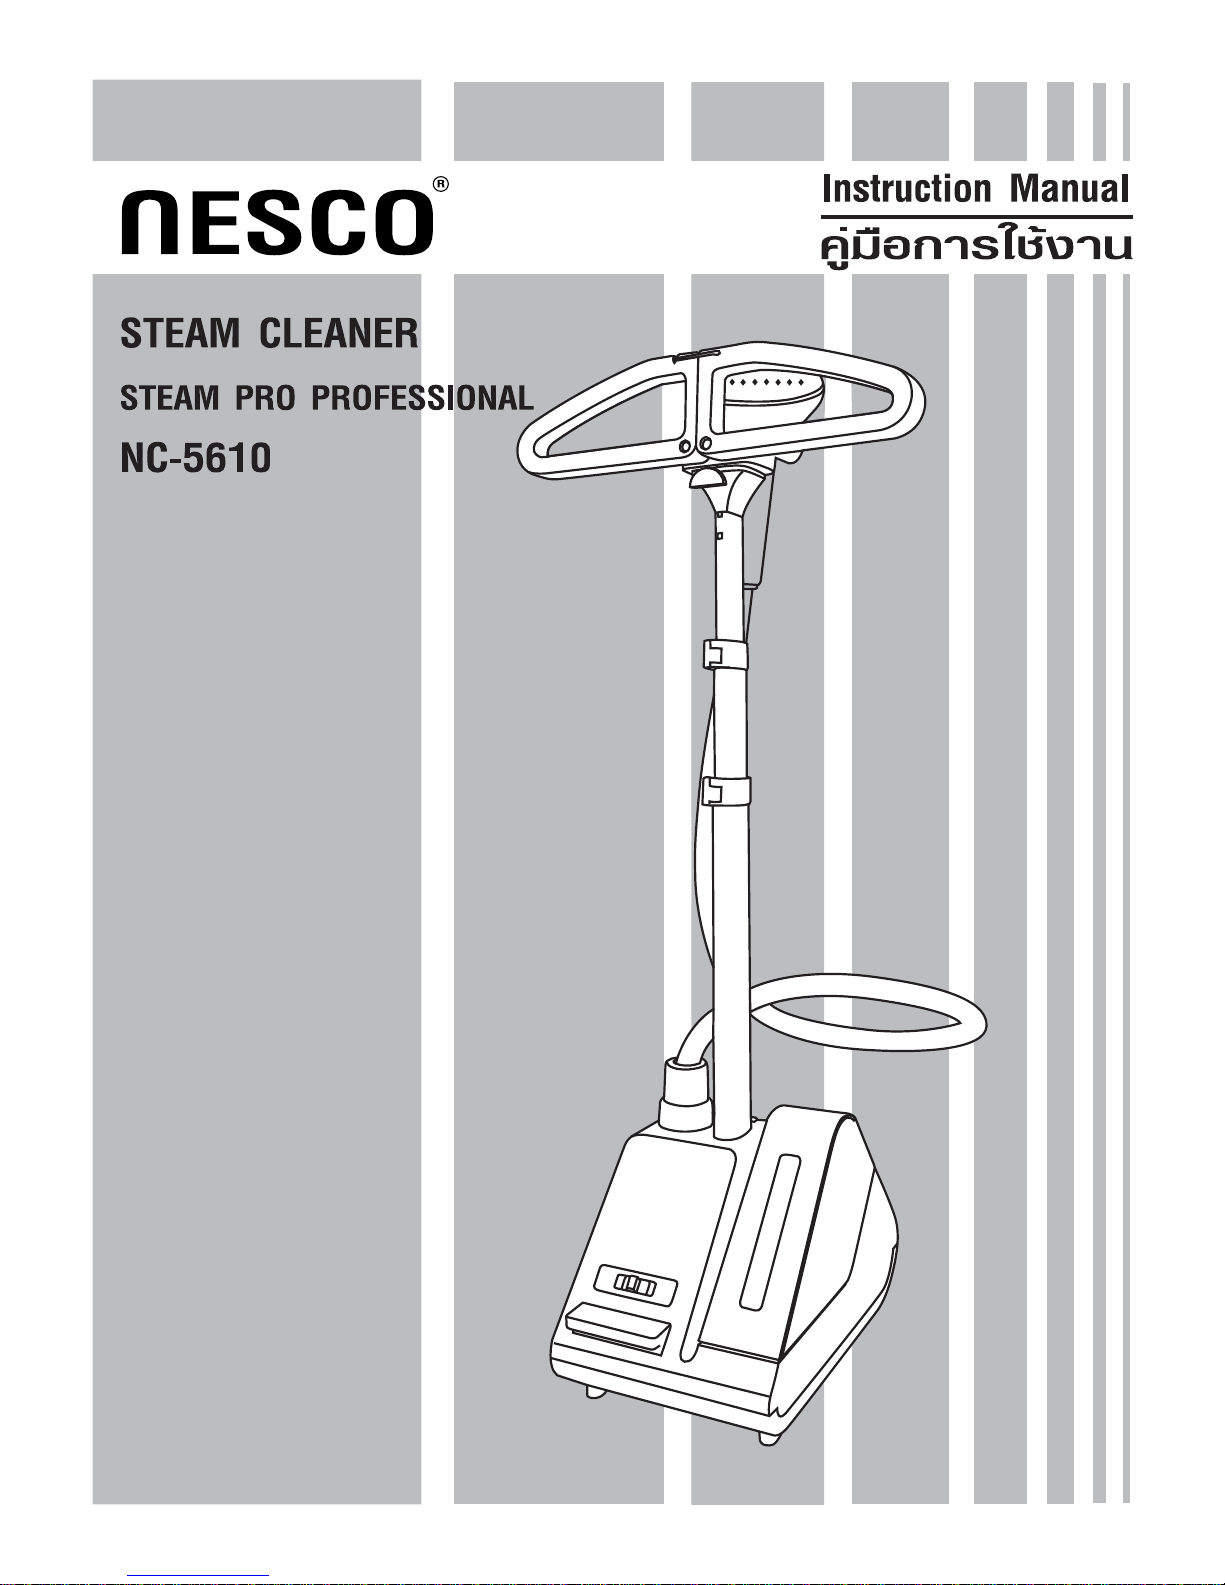
ส่วนประกอบ
A.
B.
C.
D.
E.
F.
G.
H.
I.
J.
K.
L.
M.
N.
สวิตซ์เปิด/ปิดพร้อมไฟแสดงสถานะ
ปุ่มปรับระดับไอน้ำ
ข้อต่อสายส่งไอน้ำ
แทงค์บรรจุน้ำ
ช่องจ่ายน้ำ/ช่องเติมน้ำในแทงค์บรรจุน้ำ
สายส่งไอน้ำ
เสาปรับระดับ
อุปกรณ์เสริมคลิปหนีบจับจีบผ้า
อุปกรณ์เสริมหัวแปรง
มือจับหัวพ่นไอน้ำ
ที่วางพักหัวพ่น
ที่แขวนเสื้อ
สวิตซ์ม้วนเก็บสายไฟอัตโนมัติ
ปลั๊กและสายไฟ
คำเตือนเพื่อความปลอดภัย
1.เมื่อใช้งานเครื่องใช้ไฟฟ้าทุกชนิด ควร
ปฏิบัติตามคำแนะนำเพื่อความปลอดภัยอย่าง
เคร่งครัด
2.อ่านและทำความเข้าใจกับคำแนะนำในคู่มือ
การใช้นี้ก่อนการใช้งาน
3.ใช้งานเครื่องใช้ไฟฟ้าตามวัตถุประสงค์ที่
ระบุไว้ในคู่มือการใช้งานเท่านั้น
4.เครื่องใช้ไฟฟ้านี้ถูกออกแบบมาเพื่อใช้
งานภายในครัวเรือนเท่านั้นบริษัทฯขอสงวน
สิทธิ์ที่จะไม่รับผิดชอบต่อความชำรุดเสียหาย
ของผลิตภัณฑ์อันเนื่องมาจาก การใช้งาน
ในเชิงพาณิชย์หรือการใช้งานผิดประเภท
หรือการใช้งานโดยไม่ปฏิบัติตามคำแนะนำใน
คู่มือการใช้งานนี้
5.เครื่องใช้ไฟฟ้านี้ไม่ได้ถูกออกแบบมาให้บุคคล
(รวมถึงเด็ก) ผู้ทุพพลภาพ บุคคลไร้ความ
สามารถทั้งด้านร่างกายหรือจิตใจ,บุคคลผู้ขาด
ความรู้และความเข้าใจเกี่ยวกับผลิตภัณฑ์เป็นผู้
ใช้งานยกเว้นอยู่ภายใต้การดูแลและแนะนำ
ของผู้ที่มีหน้าที่รับผิดชอบต่อความปลอดภัย
ของบุคคลเหล่านั้น
6.ควรระมัดระวังไม่ให้เด็กเล่นเครื่องใช้ไฟฟ้า
หรือนำเครื่องใช้ไฟฟ้ามาเป็นของเล่น
7.ไม่ควรทิ้งเครื่องใช้ไฟฟ้าไว้โดยไม่มีผู้ดูแล
ในขณะที่เครื่องกำลังทำงาน หรือในขณะที่
เครื่องมีความร้อน
ถึงท่านผู้มีอุปการะคุณทุกท่าน
ขอขอบคุณทุกท่านที่ไว้วางใจเลือกใช้
ผลิตภัณฑ์ของเนสโก้ด้วยประสบการณ์
และการออกแบบที่ทันสมัยและโดดเด่น
ของผลิตภัณฑ์ที่มากด้วยคุณประโยชน์
ในการใช้งานจะสามารถตอบสนองความ
พึงพอใจในการใช้งานของท่านได้อย่าง
คุ้มค่า
ภาษาไทย
2

8.ไม่ควรใช้งานเครื่องใช้ไฟฟ้าในขณะที่สายไฟ
หรือปลั๊กไฟหรือสายส่งไอน้ำชำรุดเสียหาย
หรือเมื่อเครื่องใช้ไฟฟ้าทำงานผิดปกติหรือ
หลังจากเครื่องตกหล่น หรือเมื่อเครื่องชำรุด
เสียหายไม่ว่ากรณีใดๆและเพื่อเป็นการป้องกัน
อันตรายจากไฟฟ้าช็อต ห้ามแกะประกอบ
เครื่องหรือซ่อมเครื่องใช้ไฟฟ้าด้วยตัวท่าน
เองควรส่งให้ศูนย์บริการของบริษัทหรือส่ง
ให้ช่างที่มีความชำนาญเป็นผู้ซ่อม
9.เพื่อป้องกันอันตรายที่อาจเกิดจากสัมผัสไอน้ำ
ร้อนที่ออกมาจากเครื่องพ่นรีดไอน้ำควรตรวจ
สอบเครื่องทุกครั้งก่อนการใช้งานโดยการหัน
หัวพ่นไอน้ำให้ออกจากตัวและเปิดการทำงาน
ควรจับหัวพ่นรีดไอน้ำในแนวตั้งเพื่อให้ไอ
น้ำออกจากหัวพ่นด้านบนและล่างห้ามใช้หัว
พ่นรีดให้รีดในแนวนอนหรือหมุนหัวพ่นรีด
กลับหลังเพราะจะทำให้การส่งไอน้ำไม่สม่ำเสมอ
10. เพื่อป้องกันอันตรายที่อาจเกิดจากไฟฟ้า
ช็อตห้ามนำเครื่องใส่ลงในน้ำหรือของเหลวชนิด
อื่นใด ก่อนเสียบปลั๊กหรือถอดปลั๊กเข้ากับ
เต้ารับทุกครั้ง ควรปิดการทำงานของเครื่อง
เมื่อต้องการถอดปลั๊ก ห้ามดึงบริเวณสายไฟ
ให้จับที่ปลั๊กแล้วดึงออก
11. ไม่ควรปล่อยให้สายไฟพาดผ่านพื้นผิว
บริเวณที่มีความร้อน ควรรอให้เครื่องเย็น
สนิทก่อนเก็บเครื่องควรม้วนสายไฟหลวมๆ
ไว้ใต้เครื่องเมื่อเก็บเครื่อง
12.ไม่ควรปล่อยให้สายไฟพาดผ่านกับขอบ
หรือมุมที่มีความคมหรือพื้นผิวที่มีความร้อน
ไม่ควรพยายามรัดสายส่งไอน้ำในระหว่างที่
เครื่องกำลังทำงานและไม่ควรถอดสายส่งไอน้ำ
ในระหว่างใช้งาน ควรถอดปลั๊กเครื่องออก
จากเต้ารับเสมอ เมื่อต้องเติมน้ำลงใน
แทงค์น้ำหรือเมื่อต้องการเทน้ำออกจาก
แทงค์หรือเมื่อไม่ได้ใช้งาน
13. ห้ามหิ้วหรือยกเครื่องพ่นรีดไอน้ำโดยจับ
ที่สายส่งไอน้ำ ควรจับบริเวณมือจับ
14.ไม่ควรนำอุปกรณ์ประกอบอื่นใดนอกเหนือ
จากอุปกรณ์ที่มาพร้อมกับเครื่อง มาใช้งาน
ร่วมกับเครื่องพ่นรีดไอน้ำนี้เพราะอาจทำให้เกิด
ไฟฟ้าลัดวงจรหรือเป็นอันตรายต่อผู้ใช้
การสัมผัสส่วนประกอบของเครื่องในขณะที่มี
ความร้อนหรือสัมผัสน้ำร้อนหรือสัมผัสไอน้ำ
ร้อนอาจทำให้เกิดการบาดเจ็บได้ควรใช้
ความระมัดระวังเป็นอย่างสูงเมื่อต้องการเทน้ำ
ออกจากเครื่องเพราะอาจมีน้ำร้อนค้างอยู่
ภายในแทงค์น้ำ
15. ห้ามฉีดพ่นไอน้ำโดยตรงเข้าหาคน สัตว์
หรือพ่นรีดเสื้อผ้าในขณะสวมใส่
16.เครื่องพ่นรีดไอน้ำนี้ถูกออกแบบมาโดยมี
วัตถุประสงค์เพื่อการใช้งานภายในครัวเรือน
เท่านั้นและสำหรับการใช้งานโดยวางลงบนพื้น
ดังนั้นจึงไม่ควรยกหรือหิ้วเครื่องในขณะที่
กำลังใช้งาน
คำแนะนำในการใช้งานเครื่องพ่นรีดไอน้ำ
3
- ควรตรวจเช็คให้แน่ใจว่ากระแสไฟฟ้า

ที่ใช้ในบ้านท่านตรงกับกระแสไฟฟ้าของ
เครื่องโดยตรวจสอบจากฉลากใต้เครื่อง
- เครื่องพ่นรีดไอน้ำนี้ใช้กำลังไฟ 1750 วัตต์
เพื่อป้องกันกำลังไฟฟ้าเกิน ไม่ควรใช้งาน
เครื่องใช้ไฟฟ้าที่ใช้กำลังไฟสูงหลายๆเครื่อง
ในเวลาเดียวกัน
- กรณีที่มีความจำเป็นต้องใช้สายไฟต่อพ่วง
ควรตรวจดูให้แน่ใจว่าสายไฟต่อพ่วงสามารถ
รองรับกำลังไฟของเครื่องพ่นรีดไอน้ำนี้ได้
หากใช้สายต่อพ่วงที่รับกำลังไฟฟ้าได้ต่ำกว่า
กำลังไฟของเครื่องอาจทำให้สายไฟต่อพ่วง
ไหม้ได้ควรจัดสายไฟให้เป็นระเบียบและ
ระมัดระวังไม่ให้ผู้ใดสะดุดสายไฟ
- ห้ามตัดหรือพยายามต่อสายส่งไอน้ำ
วิธีการใช้งาน
ปุ่มปิด/เปิดเครื่องและไฟแสดงการเปิดเครื่อง
เครื่องพ่นรีดไอน้ำนี้ถูกควบคุมการทำงานโดย
ปุ่มปิด/เปิด เมื่อกดปุ่มเปิดเครื่อง ไฟแสดง
การเปิดเครื่องจะติดขึ้นและเครื่องจะเริ่มทำงาน
รอจนกระทั่งเครื่องต้มน้ำแล้วพ่นไอน้ำออกมา
เมื่อใช้งานจนกระทั่ง ไม่มีไอน้ำพ่นออกมา
แสดงว่าน้ำในแท็งก์หมด ไฟแสดงการเปิด
การประกอบเครื่อง (ก่อนการใช้งาน)
- กรุณาอ่านคำแนะนำในคู่มือการใช้งานนี้
อย่างละเอียด
- นำเครื่องออกมาจากบรรจุภัณฑ์ทั้งหมด
(กล่อง, โฟม, ถุงพลาสติก)
- ควรประกอบเครื่องให้เรียบร้อยก่อนเสียบ
ปลั๊กเครื่องเข้ากับเต้ารับหรือกดปุ่มเปิดเครื่อง
- ตั้งเครื่องและอุปกรณ์ต่างๆ ของเครื่อง
- ประกอบเสาสำหรับแขวนรีดผ้าและสวมลง
ในฐานเสา
- ตรวจดูให้แน่ใจว่าเสาประกอบลงบนเครื่อง
แน่นสนิทแล้ว
4
- ปลดล็อคตัวล็อคข้อต่อของเสาสำหรับ
แขวนผ้า ดึงเสาขึ้นเพื่อปรับระดับความสูง
ของเสา เมื่อปรับระดับความสูงของเสาได้
ตามความต้องการแล้วให้กดตัวล็อคเสาลง
เครื่องจะยังติดอยู่ให้กดปิดเครื่อง เติมน้ำ
ในแท็งก์และประกอบแท็งก์เข้าที่เดิมจากนั้น
กดเปิดเครื่องใช้งานตามปกติ
การดูแลรักษาสิ่งแวดล้อม
เครื่องพ่นรีดไอน้ำนี้ประกอบด้วยวัสดุหลาย
ชนิดที่สามารถนำกลับมาใช้ซ้ำได้(recycle)
เมื่อต้องการทิ้งเครื่อง ควรส่งให้กับผู้ที่
สามารถนำวัสดุกลับมาใช้ใหม่
This manual suits for next models
1
Table of contents
Languages:
Other Nesco Steam Cleaner manuals


