Netac iMuve-shot P100 User manual

Notice
Thismanualcontainsinformation protectedbycopyrightlaw.All rightsarereserved.
Nopartofthisdocumentmaybe used orreproduced inanyformorbyanymeans,
orstored inadatabase/retrievalsystemwithoutpriorwritten permission fromNetac
TechnologyCo., Ltd.
Netacprovidesthe repairserviceduring warrantyperiod inpromised supportrange.
Thisproductisnotguaranteed foritscompatibilitywithall kindsofcomputersand
Operating System.NetacTechnologyCo., Ltd.isnotresponsibleforanyloss arising
outofusingthisproduct.Thegoverning lawsforthisproductarelawsofthe People’s
RepublicofChina.
Netacreservesthe rightstoupdateuser’smanualbased on the application
upgrade withoutpriornotice.All changeswill be putintothe newedition manual.
Pleasevisitwebsitehttp://www.netac.comtodownload the latestuser’smanual.
PatentNumber:US6829672,CN 99117225.6,CN 00114081.7
iMuve-shot
Remarks
1)Storage
A)PleaseavoidplacingiMuve-shotdirectlyinthesunshineordustyplace.
B)Pleaseavoiddropping orimpactupon iMuve-shot.
C)Don’tletliquidorobjectsintoiMuve-shot.
2)Cleanup
A)Don’tusechemicals,suchasgasoline orotherdiluents,upon
iMuve-shotsurface.
B)Wipe the iMuve-shotwithadry,soft clothtokeep inclean condition.
C)PleasedisconnectiMuve-shotfromthe computerbeforemaintenances
orcleaning.
3)Battery
A)When startusing the unit, pleasefullycharge and discharge the battery
forabout2~3timestoensuremaximumbatterylifeandpowercapacity.
B)Pleasedon’tdisposethe unitintofiretoavoidthe batteryexploding.
C)Pleasedon’tdisassembleanypartofthe unit, anyunauthorized
disassembling will causetermination ofNetacofficialwarranty.
4)Usage
A)Pleasedon’tusewethand toplug/unplug orcontactiMuve-shot
forpreventing shock ordamage.
B)Pleasedon’tunplug iMuve-shotwhiledataistransferring withthe
computer,otherwisethe datamaybe lost.
D)Pleasedon’tjudder,otherwiseiMuve-shotmaybe damaged.
E)PleaseensurethatiMuve-shothasenough spacetosavethe new
recorded files.
5)Others
A)The foldersnamed as“MP3”,“TXT”,“DCIM”and “100MEDIA”which
areauto-generated defaultfoldersforsavingaudio,E-Bookand video/
photofiles.Pleasesaving differentkindsoffilesintocorrectfolders,
otherwiseiMuve-shotcouldn’trecognize.Video/photofilesaresaved
in“100MEDIA”folderunder“DCIM”folder.
B)“REC*****.ASF”,“REC*****.JPG”and“REC*****.WAV”are auto-generated
default titles for video recorded files, photos and MIC recorded files. “*****”
Presents numbers as 0~9.
C)Filesordatastored iniMuve-shotcannotcompletelyavoidbeing
destroyed orlostdue toimproperuseorotherreasons.Please
backup filesand datawhen necessary.
iMuve-shot
Introduction ........................................................................................ 1
uFeatures ....................................................................................... 1
uPackage Checklist ........................................................................ 2
uFunctions and Buttons .................................................................. 3
Usage on the Computer ..................................................................... 5
uDriverInstallation .......................................................................... 5
uData Transferring .......................................................................... 7
uDisconnecting ............................................................................... 9
Basic Operations ................................................................................ 10
uBattery .......................................................................................... 10
uPower On/Off ................................................................................ 11
uSD/MMC Card .............................................................................. 11
uHOLD............................................................................................ 12
uReset ............................................................................................ 13
uFirmware Upgrade ........................................................................ 13
Mode Operations ............................................................................... 16
uVideo ........................................................................................... 16
uAudio ........................................................................................... 20
uPhoto........................................................................................... 26
uRec.............................................................................................. 29
uAccessory.................................................................................... 31
uE-Book ........................................................................................ 34
uCamera ....................................................................................... 37
uDv................................................................................................ 40
uSetup........................................................................................... 42
Video Out ........................................................................................... 44
Convert Tool ...................................................................................... 45
Specifications .................................................................................... 51
FAQ ..................................................................................................... 53
RMA Service....................................................................................... 55
Contact Netac .................................................................................... 57
Catalog Listing
iMuve-shot
Introduction
Thanks forpurchasing NetaciMuve-shot(P100).P100 isanewtype ofportable
mediaplayer,whichperfectlycombinesdigitalvideo &audioplaying,photo
browsing,game,E-Book,FMOut, video recordand MICrecording,etc.
Features
A)SupportFMtransmission
B)Supportvideo filesasASF
B)1300Kpixels photographiclens
C)SupportMP3and WAV audiofiles
D)Supportmultiplesound modesand playback modes
E)Lyric(LRC file)displays synchronously
F)Supportphotobrowse
G)Supportgamefunction
H)SupportE-Bookbrowse
I)SupportVideo and MICrecording
J)Supportcalendarbrowse
K)Built-inloudspeaker
L)SupportSD/MMCCard
M)User-defined poweroff
N)Effectivelypreventmisoperation withHOLDswitch
O)Nodriverinstallation required (excepton Windows98/98SE)
P)Firmwareupgrade
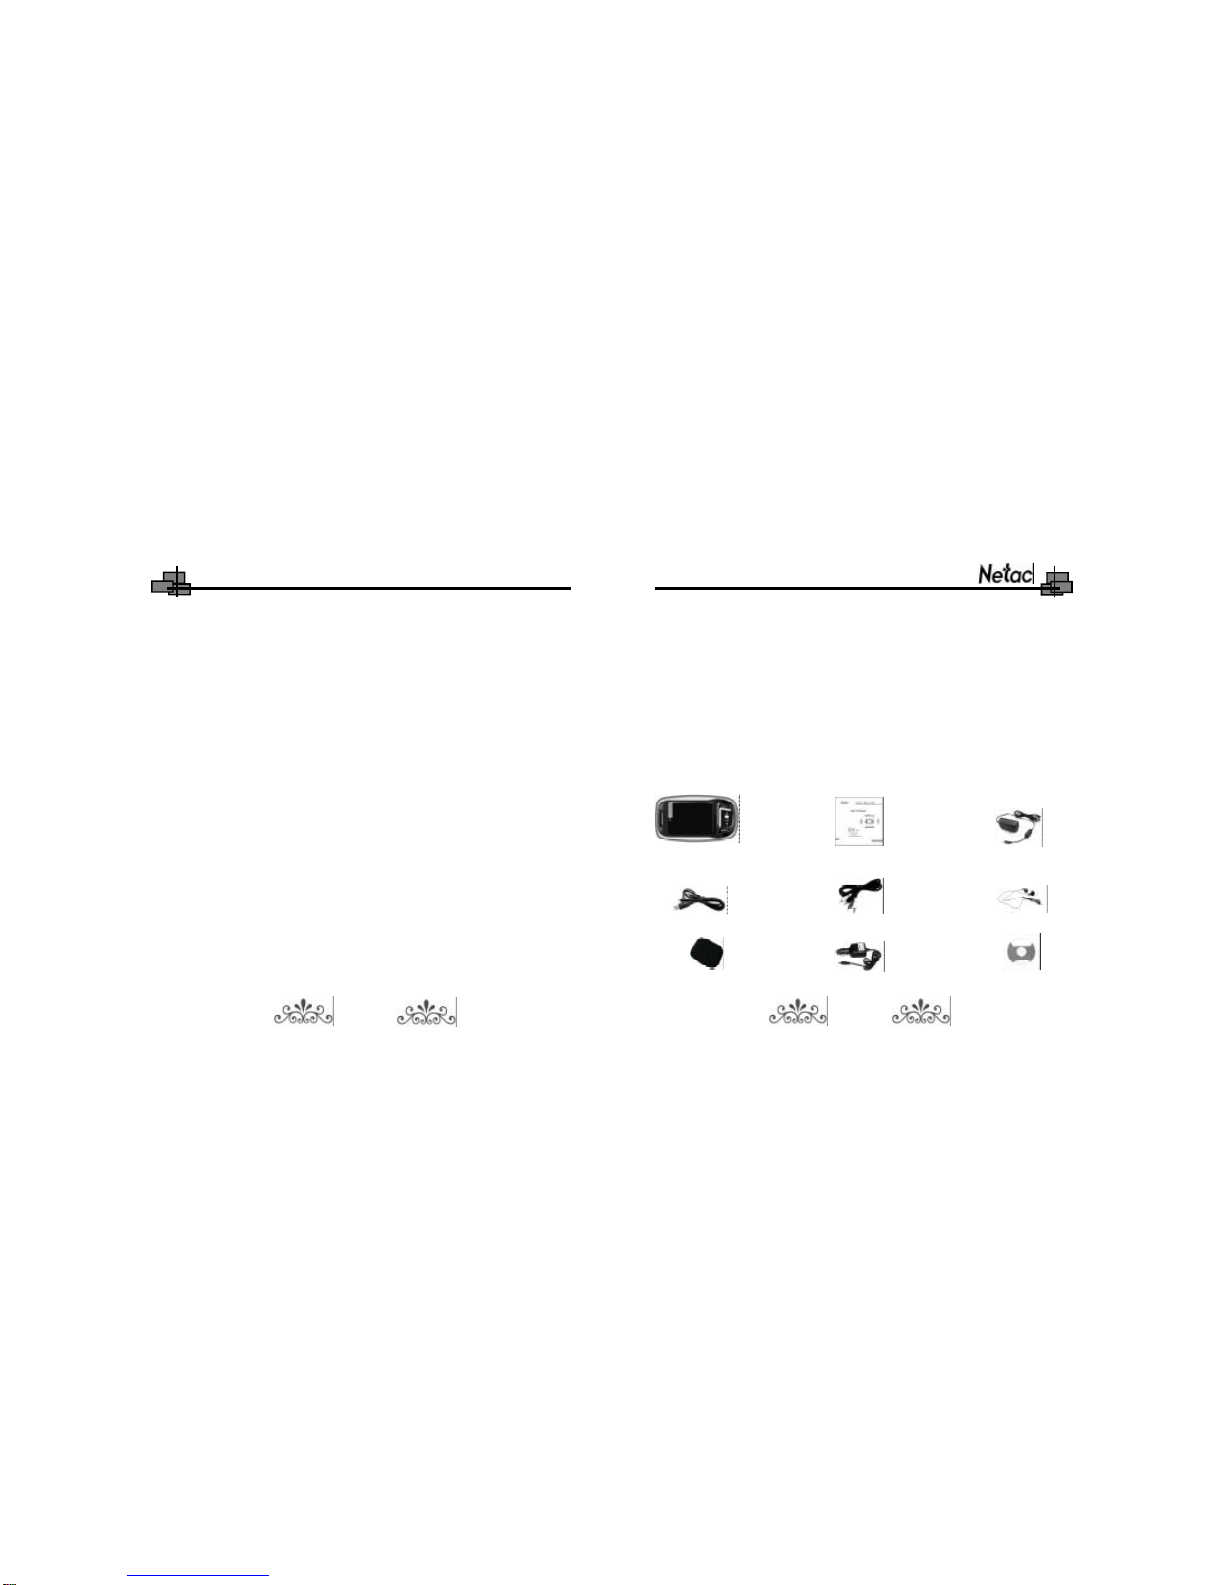
PackageChecklist
Please check that you have all of the following items. If any items are missing,
contact vendor who selling it to you for help.
1 2
CarAdapter(*Optional)
P100 User’sManual
AV Cable
USB Cable
Adapter
Earphones
Carrying CaseInstallation CD
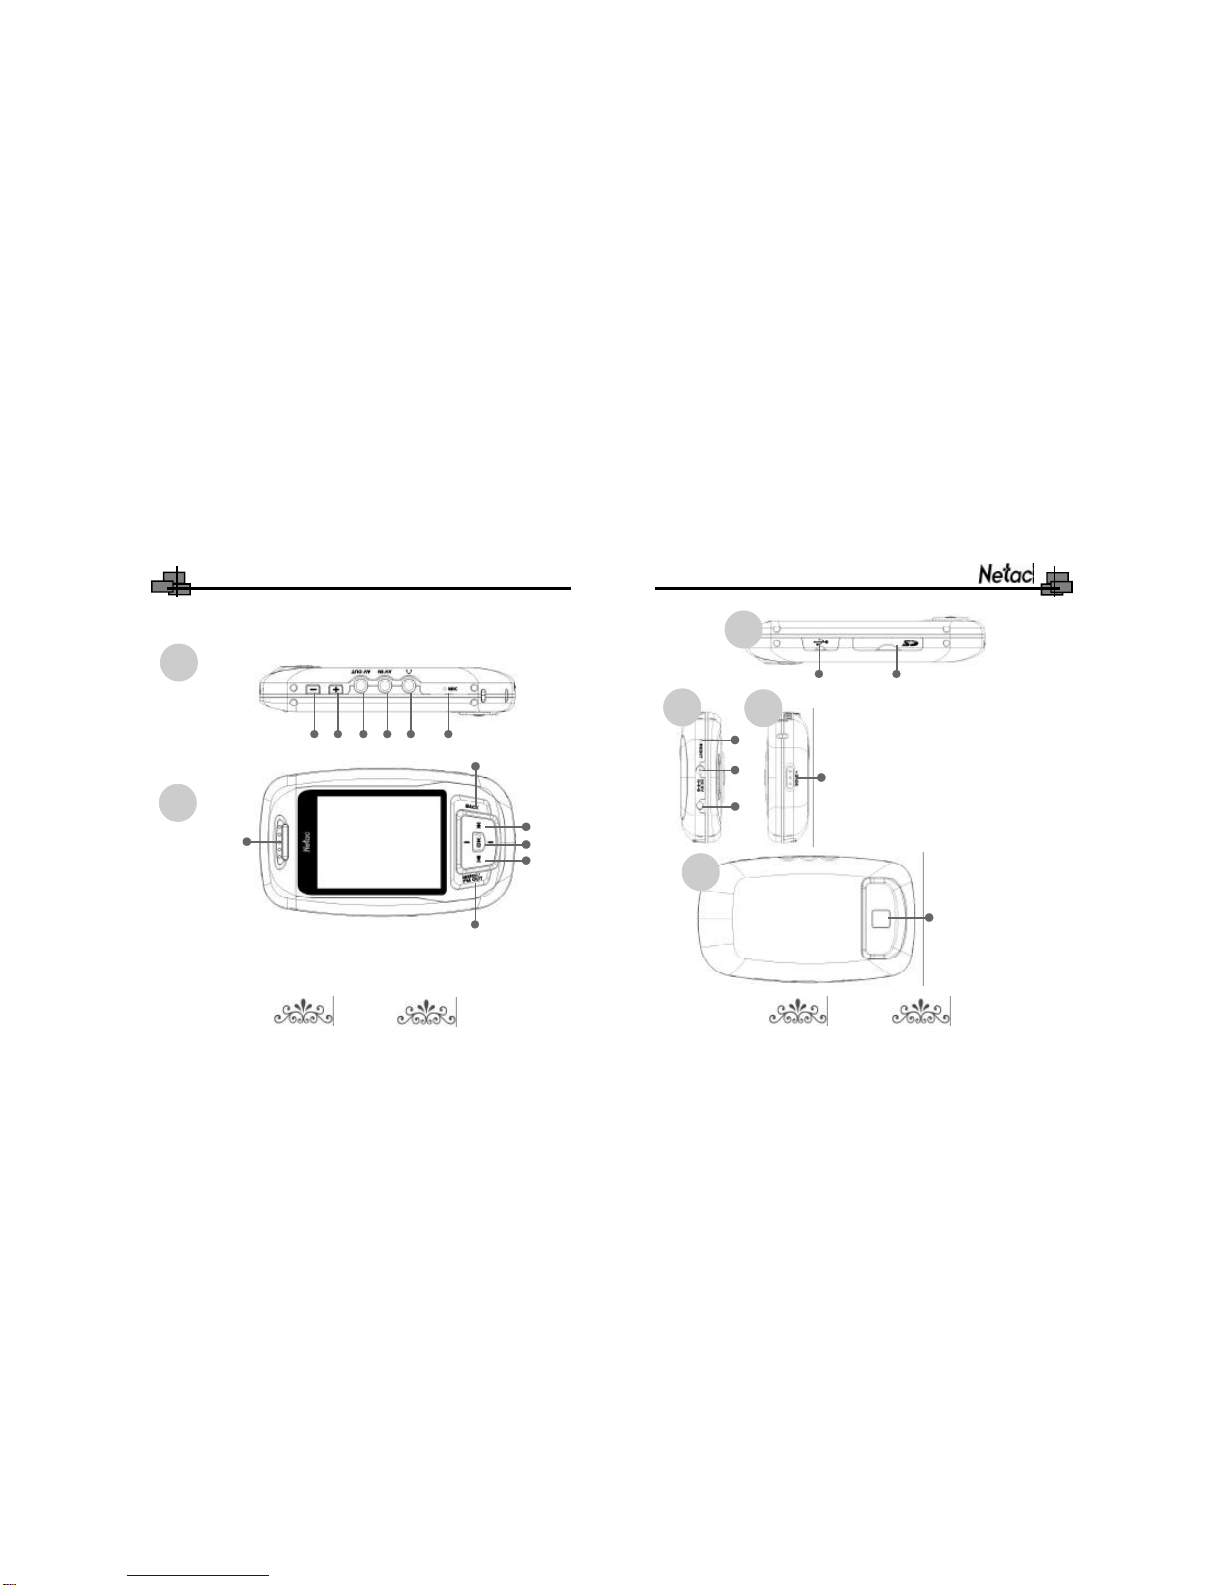
iMuve-shot
1.Volume-Button 2.Volume+Button 3.AV OUTJack 4.AV INJack
5.Earphone Jack 6.MIC7.BACKButton 8.PreviousButton
9.OKButton 10.NextButton 11.MENU Button 12.Speaker
Functionsand Buttons
Front
Top
7
8
9
10
11
12
1 2 3 4 5 6
3 4
Back
19. Photographic Lens
Left Right
Bottom
13 14
13.Mini USB Port
14.SD/MMC Card Slot
15.RESETHole
16.AdapterJack
17. LED
18. HOLD Switch
15
16 18
17

iMuve-shot
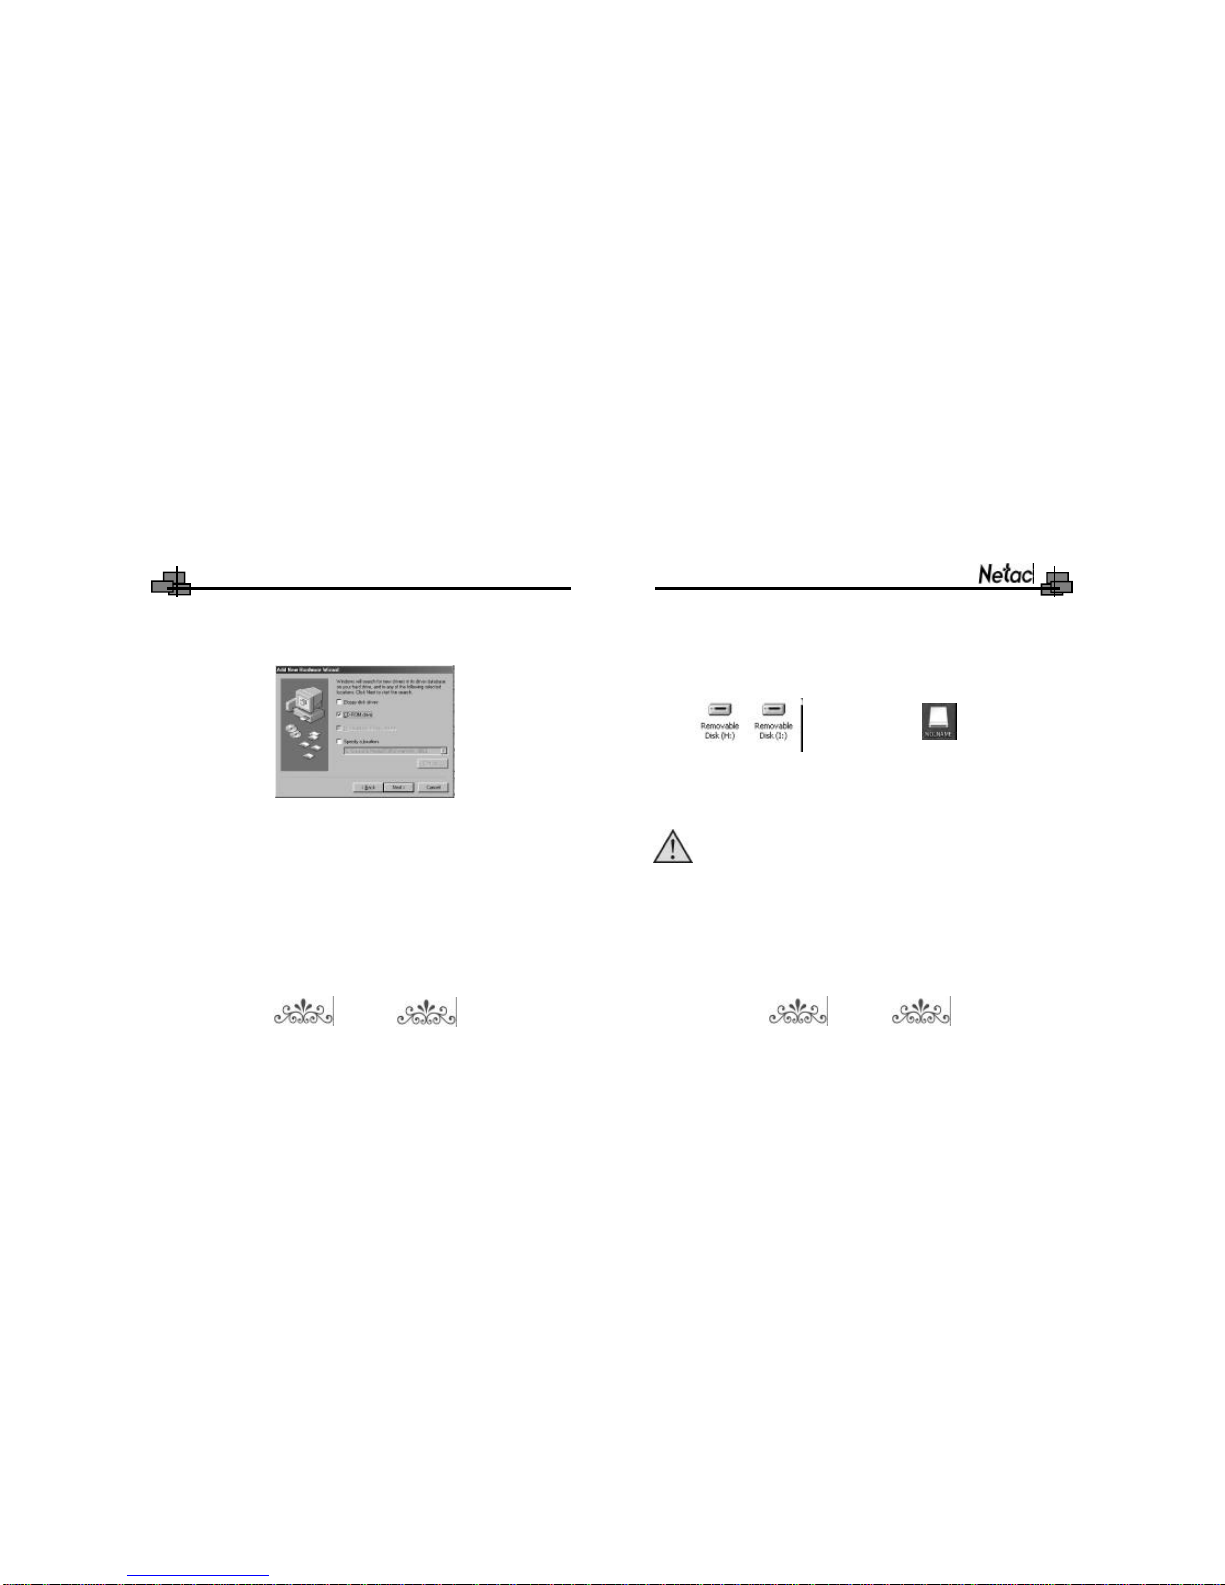
2)Insertthe Installation CD intoCD-ROM.
3)ConnectP100 withthe computerthrough USB cable,systemwouldfind an
USBdeviceautomatically.“AddNewHardwareWizard”dialogwouldappear,
click “Next”button tocontinue.
4)Pleaseselect“Searchforthe bestdriverforyourdevice.(Recommended)”,
and click “Next”button tocontinue.
Usageon theComputer
ConnectP100 withthe computerthrough USB cable,connectstandardportof
USB cablewiththe computer,miniportwithP100.Afterbeing connected,the
screen ofP100 woulddisplayasfollowing:
DriverInstallation
Pleaseinstall driverbeforeusing P100,ifyoursystemhasnotinstalled itpreviously
on Windows98/98SE.The installation stepsareasthe following:
1)Bootyoursystemon Windows98/98SE.
5 6
Fig. 2.1
iMuve-shot
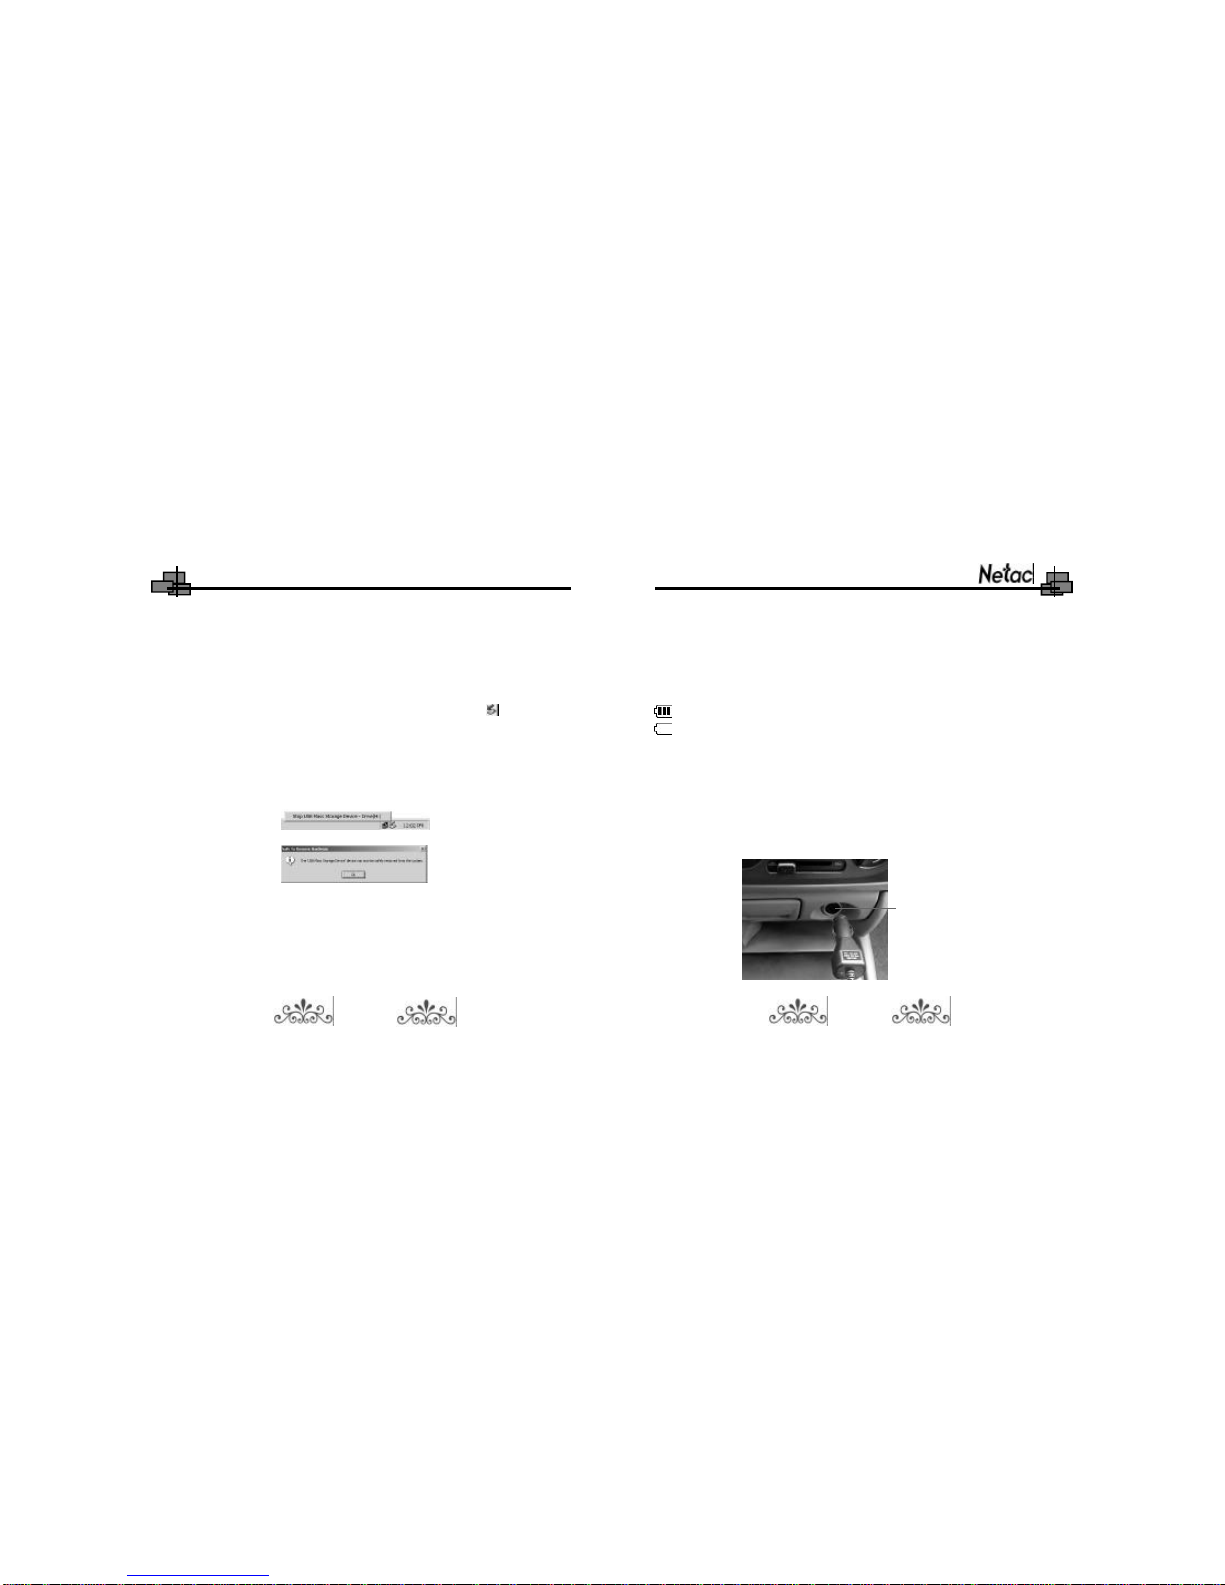
Windows98/98SE/Me/2000/XP:Doubleclick “MyComputer”,you wouldfind
twonewiconsnamed “RemovableDisk”(Fig.2.2),and the firsticon represents
P100,the second icon representsSD/MMCCard.
5)WizardshowswheretolocateP100 driver.Onlyselect“CD-ROM”.Click
“Next”button tocontinue.
Mac OS9.0orabove (Mac OS10.3.2e.g.):Anewicon named “NO_NAME”
(Fig.2.3)wouldappearon the desktop ofyourcomputer,representing P100.
NOTE:UnderthesystemofMac OS10.0orabove,therearetwo
iconswouldappearon thedesktop ofyourcomputer,ifyou have
insertedtheSD/MMCCardintoP100.
3)Then you can copy,deleteoreditdata,justason atraditionalharddisk.
7 8
Fig. 2.2 Fig. 2.3
6)Pleaseclick “Next”button inthe following stepsand click “Finish”button in
the laststep tofinishthe installation.
DataTransferring
1)Bootyourcomputer,connectP100 withthe computer.
2)The screen ofP100 woulddisplayas“Fig.2.1”topromptthe connection
statusafterbeing connected.
iMuve-shot
BasicOperations
Battery
:The batterydoesfull.
:The batterydoesexhausted.Thisicon wouldflashwhen the batterydoes
extremelylow.
P100 powered by lithium battery. Please connect P100 to adapter for charging, or
connect car adapter with cigar-lighter adapter of car for charging to the battery. When
the battery does charging, the LED would display red, and green represents finished
charge.
Disconnecting
1)Windows98/98SE:Unplug P100 fromUSB portofthe computerafterstop
transferring.
2)WindowsMe/2000/XP (Windows2000e.g.):Click the icon atthe taskbar,,
then click “Stop USB Mass Storage Device-Driver”,and click “OK”button in
the popupwindow“The‘USB MassStorage Device’devicecan nowbesafely
removed fromthe system”,then you can unplug P100 fromthe computer
safely.
3)Mac OS9.0orabove (MacOS10.3.2e.g.):Selectthe icon(s)representing
P100,and click “File”toselect“ExitNONAME”or“Exit”(ifSD/MMCcardhas
plugged intoP100),then you can disconnectP100 fromthe computer.
TIPS:Please dragP100 icon intoTrash,thenunplug iton Mac OS9.0orabove.
Cigar-lighter adapter of car
9 10

iMuve-shot
Please refer to the figure to connect the car adapter to cigar-lighter adapter of
car. Netac Technology Co., Ltd. is not responsible for any loss arising out of
using this cigar-lighter adapter of car.
PowerOn/Off
Topoweron P100,pleaseholdOKbutton,P100 wouldentermainmenu
automatically.
Topoweroff P100,pleaseholdOKbutton.
When P100 isinnon playing/playing pause/recording/playing game/photographing/
USB modes,P100 wouldpoweroff automaticallyifthereisno operation during the
timewhichissetin“Setup ->POWEROFF”(Pleasereferto“Setup”fordetails).
SD/MMCCard
Beforepowering on P100 orwhen P100 isinmainmenu status,open the slot
convertand insertthe SD/MMCCardintoP100.
SD/MMC Card Slot
Afterbeing inserted the SD/MMCCard,an icon ( ) wouldappearon the screen
ofP100.Pleasereferto“Mode Operations”fordetails.
NOTE:Please createfolderssuchas “MP3”,“TXT”,“DCIM”and
“100MEDIA”inSD/MMCCardbeforeuse it,please referto“Remarks
->Others->A”fordetails.
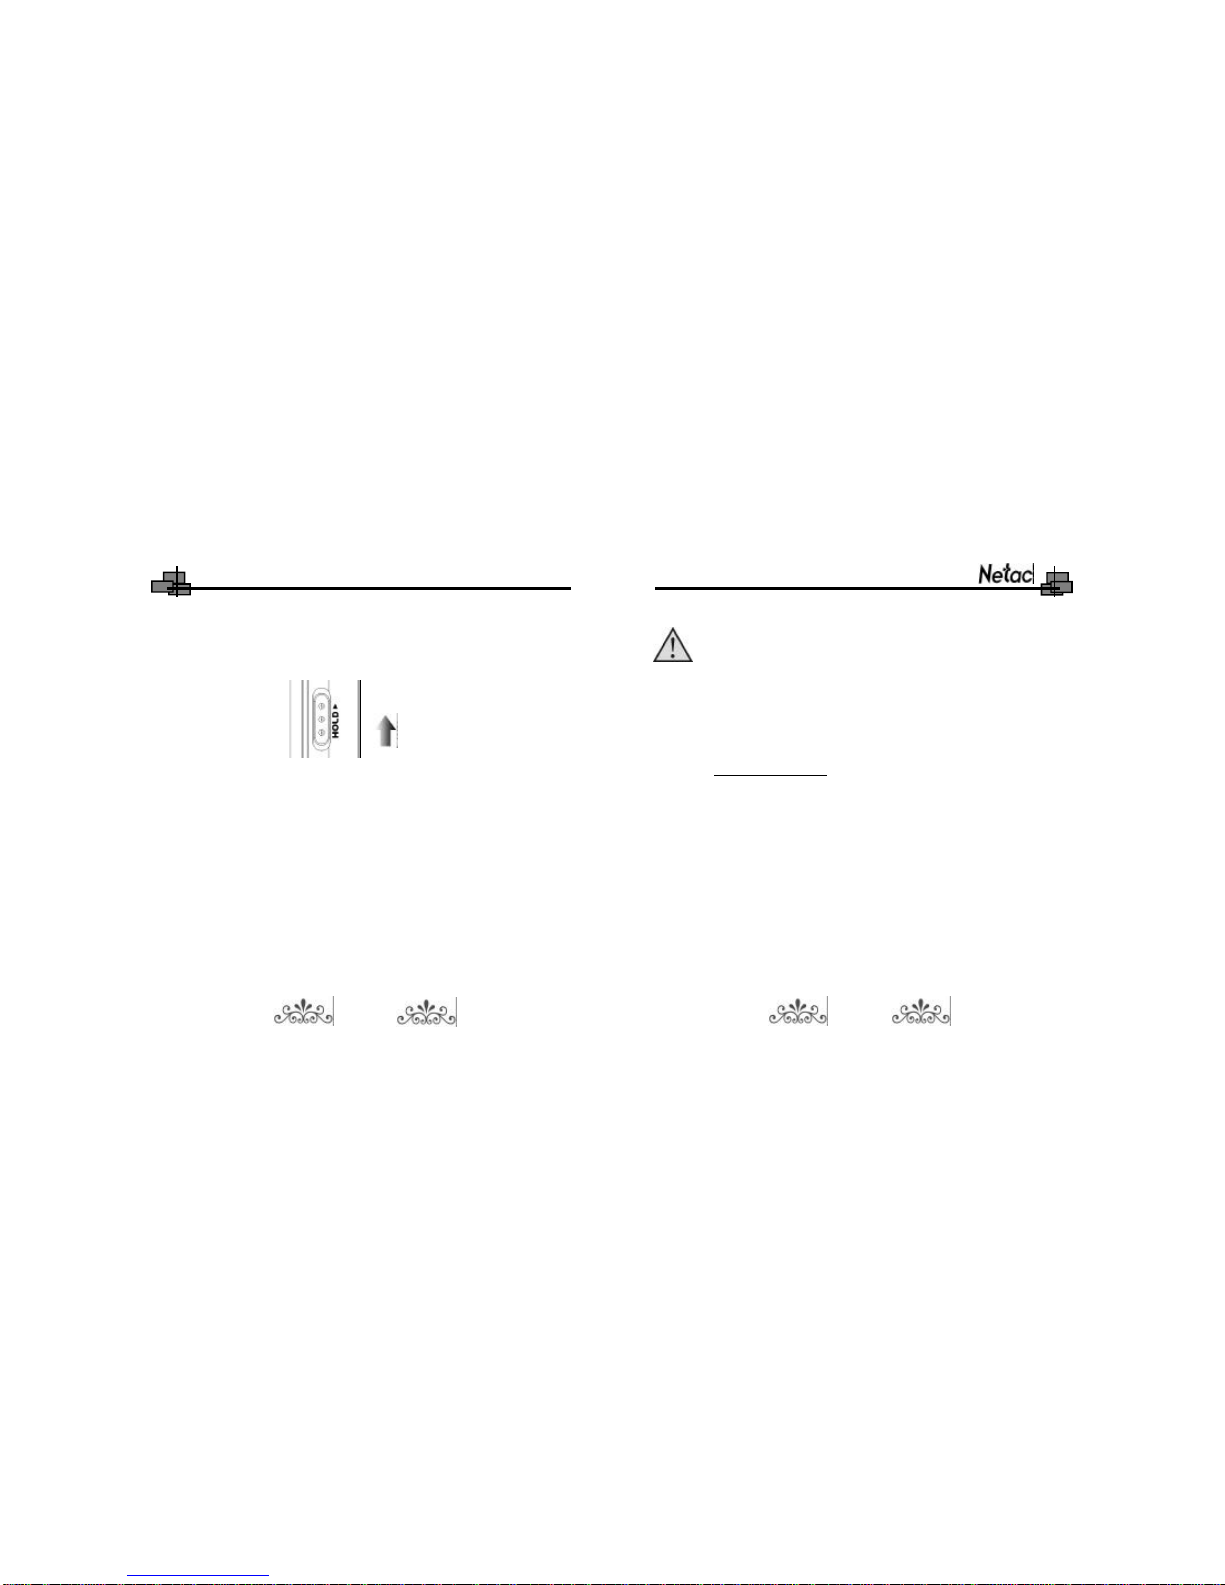
HOLD
Thisfunction isused topreventthe buttonsfrombeing operated accidentally.To
lock all buttonspleasesimplylock HOLDswitch,alock icon wouldappearon the
screen,and no button wouldbe abletooperate.Toreleasethe lock status,please
11 12
iMuve-shot
unlock HOLDswitch.If trytopoweron whileHOLDswitchislocked,P100 can’tbe
powered on,pleaseunlock HOLDswitch,then tryagain.
Push
Reset
IncaseP100 doesn’tresponsetoanyoperation,pokethe RESETholetopower
off P100.You need torestartP100 tocomplete.
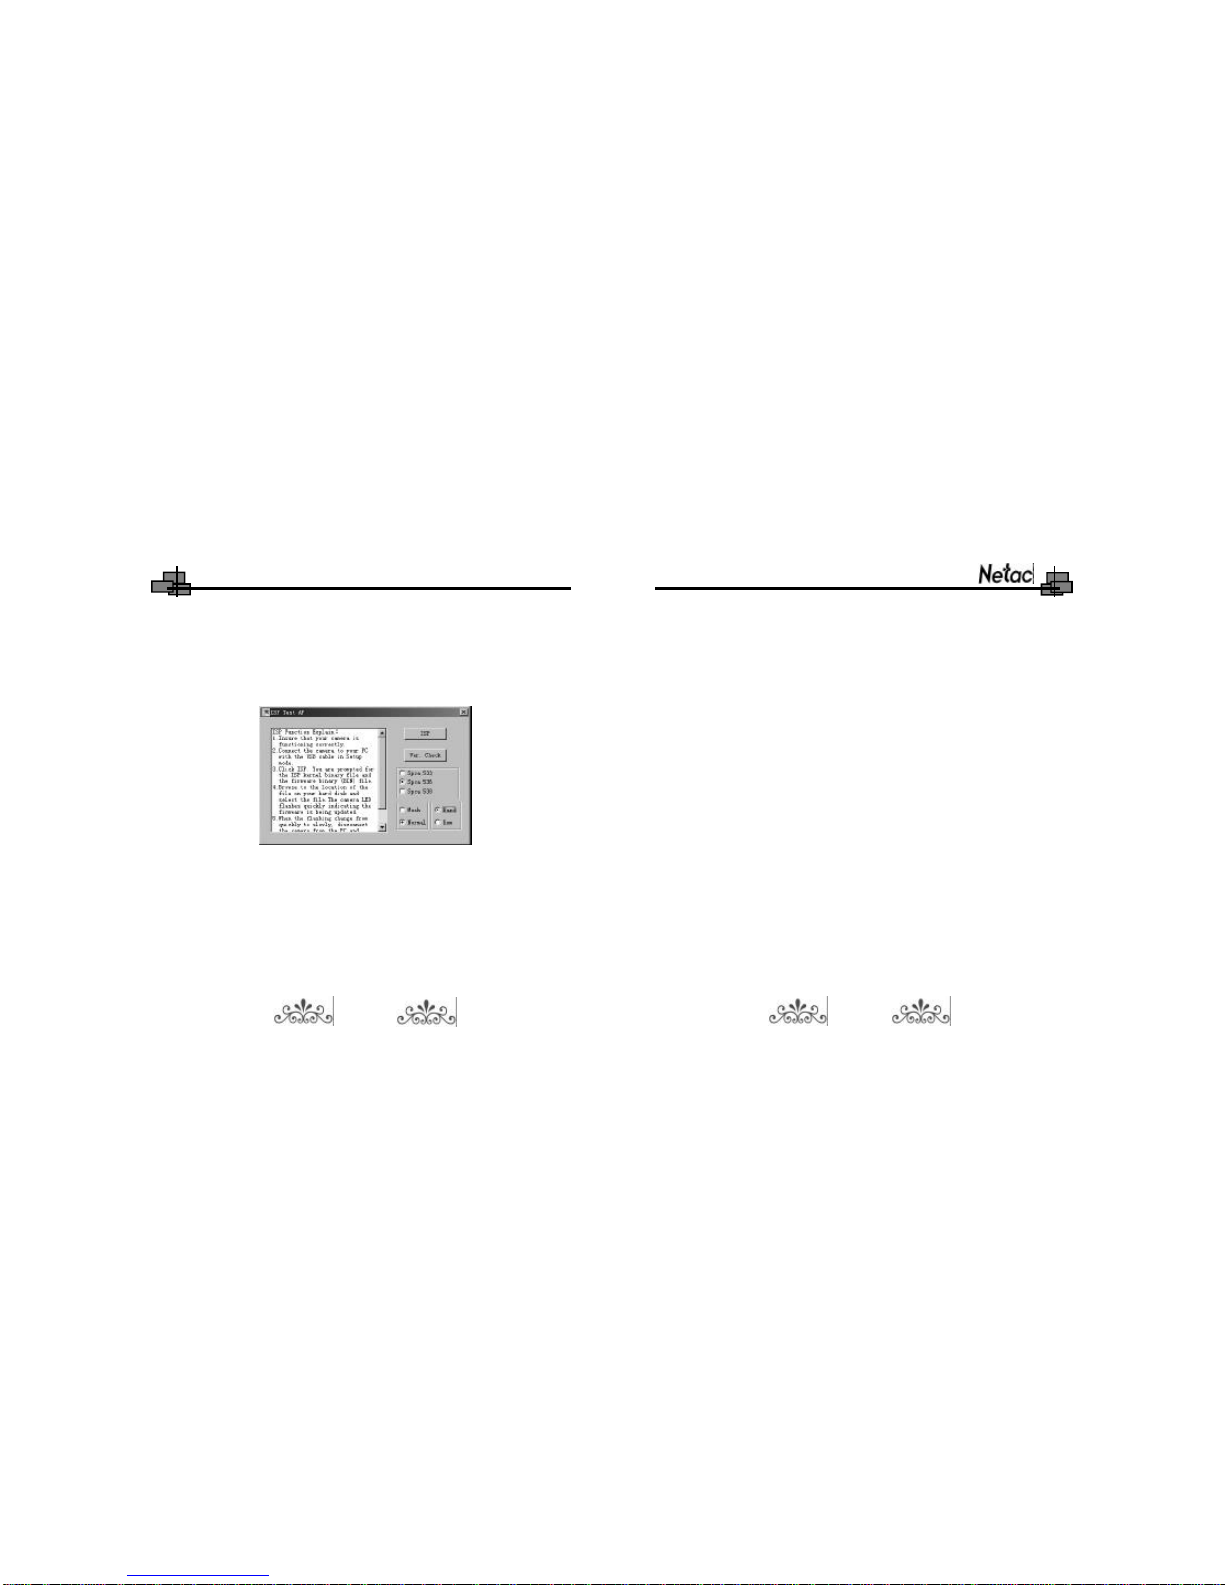
FirmwareUpgrade
Before upgrade, you need to installphotographicdriver of P100 at first, please refer
to “Camera” for details.
NOTE:Please make surethefree space ofP100 ismorethan
20MBbeforeupgrade,otherwise theupgradewouldbefail. Please
backup files firstbecause theupgrading woulddeleteall offiles
whichsavedinP100.
After having installed photographicdriver, please refer to the following steps to
upgrade.
1) Download the latest firmware files from the website
http://www.netac.com.
2) Enter “Setup” menu, set the item of “STORAGE ” as “PC-DEVICE”,
press OK button to confirm. Then connect P100 with the computer
through USB cable.
3) Insert the installation CD into CD-ROM.
4) Double click the “ISP_V5.2.exe” in “ISP” folder, system would prompt
a popup window.
13 14
iMuve-shot
Mode Operations
There are 9 menus in main menu: Video, Audio, Photo, Rec, Accessory, E-Book,
Camera, Dv and Setup.
Keystroke
1) Press Previous/Next button to select item in main menu, and press OK
button to enter.
2) Press BACK button to return to previous menu.
3) Press Volume+/- button to turn up/down the volume.
4) To lock all buttons please simply lock HOLD switch.
The operations and settings would be introduced as following.
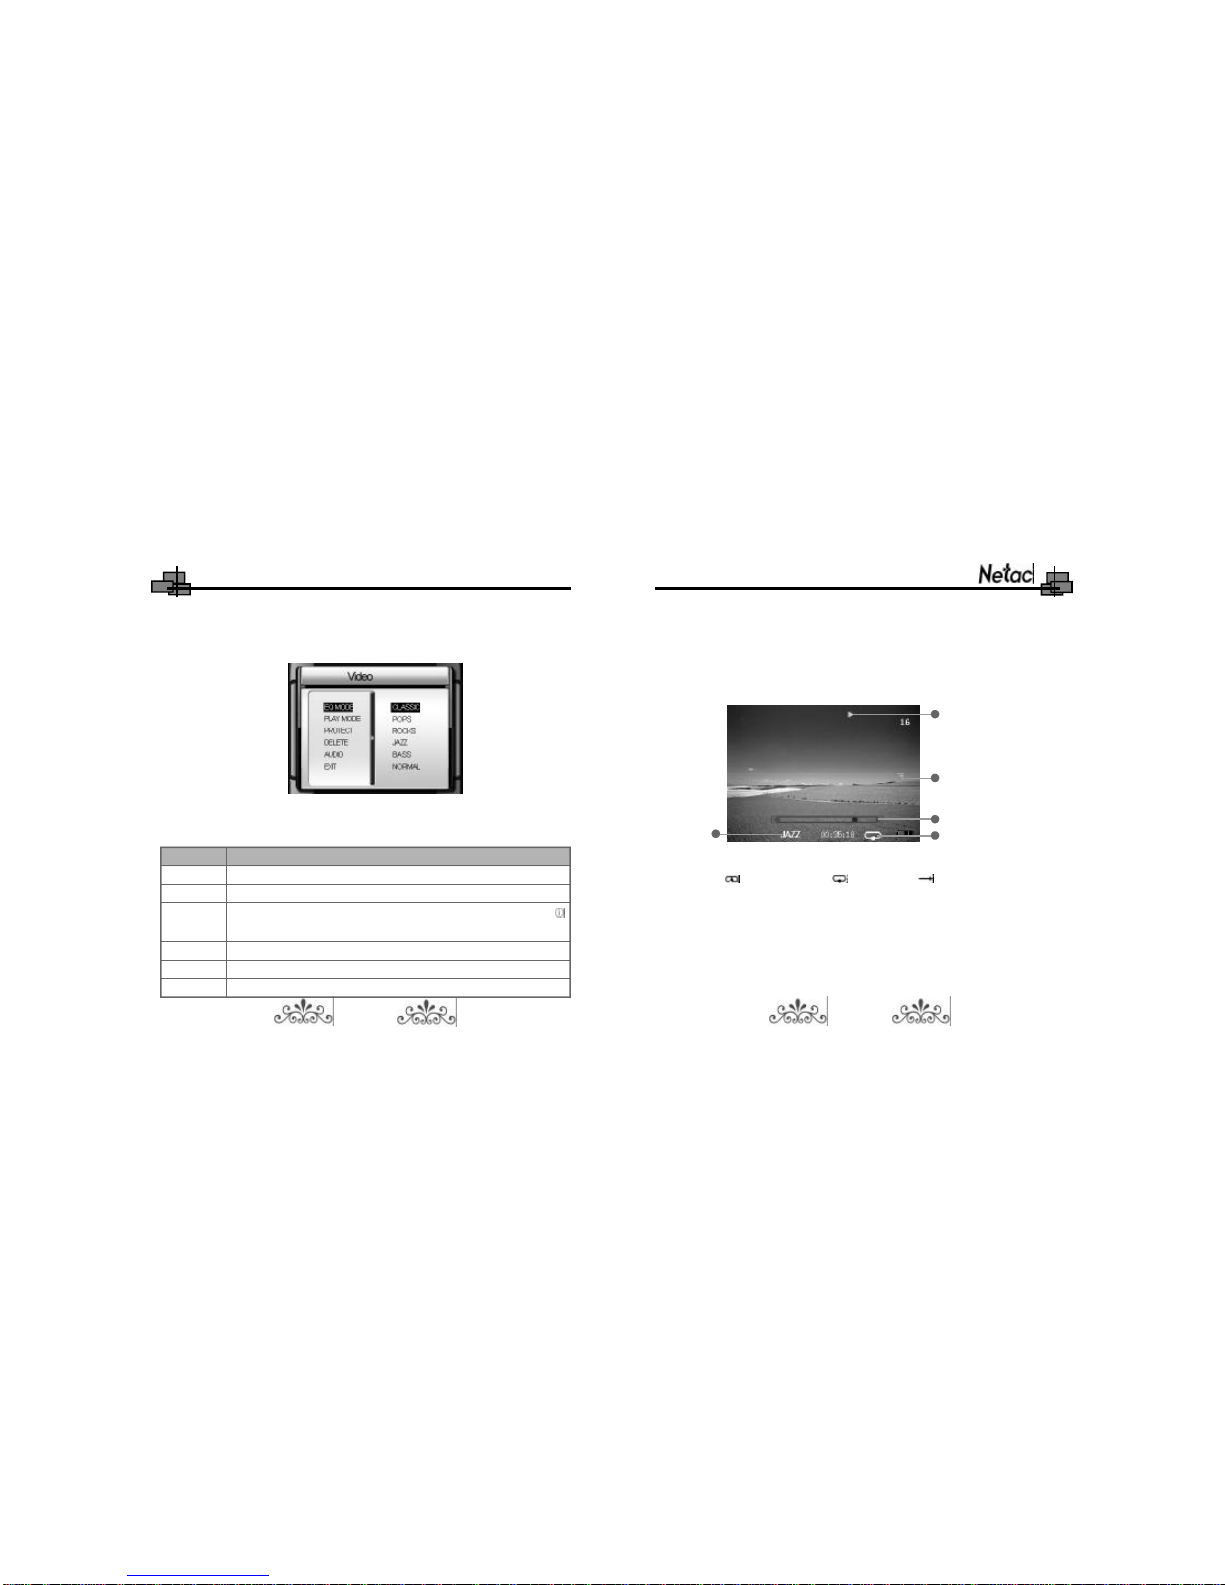
Video
Press Previous/Next button to select “Video” in main menu, and press OK button to
enter.
1) Press MENU button to enter sub menu, press Previous/Next button to select
5) Select “Normal” and “Nand”, then click “ISP” button in the window.
6) System would popup a dialogue box, select the files which you have
download, click “Yes” button in the popup window, system would
upgrade firmware of your P100 automatically.
15 16
7) After finishing upgrade, “ISP Write File OK.”would appear in the window,
waiting for about 30 seconds, then unplug P100 from the computer
safely. P100 would run new firmware program when powering on again.
iMuve-shot
2) Press Previous/Next button or Volume +/- button to select video file, press
OK button to play.
3) FM transmitting: Please refer to “Audio” for details.
4) The screen would display as following (for example):
Play Mode: REP ONE REP ALL RANDOM
When the play mode is set as “SINGLE”, there is no icon displays on the screen.
When the EQ MODE is set as “NORMAL”, there is on icon displays on the screen.
Play/pause: Press OK button.
item, press Volume + button to enter, press Previous/Next button to set, press
Volume - button to exit.
You can set the following items in sub menu:
Item
EQMODE
PLAY MODE
PROTECT
DELETE
AUDIO
EXIT
Description
Tosetthe EQmode as:CLASSIC,POPS,ROCKS,JAZZ,BASS,NORMAL
Tosetthe playmode as:REP ONE,REPALL,RANDOM,SINGLE
Tosetthe filehasprotected ornot, press OKbutton toconfirm.The icon
representsthe filehasprotected.
Tosetselected filedeleteordeleteall offiles,press OKbutton toconfirm.
Tosetsamplerateofaudioas8KHz,16KHz,24KHz,32KHz,48KHz.
Press OKorMENU button toexit.
17 18
EQ Mode Play Mode
Progress
Volume Icon
Play Status

iMuve-shot
Audio
Press Previous/Next button to select “Audio” in main menu, press OK button to
enter.The screen would display the audio file list.
1) Press MENU button to enter sub menu, press Previous/Next button to select
item. Press Volume + button to enter, press Previous/Next button to set,
press Volume - button to exit. Press MENU or OK button to return to audio
menu.
When playing video, you can switch status by pressing MENU button, the details
are as the following:
Status
Playmode switchstatus:
The icon ofplaymode (, , )
doesdisplayasred.
EQMODEswitchstatus:
The icon ofEQmode doesdisplay
asred
The icon ()ofvolumeappears
The icon ()ofvolumedoesn’t
appear
EnableOperations
Press Volume+/-button toswitchthe playmode
Press Previous/Nextbutton toselectprevious/next
video filetoplay
Press Volume+/-button toswitchEQmode
Press Previous/Nextbutton toselectprevious/next
video filetoplay
Press Volume+/-button toturnup/downthe volume
Press Previous/Nextbutton torewind/forward
Press Previous/Nextbutton toselectprevious/next
video filetoplay
NOTE: P100 can only recognize the video files as ASF format which
saved in the folder of “100MEDIA” under “DCIM” folder.
19 20

iMuve-shot
The screen would display as following:
1. Information of playing track
2. Play Mode: REP ONE REP ALL RANDOM
When the play mode is set as “SINGLE”, there is no icon displays on the area.
3. Lyric Shows
4. EQ Mode: When the EQ mode is set as “NORMAL”, there is no icon displays
on the screen.
5. Elapse Time 6. HOLD 7. A-B Repeat
8. Battery 9. Estimated time remaining 10. Volume Icon
11. Volume 12. Play Status 13. Track NO./Total NO.
1
2
3
4
6 7
8
10
11
13
59
12
You can set the following items in sub menu:
2) Press Previous/Next button to select audio file in audio menu, Press OK
button to enter and play the selected file.
Item
EQMODE
PLAY MODE
LCD OFF
PROTECT
DELETE
EXIT
Descriptions
Tosetthe EQmode as:CLASSIC,POPS,ROCKS,JAZZ,BASS,NORMAL
Tosetthe playmode as:REP ONE,REPALL,RANDOM,SINGLE
Inplaying track status,P100 wouldturnoff LCD ifthereisno operation
exceed the timewhichissetas5,10,20,30,40 secondsand NEVER,
“NEVER”representsthe LCD can’tbe turnoff.
Tosetthe filehasprotected ornot, press OKbutton toconfirm.The icon
representsthe filehasprotected.
Tosetselected filedeleteordeleteall offiles,press OKbutton toconfirm.
Press OKorMENU button toexit.
21 22

iMuve-shot
.Lyric shows: P100 would automatically search the lyric file (LRC format,
you can make it by yourself, download from Internet, etc.).
A) Copy the track and the lyric file (LRC format) into the same folder.
B) Make sure the name of the lyric file is the same as the name of the
track, otherwise the lyric can not be displayed.
C) Lyric would be shown synchronously in the “Lyric Shows” area of the
screen during playing.
.FM transmission:
P100 can send the playing track toFMradio,soyou can enjoythe playing
track inP100 through FMradio.
The stepsareasthe following (FMradioofcare.g.)
.Play/Pause: Press OK button to pause/resume track.
When playing track, you can switch status by pressing MENU button, the details
are as the following:
Status
Playmode switchstatus:
The icon ofplaymode (, , )
doesdisplayasred
EQMODEswitchstatus:
The icon ofEQmode doesdisplay
asred
The icon ()ofvolumeappears
The icon ()ofvolumedoesn’t
appear
The playmode doessetas
“SINGLE”:thereison icon displays
on the area
EnableOperations
Press Volume+/-button toswitchthe playmode
Press Previous/Nextbutton toselectprevious/next
track toplay
Press Volume+/-button toswitchEQmode
Press Previous/Nextbutton toselectprevious/next
track toplay
Press Volume+/-button toturnup/downthe volume
Press Previous/Nextbutton torewind/forward
Press Previous/Nextbutton toselectprevious/next
track toplay
Press MENUbuttontwicetodecideA(start)andB(end)
spotand beginA-Brepeating.
NOTE: You can only set A-B repeat when play mode is set as
“SINGLE”.
23 24

iMuve-shot
D)Pleasepress Volume+/-button tochange the frequency,till the
transmitting frequency ofP100 issameasthe frequency ofFM
radioofcar.
E)Nowyou can enjoythe track inP100 through FMradioofcar.
F)You can play/pausetrack bypressing OKbutton,orswitchto
previous/nexttrack bypressing Previous/Nextbutton whileFM
transmitting.
.ExitFMtransmission:HoldMENU button toexitFMtransmission.
NOTE: P100 can only recognize the audio files as MP3 and WAV
format which are saved in “MP3” folder under root directory.
Photo
Press Previous/Next button to select “Photo” in main menu, and press OK
button to enter.
1) Press MENU button to enter sub menu, press Previous/Next button to select
item. Press Volume + button to enter, press Previous/Next button to set, press
A)Connectthe earphone toP100 toensurethe besteffectofFM
transmitting.
B)Turnon the FMradioofcar,pleasechange the range ofFMfrequency
within87.5MHz~107MHz.(Pleasechoosethe frequency withoutFM
programforbettereffect.)
C)Connectearphone toP100,and the playmode isNOTsetas
“SINGLE”,holdMENU button toenterFMtransmitting inplaying
track/video status.The earphone wouldbe silentwhileFM
transmitting,the screen displays asfollowing:
FM transmitting status
FM transmitting frequency
25 26

iMuve-shot
Volume - button to exit. Press MENU or OK button to return to photo menu.
You can set the following items in sub menu:
Item
PROTECT
DELETE
SLIDE
EXIT
Descriptions
Tosetthe filehasprotected ornot, press OKbutton toconfirm.The icon
representsthe filehasprotected.
Tosetselected filedeleteordeleteall offiles,press OKbutton toconfirm.
Tosetslide timeofthe photoas3s,5s,10s,30s.
Press OKorMENU button toexit.
2) Press Previous/Next button or Volume +/- button to select photo.
3) Press OK button to browse.
7Set browsing mode: Press OK button to select browsing mode as zoom in/
out mode or moving mode while browsing.
]Zoom in/out mode: Press Volume + button to zoom in the photo, after
zooming in, press Volume - button to zoom out.
]Moving mode: After zooming in, press OK button to switch to moving
mode, press Volume +/- button to move left/right, press Previous/
Next button to move up/down.
7Browsing previous/next photo: When P100 is not in zoom in status and is
not in moving mode, press Previous/Next button to switch to previous/next
photo.
7Set start picture: Press MENU button to set the browsing photo as start
picture while powering on.
7Press BACK button to return to previous menu.
NOTE: P100 can only recognize the photo files as JPG format
which saved in the folder of “100MEDIA” under “DCIM” folder.
Please refer to “Convert Tool” for details.
27 28
iMuve-shot
The store location of recorded files are as the following:
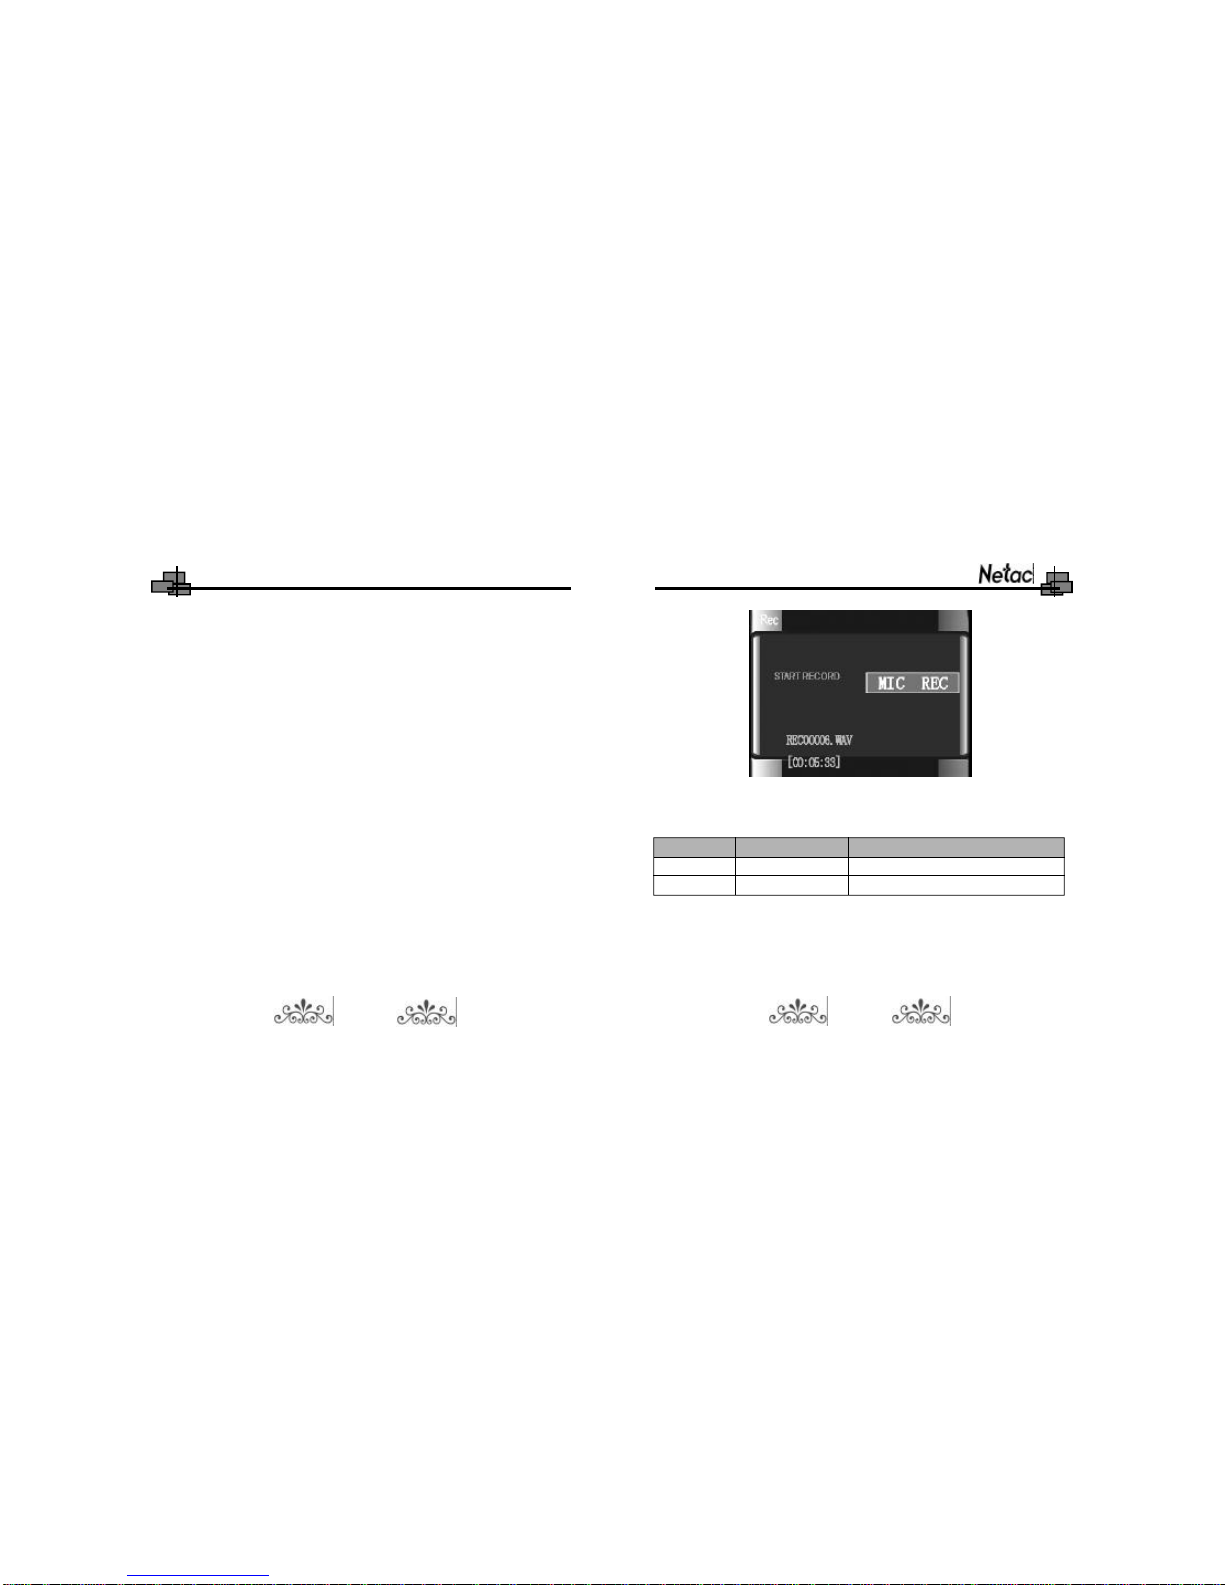
Rec
Press Previous/Next button to select “Rec” in main menu, and press OK button
to enter. P100 would get ready to record after entering Rec menu. If you didn’t
connect the P100 with video device through AV cable, the screen of P100 would
display as blue.
7Set record mode: P100 would enter default mode as video record. You can
press MENU button to select record mode as “MIC REC”.
7MIC Record: Press MENU button to select “MIC REC” in sub menu. Press
OK button to start to record. Press OK button to stop recording and save
the recorded file in record process.
The screen would display as following in recording status:
29 30
Locations for Saving
The folder of “100MEDIA” under “DCIM” folder
The folder of MP3
Recorded Mode
Video Record
MIC Record
Name of Recorded files
REC*****.ASF
REC*****.WAV
7Video Record ( TV e.g.):
=Connect P100 with television through AV cable.

iMuve-shot
/Browse the Calendar:
dPress Previous/Next button to select CALENDARinAccessorymenu.
dPress OK button to enter.
dPress Previous/Next button or Volume +/- button to select date.
dPress BACK button to Accessory menu.
=Press Previous/Next button to select “Rec” in main menu, and press
OK button to enter, the screen of P100 would display the television
program.
=Press OK button to start to record, the icon where on LCD would
be flash in record process.
=Press OK button to stop recording and save the recorded file.
7Play the recorded files: The video recorded files would be played in Video
menu, and the MIC recorded files would be played in Audio menu. Please
refer to “Video” and “Audio” for details.
Accessory
Press Previous/Next button to select “Accessory” in main menu, press OK
button to enter. You can browse the CALENDAR, MEMORY, and play the SNAKE
or RUSSIA BLOCK game in Accessory menu.
31 32

iMuve-shot
/MEMORY:
hPress Previous/Next button to select MEMORY in Accessory menu.
hPress OK button to enter. You can browse the system information,
which includes version, available and total capacity of flash.
hPress BACK button to return to Accessory menu.
E-Book
Press Previous/Next button to select “E-Book” in main menu, press OK button
to enter.
pDelete E-Book:
fPress Previous/Next button to select E-Book file which you want to
delete in E-Book menu.
fPress MENU button to enter popup menu, press Previous/Next
button to select DELETE ONE (delete the one which you selected
file) or DELETE ALL (delete all of E-Book files where saved in P100).
fPress OK button to confirm.
/SNAKE game:
8Press Previous/Next button to select SNAKE in Accessory menu.
8Press OK button to enter.
8Press MENU button to start to play.
8Press Volume +/- button to turn right/left, and press Previous/Next
button to move up/down for devouring the dice.
8Press MENU button to pause/resume of the game.
8Press BACK button to return to Accessory menu in non pause status.
/RUSSIA BLOCK game:
zPress Previous/Next button to select RUSSIA BLOCK inAccessory
menu.
zPress OK button to enter.
zPress MENU button to start to play.
zPress Volume +/- button to shift right/left, press Previous button to
change shape, press Next button to downhill.
zPress MENU button to pause/resume of the game.
zPress BACK button to return to Accessory menu in non pause status.
33 34
Table of contents
Other Netac MP3 Player manuals


