MP3 Player (C632) User’s Manual
Copyright
Thismanualcontainscontentprotected bycopyrightlaws.All rightsarereserved.Nopartof
thisdocumentmaybe used,reproduced,or/and stored inadatabase/retrievalsysteminany
formwithoutpriorwritten permission ofNetacTechnologyCo., Ltd.
The information inthismanualissubjecttochanging withoutnotice.PleasevisitNetac
websitehttp://www.netac.comtodownload the latestuser'smanual.
PatentNumber:US6829672,CN 99117225.6,CN 00114081.7
Introduction
Thanks for purchasing Netac MP3 Player. MP3 Player is a new type of portable digital
music player, perfectly combines digital music playing, recording, FM tuner and removable
hard disk, etc.
Features
lSupport MP3, WMA music files
lBuilt-in FM tuner
lLyric (LRC file) shows when music is playing
lSupport MIC and FM recording
lSupport A-B repeat
lSupport multiple sound modes and playback modes
lUser-defined the time of power off
lFlash Drive without driver installation (except on Windows 98/98SE)
Parts and Controls
Usage on the Computer
MP3 Player Utilities Installation
Netac supplies you MP3 Player Utilities to ease your use of MP3 Player. MP3 Player
Utilities includes MP3 Player driver (Especially for users on Windows 98/98SE), MP3
Player Disk Tool (Format MP3 Player or make bootable/secure disk), MP3 Player Update
Tool (Update MP3 Player’s firmware), Sound Convert Tool (Convert the recorded ACT file
into WAV file and play MP3/WAV file in the computer). You can download MP3 Player
Utilities from http://www.netac.com for installation.
Note: The system would install the Installer 2.0 first (according to the prompts to finish) if
your system has not installed it on Windows 98/98SE.
Using MP3 Player with the Computer
1) Boot your computer, connect standard port of USB cable with the computer, mini port
with MP3 Player.
2) Windows 98/98SE/Me/2000/XP: Open “My Computer”, you would find a new icon
named “Removable Disk” representing MP3 Player.
Mac OS 9.x or above: Anew iconnamed “NO_NAME” (“Untitled” on Mac OS 9.x) would
appear on the desktop of your computer representing MP3 Player.
Linux 2.4.2 or above: Enter the system by user ID “root” and input the command
“mount /dev/sda /mnt”. This command is to create a directory where MP3 Player will
be mounted.
Note: “sda” is an unfixed input item, please make relevant changes according to Linux operating
discipline.
3) Then you can copy, delete or edit data, just as on a traditional hard disk.
SafelyRemove MP3Player
Please refer to the following steps to remove MP3 Player after data transferred:
Windows 98/98SE: Unplug MP3 Player from USB port of the computer about 3 seconds
later after data transferring finished.
Windows Me/2000/XP (Windows 2000 as example): Click the icon at the taskbar with
the left key of mouse, click the prompt menu “Stop USB Mass Storage Device - Driver”,
and click “OK” in the pop-up window, then you can unplug MP3 Player safely.
Mac OS 9.x or above: Select the icon representing MP3 Player, click “File”, select “Exit NO
NAME”, then unplug MP3 Player from the computer. (Please drag MP3 Player icon into
Trash, then unplug it on Mac OS 9.x.)
Linux 2.4.2 or above: Input the command “umount /mnt” before unplugging MP3 Player. The
“/mnt” directory is corresponding with the “/mnt” mentioned above.
Dual Zone (Normal & Secure Disk) & Bootable Function
MP3 Player supports dual zone (normal & secure disk) & bootable function. You can use
MP3 Player Utilites to format MP3 Player to secure or bootable disk. The steps are as the
following:
lConnect the MP3 Player with the computer. Run the MP3 Player Disk Tool by selecting
“Start -> Programs -> MP3 Player Utilities 1.47 -> MP3 Player Disk Tool”. Click to select
the “Partition and Encrypt”option, drag the scroll bar to select the size of secure partition.
You can also set the access username and password by selecting the check box of “Set
username and password”. Press “Start” button and follow the prompted message to
complete the process.
lYou can also use this tool to format MP3 Player by choosing "Format" option. You can
choose from “Quick”, “Full” or “Low” format by selecting the radio button accordingly.
Making MP3 Player as a bootable disk is easy. Just select the “Make bootable disk”
check box in “Format” option, and press “Start” button to complete the process. You
can use MP3 Player as a bootable disk to rescue your system in emergency situation.
Note: wMP3 Player can only play files saved in normal disk.
wUndersystemWindowsXP withSP2,ifyou don’tlogon inwithadministrator
acount, afterusing securedisk,pleaserefertothe following stepstounplug MP3
Player:
1) Click the icon , and click the pop-up menu “Stop USB Mass Storage
Device - Driver”, it would pop-up another menu prompting that you can’t stop
the storage device, click “OK”.
2) Refresh the system (press F5 or click the right button of the mouse, select
“refresh”).
3) Do as step 1) again, then you can unplug MP3 Player from the computer
safely.
Basic Operation
Keystroke Definition
Hold: The time of keystroke is about 2 seconds.
Press: The time of keystroke is less than 2 seconds.
HOLD
This function is used to prevent the buttons from being operated accidentally. Push the
HOLD switch to the direction of the arrow marked above it, all buttons are locked, if MP3
Player is connected with the computer, you can not copy data into MP3 Player because it is
writing protected. To release, please push the HOLD switch to the opposite direction. If the
HOLD switch is opened when power on, MP3 Player would power off automatically after
prompted the lock status.
Power On/Off
To power on/off MP3 Player, please hold Play/Pause button (except for recording and
recording pause status). When MP3 Player is in status except for playing\recording status
and non-USB mode, MP3 Player would power off automatically if there is no operation
during the time which is set in “SYS -> Power off -> Off time”. (Please refer to “SYS
(System Settings Mode)” for details.)
Main Menu
There are five modes in MP3 Player: MSC (Music Mode), REC (Recording Mode), RPL
(Recorded File Playing Mode), FM (FM Mode) and SYS (System Settings Mode). The
operations and settings would be introduced detailedly in this manual.
Keystroke Operations
Press Previous/Next button to select the mode, press MODE button to enter.
Tips: 1) Holding MODE button under each Mode to enter the main menu.
2) Under settings of each Mode, press Play/Pause button to return to the main
interface of the Mode, or MP3 Player would switch to the maininterface of the Mode
automatically if there is no operation in 2 seconds.
MSC (Music Mode)
Select MSC in the main menu, press MODE button to enter.
Keystroke Operations
lPlay/Pause: Press Play/Pause button to play/pause a track.
lSelect Track: Press Previous/Next button to switch previous/next track.
lRewind/Forward: Press Previous/Next button continuously to rewind/forward track
during playing. It will stop when rewind/forward to the beginning/ending of the track.
lVolume: Press Volume +/- button to turn up/down the volume.
Playing Settings
Keystroke Operations
lPress MODE button to enter the interface of playing settings when playing.
lPressPrevious/Next button to select the item, press MODE button to enter.
lPress Previous/Next button to set the value of the selected item.
lPress MODE or Play/Pause button to confirm settings and return to the main
interface of MSC.
You can set the following items in the interface of playing settings:
REC (Recording Mode)
Please ensure MP3 Player is power enough to record.
You can use MP3 Player to record through MIC under REC. Press Previous/Next button to
select “REC” in the main menu. Press MODE button to enter the main interface of REC.
Note: The LCD would display “Disk Full!” if there is no space to save the new recorded file.
It would display “Over record” if there are 99 files in this folder.
Recording Settings
MP3 Player is getting ready for recording once entering the main interface of REC.
Keystroke Operations
The keystroke operations are the same as “Playing Settings”. Please pay attention: Press
MODE button to confirm settings and return to the main interface of REC.
You can set the following items in the interface of recording settings:
1) Local folder: Select the folder to save the recorded file.
2) REC type: You can select Fine REC, Long REC, Fine VOR, and Long VOR.
In type VOR, the recording can pause automatically if little voice recognized.
lIt is suggested to use VOR when the noise is small.
lIt is better to begin speak after MP3 Player hasrecorded for 5~6 seconds.
3) Exit: Select “Exit” to return to the main interface of REC.
Tips: There should be proper distance between MP3 Player and the voice source when
recording the voice from TV or sound box to get the best effect.
Recording
You can start recording after settings of recording finished.
1) Press Play/Pause or REC button to start recording.
2) Press Play/Pause or REC button to pause/resume during recording.
1) Repeat: There are 7 repeat modes as Normal, Repeat One, Folder, Repeat Folder,
Repeat All, Random and Intro (Play the anterior 10 seconds of each track in current
folder orderly).
2) Equalizer: There are 7 EQ modes as Natural, Rock, Pop, Classic, Soft, Jazz and
DBB.
3) Tempo rate (Only supports MP3 file): Select different tempo rate (such as becoming
faster or slower) when playing, but the tune doesn’t be changed.
4) Replay
lSelect “Replay” and press MODE button to enter the interface of replay.
lPress Next button to set A and B spot, then the track would be played between A and B
repeatedly. MP3 Player would exit “Replay” automatically when the repeated times
reach the replay times (refer to “Replay times” for details). You can set A and B spot
renewedly by pressing Previous button.
lPress Next button to enter “Follow” and “Contrast” status during A-B replaying
process.
lYou can press REC button to enter A-B repeat mode facilely during playing.
PN:UM05520103
Tips: You can press MODE button to exit the “Replay” mode during the whole process
above.
5) Replay times: Set the replay times as 1~10.
6) Replay gap: Set the interval of replay as 1~10 seconds.
7) Exit: Select exit to return to the main interface of MSC.
Pause Settings
Keystroke Operations
The keystroke operations are the same as “Playing Settings”. Please pay attention: Press
MODE button to confirm settings and return to the main interface of MSC.
You can set the following items in the interface of pause settings:
1) Local folder: Select the playing folder, and play tracks of the selected folder.
Note: MP3 Player can only play 1 level folder (each folder only supports 99 tracks or
recorded files).
2) Delete file
lSelect “Delete file”, and press MODE button to enter the interface.
lPress Previous/Next button to choose whether delete the playing track or not, press
MODE button to confirm and return to the main interface of MSC.
3) Del. all: Delete all files of current folder. The operations are as above.
Note: MSC (Music Mode), RPL (Recorded File Playing Mode) and FM (FM Mode) have the
deleting function. Under each Mode, the function can only delete the files correlated with the
current Mode. The LCD would display “No Files!” after deleted all files, and MP3 Player
would return to the main menu automatically.
4) Exit: Select “Exit” to return.
LRC Showing
MP3 Player would automatically search the lyric file (LRC format, you can make
by yourself, download from Internet, etc.) which name is the same as the current playing
track in the same folder. If there is lyric file matching with the playing track, hold MODE
button to enter the lyric displaying interface. The lyric shows with the track playing
synchronously. In the lyric displaying interface:
lPress MODE button can return to the main interface of MSC, and hold MODE button
can return to the main menu.
lThumb the lyrics manually: Press Volume +/- button to thumb lyrics manually. The
lyric shows synchronously once stop thumbing manually.
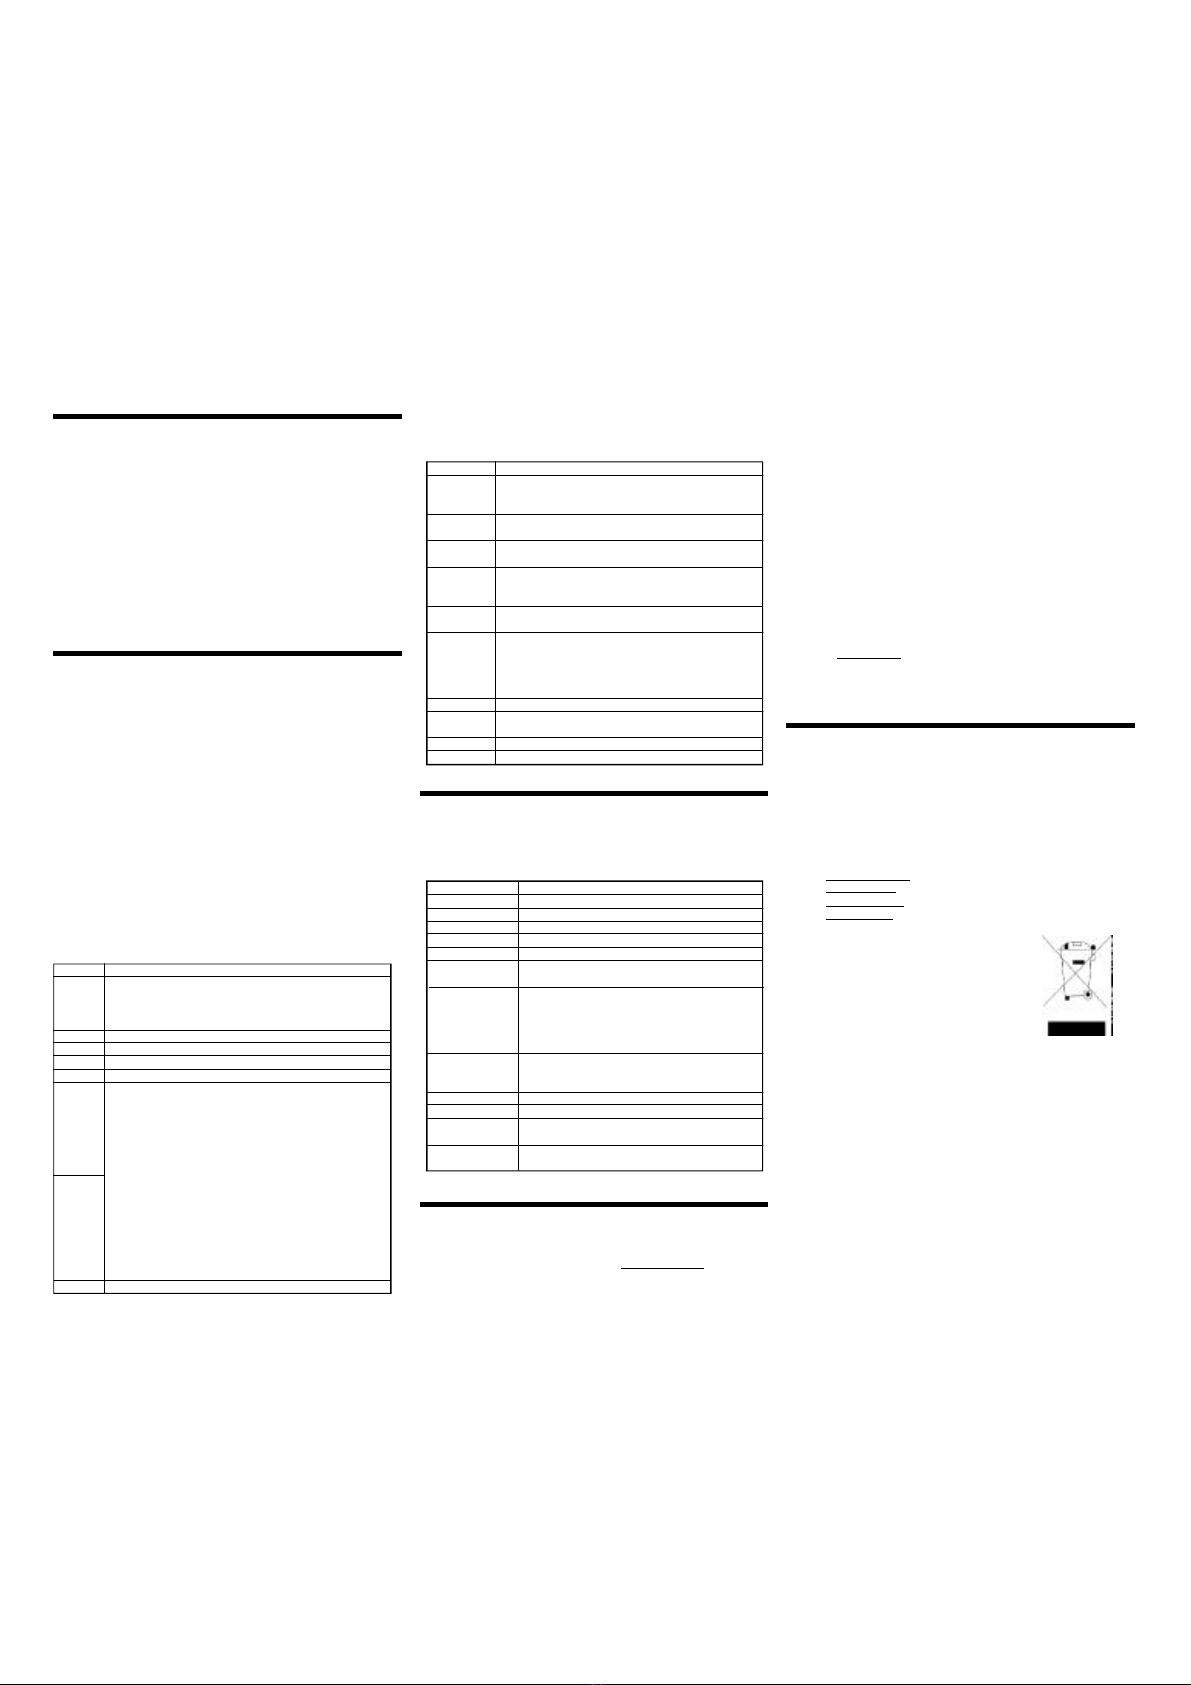
BatteryCover
Play/Pause Button
Earphone Jack
Neck Strap Jack
MODE Button
Mini USB Port
MIC
REC Button
LCD Previous Button
Next Button
HOLD Switch Volume+/- Button
Keystroke
Operations
First
SelectASpot Second
SelectBSpot,EnterReplay Third
EnterFollowStatus Fourth
EnterContrastStatus