Netkrom AIR-BR500GHP User manual

NETKROM OUTDOOR AP/BRIDGE
MODELS
AIR-BR500GHP/GUHP
AIR-BR500AGH
AIR-BR500AHP
User’s Manual
July, 2008

CHAPTER 1: PRODUCT OVERVIEW .............................................1
Introduction..........................................................................................................1
Features and Benefits..........................................................................................2
When to use which mode...................................................................................3
Access Point Mode............................................................................................3
Access Point Client Mode................................................................................4
Wireless Routing Client Mode ..........................................................................5
Gateway Mode..................................................................................................6
Wireless Adapter Mode ....................................................................................7
Transparent Client Mode..................................................................................8
Repeater Mode..................................................................................................9
CHAPTER 2: HARDWARE INSTALLATION...................................10
Warnings.............................................................................................................10
Package contents .............................................................................................11
Setup Requirements...........................................................................................12
Outdoor ap installations....................................................................................13
Mounting ap in the pole or tower.................................................................17
CHAPTER 3: ACCESS TO WEB-BASED INTERFACE....................18
Access to the Web interface with uConfig......................................................18
Verify the IP address of the Access Point with NpFind...................................22
Manual access to web-based interface via Internet Explorer .....................23
CHAPTER 4: COMMON CONFIGURATION ..............................28
Management Port Setup...................................................................................28
To Setup DHCP Server .....................................................................................33
View Active DHCP Leases ..............................................................................37
Reserve IP addresses for predetermined DHCP clients.............................38
Delete DHCP Server reservation....................................................................40
WLAN Setup........................................................................................................41
Antenna Alignment.........................................................................................52
Configure the Advanced setup of the Wireless Mode.............................54
View the Statistics.............................................................................................56
WAN Setup (Available in Wireless Routing Client and Gateway modes)....57
Setup Telnet / SSH..............................................................................................64
Access the TELNET Command Line Interface.............................................66

Table of Contents
iii
Access the Secure Shell Host Command Line Interface ...............................67
Set the WEB Mode..............................................................................................68
SNMP Setup ........................................................................................................69
Setup SNMP Trap................................................................................................70
Setup STP (Only available in Access Point, Transparent Client and Repeater
modes)................................................................................................................71
Use MAC Filtering...............................................................................................75
CHAPTER 5: ADVANCED CONFIGURATION............................85
Setup Routing (only supported by Wireless Routing Client and Gateway)..85
Configure Static Routing.................................................................................86
Using Routing Information Protocol-RIP........................................................87
NAT – Network Address Translation (only supported by Wireless Routing
Client and Gateway)......................................................................................88
Configure Virtual Servers based on De-Militarized Zone (DMZ) Host......89
Configure Virtual Servers based on Port Forwarding.................................91
Configure Virtual Servers based on IP Forwarding.....................................94
Bandwidth Control (only supported by Wireless Routing Client and
Gateway) ...........................................................................................................95
To enable or disable Bandwidth Control.....................................................95
To configure WAN Bandwidth Control Setting ...........................................96
To configure LAN Bandwidth Control Setting .............................................97
Remote Management (only supported by Wireless Routing Client and
Gateway) ...........................................................................................................99
To set up Remote Management...................................................................99
Parallel Broadband (only supported by Gateway Mode) ..........................100
Enable Parallel Broadband on the Access Point.....................................100
Enable Parallel Broadband on the Access Point.....................................101
Email Notification.............................................................................................102
Static Address Translation (only supported by Wireless Routing Client and
Gateway) .........................................................................................................104
DNS Redirection (only supported by Wireless Routing Client and Gateway)
...........................................................................................................................105
To enable/disable DNS Redirection............................................................106
Dynamic DNS Setup.........................................................................................107
To enable/disable Dynamic DNS Setup.....................................................107
To manage Dynamic DNS List (DDNS)........................................................108
CHAPTER 6: WIRELESS EXTENDED FEATURES ..........................114
Setup WDS2.......................................................................................................114

Table of Contents
iv
Set Virtual AP (Multiple SSID) ..........................................................................118
Set Preferred APs (Available in Client Mode) ...............................................120
Long Distance Parameters..............................................................................121
Set Wireless Multimedia ..................................................................................123
Setup Point-to-Point & Point-to-MultiPoint Connection................................127
Setup Repeater ................................................................................................130
CHAPTER 7: WLAN SECURITY..................................................135
How to set up WEP ...........................................................................................136
How to set up WPA-Personal (Only available in Access Point mode)......137
How to set up 802.1x/RADIUS (Only available in Access Point mode)......139
How to set up WPA Enterprise (Only Access Point mode supports WPA2-EAP
and WPA-EAP-AUTO).......................................................................................141
CHAPTER 8: SECURITY CONFIGURATION...............................143
Packet Filtering ................................................................................................143
Configure Packet Filtering............................................................................143
URL Filtering.......................................................................................................147
To configure URL Filtering..............................................................................147
Firewall Configuration .....................................................................................148
To configure SPI Firewall................................................................................148
Firewall Logs.....................................................................................................152
To view Firewall Logs......................................................................................152
CHAPTER 9: SYSTEM UTILITIES .................................................153
Using the SYSTEM TOOLS Menu.......................................................................153
Ping Utility.........................................................................................................153
Use Syslog ........................................................................................................154
System Identity................................................................................................157
Set System’s Clock.........................................................................................158
Firmware Upgrade.........................................................................................159
Backup or Reset Settings ..............................................................................161
Reboot System................................................................................................164
Change Password..........................................................................................165
Logout..............................................................................................................166
Using the HELP menu .......................................................................................167
About System..................................................................................................167

Table of Contents
v
APPENDIX I: FIRMWARE RECOVERY.......................................168
APPENDIX II: TCP/IP CONFIGURATION..................................170
For Windows 95/98/98SE/ME/NT ..................................................................170
For Windows XP/2000.....................................................................................173
APPENDIX III: PANEL VIEWS & DESCRIPTIONS.......................175
APPENDIX IV: VIRTUAL AP (MULTI-SSID) FAQ.......................177
APPENDIX V: HOW TO UPGRADE YOUR SINGLE SSID
FIRMWARE TO NEW MULTI-SSID FIRMWARE ....................181

1
C
Ch
ha
ap
pt
te
er
r
1
1:
:
P
Pr
ro
od
du
uc
ct
t
O
Ov
ve
er
rv
vi
ie
ew
w
I
IN
NT
TR
RO
OD
DU
UC
CT
TI
IO
ON
N
The AIRNET 54Mb Outdoor AP/Bridge series is a high-performance Access Point
and Bridge designed for enterprises and outdoor users. It is compatible with IEEE
802.11a/b/g and supports high-speed data transmission up to 54Mb. Housed in
a waterproof casing, AIRNET 54Mb Outdoor AP/Bridge series is designed to
withstand any extreme climatic conditions, making it the ideal solution for
outdoor applications.
The AIRNET 54Mb Outdoor AP/Bridge series has the ability to operate in 7
different modes and can be used in a wide variety of wireless applications like
Point-to-Point, Point-to-Multipoint, Wireless ISP, Hot Spot and Mesh Network
applications. The integrated WDS (Wireless Distribution System) feature creates
a virtually larger wireless network infrastructure by linking up other access points.
Perfect for applications requiring high bandwidth at a fraction of the cost of
T1/E1 leased-line, with the additional advantage of zero monthly recurring cost
from the service carrier. Typical usages include bridging satellite offices,
corporate LANs, school campus, as well as wireless Internet services, at
distances up to 31 miles or 50 Km (without using amplifiers). The Airnet 54Mb
Outdoor Bridge High Power also represents the perfect solution for bridging
networks that are impossible to connect using wired alternatives, including
networks separated by difficult terrains, railroads, or bodies of water.
The AIRNET 54Mb Outdoor AP/Bridge series is based in Atheros eXtended Range
(XR) chipset and provides powerful features such as High Power, higher
throughput, Long Range Parameter Settings, high security 64/128/152 WEP and
WPA2, DHCP Server, Spanning Tree Protocol, Web-based Configuration and
QOS feature which allows media files to be delivered over the network more
efficiently.
Designed for outdoor use, the AIRNET 54Mb Outdoor AP/Bridge series is able to
draw power through Cat-5 Ethernet cable from our DC injector. This ensures
that power is available wherever you need it, without the need of expensive
electrical work often associated with outdoor installations.

Product Overview
2
F
FE
EA
AT
TU
UR
RE
ES
S
A
AN
ND
D
B
BE
EN
NE
EF
FI
IT
TS
S
•Outdoor and Waterproof Design
•Full IEEE 802.11a/b/g compatibility allows inter-operation among multiple
vendors.
•High speed data transfer rate up to 54Mbps
•Virtual AP (Multiple SSID)
•WDS2
•Long-Range Parameter Settings
•Power over Ethernet - PoE
•Supports 64/128/152 WEP, WPA and WPA2
•SNMP, Web base Management System and Windows-based utility
•Supports Atheros extended Range (XR) technology
•Spanning Tree Protocol
•DHCP Server
•Bandwidth control
•SPI Firewall and packet/URL filtering
Product Overview
3
W
WH
HE
EN
N
T
TO
O
U
US
SE
E
W
WH
HI
IC
CH
H
M
MO
OD
DE
E
The access point is versatile in the sense that it may operate in seven different
types of modes: Access Point Mode, Client Mode, Point to Point, Point to
Multiple Point, Wireless Routing Client , Gateway and Wireless Adapter.
This section presents a brief outline of the different network applications that
can be accommodated through the different modes of the access point.
A
AC
CC
CE
ES
SS
S
P
PO
OI
IN
NT
T
M
MO
OD
DE
E
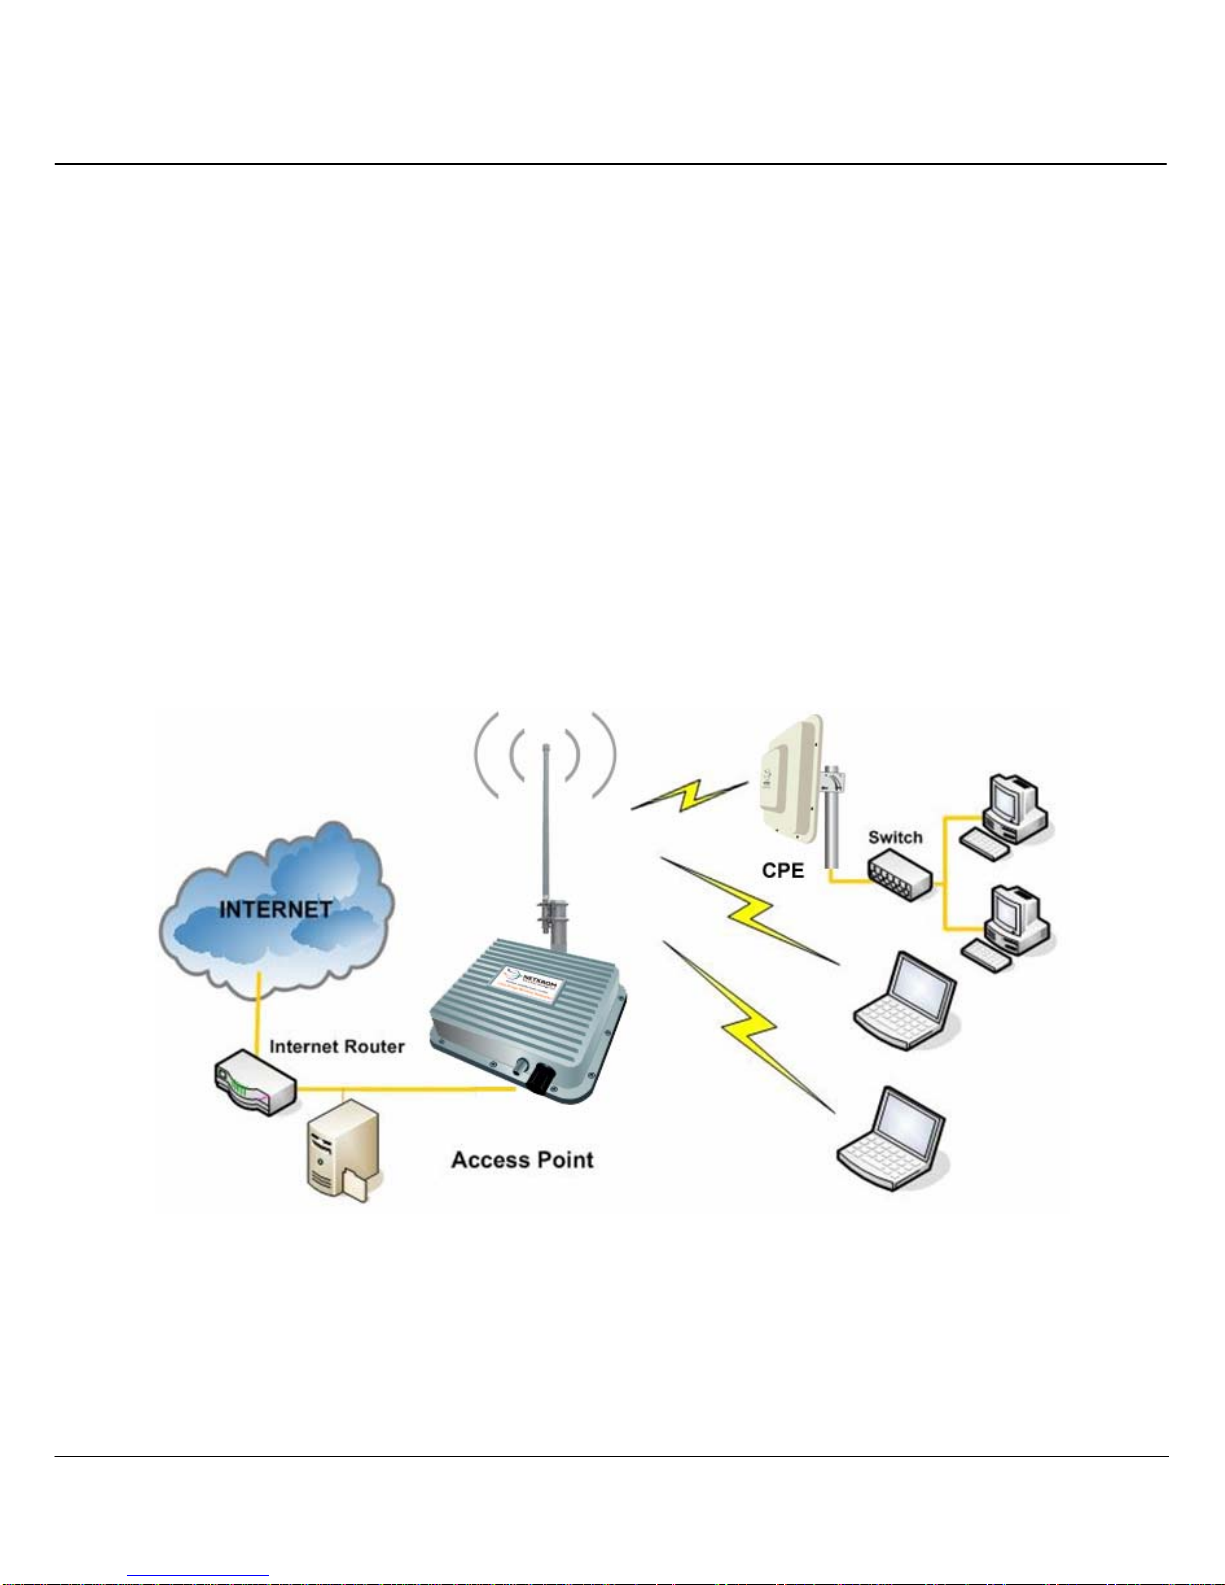
This is the default mode of your access point. The Access Point mode enables
you to bridge wireless clients to access the wired network infrastructure and to
communicate with each other.
In the example above, the wireless users will be able to access the file server
connected to the switch through the access point in Access Point mode.

Product Overview
4
A
AC
CC
CE
ES
SS
S
P
PO
OI
IN
NT
T
C
CL
LI
IE
EN
NT
T
M
MO
OD
DE
E
In Access Point Client mode, the access point acts as a wireless client that can
operate wirelessly with another access point to perform bridging between two
Fast Ethernet networks. The Access Point client cannot communicate directly
with any other wireless device.
In the example above, the workgroup PCs will be able to access the PCs
connected to the access point in Access Point Client mode.

Product Overview
5
W
WI
IR
RE
EL
LE
ES
SS
S
R
RO
OU
UT
TI
IN
NG
G
C
CL
LI
IE
EN
NT
T
M
MO
OD
DE
E
An application of this mode would be for the Ethernet port of the Wireless
Routing Client to be used for connection with other devices on the network
while access to the Internet would be achieved through wireless
communication with wireless ISP.
The above illustration describes how this mode operates.

Product Overview
6
G
GA
AT
TE
EW
WA
AY
Y
M
MO
OD
DE
E
Or put it more simply, Broadband Internet sharing in a wireless network!
Since the access point supports several types of broadband connections, the
first step in setting up the access point as a Broadband Internet Gateway is to
identify the type of broadband Internet access you are subscribed to.
Static IP address
Use this type of connection if you have subscribed to a fixed IP address or to a
range of fixed IP addresses from your Internet Service Provider.
Dynamic IP address
When powered using this type of connection, the access point requests for an
IP address which will be automatically assigned to it by your Internet Service
Provider.
This type of connection applies for instance, to:
•Singapore Cable Vision subscribers
•@HOME Cable Service users
Product Overview
7
PPP over Ethernet (PPPoE)
Select this type of connection if you are using ADSL services in a country utilising
standard PPP over Ethernet for authentication.
For instance:
If you are in Germany which uses T-1 connection or
If you are using SingNet Broadband or Pacific Internet Broadband in Singapore.
PPTP
Select this type of connection if you are using ADSL services in a country utilising
PPTP connection and authentication.
W
WI
IR
RE
EL
LE
ES
SS
S
A
AD
DA
AP
PT
TE
ER
R
M
MO
OD
DE
E
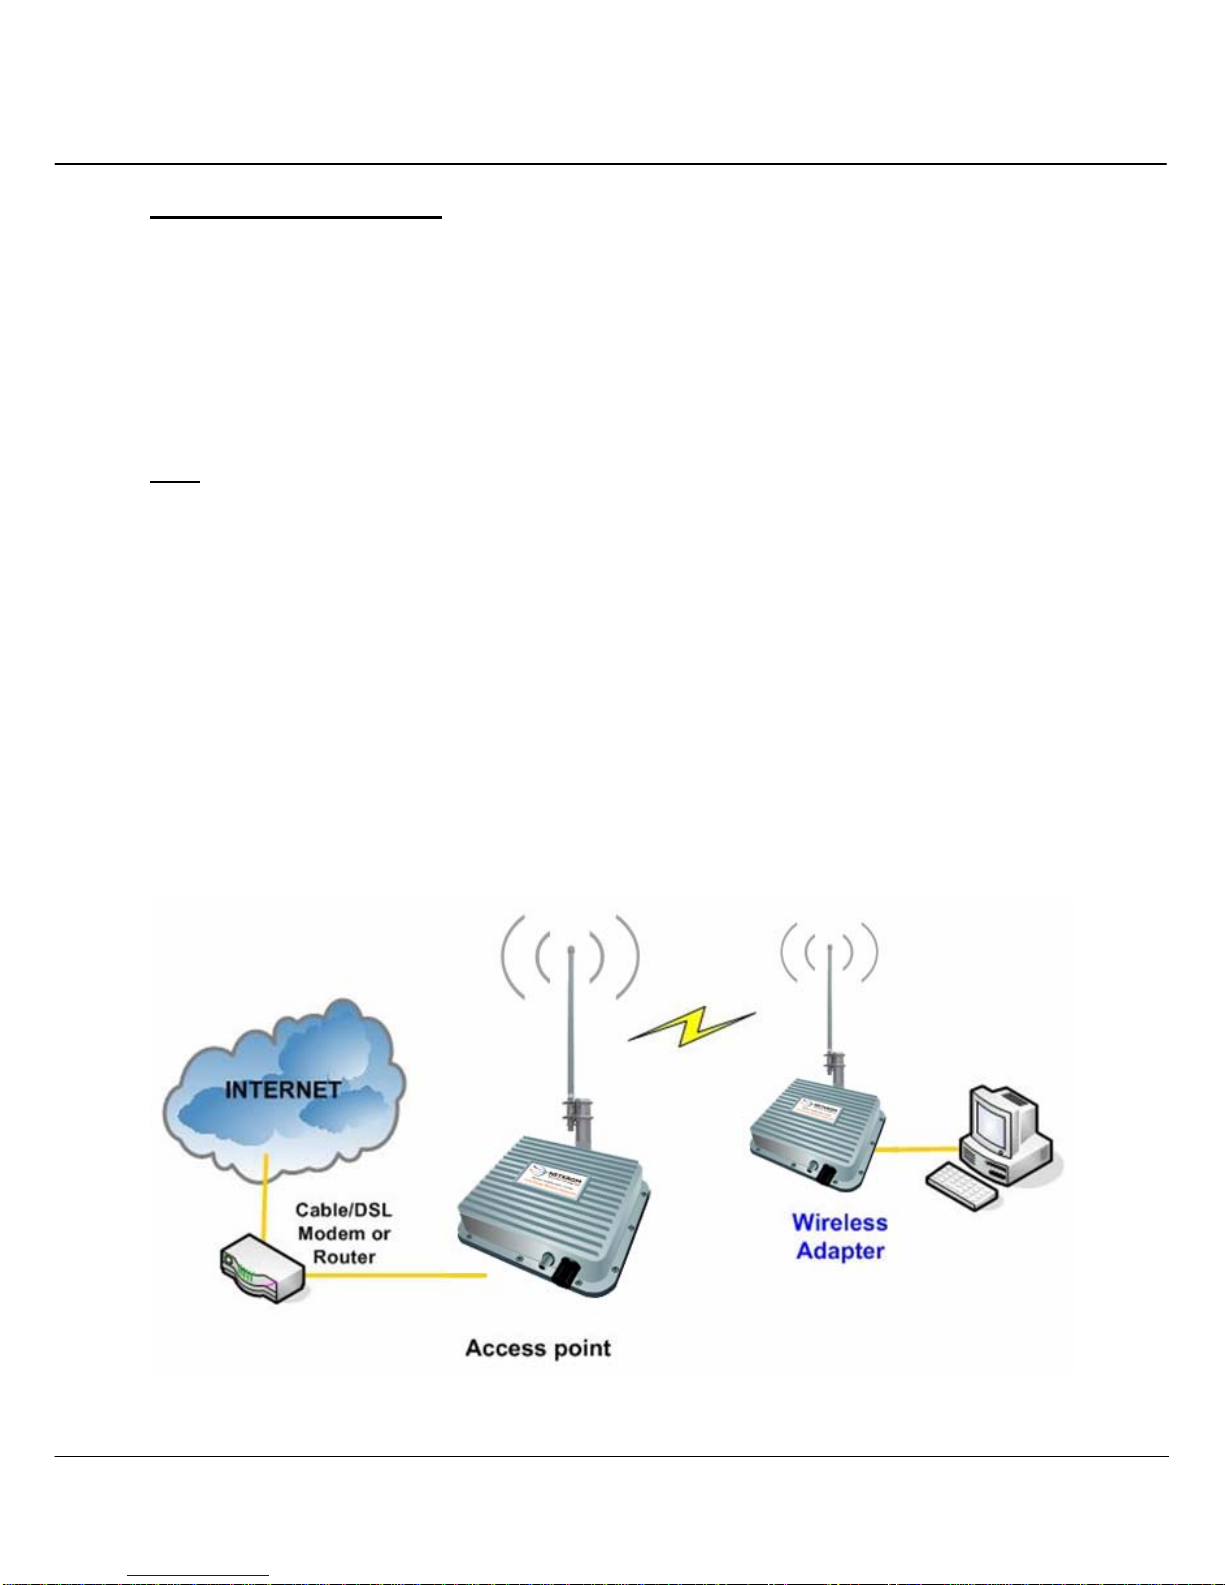
Similarly to the Access Point Client mode, the access point used in this mode, is
able to communicate wirelessly with another access point to perform
transparent bridging between two networks.
However here, the Wireless Adapter connects a single wired workstation only.
No client software or drivers are required while using this mode.

Product Overview
8
T
TR
RA
AN
NS
SP
PA
AR
RE
EN
NT
T
C
CL
LI
IE
EN
NT
T
M
MO
OD
DE
E
In Transparent Client Mode, the access point provides connection with an
access point acting as the RootAP. This operation is designed for the
implementation of Point-to-Point and Point-to-Multipoint connections
An access point acts as Root AP and 1
An access point acts as Root AP
other access point acts as Transparent
and several other access point
Client. acts as Transparent Clients.
Product Overview
9
R
RE
EP
PE
EA
AT
TE
ER
R
M
MO
OD
DE
E
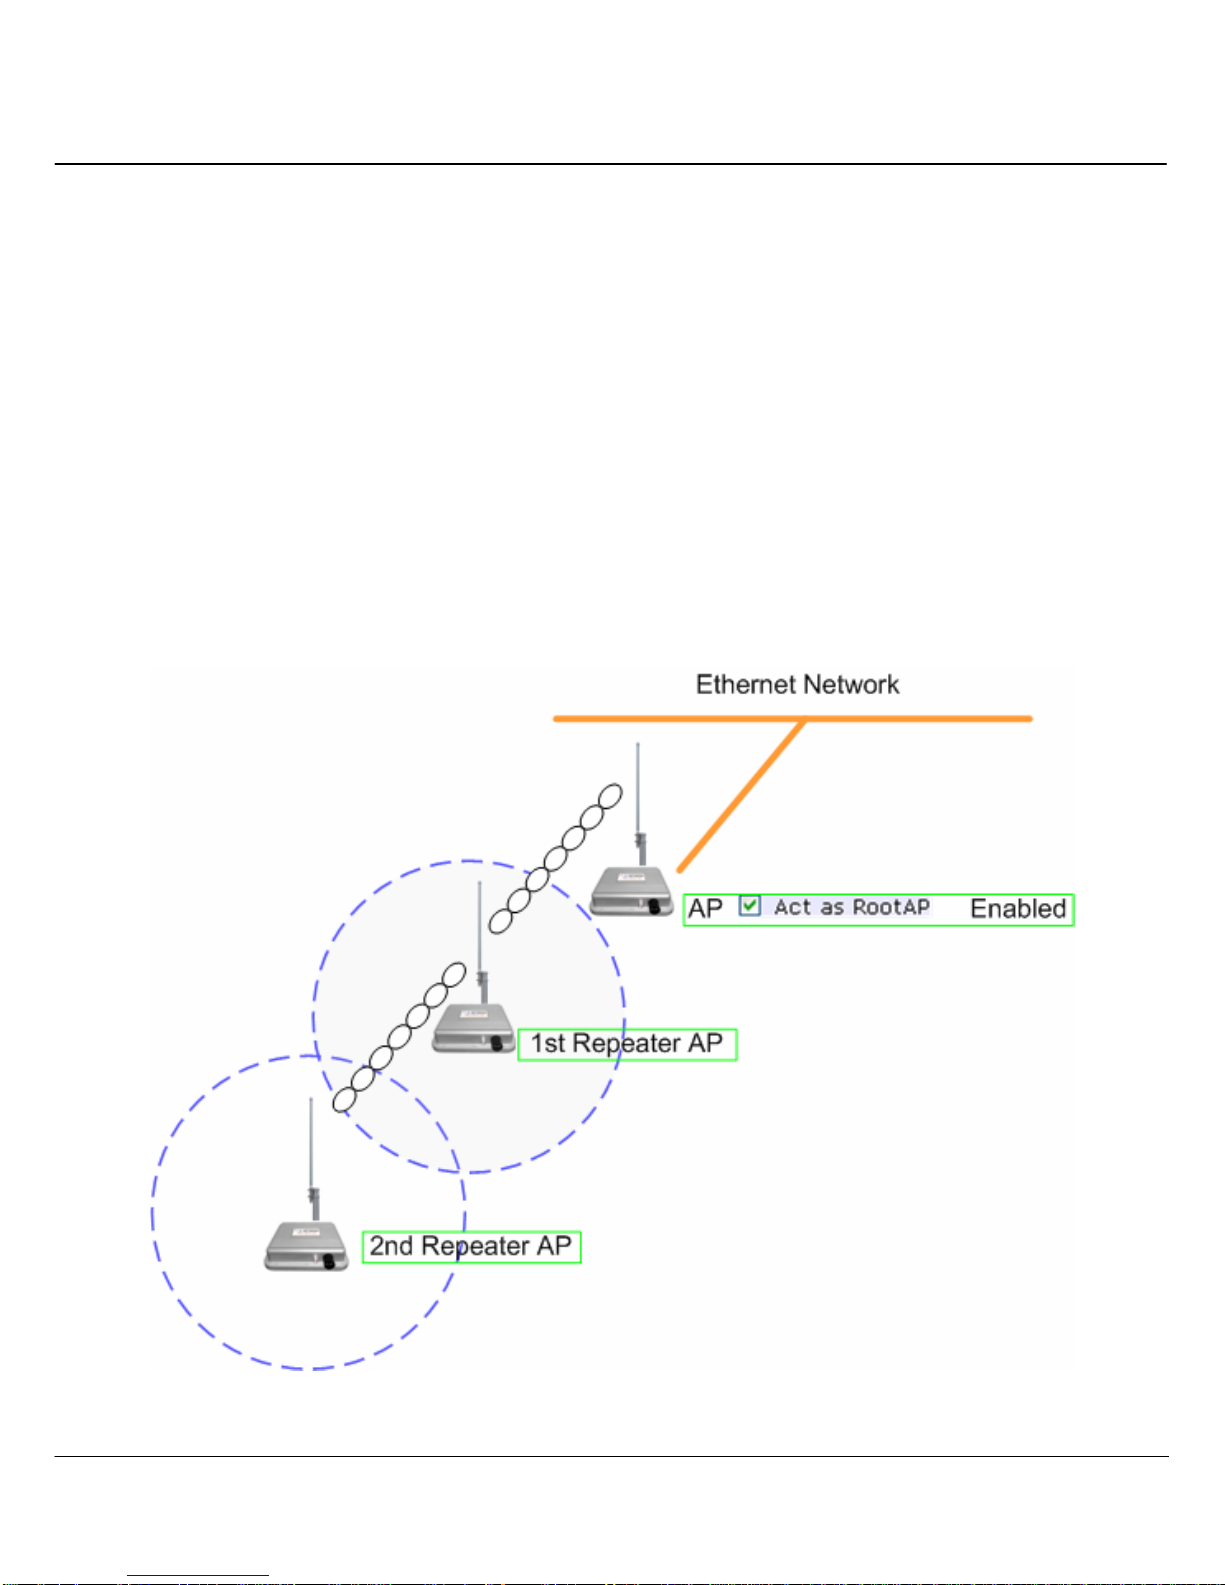
The access point comes with a built-in Repeater Mode to extend the range,
and substantially enhance the performance of the wireless network by allowing
communications over much greater distances.
In Repeater Mode, the access point acts as a relay for network signals on the
network by regenerating the signals it receives, and retransmitting them to
extend the range of the existing network infrastructure.
Detailed information on the Repeater Mode is available in the Repeater Setup
section.

10
C
Ch
ha
ap
pt
te
er
r
2
2:
:
H
Ha
ar
rd
dw
wa
ar
re
e
I
In
ns
st
ta
al
ll
la
at
ti
io
on
n
W
WA
AR
RN
NI
IN
NG
GS
S
• Do not work on the system or connect or disconnect cables during periods of
lightning activity.
• Do not locate the antenna near overhead power lines or other electric light
or power circuits, or where it can come into contact with such circuits. When
installing the antenna, take extreme care not to come into contact with such
circuits, as they may cause serious injury or death.
• Only trained and qualified personnel should be allowed to install, replace, or
service this equipment.
• To meet regulatory restrictions, the radio and the external antenna must be
professionally installed. The network administrator or other IT professional
responsible for installing and configuring the unit is a suitable professional
installer. Following installation, access to the unit should be password protected
by the network administrator to maintain regulatory compliance.
•The outdoor access point and PoE injector can be damaged by incorrect
power application. Read and carefully follow the installation instructions before
connecting the system to its power source.

Hardware Installation
11
P
PA
AC
CK
KA
AG
GE
E
C
CO
ON
NT
TE
EN
NT
TS
S
Take a moment to ensure you have all of the following parts in your Outdoor
Waterproof Unit installation kit before you begin installing the product. If any
parts are missing, please contact your local vendor or contact us at 305-
4182232.
KIT CONTAINS
1. Airnet Outdoor Access Point
2. Mounting bracket (include: 2 Brackets and 4 screw nuts
3. PoE Injector
4. Power Cable
5. RJ45 Waterproof Connector System
6. CD ROM
1
2
3
4
5
6

Hardware Installation
12
S
SE
ET
TU
UP
P
R
RE
EQ
QU
UI
IR
RE
EM
ME
EN
NT
TS
S
Before starting, please verify that the following is available:
•CAT5/5e or FTP Outdoor Ethernet cable (from the Outdoor AP to PoE Injector)
•At least one computer is installed with a Web browser and a wired or wireless
network interface adapter
•TCP/IP protocol is installed and IP address parameters are properly
configured on all your network’s nodes
Important!
• Configure and verify the outdoor access point operations first before you
mount the unit in a remote location.
• You may need to install a lightning arrestor to protect your outdoor Access
Point from the lightning.
• For choosing the best location for your outdoor access point choose an
elevated location where trees, buildings and large steel structures will not
obstruct the antenna signals and which offers maximum line-of-sight
propagation with the users.
• Select an appropriate antenna to improve range and/or coverage and
the access point also lets you fine-tune parameters such as the transmit
power to achieve the best results.

Hardware Installation
13
O
OU
UT
TD
DO
OO
OR
R
A
AP
P
I
IN
NS
ST
TA
AL
LL
LA
AT
TI
IO
ON
NS
S
The diagram below shows the overall setup of Outdoor Access Point.

Hardware Installation
14
S
St
te
ep
p
1
1:
:
Connect your UTP or FTP Outdoor cat.5 Ethernet cable with waterproof
connector to the RJ-45 connector on the outdoor access point. Then
connect the other end of the cable to the PoE injector.
For the Netkrom PoE, the recommended length of the RJ45 Category 5 cable
is up to 150 feet or 50 meters.
1.- Remove the thin enclosure nut
from the feedthru assembly. This
can be discarded. Loosen the
compression nut completely
2.- Insert the RJ45 connector thru
the feedthru assembly
3.- Tighten the compression nut
loosely to the feedthru assembly
4.- Screw the entire feedthru
assembly into the RJ45-ECS housing
which is already mounted in the
enclosure. There should be a rubber
gasket between the two
assemblies. Tighten the feedthru
assembly to create a seal.
enclosure nut
feedthru assembly
RJ45-ECS housing
compression nut

Hardware Installation
15
5.- The final step is to tighten the
compression nut until the gaskets
are tight around the Cat5 cable.
Always push the cable toward the
connector while tightening to
ensure good strain relief of cable to
connector.
S
St
te
ep
p
2
2:
:
Connect the external antenna to the N Female connector of the access
point.
From the PoE injector connect one cat.5 Ethernet cable to the radio and
another cat.5 cable to a switch or PC.
This manual suits for next models
3
Table of contents
Popular Network Hardware manuals by other brands


Patton electronics
Patton electronics ForeFront 6081RC EdgeRoute Specification sheet

Nokia
Nokia 7302 Basics, Management and OAM Guide

FIBER FOX
FIBER FOX MINI 4R user manual

Ericsson
Ericsson MINI-LINK 6351 Technical description

Biotector
Biotector Network Control Unit user manual

Quectel
Quectel EC200T Series Hardware design


