NETmc Marine DVR User manual

NETmc Marine DVR Manual-Rev7.2 Dec 2020 1 of 52
© NETmc Marine Ltd 2020
USER GUIDE FOR
NETmc MARINE
DVR
Rev. 7.2 DVR
Firmware 1.6.39
December 2020

NETmc Marine DVR Manual-Rev7.2 Dec 2020 2 of 52
© NETmc Marine Ltd 2020
Contents
1Introduction 3
2Hardware Description and Connections 4
3Setup 8
4Operation 9
5Software Setting 14
6File Save Setup 17
7Full Screen Setup 18
8Overlay 20
9Blackbox 23
10 Multi Channel 25
11 Pipeline Mode 27
12 RTSP Input 28
13 How to Contact NETmc Marine Support 30
Appendix 1: Technical Spec 31
Appendix 2: Overlay Serial Parser 32
Appendix 3: Coabis Interfacing 36
Appendix 4: Nexus Interfacing 42
Appendix 5: Eiva / Pipeline Interfacing 46
Appendix 6: MSDS
NETmc Marine Ltd
New Deer, Turriff
Aberdeenshire
AB53 6TL
TEL. +44 1771 644001
FAX. +44 1771 644005

NETmc Marine DVR Manual-Rev7.2 Dec 2020 3 of 52
© NETmc Marine Ltd 2020
1. Introduction
The NETmc Marine DVR is our latest one size fits all, modular, adaptable digital video recorder.
Bringing together over 20 years of experience and innovative digital video solutions to the offshore
survey and inspection sector, this product consolidates features to replace the DVRi, XOPs, 73fifty,
DVRiHD and Four264.
Supplied in its base configuration as a single channel, simple video recorder, the unit can be
upgraded in the field* to perform other functions as and when desired.
Functions such as – overlay, blackbox, multi video channel, clip recording, remote control, integrity
management control (Coabis etc), pipeline mode (EIVA control and compatibility) are available.
Understanding that some of these features may only be of use on certain projects, the features can
be rented for set durations and activated by a license code emailed out to the field.
*some features may require return to supplier upgrades depending when purchased

NETmc Marine DVR Manual-Rev7.2 Dec 2020 4 of 52
© NETmc Marine Ltd 2020
2. Hardware Description and Connections
2.1 Front of the unit
1U unit
4U unit (behind door)
Hard drive
activity LED Power LED
Network
activity LEDs Power-On
Button
Power-On
Button
Reset Button
Power LED
Hard drive
activity LED
Network
activity LEDs
NETmc Marine DVR Manual-Rev7.2 Dec 2020 5 of 52
© NETmc Marine Ltd 2020
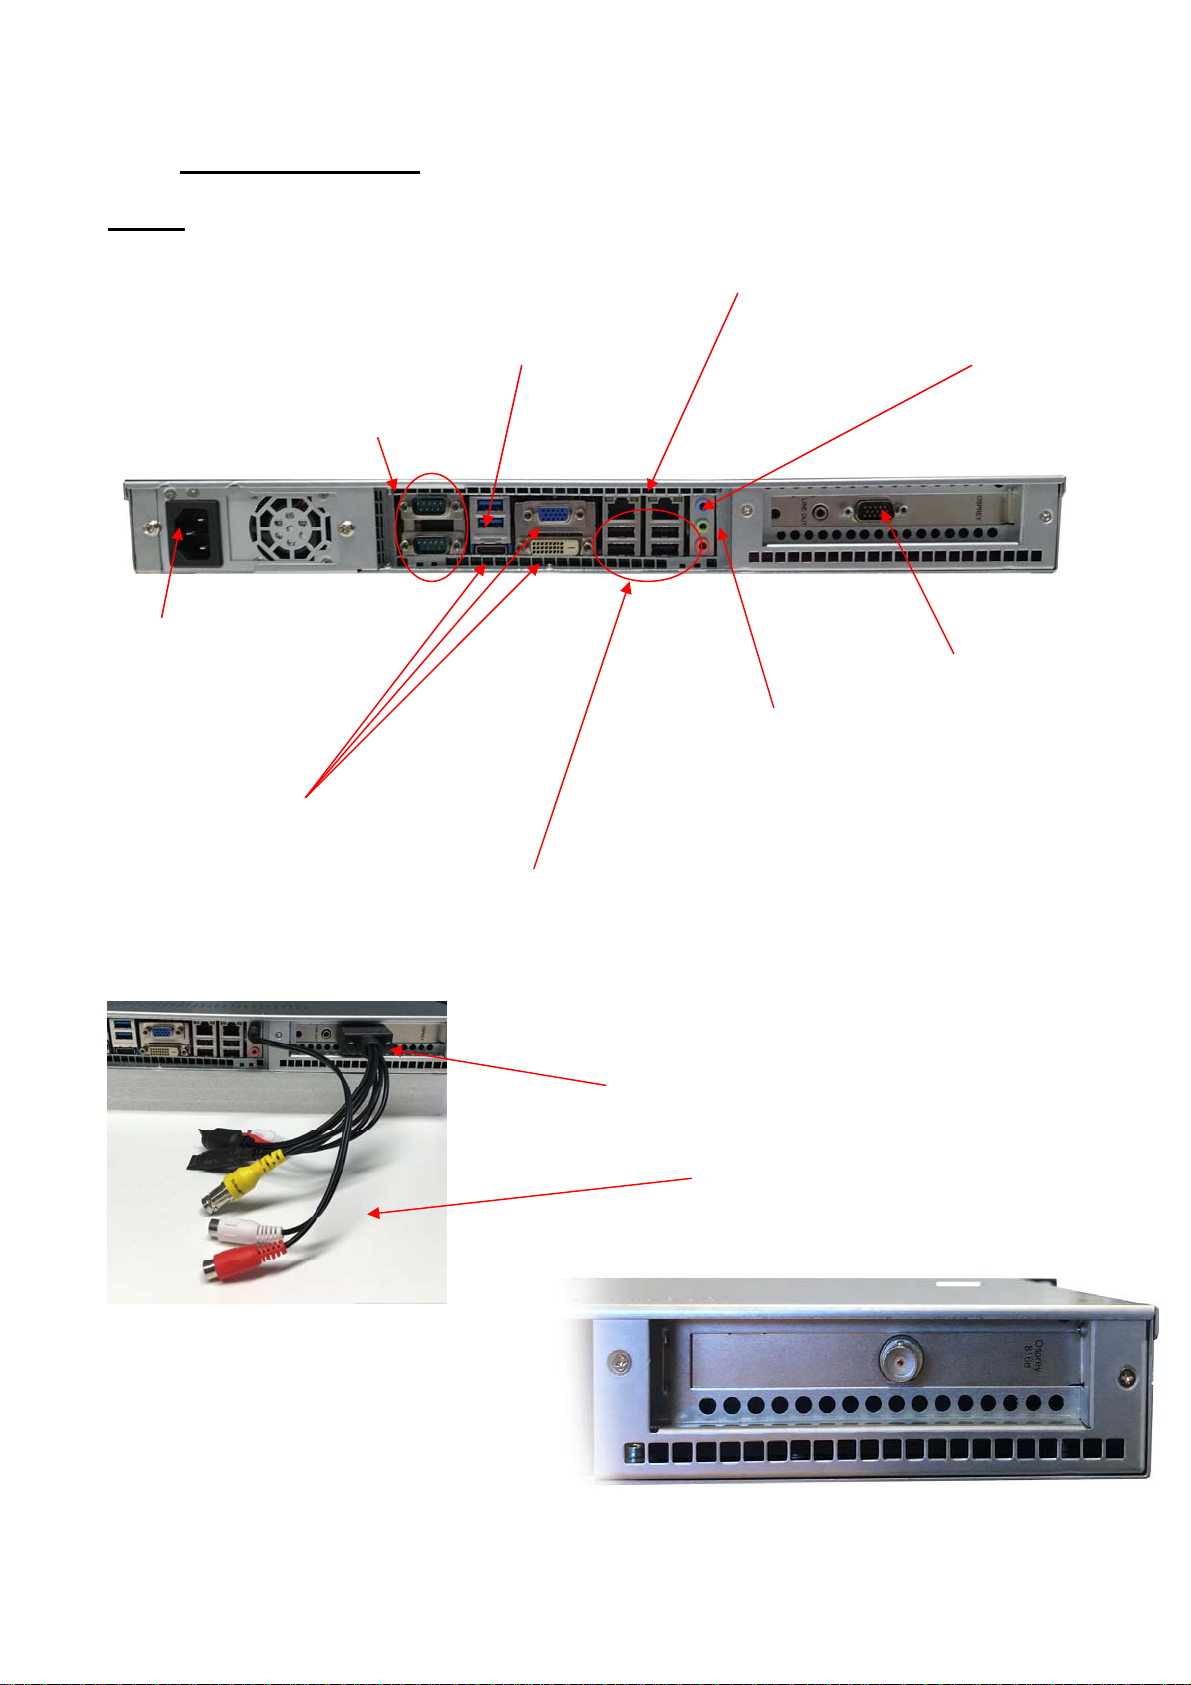
2.2 Back of the unit
1U Unit
LAN
connection
Video input via
adapter cable
supplied
Connections for
monitor – choice of 3
types (HDMI, DVI-D,
analogue VGA)
Blue = audio
recording input
(line in)
Green = audio out
speakers / headphones
Pink = Mic. in
Mains power
cable socket
4x USB 2.0 sockets (2
required for keyboPO
3125ard / mouse
2x USB 3.0
sockets
2 serial
p
o
r
ts
Supplied adapter installed
– yellow BNC is video
input
Supplied RCA
adapter for audio
recording
HD-SDI input (720 & 1080 support)
NETmc Marine DVR Manual-Rev7.2 Dec 2020 6 of 52
© NETmc Marine Ltd 2020
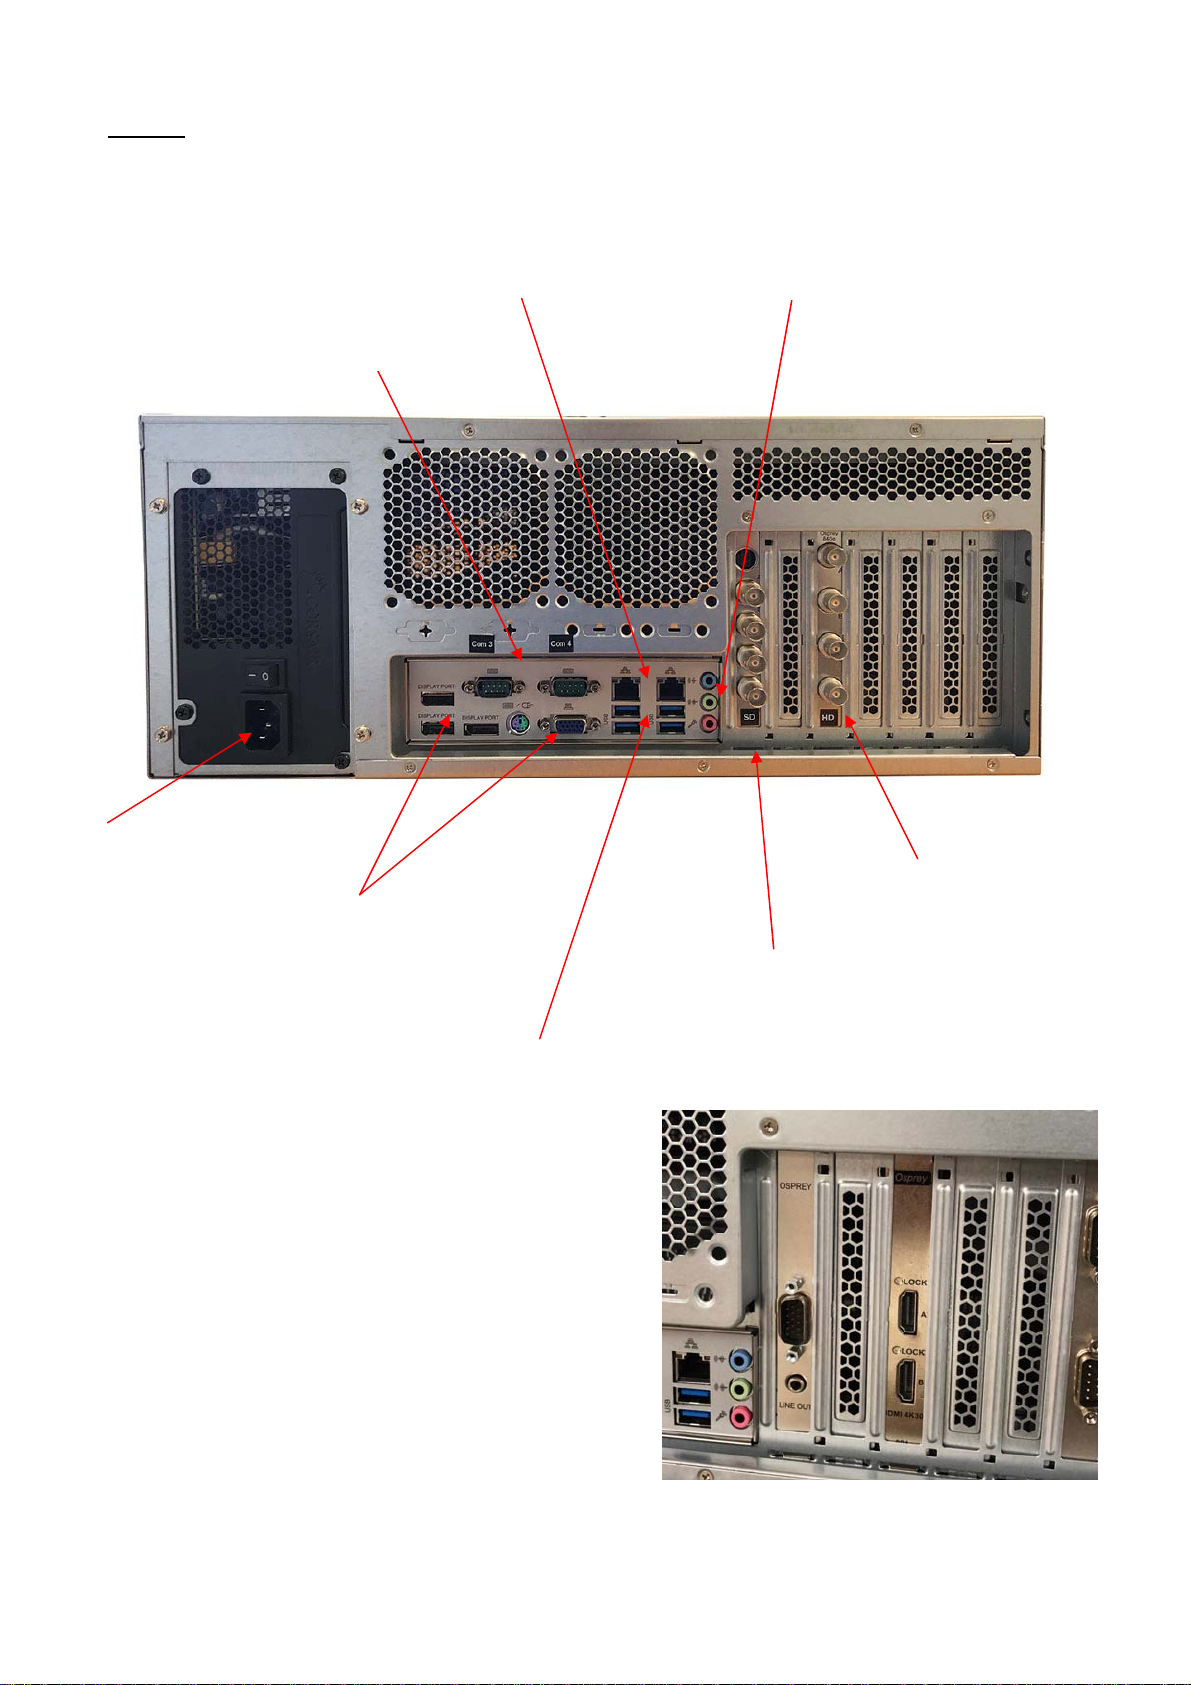
4U Unit
High Definition
inputs (HD-SDI) –
Input 1 at the top
(optional)
Connections for
monitor – VGA or
display port
Blue = audio recording
input (line in)
Green = audio out
speakers / headphones
Pink = Mic. in
Standard Definition
inputs (composite video)
– Input 1 at the top
Mains power
cable socket
4x USB 2.0 sockets (2
required for keyboard /
mouse
LAN
connections
2 serial
p
orts
HDMI input (720 & 1080 support)
NETmc Marine DVR Manual-Rev7.2 Dec 2020 7 of 52
© NETmc Marine Ltd 2020
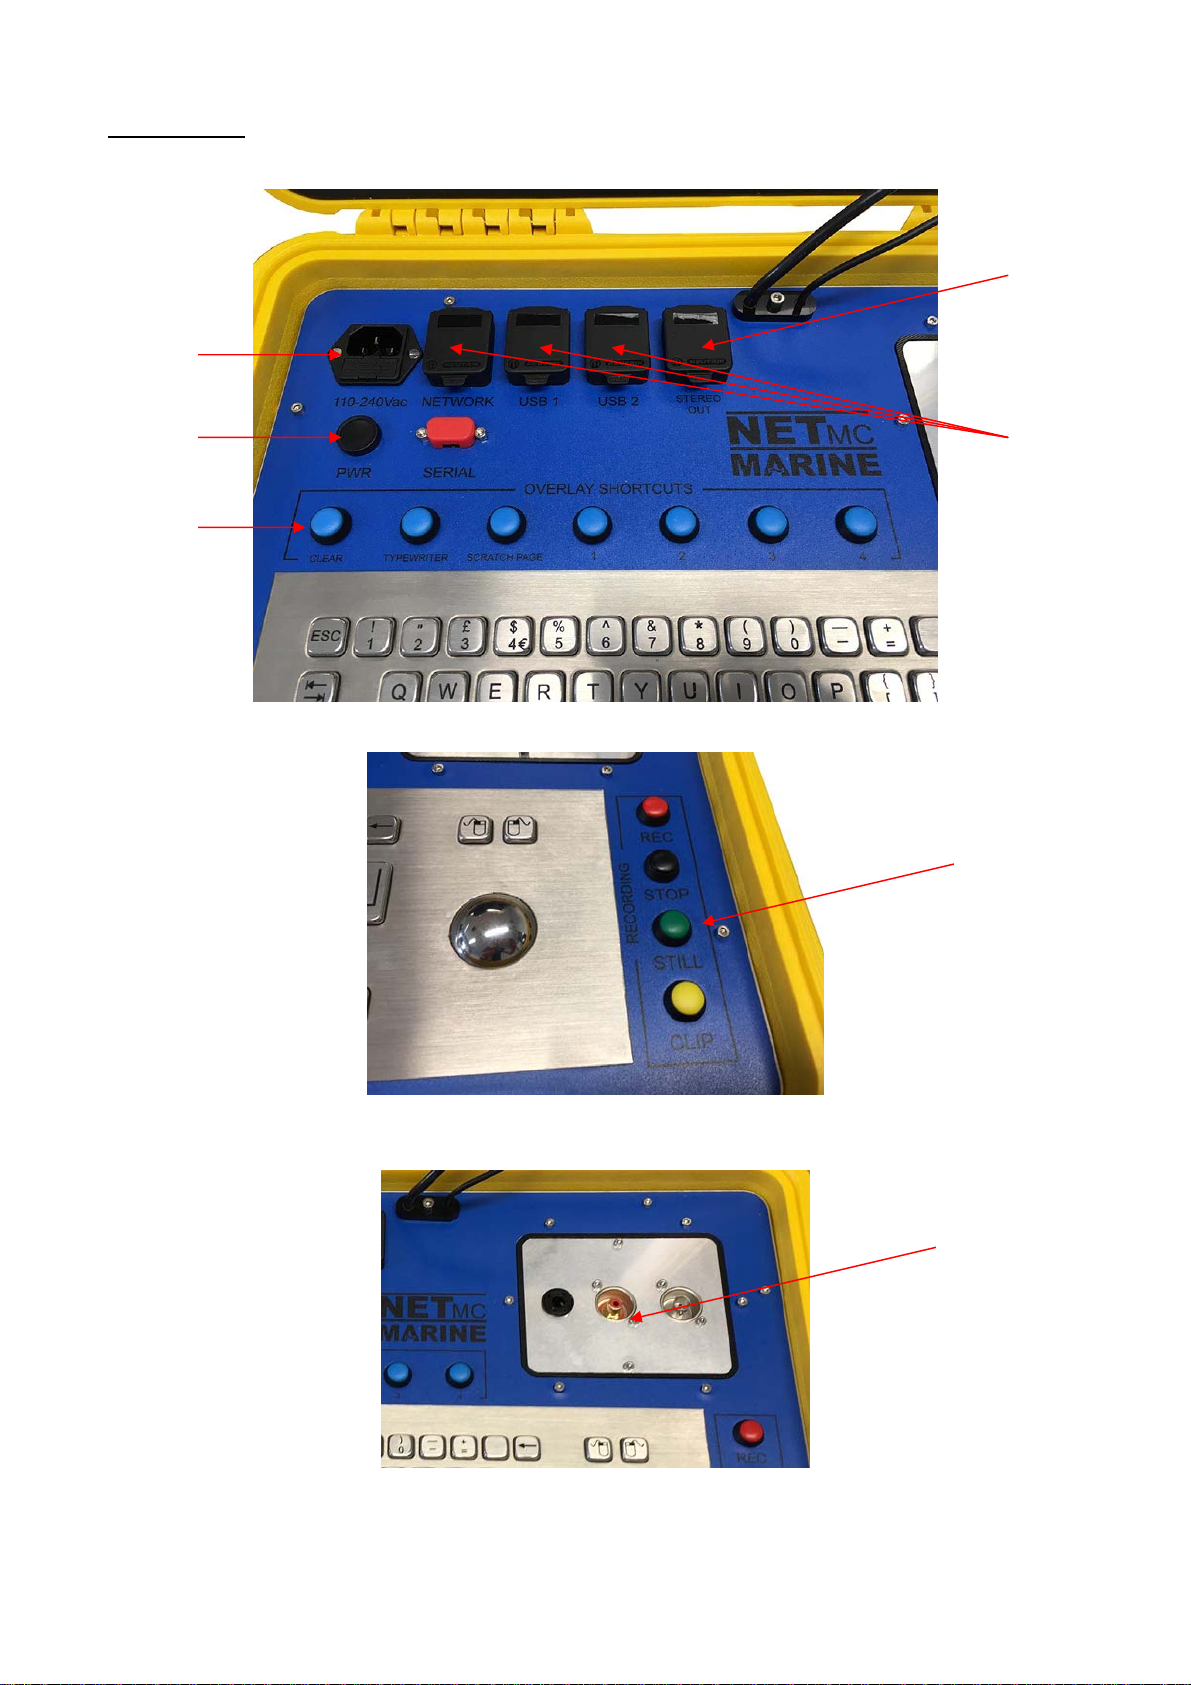
Pelicase Unit
** as the unit is air-tight, the metal panels will act as heatsinks and will get warm during operation **
Mains input
(110/240)
Power On
Overlay
keyboard
controls
PC audio out
–
headphones
etc
PC I/O
Recording
control
shortcut
keys –
alternative
to using the
trackerball
or mouse –
ideal if
wearing
gloves.
Client specific
I/O panel –
connectors
depend on
ordered
specification /
video type etc

NETmc Marine DVR Manual-Rev7.2 Dec 2020 8 of 52
© NETmc Marine Ltd 2020
3. Set-up
It is important to plug in all video and audio connections before
switching on the DVR.
THIS EQUIPMENT MUST BE EARTHED.
1. Mount the DVR in a suitable rack mount system.
2. Connect the power supply. Note: this unit must be earthed. Note (2): we highly
recommend connection to a UPS (uninterruptible power supply) to prevent data loss.
3. Connect keyboard / mouse / monitor
4. Connect video / audio signals.
5. Power up the unit
6. Launch NETmc software from desktop icon.
7. Live video images should be displayed on screen.

NETmc Marine DVR Manual-Rev7.2 Dec 2020 9 of 52
© NETmc Marine Ltd 2020
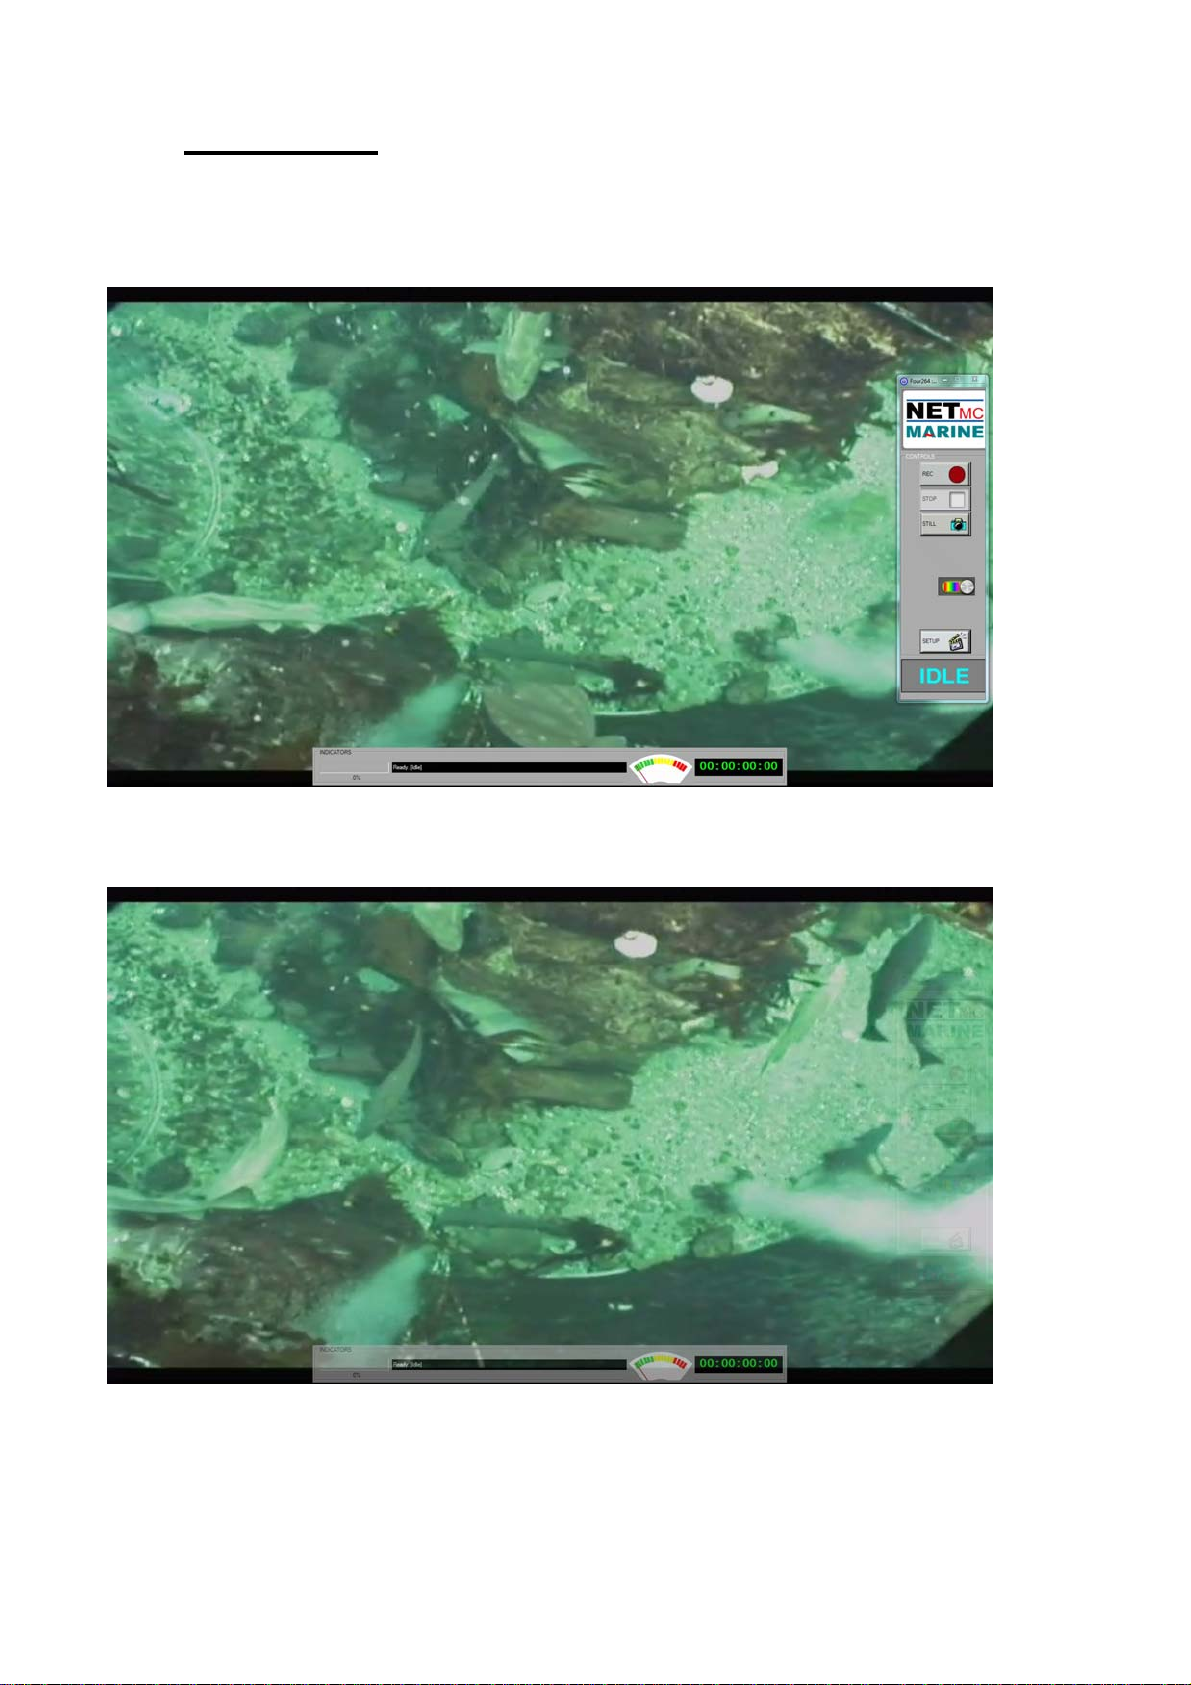
4. Operation
A shortcut on the desktop will launch the software which controls the DVR
Once the program has started, the operation controls are displayed.
From here the user can start and stop recording, take still images (snapshots) and/ or video clips
and enter the set-up screen.
Drive Capacity
Note that this display changes colour according to how much disk space is free:
The display is:
Time Encoded
This Session
Start Recording
Stop Recording
Take Snapshot /
Still Image Grab
Enter Setup
Recording
Status Indicator
Drive Capacity
Indicato
r

NETmc Marine DVR Manual-Rev7.2 Dec 2020 10 of 52
© NETmc Marine Ltd 2020
Green if more than 25% of the disk is free.
Orange if between 10% and 25% of the disk is free
Red if less than 10% of the disk is free.
To start the recording, simply click on the REC button.
When recording has started, the status indicator changes to “REC” instead of “IDLE”, the REC
button will become depressed and the minute counter will start to increment.
The image on the screen shows the video signal that is being input to the DVR.
Once the desired footage has been recorded, simply click on the STOP button to end recording.
At any point during the recording or preview, the image on the screen can be saved as a jpg file by
clicking the STILL button.
To resume logging, simply click the REC button again.
The system will automatically create a new file, automatically named as per the configuration in the
SETUP page.
If audio has been lost or disconnected from the system a warning will appear on screen.
After correcting the problem click on the red warning to re-enable audio and continue. If no audio is
required, no action needed.

NETmc Marine DVR Manual-Rev7.2 Dec 2020 11 of 52
© NETmc Marine Ltd 2020
In composite video input models, the system will auto detect PAL or NTSC. Due to the different
picture size and frame rates, a switch during recording will cause replay issues – so the system will
prompt the user to the format change with the a red warning message. Clicking on this message
gives the user to continue on and risk file replay issues – or stop/start the recorder so a new file is
started with the new format.
Pelicase units have push-button shortcuts to make the unit easier to operate while wearing gloves
or in a moving environment where using the trackerball / mouse is difficult.
These buttons control the base functions of record, stop, still image grab, clip start/stop
#
The overlay controls are also brought out to push-buttons, to clear screen, switch between saved
pages and bring up the text entry box (typrewriter)
All these push-buttons (overlay and control) are only active when the NETmc recording software is
the active software application.
The active application will have red shaded close (x) button in the top right corner. Clicking
anywhere on an application should bring it to being the active one.
These buttons
control the base
functions of
record, stop, still
image grab, clip
start/stop
NETmc Marine DVR Manual-Rev7.2 Dec 2020 12 of 52
© NETmc Marine Ltd 2020
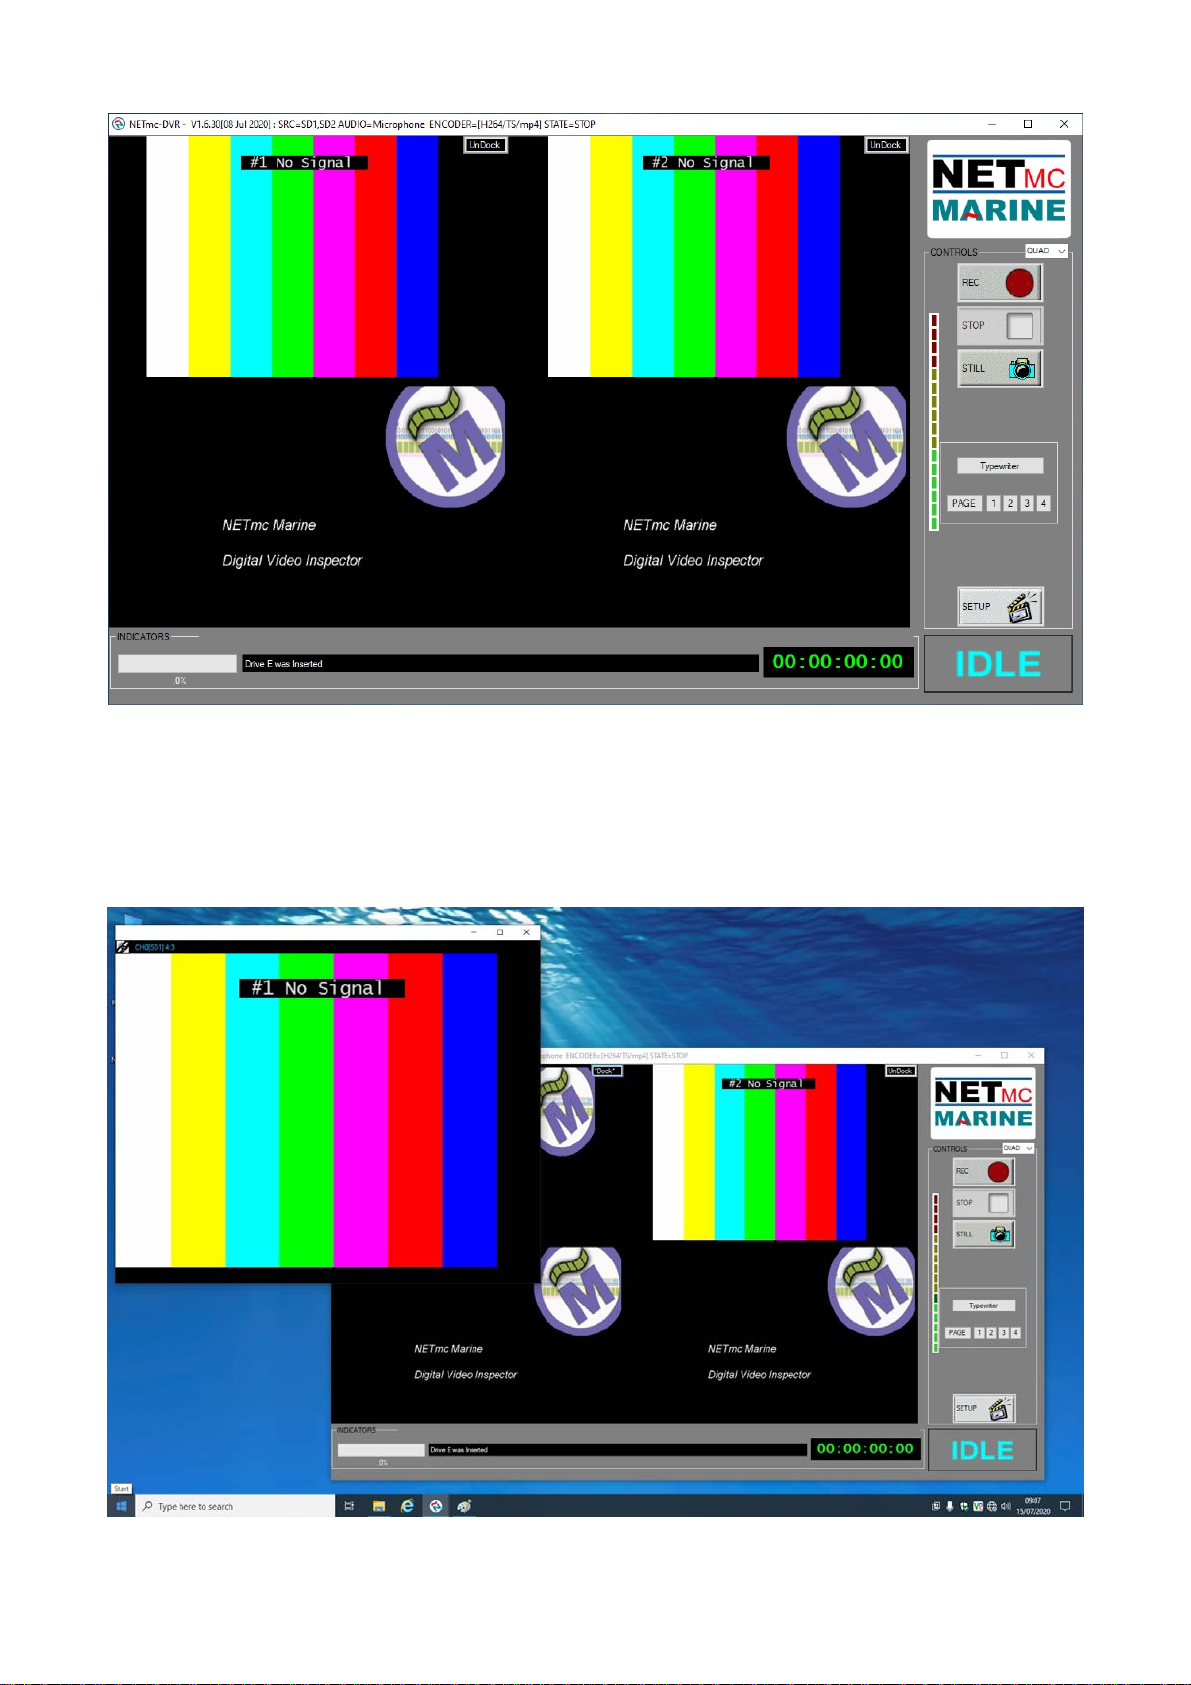
If multi monitors are being used – it may be beneficial if one or more of the live video feeds be
detached from the main software app and moved around and resized.
If supported / enabled, the UnDock button will be visible on each live video frame
Clicking UnDock will pull the video out so it can be moved around independently

NETmc Marine DVR Manual-Rev7.2 Dec 2020 13 of 52
© NETmc Marine Ltd 2020
Hitting Esc key or closing the UnDocked window will put it back where it came from in the main app.
In the top left of the UnDocked video window is some information.
The Blue text tells you what channel and source its from and its aspect ratio
The linking icon is used to force the aspect ratio of the UnDocked video - - it might seem like a good
idea to stretch out the video to match your connected monitor – but it might be distorting the detail of
the image (making circles oval etc) – if it doubt – click the control in the corner and see the video
jump to its correct proportions
NETmc Marine DVR Manual-Rev7.2 Dec 2020 14 of 52
© NETmc Marine Ltd 2020
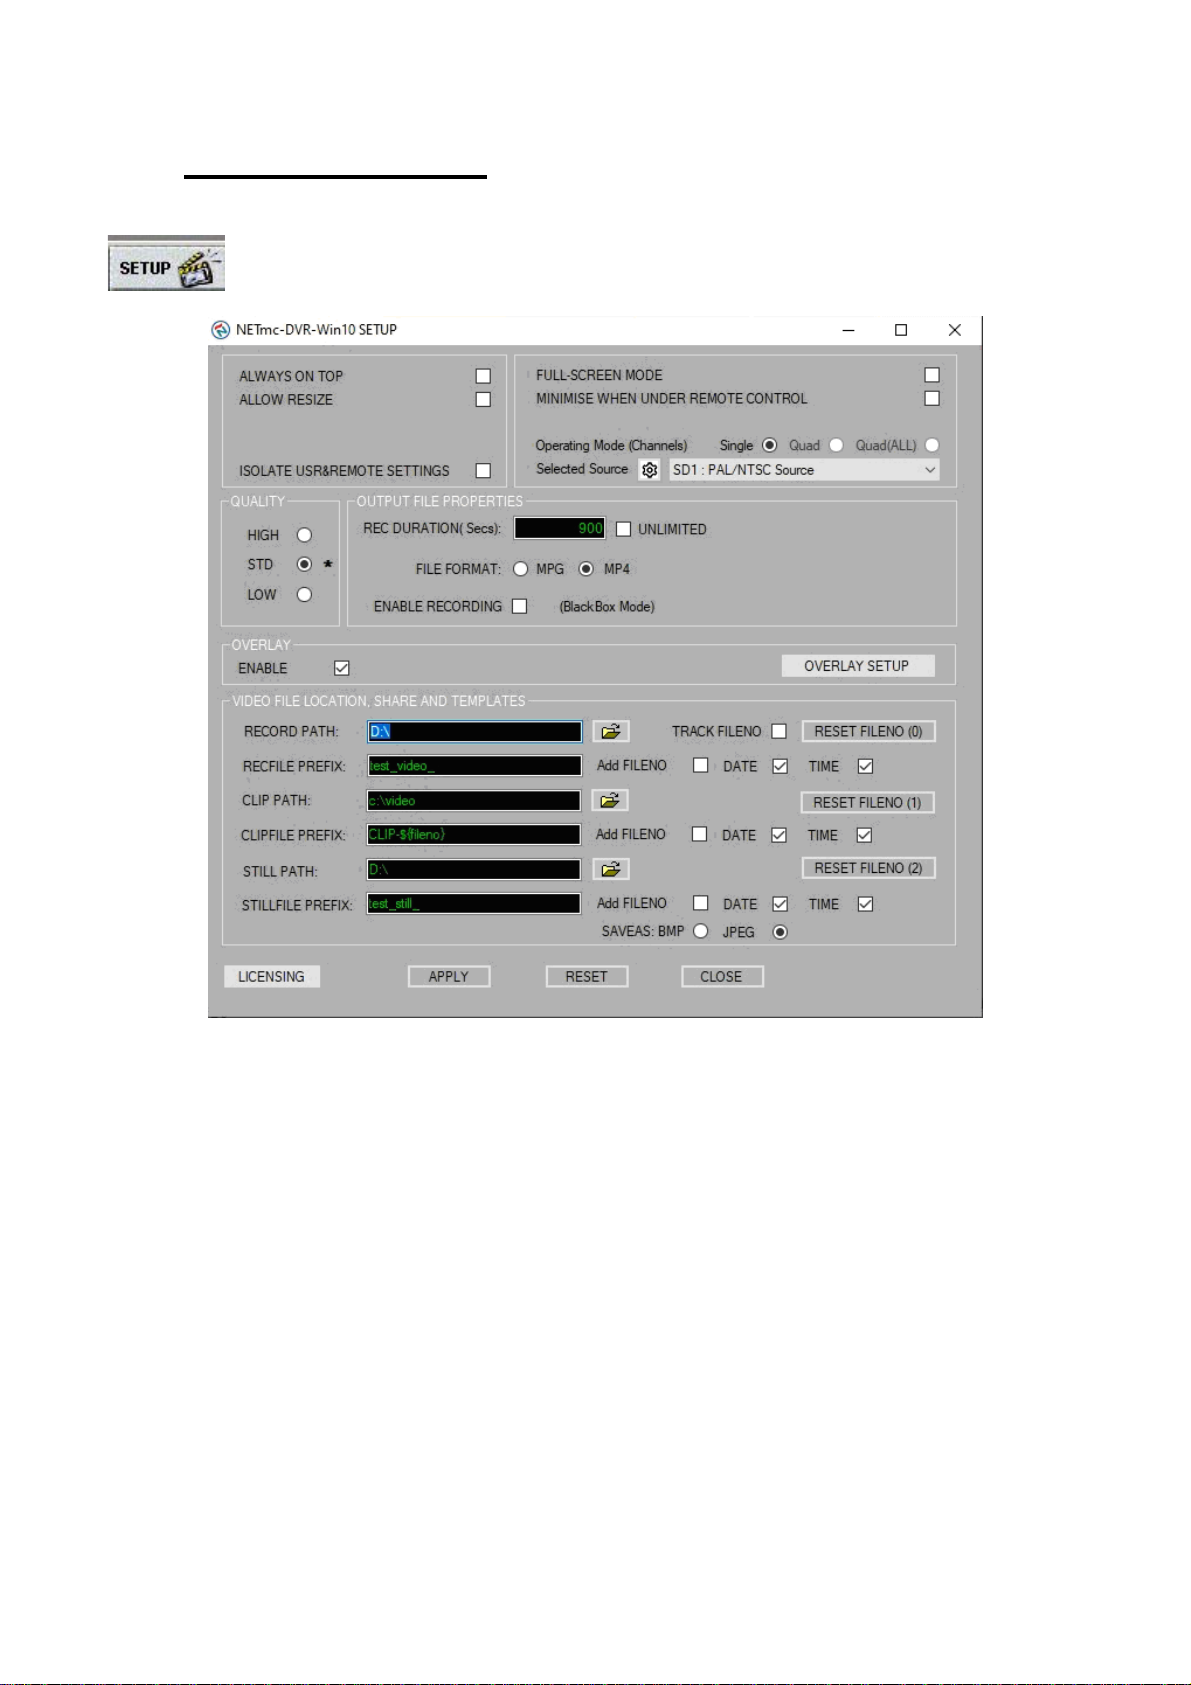
5. Software Settings
Click on the Setup icon to access the set-up page.
In the set-up page the user can select:
- ALWAYS ON TOP (if another window is opened it will always be behind, not covering, the
DVR software)
- ALLOW RESIZE (lets the user stretch or shrink the software to fit chosen monitor)
- ISSOLATE USER & REMOTE SETTINGS (keeps 2 sets of file names and paths in memory
– those get in the setup page by the user and those set remotely by 3rd party software e.g.
Coabis. Can be useful is switching between manual and remote control use)
- FULL-SCREEN MODE (makes the video image the full size of the monitor, with the record
controls floating on top – the option appears to have these floating controls disappear after a
time and come back when the mouse is moved. Can be useful when duplicating the screen
for distribution
- Operating mode (when licensed for multi channel – switches between single, quad and all
sources on screen)
- Selected source (there may be more channels available then the unit is licensed for – this
allows the selection of which sources to use)
- video quality (by experiment / customer specification)
- REC Duration (files are automatically cut into segments – this selects the size of segment)
- UNLIMITED (over rides the auto segment and creates one file – use with caution as big files
may not be playable !)

NETmc Marine DVR Manual-Rev7.2 Dec 2020 15 of 52
© NETmc Marine Ltd 2020
- File Format (the DVR outputs mpeg4 so MP4 should be the default – but MPG has been
included for compatibility with older systems and client requirements
- ENABLE RECORDING (if Blackbox has been licensed, this will be visible – tick the box to
ensure that Blackbox recording starts as soon as the software is open)
- OVERLAY (if overlay is licensed, if can be switched on / off from here)
- OVERLAY SETUP (if overlay is licensed, the OVERLAY control and setup pages can be
accessed here too)
- RECORD PATH (location of where the main recording files are to be saved)
- RECFILE PREFIX (what the files should be called)
- ADD FileNO / DATE / TIME (tick to add any of these items after your prefix name – when
recording manually – we recommend always adding date and time)
- TRACK FILENO (during recording, a new segment can be given a number which counts up
with each new segment – enabling TRACK continues the count from where it left off –
disable will start a fresh number count every time record is pressed)
- RESET FILENO (these buttons will reset the count number back to 0)
- CLIP PATH (if licensed, this is the location to save the additional video clip files which are
controlled by the CLIP button on the main page)
- CLIP PREFIX (what the clip files should be called)
- ADD FileNO / DATE / TIME (tick to add any of these items after your prefix name – when
recording manually – we recommend always adding date and time)
- STILL PATH (this is the location to save the video grab files)
- STILL PREFIX (what the still grab files should be called)
- ADD FileNO / DATE / TIME (tick to add any of these items after your prefix name – when
recording manually – we recommend always adding date and time)
- SAVEAS BMP / JPG (sets the format of the Still image grabs – jpg are compressed which
might impact on quality but will be smaller and easier to email
ALWAYS remember to apply or
the changes won’t be saved.
NETmc Marine DVR Manual-Rev7.2 Dec 2020 16 of 52
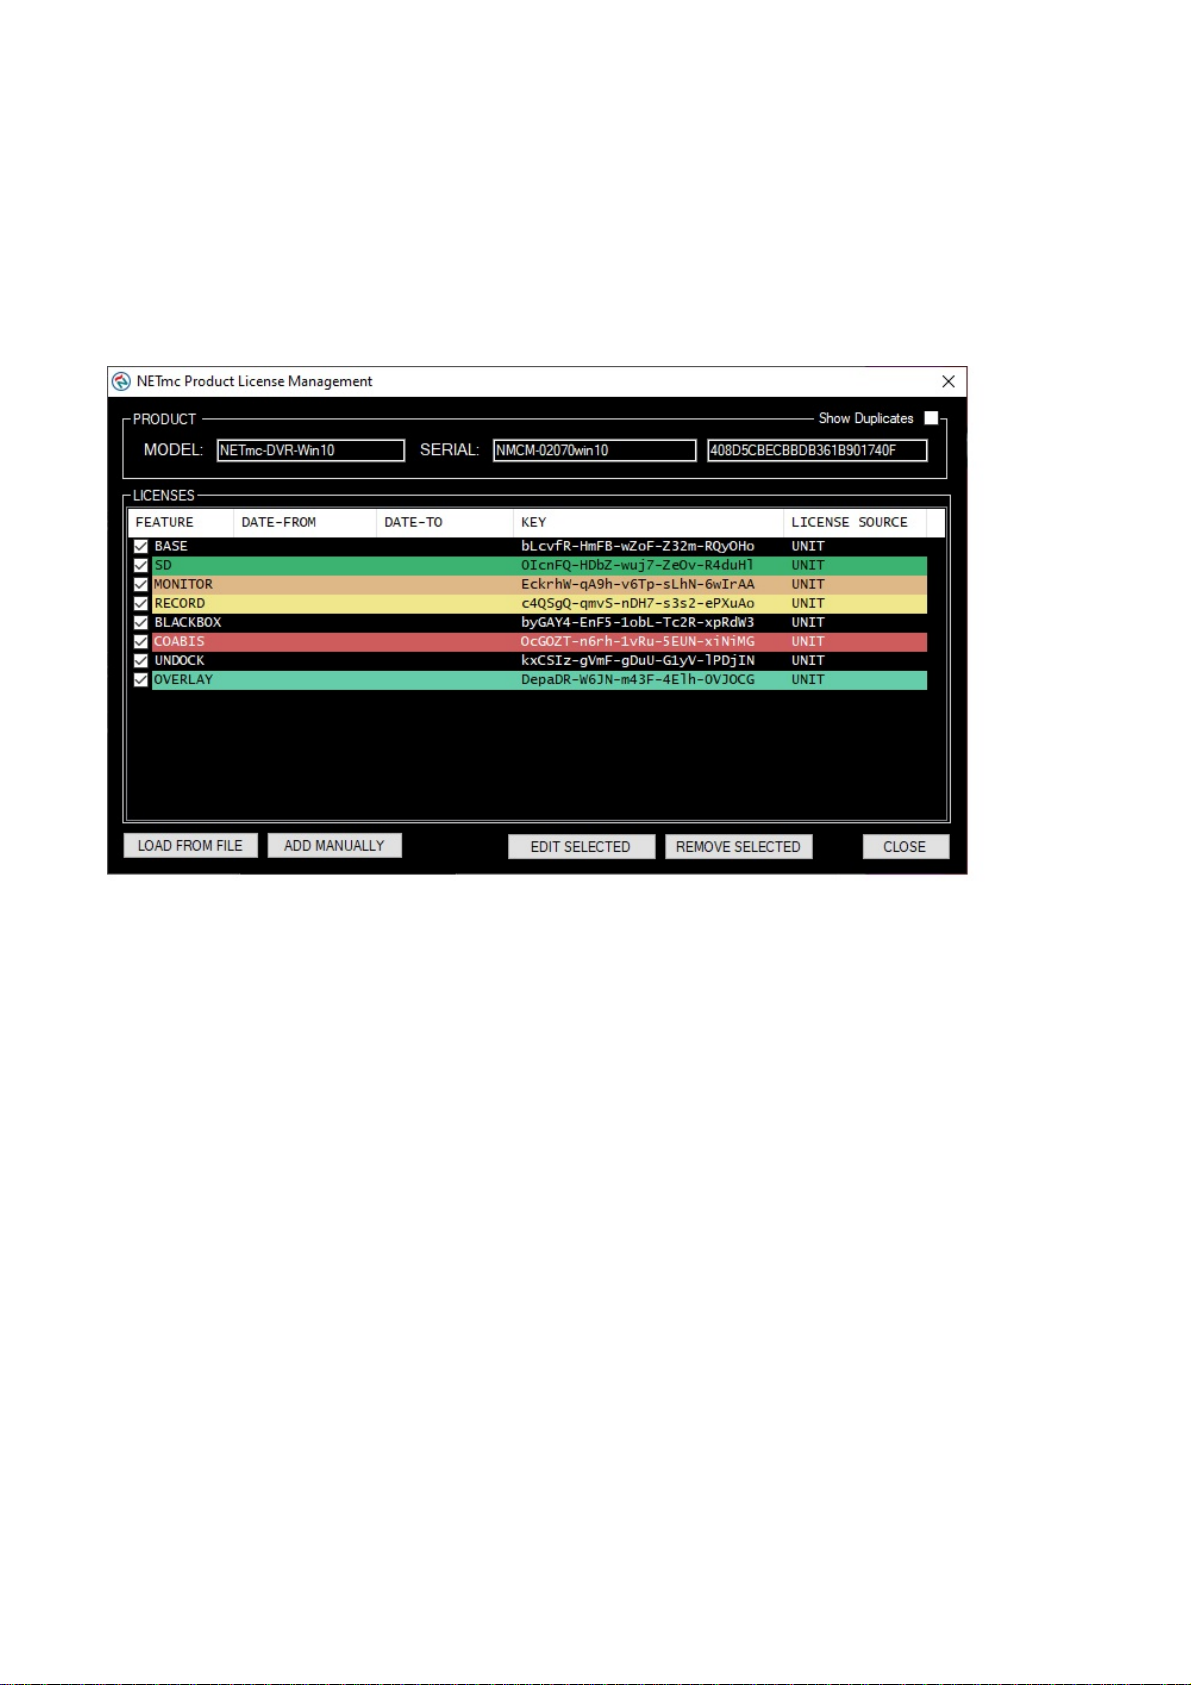
© NETmc Marine Ltd 2020
Features and options are enabled / disabled by license. Options purchased never have to be
renewed (there are no on going costs). Options can be purchased at any time and are enabled by
license code.
Options can also be rented – this is also done via license code.
When a license is issued, it can be installed in the system via the ‘LICENSING’ button in the setup
page.
Most often, a license file will be emailed out and the ‘load from file’ option used to install that license
/ new feature.

NETmc Marine DVR Manual-Rev7.2 Dec 2020 17 of 52
© NETmc Marine Ltd 2020
6. File Save Setup
1. Location the video will be saved to.
2. Name of the video when it is saved.
3. Location the video stills/grabs will be saved to.
4. Name of the video still/grabs when they are saved.
5. Clicking this button will open a “Browse For Folder” window which will allow the user to
select a file save location for recorded video.
6. Clicking this button will open a “Browse For Folder” window which will allow the user to
select a file save location for still/grabs.
7. Ticking these boxes will add time/date to the file name.
It is strongly recommended to do this as it ensures that all files will have unique names.
Example file save path: V:\Video\LiveVideo\GRABS\Client\FW1\Flange4
1.
2.
3.
4.
5.
6. 7.
NETmc Marine DVR Manual-Rev7.2 Dec 2020 18 of 52
© NETmc Marine Ltd 2020
7. Full Screen
In the setup page, the user can select FULL-SCREEN MODE.
This displays the video in the largest possible size with the control buttons and indicators floating on
top.
In full screen, the controls can be set to be more transparent when idle.
This is configured in the setup page by clicking on SETUP FADEIN/OUT

NETmc Marine DVR Manual-Rev7.2 Dec 2020 19 of 52
© NETmc Marine Ltd 2020
If the controls appear lost, use ALT + TAB to bring them back to the top.

NETmc Marine DVR Manual-Rev7.2 Dec 2020 20 of 52
© NETmc Marine Ltd 2020
8. Overlay
If the overlay option has been licensed, extra buttons will appear on the user interface
The OVERLAY option opens the interface below: allows basic overlay typing of headers and titles –
as well as a locally generate date and clock.
4 saved pages can be created with different text layouts (e.g. regular running overlay, dive headers,
anomaly found etc) – these can be switched between while recording by clicking 1,2,3,4 on the main
software page (above).
Favourite overlay setups can be loaded and saved by using the ‘select template’ and ‘SaveAs’
buttons.
CLEAR will clear the live overlay of any text
Send 2 OVL pushes any changes you have made on the green screen area to the live overlay
where it may be recorded.
Page [0] is the ‘live’ base overlay page
Page [1], [2], [3], [4] are additional saved pages which can be recalled during recording
Table of contents
Other NETmc Marine Recording Equipment manuals


