Netscout LinkRunner AT 1000 User manual

Released 04/2017
Copyright © 2017 NETSCOUT SYSTEMS, Inc. All rights reserved.
All product names are trademarks of their respective companies.
LinkRunner™AT 1000/2000
Network Auto-Tester
User Manual

LEGAL NOTIFICATION
Use of this product is subject to the NETSCOUT SYSTEMS, INC (“NETSCOUT”) End User License Agreement available at
http://enterprise.netscout.com/EULA or which accompanies the product at the time of shipment or, if applicable, the legal agreement
executed by and between NETSCOUT SYSTEMS, INC., and the purchaser of this product ("Agreement").
Government Use and Notice of Restricted Rights: In U.S. government ("Government") contracts or subcontracts, Customer will provide
that the Products and Documentation, including any technical data (collectively "Materials"), sold or delivered pursuant to this Agreement
for Government use are commercial as defined in Federal Acquisition Regulation ("FAR") 2.101and any supplement and further are
provided with RESTRICTED RIGHTS. All Materials were fully developed at private expense. Use, duplication, release, modification, transfer,
or disclosure ("Use") of the Materials is restricted by the terms of this Agreement and further restricted in accordance with FAR 52.227-14
for civilian Government agency purposes and 252.227-7015 of the Defense Federal Acquisition Regulations Supplement ("DFARS") for
military Government agency purposes, or the similar acquisition regulations of other applicable Government organizations, as applicable
and amended. The Use of Materials is restricted by the terms of this Agreement, and, in accordance with DFARS Section 227.7202 and FAR
Section 12.212, is further restricted in accordance with the terms of NETSCOUT's commercial End User License Agreement. All other Use is
prohibited, except as described herein.
This Product may contain third-party technology. NETSCOUT may license such third-party technology and documentation ("Third-Party
Materials") for use with the Product only. In the event the Product contains Third-Party Materials, or in the event you have the option to
use the Product in conjunction with Third-Party Materials (as identified by NETSCOUT in the applicable Documentation), then such third-
party materials are provided or accessible subject to the applicable third-party terms and conditions contained in the "Read Me" or
"About" file located on the Application CD for this Product. To the extent the Product includes Third-Party Materials licensed to NETSCOUT
by third parties, those third parties are third-party beneficiaries of, and may enforce, the applicable provisions of such third-party terms
and conditions.
Open-Source Software Acknowledgment: This product may incorporate open-source components that are governed by the GNU General
Public License ("GPL") or licenses that are compatible with the GPL license ("GPL Compatible License"). In accordance with the terms of the
GNU GPL, NETSCOUT will make available a complete, machine-readable copy of the source code components of this product covered by
the GPL or applicable GPL Compatible License, if any, upon receipt of a written request. Please identify the product and send a request to:
NETSCOUT SYSTEMS, INC.
GNU GPL Source Code Request
310 Littleton Road
Westford, MA 01886
Attn: Legal Department
NETSCOUT SYSTEMS, INC. reserves the right, at its sole discretion, to make changes at any time in its technical information, specifications,
service, and support programs.
Rev. 04/06/2016

i
Contents
Title Page
I. Introduction ..................................................................................................................................................1
Link-Live Cloud Service ....................................................................................................................................................1
LinkRunner Manager ........................................................................................................................................................1
About this Manual ............................................................................................................................................................1
The NETSCOUT Website ..................................................................................................................................................2
Register Your Product ......................................................................................................................................................2
Contact NETSCOUT ...........................................................................................................................................................2
Safety Information ............................................................................................................................................................2
Cleaning the Tester ..........................................................................................................................................................3
Kit Package Contents .......................................................................................................................................................3
II. Physical Features ........................................................................................................................................4
Battery Charging and Life ................................................................................................................................................5
Maintenance .....................................................................................................................................................................7
Accessories ........................................................................................................................................................................7

ii
III. The Home Screen ....................................................................................................................................... 8
IV. Common Questions LinkRunner AT Can Answer ...................................................................................9
V. Link-Live Cloud Service .............................................................................................................................. 11
VI. Setting Up the Tester ................................................................................................................................. 12
IP Configuration ............................................................................................................................................................... 12
VLAN/MAC/Proxy Configuration .................................................................................................................................... 13
AutoTest Configuration ................................................................................................................................................... 14
PoE Configuration ............................................................................................................................................................ 14
Connect Configuration .................................................................................................................................................... 15
General Configuration ..................................................................................................................................................... 15
Reflector Configuration (Model 2000 only) ................................................................................................................... 16
VII. Additional LinkRunner Tools .................................................................................................................... 17
LinkRunner Information .................................................................................................................................................. 17
Manage Files ..................................................................................................................................................................... 17
Restore Factory Defaults ................................................................................................................................................. 18
Update Firmware ............................................................................................................................................................. 19
Transfer Saved Profiles to/from LinkRunner Manager ............................................................................................... 20
Set Language .................................................................................................................................................................... 20
VIII. Using AutoTest, Switch, and Cable Test .................................................................................................. 21
Using AutoTest ................................................................................................................................................................. 21
Using the Nearest Switch Test ........................................................................................................................................ 22
Using the Cable Test ........................................................................................................................................................ 22

iii
IX. Using the PoE Feature ............................................................................................................................... 23
X. Using the Reflector Feature (Model 2000 only) ...................................................................................... 27
XI. Using the Fiber Connection (Model 2000 only) ....................................................................................... 27
XII. Saving a Report ........................................................................................................................................... 28
XIII. Specifications .............................................................................................................................................. 29
Environmental Specifications ......................................................................................................................................... 29
General Specifications ..................................................................................................................................................... 30
LinkRunner Manager Software ...................................................................................................................................... 31

iv
List of Figures
Figure Page
1. Physical Features of LinkRunner AT.......................................................................................................................... 4
2. How to Remove/Replace the Batteries..................................................................................................................... 6
3. The Home Screen ....................................................................................................................................................... 8
4. Tools Menu................................................................................................................................................................... 12
5. IP Configuration Screen.............................................................................................................................................. 12
6. VLAN/MAC/Proxy Configuration Screen ................................................................................................................... 13
7. AutoTest Configuration Screen.................................................................................................................................. 14
8. PoE Configuration Screen........................................................................................................................................... 14
9. Connect Configuration Screen................................................................................................................................... 15
10. General Configuration Screen ................................................................................................................................... 15
11. Reflector Settings Screen............................................................................................................................................ 16
12. Reflector Default Configuration Screen.................................................................................................................... 16
13. LinkRunner Information Screen with Connected Fiber Adapter ........................................................................... 17
14. AutoTest Configuration Screen.................................................................................................................................. 21
15. AutoTest Results Screen ............................................................................................................................................. 21
16. Expanded Test Results................................................................................................................................................ 21

v
17. Nearest Switch Results................................................................................................................................................22
18. Cable Test Results........................................................................................................................................................22
19. PoE Configuration on LR-AT model 1000..................................................................................................................23
20. PoE Configuration on LR-AT model 2000..................................................................................................................23
21. AutoTest results - PoE without TruePower...............................................................................................................24
22. Switch - PoE without TruePower................................................................................................................................24
23. AutoTest results - PoE with TruePower.....................................................................................................................25
24. Switch - PoE with TruePower......................................................................................................................................25
25. AutoTest results - PoE with TruePower and Measured Load.................................................................................26
26. Reflector Mode Screen ................................................................................................................................................27
27. Fiber Connected Switch Results.................................................................................................................................27

LinkRunner AT 1000/2000
Network Auto-Tester
I. INTRODUCTION
LinkRunner AT 1000/2000 Network Auto-Tester enables
quick verification of Ethernet copper and fiber (2000 model
only) cables as well as network connectivity and availability.
The tester also identifies the network device to which it is
connected, measures and displays PoE voltage and
configuration, generates reports, and serves as a packet
reflector for performance tests conducted with other
NETSCOUT products.
The included Link-Live Cloud Service provides automated
reporting and options for organizing test results while the
LinkRunner Manager application allows you to save custom
test profiles, manually load results, and update firmware.
Link-Live Cloud Service
The Link-Live Cloud Service is a free, online system for
collecting, tracking, and organizing your test results, which
are automatically uploaded to Link-Live once configured.
See “Link-Live Cloud Service,” page 11.
LinkRunner Manager
LinkRunner Manager is a Windows PC application for
updating your LinkRunner AT software, creating profiles,
storing results, and generating reports. You can install
LinkRunner Manager from the included CD or download the
app from Link-Live at https://app.link-live.com/downloads.
About this Manual
This User Manual is designed to be easy to navigate on a
screen, with Adobe PDF Bookmarks to the left, and blue
hyperlinks that point to other parts of the manual. Blue
underlined links go to external resources on the internet.
LinkRunner AT 1000/2000 Network Auto-Tester is hereafter
referred to as the LinkRunner AT or LR-AT.

2
The NETSCOUT Website
The NETSCOUT website provides additional documentation,
release notes, software updates, and other resources.
Go to http://enterprise.netscout.com, and click Support.
Register Your Product
Registering your product with NETSCOUT gives you access to
valuable information on product updates, troubleshooting
procedures, and other services. To register, create an
account, and then fill out the online form on the NETSCOUT
website at enterprise.netscout.com/register.
Contact NETSCOUT
Online: http://enterprise.netscout.com
Email: CustomerCare@netscout.com
Phone: Toll-free 1-844-833-3713;
International 1-987-320-2150
For more phone numbers, go to our website.
Safety Information
Table 1 gives descriptions of the safety symbols used on the
Tester and in this manual.
Table 1. Safety Symbols
Warning or Caution: Risk of damage to or
destruction of equipment or software.
Warning: Risk of electrical shock.
NOT FOR CONNECTION TO PUBLIC
TELEPHONE SYSTEMS
CANADIAN STANDARDS ASSOCIATION
CERTIFIED TO CANADIAN AND US STANDARDS
This product complies with the WEEE
Directive marking requirements. The affixed
label indicates that you must not discard this
electrical/electronic product in domestic
household waste.
Product Category: With reference to the
equipment types in the WEEE Directive Annex
I, this product is classed as category 9
“Monitoring and Control Instrumentation”
product. Do not dispose of this product as
unsorted municipal waste.

3
Warnings
Use only the AC adapter provided to charge the
battery.
To avoid possible electric shock or personal injury,
follow these guidelines:
Do not use this product if it is damaged. Before
using the product, inspect the case. Look for
cracked or missing plastic.
Do not operate the product around explosive
gas, vapor or dust.
No serviceable parts.
Do not try to service.
If this product is used in a manner not specified
by the manufacturer, the protection provided
by the product may be impaired.
Warning Class 1 Laser Product
With an optional SFP fiber adapter installed, this
product will contain a Class 1 laser. Do not look into
the laser port because this may cause eye injury.
Cautions
Use the proper terminals and cable for all
connections.
Cleaning the Tester
To clean the display, use a lens cleaner and a soft, lint-free
cloth. To clean the case, use a soft cloth that is moist with
water or a weak soap.
Caution
To prevent damage to the display or the case, do not
use solvents or abrasive materials.
Kit Package Contents
For a listing of the contents of your LinkRunner AT package,
see the list that came in the product's box, or see the lists of
models and accessories at enterprise.netscout.com/
linkrunner; select MODELS & ACCESSORIES at the top of the
page. If something is damaged or missing, contact the place
of purchase immediately.
Meets Australia EMC Requirements.
CLASS 1 LASER PRODUCT. DO NOT LOOK
INTO LASER

Physical Features
4
II. PHYSICAL FEATURES
Figure 1. Physical Features of LinkRunner AT
On/off key.
Makes a selection on the screen.
Shows the previous screen.
Softkeys. The function of the softkey
is shown above the key.
Cable test wire mapping input.
Connect the cable from the top
Ethernet port to this port to view
the wire map details.
Ethernet 10/100/1000BASE-X port.
Fiber port. Use one of the many
supported SFP adapters to connect
to the network.
Tx/Rx - The LED blinks when the
tester transmits and receives data.
The LED is on when the tester is
linked to the network.
Full-color LCD.
Softkeys. The function of the softkey
is shown above the key.
6
7
8
17
16
15
19
18
9
10
11
12
13
2
3
4
5
1
14

Physical Features
5
Shows the Home screen.
O: Clears the current measurement data.
P: Saves the current measurements data into a report
file, which can be transferred to the LinkRunner Manager
PC application.
NOTE: If you are using Link-Live Cloud Service, results are
automatically uploaded, and you do not need to save
report files manually. See “Link-Live Cloud Service,”
page 11.
Navigation keys. The outer ring of keys (four) perform
the left/right and up/down screen navigation.
Connector for the AC adapter.
USB port for connection to a PC.
Kensington lock slot.
Screw for the battery pack.
The LED turns on when you connect the AC adapter. The
LED is red when the battery is charging and green when
the battery is fully charged.
Battery Charging and Life
LinkRunner AT 1000 model includes a AA battery pack.
LinkRunner AT 2000 model includes a rechargeable Lithium-
ion battery pack.
Additional AA and Li-ion battery packs are available
separately.
To charge the Li-ion battery, connect the AC adapter to the
battery connector (see Figure 1 number ). You can use the
tester while you charge the battery.
When the tester is off, the battery charges in approximately 3
hours. The Li-ion battery life is approximately 6 hours during
typical operation. The AA battery life is approximately 3
hours.
An icon in the upper-left corner of the screen shows the
battery status .
NOTE: Do not leave the Li-ion battery pack in high
temperatures, such as in a car on a sunny day.
The Li-ion battery will not charge if the internal
temperature of the tester is above 113ºF (45ºC).


Physical Features
7
Maintenance
Warning
To prevent possible fire, electrical shock, personal
injury, or damage to the tester:
Do not open the case. You cannot repair or
replace parts in the case.
Use only replacement parts that are approved
by NETSCOUT.
If you replace parts that are not specified as
replacement parts, the warranty will not apply
to the product and you can make the product
dangerous to use.
Use only service centers that are approved by
NETSCOUT.
Accessories
For a complete list of options and accessories visit the
NETSCOUT website at enterprise.netscout.com/linkrunner.
Select MODELS & ACCESSORIES at the top of the page.

The Home Screen
8
III. THE HOME SCREEN
GH
A
C
D
BE
F
I
Figure 3. The Home Screen
Shows the battery status. When the battery
charge is low, the icon blinks. Connect the AC
adapter to charge the battery and to make
sure the tester continues to operate.
Shows that the AC adapter is connected.
Shows that the USB interface is connected.
Switch: Shows the advertised and actual link, PoE
measurements, nearest switch with its name, type, IP
address, port, slot, and VLAN information.
Cable: When the cable is connected un-terminated, or is
connected to a WireViewTM Office Locator, this shows
cable information or wire mapping information. This
feature can also be used to locate a cable with the
optional Fluke Networks* IntelliToneTM Probe.
The name of the tester profile. A profile contains the
tester configuration settings. The default name is
“Untitled”. An asterisk appears to the right of the name if
you have changed a setting on the tester since you
loaded or saved the profile.
AutoTest: Use AutoTest to Ping and connect to selected
targets. Up to 10 targets can be entered as a URL or IPv4/
IPv6 address along with the optional port number. When
no port is specified, a Ping is performed. When the port
is specified, a TCP SYN/ACK is performed. This is also
referred to as a TCP Connectivity test.
Tools lets you manage files and settings.
Link established indicator.
Displays the link speed and duplex mode.
Displays the connection type: PoE , 802.1x , fiber
. For 802.1x, a green lock indicates authentication
passed, yellow indicates it is not needed, and a red
closed lock indicates it failed authentication.
* IntelliTone is a trademark of Fluke Networks.

Common Questions LinkRunner AT Can Answer
9
IV. COMMON QUESTIONS
LINKRUNNER AT CAN ANSWER
First, connect an RJ-45 or fiber cable (2000 model only) from
the network hub or wall plate to the LinkRunner AT RJ-45 LAN
or fiber port. Check the following list of questions and
associated answers to see how LinkRunner AT can help you
get the job done.
Is this a good RJ-45 Ethernet cable?
Use Cable testing and the built in wiremap for patch cables,
or an external WireViewTM Office Locator.
Am I receiving a good fiber signal?
Connect to your network via a SFP adapter and validate the
signal strength and link in the Switch screen.
Where does this RJ-45 cable go?
Use the Cable test toner function, Switch > Flash Port
function, or Switch discovery protocol.
Is this cable hooked up to anything?
Select Switch to identify an open cable, an active link, or an
un-powered network device.
Does this RJ-45 port support PoE?
Use Tools to specify the desired PoE power class and use
Switch or AutoTest to verify the power under load up to
25.5 W (802.3at).
What speed/duplex is this device configured for?
Use Switch to check the advertised and actual speed/duplex.
Additionally, use Tools to test for manual (non-Auto
Negotiated) speed/duplex.
Can I see traffic from this connection?
Observe the utilization LED blinking to see network traffic.
Can I connect in a MAC access control environment?
Use Tools > VLAN/MAC/Proxy Configuration to specify a
user defined MAC address.
Do I have network connectivity?
Select AutoTest to validate key network services (DHCP, DNS,
Router).
Can I get an IPv4 DHCP address?
Select AutoTest. Select DHCP (or enter a static IP address) in
the Tools > IP Configuration menu.
Can I get an IPv6 address?
Enable IPv6 in Tools > IP Configuration. Use AutoTest to
observe the acquired IPv6 link-local and global address.

Common Questions LinkRunner AT Can Answer
10
Can I PING?
Select AutoTest. Configure an address to Ping under Tools >
AutoTest Configuration.
Can I verify application connectivity?
Select AutoTest. Configure an address and application port
(e.g. port 80 for web/HTTP) under Tools > AutoTest
Configuration.
Can I use it for throughput testing?
Use the Reflector tool (setup under Tools - only available on
LinkRunner AT 2000).
Can I connect to an 802.1X port?
Use the Tools > Connect Configuration screen to enable
802.1X. Also, use the LinkRunner Manager PC application
(select Tools > General Information to enable 802.1X and
set up security).

Link-Live Cloud Service
11
V. LINK-LIVE CLOUD SERVICE
This online service, once set up, automatically uploads and
saves results from the LinkRunner AT.
In the Link-Live Cloud Service, you can view comments added
to test results on the LinkRunner AT unit and add new
comments to completed tests. These comments and other
test characteristics can be searched and filtered to display
only specific data, which can aid in troubleshooting. You can
also customize folders in which to organize and categorize
your test results by location, event, job, or other information.
Link-Live can then generate and print reports for
communicating job status or documenting completion.
To start, create a user account at Link-Live.com and sign in.
After creating a new account, you will be prompted to Claim
your first testing device. Follow the on-screen instructions to
claim your LinkRunner AT.
Once your LinkRunner AT is claimed in Link-Live, and you
have configured it to upload to Link-Live rather than save to
internal memory, test results upload automatically as soon
as you connect to the internet.
The Cloud icon displays in the upper right corner of the
LinkRunner AT’s test results screens (such as AutoTest)
when the tester is able to upload to Link-Live Cloud Service.
If no connection is available, the Tester will queue up to 10
tests before overwriting previous results.
You can also configure uploading and notification settings on
the Link-Live Cloud Service web site. For more information
about Link-Live, click Support > Questions at the top right of
the Link-Live web page at Link-Live.com.

Setting Up the Tester
12
VI. SETTING UPTHE TESTER
To change settings on the tester, select Tools from the home
screen.
Figure 4. Tools Menu
IP Configuration
Select Tools > IP Configuration.
Figure 5. IP Configuration Screen
This screen allows you to enter an IPv4 address or use a
DHCP address (default). It also allows you to enable IPv6
addressing (2000 model only). LR-AT uses the IP address
during AutoTest. During AutoTest, the LR-AT is required to
connect to the network for Ping and TCP Connectivity testing.
At no other time does the LR-AT connect to the network using
IP addressing. This applies to the Switch and Cable test
screens.
Setting Up the Tester
13
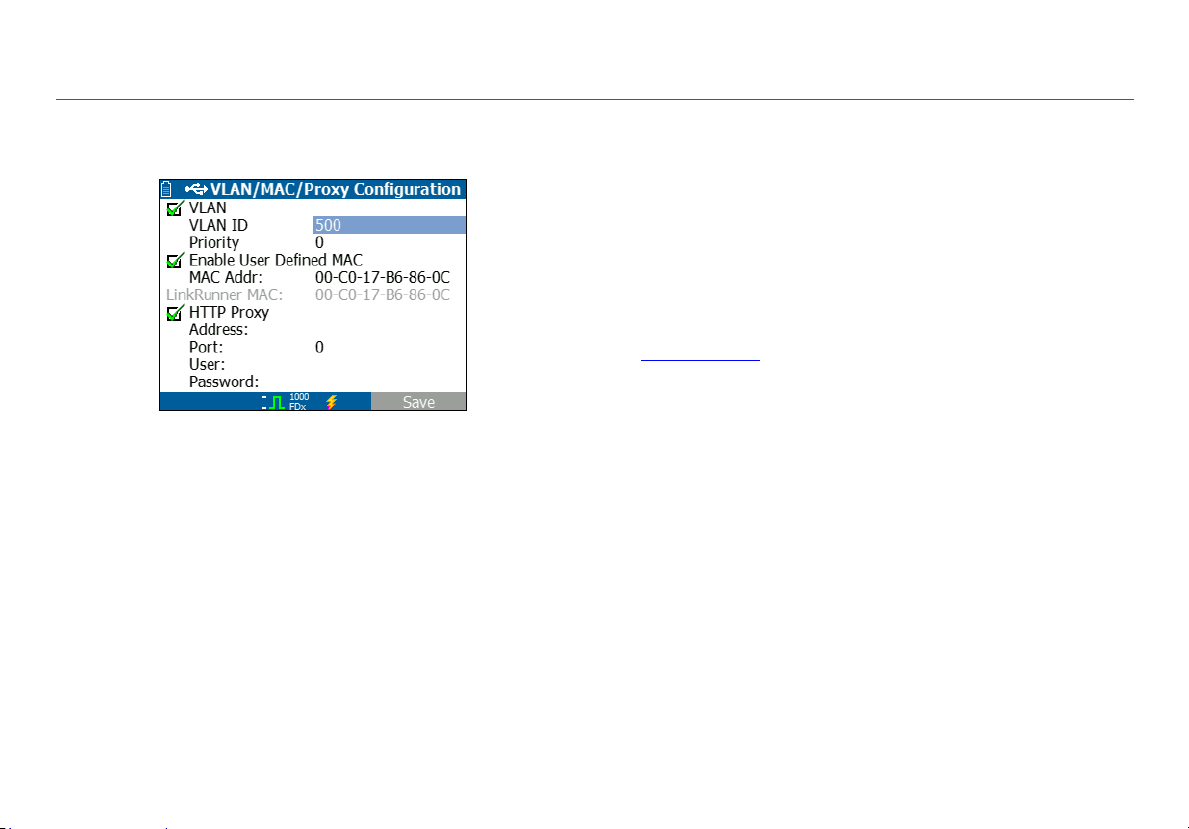
VLAN/MAC/Proxy Configuration
Select Tools > VLAN/MAC/Proxy Configuration.
Figure 6. VLAN/MAC/Proxy Configuration Screen
This screen allows you to enable and enter the VLAN ID and
its Priority level. Un-check the VLAN check box to disable the
VLAN capability.
You can also enable and enter a user defined MAC address.
Un-check the Enable User Defined MAC check box to revert
the LinkRunner AT back to the factory default MAC address.
This screen also contains Proxy settings.
NOTE: To access the Proxy Configuration, your
LinkRunner AT must have firmware version 2.5.3 or later,
which also requires you to download and update
LinkRunner Manager software to version 1.0.9.1112.
To configure with your network’s Proxy settings:
1
Select Address, enter your proxy server address, and
save (F2).
2
Select Port, enter your proxy server port number, and
save (F2).
3
If required, select User, enter your User ID, and save (F2).
4
If required, select Password, enter your proxy password,
and save (F2).
LinkRunner AT can now be claimed and then send test results
to Link-Live.com via the configured proxy server.
This manual suits for next models
1
Table of contents
Other Netscout Test Equipment manuals


