Networked Media Tank A-110 User manual

Networked Media Tank
User’s Guide
A-110

2
// Popcorn Hour A-110
Table of Contents
1.0 Safety
1.1 For Your Safety ................................................................................... 08
2.0 Product Overview
2.1 Package Contents ............................................................................... 09
2.2 Introduction ....................................................................................... 10
2.3 Features ............................................................................................. 11
2.4 Minimum System Requirements .......................................................... 12
2.5 Hardware Overview ............................................................................ 13
2.5.1 Front Panel ............................................................................... 13
2.5.2 Back Panel ............................................................................... 14
2.6 Remote Control .................................................................................. 16
2.6.1 Remote Control Overview ......................................................... 16
2.7 Installation ......................................................................................... 19
2.7.1 Video Connections .................................................................... 19
2.7.2 Audio Connections .................................................................... 21
2.7.3 Network Connections ................................................................ 22
00

3
// Popcorn Hour A-110
3.0 Quick Start
3.1 Media Filters ....................................................................................... 23
3.2 Viewing a Video .................................................................................. 25
3.3 Basic Remote Control Buttons ............................................................. 28
3.4 Basic Video Setup ............................................................................... 29
3.5 Basic Audio Controls ........................................................................... 31
4.0 Media Sharing
4.1 Installing Media Servers on your PC .................................................... 32
4.1.1 myiHome .................................................................................. 32
4.1.2 UPnP AV or DLNA Server ........................................................... 33
4.1.3 Windows Media Player Network Sharing Service (WMP-NSS) ...... 34
4.1.4 Third-Party HTML-based Servers ............................................... 35
4.2 Setting up Network Shares on your NMT ............................................. 36
4.2.1 Samba Share Setup .................................................................. 36
4.2.2 NFS (Network File System) Shares Setup .................................. 37

4
// Popcorn Hour A-110
4.3 Accessing your Network Shares on the NMT ........................................ 38
4.3.1 Browsing Network Shares ......................................................... 38
4.3.2 Permanent Network Shares ...................................................... 39
5.0 NMT Applications Installation
5.1 Hard Disk Drive (HDD) Installation ...................................................... 41
5.2 NMT Applications Installation .............................................................. 43
5.3 Using the USB Slave Drive Function .................................................. 45
6.0 Using your Popcorn Hour A-110 NMT
6.1 Remote Control Functions ................................................................... 50
6.2 Media Source ..................................................................................... 57
6.3 Web Services ..................................................................................... 58
6.3.1 Media Service Portal ................................................................ 59

5
// Popcorn Hour A-110
6.3.2 MSP Community ...................................................................... 60
6.3.3 Torrent .................................................................................... 61
6.3.4 SayaTV .................................................................................... 62
6.4 Setup ................................................................................................ 63
6.4.1 Preferences ............................................................................. 64
6.4.2 Audio/Video ............................................................................. 65
6.4.3 Network .................................................................................. 69
6.4.4 Network Share ......................................................................... 70
6.4.5 NMT Applications ..................................................................... 71
6.4.6 DVD/Audio CD .......................................................................... 73
6.4.7 Maintenance ............................................................................ 74
6.4.8 Firmware and NMT Applications Update .................................... 75
7.0 Conguring the NMT Applications
7.1 NAS (Network-Attached Storage) Functions ....................................... 81
7.1.1 FTP Server ............................................................................... 81

6
// Popcorn Hour A-110
7.1.2 SMB Server .............................................................................. 82
7.1.3 NFS Shares (Network File System) ............................................ 83
7.1.4 Syabas CE-HTML Server (myiHome) .......................................... 84
7.2 Torrent Setup ..................................................................................... 85
7.3 Usenet Client Setup: NZBGet .............................................................. 88
7.3.1 Setting up the NZBGet on the NMT ........................................... 89
7.3.2 Usenet: Working with NZBGet .................................................. 91
7.3.3 Downloading ............................................................................ 93
8.0 Troubleshooting
8.1 Frequently Asked Questions (FAQs) .................................................... 95
8.2 Technical Support Contact Information ............................................... 101
9.0 Product Specications
9.1 Physical .............................................................................................. 102
9.2 Electrical ............................................................................................ 103

7
// Popcorn Hour A-110
9.3 Chipset and Memory .......................................................................... 103
9.4 Ports and Connectors ......................................................................... 104
9.5 Audio/Video Output ............................................................................ 105
9.6 Supported Audio/Video Formats ......................................................... 106
9.7 Web Services ..................................................................................... 110
9.8 Connectivity ...................................................................................... 112

8
// Popcorn Hour A-110
Safety
01
1.1 For Your Safety
Message Description
Tip
This is a useful tip in using the product
Reminder
This is a reminder in using the product
Note
This is a non-critical notice to the user
Caution
Failure to take or avoid a specic action could result in damage
to the product or loss of data
Warning
Failure to take or avoid a specic action could result in injury

9
// Popcorn Hour A-110
Product Overview
02
Reset
networked media tank
Model No : A -110
R
R
R
FILE MODE SETUP SUSPEND PAGEUP
USB DVD ROM
EJECT TV MODE MUTE PAGEDOWN
.:/@
DELETE 0CAPS
NUM
ENTER
A
A
INFO HOME
RETURN SOURCE
MENU PREV PLAY NEXT
TITLE REV STOP FWD
REPEAT ANGLE PAUSE SLOW
TIME SEEK AUDIO SUBTITLE ZOOM
BT
2abc 3def
4ghi 5jkl 6mno
7pqrs 8tuv 9wxyz
R
1
Popcorn Hour A-110 NMT (HDD not included)
Remote Control
100~240V power adapter AC power cord USB Slave cable
HDMI cable
2.1 Package Contents

10
// Popcorn Hour A-110
2.2 Introduction
Congratulations on your purchase of an award winning product that will enhance your home
multimedia experience.
The Popcorn Hour A-110 Networked Media Tank (NMT) allows you to stream digital video, audio and
photos from various sources for your enjoyment on your HDTV or Home Theater setup. You can
stream or playback your digital media content from a variety of sources, such as your PC, Network
Attached Storage (NAS), digital camera, USB mass storage devices (Flash drive, HDD, DVD drive),
internal SATA HDD and even directly from the Internet via the Media Service Portal.
Your NMT also serves as an NAS, supports Usenet downloading, and is also a BitTorrent peer-to-peer
downloader to eliminate the need to switch on a PC or other devices for this purpose.
Feel free to browse through this user guide to know your NMT better and we hope that you, your
family and friends have a great time with this amazing product.
Tip: To start using your NMT immediately, skip to Chapter 3 for the Quick Start.

11
// Popcorn Hour A-110
2.3 Features
The Popcorn Hour A-110 NMT is an enhanced version of the popular A-100 NMT model. It adds
support for 2.5”/3.5” SATA HDD and USB Slave functionality to improve connectivity and transfer
rates. The HDMI interface has been updated to the 1.3a specications, allowing full support of HD
Audio pass-through for DTS HD-HR, DTS HD-MA, Dolby Digital Plus and Dolby TrueHD. The ports on
the A-110 have also been relocated, with a USB port moved to the rear panel, an optical S/PDIF port
to replace the co-axial S/PDIF port, and a hardware reset button for easy use of the device.
The Popcorn Hour A-110 supports the latest high bitrate video formats (MPEG2 MP@HL, H.264 HP
@L4.1, VC-1 AP@L3 in TS of at least 40Mbps) to give you up to 1080p high-denition videos.
In line with the advances in Internet TV, the A-110 supports peer-to-peer Internet TV streaming
technology from SayaTV, as well as popular unicast Internet TV such as YouTube, Revision 3 and
Vuze via the Media Service Portal.
The A-110 rmware is upgradeable to support future media containers, codecs and features.
For detailed specications of your NMT and supported audio/video formats, refer to
Chapter 9: Product Specications.

12
// Popcorn Hour A-110
2.4 Minimum System Requirements
High-Denition (HD) or standard television (TV) with HDMI, S-Video, Component Video, • or
Composite Video input
TV, Ster• eo, or HD Audio receiver with Optical Digital, Coaxial Digital, or Composite Audio input
Wir• ed or wireless network (wired 100Mbps or better network is recommended for networked
video streaming)
Connection to the Internet• (for use with Web Services)
Listed below are the minimum requirements for installation of the myiHome Media Server
software application on your PC.
Pentium 233(MHz) or higher processor• (Pentium III or higher recommended)
Microsoft Windows® 2000, XP, Vista (32 or 64-bit); Mac OS X or Linux operating systems•
512MB of RAM•
100MB of available hard disk drive (HDD) space•

13
// Popcorn Hour A-110
2.5 Hardware Overview
2.5.1 Front Panel
1Reset Button
Press to reset your NMT.
3IR (Infrared) Receiver
The IR receiver receives signals from the
remote control.
Avoid blocking the IR receiver as the remote
control needs a direct line of sight to the IR
receiver for proper function.
5Power Indicator
Displays an AMBER indicator when your NMT
has been turned ON and while it is operating.
2USB Port
Connect a USB storage device
to this port to access its media
content.
4Standby Indicator
Displays a RED indicator when your NMT is on
Standby mode.
6USB (Slave) Indicator
Displays a GREEN indicator when your NMT is
being used as a USB slave drive.
135
246
Reset Model No: A-110
networked media tank
R
14
// Popcorn Hour A-110
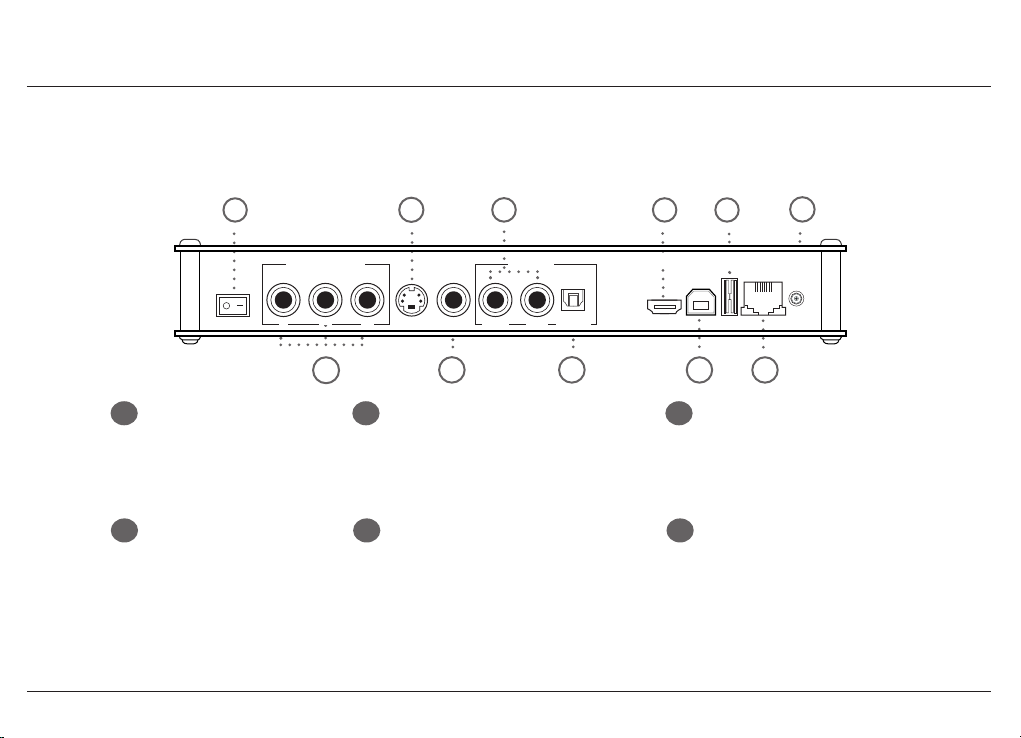
2.5.2 Back Panel
1Power ON/OFF Switch
Use this switch to turn on or turn off
your NMT.
3S-Video Connector
Use this to connect your NMT to your TV using the
S-Video connector. (Video only)
5Composite Audio Connectors
Use these connectors to connect your NMT to
your TV using the red and white Composite
Audio connectors. These connectors usually
come attached with the Composite Video
connector (yellow connector). (Audio only)
2Component Video
Connectors
Use these connectors to connect
your NMT to your TV set using
component video connectors. The
connectors are usually green, blue,
and red in color. (Video only)
4CVBS (Composite Video)
Connector
Use this connector to connect your NMT to your TV
using the yellow Composite Video connector. The
Composite Video cable usually comes attached to
Composite Audio connectors (red and white
connectors). (Video only)
6S/PDIF Optical Digital
Audio Connector
Use this connector to connect your NMT to
your home audio system using the S/PDIF
audio connector. (Audio only)
COMPONENT VIDEO
YPb Pr S-VIDEO CVBS RIGHT LEFT OPTICAL
HDMI USB-PC USB ETHERNET POWER
12V3A
OFF ON
AUDIO OUT
1
2
3
4
5
6
79
11
8
10

15
// Popcorn Hour A-110
7HDMI (High-Denition Multimedia
Interface) Connector
Use this to connect your HD TV
(High Denition TV).
(Video and Audio)
9
USB Port
Connect a USB storage device to this
port to access its media content.
11
Power Supply Port
Connect the supplied power adapter to the
Power Supply port in order to power your
NMT.
8USB Slave Connector
Connect your NMT to your PC using the supplied
USB cable to enable your NMT to function as a
slave drive for your PC.
10
Ethernet (RJ-45) Port
Connect an Ethernet cable (RJ-45) to
the Ethernet port and attach the other
end to a router or hub on your L AN
(Local Area Network).

16
// Popcorn Hour A-110
2.6 Remote Control
2.6.1 Remote Control Overview
Power
Switches the NMT ON or to Standby mode.
TV MODE
Quick-access button to select a TV output resolution.
See Video Mode Options for more information.
FILE MODE
Displays File and Folder customization options.
MUTE
Mutes the audio output.
SETUP
Jumps to the Setup menu screen. During video
playback, this button allows customization of
the display output.
USB DVDROM EJECT
Ejects an attached external DVD-ROM drive or end a
media playback.
BT SUSPEND
This button is reserved for future use.
DELETE DELETE
To erase alphanumeric values during input.
PAGE UP
Moves up a page on a list of media les.
Increases the volume during media playback.
CAPS
NUM CAPS/NUM
To switch between capitalized, numeric and non-
capitalized letters during alphanumeric value input.
PAGE DOWN
Moves down a page on a list of media les.
Decreases the volume during media playback.
0 - 9 Alphanumeric Keypad
Allows users to input alphanumeric characters.
R
FILE MODE SETUP SUSPEND PAGEUP
USB DVD ROM
EJECT TV MODE MUTE PAGEDOWN
.:/@
DELETE 0CAPS
NUM
ENTER
A
A
INFO HOME
RETURN SOURCE
MENU PREV PLAY NEXT
TITLE REV STOP FWD
REPEAT ANGLE PAUSE SLOW
TIME SEEK AUDIO SUBTITLE ZOOM
BT
2abc 3def
4ghi 5jkl 6mno
7pqrs 8tuv 9wxyz
R
1

17
// Popcorn Hour A-110
RETURN
Returns to the previous menu screen.
MENU
Jumps to the DVD Menu screen during
DVD playback.
STOP
Stops playback and returns to the menu screen.
SOURCE
Returns to the Media Source screen.
PREV
Skips backward to the previous le/track.
FWD
Fast-forwards through the current media
playback, continue pressing to toggle 2x,
4x and 8x fast-forwarding.
iINFO
Displays the timeline bar during media
le playback. Press again to display the
media le information such as the title,
format, and so on.
PLAY
Plays the selected le/track and continues
to the next le/track on the list.
REPEAT
Repeat the current selected media le.
ENTER ENTER
Selects the currently highlighted selection
or plays the highlighted media le.
(single le playback only)
NEXT
Skips forward to the next le/track.
ANGLE
Switches the camera or viewing angle during
playback. (only applicable for supported
multiangle playback formats)
Directional Keypad (D-Pad)
Allows you to navigate and highlight options
or media les.
TITLE
Opens the text input box for URL input
while in a menu screen.
PAUSE
Pauses the current media playback.
HOME
Returns to the Media Filters menu screen
of your currently selected Media Source.
REV
Rewinds the current media playback.
SLOW
Slows down the playback of the current media
playback.

18
// Popcorn Hour A-110
TIME SEEK
Allows you to time-seek the current selected
media for a jump to a particular playback time;
hour:minute:second = 00:00:00 (use numeric buttons
to input the desired playback time)
AUDIO
Toggles between the available audio modes.
A
ASUBTITLE
Turns ON the subtitles and toggles
through its options.
(if available with your video playback)
ZOOM
Toggles between available viewing options.
See Remote Control Functions for more
information
RED BUTTON
Jumps to the Video media lter.
GREEN BUTTON
Jumps to the Music media lter.
YELLOW BUTTON
Jumps to the Photos media lter.
BLUE BUTTON
Jumps to the Others media lter.
Reminder: Replace the batteries with two new AAA batteries if the remote control is slow to
respond or does not respond at all.
Tip: For the comprehensive guide to your NMT remote control, see Remote Control Functions.

19
// Popcorn Hour A-110
2.7 Installation
2.7.1 Video Connections
To connect your NMT to your television (TV) for video output, use one of the following options
available on your NMT. All the video connectors are located at the rear panel of your NMT.
Component Video
Attach the COMPONENT video cable to the COMPONENT connectors of your NMT
by matching the color coded connectors and ensure that the same is done for
the opposite end into your TV input.
Note: This cable is not supplied with your NMT.
S-Video
Attach the S-VIDEO cable to the S-VIDEO connector of your NMT and ensure that
the same is done for the opposite end to your TV input.
Note: This cable is not supplied with your NMT.

20
// Popcorn Hour A-110
Composite Video
Attach the yellow COMPOSITE video cable to the COMPOSITE connector of your
NMT and ensure that the same is done for the opposite end to your TV input.
Note: This cable is not supplied with your NMT.
HDMI
Attach the supplied HDMI cable to the HDMI connector of your NMT and ensure
that the same is done for the opposite end to your TV input.
HDMI provides the best interface for your NMT and your High Denition TV as it
is able to support a video mode of up to 1080p, with audio output as well.
Table of contents


