Neumann.Berlin MA 1 User manual

GEORG NEUMANN GMBH · LEIPZIGER STR. 112 · 10117 BERLIN · GERMANY V1.3
TEL +49 (0)30 / 41 77 24-0 · FAX -50 · HEADOFFICE@NEUMANN.COM · WWW.NEUMANN.COM PUBL. 05/2021

MA 1 –Automatic Monitor Alignment |
2
Contents
Contents ..................................................................................................................... 2
MA 1 –Automatic Monitor Alignment......................................................................... 3
Hardware requirements.......................................................................................... 3
Software requirements........................................................................................... 3
DSP loudspeakers (network-enabled)...................................................................... 3
Analog loudspeakers (not network-enabled).......................................................... 3
System setup............................................................................................................... 4
Compatibility with Neumann.Control iPad app....................................................... 4
Connecting the hardware........................................................................................ 4
Setting up the loudspeakers.................................................................................... 4
Preparing the MA 1 –Automatic Monitor Alignment ................................................... 7
Starting the process................................................................................................ 7
Selecting the network interface............................................................................... 7
Changing the loudspeaker sensitivity and the logo brightness ................................. 9
Checking the requirements................................................................................... 10
Selecting and setting up the audio interface.......................................................... 11
Microphone linearization...................................................................................... 13
Adapting the output level ..................................................................................... 13
Positioning the microphone and loudspeakers/subwoofer .................................... 14
MA 1 input channel............................................................................................... 14
Performing the MA 1 –Automatic Monitor Alignment............................................... 16
Starting the measurement .................................................................................... 16
Displaying the measurement results...................................................................... 18
Saving the results.................................................................................................. 21
Troubleshooting.................................................................................................... 22

MA 1 –Automatic Monitor Alignment |
3
MA 1 –Automatic Monitor Alignment
This document describes the requirements and procedure for using the MA 1 Automatic
Monitor Alignment. This version of the software just supports stereo systems with and without
subwoofers.
Hardware requirements
•Loudspeakers
o1 pair of KH DSP loudspeakers
or
o1 or 2 KH 750 DSP subwoofers in combination with a pair of KH DSP loudspeakers or
with a pair of analog KH loudspeakers
•Neumann MA 1 measurement microphone
•Computer (Windows 10 (64 bit), macOS 10.13, 10.14, 10.15 and 11)
•Screen resolution of 1280×720 px or higher
•Audio interface with:
oBalanced analog input with 48 V phantom power
o2 balanced analog outputs or digital AES3 output (only with KH 750 DSP)
•Network switch
Software requirements
•Operating system:
oPC: Windows 10 64 Bit
oMac: macOS 10.13, 10.14 or 10.15
•MA 1 –Automatic Monitor Alignment software
•ASIO driver (forWindows)
•IPv6 supported and enabled
DSP loudspeakers (network-enabled)
The following loudspeakers and subwoofers are network-enabled and can be controlled directly
by the software:
•KH 80DSP
•KH 750DSP
Analog loudspeakers (not network-enabled)
The following loudspeakers are not network-enabled and need to be connected via a network-
enabled subwoofer to be included in the system setup.
•
KH
120 A
•KH 120 D
•KH 310 A
•KH 310 D
•KH 420/KH 420 + DIM 1

MA 1 –Automatic Monitor Alignment |
4
System setup
Proceed as follows to set up the system.
Compatibility with Neumann.Control iPad app
The MA 1 –Automatic Monitor Alignment is not compatible with Neumann.Control iPad
app. Use either the one or the other.
Using the Neumann.Control app before, while or after using the MA 1 –Automatic Monitor
Alignment app may cause invalid alignment results. To be certain that the alignment is and
stays correct please:
Uninstall the Neumann.Control app from your iPad.
Perform a factory reset on your Neumann DSP devices (see below).
Use the MA 1 –Automatic Monitor Alignment app to align your system.
Do not use the Neumann.Control app on an aligned system.
Once the MA 1 software has started and connected to the loudspeakers previously stored
parameters from MA 1 alignment sessions before or from Neumann.Control setups are
deleted.
Neither MA 1 alignments nor Neumann.Control setups can be stored in the MA 1 software.
If after the MA 1 alignment procedure the Neumann.Control iPad app is connected to the
loudspeakers the MA 1 alignment will be overwritten by the iPad. To get back to the MA 1
automatic alignment the MA 1 alignment procedure must be redone.
Connecting the hardware
Connect your hardware as shown in this diagram
Setting up the loudspeakers
Set the switch positions and level adjustments on the rear of your loudspeakers/subwoofer
according to the following instructions.
Analog monitors in combination with KH 750 DSP
(KH 750 DSP + KH 120/KH 310/KH 420)

MA 1 –Automatic Monitor Alignment |
5
Use the following settings for the KH 750 DSP.
Use the following settings for analog monitors (KH 120 A, KH 310 A, KH 420)
Use the following settings for D-version monitors (KH 120 D, KH 310 D, KH 420 with
DIM 1)
Note! The digital connection is not supported.

MA 1 –Automatic Monitor Alignment |
6
KH 80 DSP and KH 750 DSP
Use the following settings for the KH 80 DSP.
Use the following settings for the KH 750 DSP.
Note! During the process of the automatic monitor alignment do not change any settings at the
back of the connected DSP loudspeakers/subwoofer.

MA 1 –Automatic Monitor Alignment |
7
Preparing the MA 1 –Automatic Monitor
Alignment
Perform the following steps to automatically align your setup using the MA 1 software and the
MA 1 measurement microphone.
Starting the process
Click on the orange arrow on the right of the start screen to start the process.
Selecting the network interface
Select the network your KH DSP devices are connected to.

MA 1 –Automatic Monitor Alignment |
8
The software lists all KH DSP devices found in the network. To identify which device in the list
represents which loudspeaker/subwoofer in your room you can click on the Neumann logo next
to the device name.
The logo on the front of the physical loudspeaker/the power LED on the subwoofer rear will
flash rosé.
Valid monitor hardware setups
You may select a pair of KH DSP monitors, a pair of KH DSP monitors with one or two KH DSP
subwoofers or a pair of analog KH monitors with one or two KH DSP subwoofers. If you select
two KH DSP subwoofers it does not matter which of the two subwoofers the monitors are
connected to as both left (A) and both right (B) subwoofer outputs are aligned identically. If two
subwoofers are selected both left inputs (A) and both right inputs (B) must receive the same
input signal. A stereo subwoofer constellation where the left subwoofer only receives the left
channel and the right only the right channel is currently not supported.
Selecting loudspeakers in a setup with DSP loudspeakers only
Fromthelist, select theloudspeakerswhichbelongtoyoursystem.
Choose the position the loudspeaker is placed
.
Selecting loudspeakers in a setup of a DSP subwoofer with analog loudspeakers
From the list, select the subwoofer which belongs to your system.
Select the input signal option of the subwoofer
.
oAutomatic (default): The subwoofer automatically chooses between analog or digital
AES3 input signals. Digital signals have priority over analog signals.
oAnalog: If analog is selected, only analog input signals will be received even if there are
digital signals connected.
Choose the corresponding analog version if you use D-versions of the loudspeakers (KH 120,
KH 310, KH 420).
Make sure the loudspeakers are connected according to their physical position (left output

MA 1 –Automatic Monitor Alignment |
9
of KH 750 DSP to left loudspeaker, etc.).
Saving and loading a hardware monitor setup
When you are done selecting and positioning your monitors you will be asked to enter a name
for your monitor hardware setup.
Now, when you run the application in the future, you will have the possibility to skip the
loudspeaker selection and load a previously defined setup.
Changing the loudspeaker sensitivity and the logo brightness
Once you have saved a monitor hardware setup you can change the sensitivity of the
loudspeakers in this setup as well as the logo brightness of the KH DSP devices. Simply click the
settings button to open the menu.
Now you have the possibility to change the sensitivity of your loudspeakers in decibel sound

MA 1 –Automatic Monitor Alignment |
10
pressure level at a distance of 1 meter and an analog input level of 1 dBu. The value 100% for
the logo brightness of the KH DSP devices refers to the brightness of a KH 120/310/420 logo. You
can set your KH DSP devices to shine up to 25% brighter (set to 125%) than the analog monitors.
During the measurement stage of the MA 1 application these settings are not available as the
measurement sensitivity must have a fixed value. After the measurement, the application will
set the sensitivity back to the level previously set by you.
Checking the requirements
Ensure all mentioned requirements are fulfilled and all boxes are ticked.

MA 1 –Automatic Monitor Alignment |
11
Selecting and setting up the audio interface
Perform the following steps for selecting and setting up the audio interface.
Install an ASIO driver on your Windows PC, if not done yet. ASIO Drivers are typically
available on the website of your audio interface manufacturer.
If there is no specific ASIO driver available for your audio interface, you can try the universal
ASIO4ALL ASIO emulator instead. On MacOS a driver installation is typically not necessary.
Select your audio interface in the audio interface selection dropdown menu.
If no audio interface is found that may have the following reasons:
Bluetooth headsets are not supported by the MA 1 software.
Built in microphones and loudspeakers are not supported.
On MacOS one audio interface can be shown as two devices. If this is the case, please
follow the instruction from Apple:
https://support.apple.com/en-in/guide/audio-midi-setup/ams6e21c3f61/mac
Make sure the sample rate of the audio interface is set to 48 kHz.

MA 1 –Automatic Monitor Alignment |
12
Select the input channel your MA 1 measurement microphone is connected to.
Select the output channels your Neumann KH stereo system is connected to
.
.

MA 1 –Automatic Monitor Alignment |
13
Microphone linearization
Enter the 10-digit serial number printed on your MA 1 measurement microphone.
Enter the 6-digit HEX code printed on your MA 1 measurement microphone.
This code provides the microphone-specific linearization information to linearize your
measurement microphone.
Adapting the output level
Click START to start the output signal level adaptation
.
The system automatically identifies the ideal signal level which is then applied to the
measurement signals.
During this process, the loudspeakers are muted.
If the output level of your audio interface too low or too high, the system will ask you to
change it accordingly. Make sure both the left and the right channel are connected and
have the same signal gain (panorama: center).
Do not change the output level of your audio interface until all measurements are done.
Once the level is set correctly, the system will inform you.
If this test fails please check the following points:
Proper audio connection from audio interface to loudspeaker/subwoofer
Source output is not muted
MA 1 –Automatic Monitor Alignment |
14
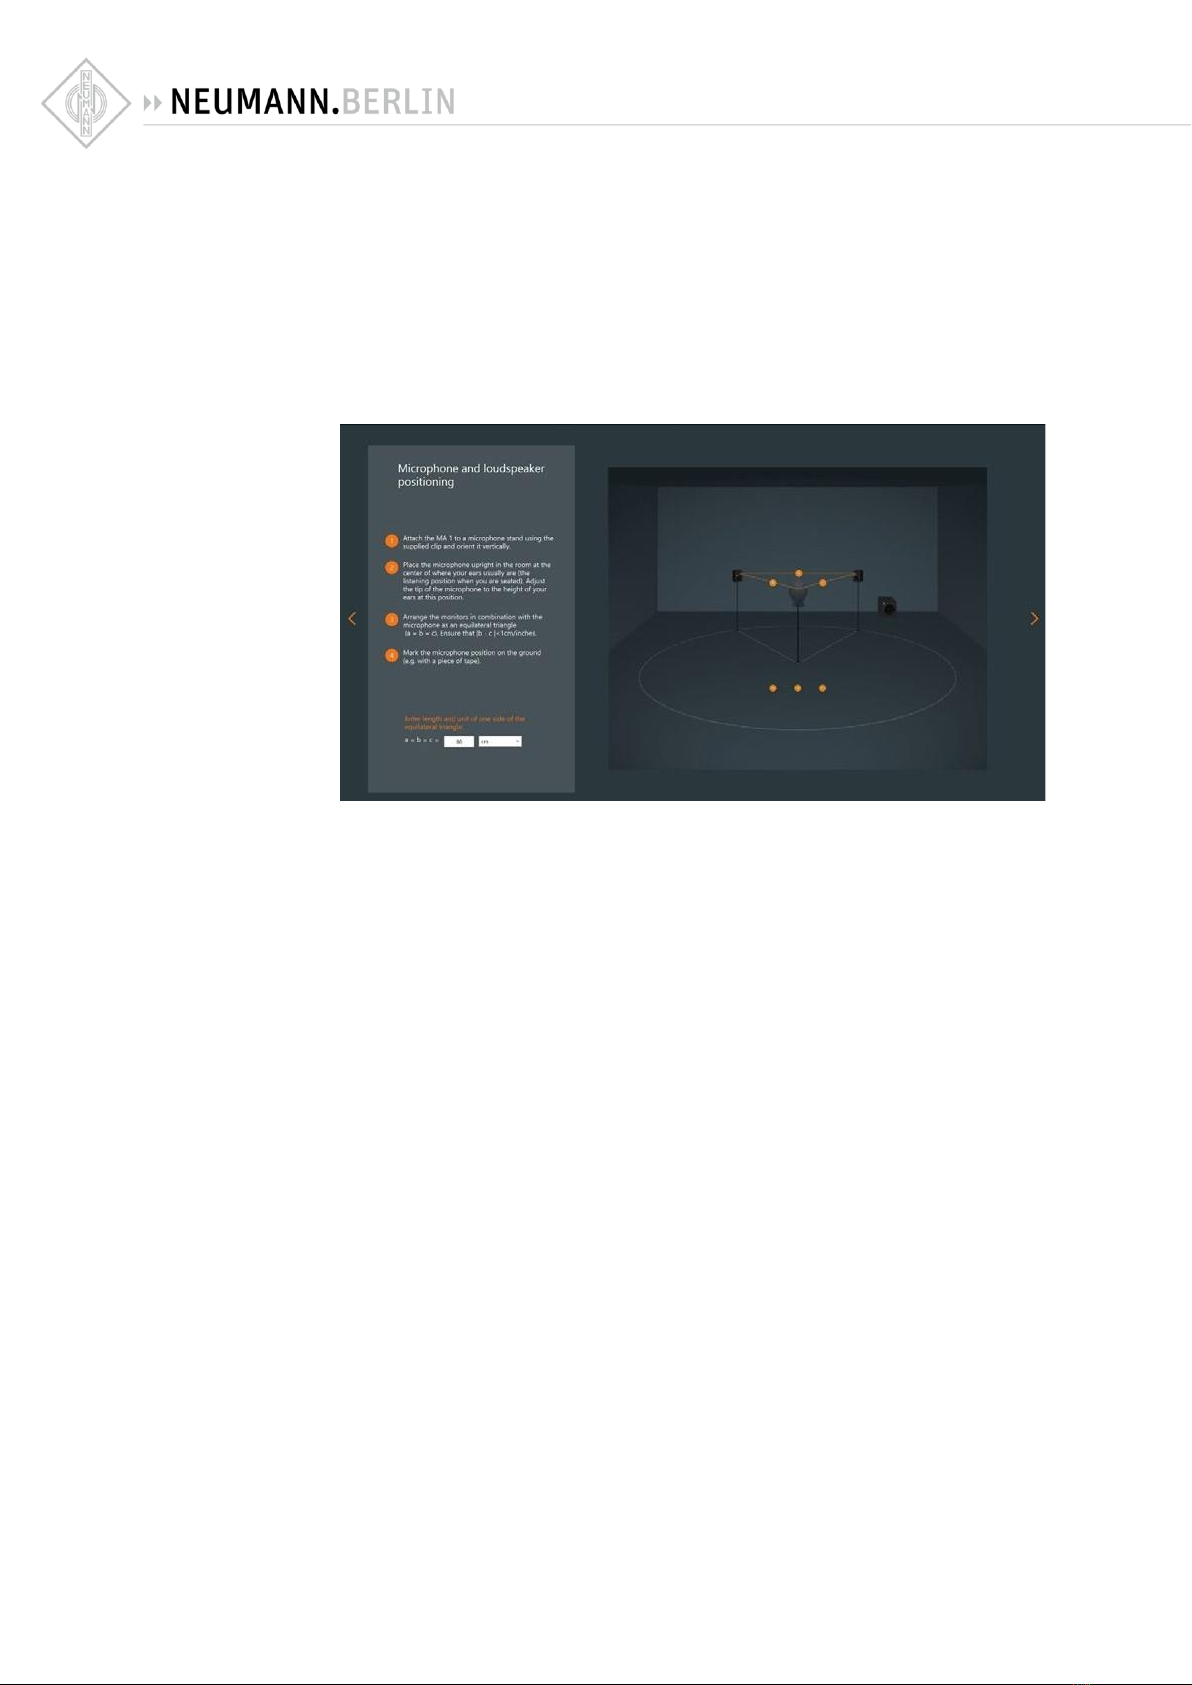
Positioning the microphone and loudspeakers/subwoofer
Before the alignment you need to ensure that your loudspeaker system is set up correctly
.
Arrangethe loudspeakers and the listening position as an equilateral triangle. The distance
between the tweeters of the loudspeakers and between tweeters and listening position
should be the same.
Place the loudspeakers and all equipment/furniture as symmetrically as possible regarding
the listening axis.
Angle the loudspeakers horizontally and vertically towards the listening position
.
Measure the distance between the left and right tweeter and enter it into the text field.
MA 1 input channel
This page helps you to find the right the input signal gain and signal-to-noise ratio.
Before starting, make sure that:
The microphone input gain of your microphone preamplifier is set to a reasonable value.
All windows are closed.
No fans, air conditioning devices or other noise generating devices are running.
Nobody is talking or walking around.
The phantom power of your microphone preamp is switched on.

MA 1 –Automatic Monitor Alignment |
15
The system will check if:
The input gain of your microphone preamplifier is set correctly.
The input signal is clipping.
The background noise of your environment is low enough
.
The signal-to-noise ratio of the entire measurement chain is sufficient
.
If any of these results do not meet the requirements, the system will inform you accordingly.
If the noise level in your room is too high the system continues to measure. If it is not possible to
reduce your environmental noise level, you can skip this test. This may lead to worse results.
CAUTION
Danger of hearing injury!
The system will play a loud pink noise signal

MA 1 –Automatic Monitor Alignment |
16
Performing the MA 1 –Automatic Monitor Alignment
Starting the measurement
The software will now start measuring your monitoring system in your room. For that purpose,
sine sweep signals will be played out to every individual loudspeaker/subwoofer. For you to be
able to step back or aside to not block the area between the loudspeakers and the microphone
with your body you can set a wait time of up to 10 seconds. You will be asked to set the wait
time before each series of measurements. The software will count down the set number of
seconds before each measurement of that series.
Follow the instructions on the screen.
Remain quiet
.

MA 1 –Automatic Monitor Alignment |
17
Start measuring at the main listening position with the microphone on a stand in an upright
position.
We highly recommend performing the measurements at every proposed microphone position to
ensure the best results.
However, it is possible to skip the measuring procedure after each of the 7 measurements. This
might be useful if any potential for improvement in terms of repositioning the loudspeakers or
other optimizations have been identified.

MA 1 –Automatic Monitor Alignment |
18
Displaying the measurement results
After the measurement procedure the system will display the results
.
The following curves are displayed:
Orange curve:
This shows the room-specific target response used by the system to align the measurement
results.
Please note that this curve is not necessarily ruler flat. The system will create a target
response optimized for the character of the room. This target response depends on the
acoustical behavior of the room, on the distance between the loudspeakers and the
listening position and on the placement of the loudspeakers in the room.
White curve:
This curve shows the combined magnitude response of the entire system. It represents the
acoustical result after the alignment.
When you unselect the checkbox, you can see and hear the system response with the default
monitor settings.

MA 1 –Automatic Monitor Alignment |
19
The combination of all measured loudspeakers/subwoofer with their default settings is shown in
white.
Editing the target response
After the automatic alignment you can play any signal through your audio interface to your
loudspeakers and listen to the result.
By selecting and unselecting the ACTIVATE AUTOMATIC ALIGNMENT checkbox you can switch
between the aligned and the unaligned result.
Please note it will take a few seconds until all parameters have been transferred completely to
the loudspeakers.
The EQ section below the graph allows you to modify the result. You can modify the orange
target response, not the measured curve. The algorithm will determine the best possible way to
align your system to the target response. The target response can be modified with 8 fully
parametric and two fixed shelf EQs.
Activating an EQ
Select the EQ-specific checkbox.
Enter frequency, gain and Q.
You can also change gain and frequency by grabbing the highlighted EQ number and
moving it up, down, left, or right. You can use the mouse wheel to change the Q value.
The effect will become visible immediately on the orange target response for all selected filters.

MA 1 –Automatic Monitor Alignment |
20
Applying the EQ modification
Once the modifications of the target response have been applied, you can realign the
loudspeaker setup with these changes.
Click the REALIGN button
.
The software will use the original measurements to align your system to the modified target
response.
Please note that the system will optimize the measured results as closely as possible to the new
target response. It will take all deviations including those from the original alignment into
account. Therefore, small adjustments of the target response may not lead to a different result.
Select / unselect the ACTIVATE AUTOMATIC ALIGNMENT checkbox to switch between the
default monitor settings and the modified alignment.
Setting the sensitivity
You can set the sensitivity of your loudspeakers in decibels sound pressure level at a distance of
1 meter and an analog input signal level of 0 dBu.
Other manuals for MA 1
3
Table of contents
Other Neumann.Berlin Recording Equipment manuals


