Neumann.Berlin MT 48 User manual

· . · ·
()/- · - · @. · ..
MT 48
. /
A brief introduction

MT 48 | 2
Preface: Mission Statement .................................................3
What‘s in the box? .........................................................4
System requirements.......................................................5
Overview .................................................................5
Inputs and Outputs....................................................6
Analog I/O ...........................................................6
Digital I/O ...........................................................7
GPIO/MIDI . . . . . . . . . . . . . . . . . . . . . . . . . . . . . . . . . . . . . . . . . . . . . . . . . . . . . . . . . . .7
Powering ............................................................7
Register your product ......................................................8
Driver installation .........................................................8
Setup.....................................................................8
Connecting your gear.......................................................8
Adding I/O via ADAT / S/PDIF and AES67 .....................................9
Configuring the MT 48 to your needs ........................................10
USB I/O.............................................................10
Routing example: Using external outboard as hardware plug-ins in your DAW 13
DAW setup ...............................................................15
DAW buer size / latency settings ......................................15
Setting up inputs and outputs in your DAW ..............................17
Working with the MT 48 ...................................................18
Understanding the mixer structure .....................................18
Preamp .............................................................19
EQ .................................................................20
Dynamics ...........................................................20
Reverb..............................................................23
Snapshots...........................................................23
Monitor controller functions ...........................................24
MT 48 mixer details ..................................................24
Strips setup . . . . . . . . . . . . . . . . . . . . . . . . . . . . . . . . . . . . . . . . . . . . . . . . . . . . . . . . . 25
MT 48 status bar.....................................................26
Remote controlling the MT 48 .........................................27
Web control .........................................................27
Advanced settings ........................................................30
Output levels ........................................................30
Speakers A/B latch mode..............................................30
Output routing.......................................................31
Output EQ...........................................................32
Output dynamics.....................................................32
Configuring the headphone outputs.....................................32
Talkback ............................................................34
Changing the sampling rate/clocking ...................................35
DAC filter ...........................................................36
Device snapshots .........................................................37
Appendix ................................................................38
Updating the firmware ................................................38
Using the MT 48 with the Neumann MA 1 Automatic Monitor Alignment .....38
FAQ ................................................................38
MT 48 signal flow ....................................................39
Contents

MT 48 | 3
Preface: Mission Statement
The MT 48 brings reference-class sound to your desktop. It is the first audio interface to unlock
the full potential of Neumann microphones, studio monitors, and headphones as well as high
class gear from other manufacturers. The MT 48 builds upon the knowledge and experience of
our friends, partners and now colleagues from Merging Technologies, famous among recording
professionals for state-of-the-art AD/DA converters and networked audio solutions. The MT 48
is the perfect marriage of Neumann sound quality and Swiss precision.
Analog-to-digital conversion in the MT 48 sets a new benchmark. With an enormous dynamic
range of 136 dB, the MT 48 has four times the resolution of competing devices. Analog cir-
cuitry is on the highest level, too. The microphone preamps oer up to 78 dB of clean gain for
capturing every detail from any microphone, be it high sensitivity condensers or low output
ribbons. The same philosophy applies to the built-in headphone amplifiers, which are
extremely powerful and ultra-low impedance to drive any headphones to their absolute best.
Just as important as sound quality is monitoring! Not only for the engineer but also for the art-
ist. Musicians play better, singers sing better with inspiring sound in their headphones. That’s
why the MT 48 is also a fully-fledged mixing console with sophisticated EQ and dynamics in
every channel plus a nice sounding reverb processor. Despite this complexity, the MT 48
remains easy to use, thanks to an intuitive touchscreen user interface: Adjust levels and pan-
ning at the touch of a finger. No more shuttling between the audio interface and a controller
app on your computer: All parameters can be set on the device itself.
The MT 48 is thus the ideal companion for self-recording musicians. But it can handle large
setups just as well, as it oers two expansion options, ADAT and AES67. While ADAT has long
been a standard in project studios for adding up to eight I/O channels, AES67 is a modern open
standard for networked audio with enormous capabilities. From the proverbial bedroom studio
though location work and broadcast applications to professional recording, the MT 48 always
oers outstanding performance. Whatever you’re up to, the MT 48 is ready for it.

MT 48 | 4
What‘s in the box?
Safety guide
Quick guide
USB-C
USB-C
USB-C
USB-C
MIDI
TRS
optional accessory:
USB-A
USB-C
power supply unit with
different country adapters
The MT 48 comes with two USB-C to USB-C cables and one USB-C to USB-A cable as well as an
external power supply including adapters for dierent countries.
Please read the Quick Guide and Safety Guide before using the MT 48.
TRS to DIN5 MIDI adapters are available as an optional accessory.
MT 48 | 5
System requirements
Windows Mac
Windows 10 64-bit or Windows 11 64-bit macOS 10.15 to 13.x
(Catalina – Big Sur – Monterey – Ventura)
Software Requirement:
MT 48 Toolkit must be installed.
Intel and Apple Silicon platforms supported
Driverless:
Plug and Play supported on macOS.
Installation of MT 48 Toolkit required for
full functionality.
Overview
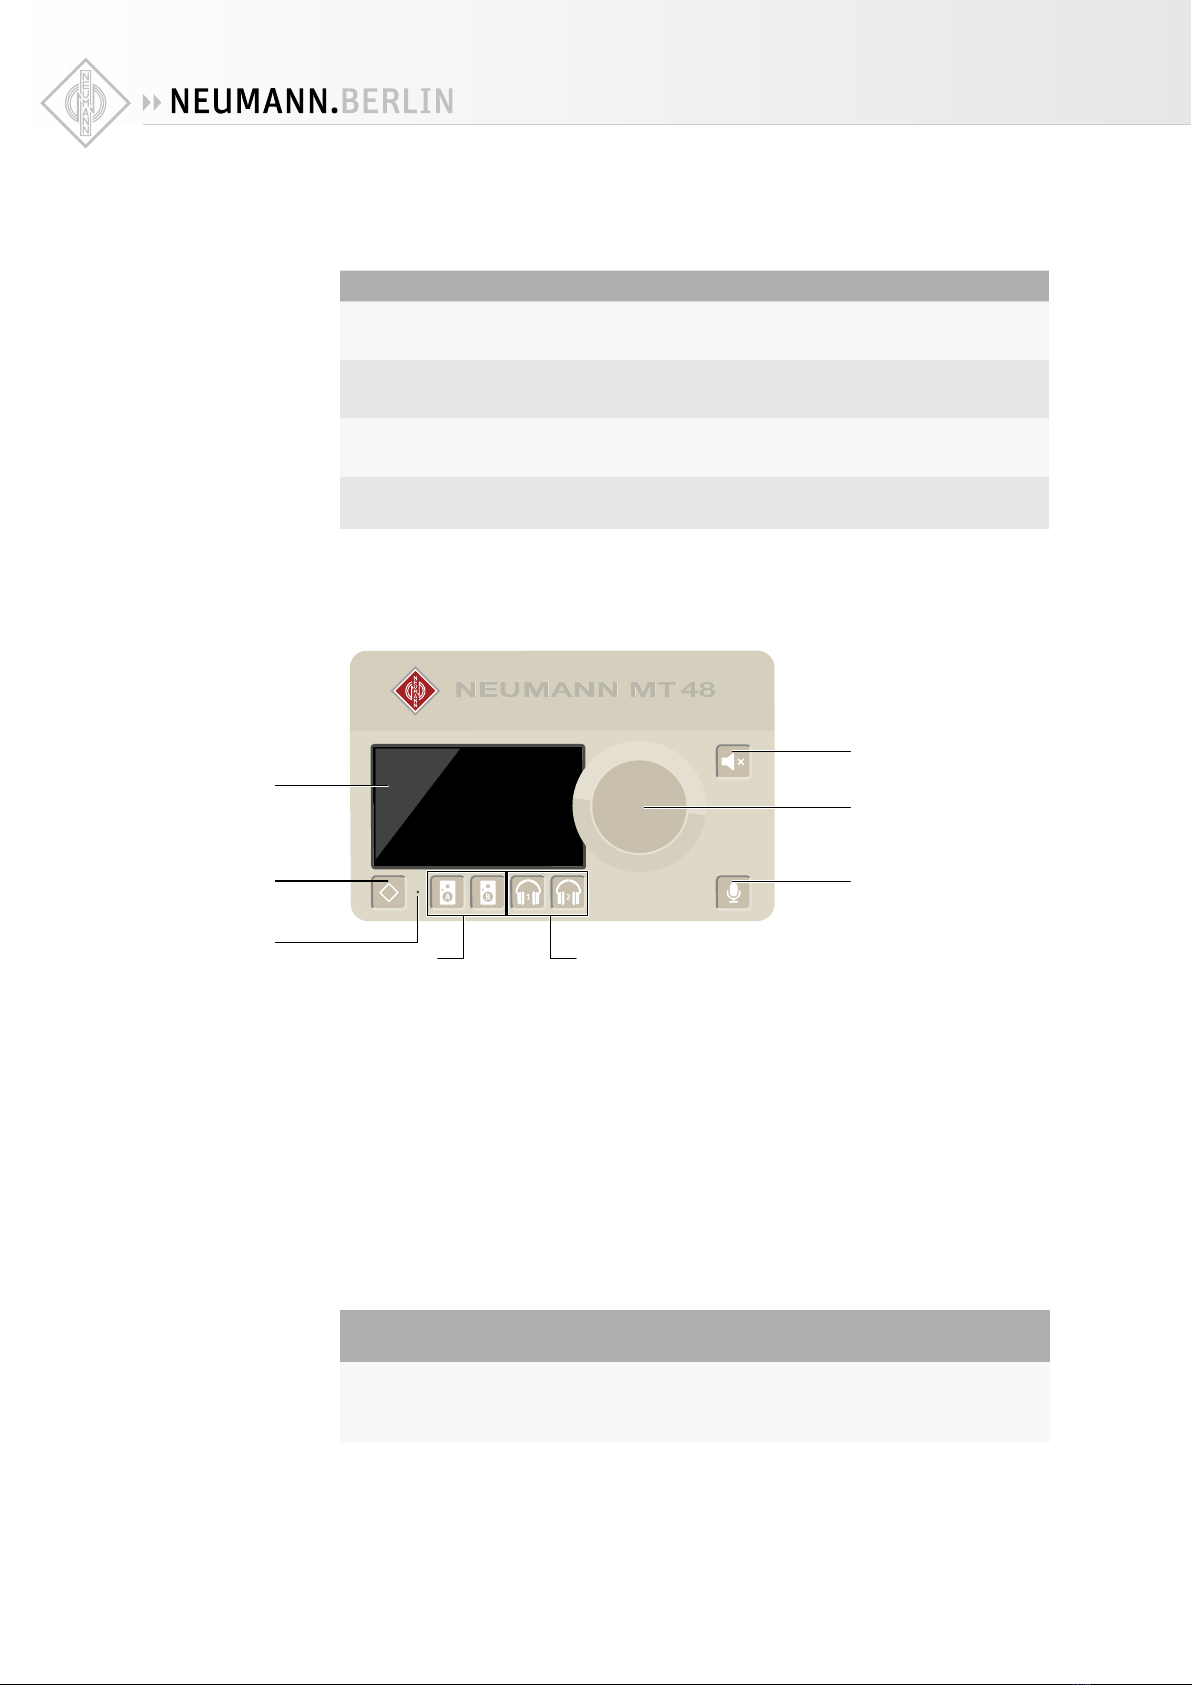
• TFT LCD: The MT 48 features a capacitive touch display.
• Home button with the Neumann diamond for navigation purposes.
• Multi-function Rotary Control for parameter value changes.
• Selector Buttons: Pressing the Speakers A, Speakers B, Headphone 1 and Headphone 2 but-
tons selects one of four separate Mixers for each output pair and assigns the large Rotary
Control to volume control for the selected stereo output.
• Mute Control: Pressing the mute button silences the selected stereo output, pressing the
mute button for more than 2 seconds mutes all outputs.
• Talkback Control: A Talkback function is integrated. Pressing the Talkback button activates
the built-in Talkback Mic, which is below the pinhole* located between the Home and Speak-
ers A buttons.
CAUTION
Damage to the product
Avoid touching the built-in microphone or applying pressure while engaged.
X
Do not insert any object or liquid into the hole, or use a vacuum over the mic hole as it
could permanently damage the microphone.
• Bottom Panel
3/8” thread for mounting the MT 48 on a mic stand
TFT LCD
Multi touch display
Home Button
Access to main menu
and settings
Built-in Microphone
Talkback Speaker Set Selectors
Configurable
Headphone Selectors
Configurable
Mute Control
Configurable
Talkback Control
Configurable
Multi-function Rotary Control
Volume and gain control/
Settings
MT 48 | 6
Inputs and Outputs
Analog I/O
The MT 48 has four analog inputs and eight analog outputs. The latter are configured as stereo
pairs.
• Mic/Line Inputs 1+2 are located on the back of the unit as combo jacks. Use the XLR part for
microphones and use the TRS part for line sources.
• Instrument/Line Inputs 3+4 are located on the front of the unit as a matter of convenience,
when you plug in a guitar or bass. These inputs can also be used for line signals.
• Main Outs 1+2 with XLR connectors are located on the back. Usually, these will be connected
to your studio monitor loudspeakers.
• Line Outs 3+4 with TRS connectors are located on the back of the unit. These can be used for
a secondary pair of monitor loudspeakers or other purposes, such as sending a line signal to
an external headphone amplifier in the live room or vocal booth.
• Two stereo headphone outputs are located on the front. Headphone output 1 and 2 are inde-
pendent of each other and can be addressed separately.
ADAT
Optical input and output
MIC / LINE IN
XLR and 6.3 mm TRS combo sockets for
microphone and line signals
Kensington Lock
for optional accessories
Power Switch
for switching the
device on and off
POWER and DATA
USB-C sockets for power supply unit
and data connection
(use supplied USB cables only)
LINE OUT
2x 6.3 mm TRS outputs
MAIN OUT
2x XLR-3M outputs
DATA
RJ-45 socket for digital audio (AoIP)
and optional Power over Ethernet (PoE) supply
GPIO/MIDI
General purpose in and out
or MIDI in and out
INST/LINE
2x 6.3 mm TRS Hi-Z or Line inputs

MT 48 | 7
Digital I/O
In addition, the MT 48 may be expanded via ADAT / S/PDIF optical and AES67
• ADAT allows for adding up to eight input and output channels via dedicated converters.
ADAT channel count depends on the sampling rate used: 8 channels up to 48 kHz, 4 channels
up to 96 kHz and 2 channels up to 192 kHz. The optical connectors can also be used in S/
PDIF mode for stereo I/O up to 96 kHz.
• AES67 is an open standard in networked audio, which has been embraced by the broadcast
market and is now gaining traction in the world of recording as well. AES67 supports high
channel counts even at double and quad sampling rates. The AES67 port is bidirectional, so
input and output devices can be connected to the MT 48 at the same time using a standard
ethernet switch.
GPIO/MIDI
• These two TRS connectors can be used in GPIO mode for switching, e.g. connecting a foot-
switch or remote switching a recording light indicator. Or you can use them in MIDI mode as
MIDI in and out, using TRS to DIN5 adapter cables (sold separately).
Powering
• Please use the included power supply and connect it to the USB-C port labeled POWER using
one of the cables provided.
• Alternatively, the MT 48 also works via Power over Ethernet with switches that support the
PoE+ standard.
• Switch the device on/o using the power button.
OR
Power over Ethernet
OFF ON

MT 48 | 8
Register your product
To register your MT 48, please go to mt48.neumann.com
Driver installation
Although the MT 48 works on Mac systems without driver installation, you need to install the
MT 48 Toolkit for full access to all of its features. On Windows systems, installing the MT 48
driver is mandatory.
• Go to mt48.neumann.com and download the installer package to your computer.
• Double click the installer for your computer operating system and follow the on-screen
instructions.
• Important note for Mac users: macOS requires the drivers to be approved. During the instal-
lation, you will have a “System extension blocked” message, go in the Security preferences
to unlock the driver.
• After restart, you will notice the Neumann logo of the MT 48 AGENT in the taskbar/menu bar
of your computer.
• If your MT 48 requires a firmware update, see Appendix “Updating the firmware” on page
38
Setup
XPlace the MT 48 on a hard surface. Make sure it stands on its rubber feet to allow airflow to
the MT 48’s bottom plate.
XConnect the power supply to the USB-C port labelled “Power”
XConnect the MT 48’s USB-C port labelled “Data” to your computer using the supplied cables
(USB-C to USB-C or USB-C to USB-A).
The MT 48 uses the High Speed protocol supported by USB 2.0 or higher ports. Should the
MT 48 not work properly on a USB 3.0 (or higher) port, please use a USB 2.0 port. Some
non-Intel USB 3.x chipsets are not fully backward compatible for use with audio devices.
XPress the Power button on the MT 48. Booting takes about 60 seconds.
After a few seconds, the Neumann symbol of the MT 48 Agent in the taskbar/menu bar of your
computer becomes solid to show that the MT 48 is connected and can be used.
Connecting your gear
The MT 48 includes a sophisticated mixer for each of its four output pairs, so you do not need
a monitor controller.
XConnect your main speakers directly to the Main Outs (XLR, balanced).
XIf you have a secondary set of speakers, connect them to Line Outs 3+4 (TRS, balanced)
XConnect your headphones to the headphone outs 1 and 2 on the front. Both outputs can be
addressed separately and have their own mixers.
XConnect microphones or line devices to Mic/Line Inputs 1+2 (XLR/TRS combo, balanced) For
microphones, use XLR cables only. For line sources use the TRS input.
XConnect your guitar or bass to Line/Instrument Inputs 3+4 (TRS) on the front. These inputs
have a very high impedance (1 MΩ unbalanced, 2 MΩ balanced) to capture the tone of mag-
netic pickups without losses. But they can also be used for low impedance sources such as
electronic keyboards, drum machines or line level studio gear.
X
GPIO/MIDI: Per default these ports are set to MIDI mode. Connect Synths, drum machines
and other MIDI gear using TRS to DIN5 adapters (sold separately). Alternatively, you can use
these ports for various switching functions, e.g. to connect a footswitch for activating talkback.

MT 48 | 9
Adding I/O via ADAT / S/PDIF and AES67
The MT 48 oers two ways for adding more I/O channels:
ADAT
• ADAT is an established standard used predominantly in project studios. ADAT allows for up
to 8 channels via optical connectors at sampling rates up to 48 kHz. At higher sampling rates
the channel count reduces to 4 channels at double sampling rates up to 96 kHz and 2 chan-
nels at quad rates up to 192 kHz.
• Alternatively, the optical I/O can be used in S/PDIF mode, allowing for 2 channels at all
sampling rates up to 96 kHz.
AES67
• AES67 is an open standard for audio-over-IP networks which ensures interoperability
between various audio network protocols such as DANTE, RAVENNA. AES67 was developed
by the Audio Engineering Society (AES) and has been embraced by the broadcast market
but is gaining more traction in recording environments as well. AES67 uses ethernet con-
nections and can handle high channel counts even at high sampling rates. The AES67 port
on the MT 48 is bidirectional, it can send and receive audio data simultaneously. Using a
standard ethernet switch you could connect a Neumann AES67 loudspeaker and Merging
converters at the same time. Note: The MT 48 supports the RAVENNA protocol, which is fully
compliant with AES67 and SMPTE ST 2110.
• Peering is a particularly convenient form of AES67/RAVENNA. Currently this only works with
devices by Merging Technologies (who are now part of Neumann), such as Hapi, Horus, and
Anubis. These high-end converters can be seamlessly integrated via Peering for I/O expan-
sion and remote controlling their preamps and other functions from the MT 48.
MT 48 | 10
Configuring the MT 48 to your needs
USB I/O
The MT 48 driver supports up to 32 input and 16 output channels at sampling rates up to 48
kHz.
At higher sampling rates up to 96 kHz, the channel count reduces to 16 input and 16 output
channels
At highest rates up to 192 kHz, the MT 48 driver can handle up to 8 input and 16 output chan-
nels.
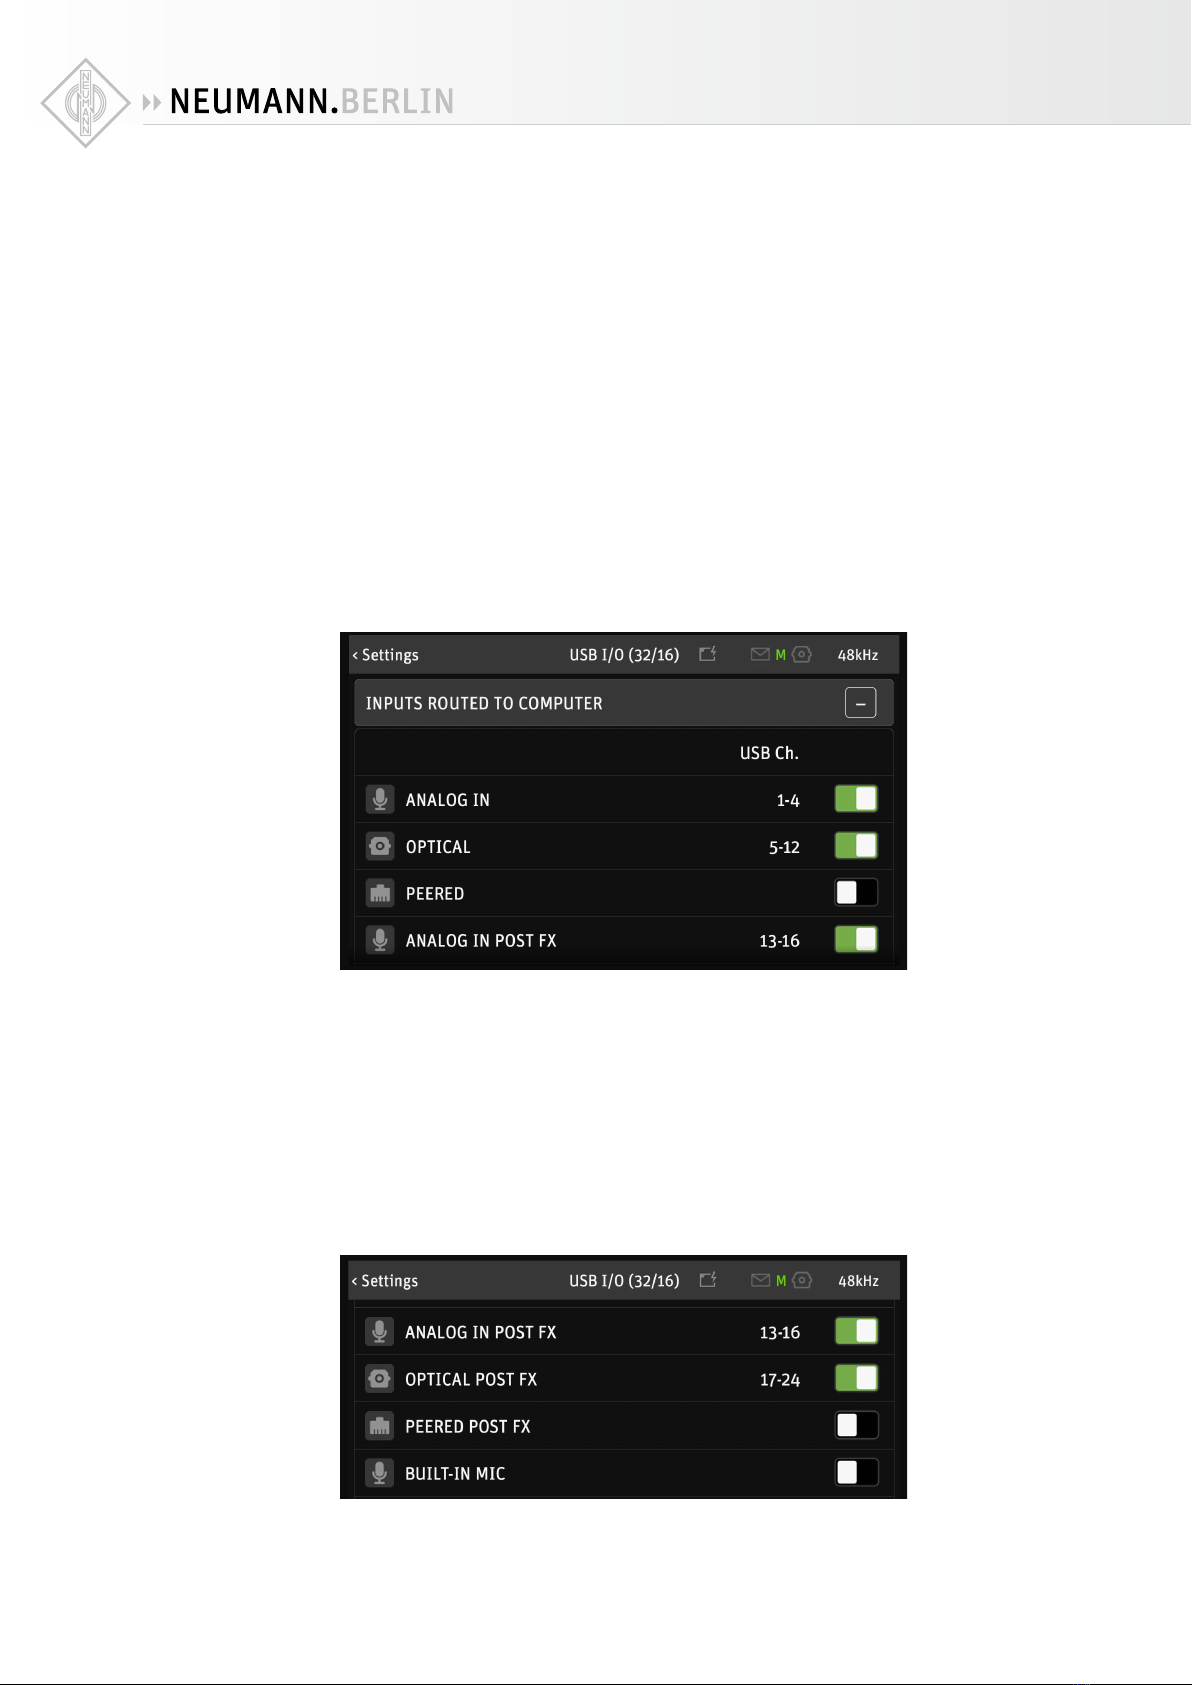
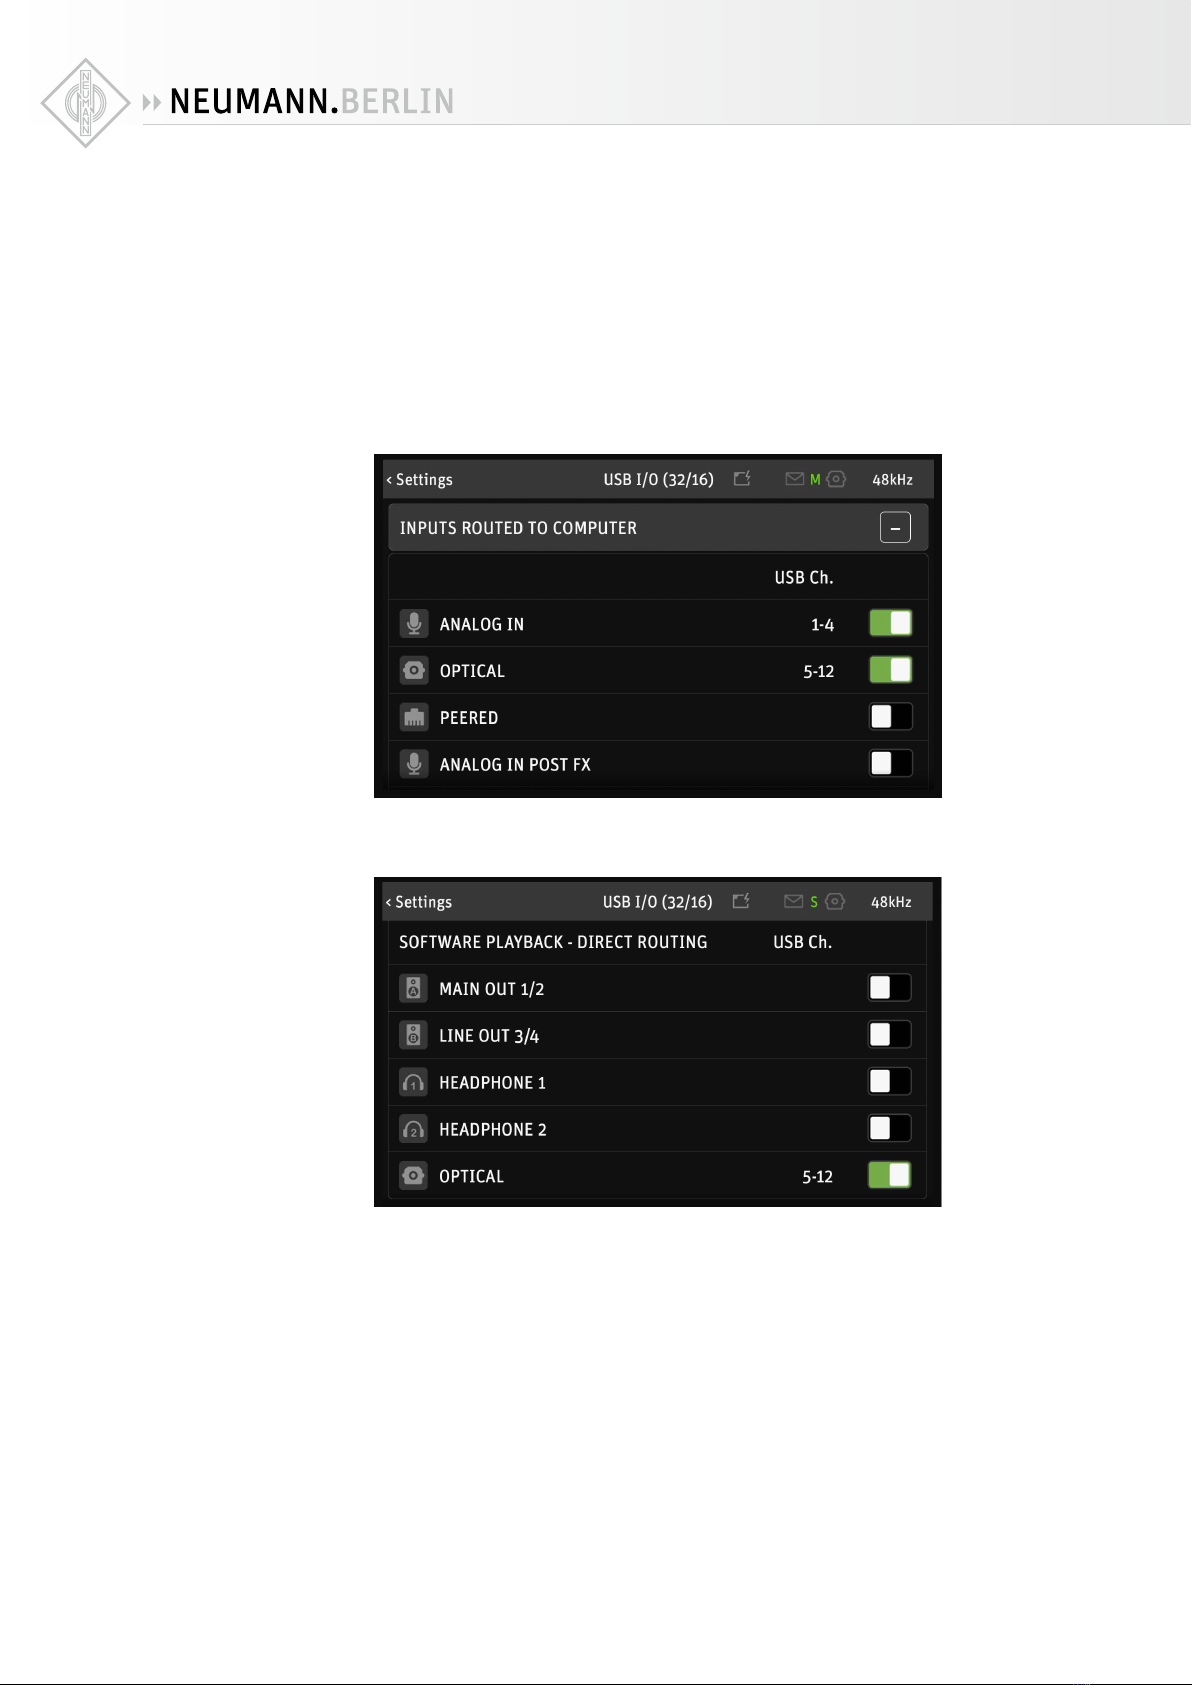
Under SETTINGS → USB I/O you can select which channels are sent to and received and from
the computer via USB. Channel numbers are assigned dynamically.
This menu has three sections:
Section 1: Inputs Routed to Computer
• Analog In: these are the two Mic/Line Inputs and the two Line/Instrument Inputs.
• Optical: the ADAT or S/PDIF input. Activate this only if you have ADAT or S/PDIF devices and
want to record their output. If you use optical devices only for monitoring (e.g. a CD player
for reference tracks), there’s no need to activate it as a recording input.
• Peered: This only applies if you use AES67/RAVENNA gear that is Peering enabled, e.g. Hapi,
Horus, or Anubis converters from Merging Technologies.
Analog, Optical and Peered Inputs can also be recorded Post FX, i.e. including the EQ and
Dynamics processing in their respective channels:
• Analog In Post FX
• Optical Post FX
• Peered Post FX

MT 48 | 11
Having this option on separate driver channels allows you to record the same source with and
without processing at the same time, if you wish. That way you can use the on-board process-
ing for creative sound shaping and record a raw backup on a separate track, in case you decide
otherwise.
If you don’t intend to record sources with processing included, you can simply uncheck the
Post-FX entries. Conversely, if you like to record processed signals only, you can uncheck the
unprocessed inputs and only select their Post FX counterparts.
• Built-in Mic – activate this only if you intend to record the Talkback Mic in your session.
Deactivating this entry does not deactivate the Talkback function as such. Please note: Input
4 is shared with the Built-in Talkback. Connecting an instrument or line source to Input 4
will deactivate the built-in Talkback (channel 5).
• Bus Return Mix 1/2/3/4 – This allows you to record the output of one (or more) of the inter-
nal mixers, including signal processing in the input channels and even the reverb eect. A
typical use case would be streaming. For instance, you could plug in a vocal microphone
and a guitar for a musical performance, apply EQ, Dynamics and Reverb and plug in another
microphone for the show host, without Reverb. Routing Bus Return Mix 1/2/3/4 to your
streaming application, your listeners will hear the entire mix, including eects.
Please note: It is a good idea to uncheck any channels you are not going to use. This
gives you a cleaner workflow in your recording software.
Section 2: Software playback
Software playback to MT 48 mixer
DAW1, DAW2, DAW3 and DAW4 are stereo channels from your computer software to the MT 48.
Per default, DAW1 and DAW2 are activated. These channels appear as stereo channel strips in
your MT 48 Mixer. This allows you to create monitoring mixes with the live inputs balanced
against the DAW signal. DAW1 is also where you receive system sounds and the audio output
from consumer software such as media players.
Having more than one DAW channel in your mixer is handy for many applications:
XPut a click track on a separate DAW channel
MT 48 | 12
XUse DAW1 for system sounds and consumer software only and use DAW2 for pro audio appli-
cations
X
Create stems on up to four DAW channels for the artist to create his/her own mix from melodic
instruments/vocals/bass/drums
XMix reference: Compare your DAW Mix with tracks played out from streaming/media player
software.
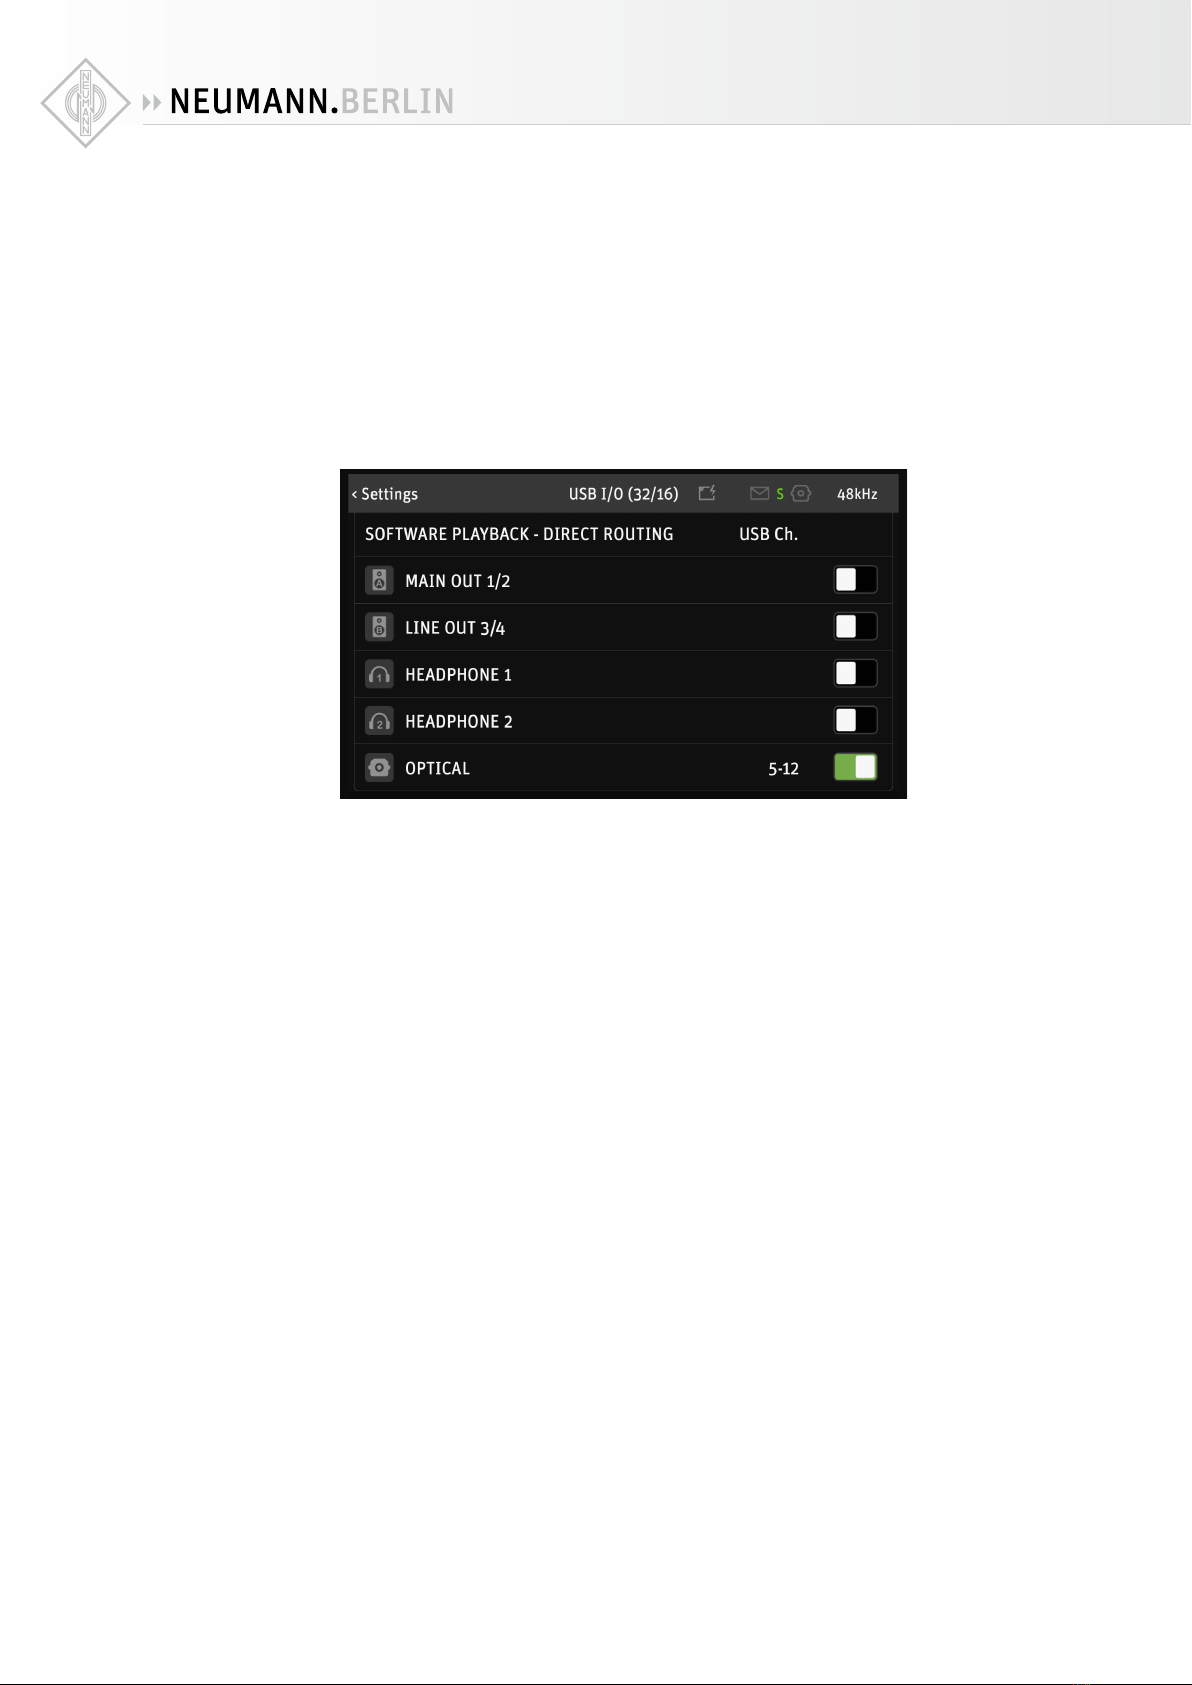
Section 3: Software Playback - Direct Routing
Channels activated in this section bypass the MT 48 Mixer. Usually, that’s NOT what you want.
But it is a useful option in some scenarios, for instance:
• If you want to manage your monitoring in the DAW instead of the MT 48. Direct Routing
allows you to address Headphones and speakers without going through the MT 48 mixer.
Keep in mind, though, that the MT 48 Mixer oers much lower latency compared to DAW
monitoring.
• If you want to use external outboard as hardware plug-ins in your DAW. In this case, bypass-
ing the MT 48 mixer via Direct Routing makes a lot of sense.
MT 48 | 13
Routing example: Using external outboard as hardware
plug-ins in your DAW
Let’s say you have an ADAT AD/DA converter that you want to use to integrate analog outboard
into your workflow as” hardware plug-ins” in your DAW. (You could do the same with analog
inputs/outputs 3+4 or Peered inputs/outputs).
1. Connect the outputs and inputs of your ADAT converter to the inputs and outputs of your
outboard gear.
2. Go to SETTINGS → USB I/O → INPUTS ROUTED TO COMPUTER and activate OPTICAL. Your
ADAT Inputs can now be addressed via the channel numbers displayed.
3. Go to SETTINGS → USB I/O → SOFTWARE PLAYBACK – Direct Routing and activate OPTICAL.
The ADAT Outs can now be addressed directly in your DAW via the channel numbers dis-
played.
MT 48 | 14
4. In the MT 48 Mixer, remove the ADAT Input channels. Go to MENU → STRIPS SETUP and
disable all ADAT channels and clear the ADAT Group.
Now you can address outboard gear connected to your ADAT converter via driver I/O chan-
nels.
MT 48 | 15
DAW setup
When you start your recording software or DAW, as it is usually called (DAW = Digital Audio
Workstation), it will usually detect your new audio interface and ask which driver to use.
Depending on your computer system and recording software, there may be more than one
choice. Select the MT 48 driver. On Windows systems, most DAWs rely on the ASIO protocol.
ASIO was developed by Steinberg specifically for audio processing with low latency – which
is crucial for using virtual instruments such as softsynths and realtime audio processing (e.g.
amp modeling). ASIO oers much better performance than Windows system drivers, so almost
all manufacturers have adopted Steinberg’s ASIO driver protocol.
On the Macintosh, system drivers (CoreAudio) oer excellent low latency performance. Some
manufacturers, however, still use ASIO. In practice, this makes little dierence. Depending on
your DAW software, you may have two driver options: “MT 48” and “MT 48 High Precision”.
Either one should work fine. The High Precision driver works with 32 Bit resolution, which isn’t
necessary since the normal driver’s 24 Bit resolution covers a dynamic range of up to 144 dB
– enough for the MT 48.
DAW buer size / latency settings
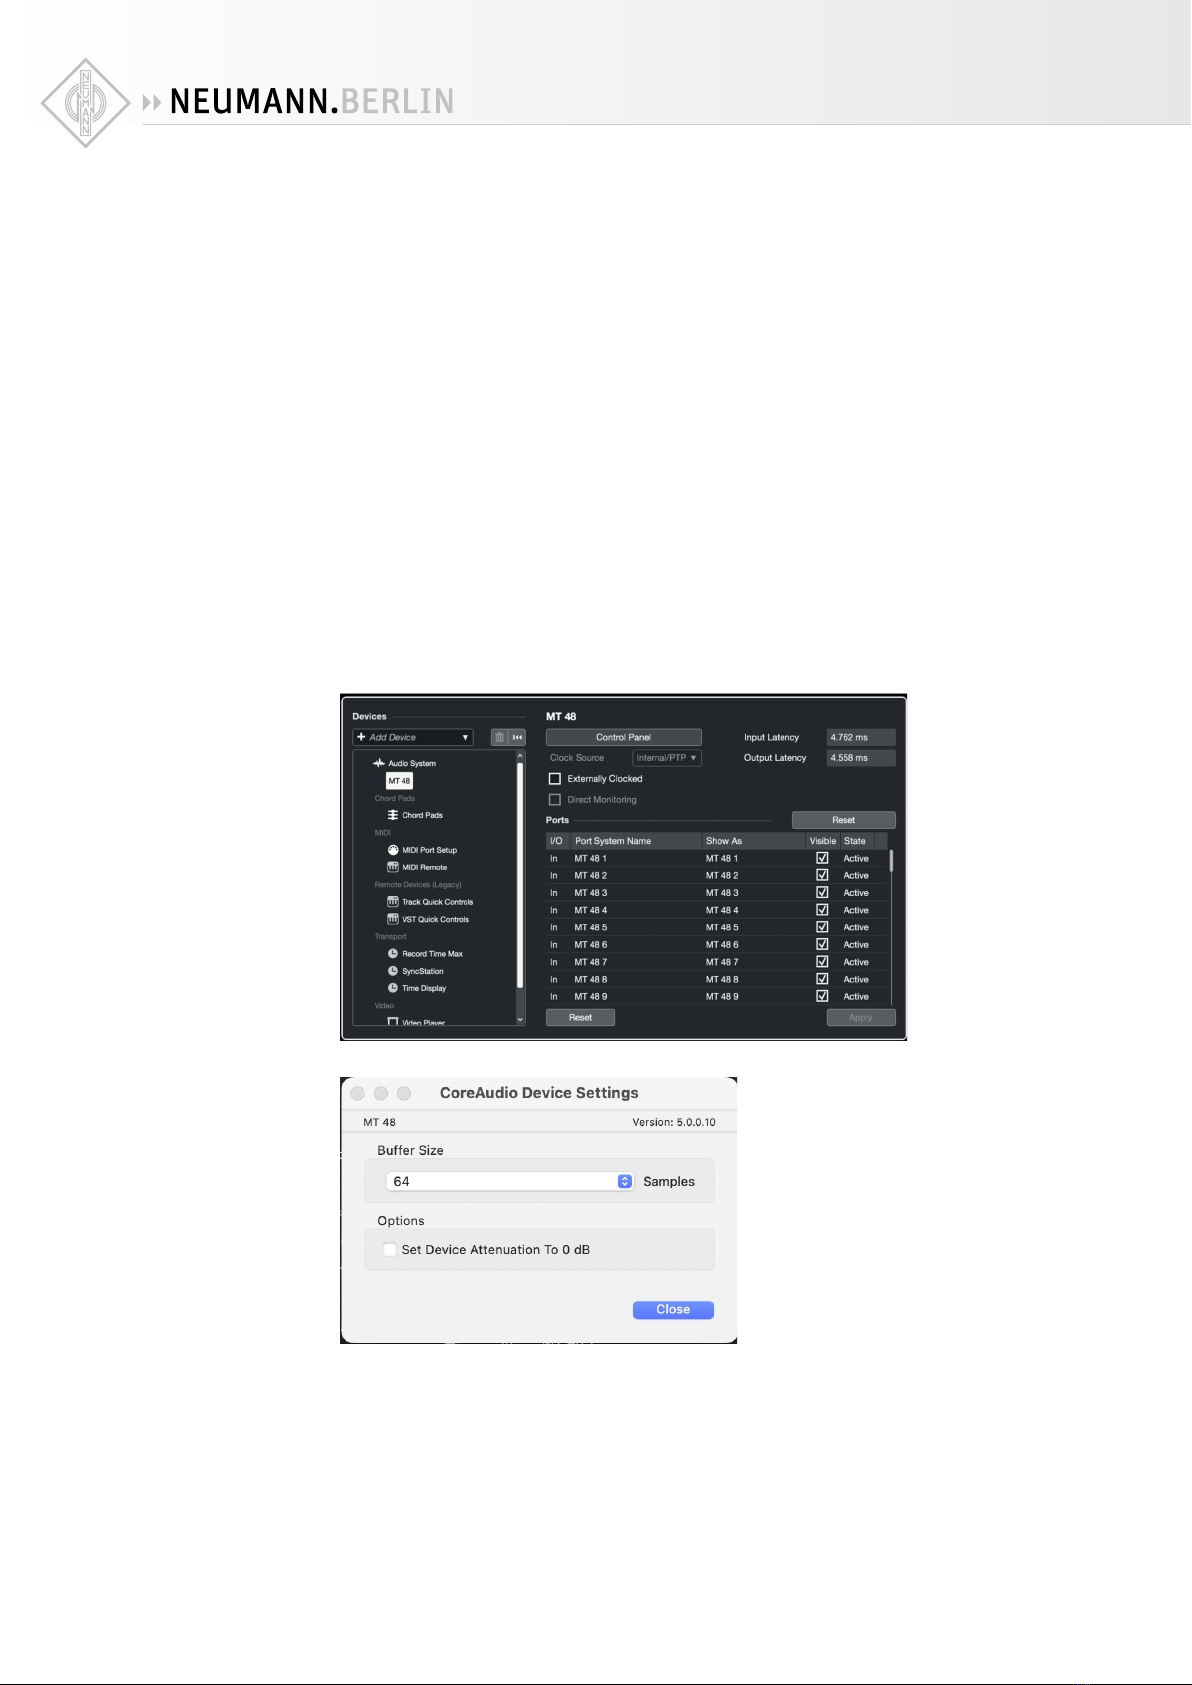
To adjust the Latency settings in your DAW, go to Preferences or Studio Setup – please refer to
your DAW manual. There will be button to open the Control Panel for the MT 48 that allows you
to specify the Buer Size.
Selecting a small buer size will give you lower latency, but it will also increase the CPU load.
Selecting a larger buer size will reduce the CPU load but results in higher latency. A good
starting point is usually 64 samples. This gives you low enough latency for a direct response
when you play softsynths while maintaining good CPU performance.
Keep in mind that low latency is only needed for realtime processing, e.g. playing virtual
instruments. There is input latency and output latency. Output latency is the delay between
hitting a key and the resulting sound. Input latency is irrelevant when you play virtual instru-

MT 48 | 16
ments as the input is MIDI data. Input latency only comes into play when you process an audio
input signal in real time. For instance, when you plug a guitar into the MT 48’s instrument
input and process its audio signal with amp modeling software.
Please note that the latency/buer size settings only relate to your DAW. The monitor
mixers inside the MT 48 always work with ultra-low latency, regardless of the DAW set-
tings. So, you do not need a small buer size for audio recording or mixing. You only
need low latency in when playing virtual instruments or realtime processing an input
signal with plug-ins in your DAW.
MT 48 | 17
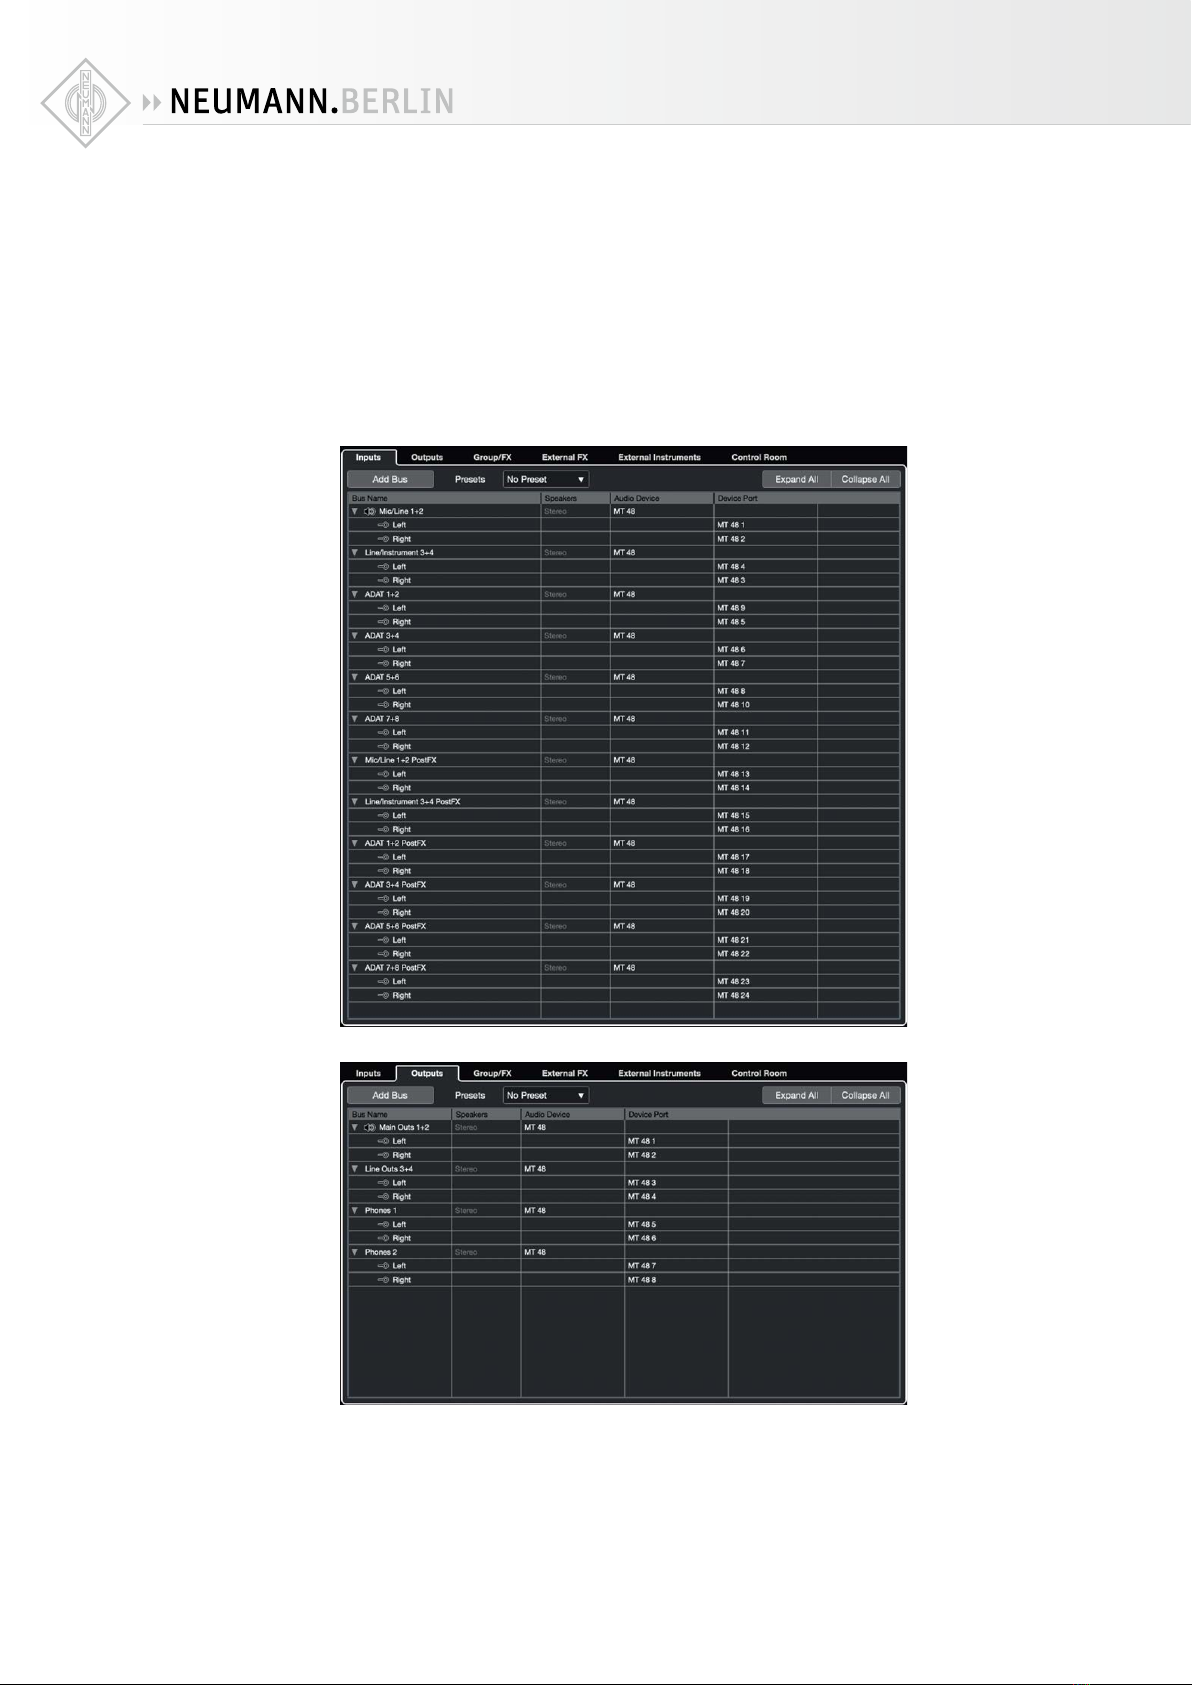
Setting up inputs and outputs in your DAW
In most DAWs inputs and outputs must be activated before you can use them. This is usually
done in Preferences or I/O Setup or Audio Connections – please refer to your DAW manual.
Usually, it is best to setup inputs as stereo pairs as you can use stereo inputs to record mono
tracks (by specifying the left or right channel), but you cannot use mono inputs to record ste-
reo tracks.
Create stereo inputs for all hardware inputs you previously activated in MT 48 USB I/O SETUP.
Channel naming is not transmitted to your computer. To avoid confusion, it’s a good idea to
name the channels in your DAW accordingly. This is what it looks like in Steinberg Cubase/
Nuendo 12; other DAWs work similarly:
Do the same for the Output channels:
Now the correct names will be displayed whenever you select an input or output in your DAW.

MT 48 | 18
Working with the MT 48
Understanding the mixer structure
The MT 48 has a separate mixer for each of its four output pairs:
• Mix1 → Speakers A
• Mix2 → Speakers B
• Mix3 → Headphone 1
• Mix4 → Headphone 2
Pressing the hardware button for SPEAKERS A, SPEAKERS B, HEADPHONE 1, or HEADPHONE 2
will automatically display the respective Mix on the touchscreen and assign the Rotary control
to the output level (volume) of the selected output.
If you do not want or need separate mixes for each output pair, you can assign MIX2, MIX3
and/or MIX4 to follow MIX1.
XGo to MENU → SETTINGS → MONITORING and scroll down to the bottom of the page:
Set like this, SPEAKERS B and HEADPHONE 1 get the same mix as SPEAKERS A while HEAD-
PHONE 2 can have a separate monitoring mix for a musician or singer.
Mixes following MIX1 still have their own output level setting. So when you press the
hardware buttons for SPEAKERS A, SPEAKERS B, HEADPHONES 1, or HEADPHONES 2 you
can adjust their output volume individually (including MUTE).
Pressing the Home Button opens the alternate mixer view.
Each input channel has inserts for EQ and Dynamics processing. EQ and DYN in color indicate
that processing is activated. The Analog Inputs as well as Peered Inputs also have a PREAMP
page.
Please note:
• PREAMP, EQ, and DYN are set for all channels at the same time.
• The same goes for the REV SEND level, as there is only one reverb processor for all four mix-
ers. However, you can adjust the overall reverb level in each mixer using the REV CHANNEL
FADER.
• FADER LEVELS and PAN positions can be adjusted individually for each Mixer

MT 48 | 19
Preamp
Pressing the PREAMP button in the alternate mixer view opens the PREAMP page.
Alternatively, the preamp (as well as many other functions) can be accessed by pressing on the
channel name. This opens a menu; select PREAMP.
Each preamp has a gain knob as well as several additional functions.
• MIC/LINE (Inputs 1+2) switches between Microphone and Line mode. INST/LINE (Inputs
3+4) switches between Instrument and Line mode.
• PAD (Mic mode only) allows to attenuate the input signal by 12 or 24 dB to accommodate
high input levels.
• CUT mutes the input.
• Ø reverses the polarity of the input signal (often called “phase reverse”)
• LOW CUT activates a filter to combat rumble. The cut-o frequency is selectable: 40/60/80
Hz. Please note that the low cut filter always aects the recorded signal, even on the Pre-FX
driver channels.
• 48V (Mic mode only) activates 48 Volts phantom power for condenser microphones (and
other microphones with active electronics)
• GAIN is adjusted by selecting the gain knob and then turning the Rotary Controller. It’s good
practice to leave at least 10 dB headroom. The Meter in the middle has a peak hold function,
which can be reset by tapping the Meter section.
For stereo operation, two channels can be linked by pressing on the chain symbol above the
level display. Any oset in the gain setting is maintained, which allows you to compensate dif-
ferences in sensitivity.
Settings can be locked by clicking on the lock symbol next to the gain knob.
Tip: You can go to the neighboring channels’ preamp page by swiping to the left or right.

MT 48 | 20
EQ
The MT 48 mixer features a sophisticated 4-band equalizer on every channel. This EQ is based
on the acclaimed EQ-X of Merging’s award winning Pyramix digital audio workstation. Like
EQ-X, the MT 48 equalizer works without audible artifacts.
Each of its four bands can has four controls:
• TYPE: low cut, low shelf, peak, high shelf, high cut
• FREQUENCY: 20 Hz … 20 kHz
• GAIN: ±24 dB
• Q: 1 (wide) …100 (very narrow)
Adjust values by selecting a parameter on the touchscreen and turning the Rotary Control.
The resulting curve is shown in the display.
Dynamics
The MT 48 mixer features complex Dynamics processor on every channel. It has three sections:
Gate, Compressor, and Limiter, each with their own bypass switch. So you can use one or two
or even all three sections at the same time. In addition, there is a global bypass switch for the
entire Dynamics processor.
Each band can be bypassed individually. A global EQ bypass is to the right of the frequency
display.
Gate
A gate is useful to suppress unwanted noise in (short) pauses of the wanted signal.
Gate has the following parameters:
Table of contents
Other Neumann.Berlin Recording Equipment manuals


