Neunaber Expanse Series User manual

EXPANSE SERIES

Thank you for purchasing our product. We really mean it.
We hope to earn your trust by delivering a quality product
that inspires you to make great music.
Neunaber products are designed and manufactured in
Orange, California USA.
EXPANSE SERIES
USER GUIDE
Please visit www.neunaber.net for more information and support.
output 1
mix knob
9V DC
output 2
USB port
EXPANSE PEDAL 2
ExP CONTROLLER 14

1
input 1output 1
effect-
dependent
knob
mix knob
ExP port
9V DC
input 2
bypass
switch
output 2
USB port
ExP
pprreseteset
morphmorph
lleefftt cencentterer ttoo
pedalpedal
rightright
eexpxprression input session inputs
pprreseteset
eeffffectect

2
CONNECTIONS
We usually recommend that this pedal be placed at the end of your chain, after
other effects. If you are using the overdrive channel of your amplifier, this effect
should be placed in the effects loop for best results.
The POWER JACK accepts a standard (5.5 mm OD x 2.1 mm ID) center-negative
pedal power adapter (not included). The power adapter must be between 9 V and
12 V and capable of supplying 100 mA or more.
The INPUT JACKS (right side) accept inputs directly from your instrument,
amplifier eects loop output, or other eect pedals via standard 1/4” (6.35 mm)
phone connectors.
• Input 1 only accepts a mono input.
• Both Inputs 1 & 2 accept a stereo input.
• Input 2 only accepts a stereo TRS input.
EXPANSE

3
The input and output connections are independent. You may—for example—use a
mono input with stereo outputs or stereo inputs with a stereo TRS output.
Important! Input/output 1 and input/output 2 should not be used with two discrete
signals (such as two different instruments).
The USB JACK allows you to plug the pedal into your Mac or PC using a standard
micro-B cable and change the effect using Expanse software, available at
neunaber.net (see the Configuration section for details).
The OUTPUT JACKS (left side) supply output to another eect pedal, an amplifier,
or eects loop return via standard 1/4” (6.35 mm) phone connectors. The buered
output is capable of driving long cables. If plugging into the input of an amp, you
should use the low impedance (Lo-Z) input if available.
• Output 1 only supplies a summed mono output.
• Both Outputs 1 & 2 supply a stereo output. Using both outputs creates a
stereo signal from a mono input.
• Output 2 only supplies a stereo TRS output.

4
The ExP PORT connects to an (optional) ExP controller.
The FOOT SWITCH bypasses the eect. The LED lights when the eect is active.
Bypassing the eect does not lower power consumption, because it does not turn
o power to the pedal.
When using buered bypass, the signal is always buered whether the LED is on
or o. Trails bypass is implemented for those eects that support it (reverb and
echo).
Pedals that support true bypass have three selectable bypass options: (1) buered
trails, (2) true bypass and (3) two-stage trails/true bypass.
Note: A knob change cannot be detected when the pedal is o. When the pedal
is powered on, it will revert to the stored state of the knob. When in doubt, turn the
knob, and it will “snap” to the current setting.
CONFIGURATION
Programming an Expanse pedal is a two-step process:
1. Load a dierent eect using Expanse software, downloadable from neunaber.net.
2. Configure the Mix Knob & Switch Behavior on the pedal itself.
These two steps are independent. For example, loading an echo eect does
not automatically enable the tap tempo functionality. This must be enabled by
configuring the Second Switch Function.

5
MIX KNOB & SWITCH BEHAVIOR
Dry Signal Mix, Bypass Mode, and Second Switch Function are configured on the
pedal itself and can be dierent for each eect (if you have an ExP).
DRY SIGNAL MIX - is how the Mix knob aects the dry signal. Generally, the level
increases as you turn the knob up, but there are dierent strategies and some
work better than others depending on the eect:
• Steep End Drop— The dry signal is constant until 50% Mix, then gradually
lowers until about 3 o’clock where it drops o steeply. At 100% Mix, the dry
signal is muted. This works well for reverb and echo.
• Unity Power Sum— The dry signal is lowered gradually (-3 dB at 50% Mix),
which results in a constant power sum with wet signals and an even mix at 12
o’clock. This works well for chorus.
• Unity Dry Signal— The dry signal remains constant throughout the Mix knob’s
range. This works well if you don’t want 100% wet signal. The total signal level
will increase by up to 3 dB with the knob at full.
• Split Wet/Dry— A special mode reserved for wet/dry setups.

6
BYPASS MODE - Selects the type of bypass (if your pedal supports true bypass):
• Buered— the only option without true bypass installed. For trails bypass,
select this option.
• Relay— true bypass
• 2-Stage— switches to a buered trails bypass while the footswitch is held down,
then to true bypass when released. This option allows for both trails and true
bypass, where you control the length of the trail.
Important! Buered bypass must be selected for the Infinity Hold eect.
SECOND SWITCH FUNCTION - Selects a second function for the footswitch,
which is particularly useful for certain eects like echo and shimmer:
• None— no second function
• Tap Tempo with Bypass Priority— bypass is always toggled, tap tempo is set if
footswitch pressed again within 1 second
• Tap Tempo with Tap Priority— bypass is toggled only when the footswitch is not
pressed again within 1 second. This results in a 1 second delay when bypassing
but avoids toggling bypass when setting tap tempo.
• Long Press Enables Right Knob— pressing the footswitch for greater than ½
second enables/disables the right-hand knob. “Disabling” the knob is equivalent
to turning it fully counter-clockwise.

7
CHANGING MIX KNOB & SWITCH BEHAVIOR
The Mix Knob and Switch Behavior may be changed using a special
start-up sequence:
1. Remove power from the pedal.
2. Hold the footswitch down.
3. Reapply power while keeping the footswitch held down.
4. If using the ExP, change to the effect slot you want to configure.
5. Turn the knob(s) as described below.
6. If using the ExP, go back to #4 to configure additional effect slots.
7. Release the footswitch.
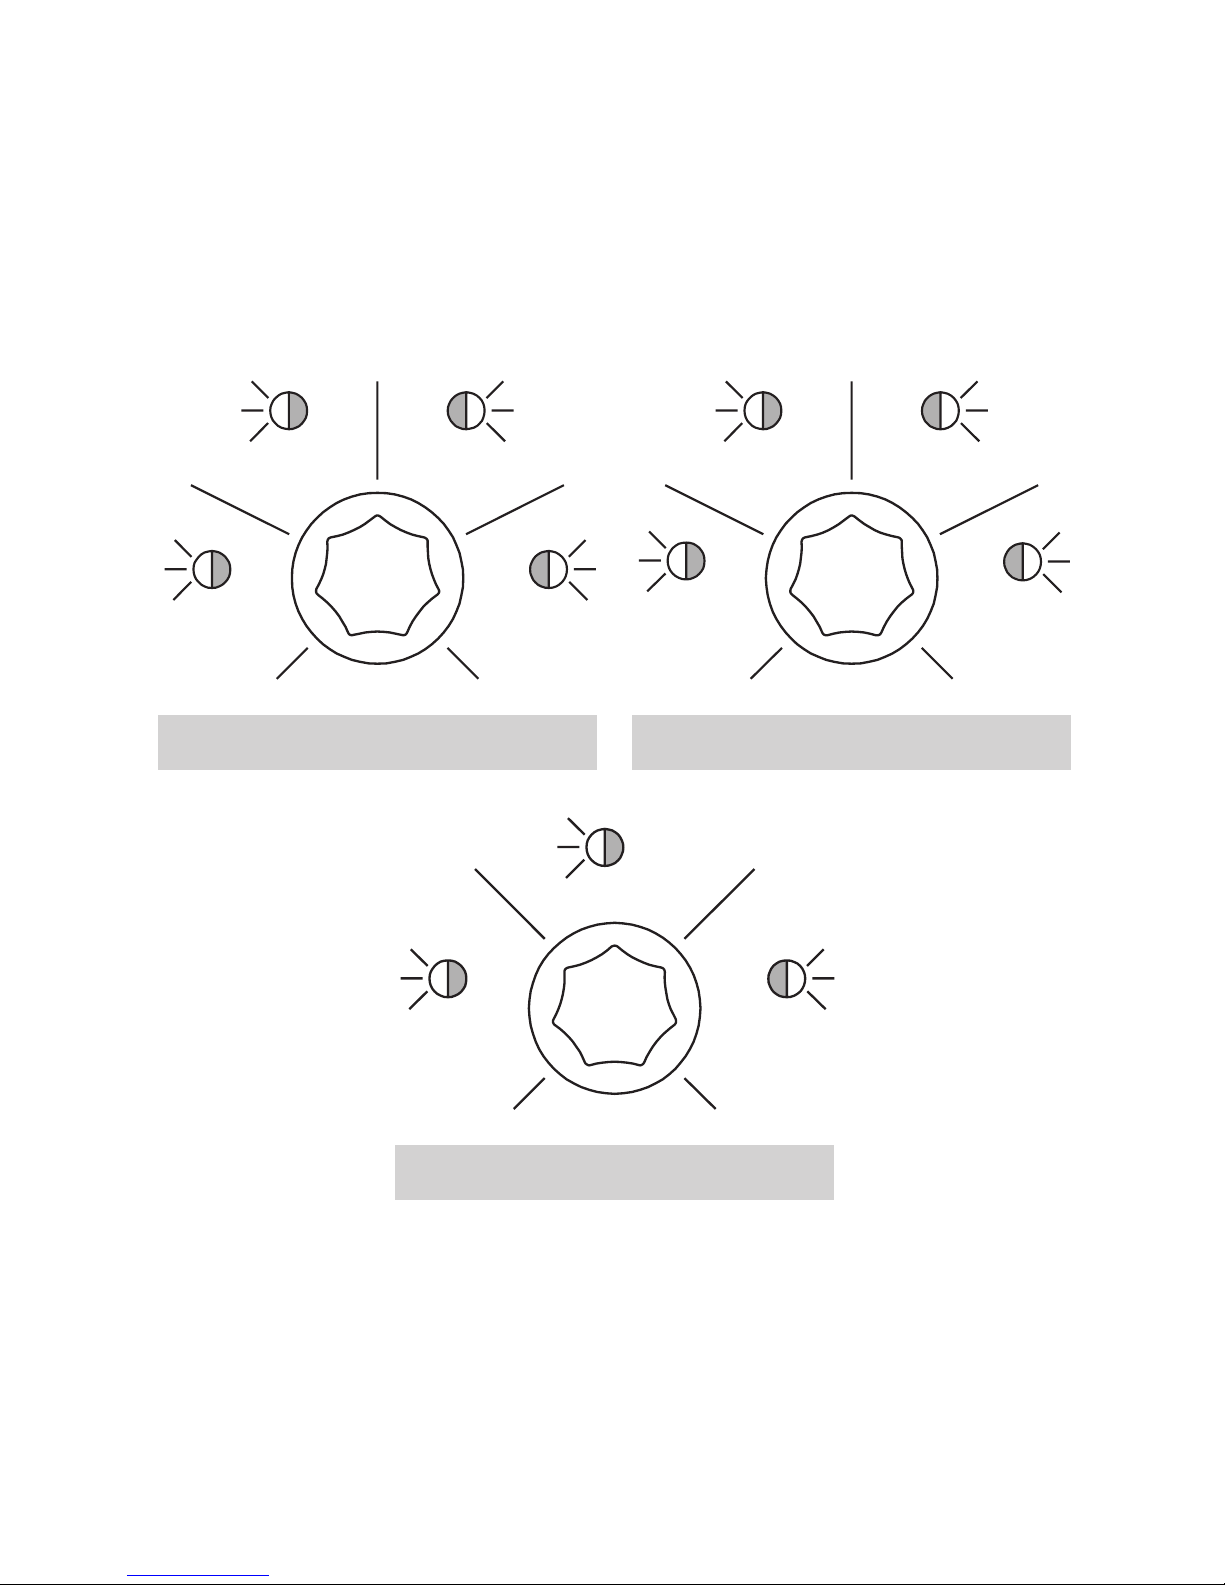
Each knob selects one of the three behaviors:
Left: Dry Signal Mix Center: Bypass Mode Right: Second Switch Function
The LED blinks to indicate the range selected (see next page). Turn the knob
slowly: there is a lag between the knob change and the LED blinking. If the LED
does not blink, then the function did not change from its stored value.
You may change more than one knob during this sequence. A stored behavior will
only change if its knob changes. When finished, release the footswitch, and the
new behaviors will be saved.
Important! Second Switch Functions and 2-Stage Bypass are mutually-exclusive.
The pedal does not allow these functions to be selected simultaneously.
Note: When using the ExP Controller, the Mix Knob & Switch Behavior must be
programmed separately for each of the four eects.
8
Bypass Mode
relay
x 2
2-stage
3 x
buffered
x 1
unity dry signalunity power sum
x 2
steep
end drop
split
wet/dry
x 1
3 x
4 x
Dry Signal Mix
tap tempo (tap pri)tap tempo (byp pri)
x 2
none long press
enables
right knob
x 1
3 x
4 x
Second Switch Function

9
RECOMMENDED & DEFAULT FUNCTIONS PER EFFECT TYPE
Eect
Reverb
Shimmer
Echo
Chorus
Hold
Hold w/ Reverb
Tremolo
Flanger and
Phaser
Second Switch
None
Long Press (for shimmer)
Tap Tempo
None
None
Long Press (for reverb)
None or
Tap Tempo
None
Dry Signal Mix
Steep End Drop
Steep End Drop
Steep End Drop
Unity Power Sum
Unity Dry Signal
Steep End Drop
Steep End Drop
or Unity Power Sum
Steep End Drop
or Unity Power Sum

10
ABOUT TAP TEMPO
TAP TEMPO has three selectable options:
• None (no Tap Tempo)
• Tap Tempo with Bypass Priority—bypass is always toggled, and tap tempo is set
only if the switch is triggered again within 1 second
• Tap Tempo with Tap Priority—bypass is toggled only when switch is not triggered
again within 1 second. This results in a 1 second delay in bypassing but avoids
changing bypass state when using tap tempo.
We recommend using Bypass Priority if you rarely use tap tempo. Otherwise, we
recommend Tap Priority.
If you wish to use tap tempo, you must enable this function as described in the
Configuration section. It is not automatically enabled when you load an echo eect
via Expanse software.
To use Tap Tempo, tap the foot switch to the beat (quarter-note tempo). The echo
time will change to the interval between the last two taps. The two taps must be
less than 1 second apart (greater than 60 BPM), because the maximum echo time is
1 second.
The LED will blink the tempo and its blink style indicates whether the pedal is
bypassed or active:
• bypassed: short on, long o
• active: long on, short o

11
You may set the tap tempo at any time, whether the pedal is active or bypassed.
To cancel the tap tempo and return to the time knob setting, hold the footswitch
down for at least 1 second.
With tap tempo active, use the time knob to set the TAP DIVIDE (TEMPO
SUBDIVISIONS). The marks around the time knob indicate time in fractions of the
tap tempo. These fractions are equivalent to music tempo as follows:
Fraction
1
3/4
1/2
1/3
1/4
1/16
Tempo Subdivision
Quarter-note
Dotted 8th-note
8th-note
8th-note triplet
16th-note
16th-note triplet

12
ABOUT LONG PRESS
If you wish to use the Long-Press for Shimmer function, you must enable it as
described in the Configuration section. It is not automatically enabled when you
load the Seraphim eect via Expanse software.
Using the footswitch, you may select between reverb only and shimmer reverb:
• A short press (less than ½ second) enables or bypasses the eect—both reverb
and shimmer.
• A long press (greater than ½ second) enables or bypasses the shimmer only,
whether or not the eect is currently bypassed.
• The LED indicates the current mode as follows:
Similarly, you may use the Long Press function to enable/disable the reverb with the
Infinity Hold w/ Reverb eect.
LED
constant o
constant on
short pulse
long pulse
Bypass
bypassed
enabled
bypassed
enabled
Eect
reverb
reverb
shimmer
shimmer
13
ELECTRICAL
Nominal Input Level -10 dBV, instrument level
Absolute Max Input Level 6 dBV
Input Impedance 1 MΩ (mono), 2 MΩ (stereo)
Output Impedance 500 Ω (mono), 1 kΩ (stereo)
Gain, enabled vs. bypass 0 dB (Mix @ 0)
Frequency Response 20 Hz—20 kHz, +0.1d B, -0.5 dB
(dry signal or bypassed)
Total Harmonic Distortion < 0.007 % typical (dry signal or bypassed,
22 Hz—22 kHz, 1.0 Vpk)
Signal-to-Noise Ratio 106 dB mono, 103 dB stereo (A-weighted)
POWER
Power Adapter Input 9-12 V DC, 100 mA (true bypass version with ExP)
Plug: center-negative, 5.5 mm OD x 2.1 mm ID
PHYSICAL
Dimensions 2.9” W, 4.6” L, 2.0” H / 73 mm W, 117 mm L, 51 mm H
Weight 8.0 oz / 227 g
*Specifications subject to change without notice.
EXPANSE PEDAL SPECIFICATIONS

14
The (optional) ExP Controller Pedal allows accesses to all additional functionality
embedded in an Expanse-series pedal:
• Four effects (1-4)
• Two presets for each effect (A & B)
• Three expression inputs
• A Preset Morph expression input
CONNECTIONS
Connect the ExP to the Expanse pedal’s ExP Port via the included cable. Power is
provided by the Expanse pedal.
Note: If nothing is connected to the ExP Port, the pedal defaults to Effect 1,
Preset A.
CONTROLLING MULTIPLE PEDALS
Two Expanse-series pedals can be controlled simultaneously using an o-the-shelf
“RJ45 Splitter.”
EP CONTROLLER

15
EFFECTS
The Effect footswitch cycles through four available effects. The color of the LED
indicates the Effect number:
white blue green red
Program the four effects into your Expanse pedal using Expanse software:
• Connect the USB cable to your Expanse pedal and open the software.
• Change to the desired effect number (color) using the ExP. The Update button
in Expanse software will display which effect will be programmed.
• Select the desired effect and click Update.
• Repeat for each effect you wish to update.
Each effect remembers its own two presets as well as the Mix Knob & Switch
Behavior. You may need to change the Mix Knob & Switch Behavior for each effect
that is programmed differently than the default.
3 4
1 2

16
PRESETS
Each effect stores two presets: A and B. The Preset footswitch toggles between
the presets, as indicated by the color of the LED:
yellow violet
A “preset” simply stores the knob positions. Presets are automatically stored when
a knob position is changed. Only knobs that change are updated in the preset.
Note: Once you change a knob, there is no way to return to the previous value.
USING THE EFFECTS AS PRESETS
If you want more than two presets for a particular eect, program the same eect
into multiple slots. Using this method, you can have up to eight presets for one
eect.
A B

17
EXPRESSION INPUTS
The Expression Inputs are compatible with the following expression pedals
(including but not limited to): Roland EV-5*, M-Audio EX-P*, AMT EX-50, Moog EP-
3, Mission EP-1. Each Expression Input controls the knob indicated; for example,
the “left” expression input controls the left-hand knob on the Expanse pedal.
*Recommended
With an expression pedal attached, the knob sets the maximum range of the
expression pedal. Remember—since a preset stores the knob position, this value
becomes the maximum of the expression pedal’s range when a preset is recalled.
The Expression Inputs are not stored as part of a preset; only the knobs are
stored.
Multiple Expression Inputs can be used concurrently. However, if you wish to
synchronously change multiple knob parameters, the Preset Morph function was
designed specifically for this purpose.
Note: The Expression Inputs work only with TRS-plug “expression” pedals, not TS-
plug expression or “volume” pedals.
Note: Expression Input 3 (right knob) is disabled when Tap Tempo is active.

18
PRESET MORPH
The Preset Morph input accepts an expression pedal, like the expression inputs,
but will morph between your two presets. “Morph” means that the knob values
transition proportionately with the expression pedal, from Preset A at toe down to
Preset B at heel down.
The Preset footswitch can be used while the Preset Morph expression pedal is
connected; however,
• Preset A (yellow) must be selected to use the Preset Morph expression pedal,
or
• The Preset Morph expression pedal must be toe down (yellow) to use the
Preset footswitch.
In other words, you can use either the footswitch or expression pedal to change
the preset, as long as you start with Preset A (yellow).
Presets can be updated (by changing a knob) while using the Preset Morph
function, but the expression pedal should be near toe-down or heel-down for the
nearest preset to be updated. Within the middle of the range, knob changes will
have no eect.
Table of contents
Other Neunaber Music Pedal manuals

Neunaber
Neunaber SERAPHIM SHIMMER v2 User manual

Neunaber
Neunaber WET REVERB v5 User manual

Neunaber
Neunaber Wet v4 User manual

Neunaber
Neunaber Immerse Mk II User manual

Neunaber
Neunaber Wet User manual

Neunaber
Neunaber SERAPHIM shimmer User manual

Neunaber
Neunaber Immerse Mk II User manual

Neunaber
Neunaber NEURON User manual

Neunaber
Neunaber IMMERSE REVERBERATOR MK II User manual

Neunaber
Neunaber ICONOCLAST User manual


