NeuroNexus SmartBox Pro User manual

NeuroNexus ©2019
| 655 Fairfield Court, Suite 100, Ann Arbor, Michigan USA
Telephone: +1.734.913.8858 | Fax: +1.734.786.0069 | support@neuronexus.com
The latest version of Allego is available on
neuronexus.com on the SmartBox page under
products, data acquisition, then SmartBox Pro!
SmartBox Pro
Quick Start Guide
Version 1.02
Updated September 30, 2019

1
NeuroNexus ©2019
| 655 Fairfield Court, Suite 100, Ann Arbor, Michigan USA
Telephone: +1.734.913.8858 | Fax: +1.734.786.0069 | support@neuronexus.com
Contents
Contents ........................................................................................................................... 1
Introduction ...................................................................................................................... 2
System Overview ............................................................................................................... 3
What’s In The Box.............................................................................................................. 4
Connect the SmartBox Pro to Your Computer ....................................................................... 5
Download & Install the Allego software application .............................................................. 6
System Requirements ........................................................................................................ 6
Activating Allego................................................................................................................ 7
Training with Allego ........................................................................................................... 7
Allego Dashboard .............................................................................................................. 8
Sample Workflows ............................................................................................................. 9
2
NeuroNexus ©2019
| 655 Fairfield Court, Suite 100, Ann Arbor, Michigan USA
Telephone: +1.734.913.8858 | Fax: +1.734.786.0069 | support@neuronexus.com
Introduction
Congratulations on your purchase of the Smartbox Pro / Allego acquisition system!
This completely new system from NeuroNexus enables and accelerates neuroscience
research through its unique combination of performance, ease-of-use, and forward-
looking advanced features, including
1. Plug-and-play compatibility with all NeuroNexus probes and electrode arrays
2. High-quality acquisition and recording of up to 512 channels of neural and
biological signals
3. Unique, highly interactive, probe-centered user interface that allows the
researcher to remain focused on the experiment at hand.
This Getting Started guide is intended to provide a brief overview of the Smartbox Pro /
Allego system and some of its basic functions.
A note on basic terminology: “Smartbox Pro” refers to the hardware component of the
system, i.e., the “Smartbox Pro box”. “Allego” refers to the software application that
interfaces with and controls the hardware box.
IMPORTANT: Please check the NeuroNexus web site for regular updates of this
document and related system documentation, as well as

3
NeuroNexus ©2019
| 655 Fairfield Court, Suite 100, Ann Arbor, Michigan USA
Telephone: +1.734.913.8858 | Fax: +1.734.786.0069 | support@neuronexus.com
System Overview
Front Panel
1
Power
LED/Button
Indicates system status.
2 Headstage
Input Ports
Proprietary HDMI-style ports for connecting SmartLink headstages to Ports
A-D.
3 RE Banana jack for connection to Reference Electrode
(potentiostat/galvanostat).
4
CE Banana jack for connection to Counter Electrode (potentiostat/galvanostat).
5 V/I
Proprietary HDMI-style multifunction port for connection to the SmartBox
Pro MUX adapter to provide access to potentiostat and galvanostat
functions.
Back Panel
1
Digital / Analog
inputs and outputs
BNC connectors for connecting auxiliary signals from other
intruments.
2
System ground
Banana jack for connecting the box to a low-noise earth ground point.
3 USB 3.0 connector
Connect to a USB 3.0 port on PC/Mac using the supplied USB 3.0
cable.
4 DC power input
Use only the supplied AC power adapter to provide the required DC
voltage input.
5 Audio output
Stereo audio Aux jack for connection to speakers to monitor the
Analog Output (AO) channels.

4
NeuroNexus ©2019
| 655 Fairfield Court, Suite 100, Ann Arbor, Michigan USA
Telephone: +1.734.913.8858 | Fax: +1.734.786.0069 | support@neuronexus.com
What’s In The Box
-SmartBox Pro unit
-AC Power Adapter
-USB 3.0 cable
-(2) Banana-to-banana cables
-(2) BNC-to-BNC cables
-(2) BNC-to-Alligator cables
-Selected SmartLink headstage amplifier(s)s and headstage interface cable(s)
that are specified in the order
-(optional) Window laptop computer that was specified in the order
5
NeuroNexus ©2019
| 655 Fairfield Court, Suite 100, Ann Arbor, Michigan USA
Telephone: +1.734.913.8858 | Fax: +1.734.786.0069 | support@neuronexus.com
Connect the SmartBox Pro to Your Computer
-Unpack the SmartBox Pro unit from its packagina nd place it on a secure
surface having adequate ventilation.
-Plug the AC adapter into a standard (120 V) wall outlet and connect its DC
power output pin into to the power port of the unit.
-Connect the USB cable to the SmartBox Pro and a USB 3.0 port on your
computer.
With the computer on and connected to the internet, press and release the
Smartbox Pro power LED switch. Your computer should indicate that it has
detected new hardware (Opal Kelly XEM6310-LX45). The necessary drivers
should be automatically installed with no further action necessary. If the driver
does not install or the Allego recording software cannot detect your SmartBox
Pro unit, try downloading and installing the driver located on the NeuroNexus
Downloads page (See the link).
Connect a headstage amplifier to a Smartlink cable and then connect the
Smartlink cable into one of the Smartbox Pro amplifier ports (ports A-D).
Optional – Use a banana cable to attach the Smartbox Pro ground port to a
low-noise earth ground. This may be beneficial for removing extrinsic noise on
the signal lines depending on the particular laboratory environment. (Note:
Regardless of the ground port connections, the recording reference and
ground signals are provided through the configuration of the headstage
amplifier(s)).

6
NeuroNexus ©2019
| 655 Fairfield Court, Suite 100, Ann Arbor, Michigan USA
Telephone: +1.734.913.8858 | Fax: +1.734.786.0069 | support@neuronexus.com
Download & Install the Allego software
application
Allego is the software application for interfacing with the SmartBox Pro unit. The
latest version of Allego can always be found on the downloads page of the
NeuroNexus website:
https://neuronexus.com/products/instrumentation-data-acquisition/smartbox/allego-
download/.
This page is currently password protected with password: SmartboxAllego
Once there, select the link for the appropriate operating system and then select
“Download” to begin the transfer.
Windows
-Launch the installer.
-If you receive a warning against running an unrecognized app, select “Run
anyway”.
-After the installation completes, Allego will launch.
Mac
-Download the Allego installer.
-Double-click the installer to launch.
-Drag the Allego icon into the Applications folder.
-Open the Applications folder by double clicking the folder icon.
-In the Applications folder, double-click the Allego icon while holding down the
control key. Holding down the control key overrides the MacOS security
check, which is only needed during the initial launch.
-After the installation completes, Allego will launch.
System Requirements
System requirements are as follows:
-Storage: SSD. Traditional magnetic hard disks may not be able to perform
sustained write speeds in some configurations.
-USB 3.0
-3rd Generation Intel Core i7 processors or (4 cores), or equivalent.

7
NeuroNexus ©2019
| 655 Fairfield Court, Suite 100, Ann Arbor, Michigan USA
Telephone: +1.734.913.8858 | Fax: +1.734.786.0069 | support@neuronexus.com
Activating Allego
-Launch Allego. Once it has finished initializing and the progress bar disappears,
navigate to the left side of the interface and hit the Settings button.
-Here, the license status of Allego will be displayed. If the status is unknown or
expired, click the request trial or activate button, or contact NeuroNexus
Customer Service to request a license key.
-This will grant a license for several weeks and unlock other parts of the
application.
Training with Allego
To familiarize yourself with Allego before using it with a SmartBox Pro, you may
download and run the SIMULATOR MODE of the software.
If you do not yet have any saved recordings, you may also download and save the
Allego Simulator Data File. A data file must be present in the data folder prior to
launching Allego in simulator mode.

8
NeuroNexus ©2019
| 655 Fairfield Court, Suite 100, Ann Arbor, Michigan USA
Telephone: +1.734.913.8858 | Fax: +1.734.786.0069 | support@neuronexus.com
Allego Dashboard
System
Configure signal sources, which ports will be used,
sampling frequency, etc.
Electrodes
Connected probe designs are selected, along with which
port and headstage will be used.
Signal Processing
Create various filter types and combine them to create
DSP groupings.
Impedance
Various bench tests are located here, including
impedance testing.
Monitor
Shows the signals currently being streamed.
HD Snapshot
Takes a high detail still picture of signals for closer
inspection.
Settings
Activate the software and set visual themes.
Terminal
Allows access to the Allego command prompt terminal
for advanced functions.

9
NeuroNexus ©2019
| 655 Fairfield Court, Suite 100, Ann Arbor, Michigan USA
Telephone: +1.734.913.8858 | Fax: +1.734.786.0069 | support@neuronexus.com
Sample Workflows
Quick Streaming and Saving – Determine if a headstage and probe are
connected properly and can stream data
1. From the dashboard, click Monitor.
2. Choose a name for this monitor if desired.
3. Click Stream. Data should begin to populate the window.
a. If it does not, navigate to the System view to verify that the SmartBox
Pro detects your headstage(s).
4. To save streamed data, click record. The file name and save location are
displayed at the bottom of the window.
10
NeuroNexus ©2019
| 655 Fairfield Court, Suite 100, Ann Arbor, Michigan USA
Telephone: +1.734.913.8858 | Fax: +1.734.786.0069 | support@neuronexus.com
Configuring Recording Settings – Set the hardware configuration and
recording parameters for data acquisition
1. On theleft side ofthe interface, click Electrodes.
2. Choose a name for this tab if you desire. Suggestion: name this according to
the portbeing used on your SmartBox Pro.
3. Choose port, headstage and probe.
4. Toggle + and – signs to enable or disable electrode sites on the probe
wireframe.
a. Individually selected electrode sites will be colored separately.
b. Selected groups of electrode sites will be the same color
c. Colors and channel numbering correspond to colors and channel
numbering that appear in Monitor view (see below).
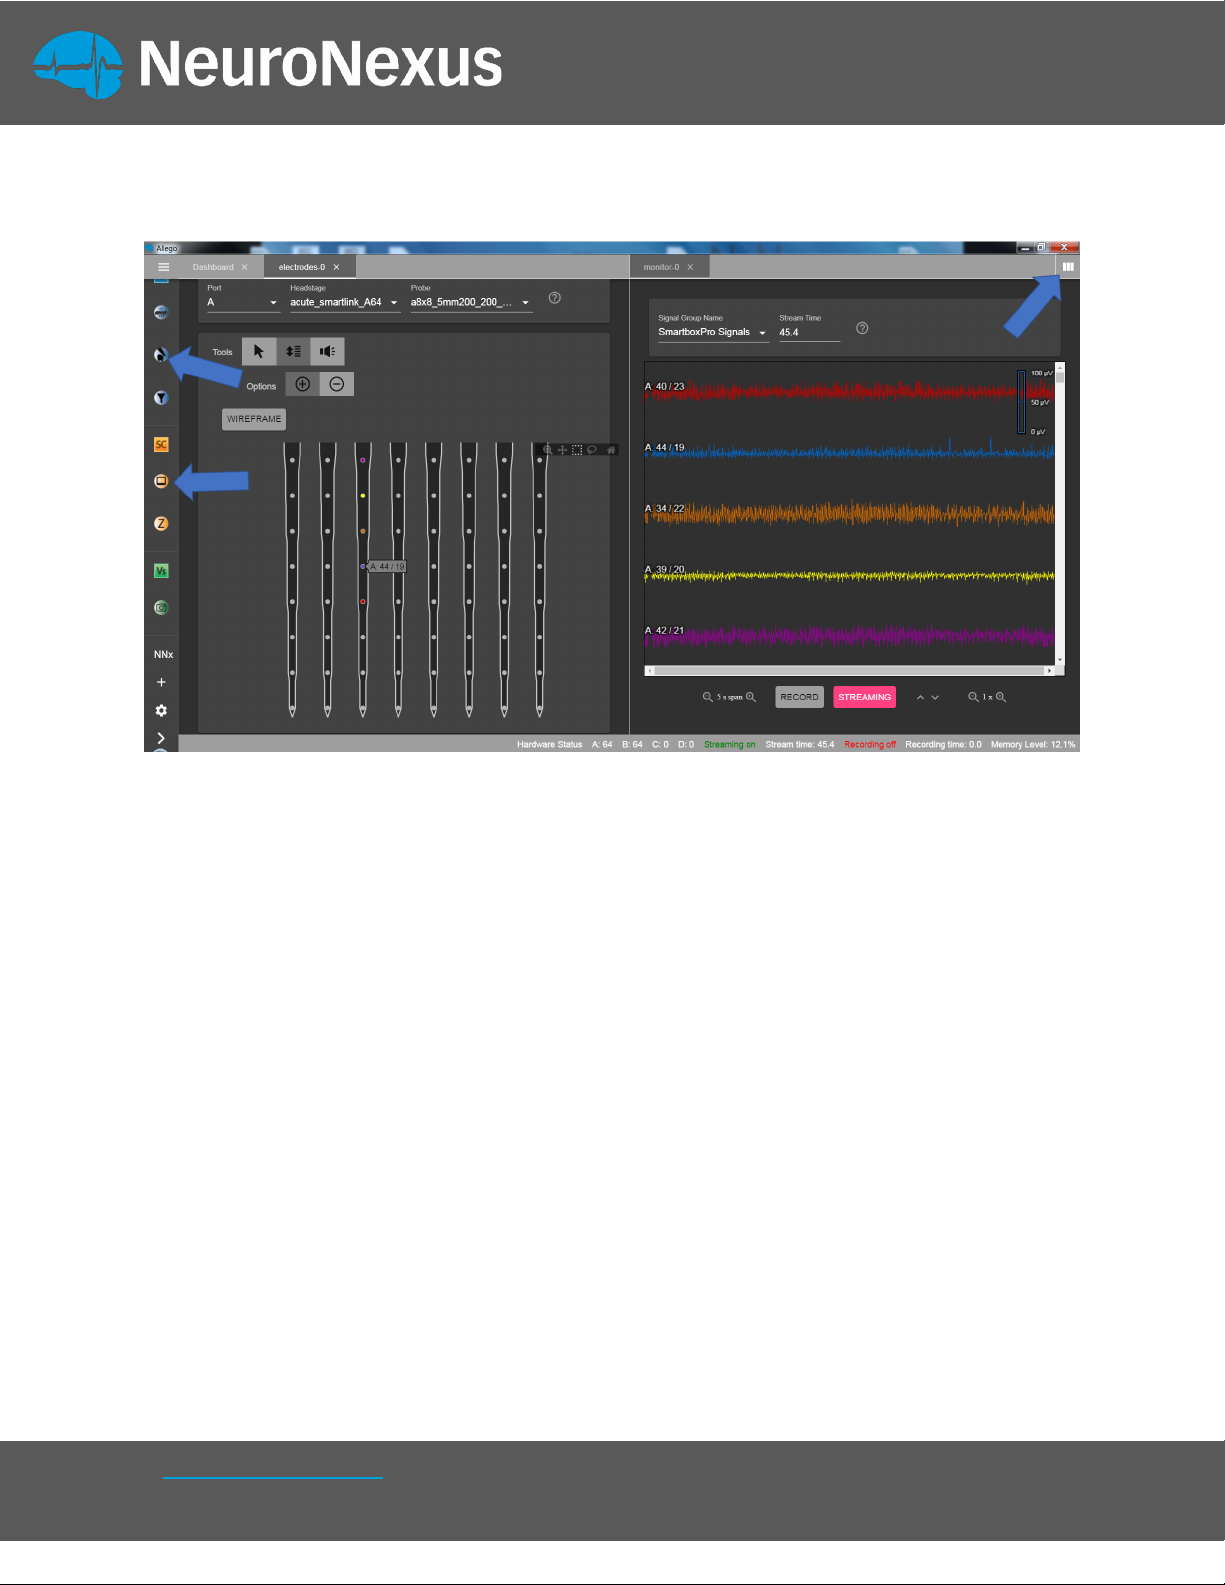
5. View signals from theenabled electrode sites bystreaming data in theMonitor
view.
a. Navigate to the top right corner of the interface to split your workspace
into twopanels.
b. With the right panel open, click Monitor from theleft side ofthe
interface.
c. In theElectrodes view (left panel), click “order” to prioritize viewing your
previously selected/colored electrode sites.
11
NeuroNexus ©2019
| 655 Fairfield Court, Suite 100, Ann Arbor, Michigan USA
Telephone: +1.734.913.8858 | Fax: +1.734.786.0069 | support@neuronexus.com
6. To review a snapshot of your recently streamed signals in detail, navigate
to the HD Snapshot tab.
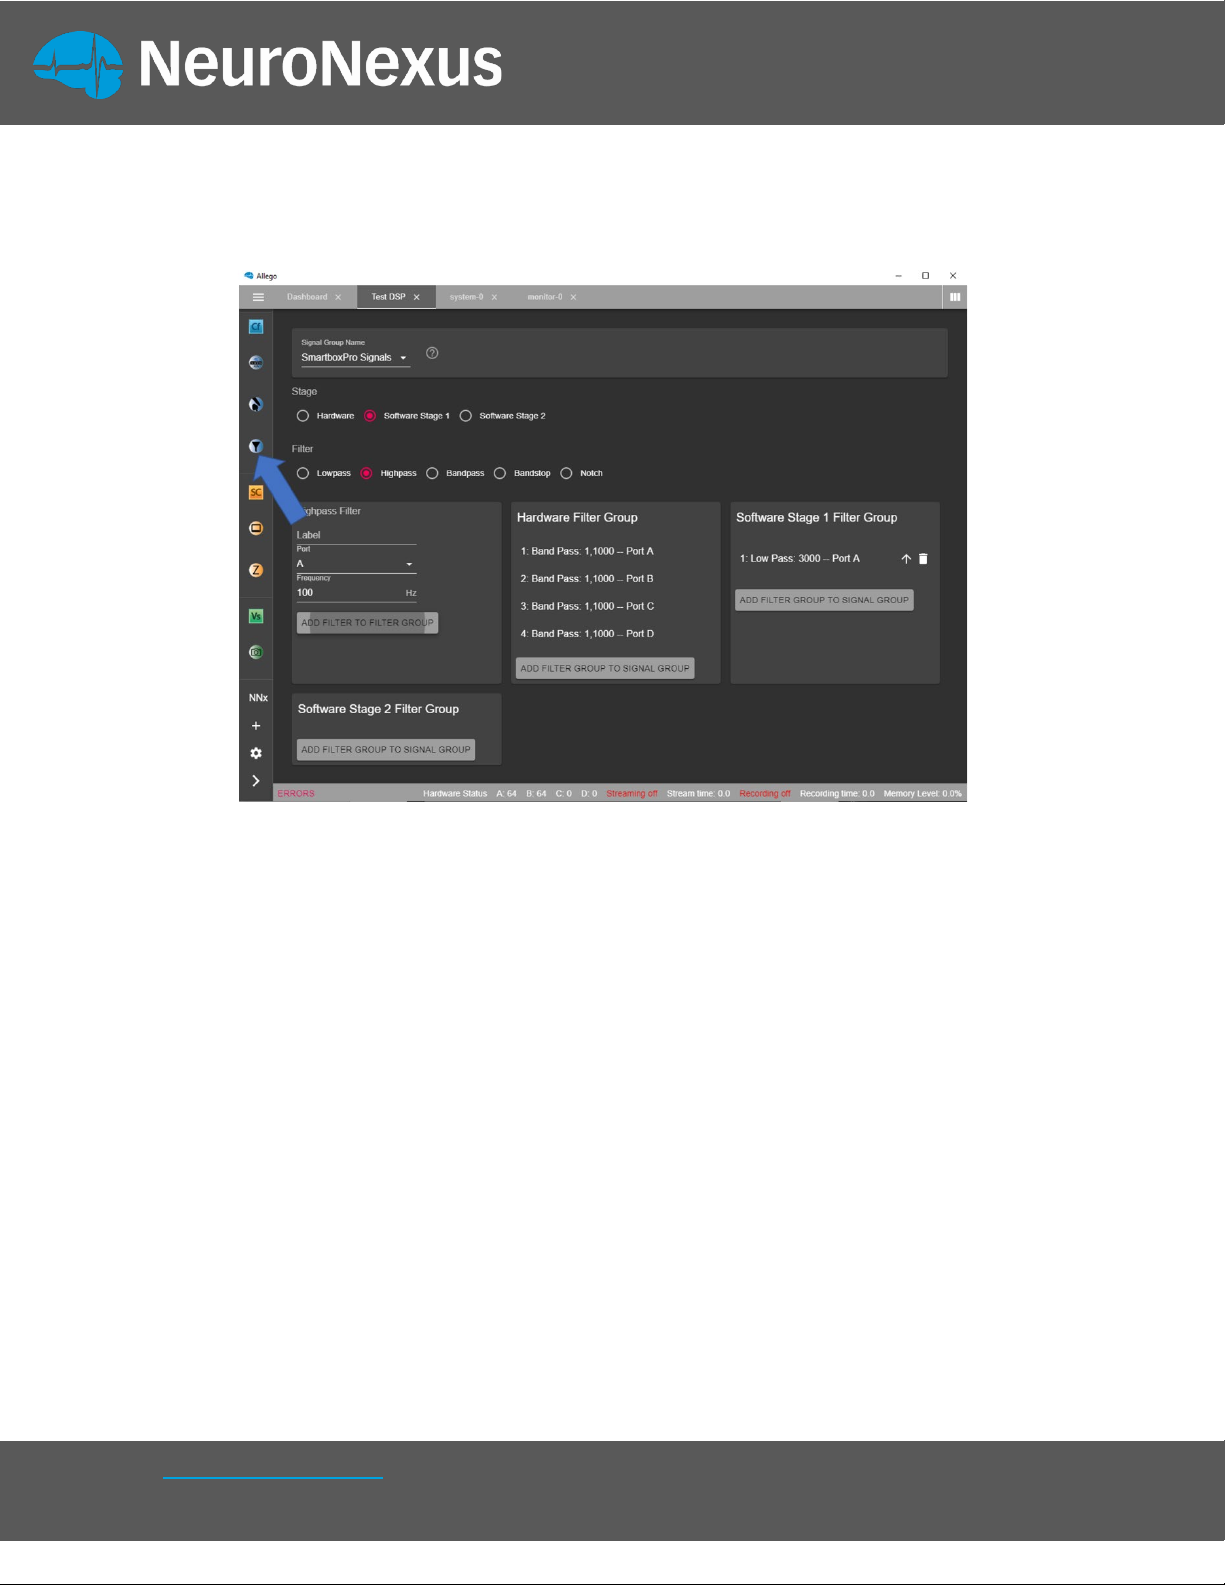
Adding filters
A. From the dashboard, or on the left side of the interface, click
Signal Processing.
B. Choose a name for this tab if you desire.
C. Stage: select the stage at which the filter is to be applied.
a. Hardware filters are applied first, followed by Stage 1 & 2.
b. Hardware filters are applied to saved data.
c. Software Stage 1 filters are applied to saved data.
d. Software Stage 2 filters are for visualization only.
D. Filter: select a filter type.
E. Enter the parameters for the filter in the box immediately below
the filter type.
F. Click the Add Filter To Filter Group button. This will add and
group filters to the stage that was selected in step 1.

12
NeuroNexus ©2019
| 655 Fairfield Court, Suite 100, Ann Arbor, Michigan USA
Telephone: +1.734.913.8858 | Fax: +1.734.786.0069 | support@neuronexus.com
Impedance Testing
1. From the dashboard, click the Impedance button.
2. In the impedance tab, select the port to be tested from the dropdown menu.
3. Click on Run Impedance Check. Depending on the number of channels in the
probe, this may take upwards of 30 seconds to complete.

13
NeuroNexus ©2019
| 655 Fairfield Court, Suite 100, Ann Arbor, Michigan USA
Telephone: +1.734.913.8858 | Fax: +1.734.786.0069 | support@neuronexus.com
Allego Terminal
The Allego terminal provides the user with a command prompt that can be used to
directly access various features without the GUI or those that otherwise aren’t
available. It can be launched by clicking the arrow button in the bottom left of the
window. This gives the user access to advanced functions and a terminal window
will appear. Some examples are:
1. Choosing any probe site to monitor audio activity by the auxiliary jack or
through an analog BNC port.
2. Setting noise suppression filters or a highpass filter in order to accentuate
spike activity in audio for easier dup to 4 monitors.
Other manuals for SmartBox Pro
1
Table of contents
Popular Personal Care Product manuals by other brands


MEDintim
MEDintim Caya instruction manual

B-CURE
B-CURE LASER SPORT Instructions for use

Ossur
Ossur i - LIMB HAND Instructions for use

LTL Home Products
LTL Home Products Lighted Impressions Zip installation instructions

VUSH
VUSH LET'S FLOW Care and instructions manual

Panasonic
Panasonic ER-412 operating instructions