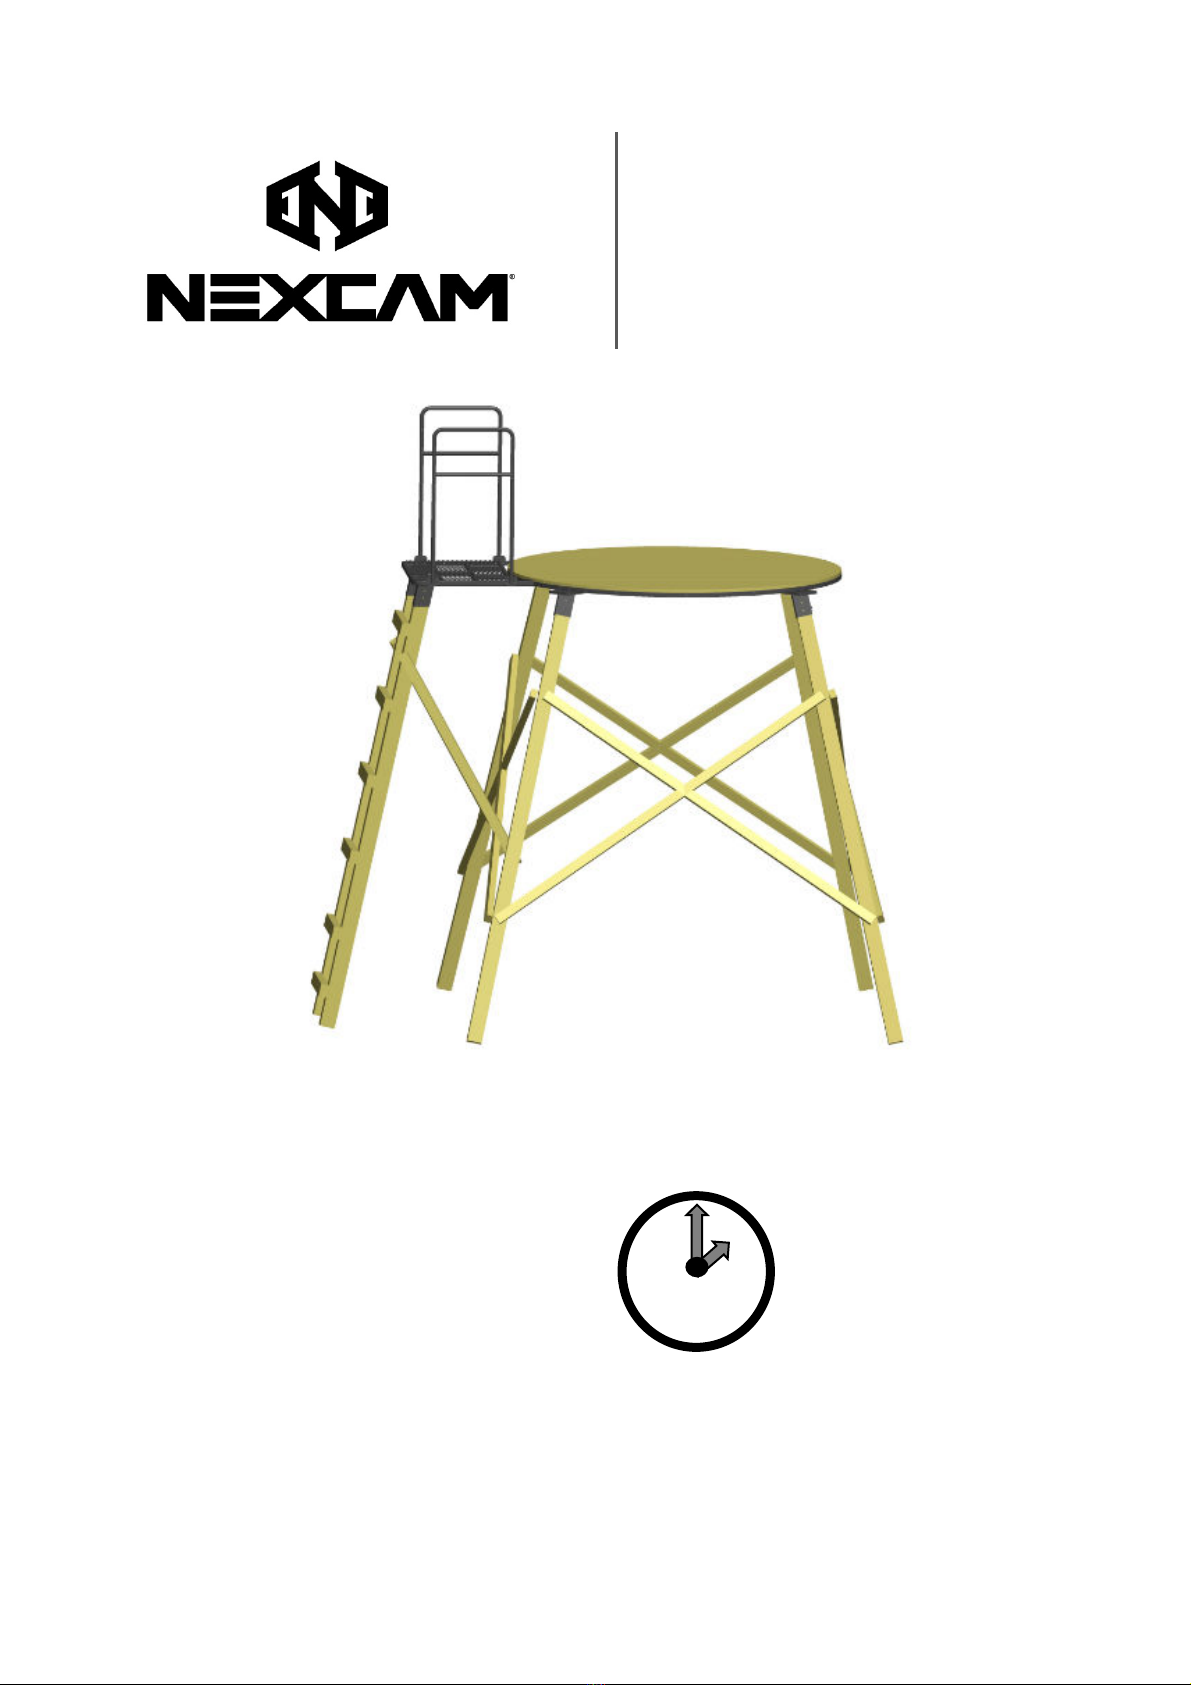
NEXCAM NA70188 User manual
Owner’s Manual
RAM PLATFORM 650 & 700
WITH 4X4 BRACK TS
PLATFORM MOD L NA70188 & NA70195
4X4 BRACK TS MOD L NA70201
Page 1
THIS OWN R’S MANUAL MUST ALWAYS ACCOMPANY THIS PRODUCT AND B TRANSF RR D WITH IT UPON
CHANG OF OWN RSHIP, WH N LOAN D, OR PR S NT D TO ANOTH R P RSON.
QU STIONS? Email support@Nexcam.com for assistance.
Approximate
Assembly Time
2 Hours
R AD, UND RSTAND,
FOLLOW ALL WARNINGS
AND INSTRUCTIONS B FOR
ASS MBLING, INSTALLING
OR USING THIS PRODUCT!
Review additional instructions
online at Nexcam.com
* Image is for reference only. Always
follow all local uilding codes to
properly construct wooden tower and
ladder.

Owner’s Manual
RAM PLATFORM WITH 4X4 BRACK TS
Page 2
Thank you for purchasing our NEXCAM RAM Platform. This product is designed y hunters, for hunters. It is
engineered for safety, security, comfort, and stealth, putting the odds in your favor when the moment of truth
arrives. Constructed with only the highest quality materials it’s uilt for years of satisfying hunts.
Read this instruction manual and all warnings in its entirety efore assem ling, installing or using this product.
If you have any questions on assem ly, use, safety warnings, or anything else, please contact us y email at
support@Nexcam.com.
QU STIONS? Email support@Nexcam.com for assistance.
INTRODUCTION
Introduction ………………………………………………………………………………………………………………………………………………………. 2
Warnings ………………………………………………………………………………………………………………………………………………………….. 3-4
No Alterations, Building Location and Tools Needed ..………………………………………………………………………………………… 5
Parts List …………………………………………………………………………………………………………………………………………………………… 6-10
Assem ly Instructions ………………………………………………………………………………………………………………………………………. 11-15
Anchoring Tower ………………………………………………………………………………………………………………………………………………. 16-17
Use …………………………………..………………………………………………………………………………………………………………………………. 18
Maintenance and Trou leshooting …………………………………………………………………………………………………………………... 19
Limited Warranty ……………………………..…………………………………………………………………………………………….………………… 20
CONT NTS
Note: Before eginning assem ly of product, make sure all parts are present. Compare parts with
package content list and hardware contents. If any part is missing or damaged do not attempt to
assem le the unit. Contact customer service for replacement parts.
Owner’s Manual
RAM PLATFORM WITH 4X4 BRACK TS
Page 3
WARNING
YOU MUST R AD, UND RSTAND, FOLLOW ALL
WARNINGS AND INSTRUCTIONS B FOR USING THIS
PRODUCT!
TOTAL W IGHT LIMIT – 750 LBS (Maximum 300lbs Per
Person) Includes Persons, Gear, Blind, tc.
MAXIMUM BUILD H IGHT – 10 F T
THIS PRODUCT CARRI S A STRICT H IGHT AND W IGHT
R STRICTIONS. DO NOT XC D TOTAL H IGHT AND
W IGHT LIMIT. W IGHT LIMIT INCLUD S TH US R(S)
AND QUIPM NT.
Questions contact N XCAM by email at
support@Nexcam.com.
Always follow safe weapon/firearm handling practices.
FAILUR TO FOLLOW TH S INSTRUCTIONS CAN R SULT
IN S RIOUS INJURY OR D ATH!
WARNING
FALLS FROM L VAT D PLATFORMS CAN OCCUR
ANYTIM AFT R L AVING TH GROUND R SULTING
IN ITH R S RIOUS INJURY OR D ATH!
For your safety, read and understand this user’s
manual in its entirety efore attempting to assem le,
setup, install and/or otherwise use this product.
Contact NEXCAM y email at support@Nexcam.com
for any questions. Failure to do so could result in
serious injury or death! Minimally review contents of
this user’s manual annually.
Safe use of this product(s) is sole responsi ility of the
user to provide any person(s) who orrows, uses or
purchases this product with the owner’s manual and
all warning prior to use. Do not allow a person to use
this product(s) that has not reviewed all instructions
and warnings. Failure to follow these instructions
may result in serious injury or death! Store user’s
manual and warnings in a safe location where they
can e shared with potential users and must e
reviewed annually. If user’s manual or warnings are
lost, email support@Nexcam.com for assistance.
WARNING
Prior to each hunt, make certain you have a
signaling device (e.g., mo ile phone, cell phone,
radio, whistle, signal flare, Personal Locator
Device [PLD], etc.) in your possession and on your
person in an opera le condition. This device must
e within easy access should you experience the
need to contact emergency assistance. Failure to
follow this instruction may result in serious injury
or death!
Before each use inspect elevated platform efore
each use for ground erosion, any damage,
including ut not limited to corrosion, wear,
cracks, rot, damage, deterioration, vandalism,
fraying or other damage. DO NOT USE If ground
erosion or damage is visi le or suspected. If there
are any questions, DO NOT use and contact
NEXCAM y e-mail support@Nexcam.com. Failure
to follow these instructions may result in serious
injury or death!
Stabilization devices must e attached efore
clim ing to platform.
For adult use only. No one under the age of 18
should attempt to use this or any other NEXCAM
product without direct adult supervision.
Never use this product while taking drugs (even
prescription drugs) or alcohol.
Never use this product when feeling sleepy, ill,
nauseous, dizzy or if you have prior medical
condition that could cause a pro lem i.e., heart
condition, joints that lock-up, spinal fusions, etc.
or if you are not well rested or if you are not
athletically fit. Never sleep in free standing
platform.
Never use this product during inclement weather
such as rain, lightning, windstorms, snowstorms
or icy conditions and end your hunt and return to
the ground if inclement conditions arise.
QU STIONS? Email support@Nexcam.com for assistance.
WARNINGS
ATTENTION!
WH N YOU S A SYMBOL OR TH WORD “WARNING!” B SUR TO R AD TH M SSAG ! TH
INFORMATION CONTAIN D IN TH S M SSAG S CAN SAV YOUR LIF OR PR V NT S RIOUS
INJURY!! B SAF ! FOLLOW ALL WARNINGS!! FAILUR TO FOLLOW ALL WARNINGS MAY R SULT IN
S RIOUS INJURY OR D ATH!

WARNING
Use heat source at your own risk – FIRE AND
CARBON MONOXIDE HAZARD IN ENCLOSED AREA
– Follow heat source instructions, warnings and
use proper ventilation requirements. Failure to
follow this instruction may result in serious injury
or death!
Only use elevated platform for its intended
purpose of allowing a hunter to clim and hunt
from an elevated positions. Do not use for any
other purpose.
Always check every ladder sections connection
efore you leave the ground. If ladder sections
are separating, DO NOT USE elevated platform.
Failure to follow these instructions may result in
serious injury or death!
Always maintain 3 points of contact when
clim ing up/down ladder and in/out of elevated
platform. Proper 3 point contact means having
either two feet with one hand or one foot with
two hands on ladder at all times when clim ing
up/down and in/out of elevated platform.
Always Lean forward as you clim ladder.
Never rely on a tree ranch for support.
Always pull up a ow, ackpack, or firearm or
other equipment only after eing secured on the
elevated platform. Firearms must e pulled up
with it unloaded, cham er open, and muzzle
down.
Always inform someone of hunting location,
where elevated platform is e located, and
expected duration of hunt. Have second adult
present or at least accessi le y cell phone or
other means when using this product. A ility to
get help quickly may save your life in event of a
fall.
WARNING
DO NOT modify, fix/repair, alter, end, cut, weld,
or heat this product in any way. Failure to follow
these instructions may result in serious injury or
death!
DO NOT lean out from platform or against lind
walls, windows, or handrails for any reason. Never
jump, ounce, hop, rock ack and forth, etc. on or
on elevated platform. Do not stand, clim , sit or
lean on hand rails. Always stay centered on
platform with minimal movement. Failure to
follow these instructions may result in serious
injury or death!
Never jump from/on or ounce on platform for
any reason. Failure to follow these instructions
may result in serious injury or death!
Always use at least (7) adults to assem le, install
and/or take down this elevated platform. Failure
to follow these instructions may result in serious
injury or death!
Always avoid electrical power lines.
Always check ground under elevated platform to
make sure it is level and firm. Never clim ladder
or use elevated platform if ground is not level and
firm. Un-level / sloping ground, erosion or
uneven surfaces (e.g. one foot on a rock or soil
erosion under foot) can cause elevated platform
to tilt or shift as you clim into or use elevated
lind Always make sure platform is level efore
using elevated lind. Always properly anchor
elevated lind to the ground using included
ground stakes. Failure to follow these instructions
may result in serious injury or death!
Before anchoring elevated platform always
contact local or national utilities agency for
location of electric lines, gas lines, fi er optic lines,
etc. Contact with utility lines may result in serious
injury or death!
Owner’s Manual
RAM PLATFORM WITH 4X4 BRACK TS
Page 4
QU STIONS? Email support@Nexcam.com for assistance.
WARNINGS
ATTENTION!
WH N YOU S A SYMBOL OR TH WORD “WARNING!” B SUR TO R AD TH M SSAG ! TH
INFORMATION CONTAIN D IN TH S M SSAG S CAN SAV YOUR LIF OR PR V NT S RIOUS
INJURY!! B SAF ! FOLLOW ALL WARNINGS!! FAILUR TO FOLLOW ALL WARNINGS MAY R SULT IN
S RIOUS INJURY OR D ATH!

Owner’s Manual
RAM PLATFORM WITH 4X4 BRACK TS
Page 5
QU STIONS? Email support@Nexcam.com for assistance.
WARNING
NO ALT RATIONS OR MODIFICATIONS:
Do not remove, modify any portion or otherwise mechanically modify this product or its assem lies in any manner.
Make certain that all parts are used in the assem ly of this product. Parts are designed and tested to work together.
Modification, additions, misuse, part omission or su stitution voids warranty and may result in serious injury or
death! If a part(s) is missing and/or damaged, immediately email support@Nexcam.com for assistance. Never
modify this product in any way y making repairs, altering, omitting, adding or attaching anything to it. ALWAYS USE
GENUINE FACTORY AUTHORIZED NEXCAM REPLACEMENT PARTS. USE OF ANY REPLACEMENT PARTS OTHER THAN
GENUINE PARTS VOIDS WARRANTY AND RELIEVES NEXCAM OF ANY RESULTANT LIABILITIES AND MAY RESULT IN
SERIOUS INJURY OR DEATH!
This product is designed to function properly in its original condition. Alterations or modifications can make it unsafe
and constitute a misuse of the product. Do not alter, add, modify or su stitute parts or accessories not made y
NEXCAM.
WARNING
S L CTING BUILDING LOCATION:
Never install elevated platform under or near overhead utility lines or poles. Always stay minimum of 50 feet away.
Always check ground under elevated platform to make sure it is level and firm. Un-level/sloping ground or uneven
surfaces (e.g. one foot on a rock) can cause elevated platform to tilt or shift as you clim into or use this product.
Always make sure platform is level efore using this product. If it is not, select a new level location.
Before anchoring elevated platform always contact your local or national utilities agency for location of electric lines,
gas lines, fi er optic lines, etc. Contact with utility lines may result in serious injury or death!
FAILURE TO FOLLOW THESE INSTRUCTIONS MAY RESULT IN SERIOUS INJURY OR DEATH!
Select a location where ground is level and firm. Always assure platform is level y placing level on platform. Level
platform y removing or adding soil under foot pads of elevated platform.
•13mm Ratchet & Socket
•13mm Wrench
•10mm Ratchet & Socket
•10mm Wrench
•Large Hammer/Sledge
•Free-Standing Step Ladder (12ft or Taller)
•Level
•Shovel
•Jig Saw
•Liquid Nails
TOOLS R QUIR D (NOT INCLUD D):
•All Lum er must e Treated Ground Contact
Wood.
•2 sheets of plywoodle
•(6) 4X4 Posts - Treated Ground Contact
•Treated Ground Contact Lum er, Fasteners,
Anchoring Method, Etc. – See local uilding codes
to properly construct, race and support tower,
ladder, stairs, etc.
SUGG ST D MAT RIALS (NOT INCLUD D):
Owner’s Manual
RAM PLATFORM WITH 4X4 BRACK TS
Page 6
QU STIONS? Email support@Nexcam.com for assistance.
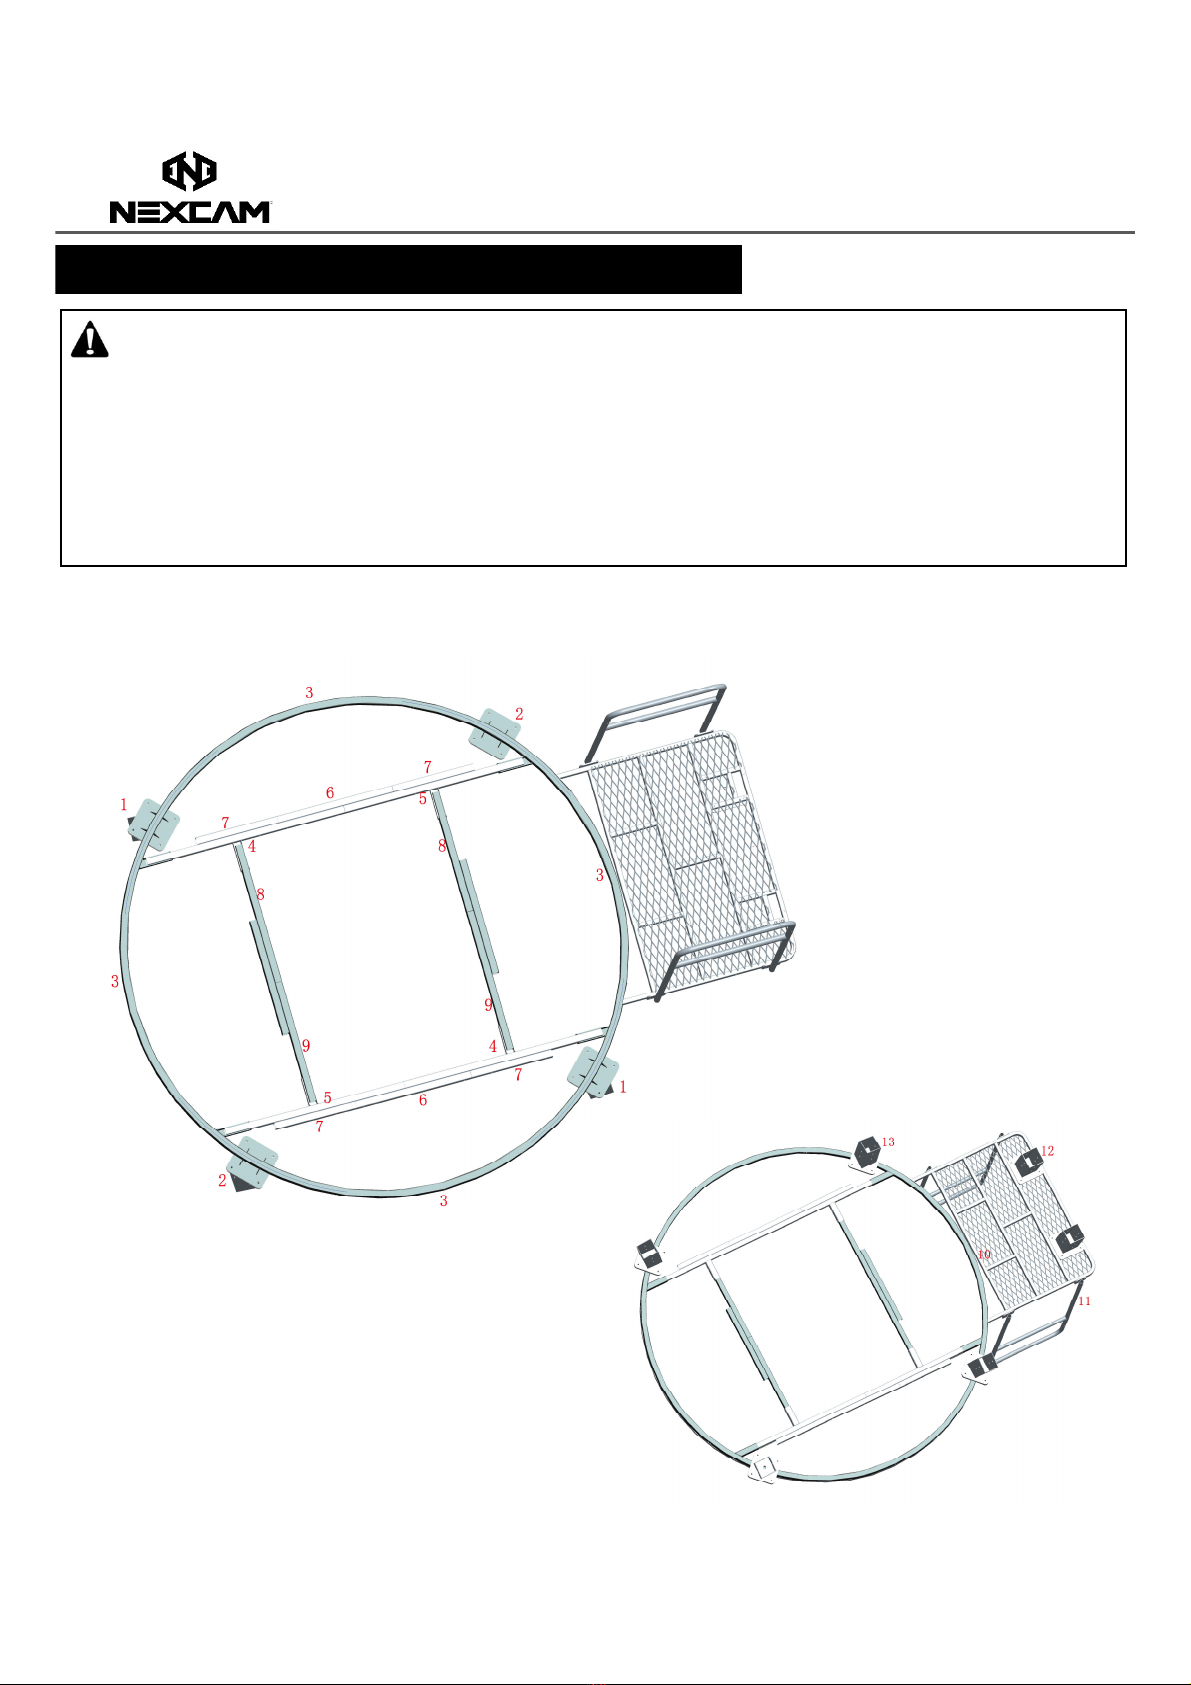
PLATFORM DIAGRAM, PARTS LIST AND NOM NCLATUR :
WARNING
nd Users Responsibility to properly and safely uild and erect wood tower structure, wood ladder / stairs, to
properly race/support and anchor this product to the ground. Always follow all local uilding codes to properly
construct tower structure, ladder / stairs, support races and to anchor to the ground. If you are not knowledgea le
or capa le of properly constructing load earing tower, consult with licensed uilder to properly uild and anchor
your wood tower, wood ladder / stairs and to properly race/support tower structure.
FAILURE TO FOLLOW THESE INSTRUCTIONS MAY RESULT IN SERIOUS INJURY OR DEATH AND MAY RESULT IN DAMGE
TO YOUR ELEVATED PLATFORM.
Unpack and Check
Review & Confirm all items are included in Package Contents. If they are not, stop and e-mail support at
support@Nexcam.com efore continuing or using this product.
Owner’s Manual
RAM PLATFORM WITH 4X4 BRACK TS
Page 7
QU STIONS? Email support@Nexcam.com for assistance.
PARTS LIST AND NOM NCLATUR :
Part
#1
Outer Round Frame
with Bracket (Male
ends)
[RAM650 has 3 holes
on the racket
RAM700 has 4 holes
on the racket]
Qty
2
Part
#2
Outer Round Frame
with Bracket (Male
ends)
[RAM650 has 3 holes
on the racket
RAM700 has 4 holes
on the racket]
Qty
2
Part
#3
Outer Round Frame
Tu es (Female Ends)
Qty
4
Part
#4
Vertical Cross Bar
(Female End)
Qty
2
Part
#5
Vertical Cross Bar
(Male End)
Qty
2
RAM650
RAM650
RAM700
or
RAM700
or

Owner’s Manual
RAM PLATFORM WITH 4X4 BRACK TS
Page 8
QU STIONS? Email support@Nexcam.com for assistance.
PARTS LIST AND NOM NCLATUR :
Part#
6
Short Cross Bar
(Female Ends)
Qty
4
Part#
7
Short Cross Bar
(Male Ends) Qty
4
Part#
8
Horizontal
CrossBar
(Female Ends)
Qty
2
Part#
9
Horizontal
Cross Bar
(Male Ends)
Qty
2
10
Landing
Platform
(included in
platform kit)
Qty
1
11 Hand Rail
(included in
platform kit)
Qty
2
12
Ladder Leg
Receivers
(in Box
NA70201)
Qty
2
13
Main Platform
Leg Receivers
(in Box
NA70201)
Qty
4
Owner’s Manual
RAM PLATFORM WITH 4X4 BRACK TS
Page 9
QU STIONS? Email support@Nexcam.com for assistance.
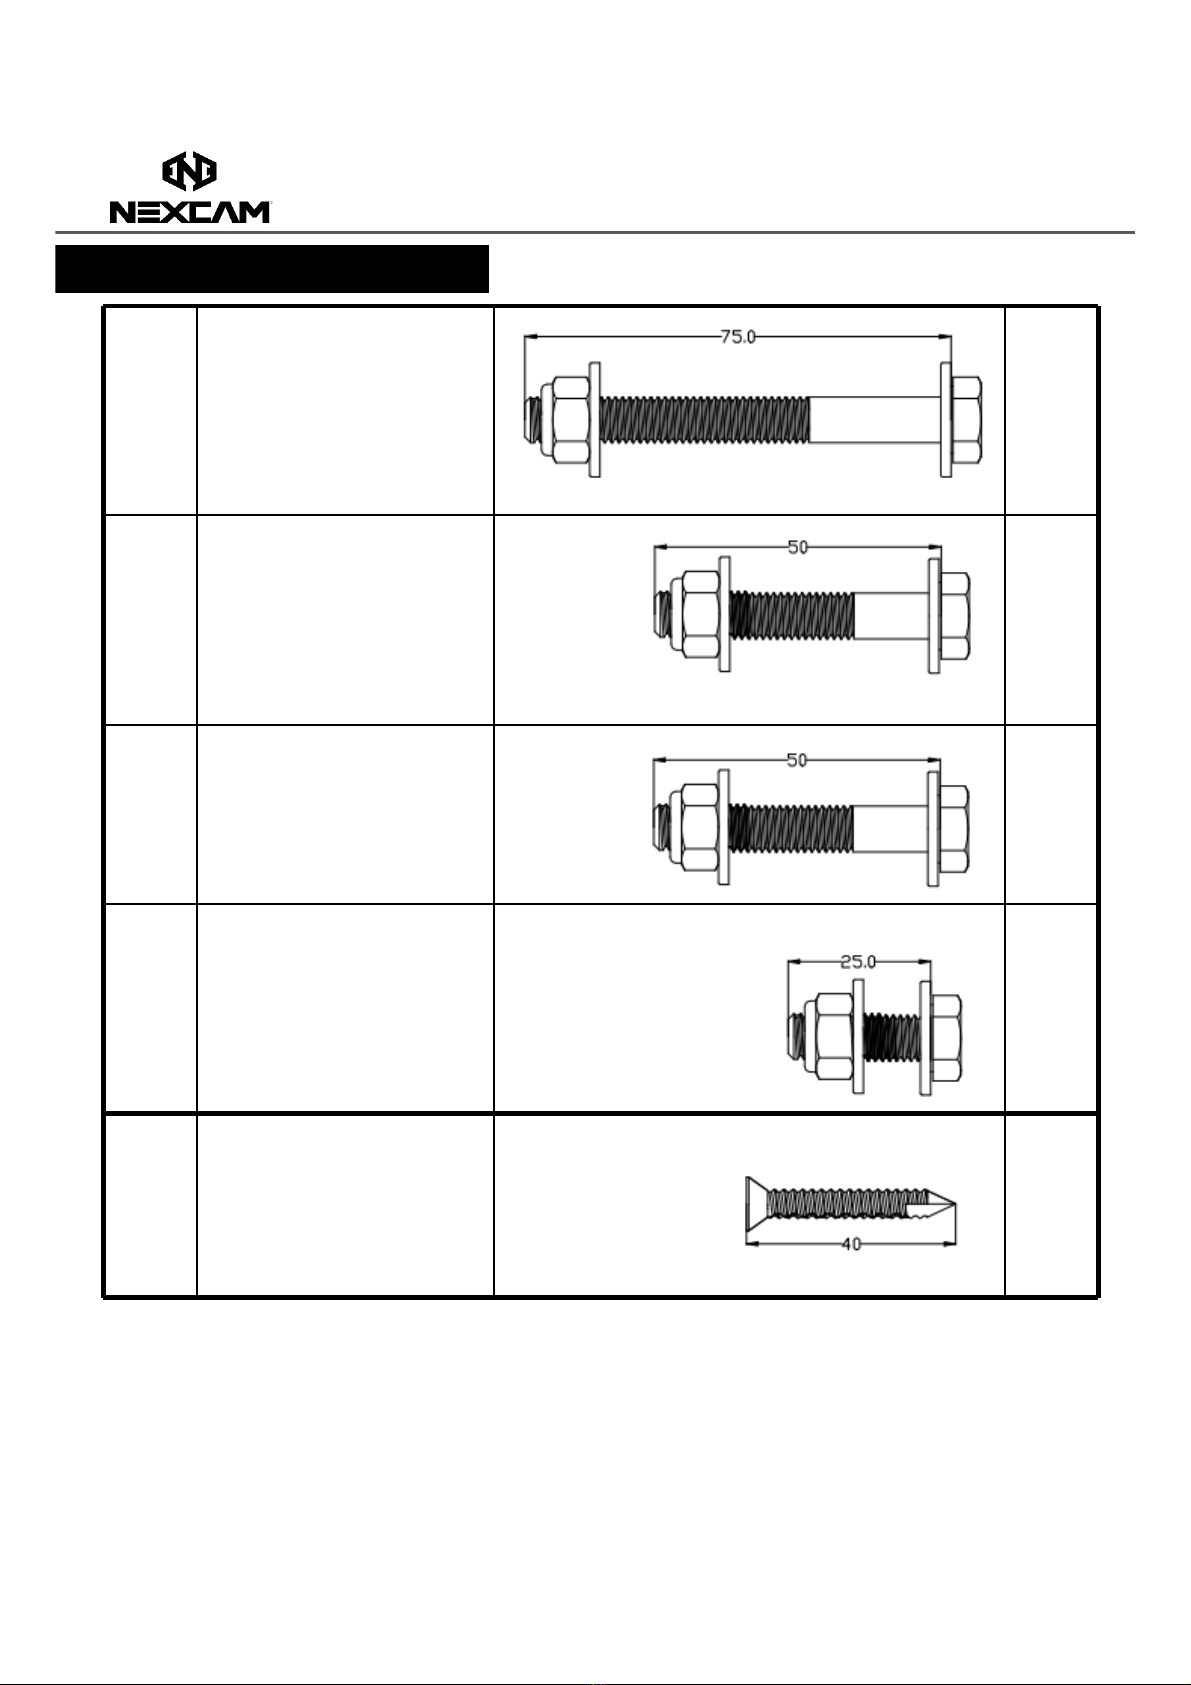
BOLT PACK AND NOM NCLATUR :
Step
2&4
M8X75 Bolt
(with 2 steel washers)
Step 2: 14pcs
Step 4: 6pcs
Qty
20
Step
&5
M8X50 Bolt
(with 2 steel washer)
Step : 8pcs
Step 5: 8pcs
Qty
16
Step
6
M8X50 Bolt
(with 2 steel washers)
Qty
8
Step
7
M8X25 Bolt
(with 2 steel washers)
RAM650: 12pcs
RAM700: 16pcs
Qty:
12
or
16
Step
8
Self-Drilling Screws
Wood-To-Metal
Qty
36
Owner’s Manual
RAM PLATFORM WITH 4X4 BRACK TS
Page 10
QU STIONS? Email support@Nexcam.com for assistance.
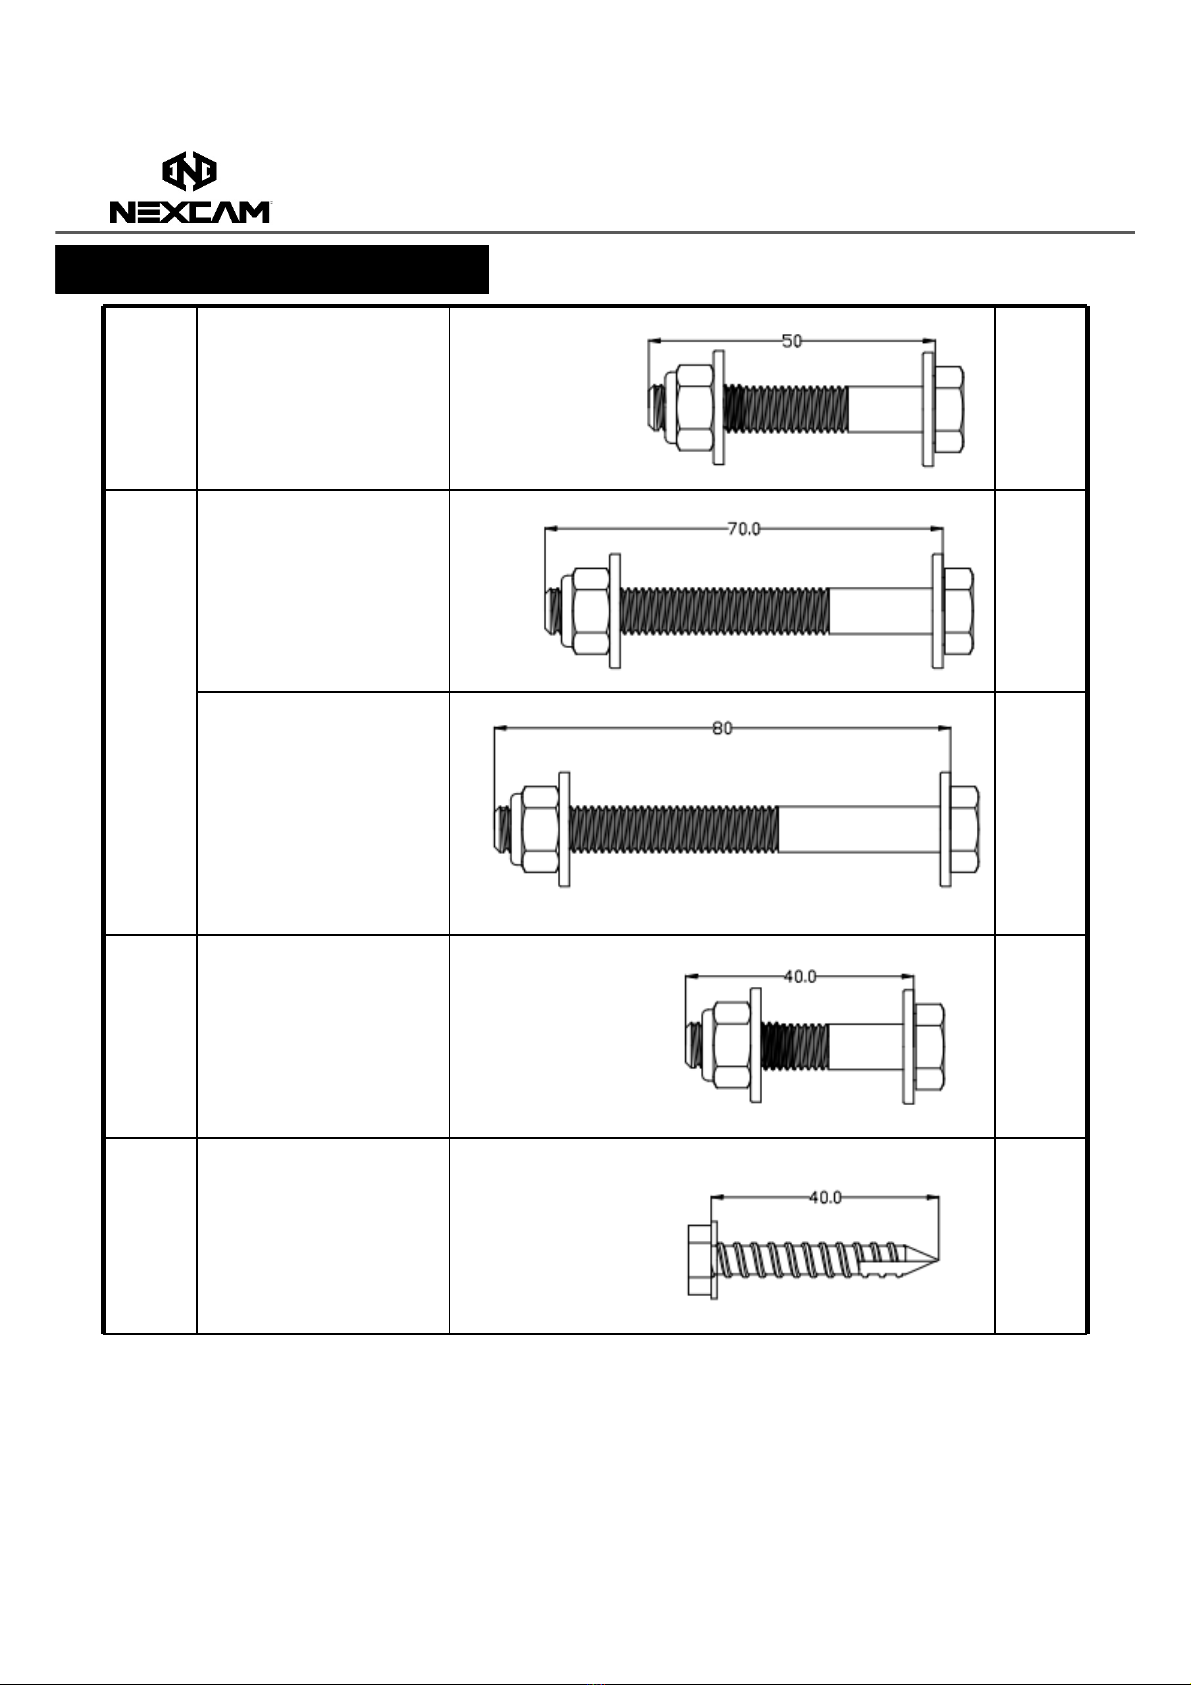
PARTS LIST AND NOM NCLATUR :
Step
9
(A)
M8X50 Bolt
(with 2 steel
washers)
Qty
2
Step
9
(B)
M8X70 Bolt
(with 2 steel
washers)
For RAM650
Qty
1
M8X80 Bolt
(with 2 steel
washers)
For RAM700
Qty
1
Step
10
M8X40 Bolt
(with 2 steel
washers)
Qty
8
Step
11
ST6. x40 Lag
Bolt
(with 1 steel
washer)
Qty
48
BOLT PACK AND NOM NCLATUR :
Owner’s Manual
RAM PLATFORM WITH 4X4 BRACK TS
Page 11
QU STIONS? Email support@Nexcam.com for assistance.
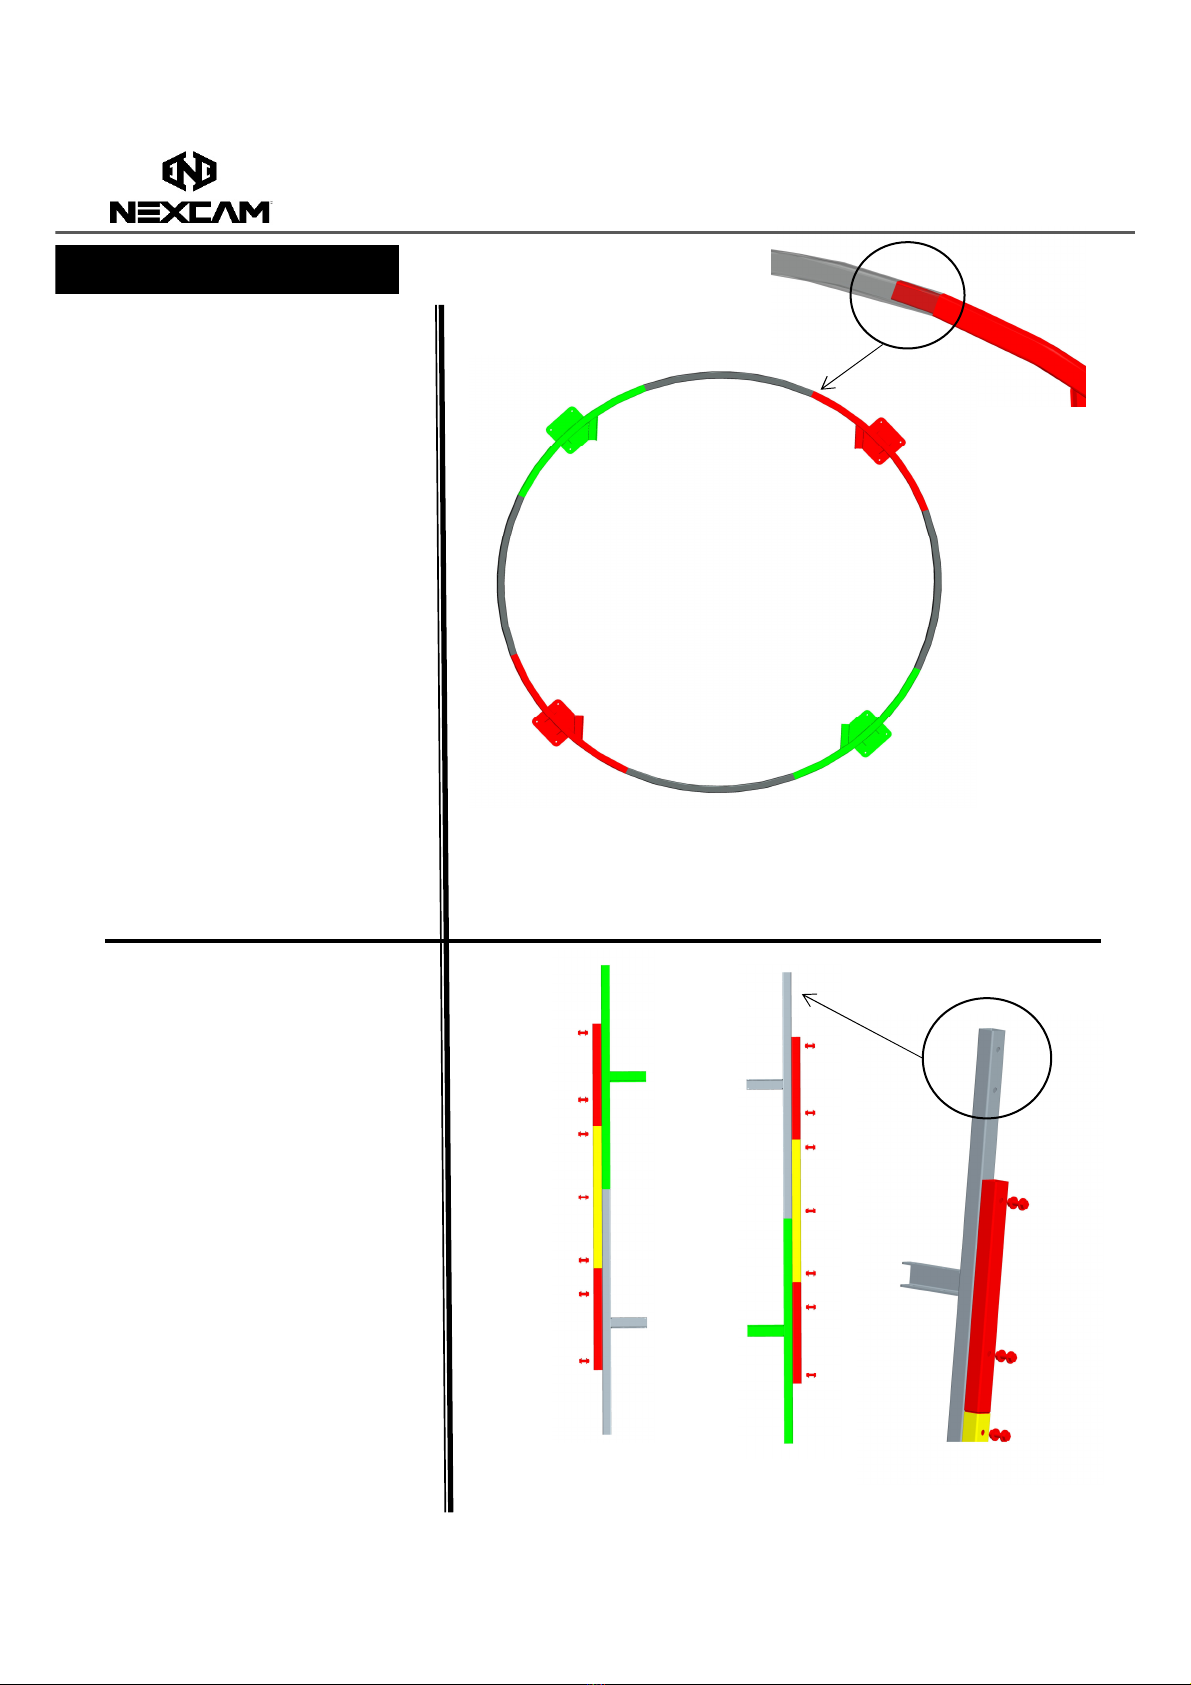
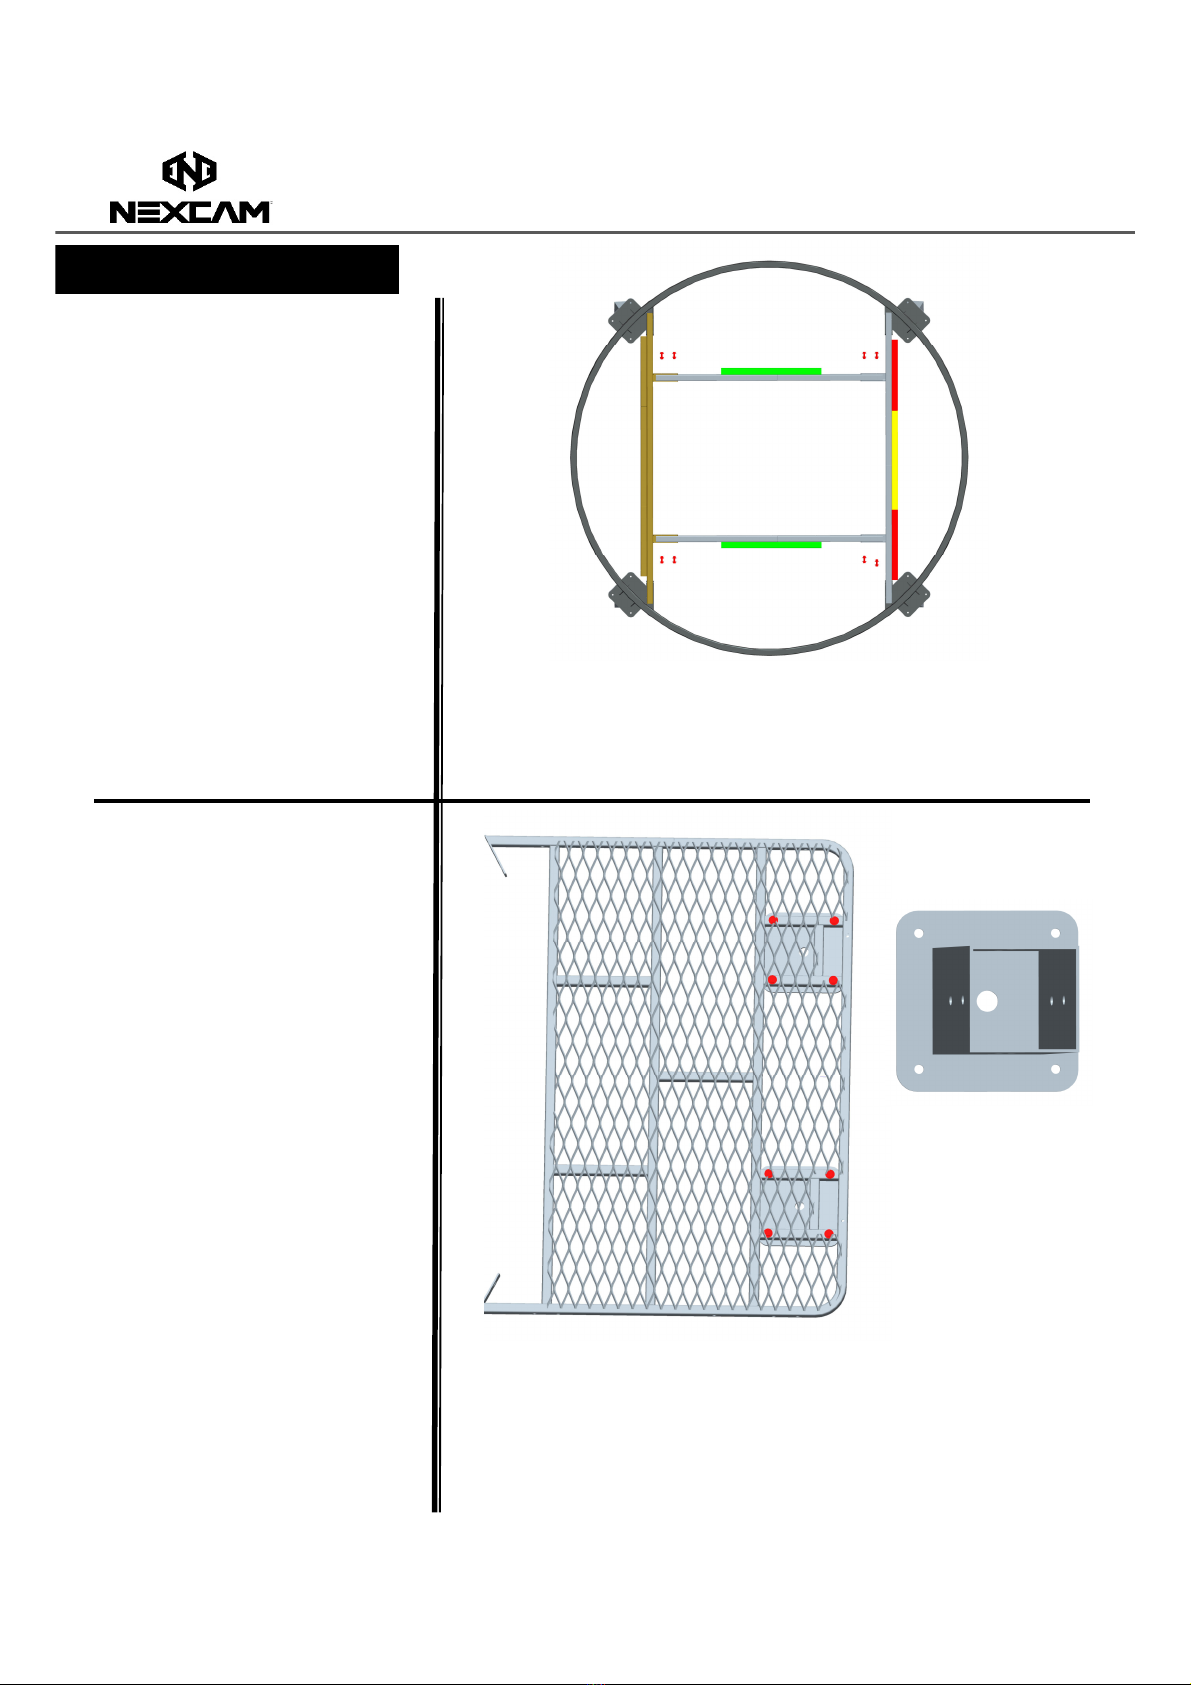
ASS MBLY INSTRUCTIONS:
Step 1:
Outer Round Frame
Assembl
Take out part #1, #2, #
Place these parts as shown in
Figure 1.
Insert #1 and #2 to # .
Step 2:
Vertical Cross Bars
Assembl x2
Take out part#4, 5, 6, 7
by using 7pcs M8x75 Bolt
from Bolt Pack Step 2&4 for
assembly.
Total 2 Sets
Figure 1
Outer Round Frame Assembl
#1
#1 #2
#2
#3
#3
#3
#3
#7
#7
#6
#5
#4
#4
#5
Figure 2
Vertical Cross Bars Assembl
Owner’s Manual
RAM PLATFORM WITH 4X4 BRACK TS
Page 12
QU STIONS? Email support@Nexcam.com for assistance.
ASS MBLY INSTRUCTIONS:
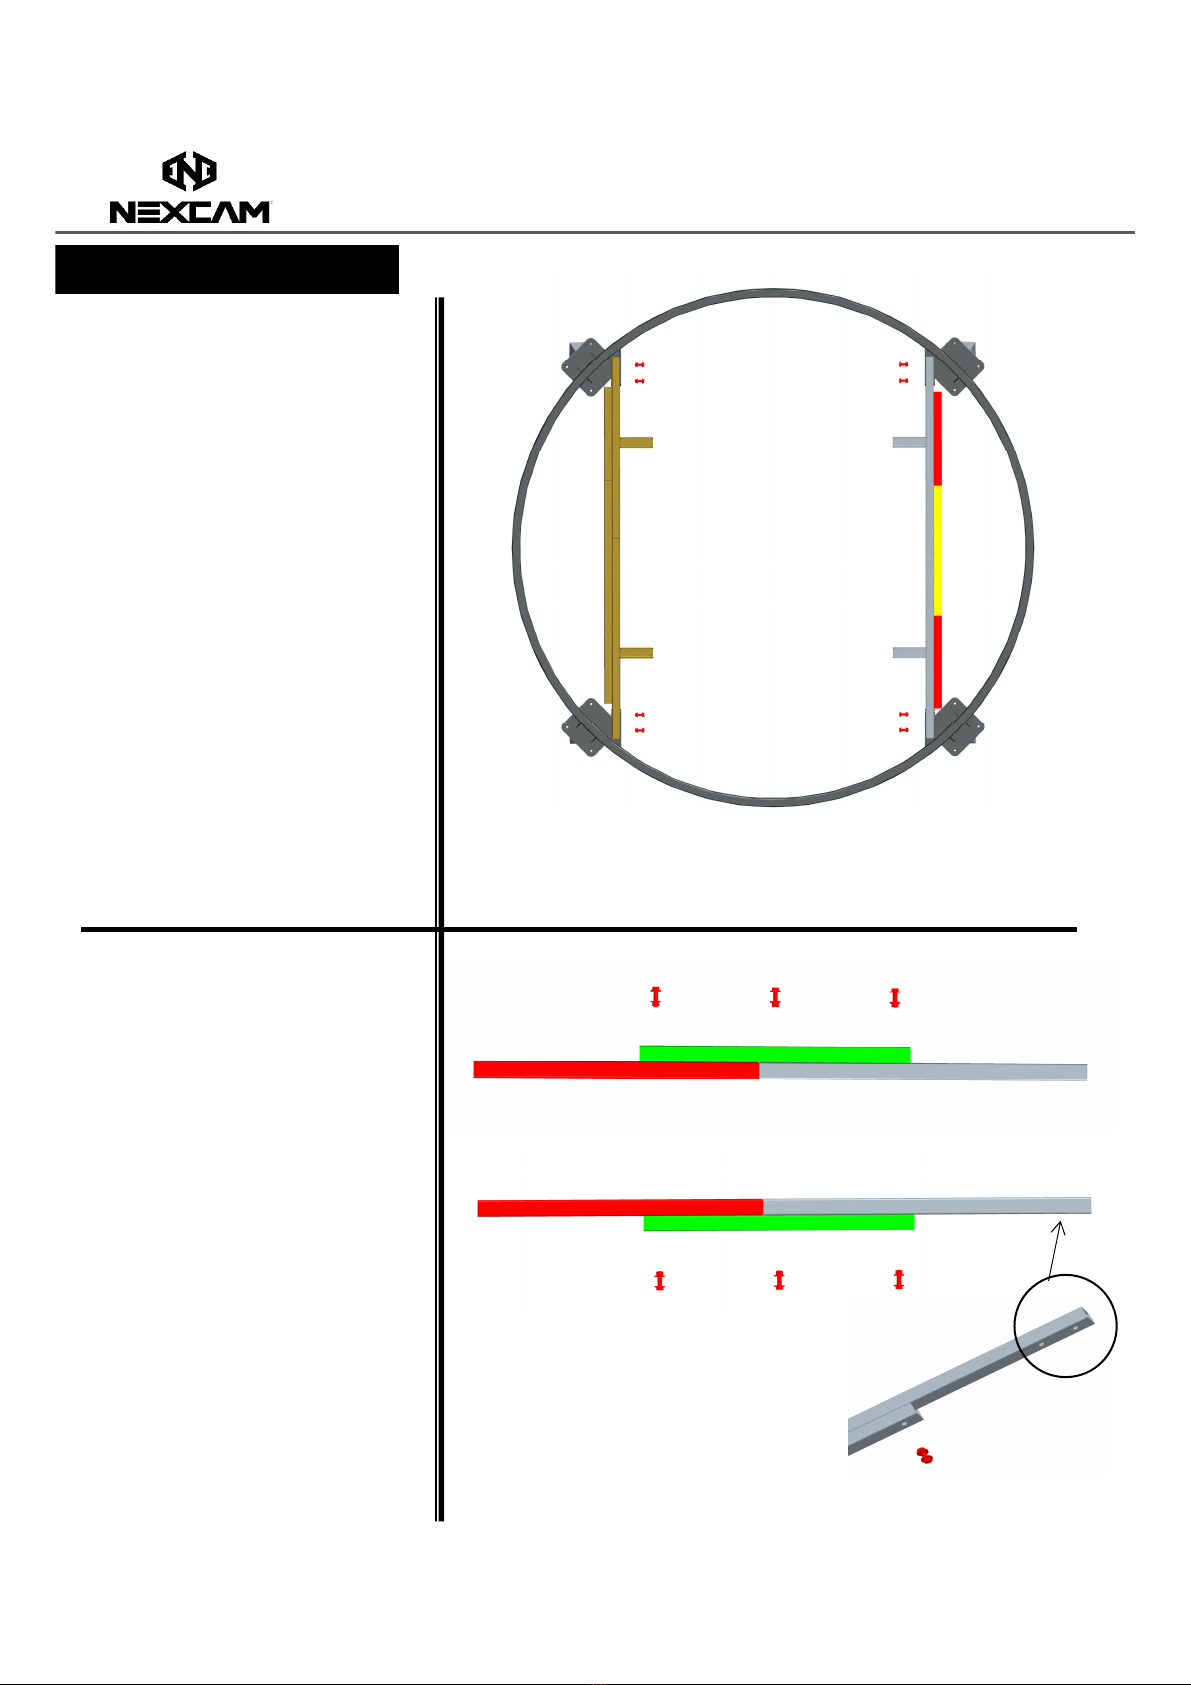
Step 3:
Step 4:
Assemble Horizontal
Cross Bars
Take out part#6, 8, 9
By using pcs M8x75 Bolt from
Bolt Pack Step 2&4
Total 2 Sets
Figure 3
Vertical Cross Bar Kits to the Outer Round Frame
Figure 4
Assemble Horizontal Cross Bars
Assemble the Vertical
Cross Bar Kits to the
Outer Round Frame
using 8pcs M8x50 Bolt from
Bolt Pack Step 3&5.
#6
#8
#9
Owner’s Manual
RAM PLATFORM WITH 4X4 BRACK TS
Page 13
QU STIONS? Email support@Nexcam.com for assistance.
ASS MBLY INSTRUCTIONS:
Step 5:
Step 6:
Figure 5
Horizontal Cross Bar Kits to the
Vertical Cross Bar Kits
Figure 6
Leg Ladder Receivers Assembl
Assemble the Horizontal
Cross Bar Kits to the
Vertical Cross Bar Kits
using 8pcs M8x50 Bolt from
Bolt Pack Step 3&5.
Leg Ladder Receivers
Assembl
Take out 2 Leg Receivers
(straight welded) from Box of
NA70201 as shown in Figure 6
By using 8pcs M8x50 Bolt
from Bolt Pack Step 6

Owner’s Manual
RAM PLATFORM WITH 4X4 BRACK TS
Page 14
QU STIONS? Email support@Nexcam.com for assistance.
ASS MBLY INSTRUCTIONS:
Step 7:
Step 8:
Figure 7
Main Platform Leg Receivers
Assembl
Main Platform Leg Receivers
Assembl
Take out 4 Leg Receivers
(straight welded) from Box of
NA70201 as shown in Figure 7
RAM650: By using 12pcs M8x25
Bolt from Bolt Pack Step 7
or
RAM700: By using 16pcs M8x25
Bolt from Bolt Pack Step 7
RAM700
RAM650
Install pl wood onto the
Round Frame
By using 6pcs Self-Drilling
Screws from Bolt Pack Step 8.
Note:
Cut the Pl wood based on
the Frame.
Figure 8
Install pl wood onto
the round frame

Owner’s Manual
RAM PLATFORM WITH 4X4 BRACK TS
Page 15
QU STIONS? Email support@Nexcam.com for assistance.
ASS MBLY INSTRUCTIONS:
Step 9:
Step 10:
Figure 10
Hand Rails
Assembl
Assemble Landing
Platform to the Assembled
Outer Round Frame
Points A:
By using 2pcs M8x50 Bolt
from Bolt Pack Step 9
Point B:
By using 1pc M8x70 Bolt
from Bolt Pack Step 9
[For RAM650]
or
By using 1pc M8x80 Bolt
from Bolt Pack Step 9
[For RAM700]
Hand Rail Assembl
By using 8pcs M8x40 Bolt from
Bolt Pack Step 10.
Figure 9
Assemble Landing
Platform
Owner’s Manual
RAM PLATFORM WITH 4X4 BRACK TS
Page 16
QU STIONS? Email support@Nexcam.com for assistance.
ASS MBLY INSTRUCTIONS:
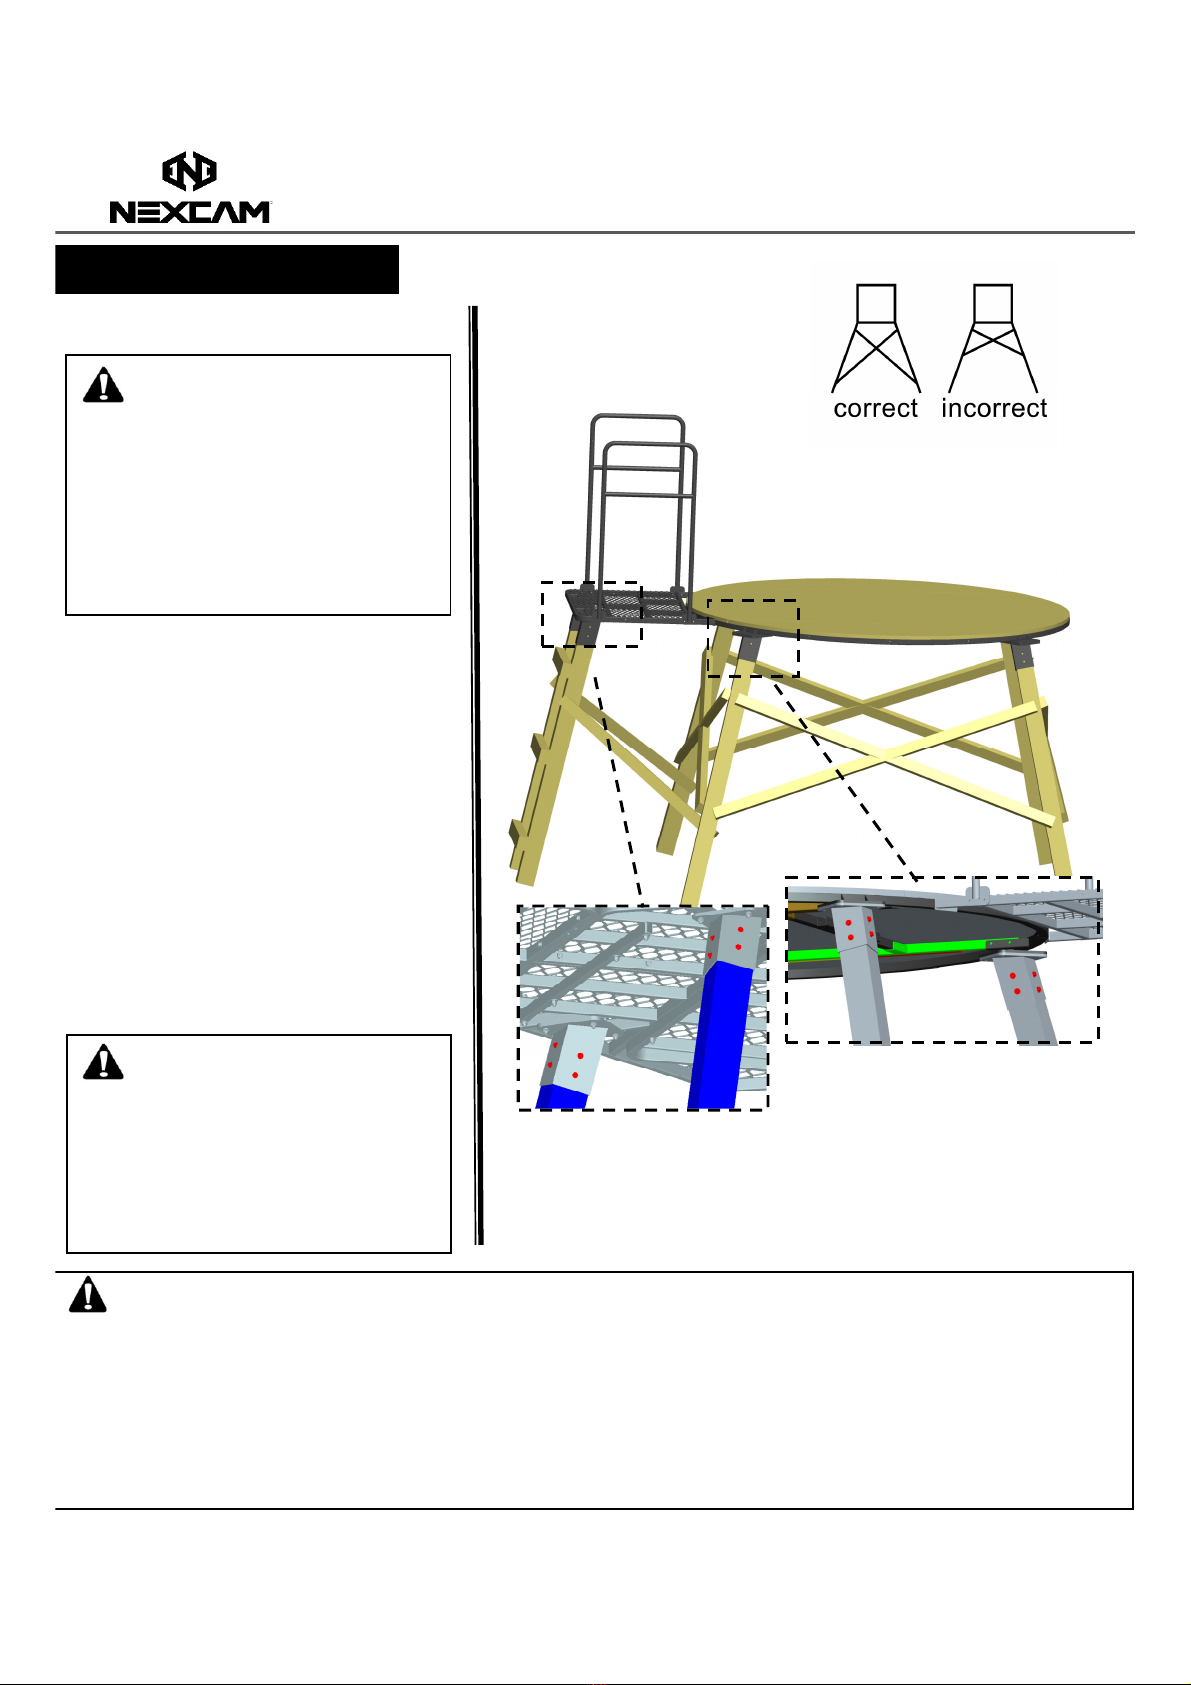
Step 11:
Tip platform on its side and
assembly Treated Ground
Contact 4”x4” Legs (not included)
into Leg Receivers so wood
contacts bottom of Receiver.
Secure with include ST6. x40
Lag Bolts with steel washer as
shown in Figure 11.
Follow all local building codes to
safely build and erect wood
tower structure, wood ladder /
stairs and to anchor tower.
WARNING
nd Users Responsibility to properly and safely uild and erect wood tower structure, wood ladder / stairs, to
properly race/support and anchor this product to the ground. Always follow all local uilding codes to properly
construct tower structure, ladder / stairs, support races and to anchor to the ground. If you are not knowledgea le
or capa le of properly constructing load earing tower, consult with licensed uilder to properly uild and anchor
your wood tower, wood ladder / stairs and to properly race/support tower structure.
FAILURE TO FOLLOW THESE INSTRUCTIONS MAY RESULT IN SERIOUS INJURY OR DEATH AND MAY RESULT IN DAMGE
TO YOUR ELEVATED PLATFORM.
4x4 Receiver Brackets are designed to
fit Treated Ground Contact 4”x4”
square lumber. Never use round or
smaller lumber for leg construction.
Failure to follow these instructions
may result in serious injury or death.
WARNING
Figure 11
Assemble 4x4 Legs
* Image is for reference only. Always
follow all local uilding codes to
properly construct wooden tower and
ladder.
Requires multiple people, equipment,
ropes and straps to setup or elevate
tower.
Do not allow any body parts or people
under platform or tower during setup.
Failure to follow these instructions can
result in serious injury or death!
WARNING
Owner’s Manual
RAM PLATFORM WITH 4X4 BRACK TS
Page 17
QU STIONS? Email support@Nexcam.com for assistance.
ANCHORING INSTRUCTIONS:
1. Always make sure ground is level and firm under each leg. Always assure platform is level y placing level on
platform. Level platform y removing or adding soil under legs of elevated platform.
2. Following all local uilding codes, anchor elevated platform to the ground to prevent tip over.
WARNING
Never install elevated platform under or near overhead utility lines or poles. Always stay minimum of 50 feet away.
Always check ground under elevated platform to make sure it is level and firm. Un-level/sloping ground or uneven
surfaces (e.g. one foot on a rock) can cause elevated platform to tilt or shift as you clim into or use elevated
platform.
Always make sure platform is level efore using. If it is not, select a new level location.
Before anchoring elevated platform always contact your local or national utilities agency for location of electric lines,
gas lines, fi er optic lines, etc. Contact with utility lines may result in serious injury or death!
Always properly anchor elevated platform to the ground y cementing legs into the ground. Failure to do this can
result in platform tipping in high wind conditions.
FAILURE TO FOLLOW THESE INSTRUCTIONS MAY RESULT IN SERIOUS INJURY OR DEATH!
WARNING
nd Users Responsibility to properly anchor this product to the ground. Always follow all local uilding codes to
properly anchor tower structure to the ground. If you are not knowledgea le or capa le of properly anchoring load
earing tower, consult with licensed uilder to properly anchor your elevated platform to the ground.
FAILURE TO FOLLOW THESE INSTRUCTIONS MAY RESULT IN SERIOUS INJURY OR DEATH AND MAY RESULT IN DAMGE
TO YOUR ELEVATED PLATFORM.

Owner’s Manual
RAM PLATFORM WITH 4X4 BRACK TS
Page 18
QU STIONS? Email support@Nexcam.com for assistance.
US :
WARNING
Before each use, inspect elevated platform and all safety devices for damage including ut not limited to corrosion,
cracks, deformity, ends, rot, wear, cuts or fraying and other damage to ladder, hand rail, legs, platform, supports,
lind, hardware, etc.
Do not use if damage, wear, deterioration, vandalism, etc. is detected or suspected.
Never wear rings, jewelry or loose fitting clothing when installing and/or using this product.
Do not clim ladder or use without having elevated platform properly anchored to ground and platform level.
Do not clim onto landing platform or use ladder with another person. Ladder and landing platform are designed for
and intended for only one person at a time.
This product is not intended for use y children under age of 18 without adult supervision.
Use heat source at your own risk – FIRE AND CARBON MONOXIDE HAZARD IN ENCLOSED AREA – Follow heat source
instructions, warnings and use proper ventilation requirements.
Do not jump, ounce, hop, rock ack and forth, etc. on or in elevated platform.
Do not lean out of or against lind walls, windows or hand rails.
Do not stand, clim , sit or lean on hand rails.
Always stay centered on platform with minimal movement.
Never hunt at heights you are not completely comforta le.
Never Hurry! While clim ing, make slow, even movements and make sure you have proper 3 point contact with
elevated platform every time you move.
Always inform someone of hunting location, where elevated platform is located, and expected duration of hunt.
Always have second adult present or at least accessi le y cell phone or other means when using this product.
A ility to get help quickly may save your life in event of a fall.
Always take and use signal device (mo ile phone, radio, whistle, signal flare or personal locating device – PLD) when
using this product. Always keep signal device on you and readily availa le at all times.
Always use hoist rope to pull up ow, cross ow, firearm, ackpack or other gear only after eing secured on platform.
Firearm, cross ow, and ow must e pulled up unloaded with firearm cham er open and muzzle down. Never clim
with anything on your ack.
FAILURE TO FOLLOW THESE INSTRUCTIONS MAY RESULT IN SERIOUS INJURY OR DEATH!
1. Clim ladder using 3-point clim ing method while leaning forward. Before stepping onto platform, open door
to lind.
2. Enter lind and close door. Your elevated lind is now ready to e used!
3. Exit Elevated Blind. Always close and latch all window. Exit lind y facing lind and step down on ladder.
When oth feet are on ladder step, close door. Use 3 point clim ing method to clim down ladder.
Owner’s Manual
RAM PLATFORM WITH 4X4 BRACK TS
Page 19
QU STIONS? Email support@Nexcam.com for assistance.
MAINT NANC :
This elevated platform is designed to e maintenance free ut should any damage occur to any part of your elevated
platform or to purchase replacement parts, e-mail support at support@Nexcam.com for assistance.
Due to the weight of this elevated platform, natural settling of the product may occur over time and it may e
necessary to re-level elevated platform.
Even though this product contains a premium finish on all exposed surfaces, no finish will last forever and when finish
is diminished or gone, corrosion can occur. To keep your elevated platform corrosion free, as part of routine
maintenance, apply Rustoleum paint or similar product to any place that finish has egun to diminish or egun to
corrode.
PROBL M SOLUTION
Missing parts Do not use. Contact Nexcam customer service at
support@Nexcam.com
Pro lems with assem ly Do not use. Contact Nexcam customer service at
support@Nexcam.com
Platform is not level. Do not clim or use. Level elevated platform and anchor
platform to ground following local uilding codes.
Elevated platform is ent, cracked,
shows signs of corrosion or damaged in
any way.
Do not use. Remain at ground level. Contact Nexcam
customer service at support@Nexcam.com for assistance.
Do not make adjustments to elevated platform while on platform. Make all
adjustments at ground level or using a household step ladder.
WARNING
This product contains no user servicea le parts.
Never use elevated platform that is not level or properly anchored. Due to natural settling, it may e necessary to re-
level elevated platform.
This product is used to support you at height. Never use an elevated platform that is damaged in any way. Do not
use this product if it is not wholly free of damage. If you have any questions, e-mail support at
support@Nexcam.com for assistance. Proper maintenance and inspection is required for this product.
Only use Nexcam authorized replacement parts. The use of unauthorized replacement parts may result in serious
injury or death.
Always inspect elevated tower, legs, anchors, ladder/stairs, support races, platform, handrails, hardware, etc. for
damage including ut not limited to corrosion, cracks, deformity, ends, rot, wear, cuts or fraying and other damage.
Do not use if damage, wear, rot, deterioration, vandalism, etc. is detected or suspected.
FAILURE TO FOLLOW THESE INSTRUCTIONS MAY RESULT IN SERIOUS INJURY OR DEATH!
TROUBL SHOOTING:

Owner’s Manual
RAM PLATFORM WITH 4X4 BRACK TS
Page 20
QU STIONS? Email support@Nexcam.com for assistance.
LIMIT D WARRANTY*:
LIMIT D ON Y AR WARRANTY. WE WARRANT THIS PRODUCT AGAINST ANY MANUFACTURER DEFECTS
IN MATERAILS AND WORKMANSHIP FOR PERIOD OF ONE YEAR FROM DATE OF PURCHASE FROM
AUTHORIZED RETAILER TO THE ORIGINAL OWN R. WE WILL REPAIR OR REPLACE ANY PART FOUND
DEFECTIVE IF THE UNIT CLAIMED TO BE DEFECTIVE IS RETURNED TO US POSTAGE PREPAID, WITHIN
WARANTY PERIOD. CONTACT CUSTOMER SERVICE AT SUPPORT@NEXCAM.COM FOR WARRANTY
CLAIMS.
This warranty is void if any product has een su jected to misuse, a use, neglect (including ut not
limited to improper maintenance or failure to follow instructions), storage, improper use, misapplication,
accident, normal wear, modification, adjustment, or repair.
NO OTHER WARRANTIES WHETHER EXPRESSED OR IMPLIED, INCLUDING WARRANTIES OF
MERCHANTABILITY AND FITNESS FOR A PARTICULAR PURPOSE, SHALL APPLY TO THE PRODUCT.
LIMITATION OF LIABILITY
It is expressly understood that our lia ility for this product, whether due to reach of warranty,
negligence, strict lia ility, or otherwise , is limited to repair of the product as stated a ove. We will not
e lia le for any other injury, loss, damage, or expense, whether direct or consequential, including ut
not limited to loss of use, income, profit, or damage to material from use of this product howsoever
caused.
S RVICING YOUR PRODUCT:
If you need repairs or have warranty issues, contact Customer Service at support@Nexcam.com
for assistance.
PL AS NOT :
We reserve the right to make su stitutions on warranty coverage for any reason, including ut not
limited to availa le parts.
*Limited Warranty to the Original Owner.
NEXCAM INC.
405 Annandale Blvd.,
Annandale, MN 55302
Email: support@Nexcam.com
We site: https://nexcam.com
This manual suits for next models
1
Table of contents
Other NEXCAM Outdoor Furnishing manuals

Popular Outdoor Furnishing manuals by other brands

Corriveau
Corriveau Ganyon B101205 Assembly lnstructions

Ivy Terrace
Ivy Terrace IVTD212 Assembly instructions

Country Living
Country Living WT-TJ01 Assembly instruction

Arbor Technology
Arbor Technology Victoria picnic table and bench set Quick start quide

Basiclabel
Basiclabel TIMBER manual

Foldcraft
Foldcraft Plymold Contour installation manual


