Next generation 4050/A/2013 Guide
CHILD BOOSTER SEAT
Instructions for Installation & Use
Series No. 4050/A/2013
IMPORTANT:
KEEP THIS BOOK IN THE PLACE PROVIDED ON THE CHILD RESTRAINT

2
INDEX
PAGE
INTRODUCTION
WARNINGS
SHOULDER HEIGHT MARKERS AND A GROWING CHILD
SHOULDER HEIGHT MARKERS AND THE NEXT STEP
FEATURES
HOW TO SETUP
HOW TO USE
CARE AND MAINTENANCE
ACCESSORIES
IN CASE OF CRASH
3
4
7
9
10
14
19
21
22
6

INTRODUCTION
3
To be used with a lap-sash seatbelt by a child whose shoulders are above the lower
shoulder height marker (approximately 4 years of age) until the child’s shoulders reach
the upper shoulder height marker (approximately 6 to 8 years of age).
Continue to use this booster seat until the child reaches this limit. Children are safest
in a booster seat until their shoulders reach the upper shoulder height marker of the
booster seat.
Do not use this booster seat until child’s shoulders are above the lower shoulder height
marker.
If the knees do not bend in front of the vehicle seat cushion continue to use a booster
seat.
Just using a seatbelt is not recommended for children that have outgrown this seat.
Use a larger booster seat.
Carefully read all the instructions for installation. If in doubt about the method of
installation, consult Next Generation Nursery Products Pty. Ltd. or agent or a child
restraint tter or, in New Zealand, consult the agent for the vehicle.
THIS RESTRAINT MUST BE USED IN CARS WITH FORWARD-FACING SEATS WITH A
LAP-SASH SEATBELT. THIS BOOSTER SEAT IS NOT SUITABLE FOR USE WITH A CHILD
HARNESS.
No child restraint can guarantee absolute protection from injury in every crash. However,
to ensure that your child gets all the protection designed into the restraint PLEASE READ
AND FOLLOW THESE INSTRUCTIONS EXACTLY.
This child restraint is not suitable for use on an aircraft.
Always store the instruction book in the pocket provided on the side of the cover.
4
• Use the restraint exactly as shown in the instructions.
• Supervision of children is needed because they may be able to undo the buckles.
• DO NOT LEAVE CHILDREN UNATTENDED IN THE CAR.
• Do not alter or modify this restraint.
• Repairs must only be done by the manufacturers or agent.
• Do not allow the restraint to come into contact with polishes, oils, bleach and other
chemicals.
• Destroy the restraint if it has been in a severe crash, even if no damage is visible
• DO NOT USE THIS RESTRAINT WITHOUT THE COVER.
• DO NOT USE WITH JUST A LAP BELT. You must use with a lap-sash seatbelt.
• The lap part of the seatbelt must be rmly across the thighs and the sash belt tted
diagonally across the chest and on the shoulder.
• Regularly check the condition of the restraint components, straps and other tments
for correct function and condition. Seek prompt repair.
• IF AN AIRBAG IS FITTED IN THE SEATING POSITION WHERE THE CHILD RESTRAINT
IS TO BE FITTED, FOLLOW THE VEHICLE MANUFACTURERS WARNINGS AND
INSTRUCTIONS.
• The child in the seat must not slump or slouch such that the lap belt is on the
abdomen. The lap belt on the abdomen is dangerous. The lap belt positioning device
KeepSafe™guide must always be used.
• This child restraint is not approved for use with any connectors that connect to the
car's ISOFIX low anchorages.
5
• The restraint should not be purchased or sold as a second hand item. It is
recommended not to use child restraints older than 10 years as the protection in an
accident may be reduced.
• Seatbelt extenders are not recommended to be used if the seatbelt is not long enough
to secure the child restraint. If seatbelts are too short then seek advice from a child
restraint tter and consider their recommendations before using a seatbelt extender.
If you use a seatbelt extender then ensure that the seatbelt buckle does not contact
the child.
• Do not use in a front seat, unless your child is over 4 years of age or in accordance
with the applicable Road Rules in your region.
• Do not use on any vehicle seat which faces sideways or rearwards.
• Use of aftermarket accessories (i.e. items not provided in the box with the child
restraint), can reduce the safety provided by the child restraint and may cause injury
or death.
• Use a towel or seat protector (messy mat) to protect the vehicle seat. Protection of
both underneath or behind the booster seat may be required.
• This booster seat is not suitable for use with an accessory child harness.
IMPORTANT :
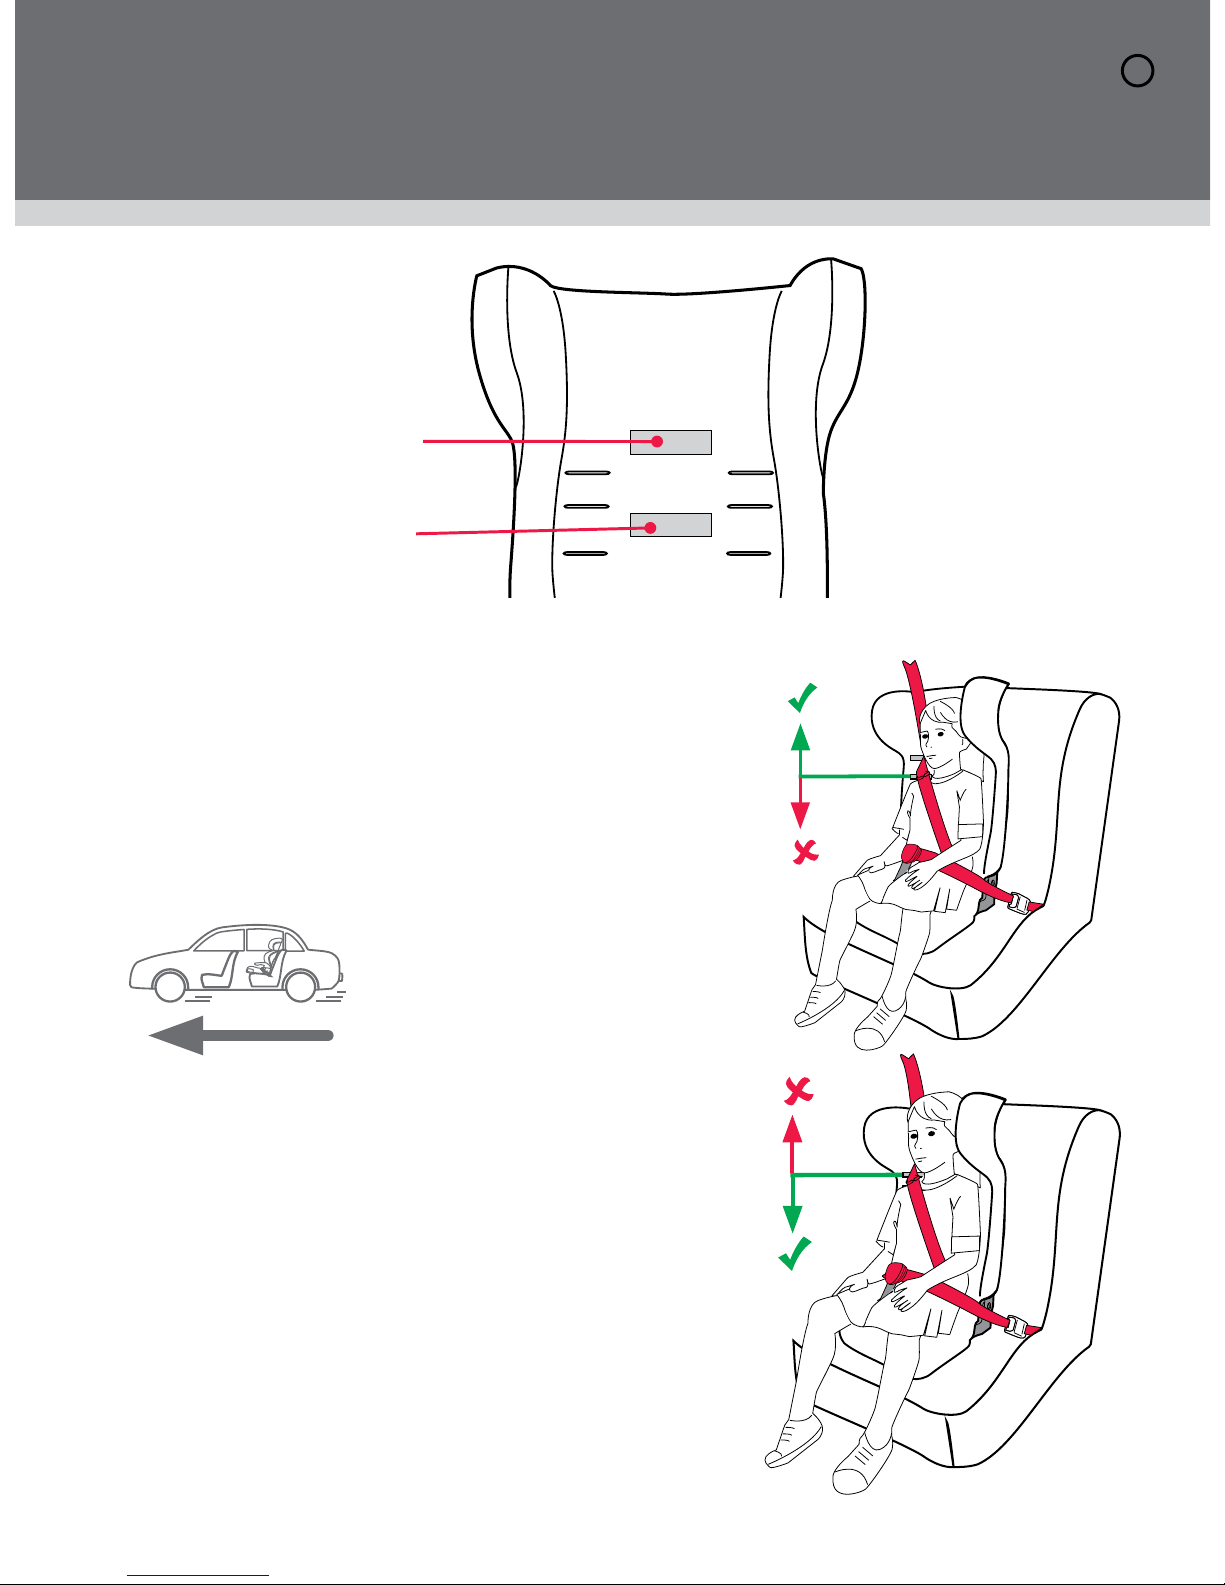
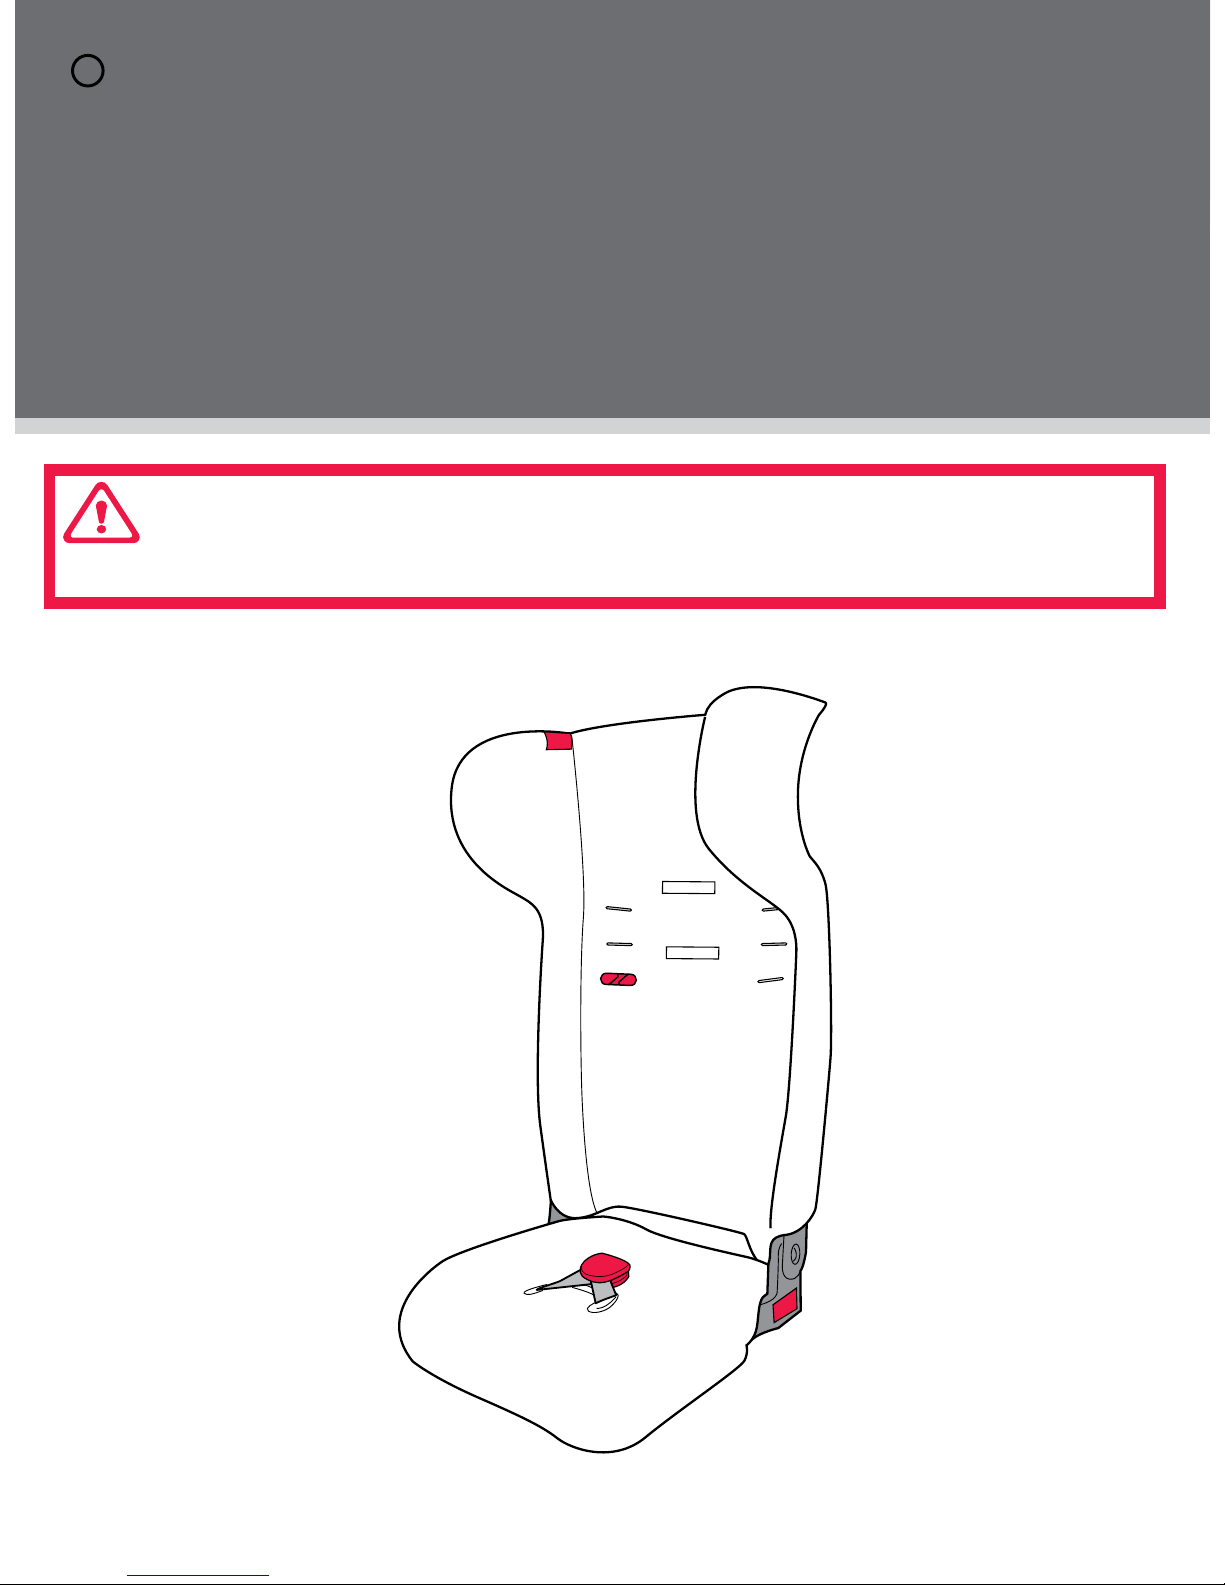
SHOULDER HEIGHT MARKERS AND
A GROWING CHILD
SHOULDER HEIGHT MARKERS AND
THE NEXT STEP
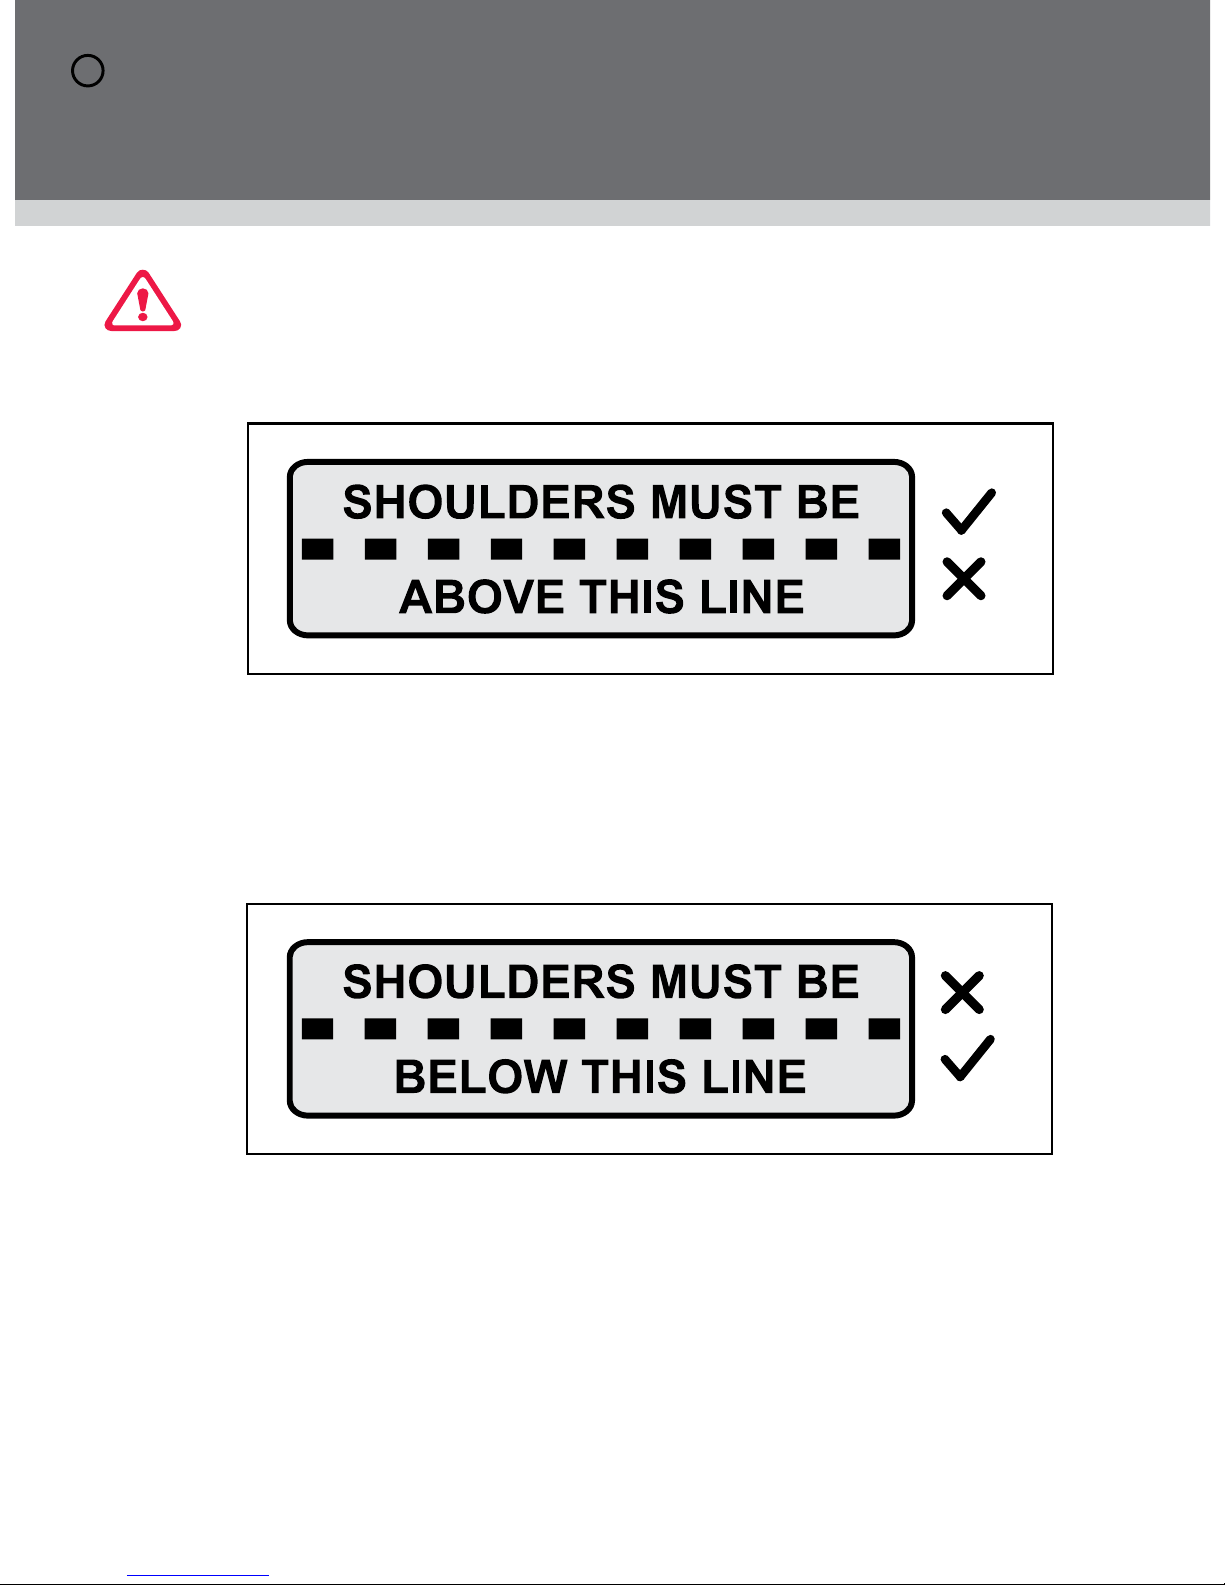
SMALLER CHILD
Shoulders must not be below the Lower
Shoulder Height Marker.
From approximately 4 years of age.
TALLER CHILD
Shoulders must not be above the Upper
Shoulder Height Marker.
To approximately 6 to 8 years of age.
Height label will be behind the child’s neck.
Front of Vehicle
Label B
Label A
6
Label A
Label B
SHOULDER HEIGHT MARKERS AND
A GROWING CHILD
SHOULDER HEIGHT MARKERS AND
THE NEXT STEP
7
IMPORTANT: Follow this advice.
LOWER SHOULDER HEIGHT MARKER : Label A
The child’s shoulders must be in-line or above this marker. Approximately 4 years of age.
If the child’s shoulders are below then the child should remain in their previous child
restraint.
When the child’s shoulders reach this upper marker, or the child no longer ts in the
child restraint, approximately 6 to 8 years of age, then the child must be moved to the
next form of child restraint, see next page.
The child restraint is unsuitable for the occupant when the shoulders are below the lower
marker or above the upper height marker. The child needs to be moved into the next form
of restraint when they reach the top shoulder height.
UPPER SHOULDER HEIGHT MARKER : Label B
8
SHOULDER HEIGHT MARKERS AND
THE NEXT STEP
Next type of restraint that can be used in the
car for your child.
When your child has outgrown the seat, you can then use either restraint methods as
follows:
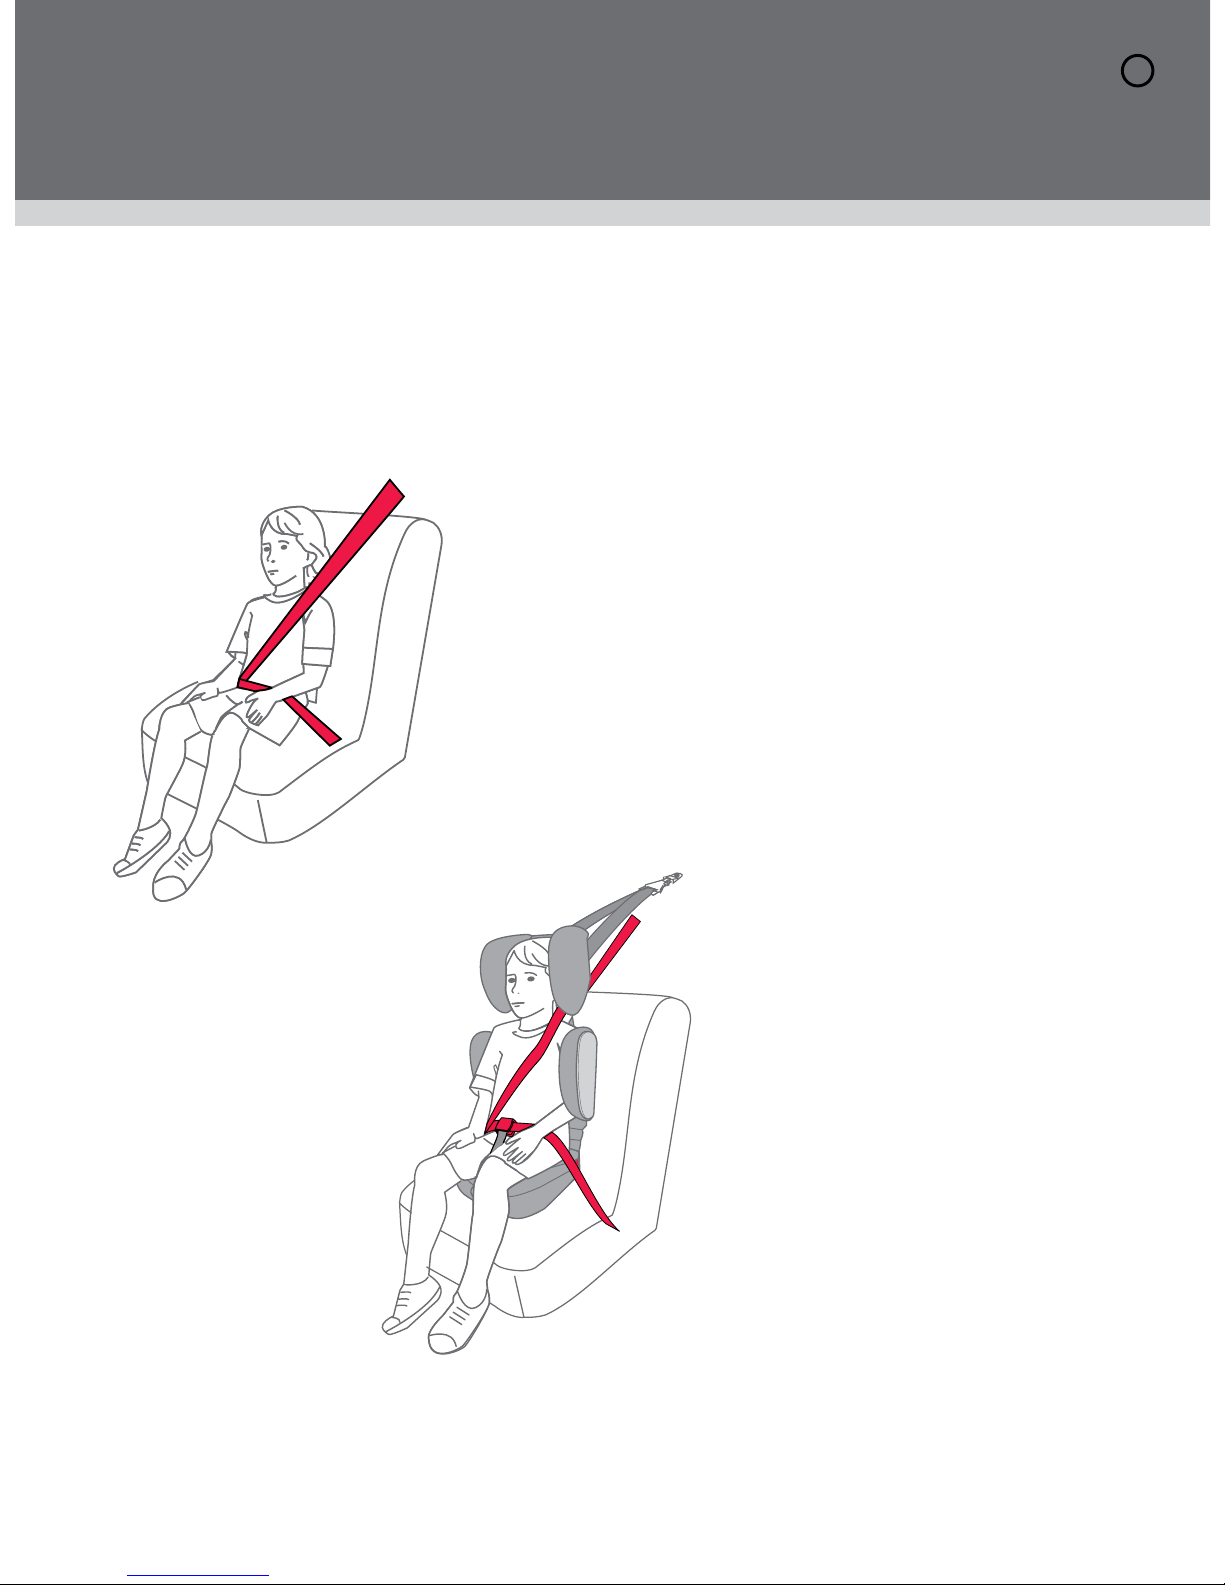
Just the car's lap-sash seatbelt.
Lower leg must hang over the edge
of the seat cushion.
Or you can use a larger booster
seat suitable for children; up to
8-10 years of age or until they no
longer t the booster seat.
9
SHOULDER HEIGHT MARKERS AND
THE NEXT STEP
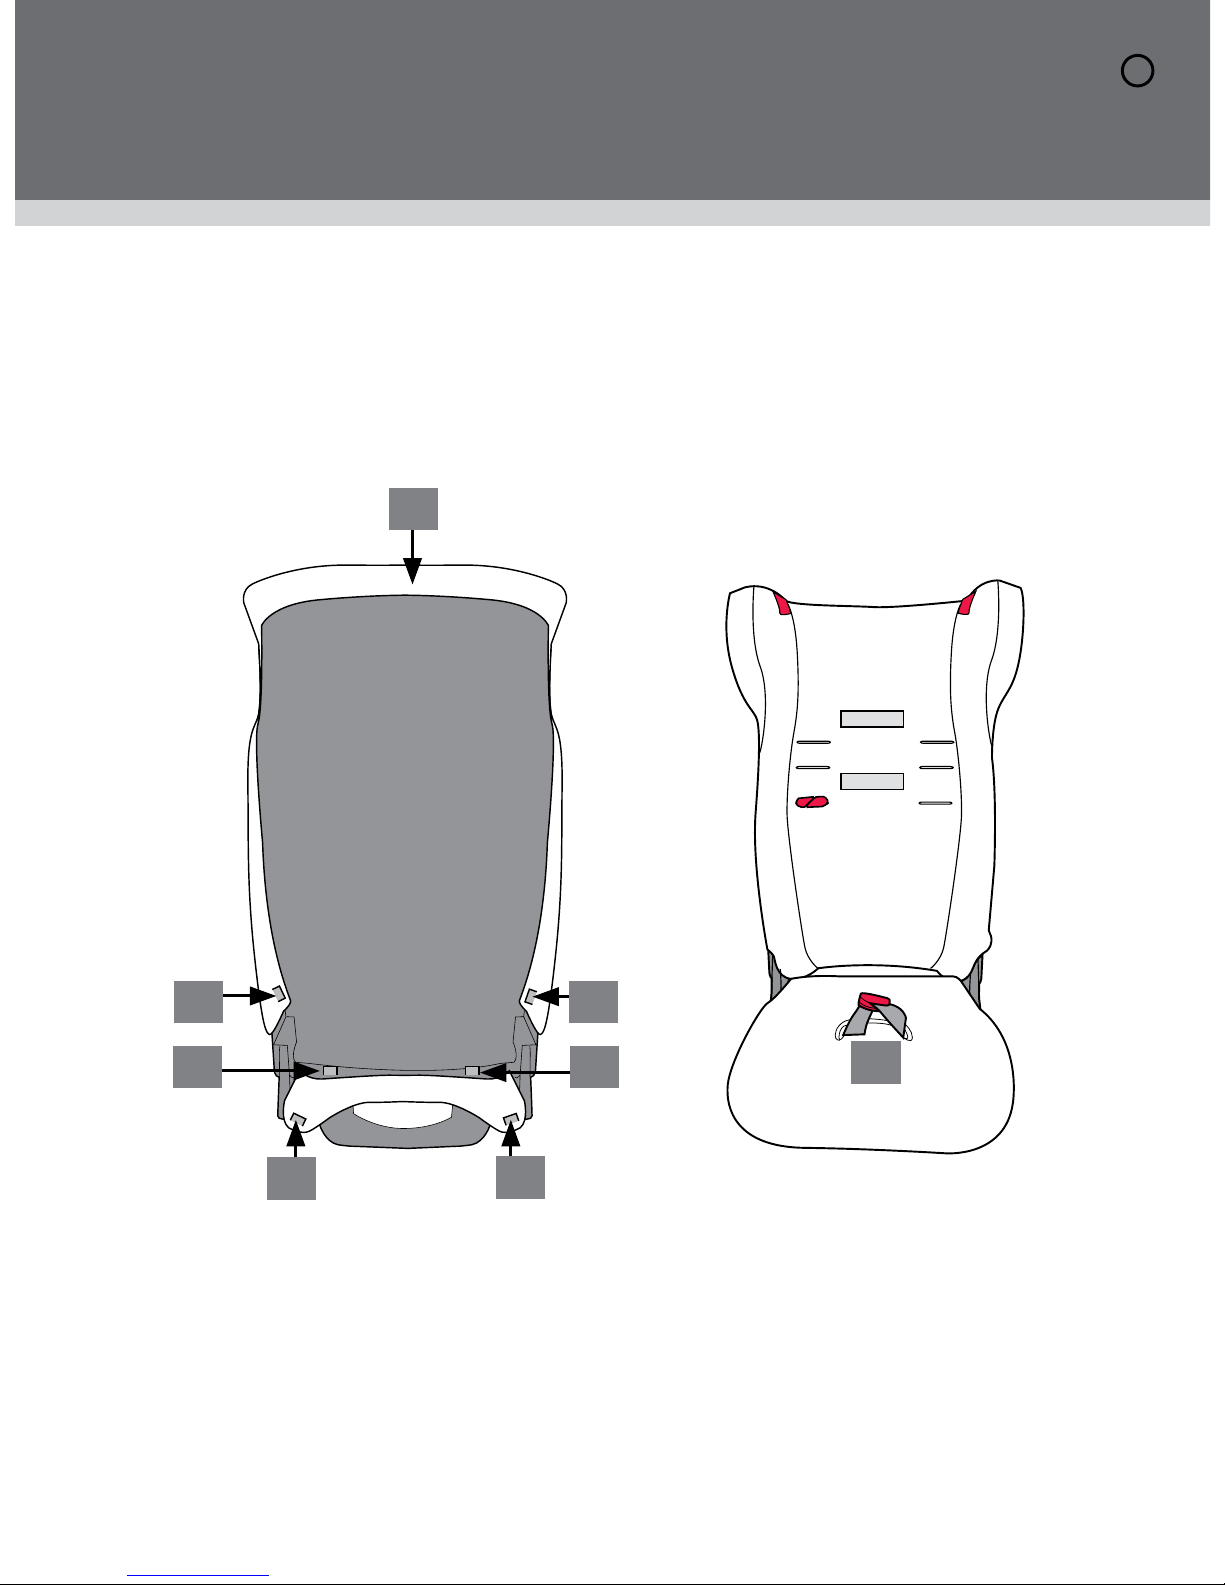
FEATURES
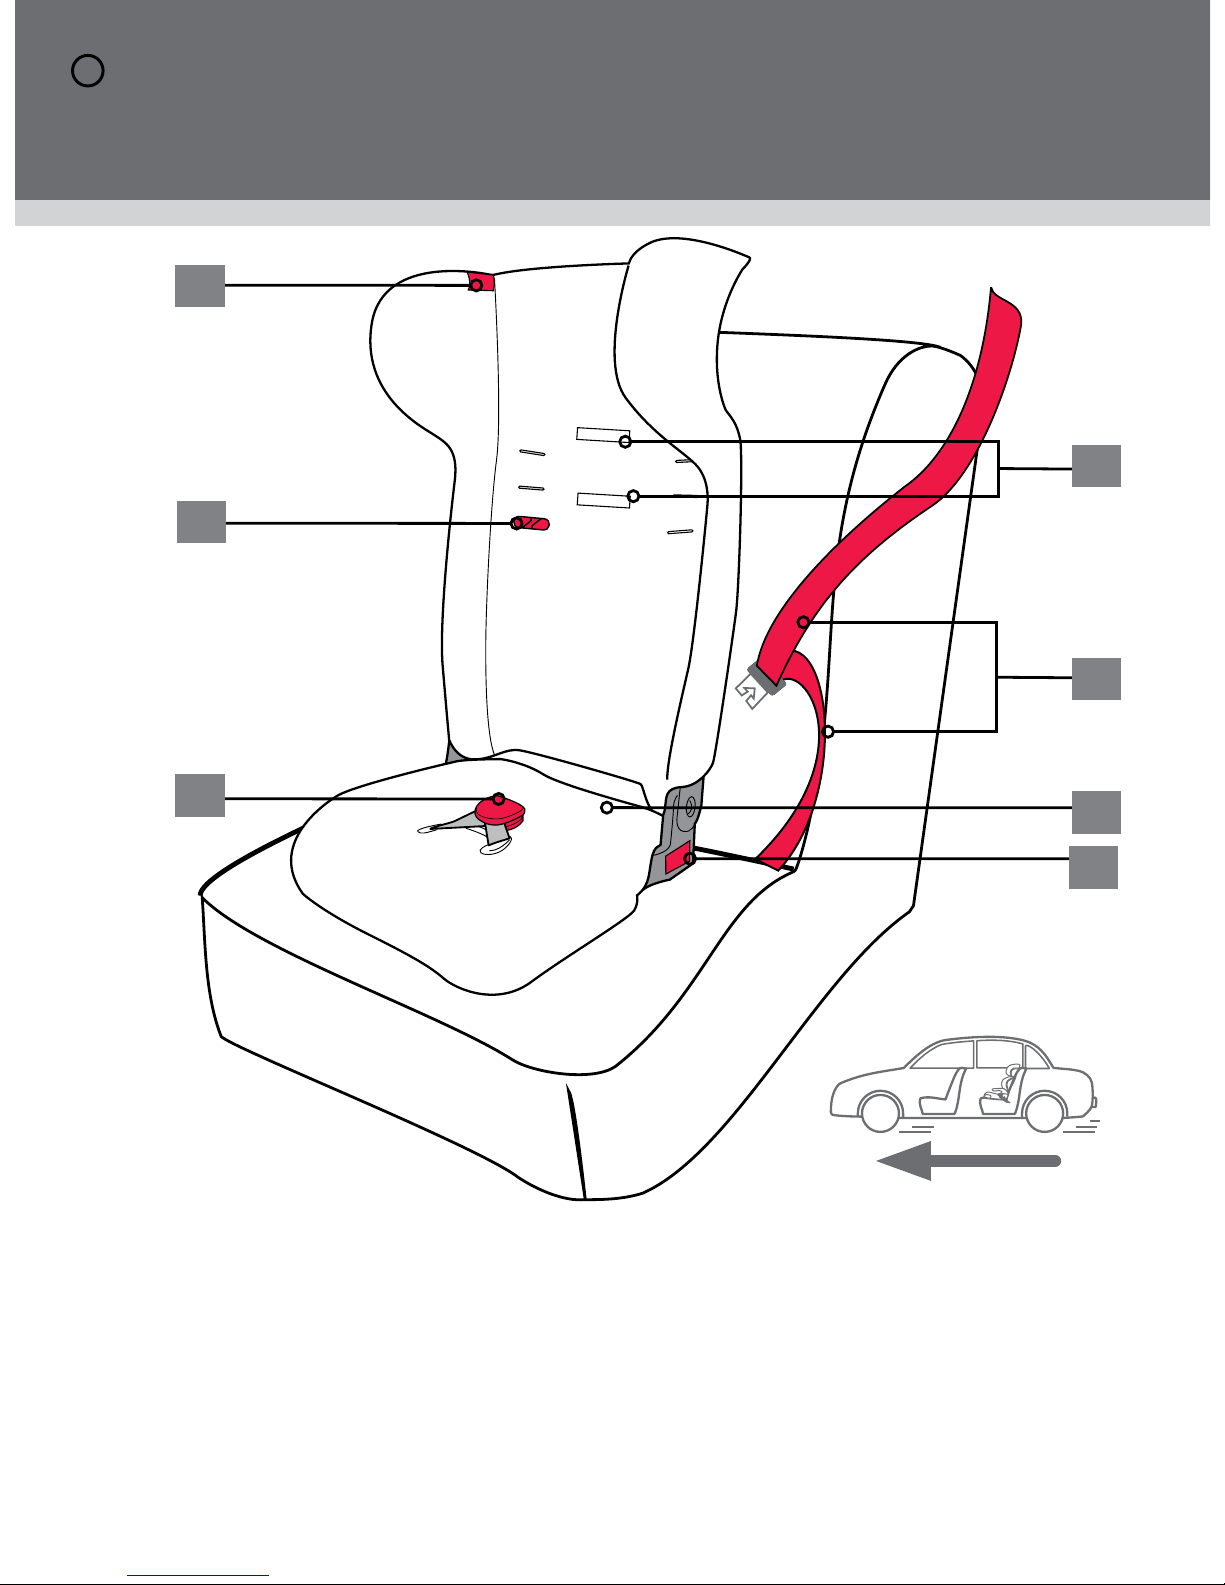
Front of Vehicle
1. Shoulder Height Markers
2. Car Seatbelt
3. Padded Cover for Comfort
4. BOOSTER SEATBELT PATH label (each side, for lap belt)
5. KeepSafe™guide
6. Sash guide
7. BOOSTER SEATBELT PATH label (each side, for sash belt)
2
5
1
7
6
3
4

10
HOW TO SETUP
ADJUSTING THE BACKREST
The backrest pivots freely so as to match the car seat back angle. Move the restraint
back until it is touching the car’s seat back. If the vehicle seat back angle is adjustable
put it in the normal upright mode.
Normal
backrest angle
Backrest angle
too reclined
UNFOLDING THE BOOSTER
SEAT
If the seat is in a folded position, grip the Booster seat
back and seat base and unfold till you hear it lock into
position.
FOLDING THE BOOSTER SEAT
To store the booster seat, push forward to fold the seat
forward. The booster seat can be folded for compact
storage.
DO NOT PLACE FINGERS IN BETWEEN SEAT BACK &
SEAT BASE WHEN FOLDING OR UNFOLDING.
CAUTION:

11
HOW TO SETUP
ALWAYS USE THE KeepSafe™guide.
TO SHORTEN TO LENGTHEN
You must adjust the crotch strap to the correct length for your child before installing the
restraint as it cannot be adjusted in the car.
Always return the crotch strap to its original shorter length when using the seat with a
smaller child. The KeepSafe™guide must always be positioned so that the lap belt is kept
on the child's thighs - it will not connect correctly with the seatbelt if it is too high. DO NOT
attempt to remove or dismantle the crotch strap and KeepSafe™guide.
IMPORTANT :
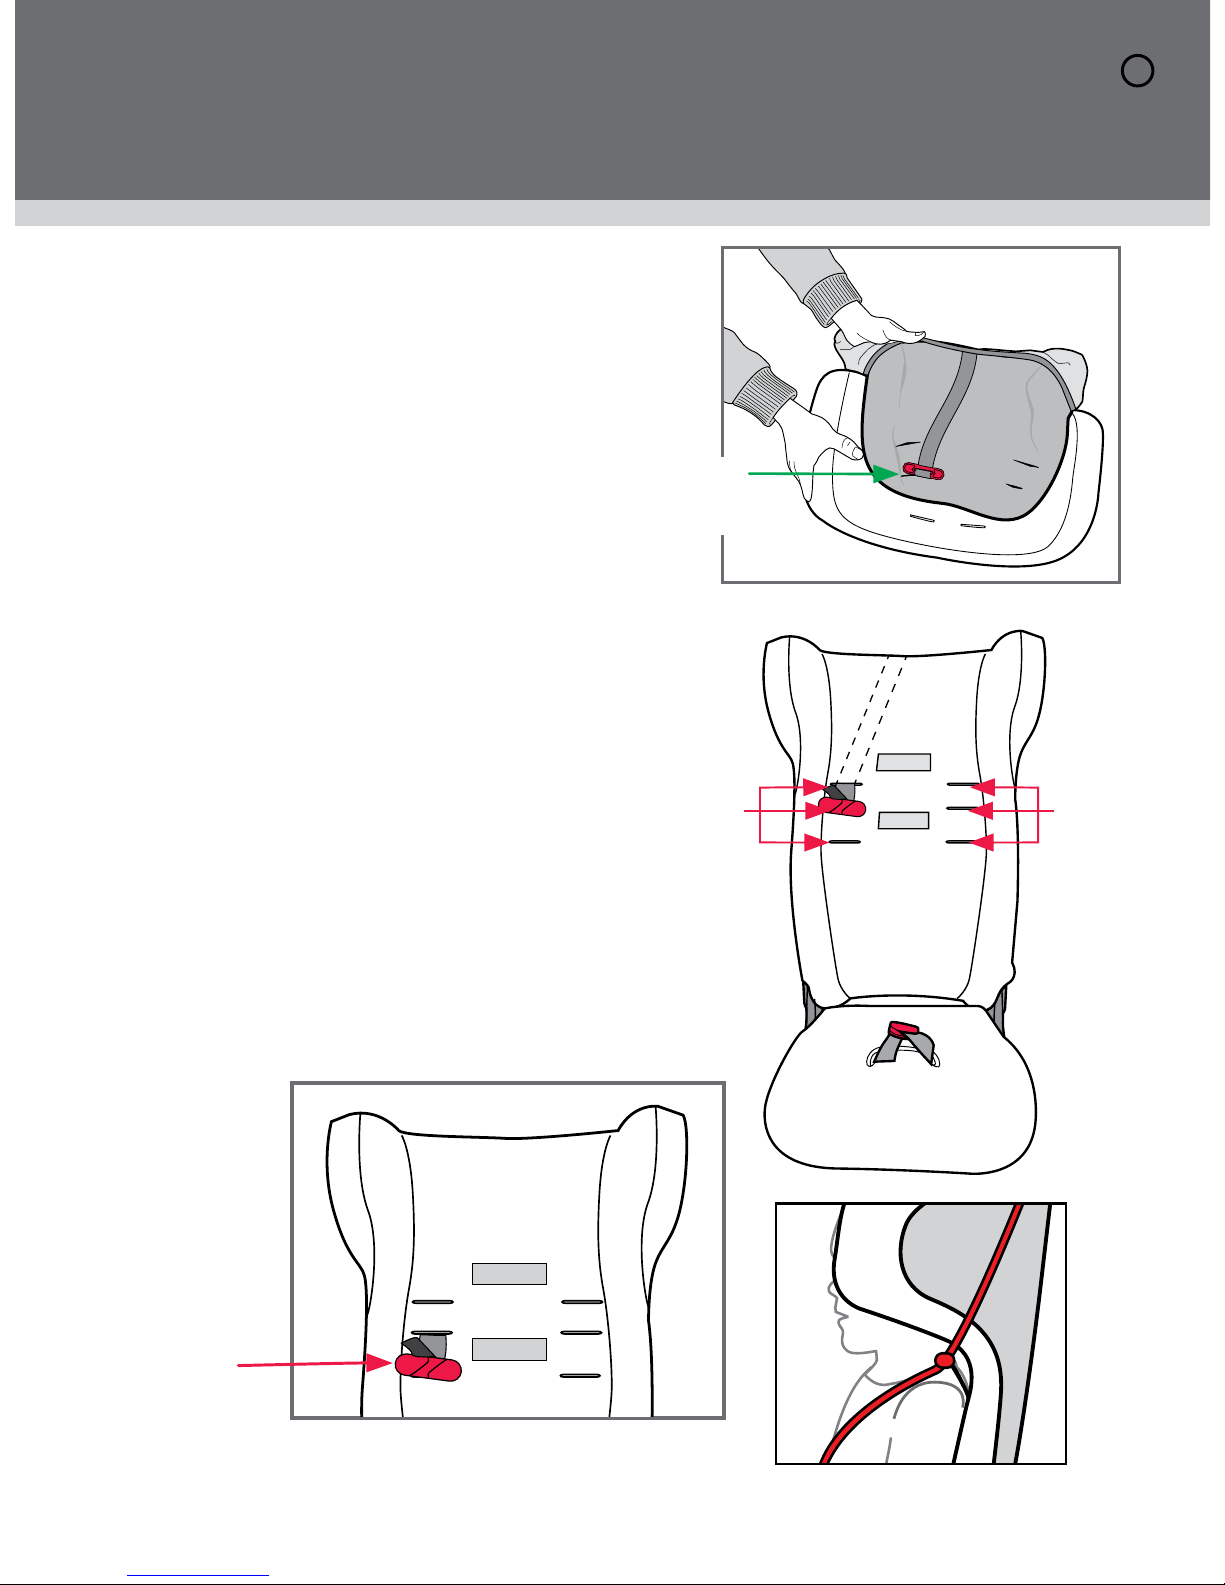
ADJUSTING THE KEEPSAFE™GUIDE
The crotch strap can be adjusted so that it ts the seatbelt
correctly to the child. The crotch strap length adjuster can be
found under the seat.
A. Adjust the crotch straps for the KeepSafe™guide so that the
Lap portion of the seatbelt is sitting on the child's thighs and
the clip prevents the lap belt rising on the abdomen. Ensure the
KeepSafe™guide does not push into your child's thighs as this
may cause discomfort.
B. To change the length of the crotch strap, thread through the
adjuster in the direction of the arrows shown below.
The KeepSafe™guide
must pull the lap belt
rmly in contact with the
child's thighs.
KeepSafe™guide
position
TOO HIGH
KeepSafe™guide position
OK
Lower edge of
KeepSafe™guide, level
with top of thighs.
12
HOW TO SETUP
ADJUSTING THE SASH
GUIDE POSITION
A. The sash guide needs to be positioned
in-line with or just above the child's
shoulders.
B. Remove trim at the top rear of the
restraint, then pull the cover forward
to reveal the Sash guide which is
attached to a strap at the back of the
seat cover.
C. Align the sash guide with the slot just
below the child's shoulder and on the
same side as the sash belt is connected
to the car. Thread the sash guide
through the slot in the seat cover and
ret the seat cover to the restraint.
Smaller children will generally use the
lowest slot.
Sash
guide
slots
Sash
guide
slots
Sash
guide
Thread the
sash guide
through the
chosen slot
in the seat
cover.

13
HOW TO SETUP
The sash guide should be used to correctly
position the sash portion of the lap-sash
seatbelt across the child's shoulder and
chest.
Feed the adjusting strap into the slot on the
cover that is just below the child's shoulder.
Adjust the height of the sash guide so that
the guide is above the child's shoulder.
ALWAYS
USE
THIS
SASH
GUIDE
Hold the sash
guide and pull
strap to shorten
To Lengthen
To Shorten
Hold the strap,
rotate and pull
the sash guide
to lengthen
14
HOW TO USE
WITH LAP-SASH SEATBELT
BOOSTER
SEATBELT PATH
label
A. Place the booster seat in the desired seating position.
B. Seat the child in the seat. The child's shoulders must be between the lower and upper
shoulder height markers.
C. Pull the seatbelt out fully and place the lap belt over the child's hips and thighs,
across the red BOOSTER SEATBELT PATH label, engage seatbelt buckle and
tongue, ensuring there are no twists in the belt. If the seatbelt buckle is adjustable,
adjust the buckle as low as possible away from the child.
15
HOW TO USE
D. Feed the sash-belt across the child's chest and through the sash guide. The sash
guide should be used to correctly position the sash portion of the lap-sash seat over
the child’s shoulder and across the chest. Continue to adjust the height of the sash
guide so that the guide is above the child’s shoulder as the child grows. To adjust
the height and position of the sash guide see page 12 and 13.
IMPORTANT: ALWAYS USE THE SASH GUIDE

16
HOW TO USE
IMPORTANT: ALWAYS USE THE KeepSafe™guide.
Engage buckle
Sash belt
across the
chest and
through the
sash guide
BOOSTER SEATBELT
PATH label
BOOSTER SEATBELT PATH label
Lap belt
must always
be rm on
the thighs.
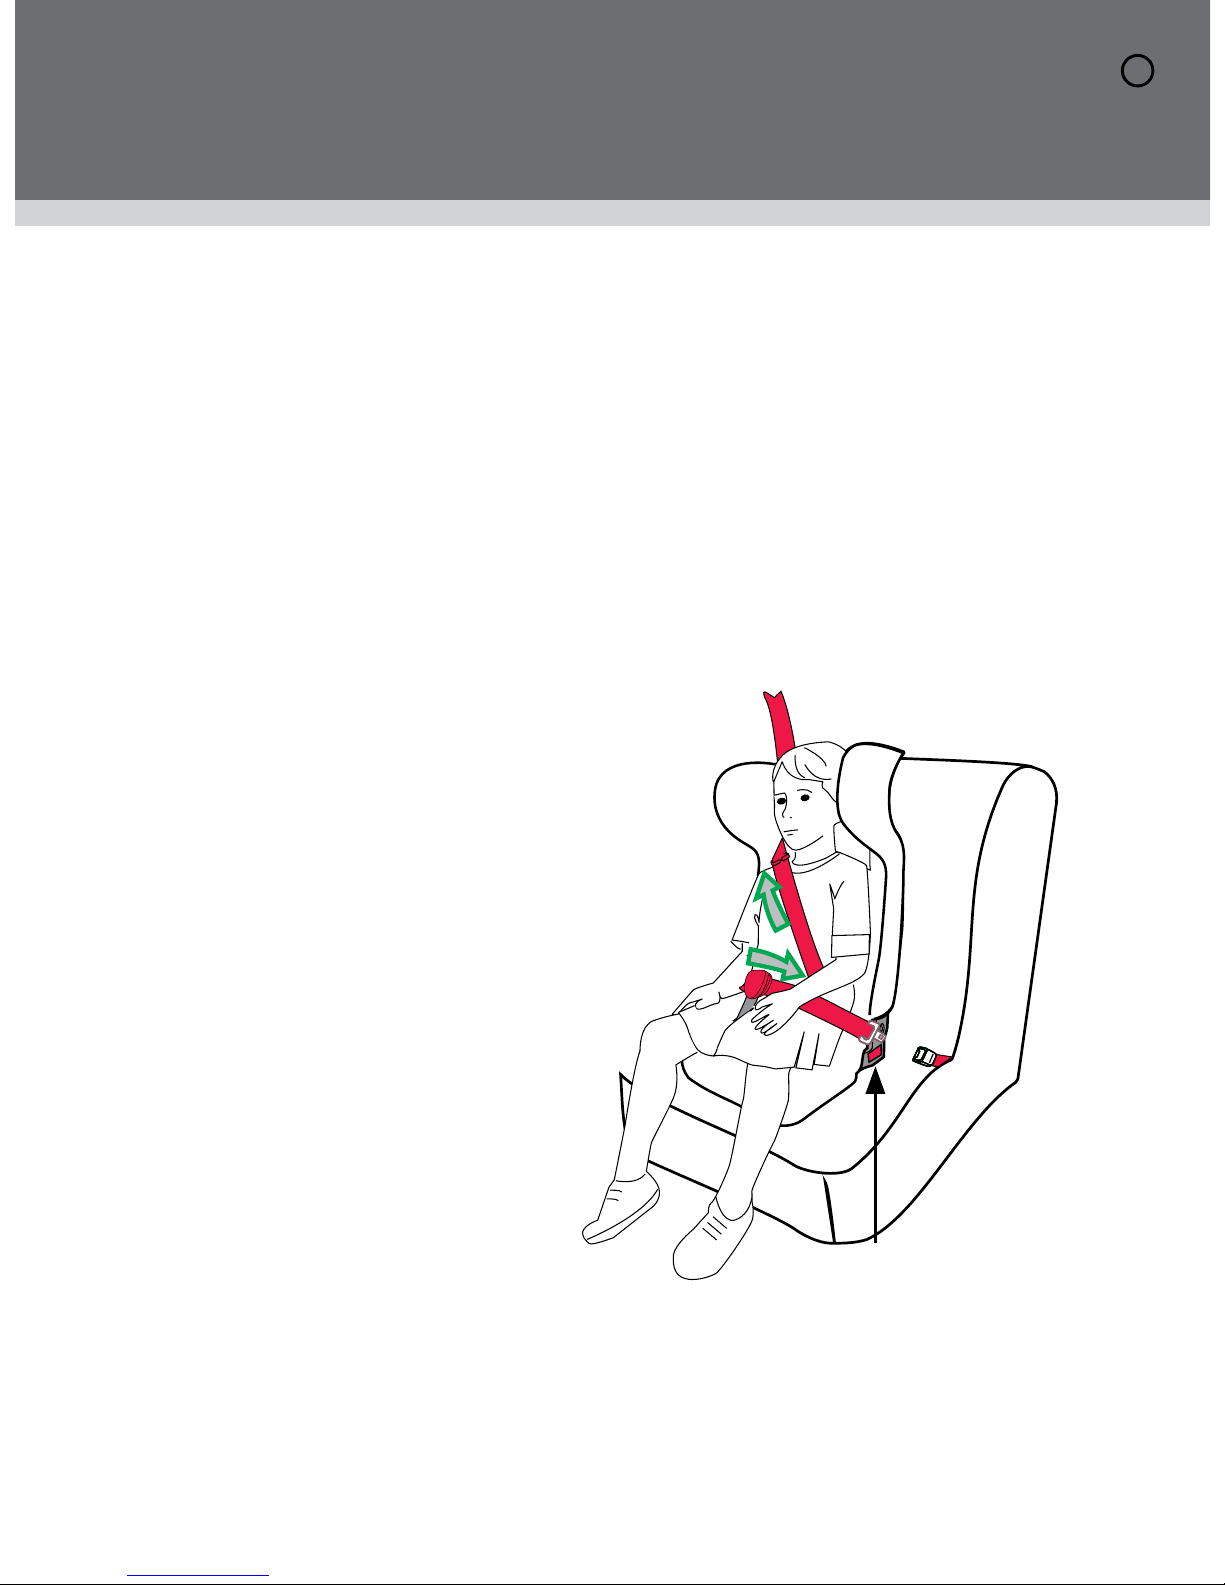
E. Hook the KeepSafe™guide over the lap part of the seatbelt with the lap belt positing
logo facing forward. The KeepSafe™guide must be used at all times to prevent the
child slumping (sliding forward at base of seat) as the lap belt on the abdomen is
dangerous in the event of a crash.
F. Tighten the lap belt and the sash
belt if using an Inertia reel retractor
seatbelt, adjust lap portion of the
seatbelt rmly around the child and
child booster seat, place the sash
over the top of the seat where the
red BOOSTER SEATBELT PATH
label is. Then let the slack sash portion
retract up into sash retractor.

17
HOW TO USE
IMPORTANT:
Always ensure the seatbelt is rmly tted to the hips and thighs and the sash belt is
always tted diagonally across the chest.
The KeepSafe™guide correctly adjusted must always be used when the child is using
the booster seat as it ensures the lap belt is correctly positioned on the child's thighs
and hips. A loose or poorly positioned lap belt can allow the lap belt to ride up into the
abdomen and can cause serious injuries in a crash.
DO NOT LEAVE CHILDREN UNATTENDED IN THE CAR
:
G. The seatbelt must t rmly but comfortably across the lap and chest. If needed,
adjust the vehicle seat to improve the position of the sash on the child’s chest. It
should pull to the rear of the child.
H. Always ensure the lap belt is on the child's hips and thighs at all times. The lap belt
must not be on the child's abdomen. The sash belt must be across the child's chest.
18
HOW TO USE
NOTE: Seatbelt extenders should
not be used if the seatbelt is
not long enough to t around
the child. If a seatbelt extender
is used then the seatbelt buckle
must not be in contact with the
child.
TO REMOVE CHILD
Disengage seatbelt tongue and buckle. Remove the seatbelt from
the child and KeepSafe™guide. When the booster seat is not
being used, secure in position, by engaging seatbelt around the
booster seat or store in a safe place to prevent it becoming a
projectile in a crash.
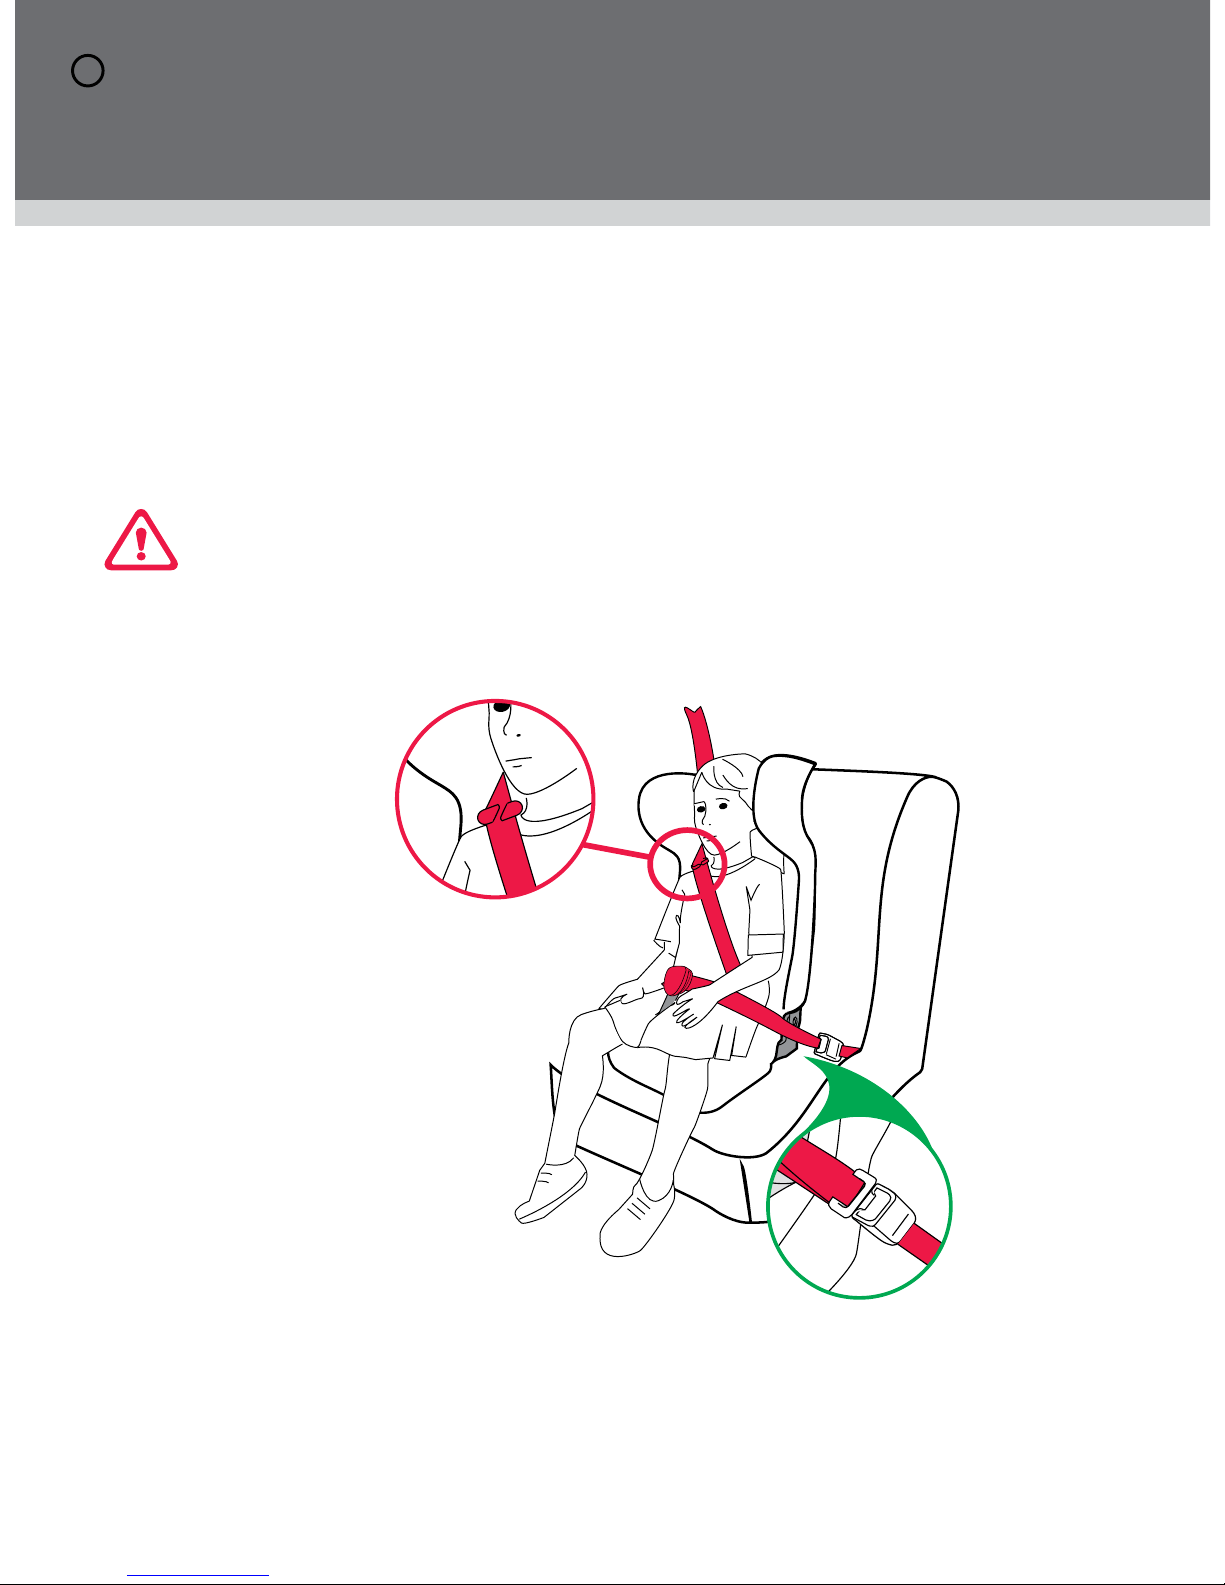
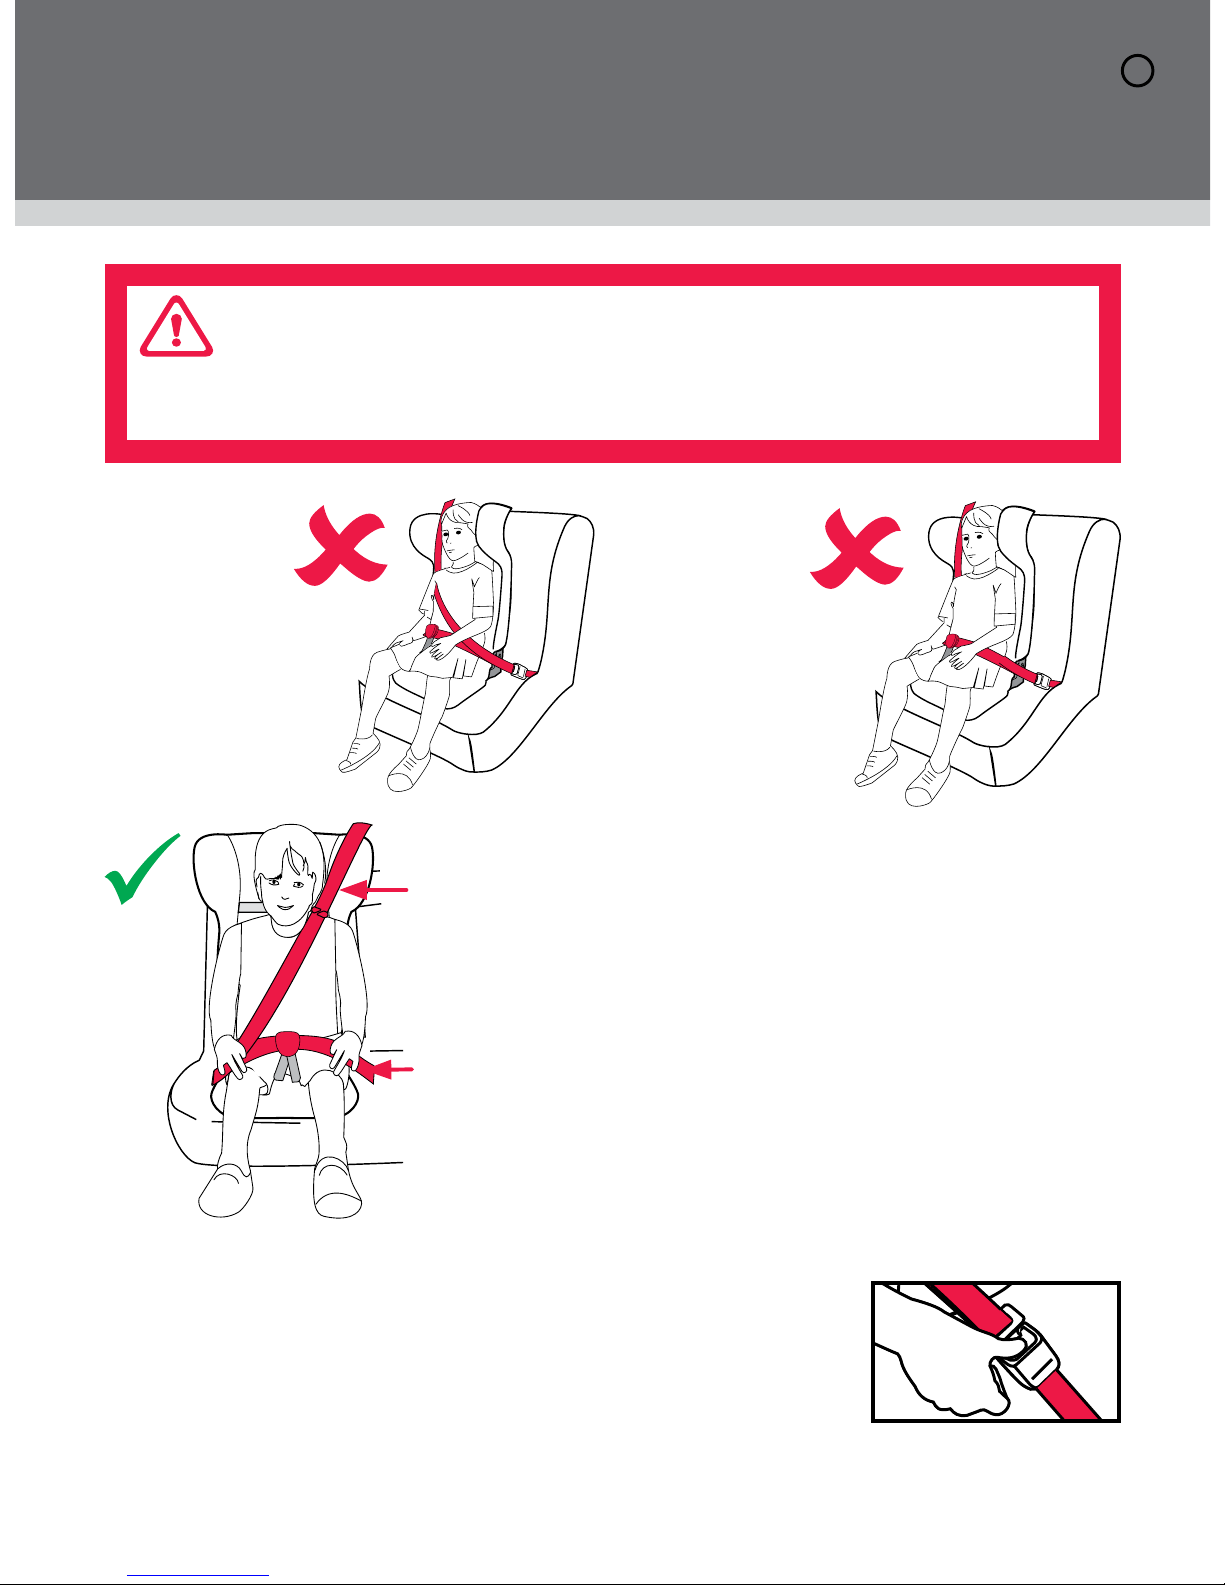
WARNING: A SASH BELT UNDER THE ARM OR BEHIND
THE BACK IS DANGEROUS
SEATBELT BEHIND THE
BACK
IS DANGEROUS
SEATBELT UNDER
THE ARM
IS DANGEROUS
Lap belt must always
be rm on the thighs
and hips.
Seatbelt tting closely
across the chest and
through the sash guide
and over the top of the
seat.

19
CARE & MAINTENANCE
MAINTENANCE
There are no parts on this booster seat that require the user to maintain.
REGULAR CARE OF THIS RESTRAINT:
Please check the following items regularly to ensure the safety of your child:
A. Check the webbing for fraying.
B. Ensure there are no cracks in moulding or the plastic moulding.
C. If any part of the restraint is cracked or broken, seek repair immediately or replace
the child restraint.
HOW TO CLEAN
Use only mild soap and water with a moist cloth to clean all metal and plastic parts of the
booster seat. Do not use harsh cleaners, polishes, oils, bleach or other chemicals.
COVER
The booster seat has a cover made from ame retardant fabric and is removable for
cleaning. Washing and care instructions are on the care label attached to the cover.
Refer to the following pages for instructions on how to remove and replace the cover.
VERY IMPORTANT:
Only replace the cover with Next Generation Nursery
Products supplied replacement cover with identical
shoulder height markers or a replacement cover
meeting AS/NZS 8005.
20
CARE & MAINTENANCE
TO REMOVE COVER
1. To remove the main cover unclip clips (B and C) located at the lower back of the seat.
Lift and peel away A from seat.
2. To remove the base cover unclip clips (D) and feed KeepSafe™guide (E) through the
cover and peel away from seat.
TO REPLACE COVER
1. To replace the main cover align trim to slots and lift elastic (A) over top of seat, clip
the clips (B and C) located at the lower back of the seat.
2. To replace the base cover clip clips (D) and the back of the base and feed through
KeepSafe™guide (E) through the cover.
E
B
C
DD
C
B
A
Table of contents
Other Next generation Car Seat manuals


Popular Car Seat manuals by other brands


BEBE CONFORT
BEBE CONFORT Tinca base manual

Britax
Britax Safe-N-Sound BABY CAPSULE BS0040A-i20133... Instructions for installation & use

RECARO
RECARO Monza Nova IS Instructions for installation and use

BESAFE
BESAFE IZI SLEEP - V8.0 user manual

teutonia
teutonia Tario operating instructions

Britax
Britax Car Seat user manual


