Clek FOONF Wiring diagram

Foonf Inflatable Belt
Supplementary Instructions
Table of Contents
Installing/Removing Rear-Facing Car Seat............................................................... 1
Installing Rear-Facing Car Seat With Inflatable Vehicle Belt ................................ 1
Removing Rear-Facing Car Seat Installed With Inflatable Vehicle Belt................... 7
Installing/Removing Forward-Facing Car Seat ......................................................... 8
Installing Forward-Facing Car Seat With LATCH and Inflatable Vehicle Belt........... 8
Removing Forward-Facing Car Seat
Installed With LATCH and Inflatable Vehicle Belt ............................................. 18
Installing Forward-Facing Car Seat With Inflatable Vehicle Belt ......................... 20
Removing Forward-Facing Car Seat Installed With Inflatable Vehicle Belt............ 27
® Clek and Clek logos, Olli, Ozzi, Oobr, and Foonf are registered trademarks of Clek Inc.
For a complete list of Clek Inc. trademarks please visit www.clekinc.com/trademarks.
January 2017
1
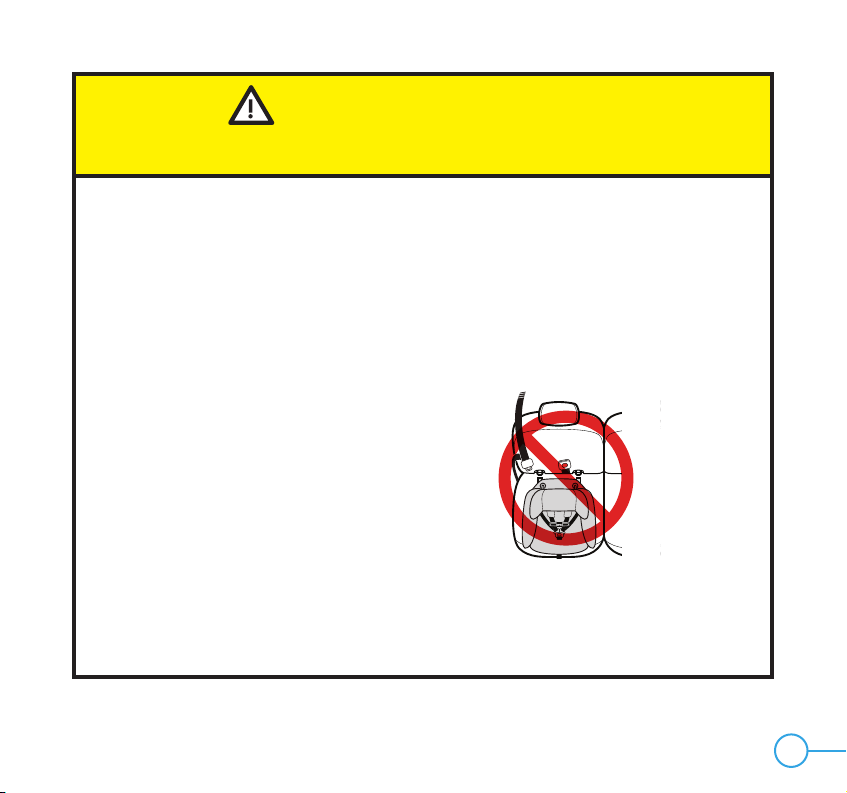
WARNING — DEATH or
SERIOUS INJURY can occur
• Use these instructions to replace the “Installing Rear-Facing Car Seat with
Vehicle Belt” section in your car seat manual.
• Not all inflatable vehicle belts are safe for use with this car seat. Contact
Clek Customer Service at 1-866-656-2462 to determine if the inflatable
belts in your vehicle are approved for use with this car seat.
• Always use these supplementary instructions in addition to the instructions
found in your car seat manual. Your car seat manual contains other
important information about the use and installation of this car seat.
• Never use the Rear-Facing Belt Lock-offs when installing this car seat Rear-
Facing using an inflatable vehicle belt.
• This car seat must be held tight at all times by the lap portion of the lap/
shoulder belt.
− Refer to the vehicle owner’s manual for information regarding
car seat installation and inflatable vehicle belt use with a car seat.
Installing Rear-Facing Car Seat With Inflatable Vehicle Belt
2
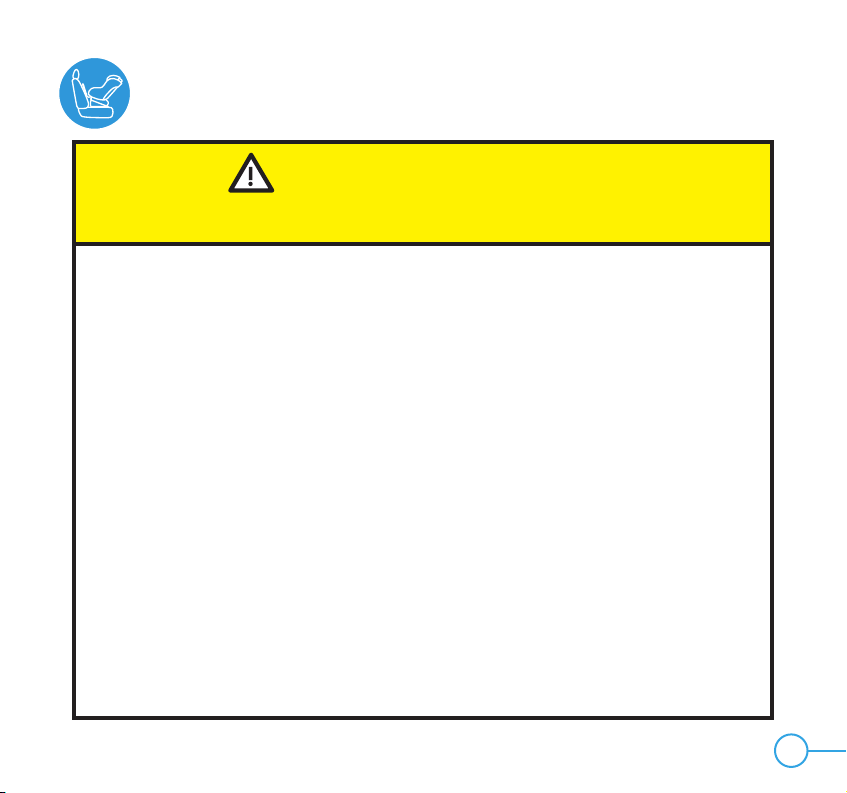
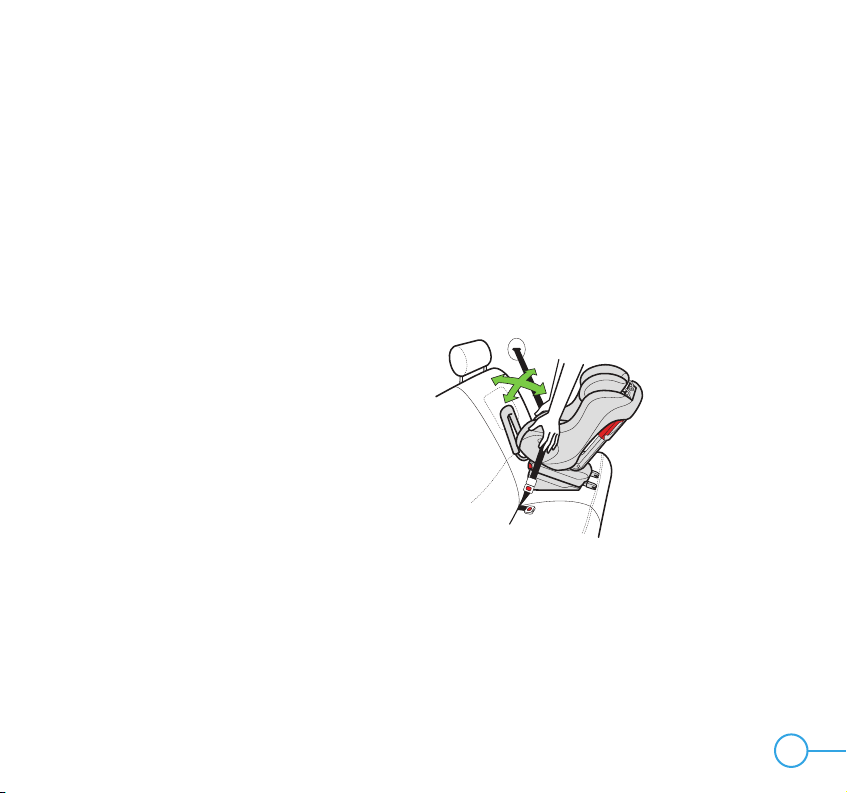
Step 1
Prepare car seat for Rear-Facing Installation:
• Fully recline car seat to Recline Position
3 by pulling Recline Handle out and
rotating car seat back as shown in
Figure 1.
• Install Rear-Facing Base to bottom of
seat. See “Installing/Removing Rear-
Facing Base” in your car seat manual.
• Remove Seat Cushion and install
Anti-Rebound Bar. See “Installing/
Removing Anti-Rebound Bar” in your
car seat manual.
Note: This car seat can be used Rear-Facing
in recline position 2 or 3 only.
Step 2
Select a forward-facing vehicle seating
location which has a vehicle belt which can
be used with this car seat.
2
tation
’arrière Orientationv
Pourajust
Pourdéverrouillerles c
maximumpuistirez sur les poignées de déverrouillage DUA.
1
32
Orientation
versl’arrière Orientationversl’avant
•Pourajusterlesconnecteursrigides inférieurs du DUA: Tirez sur la poignée d’ajustement
DUAetglissezlesiègedans la position souhaitée.
•Pourdéverrouillerlesconnecteursrigides inférieurs du DUA: Étirez les connecteurs au
maximumpuistirezsurlespoignées de déverrouillage DUA.
•Leniveaudusoldoit être dans la plage
d’inclinaisonprévuepourl’âgedel’enfant.
Plaged’inclinaison
Touslesenfantsorientés
versl’arrière
1anetplus
cuandolalínea adecuada para el peso del niño es paralelo al suelo
UTILICEESTALÍNEAPARA BEBÉS BAJO22 libras (10 kg)
UTILICEESTALÍNEAPARA LOS NIÑOSENTRE 22–50 libras (10 a 22.7 kg)
Viendohacia atrá s
1
3
•Parasoltar los conectores inferiores del sistema LATCH rígido: Extienda totalmente los conectores
y luego tire de las manijas rojas para soltar el sistema LATCH rígido.
2
Viendohacia ad elante
Viendo
haciaatrás
Elasientoinfantil está debidamente inclinado en modo mirando hacia atrás
cuandolalíneaadecuadaparael peso del niño es paralelo al suelo
UTILICEESTALÍNEAPARABEBÉSBAJO22libras(10 kg)
UTILICEESTALÍNEAPARALOSNIÑOSENTRE22–50libras (10 a 22.7 kg)
Viendohaciaatrás
1
3
•Parasoltarlosconectoresinferiores del sistema LATCH rígido: Extienda totalmente los conectores
yluegotire de las manijas rojas para soltar el sistema LATCH rígido.
2
Viendohaciaadelante
Viendo
haciaatrás
Elasientoinfantilestádebidamenteinclinado en modo mirando hacia atrás
Figure 1
3
Figure 3
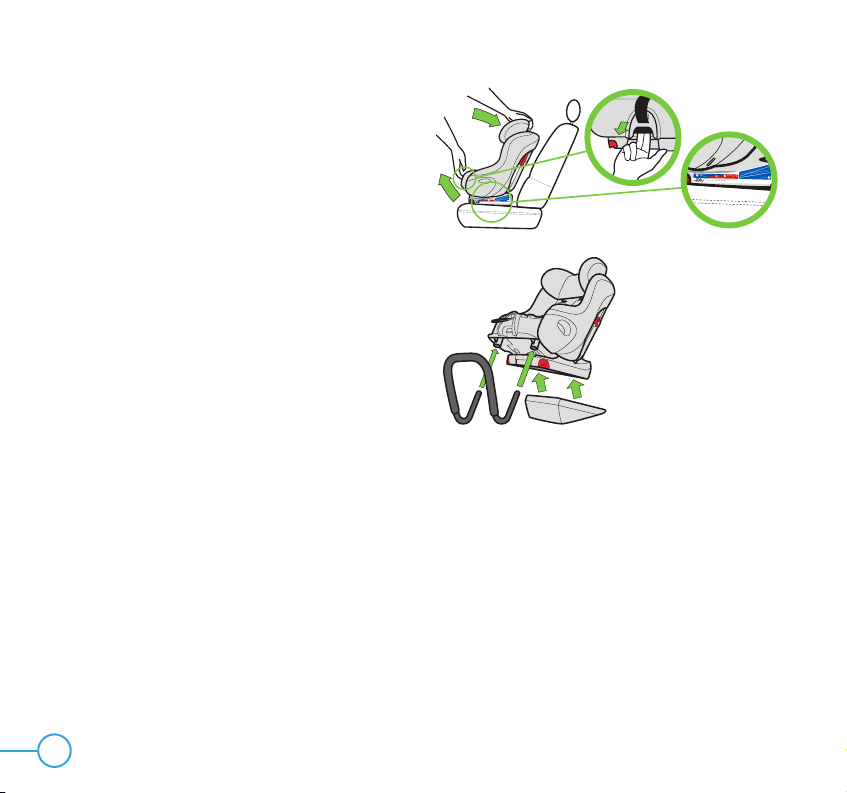
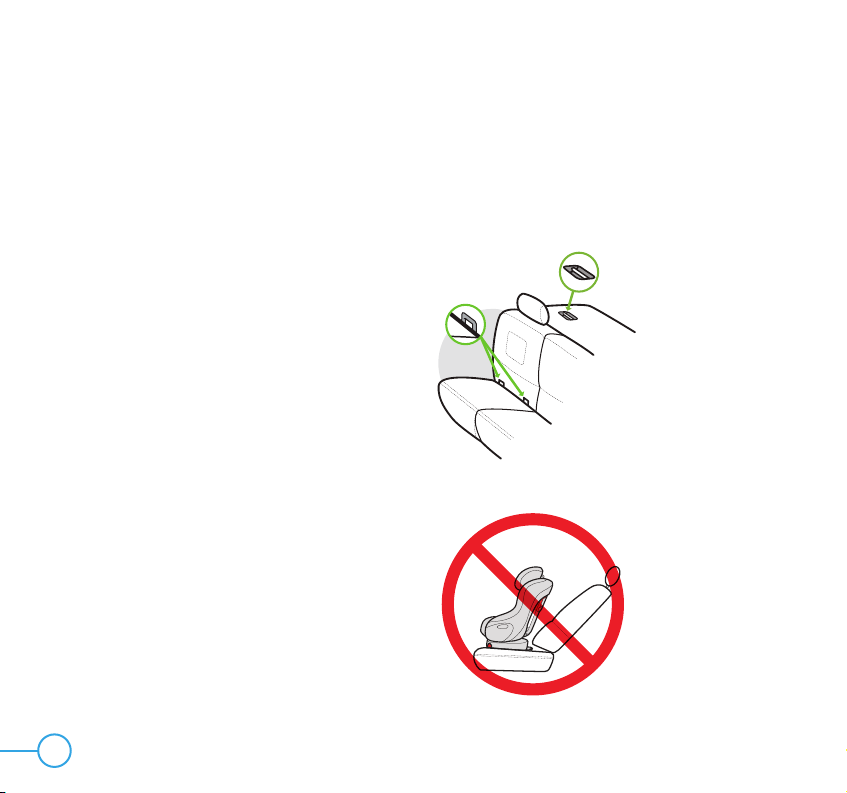
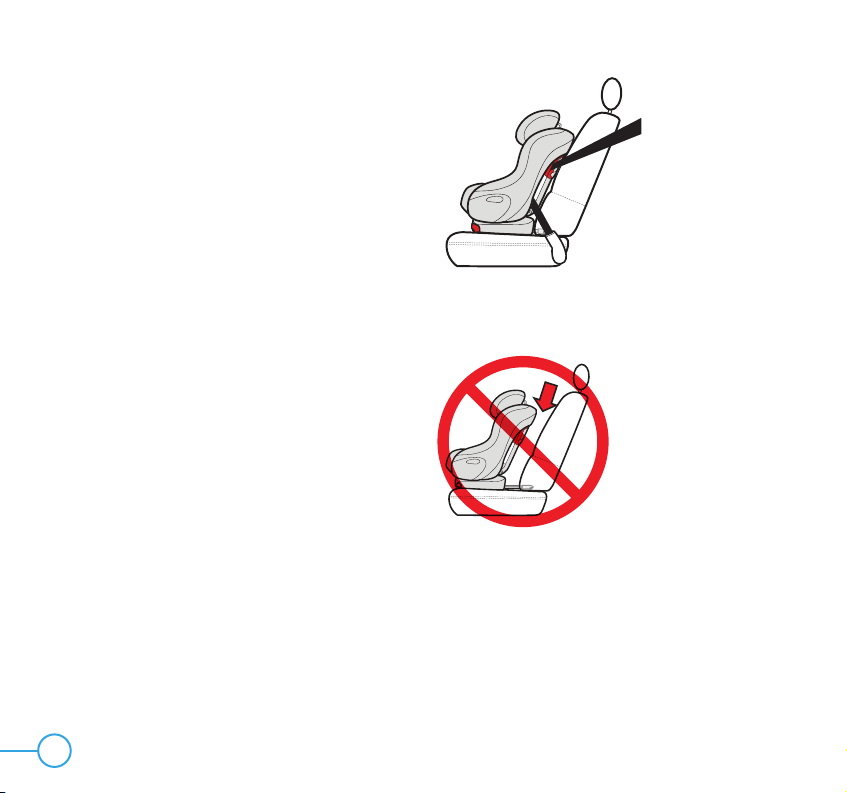
Step 3
If the vehicle seat back is adjustable, make
sure the seat back is locked in a more upright
position. Refer to vehicle owner’s manual for
recommended seat back angle. DO NOT
install or use this car seat while the vehicle
seat back is excessively reclined, as shown
in Figure 2.
Step 4
Place car seat Rear-Facing in the vehicle seat
location selected with Rear-Facing Belt Path
toward vehicle seat back and centered in
seating position as shown in Figure 3.
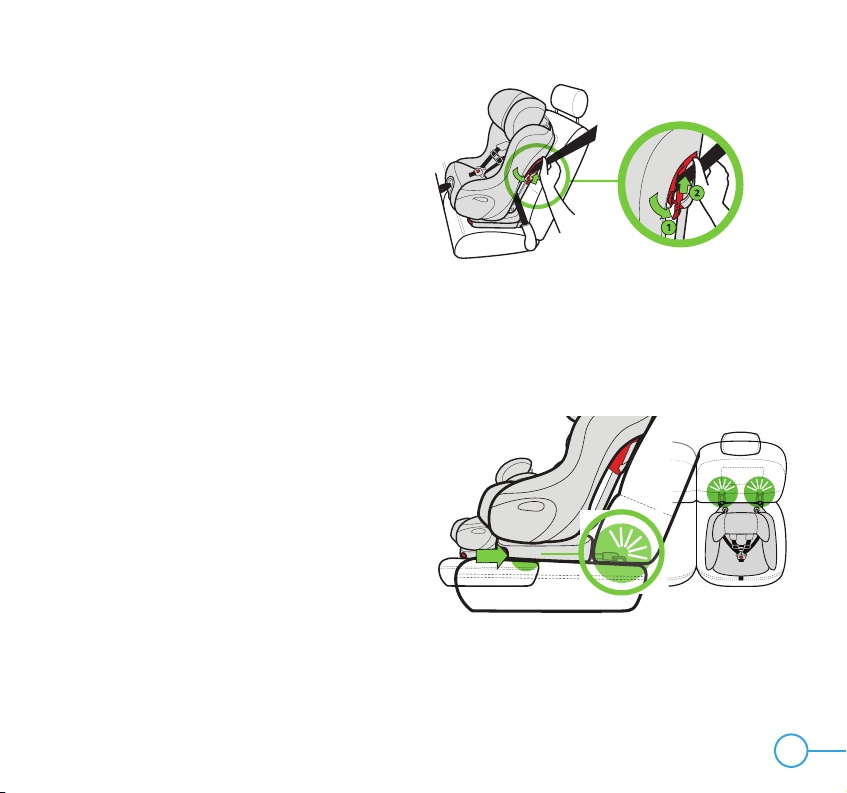
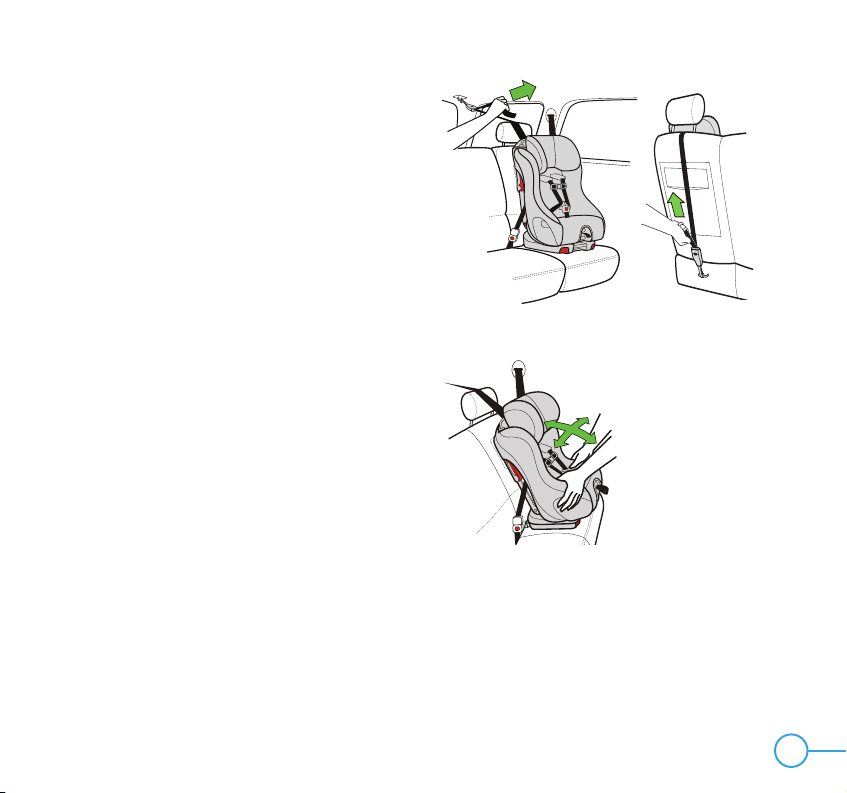
Step 5
Route vehicle belt through the Rear-Facing
Belt Path and over both closed Rear-Facing
Belt Lock-offs, and buckle vehicle belt, as
shown in Figure 4.
Position lap portion of inflatable lap/shoulder
belt under both forward Belt Tabs and check
that Crotch Strap is not under the vehicle belt.
Figure 2
Figure 4
4
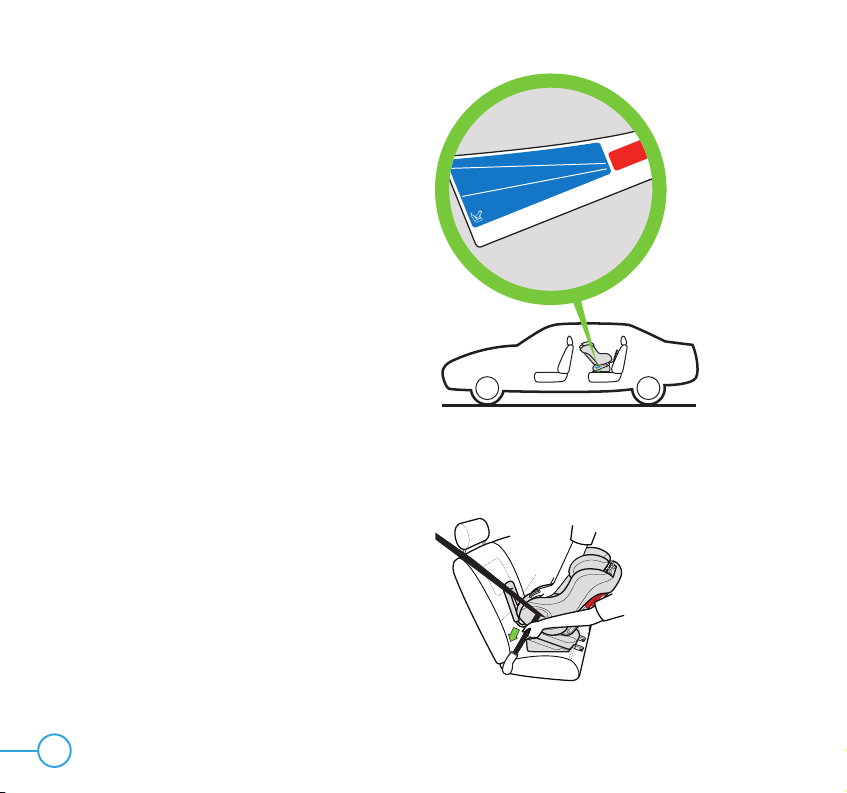
Step 6
Position the seat so that the Rear-Facing Level
Reference Line appropriate for the child’s
weight is parallel with the ground as shown
in Figure 5.
• If using with an infant under 22 lb
(10 kg), position the seat with the more
reclined Reference Line (top line) parallel
to the ground.
• If using with an older child who is over
10 kg (22 lb), position the seat with the
more upright Reference Line (bottom
line) parallel to the ground.
Step 7
Switch the the lap portion of the lap/shoulder
belt to the automatic locking mode by pulling
the lap portion of the lap/shoulder belt all the
way out by holding the webbing and pulling
upwards, as shown in your vehicle manual.
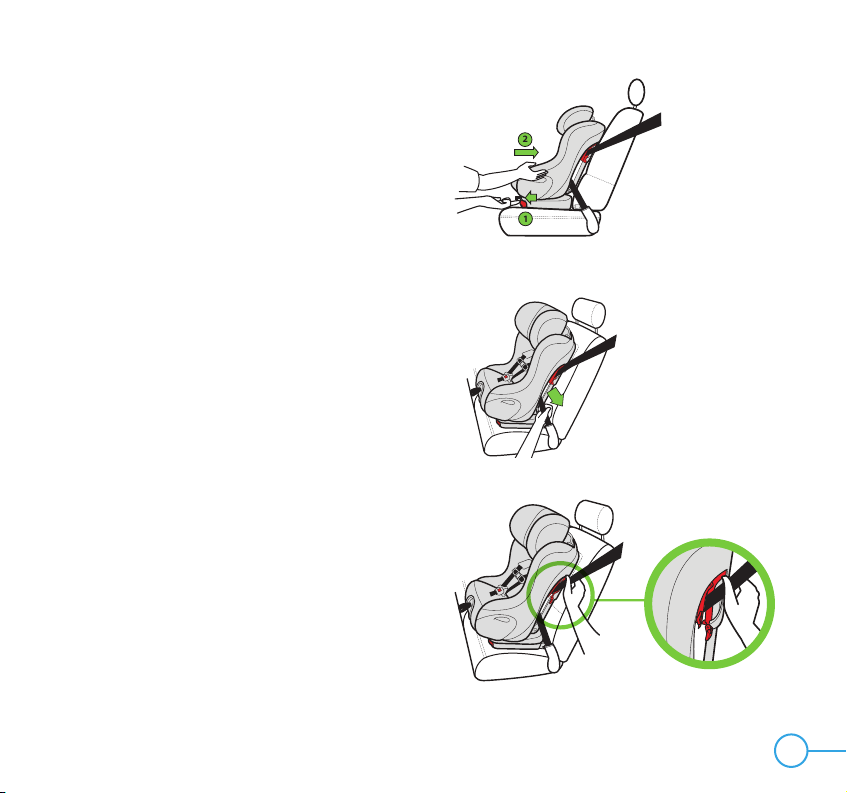
Step 8
Tighten vehicle belt to secure the car seat
• Press down in center of car seat to
depress the vehicle cushion and pull
down on lap portion of inflatable lap/
shoulder belt to tighten as shown in
Figure 6.Figure 6
ChildseatisproperlyreclinedinRear-Facingmodewhentheline
appropriateforthechild’sweightisparalleltotheground
USETHISLINEFORINFANTSUNDER22lbs(10kg)
USETHISLINEFORCHILDRENBETWEEN22-50lbs(10-22.7kg)
Rear-Facing
13
•ToReleaseRigidLATCHConnectors:FullyextendConnectors,thenpullRedRigidLATCHRelease Handles.
2
Forward-Facing Rear-Facing
Child seat is properly reclined in Rear-Facing mode when the line
appropriate for the child’s weight is parallel to the ground
USE THIS LINE FOR INFANTS UNDER 22 lbs (10 kg)
USE THIS LINE FOR CHILDREN BETWEEN 22 - 50 lbs (10 - 22.7 kg)
Rear-Facing
1
• To Release Rigid LATCH Connectors: Fully extend Connectors, then pull Red Rigid LATCH Release Handles.
Forward-Facing
Figure 5
5
NOTE: The lap portion of the inflatable
lap/shoulder belt MUST remain tight and
not lengthen when pressure is released
from the seat. If the lap portion of the
inflatable lap/shoulder belt does not
remain tight, go back to Step 6 and refer
to your vehicle manual.
Step 9
Check for secure installation. Gripping car
seat at top of armrests, pull car seat front
to back and left to right to check for secure
installation as shown in Figure 7. Vehicle
belt MUST stay tight and car seat should
not move more than 1 in. (2.5 cm) in any
direction.
• If vehicle belt still does not stay tight or
car seat cannot be securely installed,
try a different vehicle seat location or
install using LATCH, see “Installing Rear-
Facing Car Seat With LATCH” in your
car seat manual.
Figure 7
6
Step 10
Verify that the Rear-Facing Level Reference
Line appropriate for the child’s weight is
parallel to the ground as shown in Figure 8.
If not, go back to Step 5, adjust the recline
level and try installing again, or move the
seat to a different vehicle seating position.
NOTE: If needed, a rolled towel or pool
noodle may be placed under the foot end of
the car seat to achieve an acceptable recline
level.
S t ep 11
Install Seat Cushion, see “Removing/Installing
Seat Cushion” in your car seat manual.
ChildseatisproperlyreclinedinRear-Facingmodewhentheline
appropriateforthechild’sweightisparalleltotheground
USETHISLINEFORINFANTSUNDER22lbs(10kg)
USETHISLINEFORCHILDRENBETWEEN22-50lbs(10-22.7kg)
Rear-Facing
13
•ToReleaseRigidLATCHConnectors:FullyextendConnectors,thenpullRedRigidLATCHRelease Handles.
2
Forward-Facing Rear-Facing
Child seat is properly reclined in Rear-Facing mode when the line
appropriate for the child’s weight is parallel to the ground
USE THIS LINE FOR INFANTS UNDER 22 lbs (10 kg)
USE THIS LINE FOR CHILDREN BETWEEN 22 - 50 lbs (10 - 22.7 kg)
Rear-Facing
1
• To Release Rigid LATCH Connectors: Fully extend Connectors, then pull Red Rigid LATCH Release Handles.
Forward-Facing
Figure 8
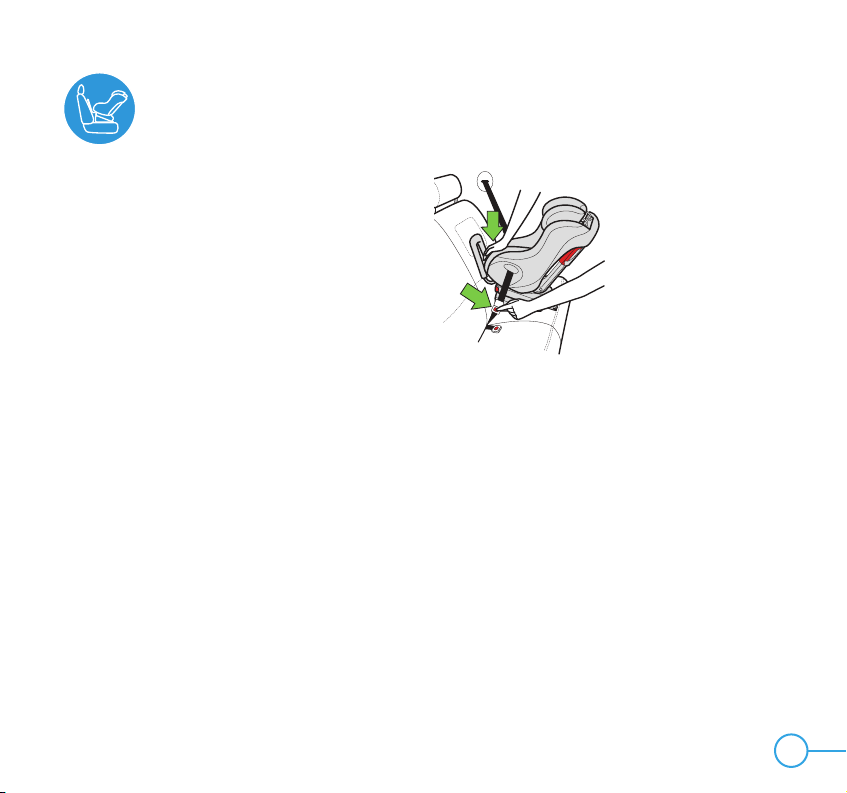
7
Step 1
Unbuckle vehicle belt.
• Pressing down in center of car seat to
reduce tension on vehicle belt will make
it easier to unbuckle vehicle belt as
shown in Figure 9.
Step 2
Remove Seat Cushion, see “Removing/
Installing Seat Cushion” in your car
seat manual.
Step 3
Remove vehicle belt from Rear-Facing
Belt Path.
Step 4
Remove this car seat from vehicle.
Step 5
Install Seat Cushion, see “Removing/
Installing Seat Cushion” in your car
seat manual.
Removing Rear-Facing Car Seat
Installed With Inflatable Vehicle Belt
Figure 9
8
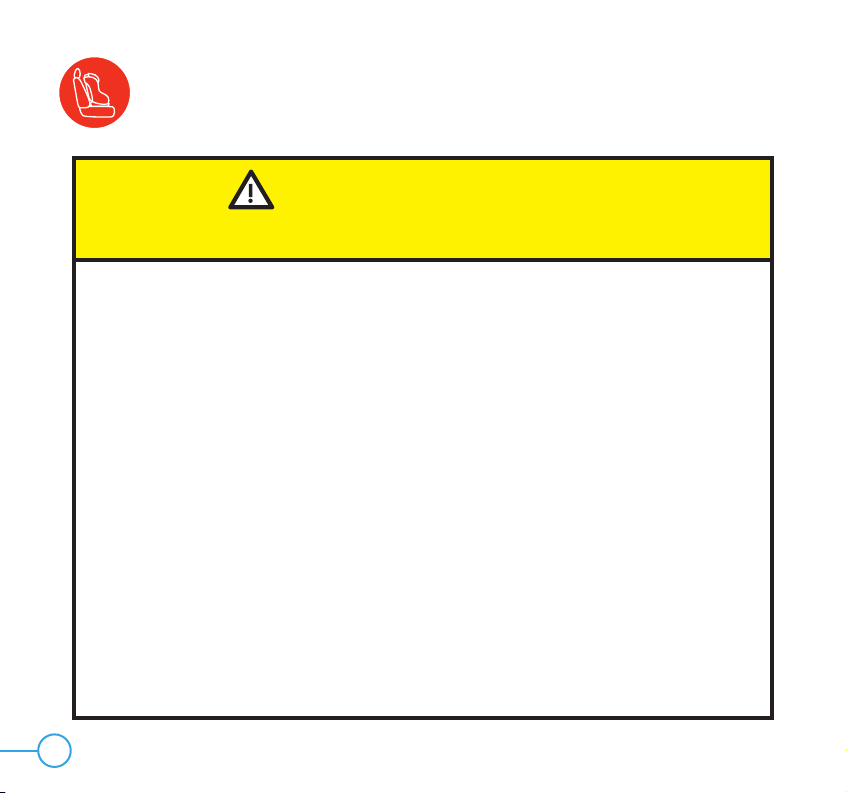
Installing Forward-Facing Car Seat
With LATCH and Inflatable Vehicle Belt
WARNING — DEATH or
SERIOUS INJURY can occur
• Use these instructions to replace the “Installing Forward-Facing Car Seat
with LATCH” section in your car seat manual.
• Not all inflatable vehicle belts are safe for use with this car seat. Contact
Clek Customer Service at 1-866-656-2462 to determine if the inflatable
belts in your vehicle are approved for use with this car seat.
• Always use these supplementary instructions in addition to the instructions
found in your car seat manual. Your car seat manual contains other
important information about the use and installation of this car seat.
• Forward-Facing Belt Lock-off must remain completely open when installing
this car seat Forward-Facing using Rigid LATCH and an inflatable
vehicle belt.
• Only use this car seat LATCH system in vehicle seating locations
designated by the vehicle manufacturer for use with LATCH and that have
a standard anchor spacing of 11 in. (280 mm).
9
WARNING — DEATH or
SERIOUS INJURY can occur
• Rigid LATCH Connectors must be secured to the vehicle LATCH lower
anchors only. Connection to other vehicle anchors or vehicle components
could result in the anchor tearing free in a crash.
• Never attach more than one LATCH connector to a vehicle lower anchor
unless recommended by the vehicle owner’s manual for that vehicle.
• ALWAYS secure the Top Tether provided with this car seat when installing
Forward-Facing with an inflatable vehicle belt.
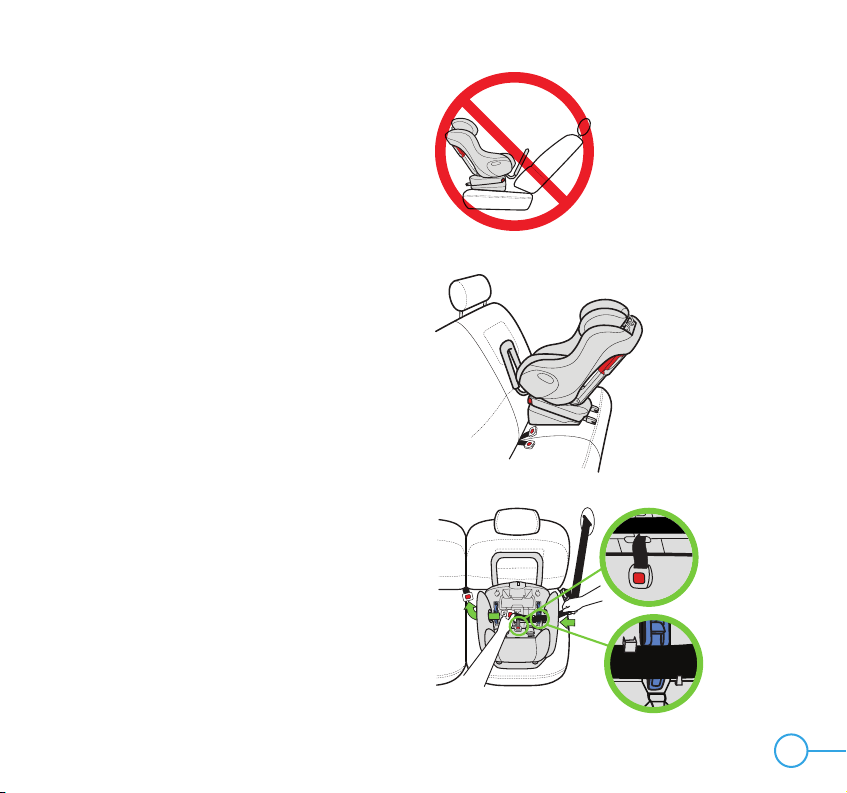
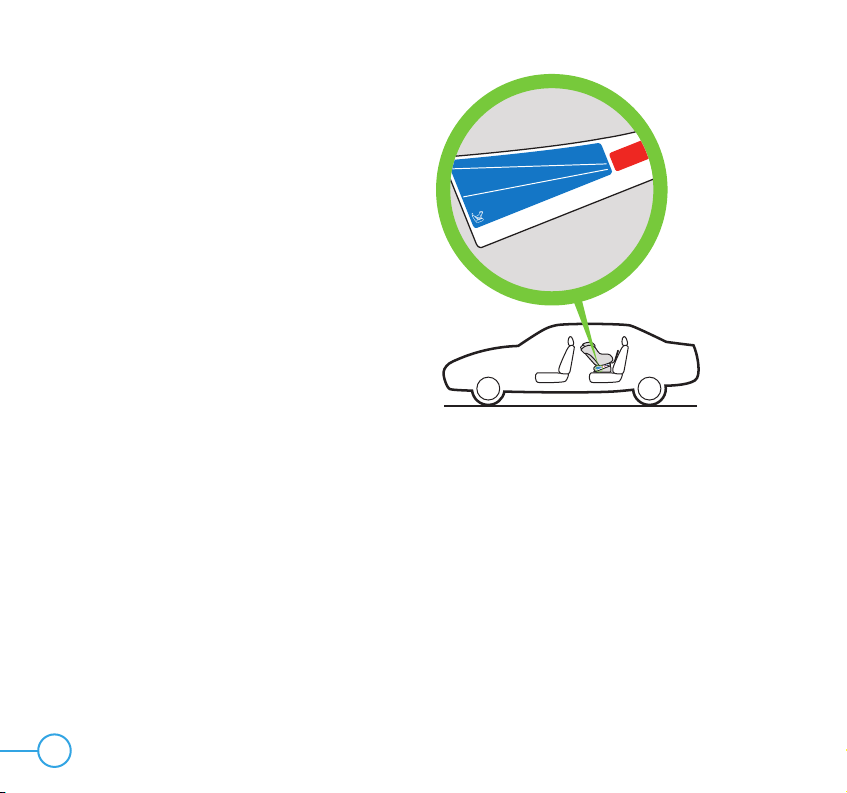
• NEVER install this car seat using both
LATCH and an inflatable vehicle belt
if prohibited in the vehicle’s owner’s
manual or if the condition shown
in Figure 10 is present.
Figure 10
Vehicle belt buckle is
located in between
LATCH lower anchors
10
Step 1
Prepare car seat for Forward-Facing
Installation:
• If Rear-Facing Base or Anti-Rebound
Bar is attached, remove it now, see
“Installing/Removing Rear-Facing Base”
and “Installing/Removing Anti-Rebound
Bar” in your car seat manual.
Step 2
Select a Forward-Facing vehicle seating
location which has LATCH.
Locate the LATCH lower anchors and top
tether anchor (as explained in the “Vehicle
Child Restraint Anchorage System (LATCH)”
in your car seat manual and in your vehicle
owner’s manual). See Figure 11.
Step 3
If the vehicle seat back is adjustable, make
sure the seat back is locked in a more upright
position. Refer to vehicle owner’s manual for
recommended seat back angle. DO NOT
install or use this car seat while the vehicle
seat back is excessively reclined, as shown in
Figure 12.
Figure 11
Figure 12
11
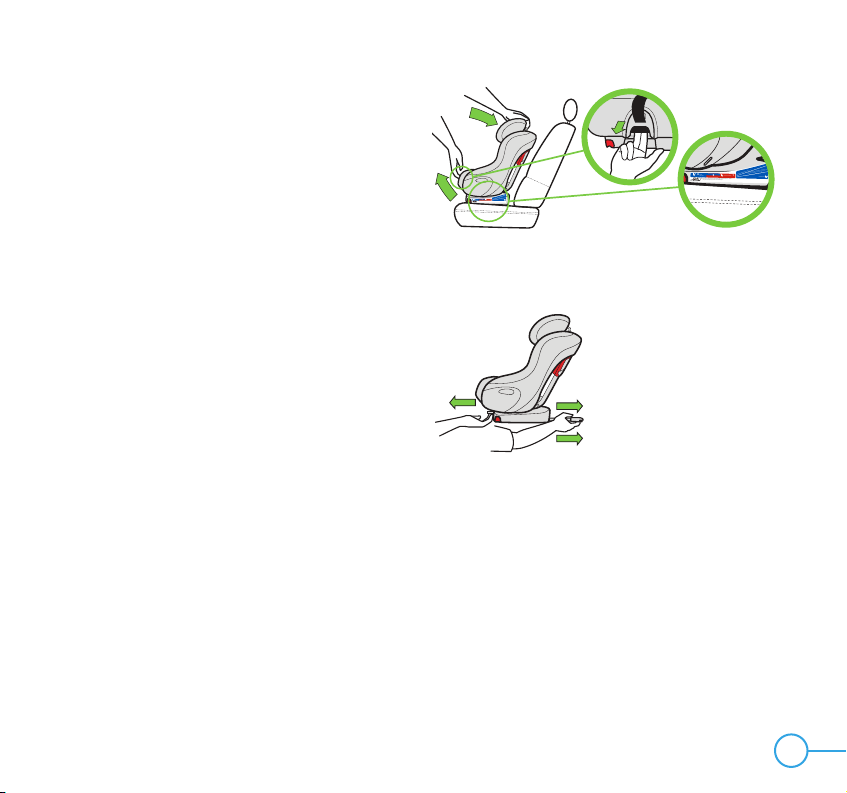
Step 4
Adjust car seat to Recline Position 1 or 2 by
pulling recline handle out and rotating car
seat as shown in Figure 13.
NOTE: NEVER use Recline Position 3
Forward-Facing.
Step 5
Pull Rigid LATCH Connectors to the fully
extended position as shown in Figure 14
• Pull and hold Rigid LATCH
Adjustment Handle.
• Grasp the back of the Rigid LATCH
Connectors and pull out until they stop.
• Release Rigid LATCH
Adjustment Handle.
Figure 14
2
tation
’arrière Orientationv
Pourajust
Pourdéverrouillerles c
maximumpuistirez sur les poignées de déverrouillage DUA.
1
32
Orientation
versl’arrière Orientationversl’avant
•Pourajusterlesconnecteursrigides inférieurs du DUA: Tirez sur la poignée d’ajustement
DUAetglissezlesiègedans la position souhaitée.
•Pourdéverrouillerlesconnecteursrigides inférieurs du DUA: Étirez les connecteurs au
maximumpuistirezsurlespoignées de déverrouillage DUA.
•Leniveaudusoldoit être dans la plage
d’inclinaisonprévuepourl’âgedel’enfant.
Plaged’inclinaison
Touslesenfantsorientés
versl’arrière
1anetplus
cuandolalínea adecuada para el peso del niño es paralelo al suelo
UTILICEESTALÍNEAPARA BEBÉS BAJO22 libras (10 kg)
UTILICEESTALÍNEAPARA LOS NIÑOSENTRE 22–50 libras (10 a 22.7 kg)
Viendohacia atrá s
1
3
•Parasoltar los conectores inferiores del sistema LATCH rígido: Extienda totalmente los conectores
y luego tire de las manijas rojas para soltar el sistema LATCH rígido.
2
Viendohacia ad elante
Viendo
haciaatrás
Elasientoinfantil está debidamente inclinado en modo mirando hacia atrás
cuandolalíneaadecuadaparael peso del niño es paralelo al suelo
UTILICEESTALÍNEAPARABEBÉSBAJO22libras(10 kg)
UTILICEESTALÍNEAPARALOSNIÑOSENTRE22–50libras (10 a 22.7 kg)
Viendohaciaatrás
1
3
•Parasoltarlosconectoresinferiores del sistema LATCH rígido: Extienda totalmente los conectores
yluegotire de las manijas rojas para soltar el sistema LATCH rígido.
2
Viendohaciaadelante
Viendo
haciaatrás
Elasientoinfantilestádebidamenteinclinado en modo mirando hacia atrás
Figure 13
12
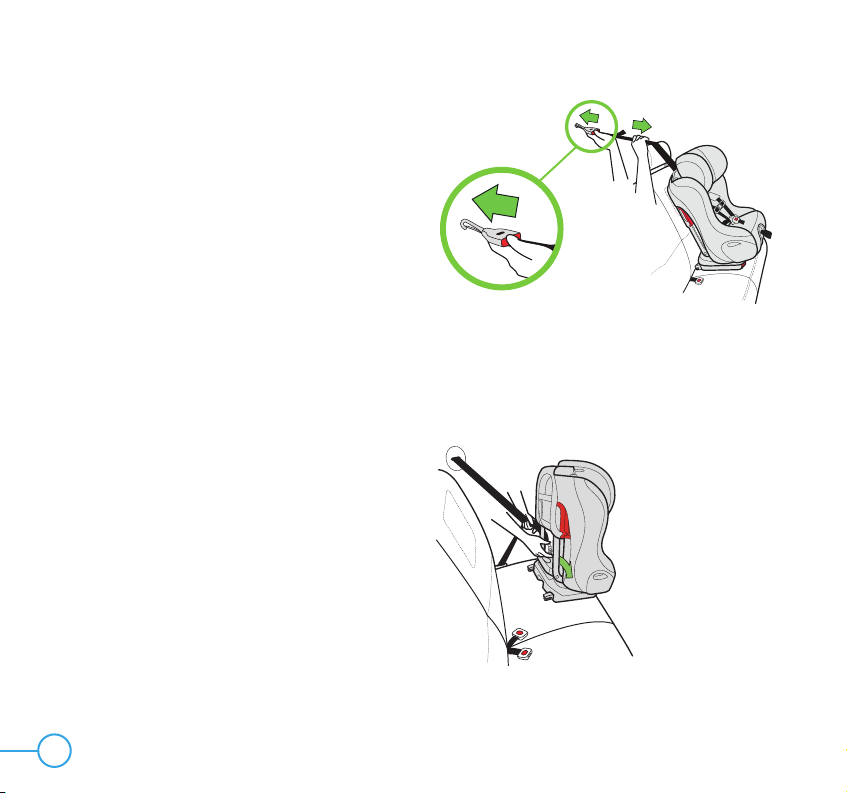
Figure 15
Step 6
Remove Tether Hook from its storage location
on back of car seat. See “Top Tether
Storage” on page 88.
• Lengthen Top Tether belt by pressing
and holding Tether Adjuster button while
pulling strap as shown in Figure 15.
• Place Tether Hook in the seat of the
car seat.
Step 7
Secure car seat with vehicle belt:
• Route vehicle belt through the Forward-
Facing Belt Path, taking care not to put
vehicle belt between Harness and back
of seat, and buckle vehicle belt, as
shown in Figure 16.
Figure 16
13
• Open the Forward-Facing Belt Lock-
off on the same side of the seat as the
vehicle shoulder belt anchor point. Place
the vehicle shoulder belt through the
Forward-Facing Belt Lock-off as shown
in Figure 17.
Step 8
Place car seat in the seating location selected
with the Rigid LATCH Connectors facing the
vehicle seat.
Secure the Rigid LATCH Connectors to the
vehicle LATCH lower anchors by aligning
the Rigid LATCH Connectors with the vehicle
LATCH lower anchors and pressing the Rigid
LATCH Connectors against the LATCH lower
anchors until each Rigid LATCH Connector
locks, as shown in Figure 18.
Figure 17
Figure 18
14
Step 9
Once the Rigid LATCH Connectors are
connected to the LATCH lower anchors,
check both LATCH Connector lock indicators
located behind the Rigid LATCH Connectors
to make sure they have changed from red
(unlocked) to mostly green (locked) as shown
in Figure 19.
Pull forward on this car seat to make sure it
is securely attached to the vehicle’s LATCH
lower anchors on both sides. If not, go back
to Step 8.
NOTE: It may be necessary to adjust the car
seat to recline position 1 in some vehicles in
order to connect Rigid LATCH Connectors to
the vehicle LATCH Lower Anchors. If Rigid
LATCH Connectors cannot be successfully
connected in this position, it may be
necessary to go back to step 2 and try a
different seating position.
IMPORTANT: If Rigid LATCH Connectors
fail to connect to the vehicle’s LATCH lower
anchors, you can still use this seat. See
“Installing Forward-Facing Car Seat With
Inflatable Vehicle Belt” on page 20 of this
manual. Please notify Clek Customer Service
if the Rigid LATCH Connectors fail to latch by
calling 1-866-656-2462.
Figure 19
15
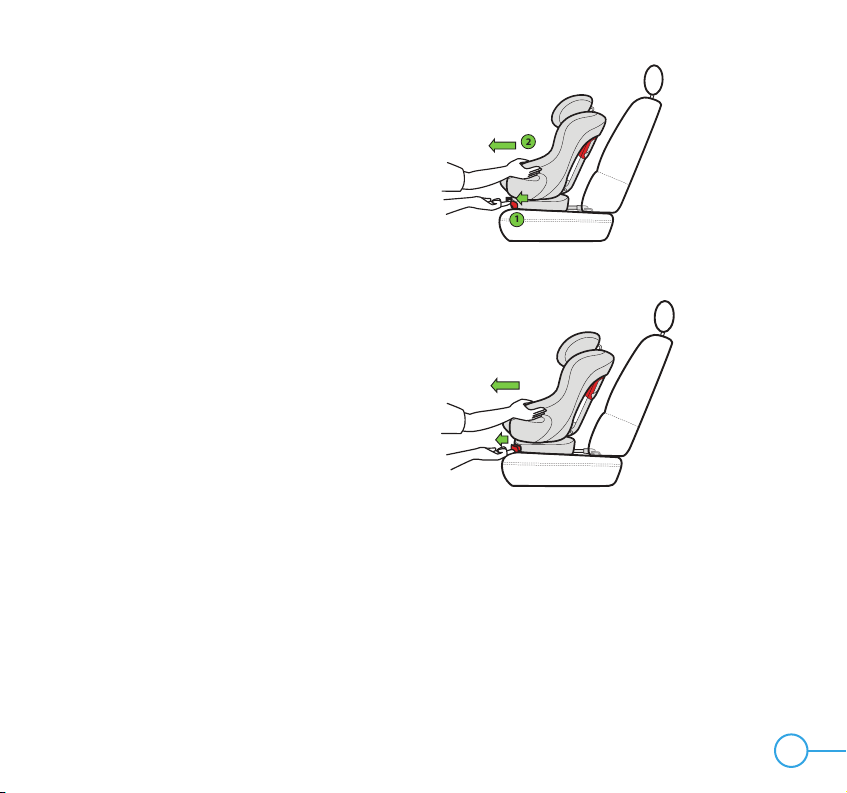
Step 10
Adjust seat to fit snugly against the vehicle seat
back as shown in Figure 20.
• Pull and hold Rigid LATCH
Adjustment Handle.
• Push car seat firmly into vehicle seat back.
• Release Rigid LATCH Adjustment Handle.
S t ep 11
Tighten vehicle belt:
• Switch the lap portion of the inflatable
lap/shoulder belt to the automatic locking
mode by pulling the lap portion of the belt
all the way out by holding the webbing
and pulling upwards, as shown in your
vehicle manual.
• Pull down on lap portion of inflatable
vehicle belt to remove excess slack, as
shown in Figure 21.
• Check that Forward-Facing Belt Lock-off
is all the way open with Lock-tab rotated
completely down and as close to the back
metal support bar as possible, as shown
in Figure 22.
IMPORTANT: NEVER lock or partially close
Forward-Facing Belt Lock-off when using an
inflatable vehicle belt.
2
1
Figure 20
Figure 22
Figure 21
16
Step 12
Check fit against the vehicle seat back. If the
back of this car seat cannot be adjusted to
be in contact with the vehicle seat back as
shown in Figure 23, try changing the recline
position of this car seat, verify that the
vehicle seat back is in a more upright
position and re-adjust.
If this seat cannot be positioned so that car
seat back is in contact with the vehicle seat
back, try a different LATCH equipped vehicle
seating position or install with a vehicle belt.
See “Installing Forward-Facing Car Seat
With Inflatable Vehicle Belt” on page 21 of
this manual.
A small gap between the top or bottom of the
car seat and vehicle seat back is acceptable
as long as there is contact with the front
surface of the vehicle seat back or headrest.
Figure 24 shows an unacceptable gap.
Figure 23
Figure 24
17
Step 13
Attach Tether Hook to vehicle top tether
anchor as shown in Figure 25 or
Figure 26 and pull firmly on free end
of strap until Top Tether is snug.
Refer to vehicle owner’s manual for
recommended Top Tether routing and
identification of top tether anchor point.
Step 14
Check for secure installation. Gripping car
seat at top of armrests, pull car seat front
to back and left to right to check for secure
installation as shown in Figure 27. LATCH
system and Top Tether must stay tight and car
seat should not move more than 1 in. (2.5 cm)
in any direction.
• If LATCH system does not stay tight or
car seat cannot be securely installed,
try a different LATCH location or install
using the vehicle belt. See “Installing
Forward-Facing Car Seat With Inflatable
Vehicle Belt” on page 20 of this manual.
Figure 27
Figure 25 Figure 26
18
Figure 28
Figure 29 Figure 30
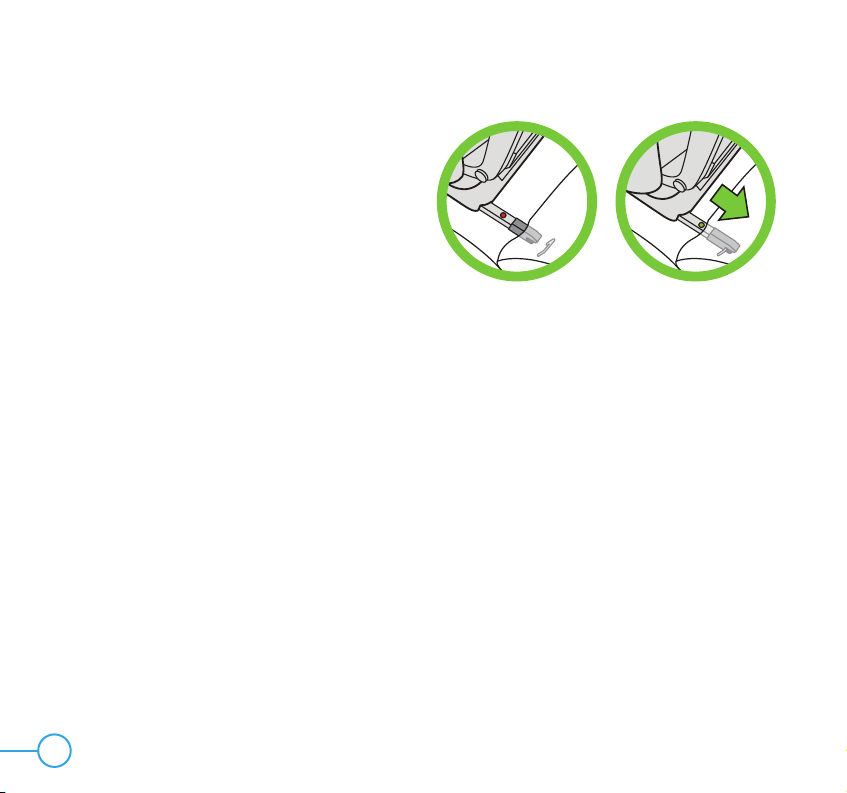
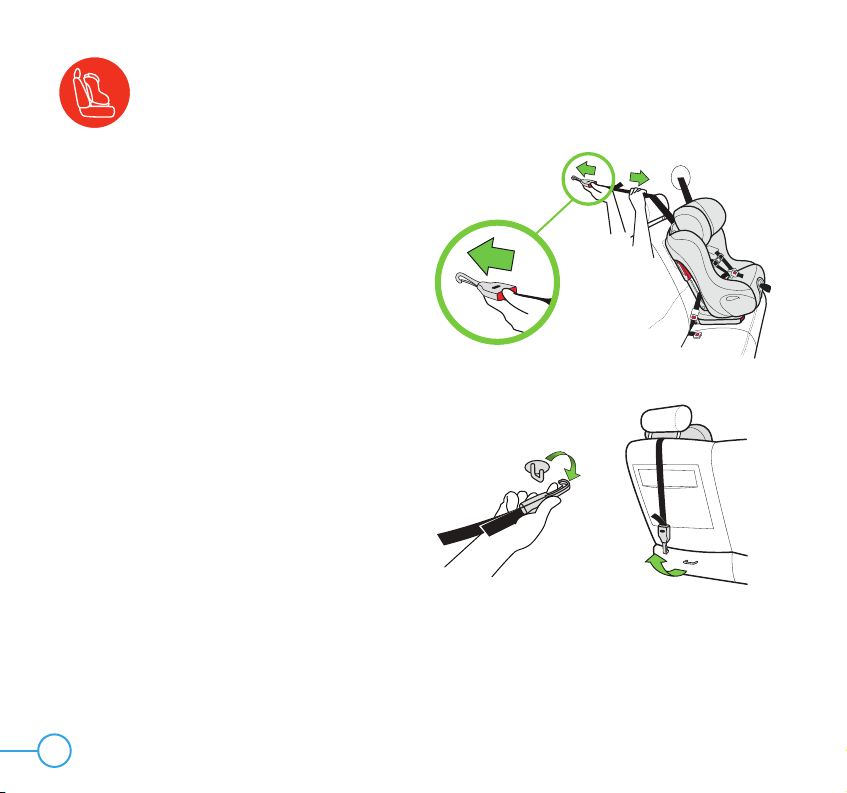
Step 1
Loosen Top Tether belt by pressing and
holding Tether Adjuster while pulling strap as
shown in Figure 28.
Step 2
Remove Tether Hook from vehicle
tether anchor.
• Pull in and hold retention spring
on Tether Hook, then remove Tether
Hook from tether anchor as shown
in Figure 29 and Figure 30.
Step 3
Unbuckle vehicle belt and remove from
Forward-Facing Belt Path.
Removing Forward-Facing Car Seat
Installed With LATCH and Inflatable Vehicle Belt
19
Step 4
Pull Rigid LATCH Connectors to the fully
extended position as shown in Figure 31.
• Pull and hold Rigid LATCH
Adjustment Handle.
• Grasp the seat and slide it out until it stops.
• Release Rigid LATCH Adjustment Handle.
Step 5
Pull the red Rigid LATCH Release Handles,
one at a time and pull the car seat forward
to remove each Rigid LATCH Connector from
the vehicle LATCH lower anchor as shown in
Figure 32.
IMPORTANT: Rigid LATCH Connectors
CANNOT be released unless they are
FULLY extended.
NOTE: Moving the car seat slightly from front
to back or side to side may make it easier to
release the Rigid LATCH Connectors from the
vehicle LATCH lower anchors.
Step 6
Remove this car seat from vehicle.
Step 7
Store the Top Tether and Rigid LATCH Connectors,
see “Top Tether Storage” and “Forward-Facing
Rigid LATCH Storage” in your car seat manual.
Figure 32
Figure 31
2
1
Other manuals for FOONF
6
Table of contents
Other Clek Car Seat manuals


