Nextlevel Acoustics UM1-A User manual

USER MANUAL
EXCLUSIVELY FOR THE SONOS®ARC

2
Limited Warranty
JS Speaker Technology LLC guarantees the UM1-A to be free of de-
fects for the product’s warranty period of 5 years.
The warranty period begins on the original date of shipping. The lim-
ited warranty is intended only for the original purchaser. The warran-
ty will be void if the bracket is modified in anyway or not installed cor-
rectly, Including overloading, abuse, or use for any purpose other than
specified in these directions. The UM1-A bracket is for indoor use only
and any use outdoors will void this warranty.
JS Speaker Technology LLC is not liable for any damage or injury
caused from the use of or the inability to use our bracket. To the maxi-
mum extent permitted by applicable law, JS Source Technology LLC
disclaims any responsibility for incidental or consequential damages.
Additional terms and limited warranty conditions that apply to this prod-
uct are listed on the Next Level Acoustics website at:
www.nextlevelacoustics.com/warranty.
DISCLAIMER: JS Speaker Technology LLC and Next Level
Acoustics has NO affiliation with Sonos, Inc. Sonos® and ARC®
are registered trademarks of Sonos, Inc.

3
Next Level UM1-A Mounting Bracket
Thank you for purchasing the UM1-A bracket system exclusively for the
Sonos ARC. Please read the directions thoroughly and plan how the mount
would be best installed for its intended use. Failure to do so may result in
Damage, Personal Injury, or voiding the warranty. It is the installer’s re-
sponsibility to ensure all components are properly installed. JS Speaker
Technology LLC is not responsible for any damage or injury resulting from
improper mounting or use of the UM1-A bracket.
These instructions are only a guide and the installer is responsible for the
correct and secure mounting of all associated products. Please follow all
manufactures instructions for any product being installed with the UM1-A
bracket. Please note: Each Setup will be different and these directions may
not account for every situation. The person installing the bracket should have
experience mounting load bearing assemblies. For any questions or con-
cerns, please contact technical support at Next Level Acoustics at 617-237-
CAUTION: The UM1-A is intended for use when
mounting only the Sonos ARC. Use with any other
soundbar/speaker product may result in instability
causing possible serious injury or damage. Review
all relevant manuals (i.e. third-party mounts / dis-
play) to ensure that the setup can handle the load.
30 lbs. when mounting below the TV in conjunction with a TV
mount
DISCLAIMER: Only use this bracket to mount the Sonos ARC
BELOW the display.

4
Specifications
Shipping Dimensions: 22” x 4” x 4”
Shipping Weight: 4 lbs.
Bracket Weight: 3 lbs.
Parts Included
(1) Left and Right Bracket Assemblies (Sandwich, Vertical)
(1) Sonos ARC Adapter Left and Right Brackets
Hardware Included
(4) #10 Nuts and (4) 1/4” Nut
(4) #10 Bolts and (4) 1/4” Bolts
(1) Set of M5 Bolts and Washers w/ hex Key to attach the bracket to
the Sonos ARC
PLEASE READ: May require spacers between the UM1-A and TV
mount, when using lower profile mounts (sub 2.75″from wall to back
of the display) due to the increased depth adjustment capabilities of this
bracket system
Mount Uses (below TV only)
Mounting the Sonos® ARC® directly to the TV
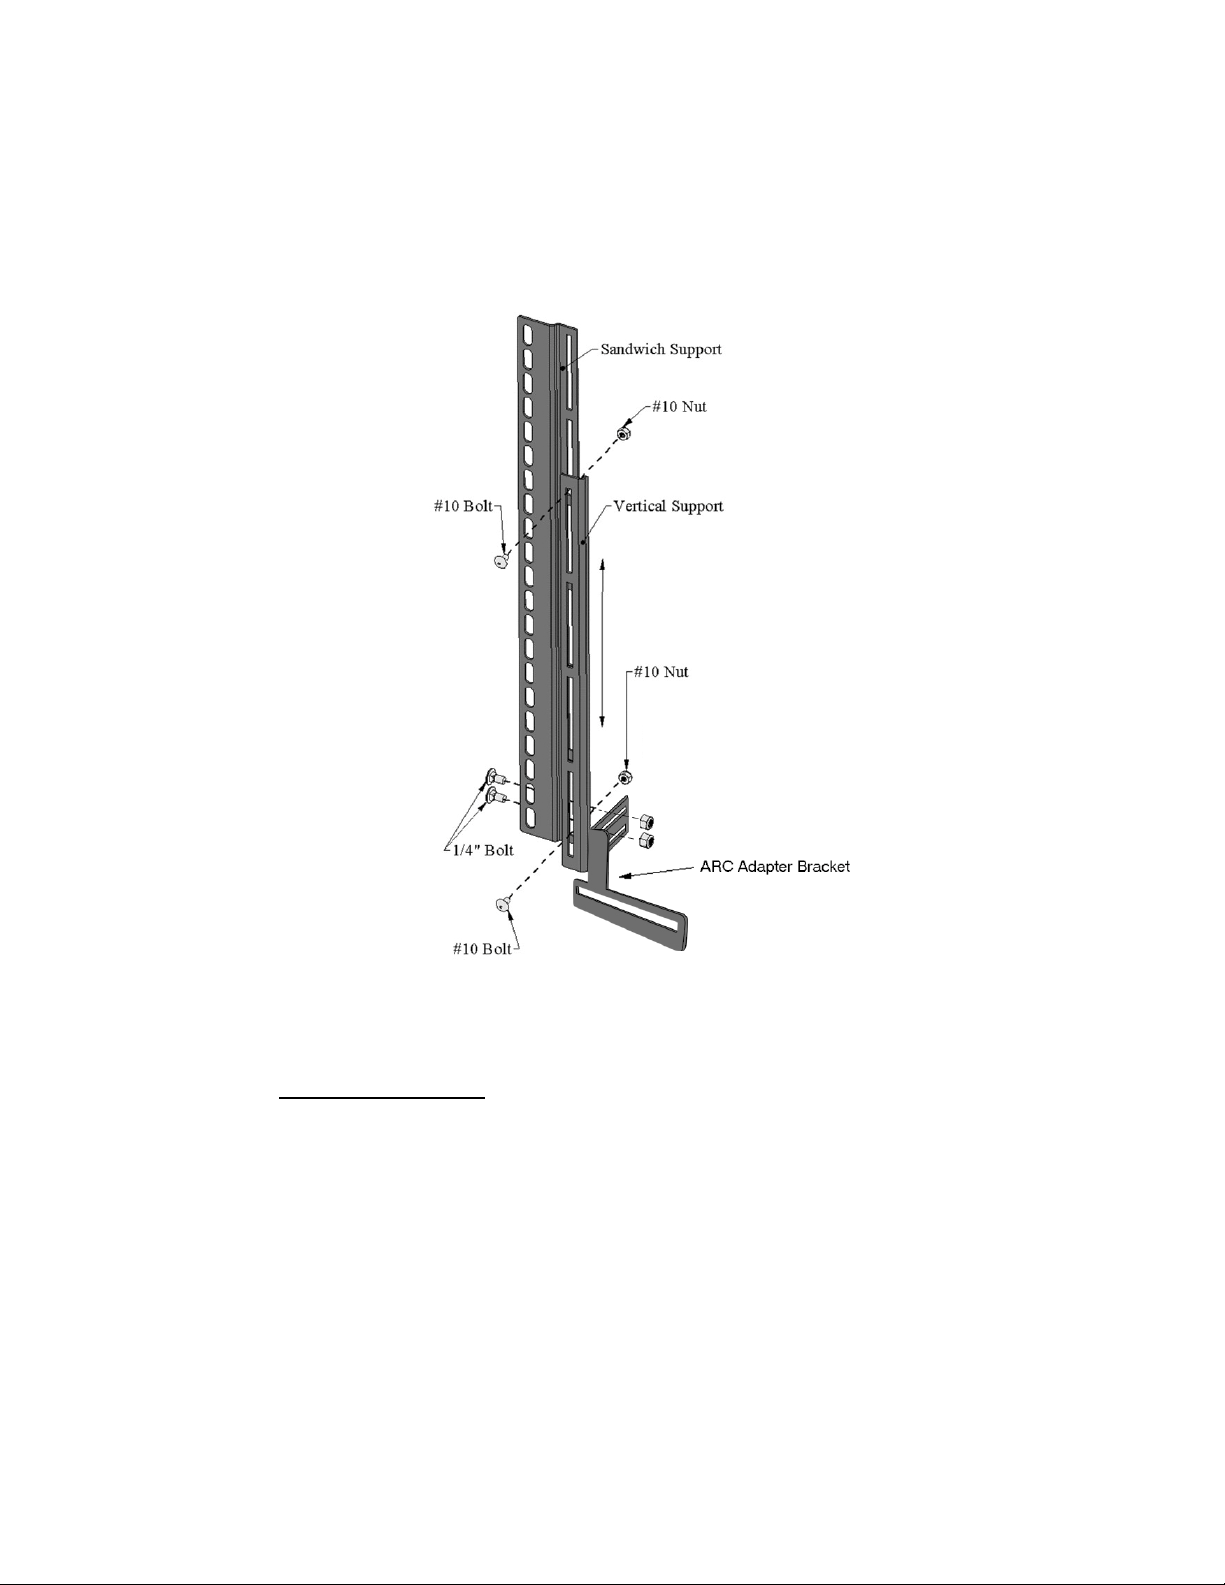
Configuring the UM1-A Bracket
Assemble the UM1-A following the Figure 1 Bracket Setup dia-
gram using the provided parts and hardware
Please note: There are left and right side parts to this assembly
(Vertical Support, ARC Adapter)
Once assembled, the UM1-A bracket locations can be swapped/
flipped to fit an assortment of required installations
5
Height Adjustments
Height Adjustment is achieved by loosening the #10 Bolts as needed
and sliding the Vertical Support up and down on the Sandwich Sup-
port. For the sturdiest setup keep the #10 Bolts as far away from each
other as possible
Once you have achieved the proper height, lock the setting into place
by tightening the #10 bolts. Do not overtighten!
Figure 1 Bracket Setup
6
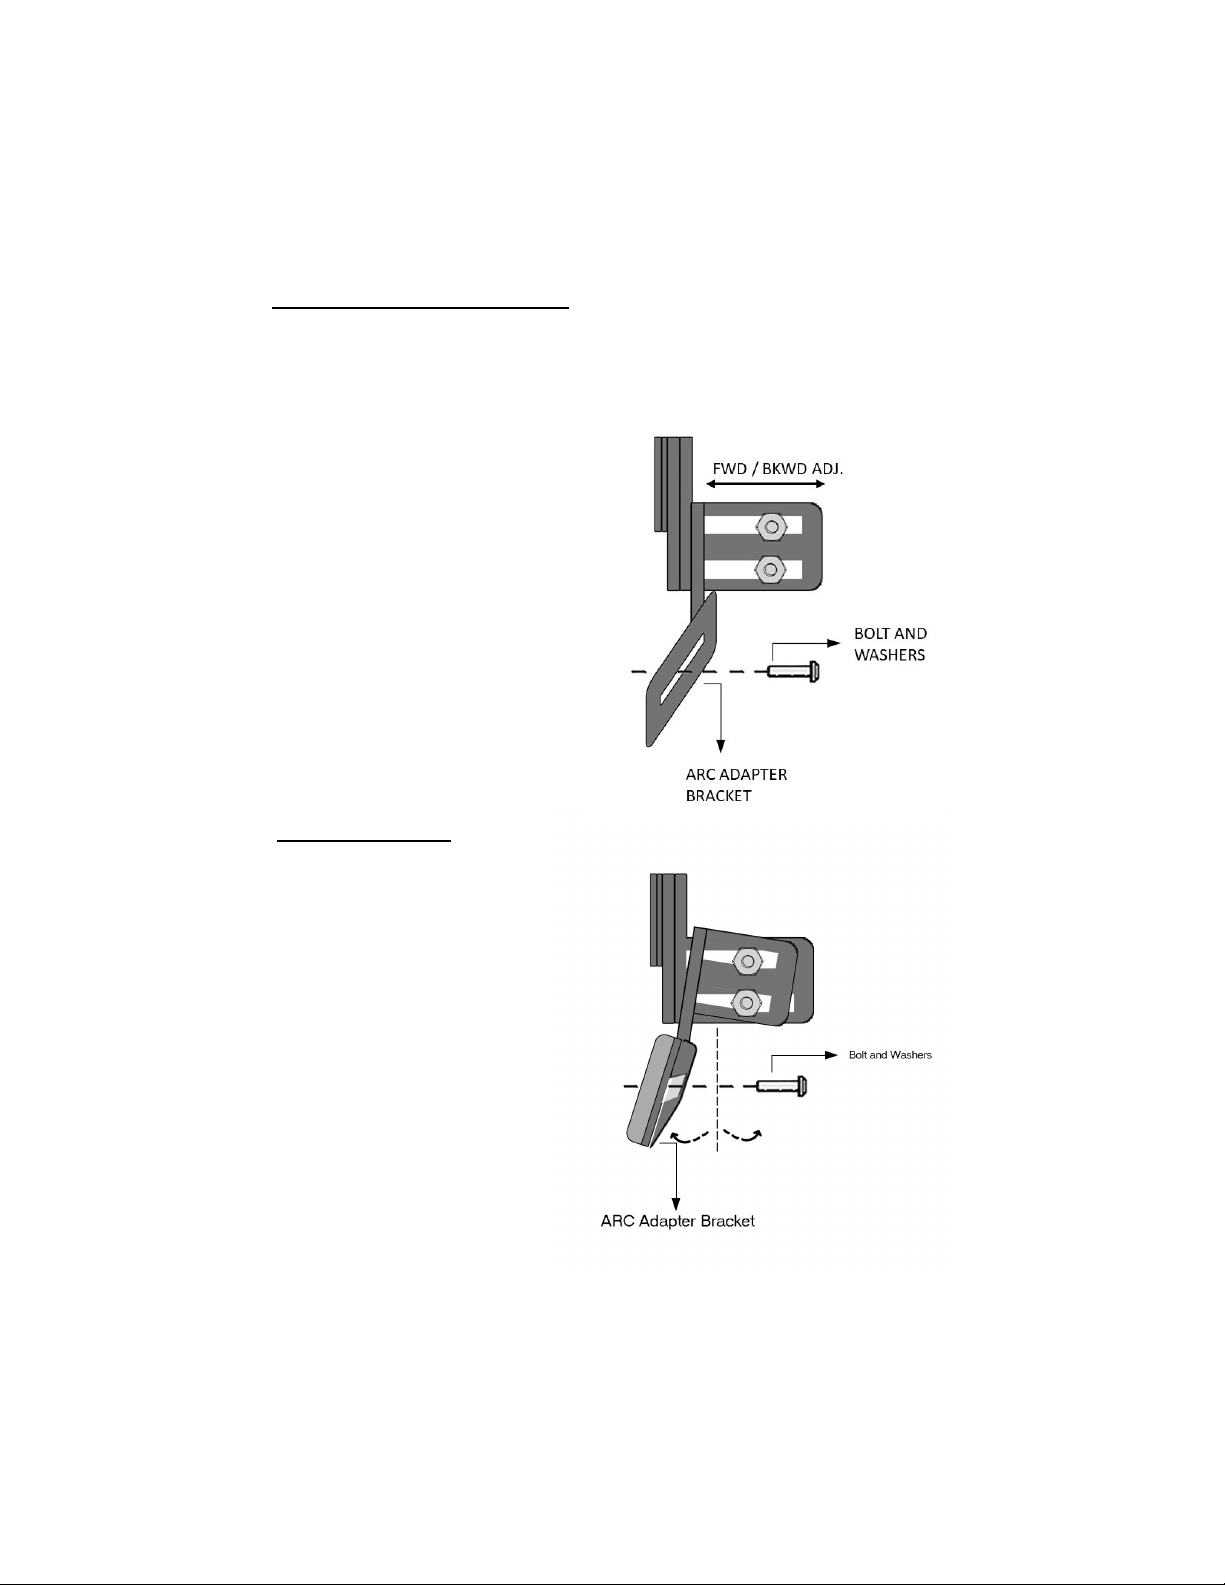
Forward/Depth Adjustments
Choose the proper forward/depth adjustment location to position Sonos
ARC so that at the minimum the back edge of the grille on the soundbar
clears the front edge of display
Loosen the 1/4” nuts, slide the
bracket forwards or back-
wards, lock into place by
tightening the 1/4” nuts. Do
not over tighten!
Tilt Adjustments
Choose the proper tilt ad-
justment angle to ensure
that the Sonos ARC is
level
Loosen the 1/4” nuts, tilt
the ARC Adapter Bracket,
lock into place by tighten-
ing the 1/4” nuts. Do not
over tighten!
7
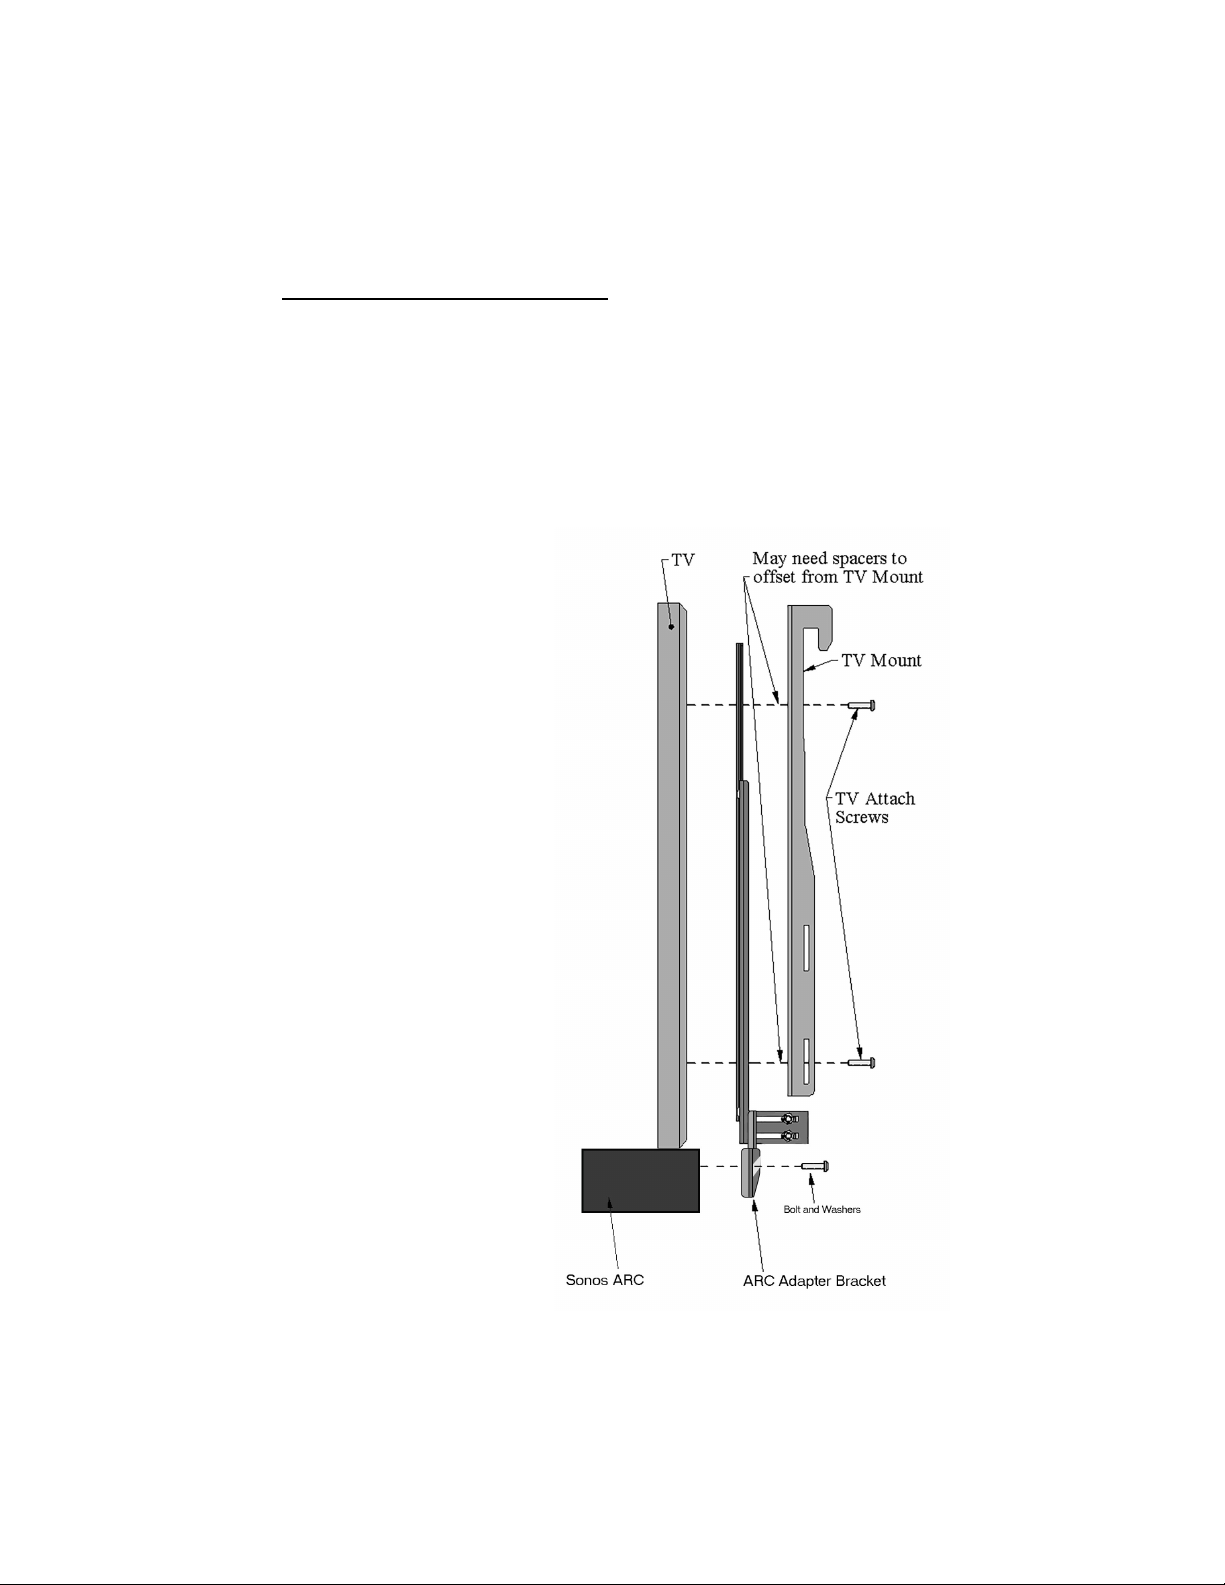
Attaching the UM1-A to the TV
Determine the optimal bracket placement and line the Sandwich sup-
port’s oval holes with the threaded holes on the back of your TV. Se-
cure the Sandwich Support to the back of the TV using the TV manu-
facturers recommended hardware. Please note: The UM1-A bracket
assembly should always be mounted between the TV and the TV
mount. Ensure that the bolts go through all of the hardware being used
into the back of the TV
If your TV has bump
outs, spacers may be
needed. (Spacers are not
included)
** Before mounting,
consult your TV’s owner
manual / TV mount’s
manual and follow all
safety precautions**

8
Mounting your Sonos® ARC
Supports 300mm to 600mm horizontal VESA patterns ONLY
Mount the L/R sides of the UM-1 bracket to the back of the TV
For 600mm horizontal VESA spacing, swap the Sandwich brackets
mounting location so that the attached Vertical brackets mount go-
ing towards the center of the display. This will allow the ARC
adapter bracket to reach the threaded inserts on the Sonos® ARC
Please note: The Sandwich, Vertical and ARC adapter brackets
may be flipped in various ways providing additional adjustment op-
tions. The right placement will depend upon your application
Attach the ARC adapter
brackets using the in-
cluded 1/4” carriage
bolts and 1/4” nylon
nuts to the vertical sup-
port bracket

9
Secure the ARC adapter
bracket to the back of the
Sonos® ARC by using the
provided hardware in this
recommended order: 18mm
M5 bolt, lock washer, flat
washer, fender washer and
then into the Sonos® ARC
using the hex key. We
strongly suggest two people
perform this action to ensure
that you do not drop the
Sonos® ARC while securing
to the ARC adapter brackets
Use the Height, Forward/Depth, and
Tilt adjustments to place the Sonos®
ARC in your desired location and
lock into place using the nylon nuts.
Do not over tighten
At a minimum, ensure that the back
of the speaker grill on the Sonos ARC
clears the front edge of the display.
This will allow the Atmos drivers to
remain unobstructed
When using a Tilt Mount—Use the Tilt adjustment feature to re-
level the Sonos® ARC so that the Atmos drivers fire up from a lev-
el plane
Do not mount the Sonos® ARC above the TV

10
www.nextlevelacoustics.com
Table of contents
Other Nextlevel Acoustics TV Mount manuals


