Nexxt Solutions NHS-D100 User manual

NHS-D100
Smart Wi-Fi door lock
2-year
warranty

Contents
What is in the box
Product overview
Preliminary steps
Installing the Nexxt Home App
English
4
5
6
13
Smart Wi-Fi door lock | NHS-D100
1. Introduction
Thank you for purchasing the Smart Wi-Fi door lock from Nexxt Solutions.
We are excited for being part of making your life easier, safer and bringing
peace of mind inside and outside your home. Please read this guide
thoroughly to ensure proper installation and operation of this keyless and
tamper-proof door lock entry system.
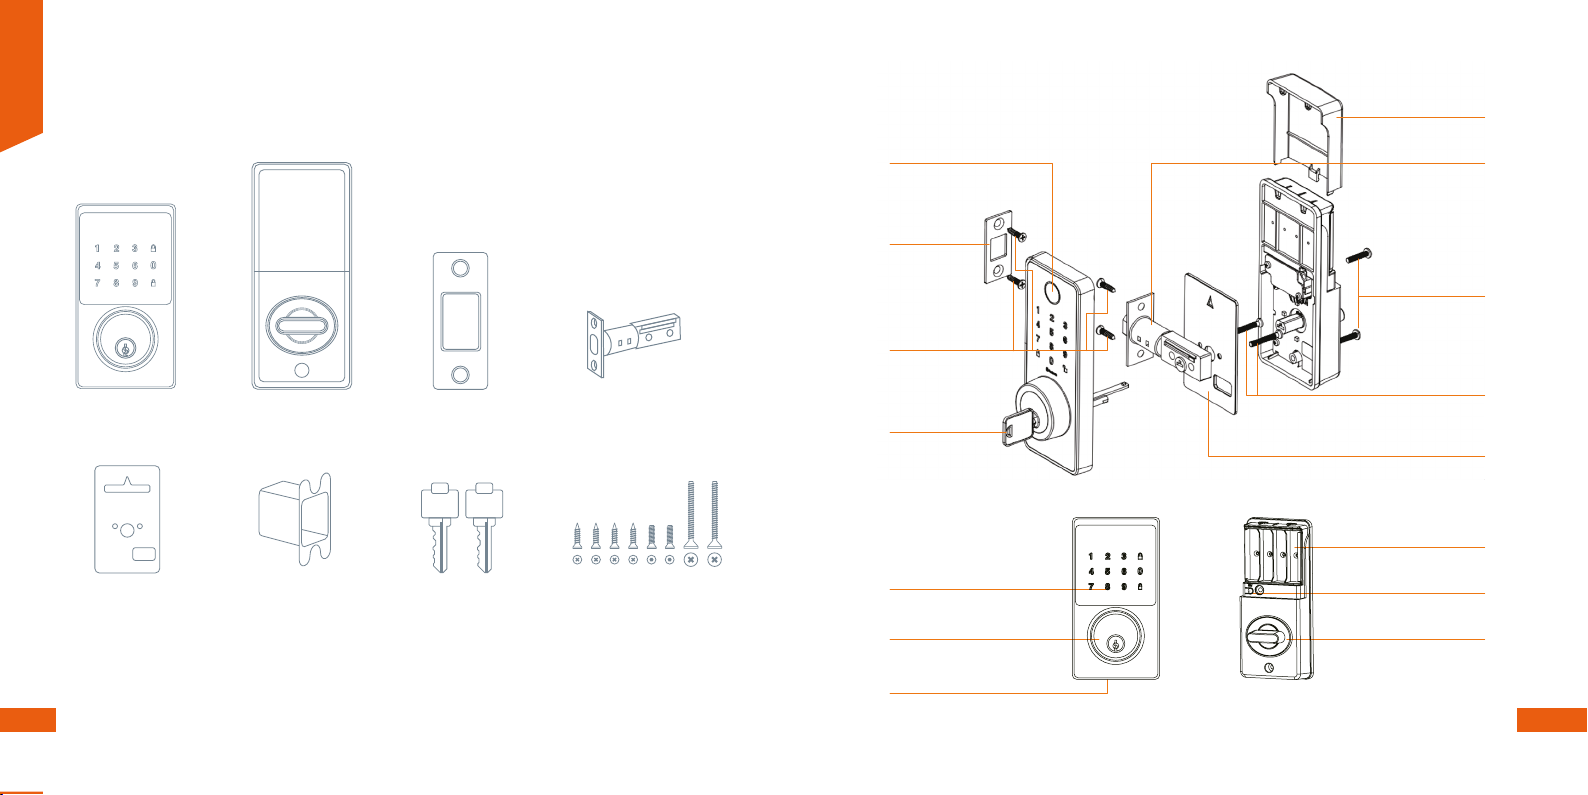
Strike plate
Status indicator light
Four ¾in screws
Mechanical key
Touchscreen lighted keypad
Keyway
USB-C port for power backup
Latch
Two ¾in screws
Two 1-5/32in screws
Mounting plate
Battery cover
Battery compartment
Reset button
Thumbturn
What is in the box 3. Product overview
Open the box and make sure all items listed below are included:
Keypad assembly
1 pc
Mounting plate
1 pc
Screw
8 pcs
Interior assembly
1 pc
Strike plate
1 pc
Deadbolt latch set
1 pc
Box strike plate Entry key
2 pcs
English
4 5
This side against door
4. Installation procedure
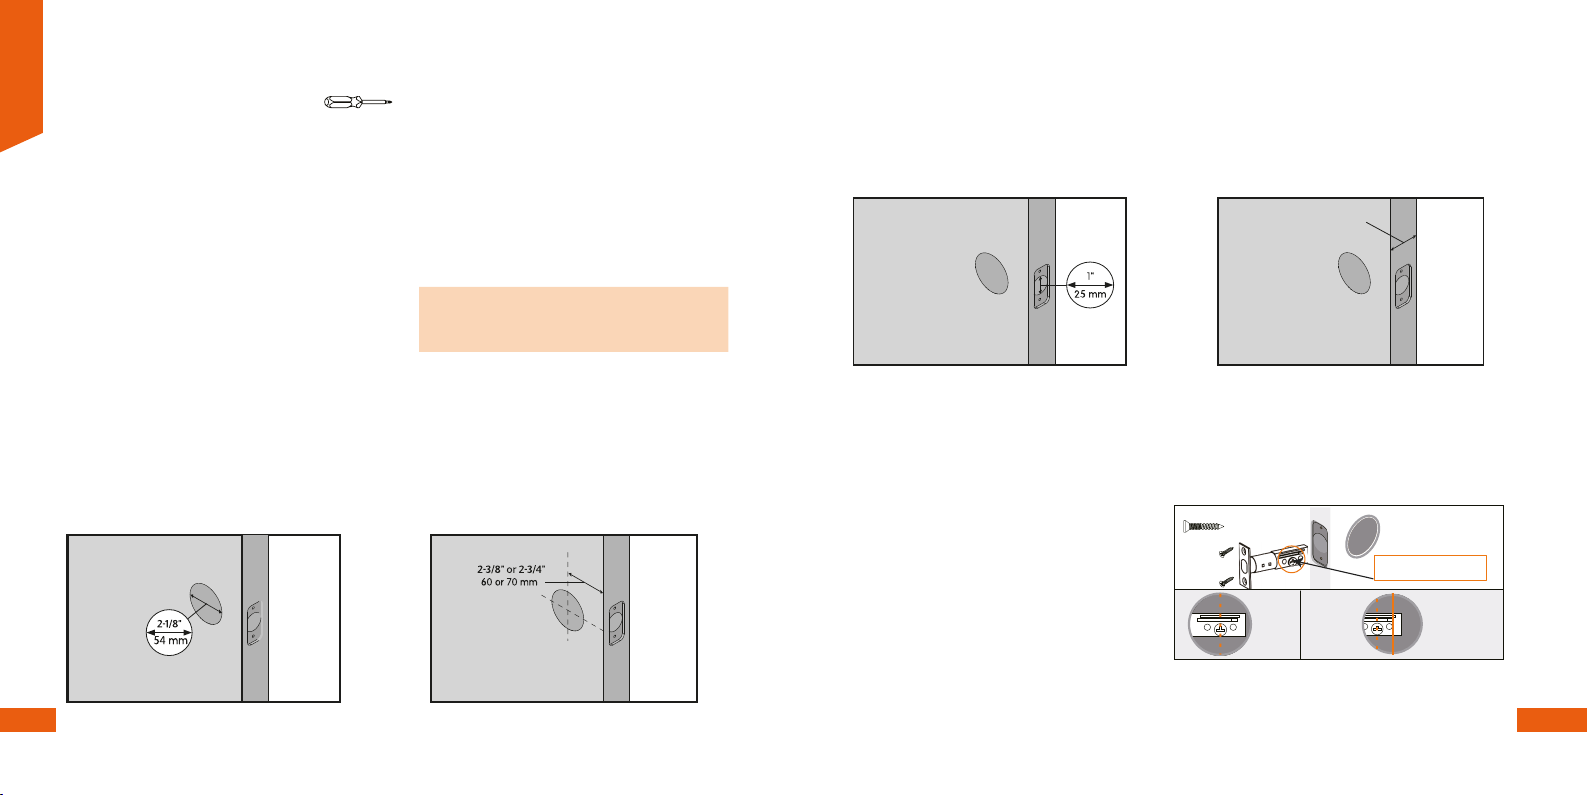
4.1 Preliminary steps
Door compatibility:
The smart lock can be installed on doors with
a thickness of 1-3/4in to 2in.
Once you have removed the existing door
hardware, you should use the included
template to make sure your door is
compatible (with the proper door thickness,
backset placement, and bore hole size).
Tools required: Phillips screwdriver.
Do not use a power drill.
Measure to conrm that the diameter
of the bore is 2-1/8in (54mm)
Step 2:Step 1:
Measure from the edge of the door to the
center of the main bore hole. This is called
the backset. Conrm that the diameter is
either 2-3/8in (60mm) or 2-3/4in (70mm).
The new latch and strike plate are installed in
the bore holes. There are two components of
the door lock the external escutcheon with
the keypad, and the internal escutcheon with
the thumbturn.
NOTE: Keep in mind that this is a deadbolt
door lock. The handle or door knob are not
included.
English
6 7
Backset
4.2 Latch and strike plate installation
• Install the latch into the door in the
retracted and unlocked position.
• Ensure the latch is facing upwards with
the T shape hole positioned at the bottom.
• Secure it into place using the two latch
screws provided.
Step 1:
Measure the edge bore hole. This must
be 1in (25mm) in diameter. Note that
when viewing the latch indention on the
side of the door, the edge bore hole is
the large circle in the center.
Step 4:Step 3:
Measure to conrm that the width of your
door is between 1-3/8in (35mm) and 2in
(50mm).
up up
Make sure the T-shaped hole
is in positioned at the bottom.
1-3/8” and 2”
35mm and 50mm
Actual Size
NO
3/4” (19mm) Screws-2ea.
The external unit is mounted to the door and attached to the inside mounting plate on the other
side with the long through screws.
English
8 9
4.4 Mounting plate and inside lock installation
• Remove the battery cover and loosen the
two screws to remove the interior
mounting plate from the inside piece of
the lock.
Step 1:
(Make sure the latch bolt is retracted)
4.3 Exterior keypad installation
Mount the exterior keypad lock so it is ush
with the door. Make sure that the wires are
placed under the latch.
Note: during the installation, do not insert
the mechanical key into the keyway.
Step 1:
• Install the strike plate into the doorframe
and secure it with the 3/4in screws.
• Make sure that the hole in the door frame
is at least 1in (2mm) deep.
Step 2:
• The latch is set to 2-3/8in. Adjust the
latch to 2 ¾in (70mm) if you require a
longer length for installation.
up
2-3/4”
70(mm)
YES NO NO
Actual Size
3/4” (19mm) Screws-2ea.
Battery
compartment
Mounting plate
English
10 11
Mounting Plate
1-5/32” (33mm)
Srews (2 ea.)
Control Wire
• Guide the cable assembly through the
cable hole of the interior mounting plate.
Step 2:
• Make sure it is ush with the door and
straight before attaching it with the two
screws.
Note: hold the external assembly against the
door during the mounting plate installation.
Step 3:
• The two units plug together via the 6-pin
cable attached to the keypad unit. Insert
the cable into the white jack making sure
that the blue ridge matches on both, the
plug and the jack located on the board.
Step 4:
•Test the mechanical operation of the lock.
Insert the key and turn it several times to
make sure the latch extends and retracts
smoothly.
• If the latch operation fails, check the
previous installation steps and whether
the mounting plate screws are rmly
tightened.
• If the keypad and mounting plate are
offset, loosen the mounting plate screws
and re-align.
Step 6:
• Proceed to tighen the secrews to secure
the assembly to the door.
Step 5:
3/4” (19mm)
Srews (2 ea.)
NONO
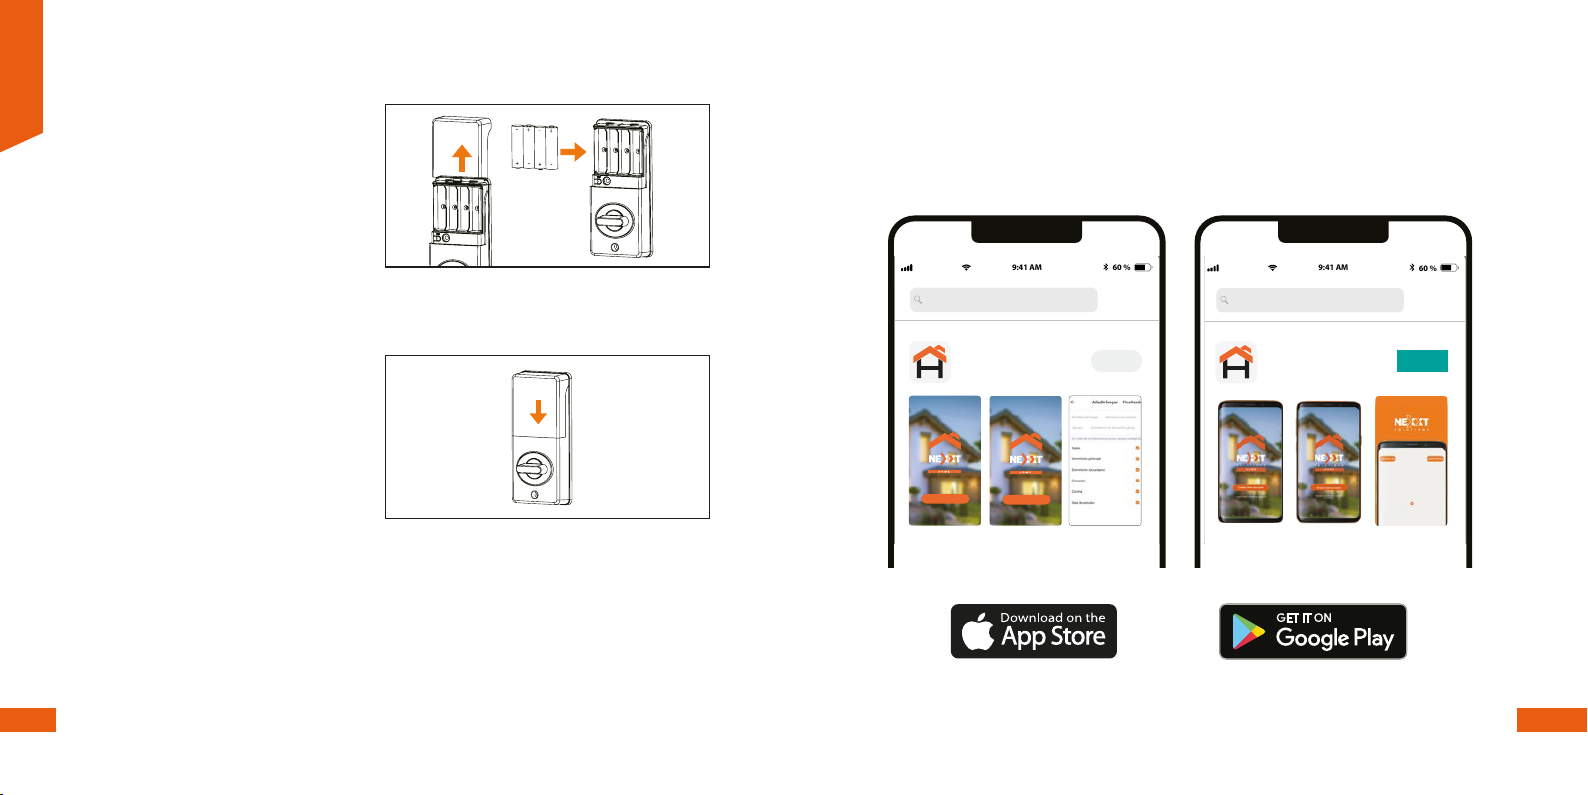
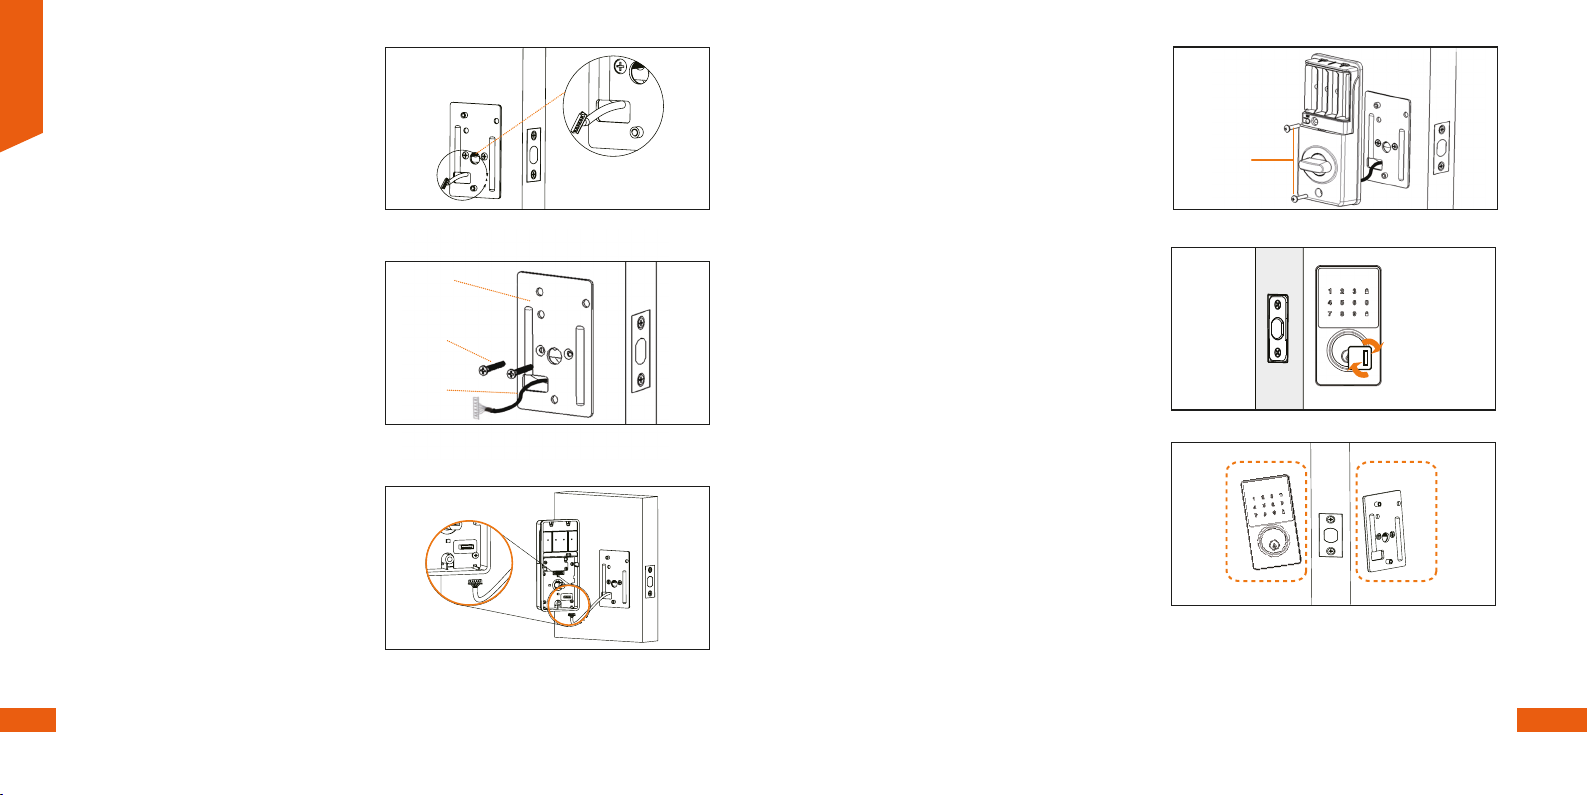
Insert four AA batteries in the
compartment. Ensure that the deadbolt is
in the retracted (unlocked) position before
the batteries are installed.
Note: batteries are not included. Do not
use rechargeable batteries or non-alkaline
batteries.
Step 1:
Replace the battery compartment cover
by sliding it down, until it clicks in place.
Step 2:
Smart Door Lock
Installing the Nexxt Home App
Scan the QR code or download the Nexxt Home app on Google Play or Apple App Store and
create a new account.
User guide
Thank you for purchasing the Smart Wi-Fi LED amber
from Nexxt Solutions. We are excited to be
part of making your life easier, safer and bringing peace of
mind into your homes.
Product overview
1.
your preferred settings through the application.
2. Screw base
Package content
•
English
1
2
Installing the Nexxt Solutions
Home App
Download the Nexxt Home app on Google Play Store or
Apple App Store.
60 %
9:41 AM
Nexxt Home
Nexxt Solutions Home App
Cancel
GET
Accvent LLC
Log in with existing account
Create New Account
SOLUTIONS
Iniciar sesión con cuenta existente
Crear Cuenta Nueva
SOLUTIONS
60 %
9:41 AM
Nexxt Home
Nexxt Solutions Home App
Cancel
INSTALL
Accvent LLC
Smart Wi-Fi
tunable bulb
English
12 13
4.5 Battery installation
Step 1
60 %
9:41 AM
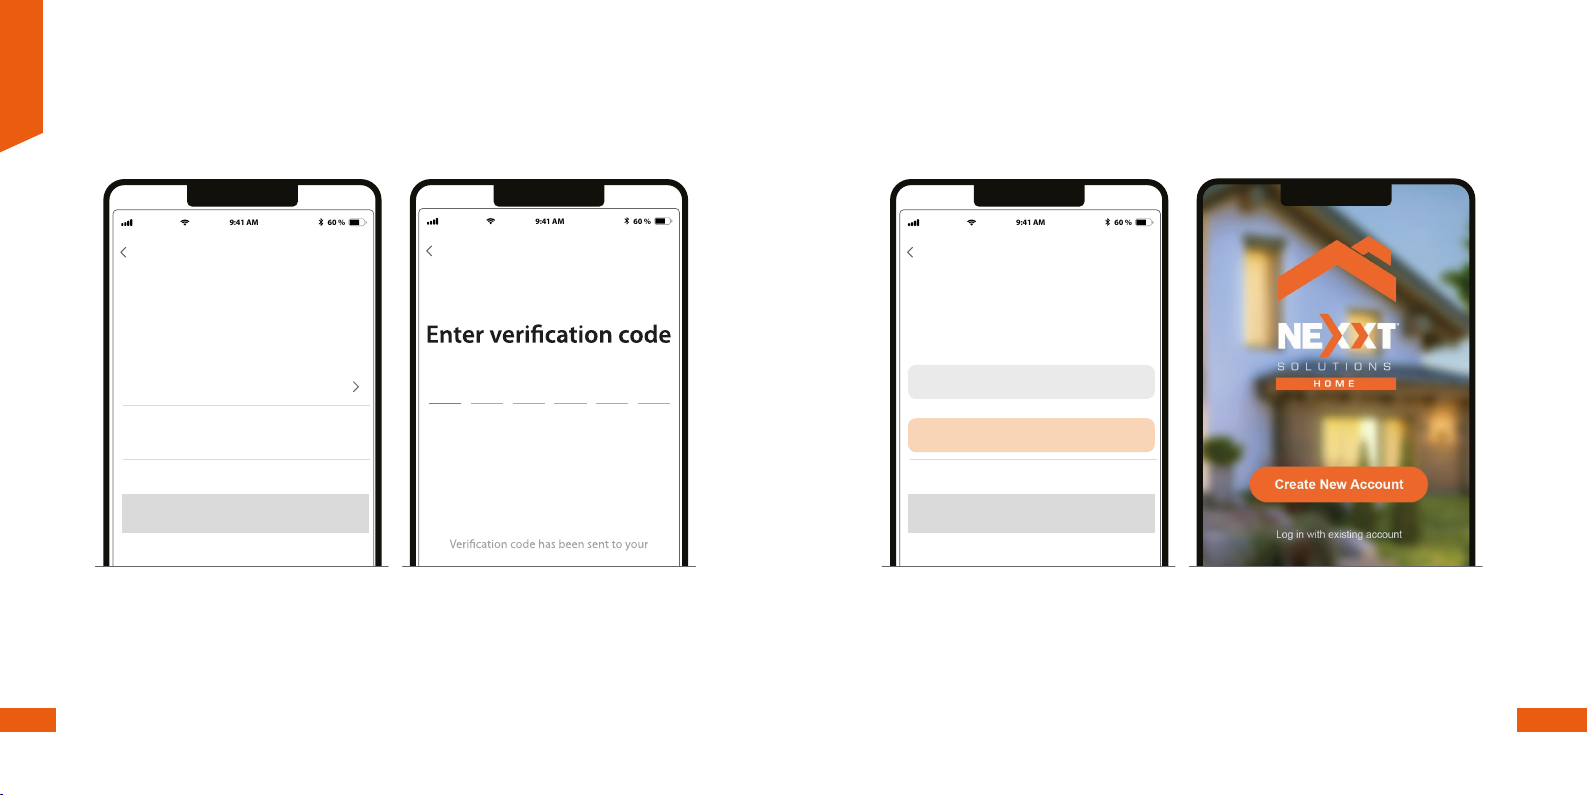
Register by email
United States of America
Email
Get authentication code
60 %
9:41 AM
English
14 15
Step 3
Step 2
Register by email. Fill in the required elds. Enter the verication code you received. Create a new password and then select Completed. The Nexxt Home
account has been successfully congured.
60 %
9:41 AM
Set Pasword
Get authentication code
Pasword
Use 6-20 characteres with a mix of letters and numbers

Add device
• Make sure that the four AA batteries are installed into the door lock before proceeding.
Step 1
Step 2
English
16 17
60 %
9:41 AM
60 %
9:41 AM
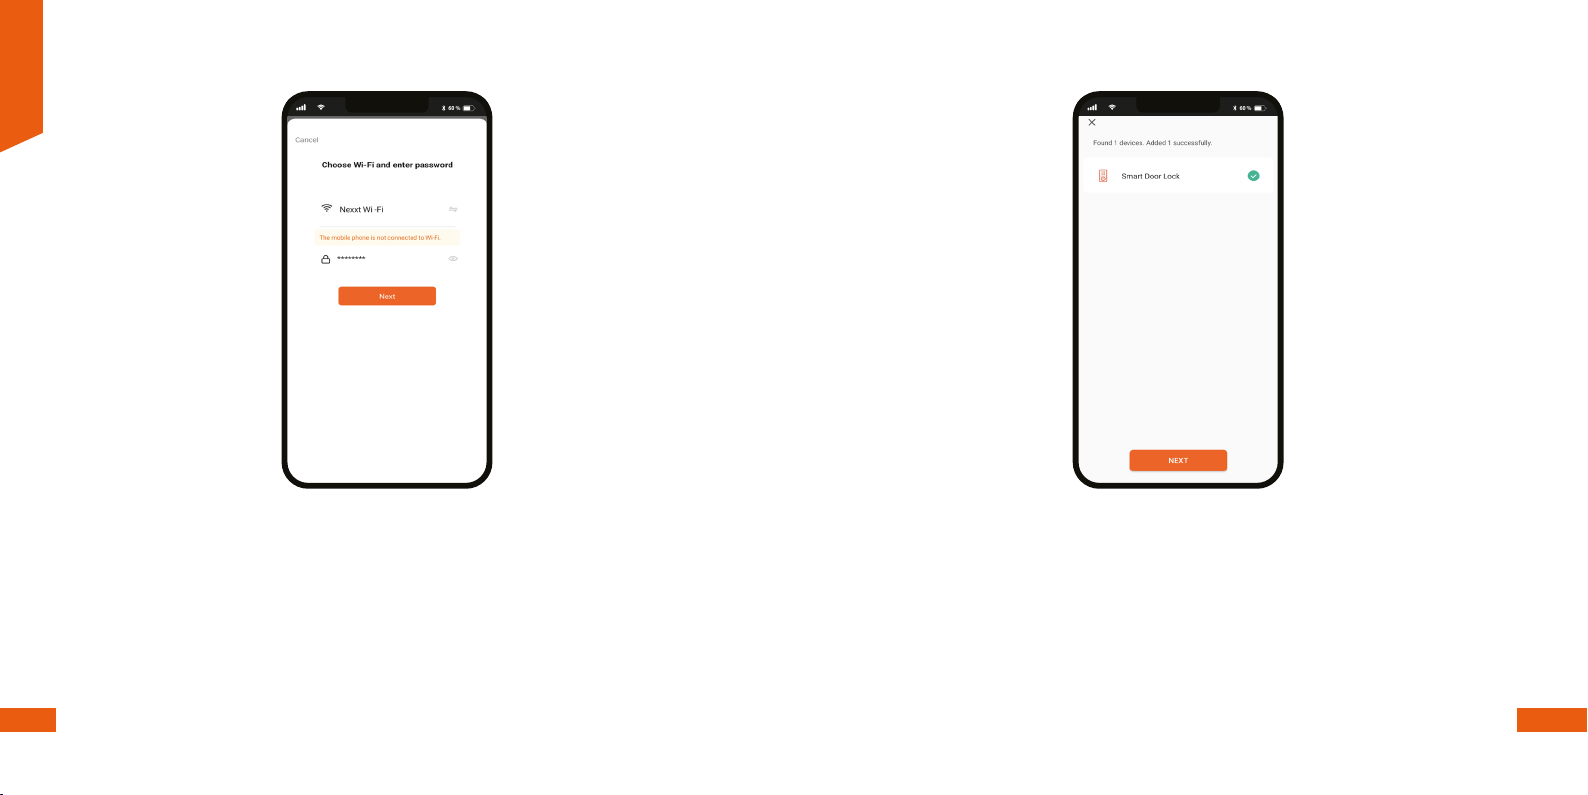
Press the reset button for 10 seconds located in the internal escutcheon below the
battery compartment. A tone will be heard, and the light will ash green twice.
Tap on Add device or click on the +icon. Then select the Smart door lock
icon and click Go to add.
60 %
9:41 AM
60 %
9:41 AM
You must connect to a 2.4GHz Wi-Fi network. Enter your network password. Make sure you
enter the correct password, otherwise the device will not connect. To add the device may take
around 30 seconds, depending on the speed of the Wi-Fi connection.
When the pairing process is completed, the notication Device added successfully will be
displayed on the screen.
English
18
Step 3 Step 4
19
English
20 21
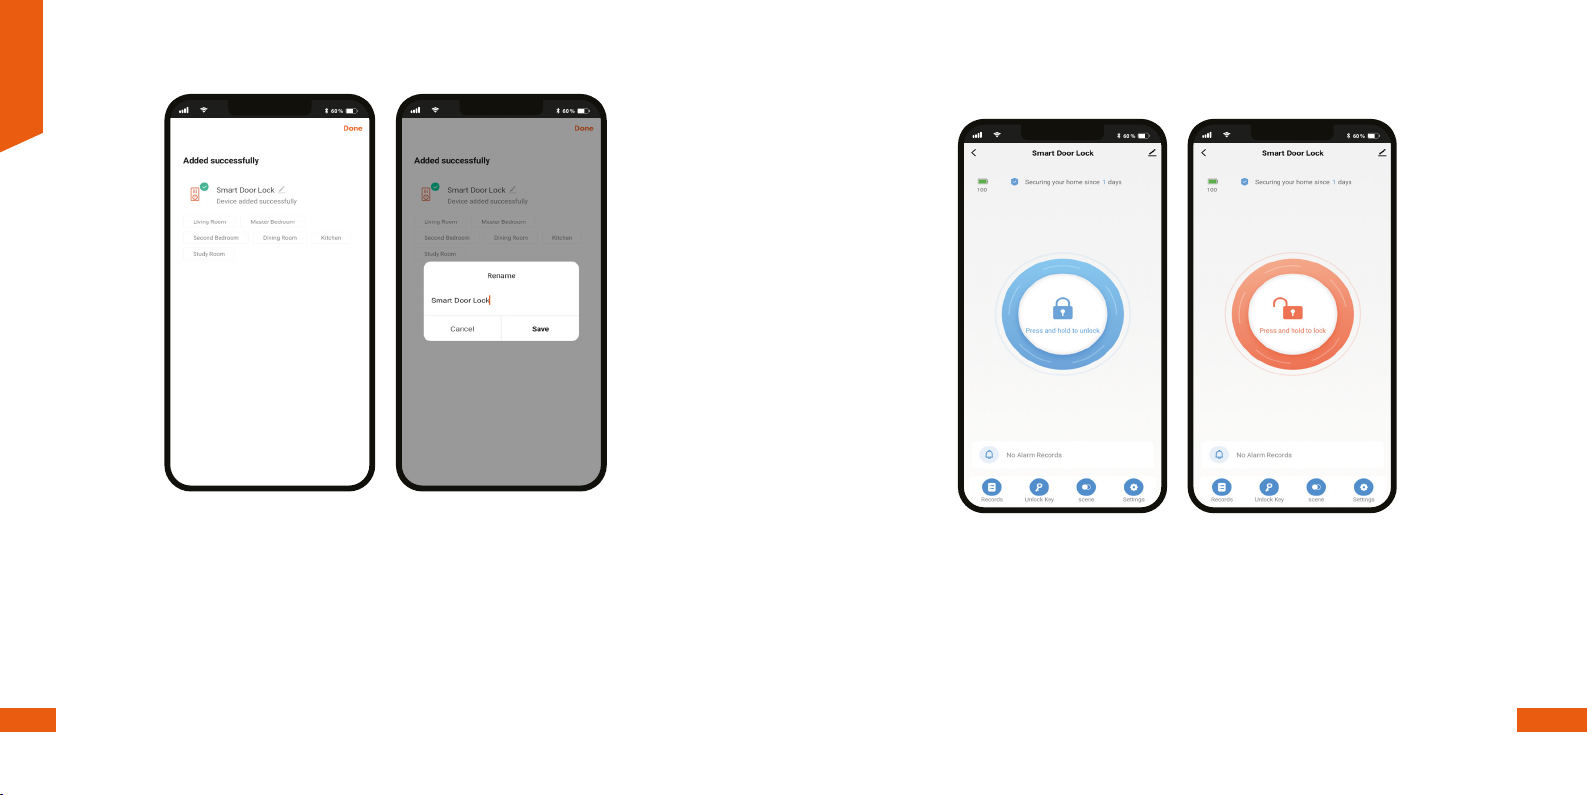
Click on the pencil icon to rename the door lock. Select Save to store your settings, followed by
Done to nish.
Step 5
60 %
9:41 AM
60 %
9:41 AM
Main device
Smart door lock
• Battery information: Provides an indication of the power remaining in the batteries.
• Securing your home: Displays the uptime since the smart door lock started to operate.
• Main opening button:
- Press and hold to unlock remotely
- Press and hold to lock remotely
• There are four conguration menus at the bottom of the screen: Records, Unlock key, Scene
and Settings. A description of each one is included in the following sections of the manual.
60 %
9:41 AM
60 %
9:41 AM

English
22 23
Activity logs
Click on Records to display the opening and closing activity of the smart door lock.
Programming of access keys
Select Unlock key to program a permanent or temporary 6-digit numerical code that will open
the lock locally. Weak passcodes containing consecutive numbers or repeated sequences
are not allowed.
Permanent code
• User Key: Since this code can be used every day at any time, it is perfect for people you trust,
for family members and others who come and go frequently. To program a permanent
numerical passcode, cick on User key. Then, select the administrator account to which you
want to assign this code.
60 %
9:41 AM
60 %
9:41 AM

English
24 25
• Click on Add. The sequence that you enter must contain 6 digits and should be easy to
remember, since once created, the application will not show this code anymore.
60 %
9:41 AM
• There is an option for creating an alert code in case of imminent danger or emergency. Select
Special code and then enable the App notication feature to let your family members know
that something is not quite right when unlocking the door.
60 %
9:41 AM
Danger alert

English
26 27
• Select Temporary key on the menu to program a passcode that is set to expire after certain
conditions are met.
• To do so, click on the + icon followed by Temporary key. Next, select the type of code from
the options displayed in the submenu.
60 %
9:41 AM
• One-time code: Select this option to create a temporary, single-use PIN which is valid for a
specic time frame.
• Guest code: Use it to generate timed, permanent, one-time or customized passkeys and
share them with guests, friends, housekeepers or service personnel.
60 %
9:41 AM
Temporary access code
English
28 29
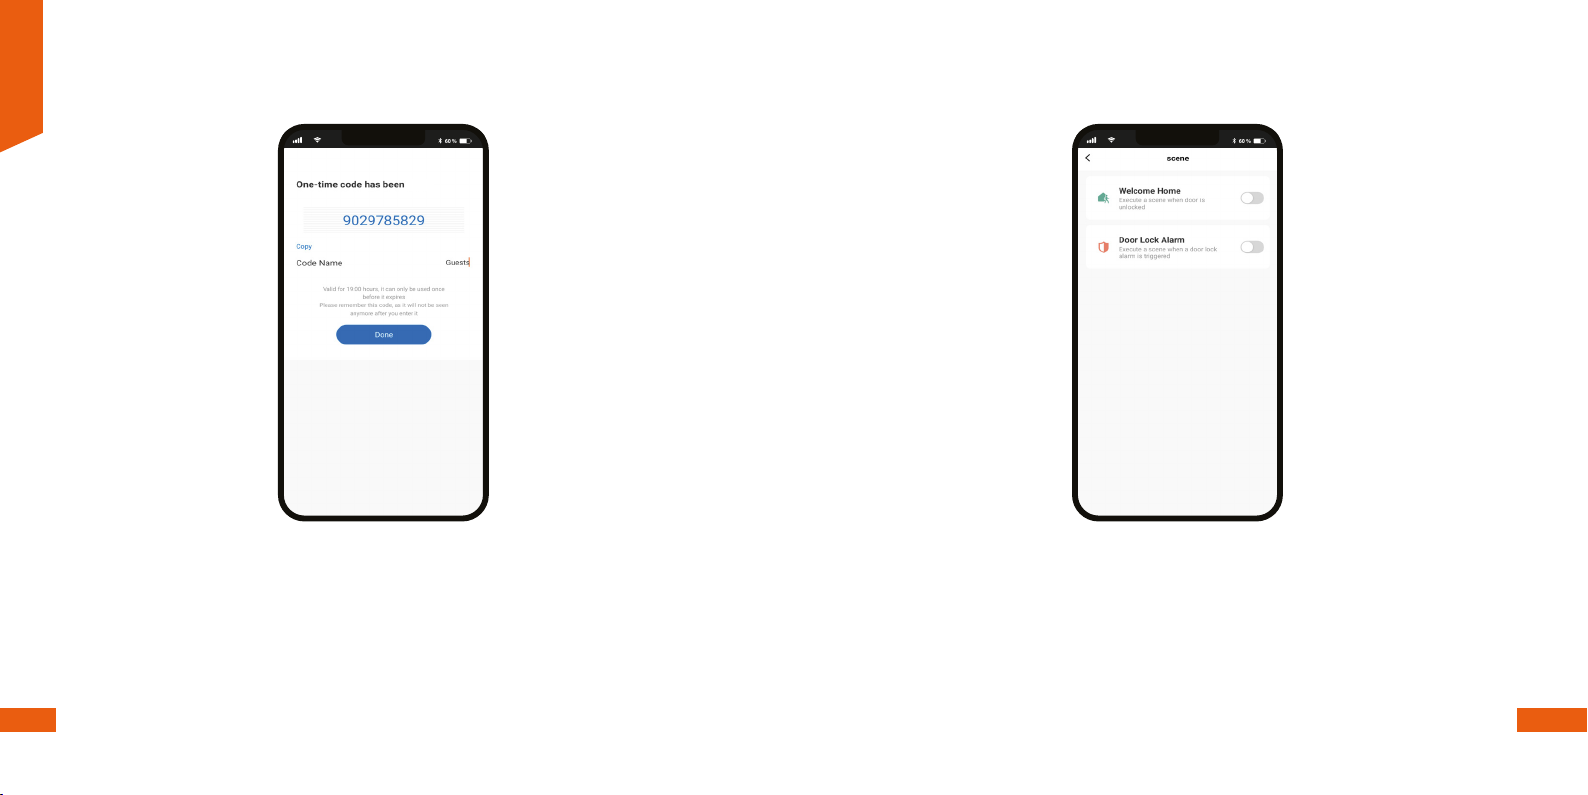
The newly created passcode will appear on the screen, with the duration details and
accessibility information. Click on Done to nish.
60 %
9:41 AM
Scene
This interface allows the conguration of home automation routines by the user. Two options
are available:
• Welcome Home: Executes a user-dened automated action every time the unlock passcode
is keyed-in the smart door lock.
• Door Lock Alarm: When the maximum number of allowed attempts is reached (5), the door
lock executes a user-dened automated action while the keypad is automatically disabled for
one minute.
60 %
9:41 AM
created

English
30 31
Smart door lock settings
• Voice code: Unlocks the smart door lock through voice assistant-enabled devices, such as
Google or Alexa.
• Auto-locking: Enable this feature to automatically lock the door after a set interval on your
way out.
• Lock volume: Audio is on by default. You can choose between Normal or Mute to enable or
disable the door lock sounds.
• Low-power threshold: Sets the minimum charge percentage at which the door lock should
operate. When the batteries reach the limit specied, a low-battery notication will be
triggered.
60 %
9:41 AM
Additional settings
• Device name: Changes the icon and the name of the device,
and it also allows the user to assign a different location.
Note: Click on the pencil icon to access the device name
menu.
• Device information: Displays detailed information related to
the door lock.
• Tap-To-Run and Automation: Links the Wi-Fi door lock with
other smart products to automatically control them through
a customized command.
• Third-party control: Enables the voice recognition feature
through Alexa and Google Assistant.
• Oine notication: Provides a selection button to enable/
disable this feature.
• Share device: Grants access to remove sharing only the
Wi-Fi door lock to family and friends through the
application.
• Create group: Makes management of devices easier by selecting and arranging multiple
components under a single group.
• Feedback: Let us know if you have any issues setting up the product.
• Add home screen: Adds a shortcut of the device to the main screen on your phone.
• Device update: We will sometimes add new features or provide updates with a new rmware
upgrade.
• Remove device: Allows you to unbind the device from the application.
60 %
9:41 AM
60 %
9:41 AM

English
32 33
Share device
Click on Share devices then tap Add sharing. Enter the e-mail address of family and friends.
Tap on Done. The newly congured users will now have access to your smart door lock.
Note: Family or friends will need their own Nexxt Solutions
Home Account to access the device
60 %
9:41 AM
60 %
9:41 AM
60 %
9:41 AM
60 %
9:41 AM
60 %
9:41 AM
Delete user
To remove a user, on Android press and hold the name you want to eliminate. On iOs, slide to
the left the name of the user you want to remove. Click on Delete. A notication conrming
you don’t want to share the device with this user will be displayed. Click on Conrm.

English
34 35
FCC ID: X4YHASD100
Nexxt Solutions® is a registered trademark. All rights reserved. Amazon, Alexa and all related
logos are trademarks of Amazon.com, Inc. or its aliates. Google, Android and Google Play are
trademarks of Google Inc. SD™ and microSD™ are trademarks owned by SD-3C, LLC. All other
brand names and trademarks are the property of their respective owners. Made in China.

Contenido
Contenido del empaque
Descripción del producto
Pasos preliminares
Instalación de la aplicación Nexxt Home
Español
38
39
40
47
Cerradura inteligente con conexión Wi-Fi | NHS-D100
1. Introducción
Gracias por adquirir la Cerradura inteligente Wi-Fi de Nexxt Solutions. Nos
complace ser parte de la solución destinada no sólo a simplicar su vida,
sino también a brindar más seguridad y tranquilidad en su hogar. Haga el
favor de leer detenidamente esta guía para garantizar la debida instalación y
funcionamiento de este novedosa cerradura para puerta resistente a la
manipulación.

Placa de impacto
Indicador luminoso de estado
Cuatro tornillos de ¾in
Llave mecánica
Teclado táctil con
iluminación de fondo
Ojo de la cerradura
Conector USB-C
para energía de respaldo
Pestillo
Dos tornillos
de ¾in
Dos tornillos de 1-5/32in
Placa de montaje
Tapa del compartimiento
de baterías
Compartimiento
de baterías
Botón de reposición
Picaporte manual
Contenido del empaque 3. Descripción del producto
Apenas abra la caja, verique que hayan sido incluidos los artículos
mencionados en la lista a continuación:
Unidad del teclado
1 ud
Placa de montaje
1 ud
Tornillo
8 uds
Mecanismo interior
1 ud
Placa de impacto
1 ud
Pestillo del cerrojo
1 ud
Encaje del cerrojo
1 ud
Llave para puerta
2 uds
Español
38 39
This side against door
Table of contents
Languages:
Popular Door Lock manuals by other brands

CAMDEN
CAMDEN EXACT CX-ED2079 installation instructions

Esco
Esco systeQ-M-SL-ESC Installation, operation and maintenance instructions

SUGATSUNE
SUGATSUNE LAMP HC-30H installation manual

SDC
SDC PRO Series installation instructions

Salto
Salto Neo E9 Series installation guide

Assa Abloy
Assa Abloy Corbin Russwin Access 800 9800 TCWI1 Series installation instructions


