Nicetex ND-600 User manual

MAP Smart Media Centre
ND-600
User's Guide

2
Important Safety Instructions
When used in the directed manner, this unit has been designed and manufactured to ensure
your personal safety. However, improper use can result in potential electrical shock or fire
hazards. Please read all safety and operating instructions carefully before installation and use,
and keep these instructions handy for future reference. Take special note of all warnings listed in
these instructions and on the unit.
1. Water and Moisture
The unit should not be used near water. For example: near a bathtub, washbowl, kitchen sink,
laundry tub, swimming pool or in a set basement.
2. Ventilation
The unit should be situated so that its location or position does not interfere with its proper
ventilation. For example, it should not be situated on a bed, sofa, rug or similar surface that
may block the ventilation openings. The ventilation should not be impeded by covering the
ventilation openings with items, such as newspapers, table-cloths, curtains, etc. Also, it
should not be placed in a built-in installation, such as a bookcase or cabinet, which may
impede the flow of air through the ventilation openings.
3. Heat & Flame
The unit should be situated away from heat sources such as radiators, heat registers, stoves
or other appliances (including amplifiers) that produce heat.
No naked flame sources, such as lighted candles, should be placed on the apparatus.
4. Power Source
The unit should be connected to a power supply only of the type described in the operating
instructions or as marked on the appliance.
Where the power adaptor is used as the disconnect device, the disconnect device shall
remain readily operable.
5. Power Cord Protection
Power supply cords should be routed so that they are not likely to be walked on or pinched
by items placed upon or against them. It is always best to have a clear area from where the
cord exits the unit to where it is plugged into an AC outlet.
6. Cleaning
The unit should be cleaned only as recommended. See the section "Care and Maintenance"
of this manual for cleaning instructions.
7. Object and Liquid Entry
Care should be taken so that objects do not fall and liquids are not spilled into any openings
or vents located on the unit. It shall not be exposed to dripping or splashing and that no
objects filled with liquids, such as vases, shall be placed on the apparatus.
8. Attachments
Do not use attachments no recommended by the product manufacturer.
9. Lightning and Power Surge Protection
Unplug the unit from the wall outlet and disconnect the periods of time. This will prevent
damage to the product due to lightning and power-line surges.
10. Overloading
Do not overload wall outlets, extension cords, or integral convenience receptacles as this can
result in a risk of fire of electric shock.
11. Damage Requiring Service
This unit should be serviced by qualified service personnel when:
A. The power supply cord or plug has been damaged.
B. Objects have fallen into or liquid has been spilled into the enclosure.
C. The unit has been exposed to rain.
D. The unit has been dropped or the enclosure damaged.
E. The unit exhibits a marked change in performance or does not operate normally.
12. Periods of Nonuse
If the unit is to be left unused for an extended period of time, such as a month or longer, the
power cord should be unplugged from the unit to prevent damage or corrosion.
13. Servicing

3
The user should not attempt to service the unit beyond those methods described in the user's
operating instructions. Service methods not covered in the operating instructions should be
referred to qualified service personnel.
Warnings:
- Battery shall not be exposed to excessive heat such as sunshine, fire or the like.
- Be sure that the battery are installed correctly. Wrong polarity may damage the unit.
- Do not mix old and new batteries.
- Do not mix alkaline, standard (carbon-zinc) or rechargeable (nickel-cadmium) batteries.
- Only batteries of the same or equivalent type as recommend are to be used.
- If the unit is not to be used for an extended period of time, remove the battery.
- Do not dispose of batteries in fire, battery may explode or leak.
- Danger of explosion if battery is incorrectly replaced.
Features
Thank you for purchasing the MAP (My Air Play) Smart Media Centre.
This model incorporates following features :
- Streams Photo / Audio / Video files from a Smart Phone (a mobile phone running Android OS
or Apple iOS device, e.g. iPod Touch / iPhone / iPad).
- Playback Photo / Audio / Video files from USB / SD memory device.
- Displays photo and playback video on external TV set (or display device) with HDMI or
Composite video input.
- Access Internet function.
- Mouse or Keyboard connection for easy access to Internet operation.
- Built-in high fidelity speakers.
- Built in Subwoofer with heavy bass effect.
- Audio line-in (AUX) for connecting other digital audio player
- Remote Control operation
iPad, iPhone and iPod touch are trademarks of Apple Inc., registered in the U.S. and other countries.
Smart Phone, iPad, iPhone, iPod Touch are not included.
Installation
Clock battery back-up
For the unit has been worked for a very long period, where the backup battery voltage may
discharge to a low level which cannot backup the system clock (the cpu time base) of the unit. In
this case you need to replace it with the fresh one.
(1) A backup battery compartment located at the bottom of the main unit.
(2) Open the battery compartment lid.
(3) Follow the polarity diagram shown inside the compartment and install 2 x AAA (UM-4)
type batteries (not included).
(4) Close the battery compartment lid.
Remote Control
The remote control operates on a CR2025 battery (included).
To activate the remote control, remove the insulation tab attached in the battery compartment.
4
System Connection
TheMAP SmartMediaCentresystem can implementfollowingfunction:
(A) It streams photo / music / video files from your Smart Phone through a Wi-Fi (wireless) network.
(B) The MAP Base unit playback photo / music / video files which stored in the USB / SD memory
device.
(C) In tablet mode, you can access Internet through the Wi-Fi (wireless) network.
Beforeoperate the MAPSmartMedia Centre,followthesetupthatdescribedinbelowsystem connection.
ThefollowingconnectionsaretheMAPsystemsetup,seediagramA,toplaybackphoto/music/videoona
TVset.
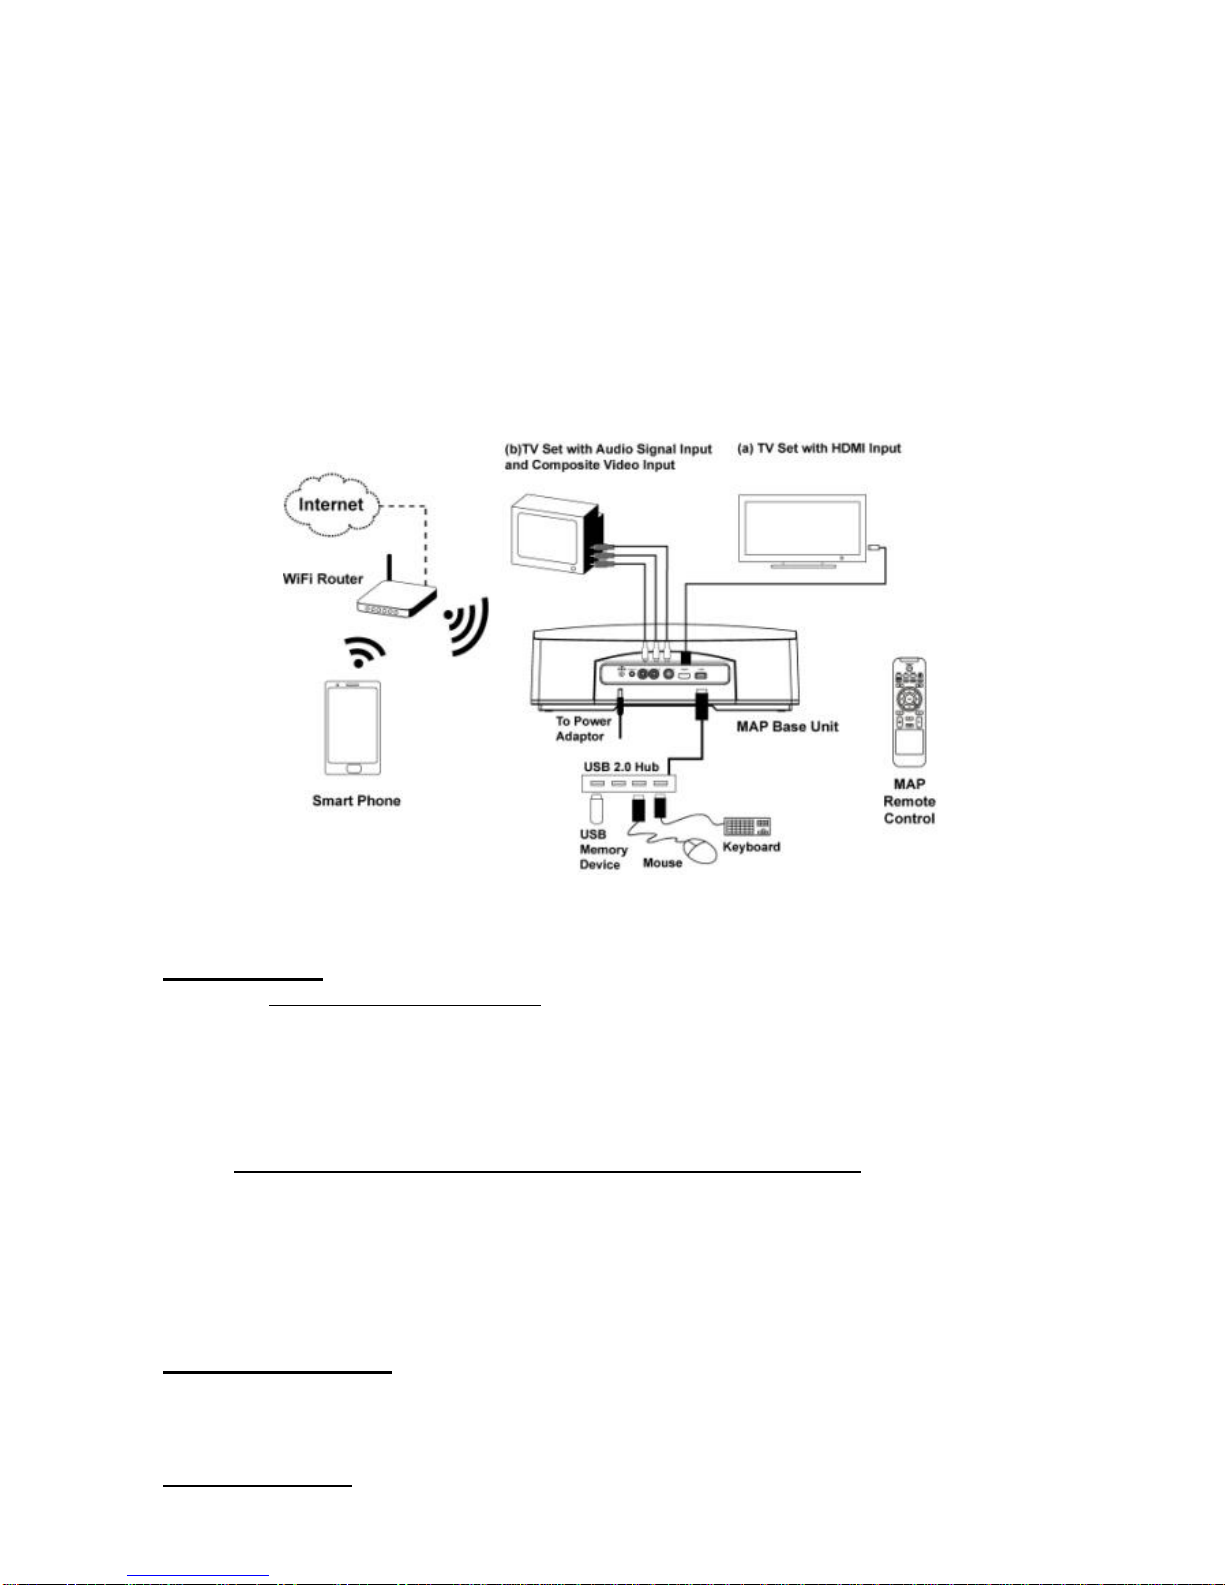
Diagram A : MAP System Connection
1. Display Device
Either, (a) For TV set with HDMI input
Connect a HDMI cable to the HDMI input of the TV set and connect the other end of the
cable to the HDMI output located at rear of the MAP Base unit.
Note: If necessary, you may press the HDMI AUDIO ON/OFF button from the remote control to
mute the audio outputfrom the digital TV set.
Or, (b) For TV set (or other display device) with composite video input
Connect the RCA cable to the TV set and connect the other end of the cable (Left / Right
Audio channels and video) to the L / R / V RCA connectors at the rear of the MAP Base
unit.
Note: The MAP Base unit will either output HDMI signal or Composite Video signal one at a time
only (i.e. will not output both at the same time). You can select your desired video output source
from the remote control or from the on screen display (OSD) menu.
2. Keyboard and Mouse
For easy operation of accessing Internet feature, connect a keyboard and a mouse (recommend
using wireless type) to the USB port (USB 2.0) located at rear of the MAP Base unit, see
example in diagram A.
3. Wireless Network
With a Wireless router paired the MAP Base unit and a Smart Phone.
5
Note: For Wi-Fi (wireless) setup, please read “Settings” section in this manual.
To have Internet operation, yourWi-Fi (wireless) router should be connected to the Internet network.
4. Power Connection
(a) Connect the DC output power plug of the AC-DC power adaptor to the DC-IN socket
located at rear of the unit.
(b) Firmly and securely plug the AC-DC power adaptor into the AC main outlet.
5. Smart Phone
With a Smart Phone installed the MAP Mobile App (the application program).
Note: For MAP Mobile App installation, please read “MAP App installation” section in this manual.
Now it is ready to operate the MAP system with this setup.
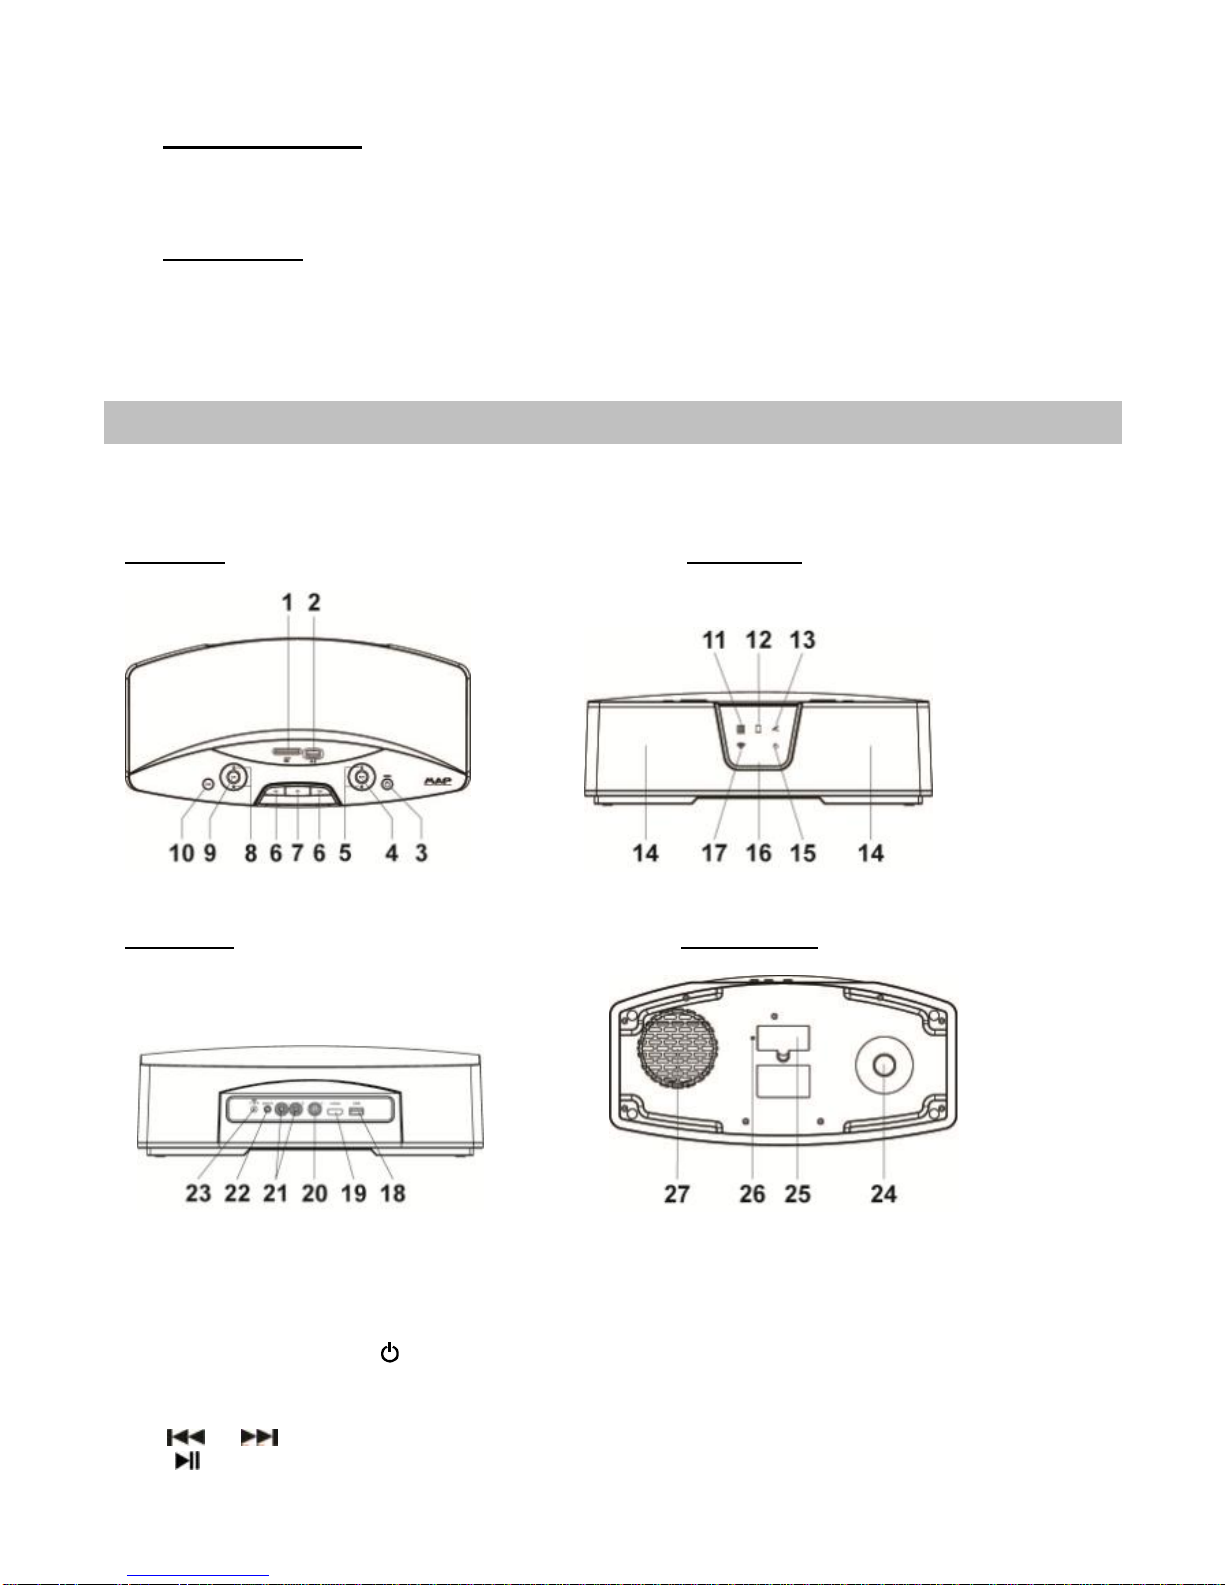
Description of Parts
MAP Base Unit
Top View Front View
Rear View Bottom View
1. SD memory card slot
2. USB device connector A
3. STANDBY ON / OFF button ----- Press to turn the unit On and Off.
4. MUTE button ----- Mute the volume of the whole system.
5. VOL + / - button ------ Adjust volume level up or down.
6. / button ----- Skip tracks Backward / Forward.
7. button ----- Play-Pause music playback.
8. AUX VOL +/- button ----- Adjust auxiliary audio volume level up or down.
Table of contents


