Night Frights GHOST BUST Manual


2

4
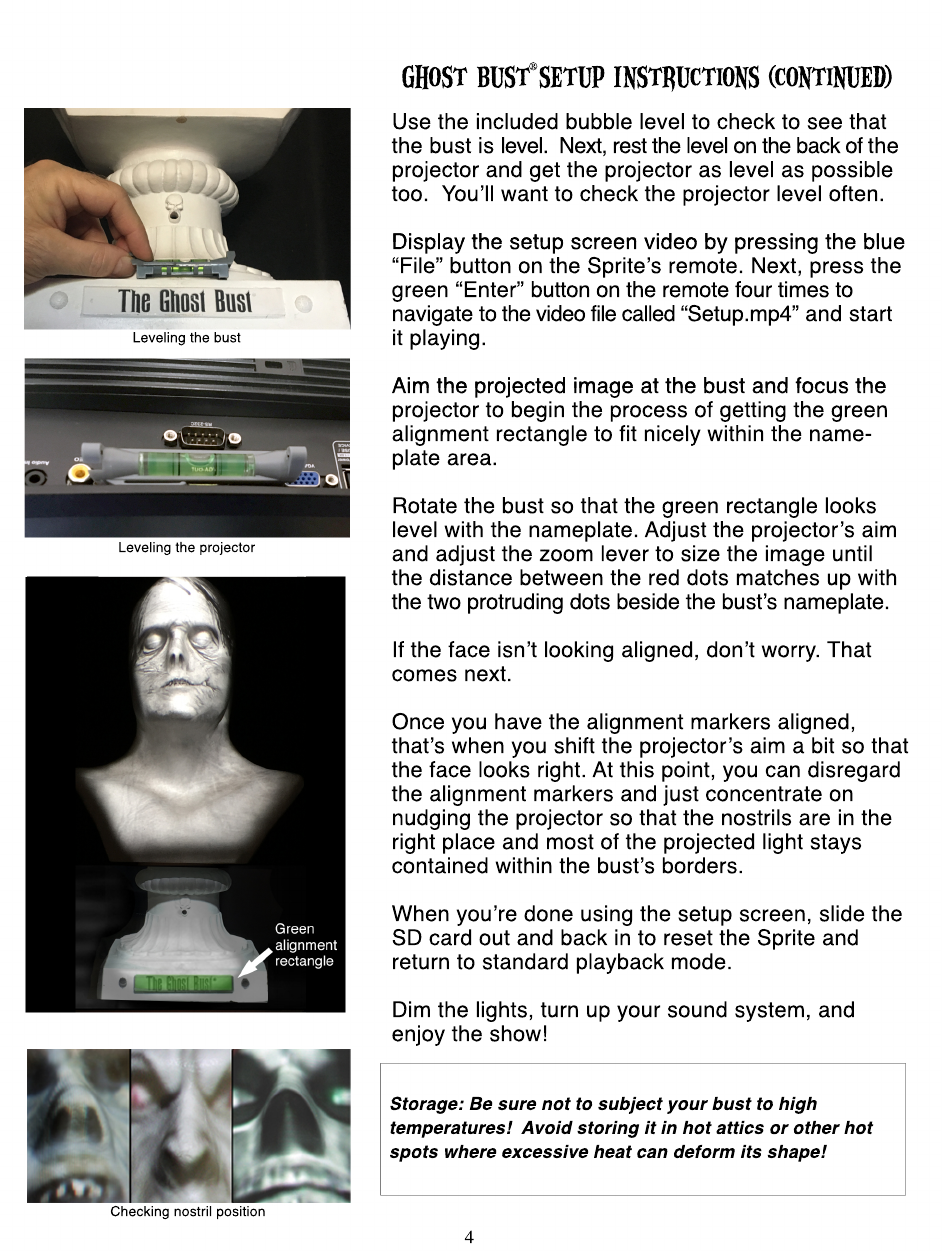
Use the included bubble level to check to see that
the bust is level. Next, rest the level on the back of the
projector and get the projector as level as possible
too. You’ll want to check the projector level often.
Display the setup screen video by pressing the blue Display the setup screen video by pressing the blue
“File” button on the Sprite’s remote. Next, press the
green “Enter” button on the remote four times to
navigate to the video file called “Setup.mp4” and start
it playing.
Aim the projected image at the bust and focus the Aim the projected image at the bust and focus the
projector to begin the process of getting the green
alignment rectangle to fit nicely within the name-
plate area.
Rotate the bust so that the green rectangle looks
level with the nameplate. Adjust the projector’s aim
and adjust the zoom lever to size the image until
the distance between the red dots matches up with
the two protruding dots beside the bust’s nameplate.
If the face isn’t looking aligned, don’t worry. That
comes next.
Once you have the alignment markers aligned, Once you have the alignment markers aligned,
that’s when you shift the projector’s aim a bit so that
the face looks right. At this point, you can disregard
the alignment markers and just concentrate on
nudging the projector so that the nostrils are in the
right place and most of the projected light stays
contained within the bust’s borders.
When you’re done using the setup screen, slide the When you’re done using the setup screen, slide the
SD card out and back in to reset the Sprite and
return to standard playback mode.
Dim the lights, turn up your sound system, and
enjoy the show!
Storage: Be sure not to subject your bust to high
temperatures! Avoid storing it in hot attics or other hot
spots where excessive heat can deform its shape!
Leveling the projector
Checking nostril position
Leveling the bust
Ghost Bust Setup Instructions (continued)
®

5
“Puppet Mode”: Use the Space Bar to Talk
To make the Ghost Bust appear as if he’s talking, press the space bar in time with each syllable
you speak. With a little practice, you’ll be puppeting the Ghost Bust like a pro!
Return Key:
At any moment, you can press the Return key to make the Ghost Bust do a little something
special, based on his character. Monsters let out a scream, Einstein rips a Raspberry, Clue Master
rolls his eyes, etc.
rolls his eyes, etc.
Tab Key:
Press the Tab key to show or hide the setup menu that includes the list of keyboard shortcuts.
“Audio Mode”: Use the Number and Letter Keys to Trigger Custom Audio Files
Ghost Bust Live includes the ability to play up to 36 pre-recorded audio files to automatically control
the Ghost Bust’s jaw, enabling you to create your own custom routines quickly and easily. The files
can be created using audio recording and editing software downloaded from the internet in order to
have the Ghost Bust say whatever you deem appropriate for your particular haunt or escape room.
have the Ghost Bust say whatever you deem appropriate for your particular haunt or escape room.
Inside the audioFiles folder, you’ll find 36 sample audio files that are there as placeholders and
to allow you to try this feature out with some various pre-recorded recordings. When you go to
create your own customized audio files, keep in mind the following tips:
• Files must be saved as .mp3 files and named “audio1.mp3”, or “audio2.mp3”, etc
• Files must be saved in the “audioFiles” folder, and the folder must be kept in the
same location as the “Ghost Bust Live” application file
•If you plan on adding music, sound effects, or reverb/echo, add them to the RIGHT channel
only. Leave the LEFT channel dry with only voice (no effects). Otherwise, the character’s
mouth will be triggered by those other non-vocal sounds/effects.
• If your audio editing program has a ”Normalization” function, use it to Normalize the audio
to -1db so that it’s consistently nice and loud.
• If you’d like a professional recording created using a script you’ve written, no problem!
Visit nightfrights.com/haunt-and-escape-room-audio to order your own custom recording.
Ghost Bust Live Controls
Table of contents


