Night Owl FTD2 Series User manual

2-Way Audio DVR & Cameras
Use Existing DVR Cables*
INNOVATIVE TECHNOLOGY
2-Way Audio Recorder User’s Manual
Support.NightOwlSP.com

What Models Does This Manual Cover?
FTD2 Series
DVR Component Model #: DVR-FTD2-161
Camera Component Model #: CM-FTD4LS-B
CM-FTD4LS-D
FTD4 Series
DVR Component Model #: DVR-FTD4-8
DVR-FTD4-81
DVR-FTD4-82
Camera Component Model #: CM-FTD4LS-B
CM-FTD4LS-D
FTD8 Series
DVR Component Model #: DVR-FTD8-8
DVR-FTD8-81
DVR-FTD8-82
DVR-FTD8-16
DVR-FTD8-161
DVR-FTD8-162
Camera Component Model #: CM-FTD8LS-B
CM-FTD8LS-D

iii
We welcome you to the Night Owl family and thank you for choosing us to help safeguard
your home or business. All of our products are proudly designed and engineered right
here in the U.S.A. Night Owl complies with the U.S. government’s stance on protecting
our nation from companies that violate human rights and threaten our national security.
Unlike other brands, we are not on any national security threat lists, nor do we do
business with companies that are. We prioritize your privacy and safety because we value
both as much as you do.
Some Basic Info
This manual covers the basic setup and functionality of our new 2-way audio recorders.
It will walk you through adding compatible cameras to your recorder using our new
Bluetooth®Wireless Setup, as well as your recorder’s menu options. With Bluetooth®,
setup is now easier than ever. A TV or monitor is no longer required. Once your system’s
hardware is connected and powered on, you can quickly nish the setup right from the
app on your Smart Device. If you prefer, you can still connect a TV or monitor and follow
along, it’s just not required.
Thank you for choosing Night Owl Security!

Is Internet Required?
While Internet is not required, it is STRONGLY RECOMMENDED. Without an Internet
connection, you can still use your device’s Bluetooth®Wireless Setup to get the product
easily setup and congured. However, you will not be able to view or access your system
remotely from a Smart Device or computer.
We STRONGLY RECOMMEND you connect your recorder to the Internet, at least for initial
setup, to search for the latest rmware. Keeping your rmware updated is vital for the
overall health of your system and allows our technical support team to assist you, should
you need support. If your recorder’s rmware is not up to date, our technical support
team will NOT be able to help. To ensure you are always running the latest rmware, we
encourage customers to stay connected to the Internet. If you are NOT connecting your
recorder to the Internet, please manually upgrade your rmware (See Firmware Version
section of this manual).
Warranty and Additional Help
By purchasing a Night Owl product, you receive a one (1) year warranty covering
manufacturing defects in material and workmanship. Please see the warranty section
of this manual for exclusions and additional details. Not all features and capabilities are
shared across all models. You may see features which are not applicable. Additionally, this
manual contains screen images that may not exactly match those on your TV/Monitor/
Smart Device.
System Requirements (for remote viewing)
Please be sure that your PC / MAC® complies with the following specications:
• PC Operating System: Windows®10 and above
• MAC Operating System: MAC OS X®10.9 and above
Please be sure that your mobile device complies with the following specications:
• Android™: 8.0 and above
• iOS®: 12.4 and above
We provide a database of self-help material on your product’s support
page on our support site. Simply visit Support.NightOwlSP.com and
enter your product’s Series (found on the support sticker on top of your
recorder) into the search bar. In addition to warranty and technical
support benets, you have access to our vast library of free instructional
How-to Videos. For all support videos, go to www.youtube.com/
nightowlsp to access Night Owl’s YouTube page (or click the image).
IMPORTANT: WHILE WE MAKE EVERY EFFORT TO PROVIDE ACCURATE INFORMATION,
INACCURACIES OR ERRORS MAY OCCUR. WE RESERVE THE RIGHT TO MAKE
CHANGES, CORRECTIONS, AND/OR IMPROVEMENTS TO THE INFORMATION
AND TO THE PRODUCTS, AT ANY TIME WITHOUT NOTICE.
iv

v
Table of Contents
FCC Warnings . . . . . . . . . . . . . . . . .vi
Safety Instructions . . . . . . . . . . . . . . 1
Initial Setup . . . . . . . . . . . . . . . . . . 2
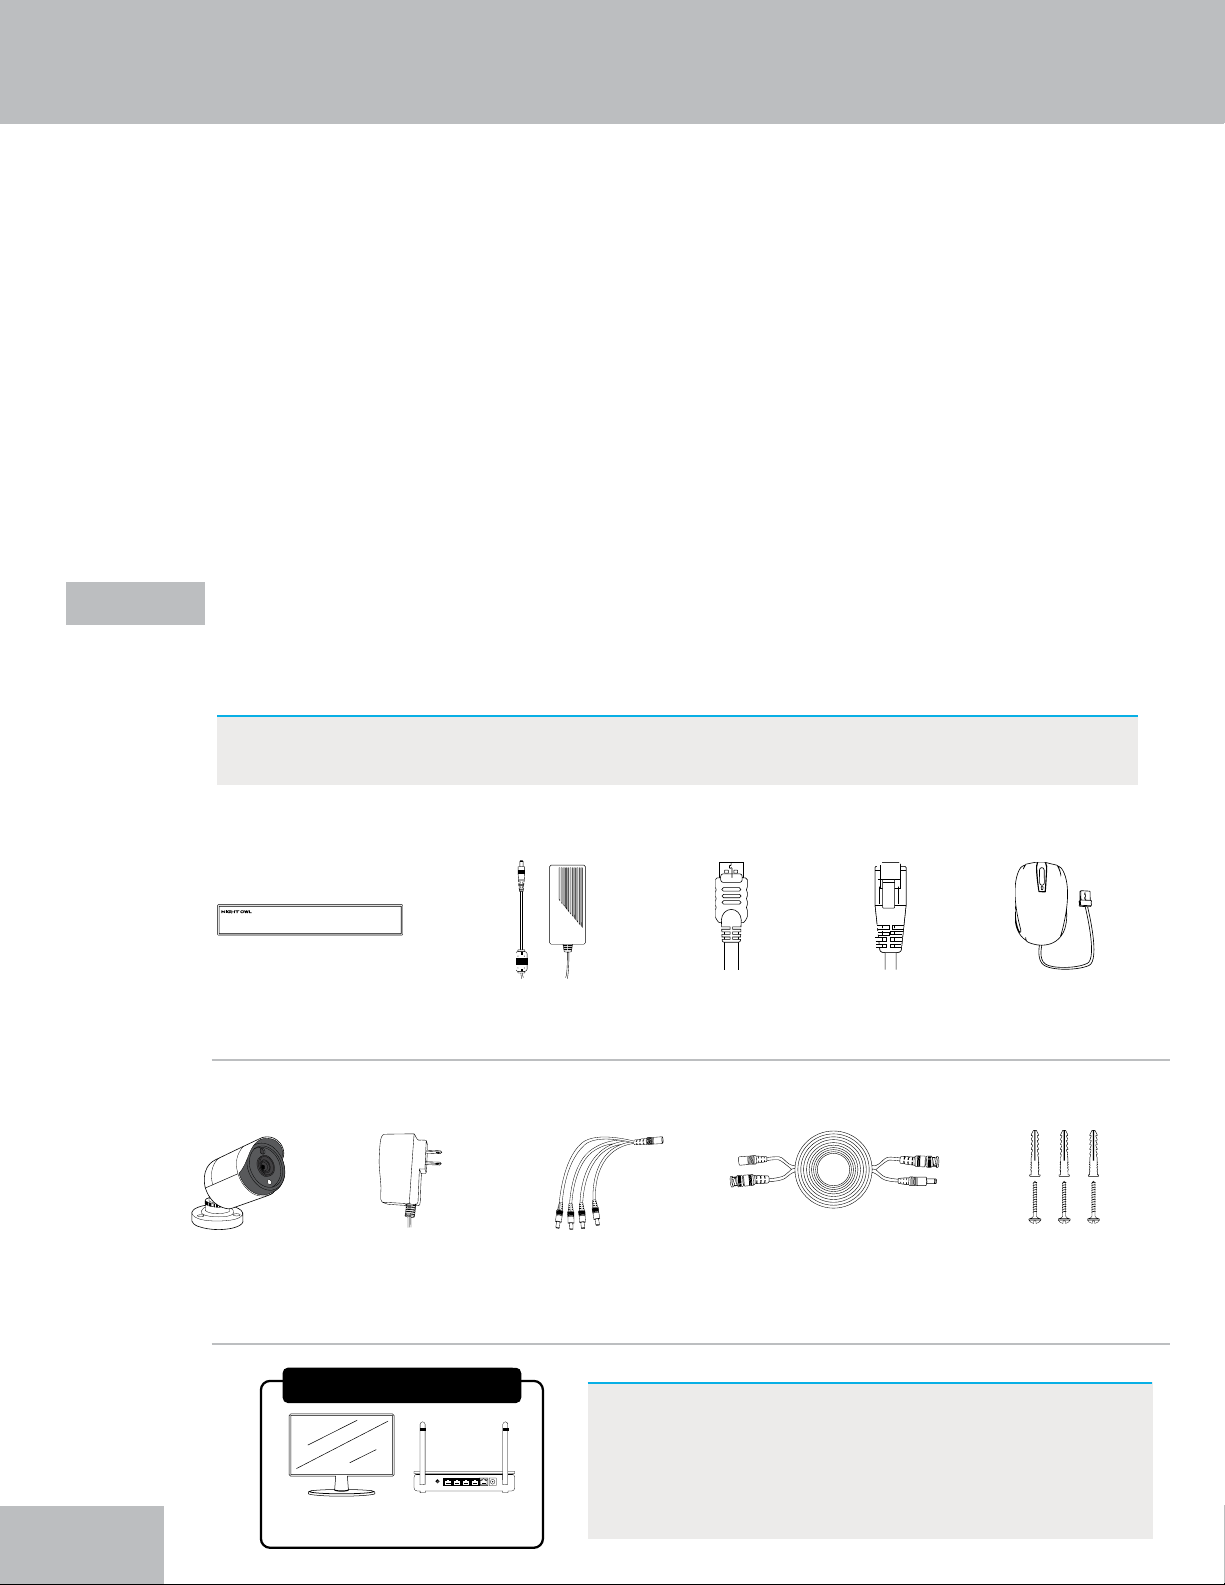
Step 1. Verify Your Package Contents . . . . . . . 2
Recorder Description . . . . . . . . . . 3
How to Use a Wired USB Mouse . . . . . . 4
Step 2. Download the Night Owl Protect App and Create
and Verify Your Account . . . . . . . . . 4
Step 3. Connect Your System (Hardware) . . . . . . 6
Step 4. Congure Your System . . . . . . . . . 9
Option 1: Easy Bluetooth®Wireless Setup . . . 9
Option 2: Manual Setup (TV / Monitor) . . . . 13
Step 5. Install the Cameras. . . . . . . . . . . 16
Plan Your Installation . . . . . . . . . . 16
Install the Cameras . . . . . . . . . . . 16
Step 6. Additional Cameras . . . . . . . . . . 17
Adding Additional Wired BNC Cameras . . . . 17
Wi-Fi Expandability . . . . . . . . . . . 17
Compatibility . . . . . . . . . . 18
Connectivity . . . . . . . . . . . 19
Log in from a TV or Monitor . . . . . . . . 24
Log In with Night Owl Protect Account . . . . . . . 24
Log In with Local Password . . . . . . . . . . . 25
Log In Information Icon . . . . . . . . . . . . 26
Live View (Navigation Bar) . . . . . . . . . 27
Shut Down . . . . . . . . . . . . . . . . . 28
View Layouts . . . . . . . . . . . . . . . . 29
Playback. . . . . . . . . . . . . . . . . . 30
Exporting Recordings for
Long-Term Storage . . . . . 32
Formatting a USB Flash Drive or External Hard Drive . . 32
Exporting / Saving a Recording . . . . . . . . . . 34
System Info . . . . . . . . . . 36
About Menu . . . . . . . . . . . . . . . . 36
Device Name . . . . . . . . . . . . . 37
Firmware Version . . . . . . . . . . . 37
Language . . . . . . . . . . . . . . 39
Monitor Resolution . . . . . . . . . . . 39
Date and Time Menu . . . . . . . . . . . . . 40
Camera Menu . . . . . . . . . . . . . . . 41
Recording Settings . . . . . . . . . . . 43
Voice Alerts / Siren . . . . . . . . . . . 43
Copy Settings . . . . . . . . . . . . . 44
Remove Camera Option . . . . . . . . . 44
Account Menu. . . . . . . . . . . . . . . . 45
Storage Menu . . . . . . . . . . . . . . . . 46
Diagnostics Menu . . . . . . . . . . . . . . 47
Network Menu . . . . . . . . . . . . . . . 49
Help and Support Menu . . . . . . . . . . . . 51
Reset Menu . . . . . . . . . . . . . . . . 52
Resetting / Forgot Your Password . . . . 54
Reset Your Password from the Night Owl Protect App . . 54
Reset Your Password from the Web Portal . . . . . . 54
Forgot Your Local Password (Recorder Not Connected to
the Internet) . . . . . . . . . . . . . 55
Appendix. . . . . . . . . . . . . . . . . . . 56
Recorder Status Icon Denitions . . . . . . . . . 56
Channel Status Icon Denitions. . . . . . . . . . 56
Glossary . . . . . . . . . . . . . . . . . 57
User Information. . . . . . . . . . . . . . . 58
Warranty. . . . . . . . . . . . . . . . . . . 59
Table of Contents

vi
FCC Warnings
FCC
This device complies with Part 15 of the FCC Rules. Operation is subject to the
following two conditions: (1) this device may not cause harmful interference and (2)
this device must accept any interference received, including interference that may
cause undesired operation.
FCC Compliance Statement
These limits are designed to provide reasonable protection against frequency
interference in residential installation. This equipment generates, uses and can
radiate radio frequency energy and if not installed or used in accordance with the
instructions, may cause harmful interference to radio communication. However, there
is no guarantee that interference will not occur in television reception, which can be
determined by turning the equipment o and on. The user is encouraged to try and
correct the interference by one or more of the following measures:
•Reorient or relocate the receiving antenna.
•Increase the separation between the equipment and the receiver.
•Connect the equipment into an outlet on a circuit dierent from that to which
the receiver is connected.
•Consult the dealer or an experienced radio/TV technician for help.
CAUTION
The Federal Communications Commission warns the user that changes or modications to
the unit not expressly approved by the part responsible for compliance could void the user’s
authority to operate the equipment.

1
Safety Instructions
Use the provided power adapter.
Do not use this product with a power source that applies more than the specied voltage.
Never insert metal into the recorder case or its openings.
Inserting metal into the recorder case may cause electric shock.
Do not operate in wet or dusty areas.
Avoid placing the recorder in areas such as a damp basement or dusty attic.
Do not expose the recorder to rain or use near water.
If the recorder accidentally gets wet, unplug it and contact technical support immediately.
Keep product surfaces clean and dry.
To clean the outside case of the recorder, use a lightly dampened cloth. Do not use
cleaning solutions or solvents.
Do not install near any heat sources.
Do not install the recorder near any heat sources such as stoves, heat registers, radiators,
or electronics (including ampliers) that produce heat.
Unplug the recorder when moving it.
Make sure that the recorder is unplugged before you move it. When moving this device,
be sure to handle it with care.
Make sure there is good air circulation around the recorder.
This recorder uses an internal hard drive, that generates heat during operation for video
storage. Do not block the vents on the recorder as these vents reduce the generated heat
while the system is running. Place this product in a well-ventilated area.
Do not attempt to remove the top cover.
If you observe any abnormal operation, unplug the recorder immediately and contact
technical support. Do not attempt to open the recorder to diagnose the cause of the
problem. Removing the cover may void your warranty.
Handle the recorder carefully.
If you drop the recorder on any hard surface, it may damage the device. If the recorder
doesn’t work properly due to physical damage, contact an authorized dealer for repair.
It is recommended to use your recorder with an uninterruptible power supply (UPS).
Connecting your recorder and cameras to a UPS allows continuous operation even during
power outages. The run-time duration will depend on the rating of the UPS used.
CAUTION
You may be subjected to severe electrical shock if you remove the cover of the recorder.

Initial Setup
This portion of the manual will cover the initial setup and conguration of your
system. Again, our Bluetooth®Wireless Setup provides an A-Z setup right from the
convenience of your Smart Device without the need for a TV or monitor.
Night Owl STRONGLY RECOMMENDS that you complete the following sections in
the order that they are listed to quickly and easily set up your system:
• Step 1. Verify Your Package Contents
• Step 2. Download the Night Owl Protect App and Create and Verify Your Account
• Step 3. Connect Your System (Hardware)
• Step 4. Congure Your System
• Step 5. Install the Cameras
• Step 6. Additional Cameras
Package Contents - DVR / Accessories
Verify Your Package Contents
Before you begin to install your system, ensure you can identify all of the parts
listed in this section. Images may vary slightly based on your model number.
Step 1.
IMPORTANT: The exact components of your system, images and quantities may
vary depending on your model number.
2
DVR
(x1)
Camera(s)
DVR Power Adapter
(x1)
Camera Power
Adapter(s)
(1 per 4 Cameras)
6 ft. HDMI
(x1)
Power
Splitter(s)
(1 per 4 Cameras)
6 ft. Ethernet
(x1)
60 ft. Video/
Power Cables
(1 per Camera)
USB Mouse
(x1)
Mounting
Hardware
(Varies by Model)
Wired BNC Camera / Accessories
RESET LAN1 LAN2 LAN3 LAN4 WAN
Items Not Included NOTE: If connecting to a TV or Monitor (Not
Required), it must have a minimum
resolution of 1080p HD. Use all of the
included Night Owl accessories. Third-party
accessories may not work correctly.
Monitor
(Not required for
Bluetooth®Setup)
Router / Network
Access Point

Recorder Description
1. Video In (Wired BNC Cameras): Connect your cameras to one of the “Wired Cameras”
Video Input Ports using the provided video power cable. The number of ports will vary
based on your model number.
NOTE: The recorder automatically detects the camera. Before turning the
recorder on, make sure the cameras are connected to the recorder and a
power source.
2. HDMI: While not required, you may connect the recorder to a TV or monitor using the
provided HDMI cable for viewing and system access.
3. USB Ports: Connect a USB mouse to a USB port to navigate the recorder’s settings
when connected to a TV or monitor. Or connect a USB ash drive to a USB port for
video backup.
NOTE: DO NOT CONNECT two USB mice or two USB ash drives to the recorder.
4. LAN (Strongly Recommended): Connect your recorder to the Internet using an
Ethernet cable. Again, while not required, this is strongly encouraged to get the full use
and benet of your new system. You can connect the Ethernet cable to any working
network access point or router.
5. Power Input: Connect the recorder power adapter to this port to power the recorder.
NOTE: Connect and test all cameras locally before you install in their nal
location to ensure that all components function properly.
6. Bluetooth®Indicator Light: Once the recorder is powered on, this light should turn
blue to indicate that the recorder’s Bluetooth® is ready for use. The light will ash blue
when no device is linked and turn solid blue when a device is paired to the recorder.
1 2 3 4 5 6
3

How to Use a Wired USB Mouse
Left / Select Button Right / Menu ButtonScroll Wheel
Live Viewing:
Double-click the left button on any camera view in split-screen mode to bring it to full
screen display. Double-click again to return to split-screen mode. Right-click to show
the Tool Bar at the bottom of the screen. Left click on the Tool Bar or Menu to access
the device’s features.
In Setup:
Left click to make a selection. Right-click to cancel setup or return to the previous
screen (select models only).
To Enter Values:
Move the cursor to a blank eld and click the mouse. A virtual keyboard will appear
which supports numbers, letters, and symbols. The Shift function will access symbols
in addition to upper case letters.
Download the Night Owl Protect App and Create and Verify
Your Account
Step 2.
IMPORTANT: Night Owl STRONGLY RECOMMENDS that you download the Night
Owl Protect App and create an account. This will allow you to use
this system’s Bluetooth® Wireless Setup (preferred setup method),
which makes setting up the system much quicker and easier. A TV
or monitor is no longer required with this start-to-nish app-based
security. Once the system has been congured, you can use the
app to remotely access and view your system right from your Smart
Device or computer, from anywhere! An Internet connection is
required for remote access. With Single Sign-On you can conveniently
access multiple devices with one set of login credentials and with
2-Step Verication your data will be kept secure.
4
If you will be accessing your new Night Owl system from a TV or monitor, you will need
to connect the provided wired USB mouse. The mouse lets you navigate the menus
and adjust settings that appear on your TV or monitor screen.
IMPORTANT: To access the system from a
TV or monitor, you must use a
wired USB mouse. We cannot
guarantee compatibility or
functionality with wireless mice.

5
1. Download the Night Owl Protect App from the Apple App or
Google Play Store. If you have previously downloaded the
app and created an account, proceed to Initial Setup.
2. Follow the prompts on the Night Owl Protect App to create
your account. For security purposes, a verication code will
be sent to your mobile phone to verify the account being
created.
3. Finish creating your account and create a personal PIN
number that you will enter upon each login to the app.
4. Ensure you verify your email address. This will register you
in our technical support database, streamlining the support
process, to ensure we can quickly and eciently assist you
should you need help. It will also generate an email to you
with your product’s support links. To verify, tap Account >>>
your name >>> Email >>> and then follow the on-screen
prompts.
6. When nished, proceed to Step 3. Connect Your System (Hardware)
to begin connecting the components of your system.
5. For more information on the Night Owl Protect App,
click here: https://support.nightowlsp.com/hc/en-us/
articles/360044127354-Night-Owl-ProtectMobile-App-CMS

6
Connect Your System (Hardware)
Now that you have veried and familiarized yourself with the package contents of
your new system, it is time to get the hardware connected.
Step 3.
1. Visit Support.NightOwlSP.com
A. Plug one end of the included HDMI cable
into the HDMI port on the back of the DVR.
Plug the other end of the cable into your
TV or Monitor.
B. Plug the USB mouse into the USB port on
the back of the DVR.
3. Click “How to Setup your System”
2. Enter your Series (located on the support sticker on the top of your
recorder) into the search bar
IMPORTANT: If you will be using a TV or monitor for setup or viewing your cameras
(OPTIONAL), you will need to perform the two steps below:
TIP: Are you more of a visual person? If so, watch our
simple step-by-step instructional video covering
initial setup! To begin watching:
NOTE: To view cameras, TV or Monitor must be tuned to the same input the HDMI
is plugged into.
Click Here

7
Perform the following steps to get the rest of the hardware setup!
1. Plug one end of the included Ethernet cable
into the LAN port on the back of the DVR.
NOTE: Night Owl recommends
connecting to the Internet for
the best user experience.
2. Plug the other end of the Ethernet cable into
a port on the back of your router / network
access point.
NOTE: As long as your DVR is hardwired
using Ethernet cabling, you can
connect to any working network
access point. See your product
manual for more details.
4. Connect the video / power cable labeled TO
DVR ONLY to an open video input on the DVR.
NOTE: Make sure you twist and lock
BNC connectors.
3. Connect the end of the camera’s cable to
the end of a video / power cable labeled TO
CAMERA ONLY.
RESET LAN1 LAN2 LAN3 LAN4 WAN
Router / Network Access Point
(Not Included)
From Camera Video / Power Cable
IMPORTANT: BEFORE installing, connect
and test each camera locally to
conrm they function properly.
To CAMERA
To C
A

6. Connect the power splitter to the camera
power adapter and plug the adapter into a
surge protector or Uninterruptible Power
Supply (UPS).
7. Connect the DVR power adapter to the Power
Input on the rear of the DVR.
8. Plug the DVR power adapter into a surge
protector or Uninterruptible Power Supply
(UPS). Some systems beep upon booting up.
NOTE: Make sure the UPS or surge
protector is switched ON.
Camera Power
Adapter
Power
Splitter Surge Protector
(Not Included)
Surge Protector
(Not Included)
8
5. Connect the red female power leads of the
video / power cables to the male power
splitter ends.Make sure you twist and lock
BNC connectors.
Power Cable
ConnectorsConnectors
Power Splitter

9
IMPORTANT: If you have a TV or monitor connected, you will see
setup information appear on the screen as you
complete the Bluetooth®setup. A TV or monitor is not
required for this setup but can be used for viewing.
Congure Your System
Now that you have the Night Owl Protect App downloaded, have created an account
and have your system’s hardware connected, it’s time to congure your system.
Again, we STRONGLY RECOMMEND using the preferred Option 1: Easy Bluetooth®
Wireless Setup.This method is quick and easy and does not require you to connect
a TV or monitor or USB mouse. Instead, it lets you set up the recorder right from the
app using Bluetooth®.
You can still connect to a TV or monitor, it’s just not required. If you do not wish to use
Bluetooth®, you may perform an Option 2: Manual Setup (TV / Monitor).View the
options below based on your preference.
Step 4.
Option 1: Easy Bluetooth®Wireless Setup

10
1. Sign In to the Night Owl Protect App.
3. With Bluetooth®enabled and the recorder
powered on, the app will use Bluetooth®to
scan for available devices that can be added.
The app will show a pop up asking if you
want to Add a New Device. Tap “Continue.”
4. Take a moment to name your new recorder.
For instance, if this system is for your home,
you could name it Home Security. Whatever
you name it is how it will appear in the app.
2. If your Smart Device’s (smartphone / tablet)
Bluetooth®is not enabled, you will be asked
to allow access.
NOTE: The screens in these steps may
vary slightly based on whether
you are using an iOS or Android
device. If a step is substantially
dierent or if the step only
applies to iOS or Android, we
will let you know.

5. The app will now pair to your recorder using
Bluetooth®.
6. You may now proceed through the startup wizard right from the convenience of your
Smart Device. This process is simple! Just follow the prompts in the app and you will be
done in no time. Here are just a few screens you will see.
IMPORTANT: If you have not connected your recorder to the Internet, you
will not be able to access many features or update the rmware
from the app. We STRONGLY RECOMMEND connecting your
recorder to the Internet during the initial setup.
11

12
7. Now you will see a message stating the
device has been successfully added.
8. Tap “Live View” and enjoy live viewing,
playback, save and share and all the
additional features of your new system.
NOTE: If you have not connected your recorder
to the Internet, you will not be able to
live view or access your system remotely.
Additionally, your recorder’s rmware
will need to be manually updated (see
Firmware Version section of this manual). If
your rmware is not current, our technical
support agents cannot assist you.

13
Option 2: Manual Setup (TV / Monitor)
While not preferred, you may perform a manual setup with your recorder
connected to a TV or monitor. With this type of setup, you must connect your
recorder to your TV or monitor using HDMI and connect the provided wired USB
mouse. These steps are covered in Step 3. Connect Your System (Hardware). The
startup wizard will appear on-screen and is easy to follow. Pay close attention to the
following screens.
When you see this screen, click “Manual Setup (not recommended)” to proceed.
We STRONGLY RECOMMEND connecting your recorder to the Internet. Even if you
will not be remotely viewing your system using our app, the rmware still needs
to be updated. The rmware not only ensures system health, but also updates the
system with the latest and greatest features. Additionally, the rmware must be
updated to receive live technical support.

14
If your recorder is not connected to the Internet, you will see this screen. Again,
we STRONGLY RECOMMEND connecting to the Internet for initial setup. If you are
connected, please click “Try Again.” If not, click “Skip.”
If you continue to proceed through the startup wizard without connecting to the
Internet, you will need to create a local password. This is the password you will use
to log in to the recorder from a TV or monitor.
This manual suits for next models
12
Table of contents