Night Watcher NW750 User manual
THANK YOU
We appreciate the trust and confidence you have placed in NightWatcher through the purchase of this motorized LED flood light
with Wi-Fi camera. We strive to continually create quality products designed to enhance your home. Visit us online to see our full
line of products available for your home improvement needs. Thank you for choosing NightWatcher!
Model # NW750
WI-FI QUICK START GUIDE
MOTORIZED LED FLOOD LIGHT WITH WI-FI CAMERA
CAN WE HELP?
Questions, problems, missing parts? Before returning to the store please call NightWatcher Customer Service:
0845 900 6764
Or Email: support@nightwatchersecurity.eu
OS Windows 2000 / XP / Vista / 7/8/10 / MAC
Micro Memory card 1GB SD ~ 32GB SDHC (max) Class 4

2
Setting up your NW750
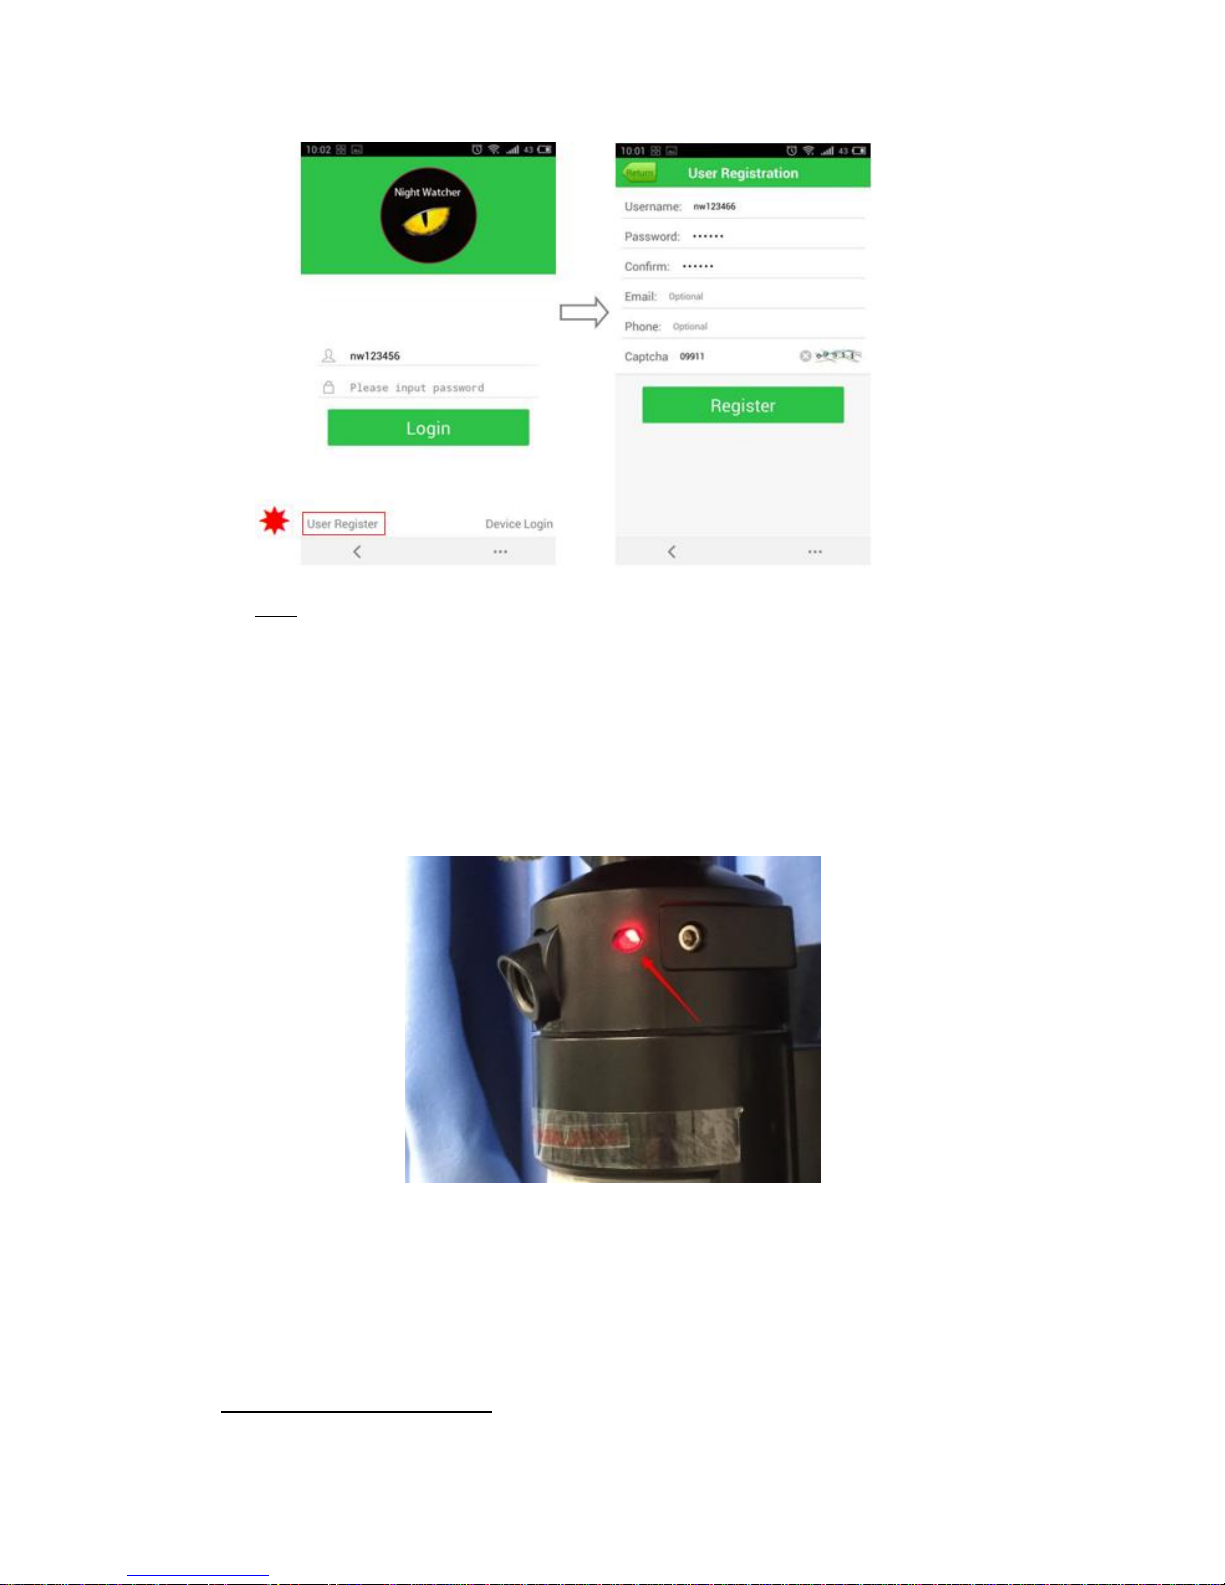
1、Power up the NightWatcher
Connect power to the NightWatcher NW750; a visible red LED light will indicate that
the power is on. (Please ensure you have removed the protective shipping tape)
Ensure that your NightWatcher NW750 is installed in a location where there is a
strong Wi-Fi signal.

3
iOS Setup Instructions
Download the NightWatcherPro APP
Ensure your Apple device is connected to the same Wi-Fi router which you plan to
connect to the NightWatcher NW750 and the Wi-Fi network is in range.
1、Open App Store; 2、Go to Search; 3、Input NightWatcherPro; 4、Click “Get”

4
3、Create User account. (NB: if you have already created a Username and
password, skip this step)
1、Open NightWatcherPro App 2、Select “Create account” 3、Enter details and
select “Register”
4、Add your new Camera
Ensure the red LED light is on to indicate that the unit is powered up.
[If not, please reset the NightWatcher NW750; refer to “How to reset the
NightWatcher”, page 13]
NB: The LED will light up in a RED colour solid state when the fixture is powered-up for the
first time. The LED will flash rapidly red when searching for the wireless router. The LED will
change to green when the light is paired with its dedicated router and the camera is visible
through the app screen.
5
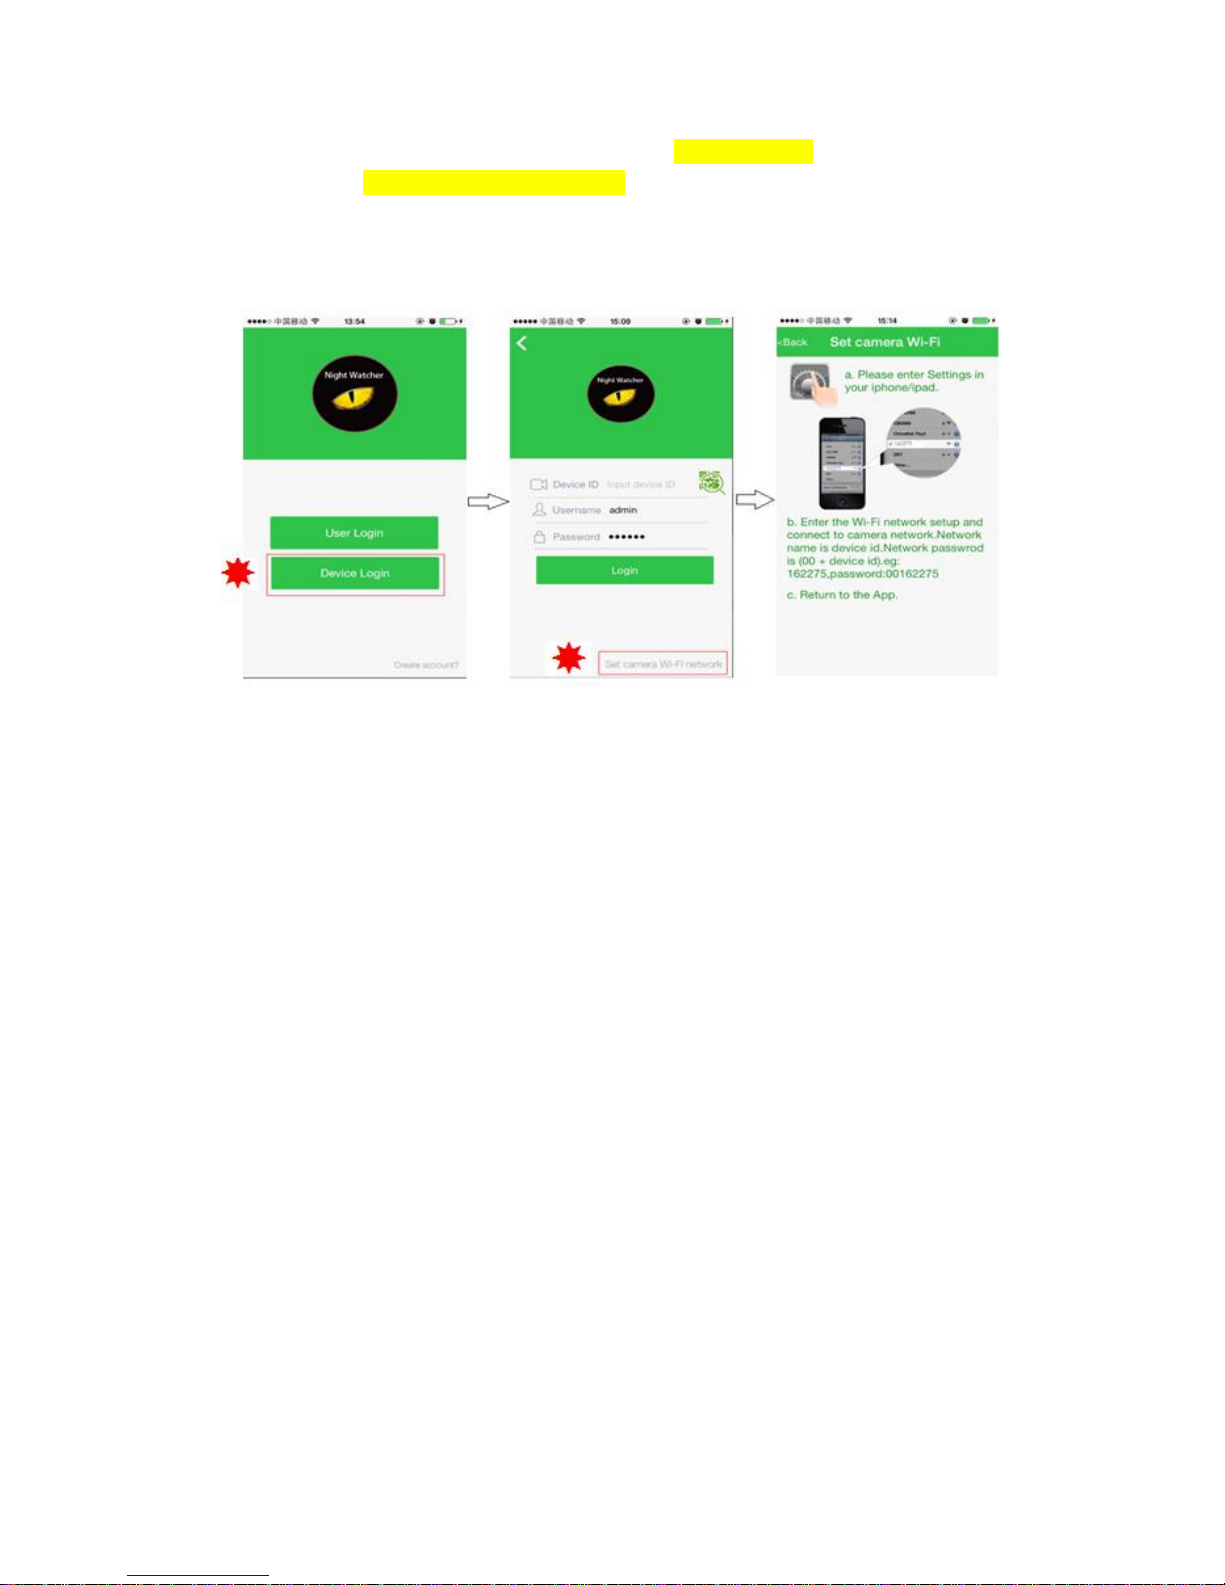
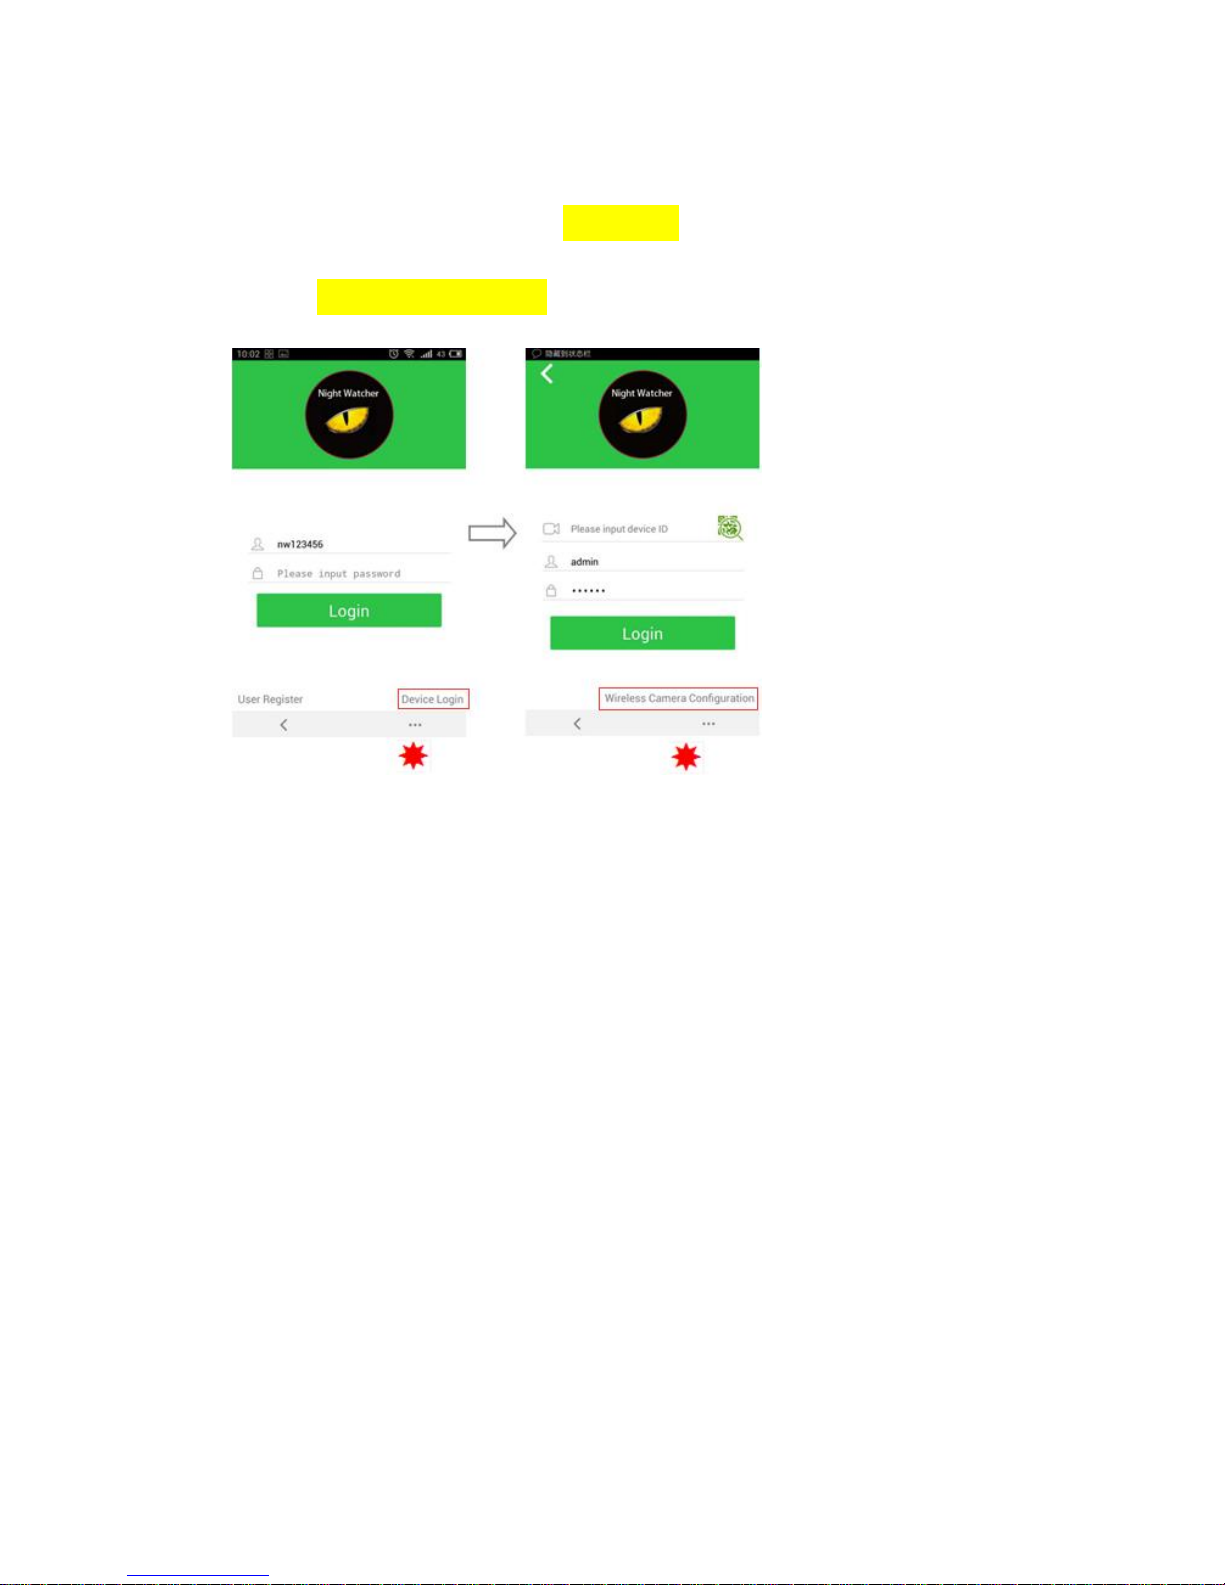
i. Open the NightWatcherPro App & select “Device Login”
ii. Select “Set camera Wi-Fi network”
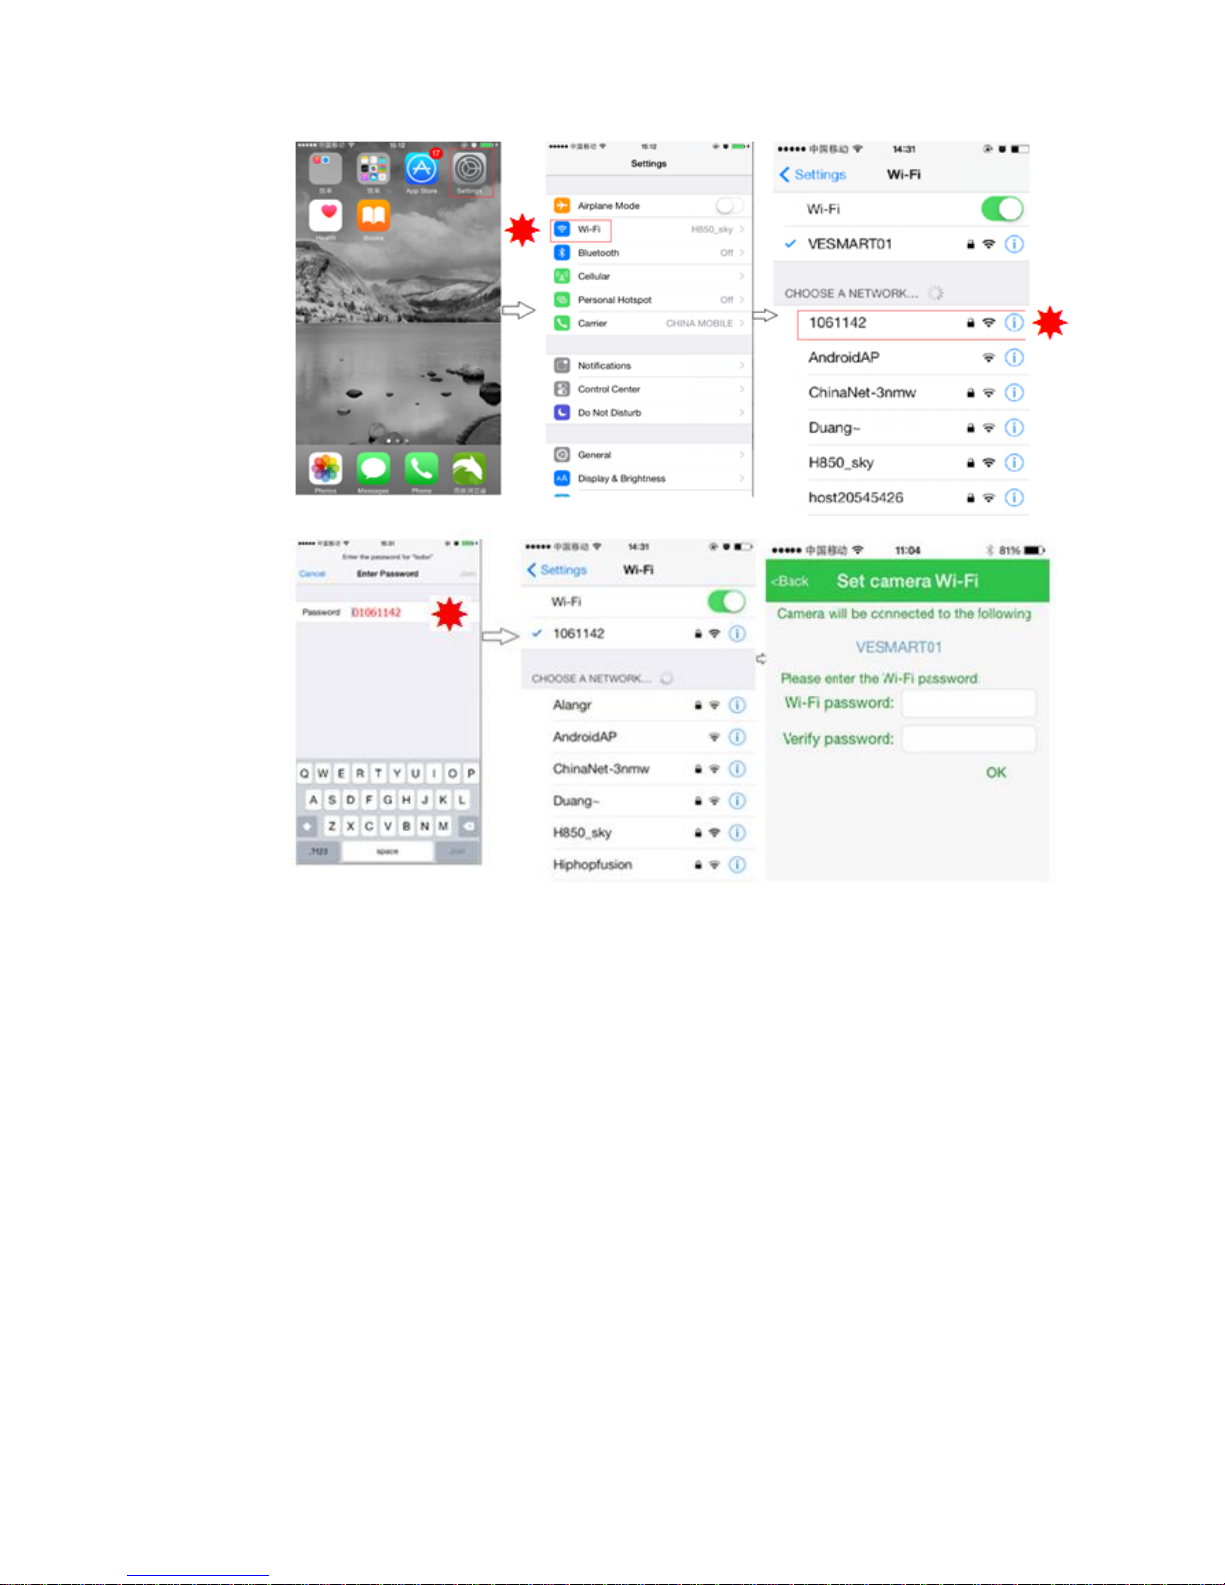
iii. Go to iPhone Settings and select Wi-Fi; this will display the available
networks under “CHOOSE A NETWORK”; make a note of the NightWatcher
Device ID which will display in the List; e.g. Device ID: 1061142
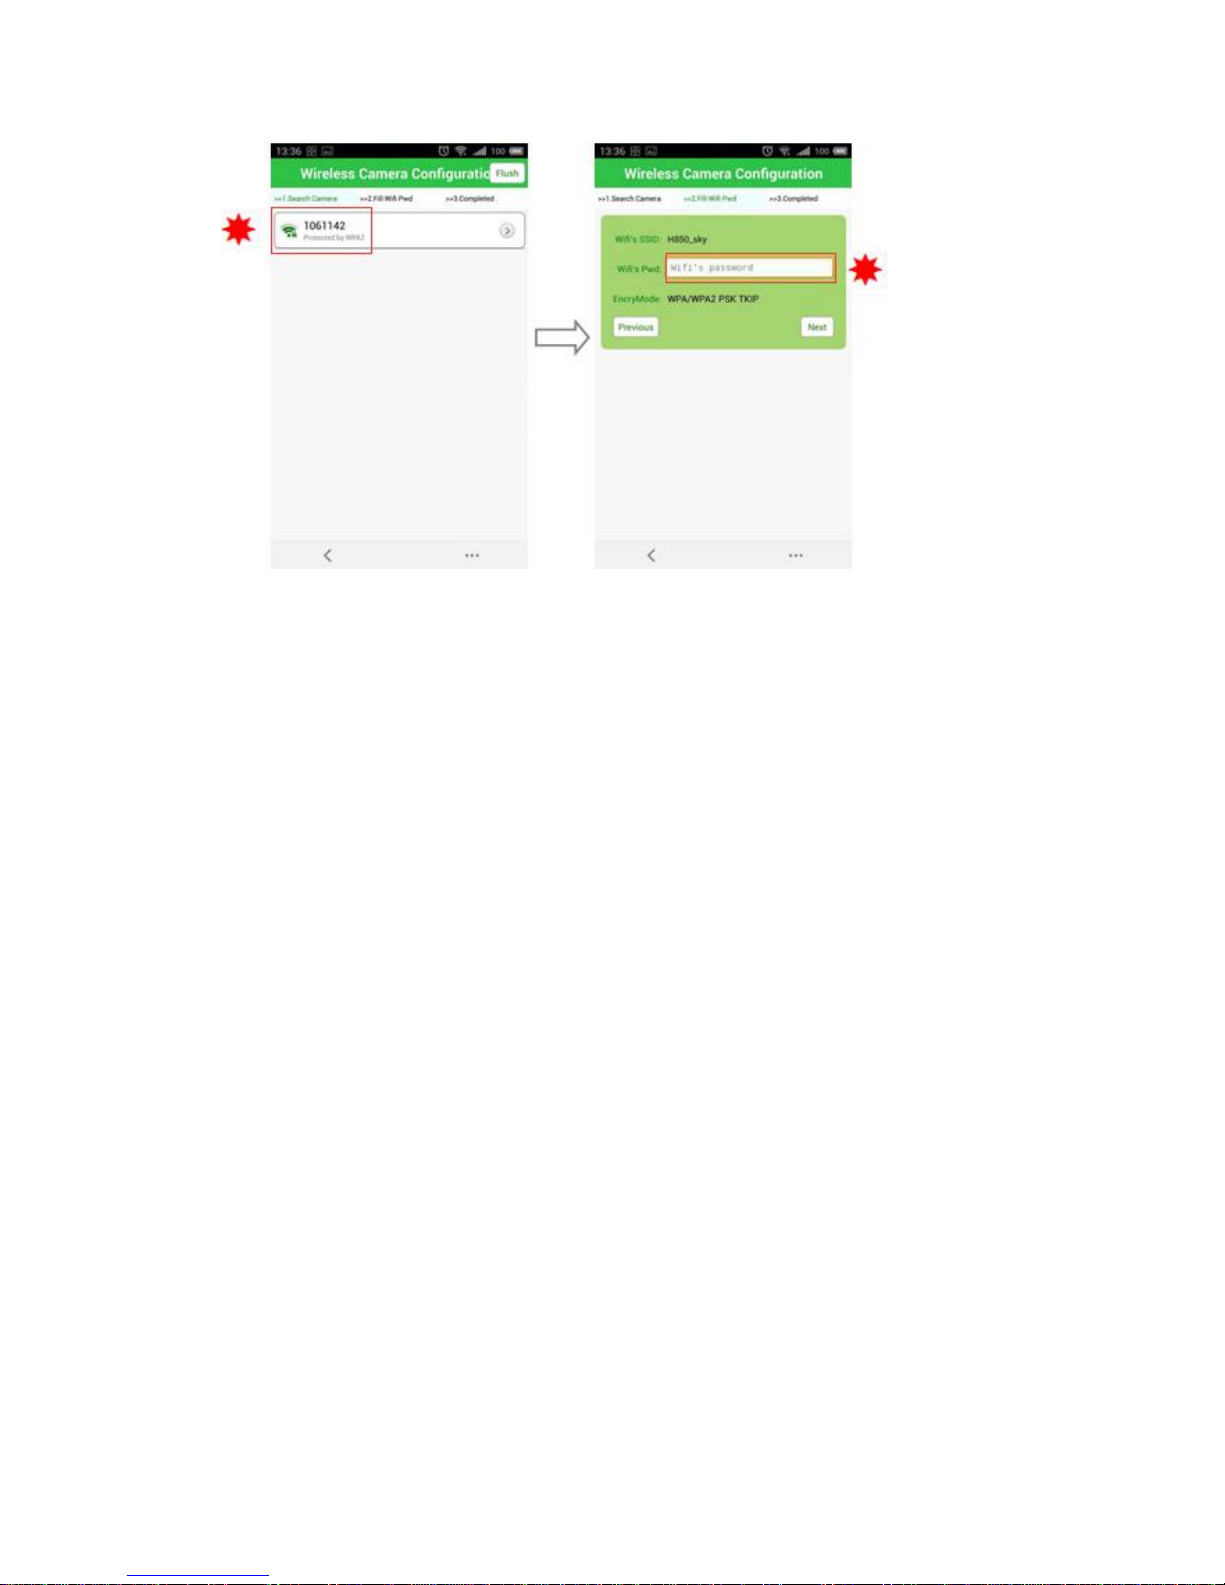
iv. Select the Device ID from the Network list and enter the password, which is
the device ID preceded by a “0”; i.e. 01061142. [password= 0+ID].
v. Return to the NightWatcher APP
vi. The APP will identify the Wi-Fi network; enter & verify the Wi-Fi network
password.
6
vii. Return to your phone Settings and reconnect to the Wi-Fi network.
7
How to connect your NW750 to the App
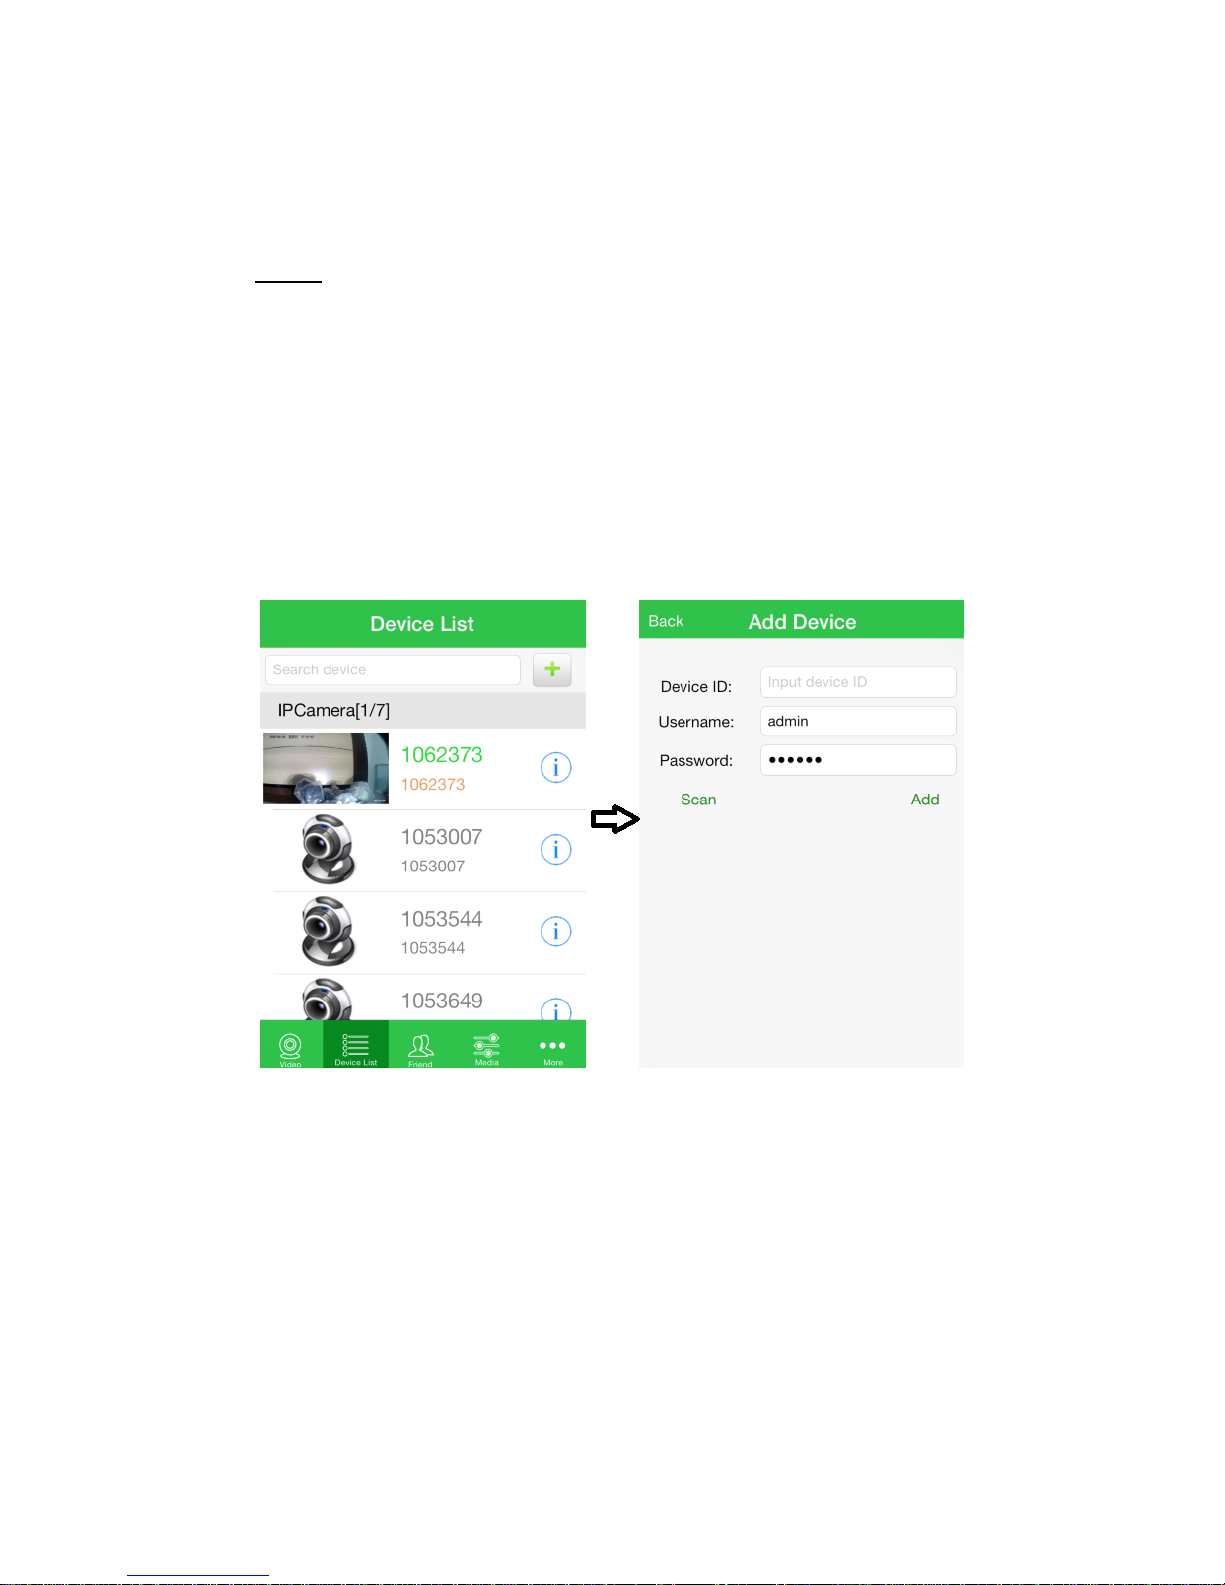
1. Restart the App and select “User Login”; enter your User name and Password.
2. Click “+” to add your camera; (top right of screen)
3. Enter the Device ID, which is the unique number for your NightWatcher NW 750,
noted at setup.
4. Enter the Username and Password;(Default Username: admin; Password:
123456)
5. Click Add.
8
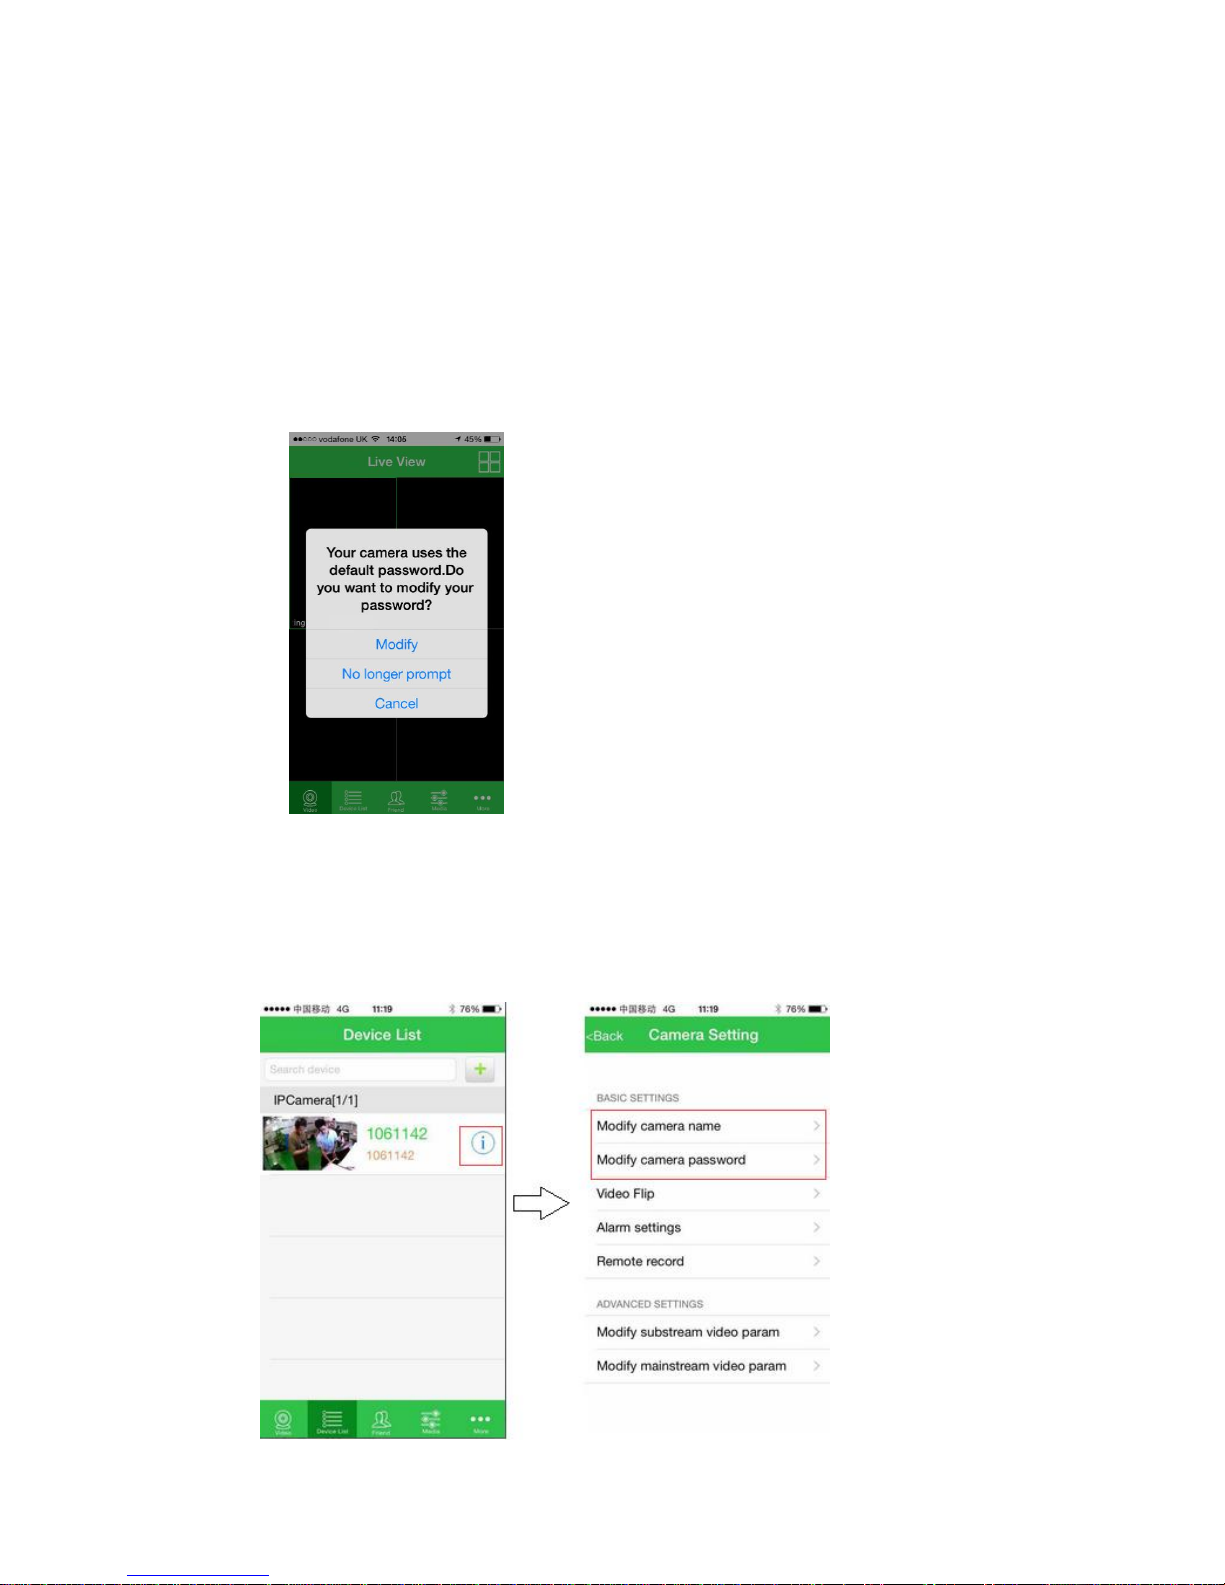
6. You will see a prompt to optionally change the default username/password
(Default Username: admin, password: 123456). N.B. Changing the default
username and password of the CAM will prevent other users accessing your
camera.
7. You can also change the camera Login Name and Password from the device
list.

9
8. To view your camera, return to the Device List and select from the list. The
viewing screen is divided into 4 to allow viewing of up to 4 cameras at the
same time. To enlarge the camera picture, double-click on the image to view
full-screen and rotate your device to adjust the orientation; i.e. horizontal or
vertical.

10
Common Functions
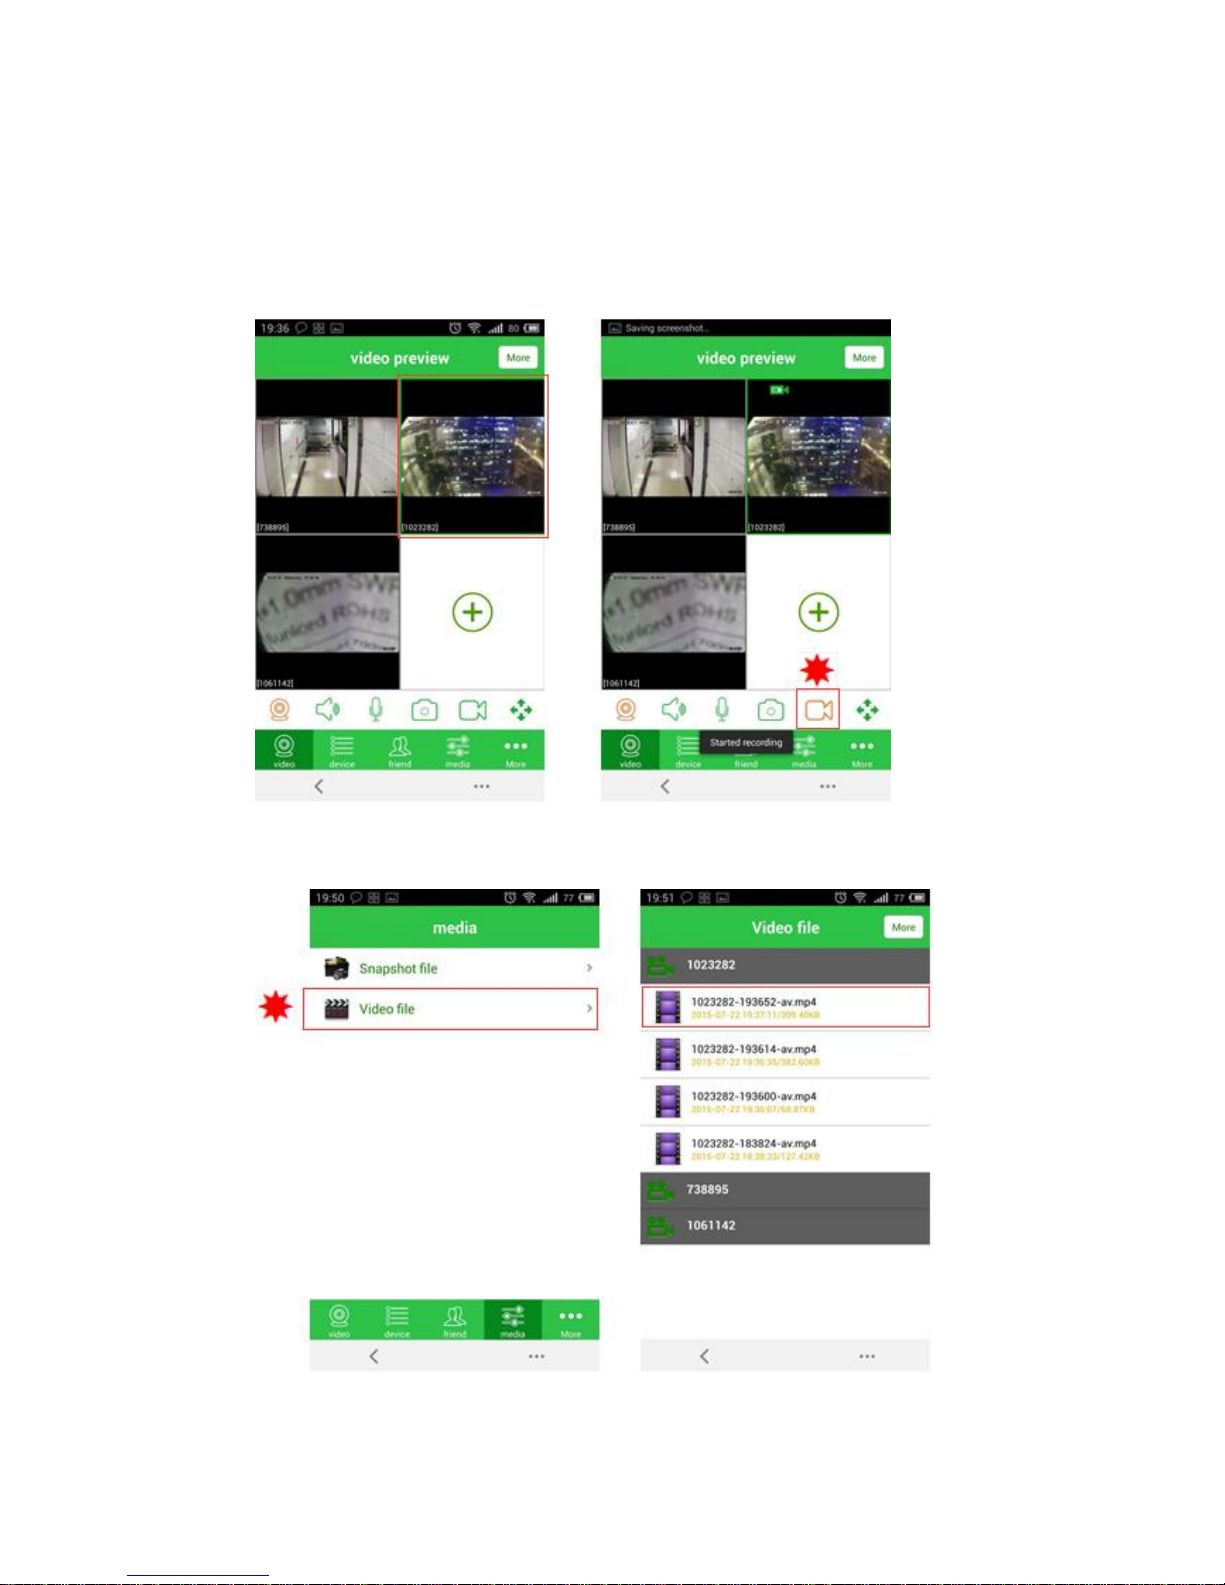
1. Video recording
Select the screen which you want to record, then click the video icon. Click again
to stop the video.
Click the “media” icon. Then click “Video file”, you can see the list of videos which
you have saved on your device.
11
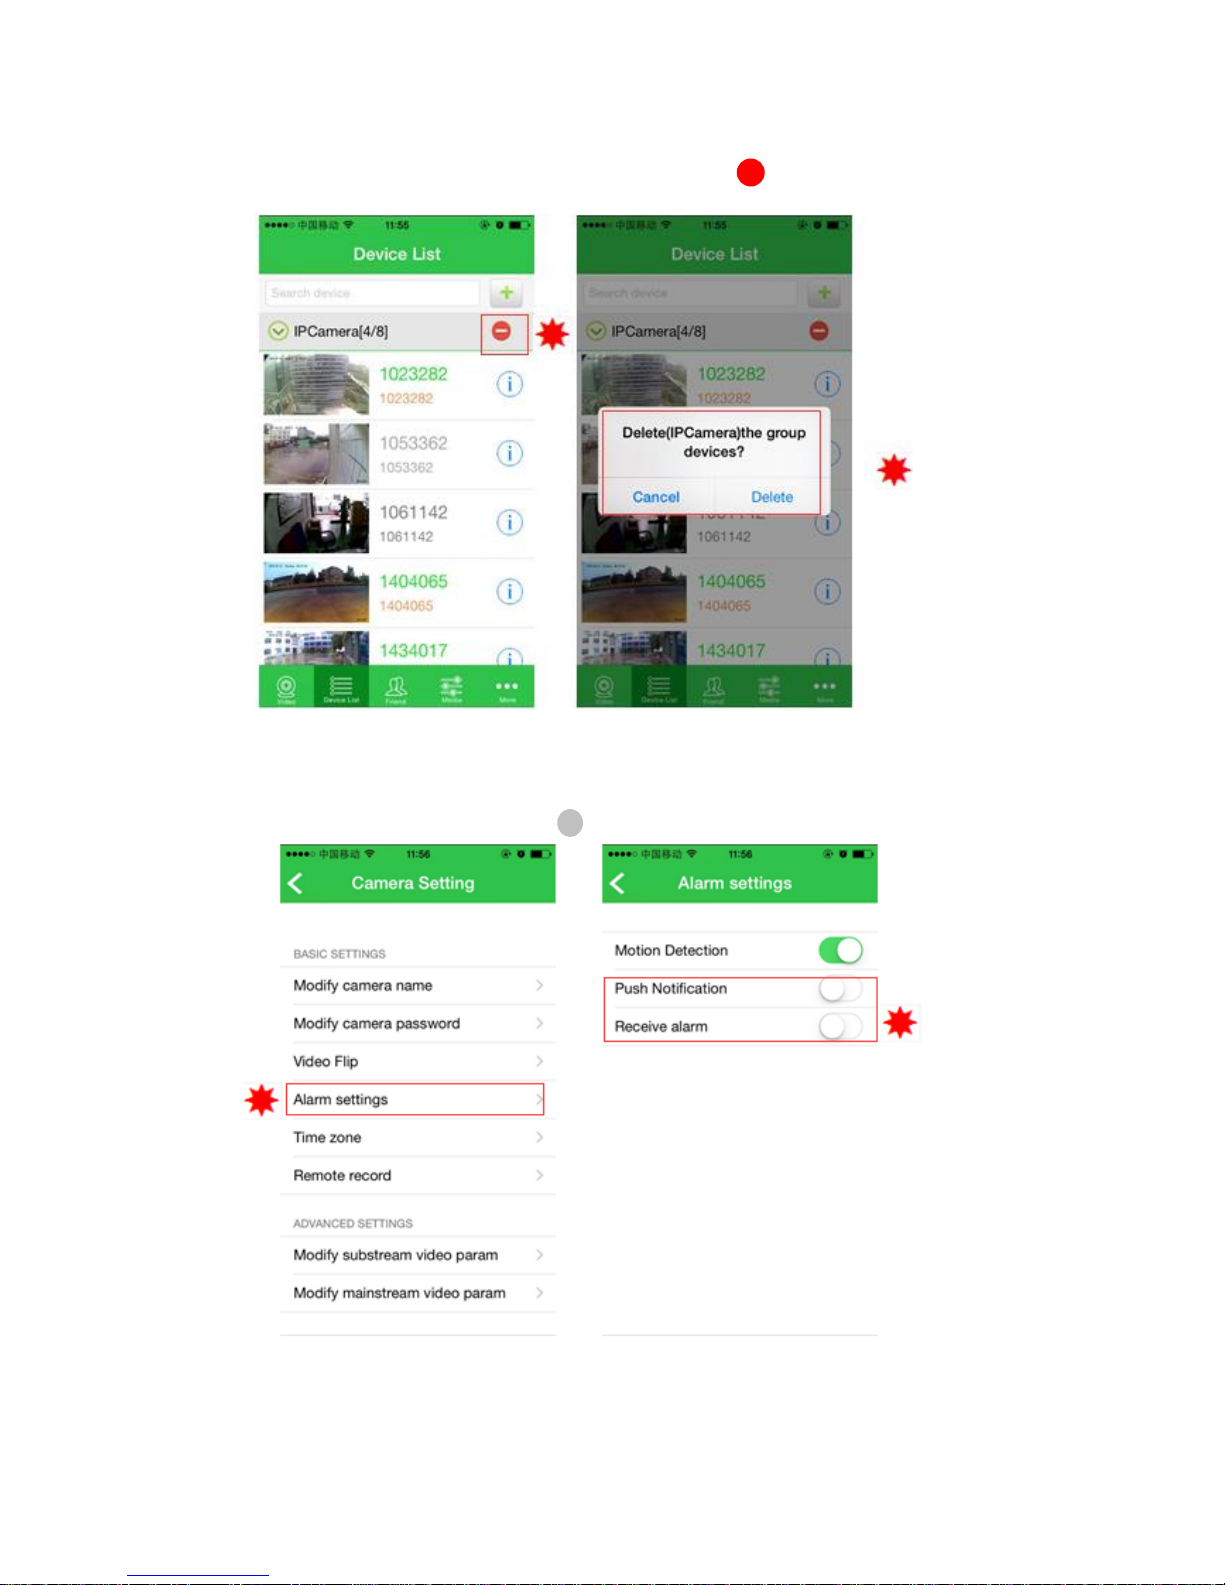
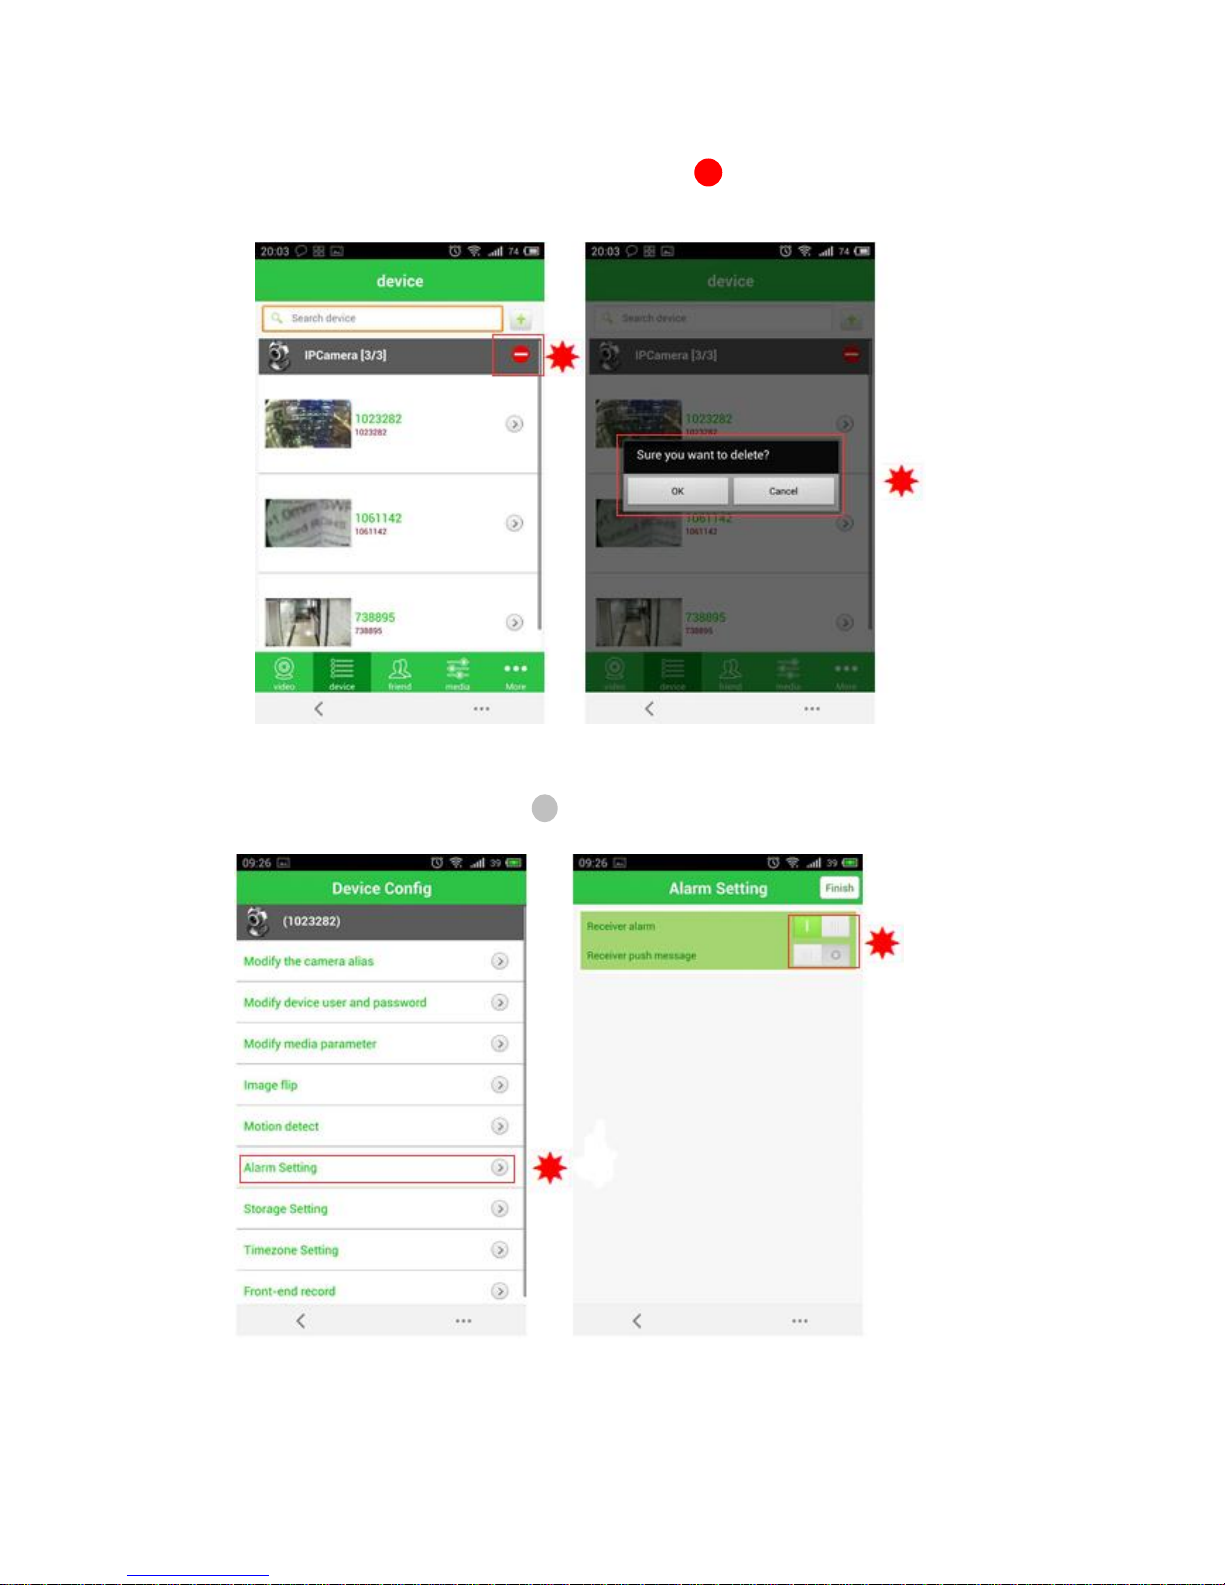
2. Video recording
Login user account to enter “Device List” page, click icon to enter “camera
deleting” page:
Click “Delete” to delete camera.
3. Alarm setting
In the “camera setting” list, click icon to enter “alarm setting” page:
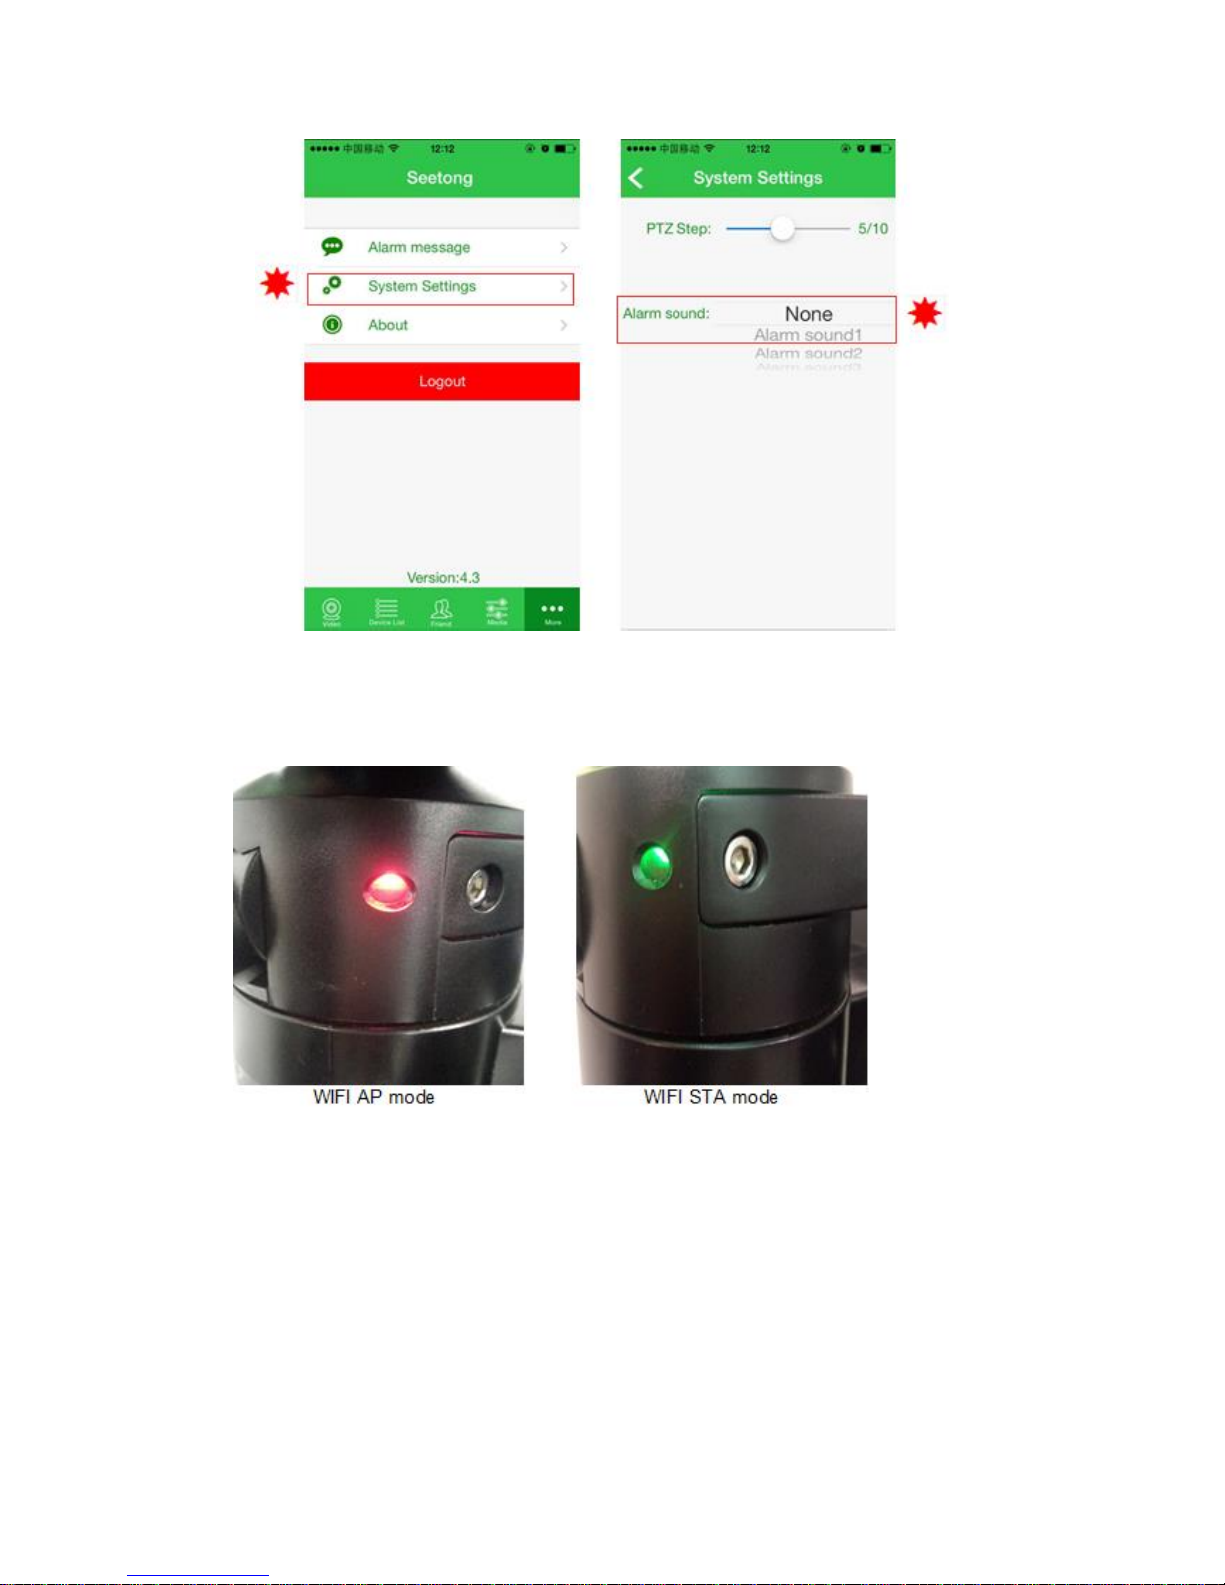
Then enter “More List” page, click “System Setting” to enter view :
一
>
12
4. Alarm setting
WIFI AP mode: red light flash; WIFI STA mode: green light flash;
The light is red in default state, When the device is connected to the Wi-Fi network
successfully, the light will turn green. After the Wi-Fi has been successfully configured, If
the device is not connected to the Wi-Fi for more than 5 minutes, the light will turn red for
3 minutes and then try to reconnect. This operation will continue until successful
connection.
13
Android Setup Instructions
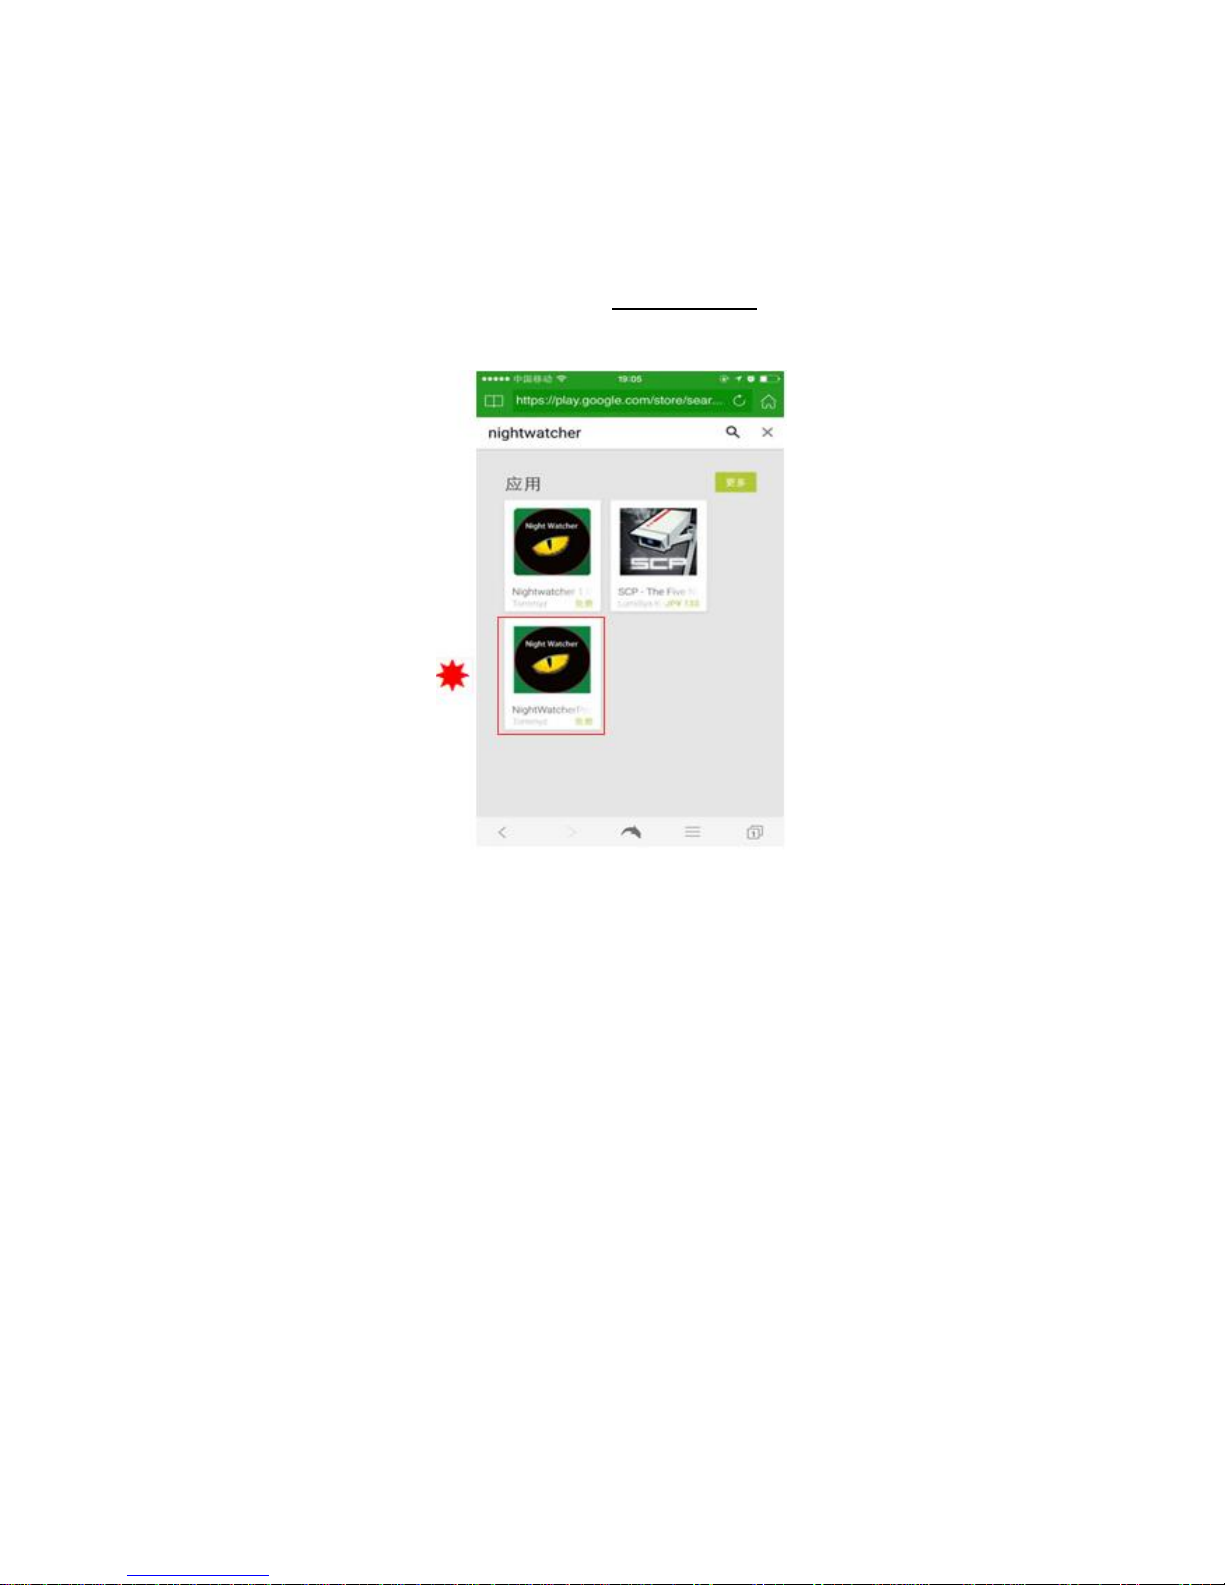
Download the Night WatcherPro APP
Access the Google Play Store, search for “NightWatcherPro”, then download the APP to
the Android device.
1. Create User Login account. (NB: if you have already created a Username and
Password, skip this step)
User login: using for view streaming videos of all camera you added in this account. Click
“User Register”: Select the registration page when the APP is used for the first time and
input all required info to create a new user account.
14
Note: Please restart the App after you have registered the user account.
2. Add your new Camera
Ensure the red LED light is on to indicate that the light is powered up.
[If not, please reset the NightWatcher NW750; refer to Step 3]
NB: The LED will light up in a RED colour solid state when the fixture is powered-up for the
first time. The LED will flash rapidly red when searching for the wireless router. The LED will
change to green when the light is paired with its dedicated router and the camera is visible
through the app screen.
15
1、In the NightWatcherPro App, select “Device Login”
2、Select “Set camera Wi-Fi network”
3、Go to System Settings and select Wi-Fi; this will display the available networks under
“CHOOSE A NETWORK”; make a note of the NightWatcher Device ID which will display in the
List; For example: EX Device ID: 1061142
4. Select the Device ID from the Network list and enter the password, which is the device ID
preceded by a “0”; i.e. 01061142. [password= 0+ID].
5、Return to the NightWatcher APP
6、The APP will identify the Wi-Fi network; enter & verify the Wi-Fi network password.
16

17
9. How to connect your NW750 to the App
10. Restart the App and log in using your User name and Password that was created in Step 1.
11. In the bottom menu, click “device”. Click “+” to add your camera; (top right of screen)
12. Enter the Device ID, which is the unique number for your NightWatcher NW 750, noted
at setup.
13. Enter the Username and Password;(Default Username: admin; Password: 123456)
14. Click Add.
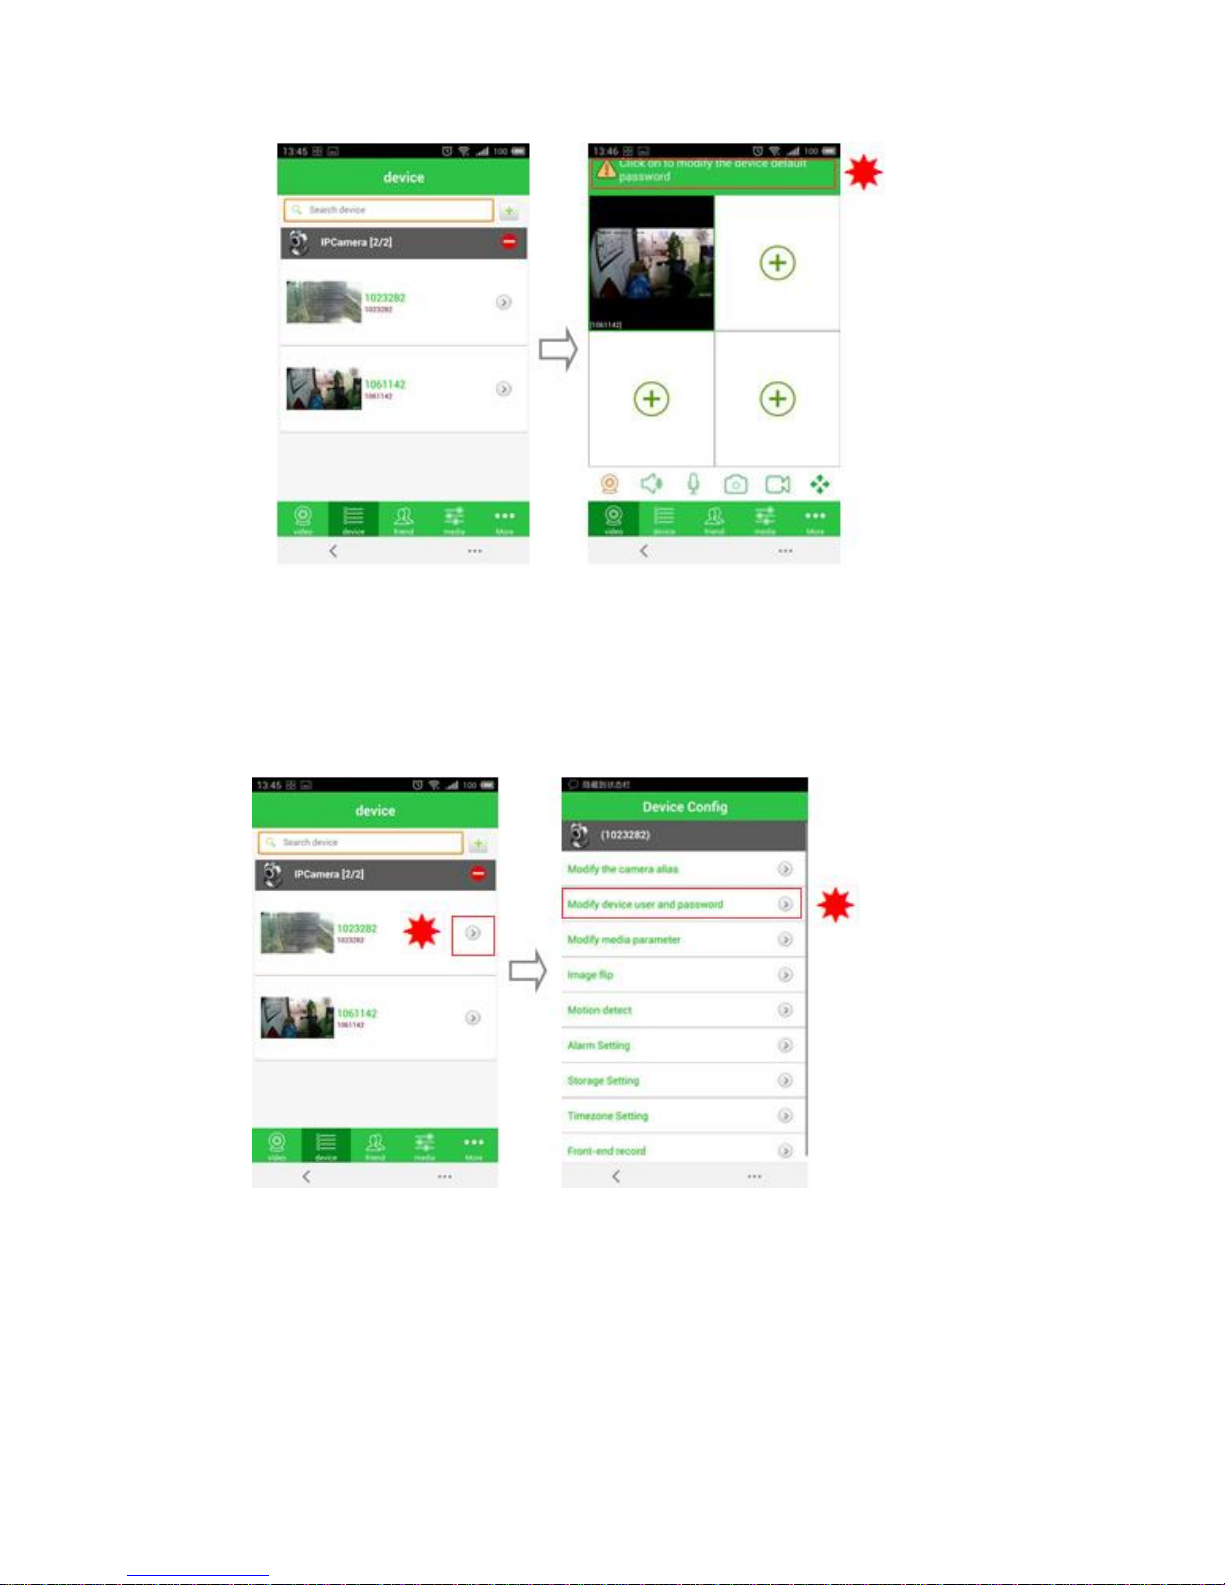
15. After you have added your camera ID, you will be able to see the camera ID in the
“device” list. Click on the device ID, you will see we jump to the “video” list, you will
notice a prompt to request you to change the default username /password, you can
click on it to change the device default username and password.
16. (Default Username: admin, password: 123456). N.B. Changing the default username
and password of the CAM will prevent other users accessing your camera.
18
17. You can also change the camera Login Name and Password by clicking the arrow icon
beside the device ID and go into the “Device Congfig” page.
19
Common Functions
5. Video recording
Select the screen which you want to record, then click the video icon. Click again to stop
the video.
Click the “media” icon. Then click “Video file”, you can see the local recorded videos
which you have saved.
20
6. Video recording
Login user account to enter “Device List” page, click icon to enter “camera delete”
page:
Click “OK” to delete camera driver.
7. Alarm setting
In the “camera setting” list, click icon to enter “alarm setting” page:
一
>
Other manuals for NW750
2
Table of contents
Other Night Watcher Security Camera manuals


