Nikon Nikomat (Nikkormat) FS User manual


NOMENCLATURE
Film
plane
indicator
--------
__
--,
Depth·of
.fieIC:
preview
button
--------
--,
Exposure
coun
ter
~
Shu
tt
er
release
button
Film
advance
lever
I
'--
,'-'
Sh
ou
ld
er
s
trap
eye
l
et
S
hutter
speed
index
Self·timer
Aperture
ring
Aperture
index
---
~
...:..:=
Distance
scale
Fo
c
using
ring
,--
---
Rewind
c
rank
knob
Len
s
lo
ck
index
Lens
lo
ck
button
S
hUI
ter s
peed
lev
er
~
----
Ap
erture
scale
-:--j'"":
::::=-....::.:..-..!..,L.
_
___
In
f
ra
red
marki
ng
IL-
____
Distance
inde
x
L
____
---.:.
_
____
Depth
·
of
.
fiel
d
scale

Nikkol'mat
Came
ra
back
----
Take-up
spool-----,
Sp
ro
cket----
-,
Film
guide
rails-----,
Shutter
curtain
------,
Finder
eyepiece------,
Synch
_
socket
'-----
Film
pressure
plate
L-
____
~
R
ewind
button
~
•••
"~
'-------
Tripod
socket
Film
chamber
3
w
'"
::>
...
<
...J
U
Z
w
~
o
z

SPECIFICATION
Film
to
be
used:
Viewfinder:
Finder
screen:
Mirror:
Shutter:
4
The
Nikkormat
FS is supplied
with
Nikkor
Auto
50
mm
Fi
lA
or
F/21ens as a
stand·
ard
equipment
. These lenses have
auto
·
matic
diaphragms
.
NIKKORMAT MODEL
FS
Standard
35
mm
film
in
daylight
cartridges
available
in
36
and
20
exposure
loads. Each
frame
measures
24
x
36mm
.
Eye·level
type
using
roof
prism
. Eyepiece
accepts
ac·
cessory
angle·
finder
as well as
~ye·correction
lenses.
Circular
micro'pr
i
sm
spot
in
center
(dia.= 4
mm)
sur
·
rounded
by
a
mat
ring
to
12mm
dia. Remaining area
is Fresnel lens.- Screen field
covers
92
%
of
the
actual
picture
field.
Automatic
return
following
exposure
.
Double
focal
plane
type
. The
shutter
curtains
,
made
of
metal
, run
vertically
.
Shutter
speeds,
set
at
B,
1
~
1
/
1000
sec., are
graduated
equi
distant
.
A one·
stroke
lever
wind
of
155
"
advances
the
film
and
winds
the
shutter.

Depth
of
field
preview
button:
Flash
synchronization:
Self-ti~er
:
Exposure
counter
:
Dimensions:
Weight:
Nikkormaf
While being
pressed
, closes
down
the
'
diaphra
gm
to
the
pr
e-se
lected
ap~r
.
ture
.
M-
contact
and
X-
contact
provided
with
automatic
t ime
la
g
adjustm
e
nt
.
Synchronizes
to
X-
contact
and
speed-lig
ht
flash
at
the
shutter
speed
of
11
125
sec.
or
slow
er.
Built
-in.
Starts
by
depressing
the
shutter
release
button
.
Automatically
returns
to
S
(Start)
with
the
camera
back
opened.
146
mm
(width)
x
95
mm
(height)
x
33
mm
(thickness)
x
73
mm
(shoulder
height)
715
g
5
IJ)
z
o
;:::
-<
~
u..
U
w
"-
IJ)
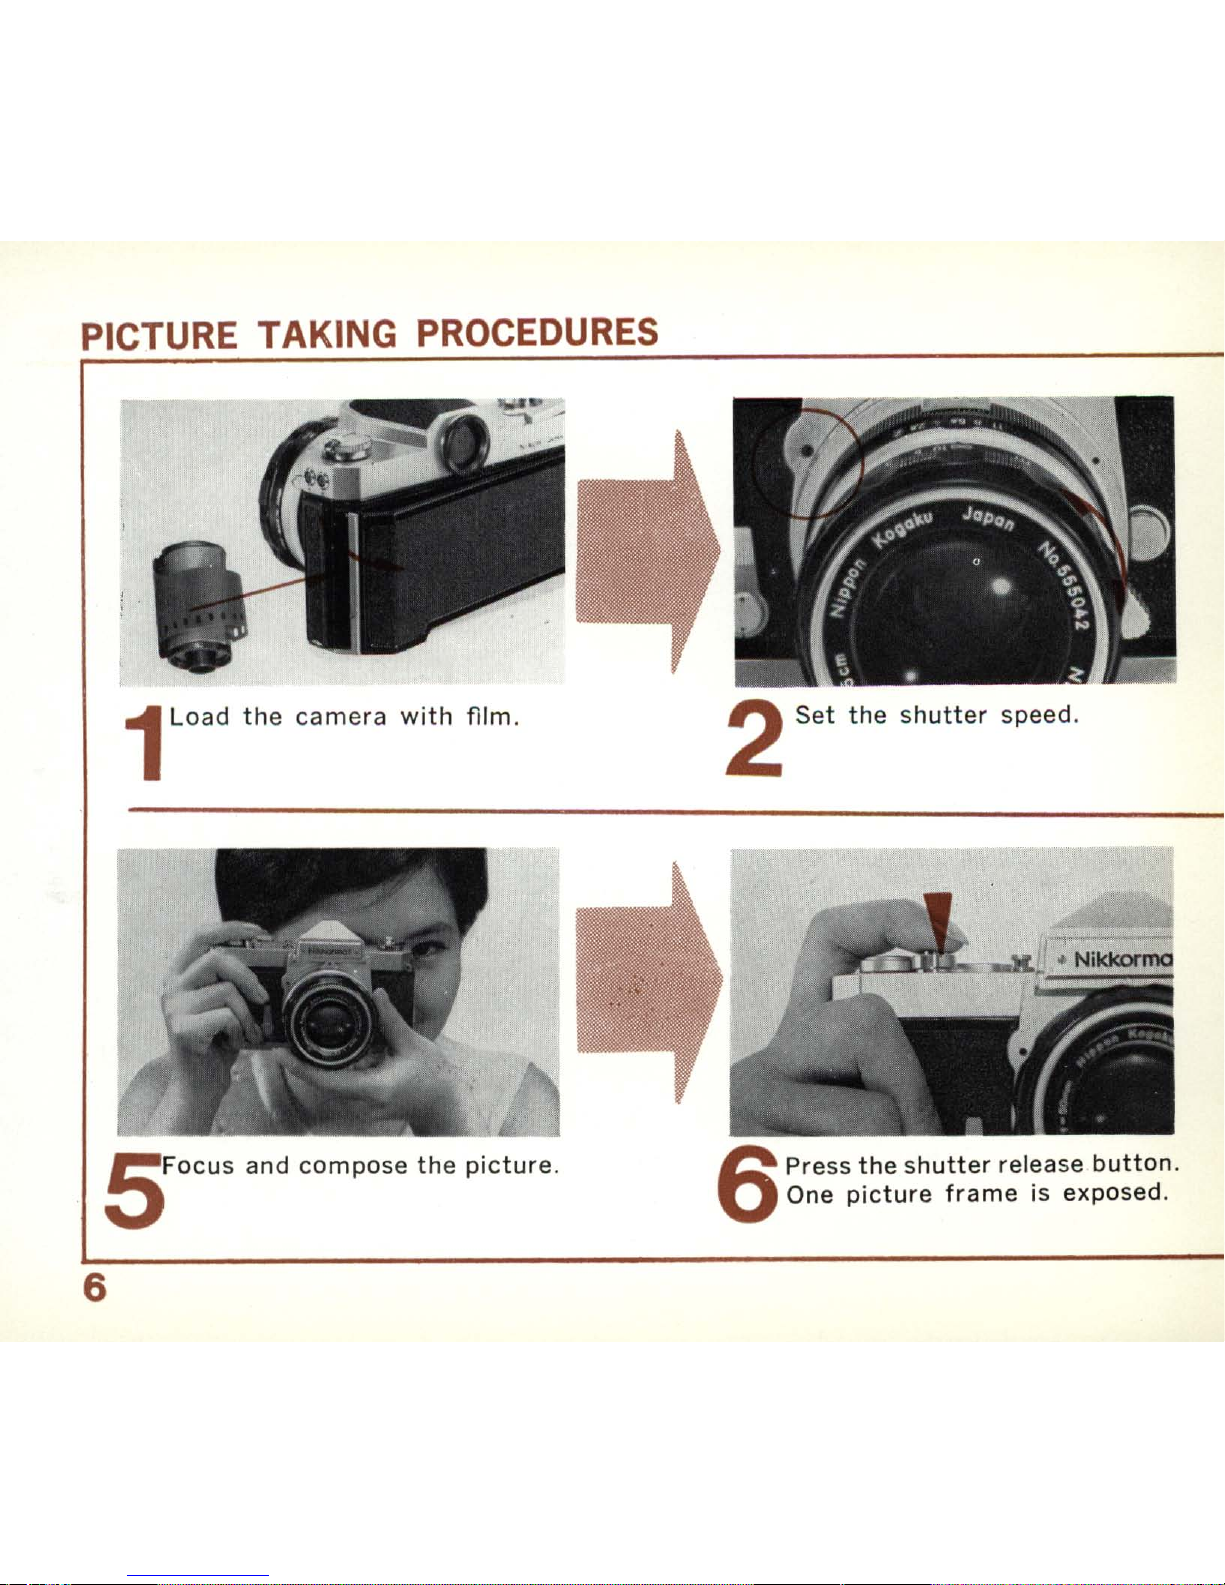
PICTURE TAKING PROCEDURES
1
Load
th
e
cam
era
with
film
.
5
FOCUS
and
compose
the
picture
.
6
2Set
the
shutter
speed.
6Press
the
shutter
release
butt
on.
One
picture
frame
is exposed.

3
Set
tile
lens ape
rtur
e
to
tile
proper
F·number.
7When
the
whole
film
is
exposed,
rewind
the
film
back
into
the
ori
gina
l
cartridge.
Nikkormat
4
Wind
the
film
advance
lever
.
8
After
complete
rewindinjl",
the
film
can
be .
removed
.
7
cJ)
w
'"
::::>
o
w
U
o
'"
<l.

EXCHANGING THE
LENS
8
To
Remove
the
Lens
Holding
the
lens by
the
milled
ring,
press
the
lock
button
and
turn
the
lens
barrel
.
clockwise
until
it
stops
.
cautio
••
lIikko,mat
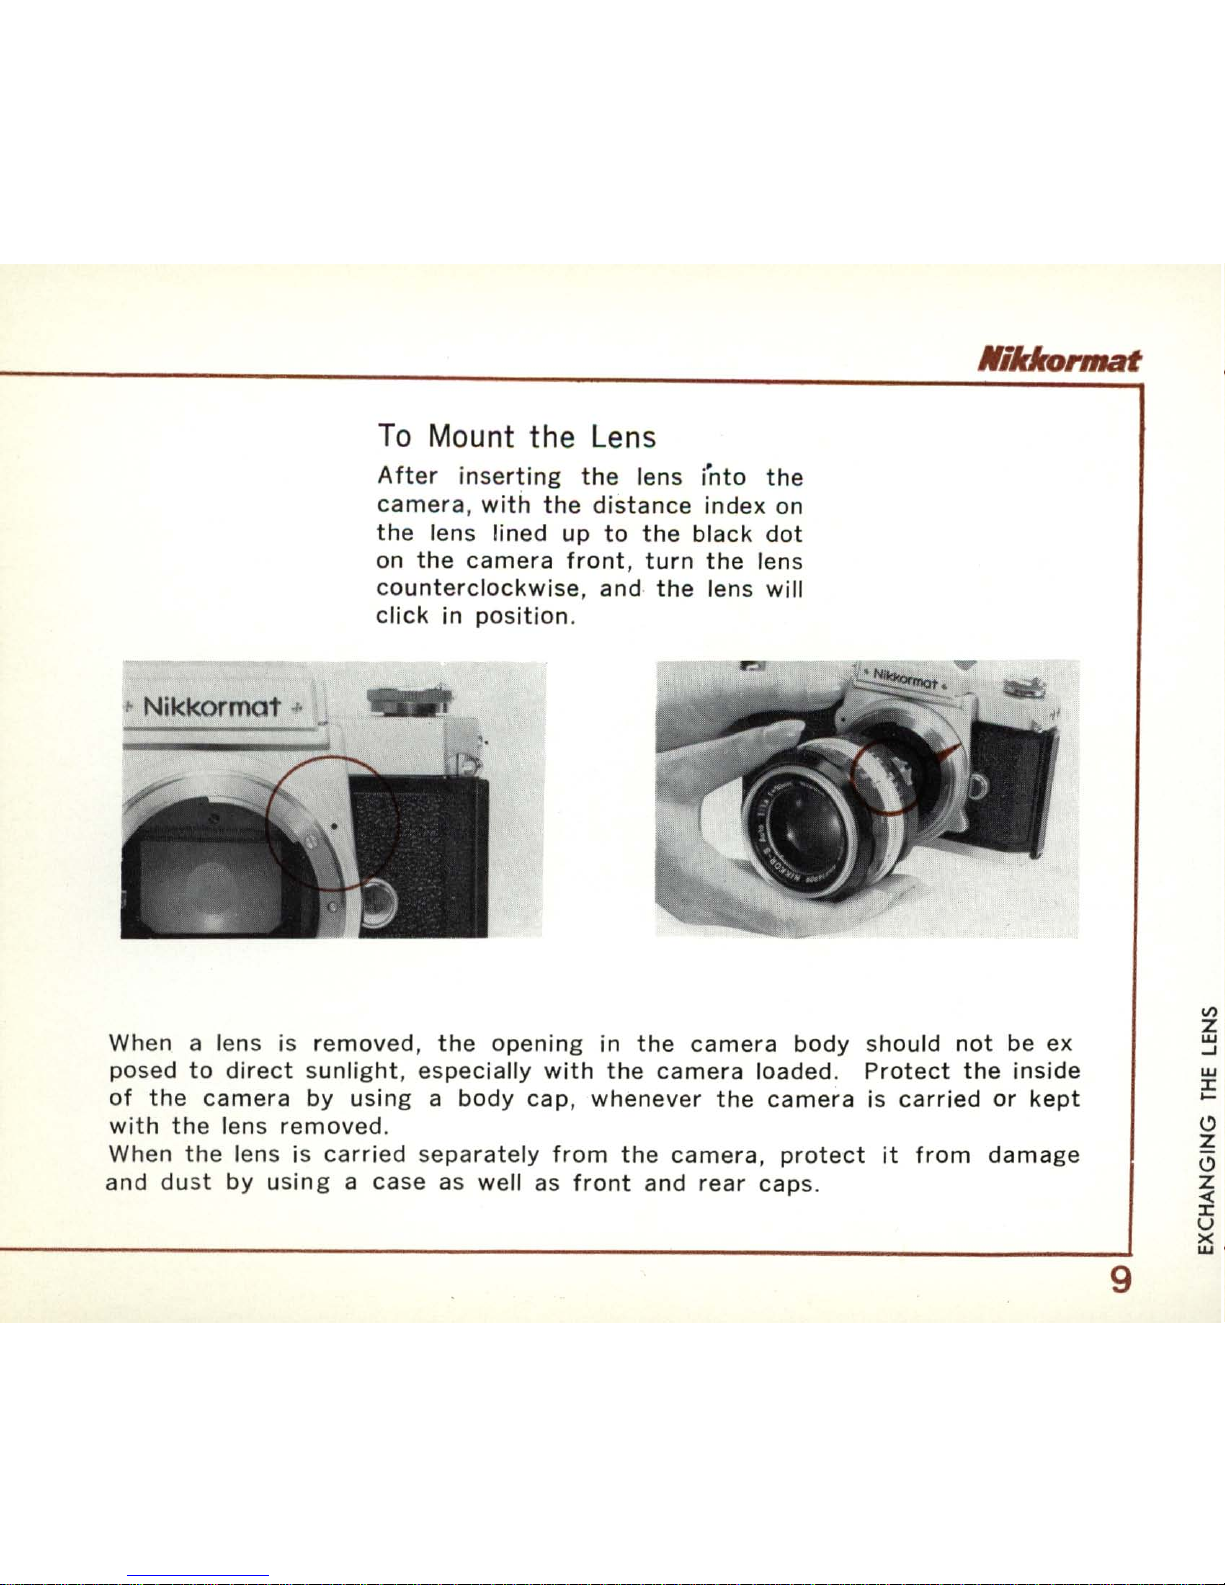
To
Mount
the
Lens
After
inserting
the
lens i'nto
the
camera
, wi
th
the
distance
index
on
the
lens lined
up
to
the
black
dot
on
the
camera
front,
turn
the
lens
counterclockwise
, and
the
lens will
click
in
position
.
When a lens is
removed
,
the
opening
in
the
camera
body
should
not
be ex
posed
to
dir
ect
sunlight
, es
pecially
with
the
camera
loaded.
Protect
the
inside
of
the
camera
by
using
a
body
cap
,
whenever
the
camera
is
carried
or
kept
with
the
lens
removed
.
When
the
lens is
carried
separately
from
the
camera
,
protect
it
from
damage
and
dust
by
using
a case as well as
front
and
rear
caps.
9
II)
z
W
....l
W
J:
.....
l?
z
(3
z
«
J:
u
x
w

LOADING THE CAMERA
1
5
10
Pull
down
the
latch,
to
open
the
camera
back
.
Place
the
cartridge
jnto
the
chamber
below
the
rewind
knob
.
Push
back
the
knob
to
lock
the
cartridge
in
place.
2Pull
up
tne
rewind
knob
.
6
Gently
push
the
flIm
advance
lever
forward,
to
catch
the
flIm
securely
.

3 , : I
Rotate
the
take
·up
sp
ool so
that
the
slit
in
the
spoo
l
face
s
upward
.
Holding
the
film
with
the
perfora
·
tion
engaged
in
the
teeth
of
the
transport
sprocket,
close
the
camera
which
,
if
properly
closed, s
hould
click
shut
.
Nikkormat
4 Ins
ert
the
trimmed
end
of
the
film
into
the
s
lit
.
Turn
the
rewind
knob
gently
in
7
the
direction
of
the
arrow
on
it
,
to
take
up
any
film
slack
in
the
cartridge
.
11
~
z
Ci
«
o
...J

FILM ADVANCE LEVER
12
The
film
advance
lever,
wh
ich
simultaneously
winds
the
shutter
,
s
houl
d be pus
hed
forward
until
it
stops
.
Then
, l
et
it
swing
back
to
th
e
ready
advance
po
s
ition
. Press
the
shutter
release
button
, and
the
s
hutte
r
will
be
released
.
After
the
camera
has been
loaded
and
closed
,
operate
the
shutter
twice
for
two
blank
shots
to
dispose
of
the
film
exposed
during
loading
. As
this
is
being
done,
note
that
the
rewind
knob
rotates
in
the
oppo
·
site
direction
to
the
arrow
on
the
knob
.
This
indicate
s
that
the
film
has
been
cor
.
rectly
loaded
and is
being
advanced
pro·
perly
.
Exposure Counter
The
exposure
counter
now
registers
"0".
With
the
film
advance
leyer
operated
again
,
the
counter
will
register
..
1"
and
the
camera
is
ready
for
the
first
shot.
It
then
continues
to
register
the
number
of
pic·
tures
taken
,
up
to
a
maximum
of
either
36
or
20
exposures
,
depending
on
the
film
length.
~·(]·CD·
~·~
Camer.. back.c:losed
FlrSl
!;!Iank.
shot Second
blink
shot FOr
fir"
shOI For second shot

UNLOADING
When
the
end
of
the
film
is
reached,
a
sudden
difficulty
will
be
felt
in
the
wind
·
ing
of
the
film
advance
lever.
At
this
position
no
further
advance
should be
attempted.
Bring
back
the
lever
to
it
s
original
position
and
proceed
to
rewind
·
ing
of
the
film
.
First,
push
in
the
rewind
button
located
on
the
camera
bottom.
Then
,
lift
up
the
rewind
crank
on
the
rewind
knob
.
Turn
the
crank
in
the
direction
of
the
arrow
.
When
the
whole
film
is
rewound
and de·
tached
trom
the
take
·up spool, a release
in
the
film
tension
will
be
felt
. Open
the
camera
in
subdued
light
.
........
/(13
For
20
lh
shol
For
36
1h
shol
Nikko,mat
Pull up
the
-
rewind
knob
.
Remove
the
film
cartridge
from
the
camera.
The
rewind
button
on
the
camera
bottom
will
snap
back
into
position,
when
the
film
advance
lever
is
next
operated
.
The
exposure
counter
auto
·
matically
returns
to
"s
"when
the
'
camera
back
is opened.
13
~
~
a
-<
o
-'
z
::;,
""
w
>
w
-'
w
U
Z
~
a
-<
~
,d
....

SHUTTER
SPEED
The
shutter
speed
controls
the
a·
mount
of
light
admitted
through
the
lens and
can
freeze
the
image
of
moving
subjects,
too
.
Turn
the
lever
found
on
th
e
right
side,
until
the
desired
shutter
speed
num.
ber
on
tne
left
side
comes
opposite
the
black
index
.
The
numbers
from
1
to
1000
repre
·
sent
the
denominations
of
the
shutter
speeds
in sec.
Thus,
for
example,
the
figure
125
represents
1/
125
sec.
The
speeds
are
so
arranged
that
each
subsequent
speed is
twice
as
high
as
the
preceding
.
The
shutter
speed
lever
clicks
at
each
marked
number
.
The
shutter
does
not
give
an
intermediate
exposure
time,
except
from
1/
250
to
1/
1000
sec.
When
set
at
B,
the
shutter
will
remain
open
as
long
as
the
shutter
release
button
is held
depressed
.
14

LENS APERTURE Nikkormat
10
11
~
56
.4 L0 ,
'.
~{r""\:j
. .
The
lens
aperture
controls
the
amount
of
light
and
at
the
s
ame
time
the
depth
of
field (see
P.
1B)
.
The
F·
numbers
-
the
focal
length
of
the
lens
divided
by
the
diameter
of
the
effective
aperture
of
lens-
for
ex
-
ample
,
1.4,
2,
2.B, 4 ,
5.6,
B,
II,
16,
22
....
are
engraved
on
the
aperture
ring
of
each
lens, and can be
set
by
turning
the
ring
to
the
index
dot
.
Each
number
will
permit
the
passage
of
half
the
light
of
the
number
preced
-
ing
it
.
Thus
, F18
will
allow
half
the
light
allowed
by
F/5 .6 .
COMBINATION
OF
SHUTTER
SPEED
AND APERTURE
The
amount
of
light
admitted
through
the
lens
to
fall
on
the
film
is
adjusted
by
the
exposure
which
is
determined
by
the
combination
of
the
shutter
speed and
aperture
of
the
lens
.
Therefore,
a
number
of
different
combinations
are
possible
for
the
same
exposure
;
for
example
, 1/
250
sec.
with
F/
1.4
will
give
the
same
exposure
as 1/
60
sec.
with
F/2 .B
or
l iB sec,
with
F/8.
15
w
'"
=>
I--
'"
W
"-
-<
c
z
-<
c
w
w
"-
I/)
'"
W
I--
I--
=>
J:
I/)
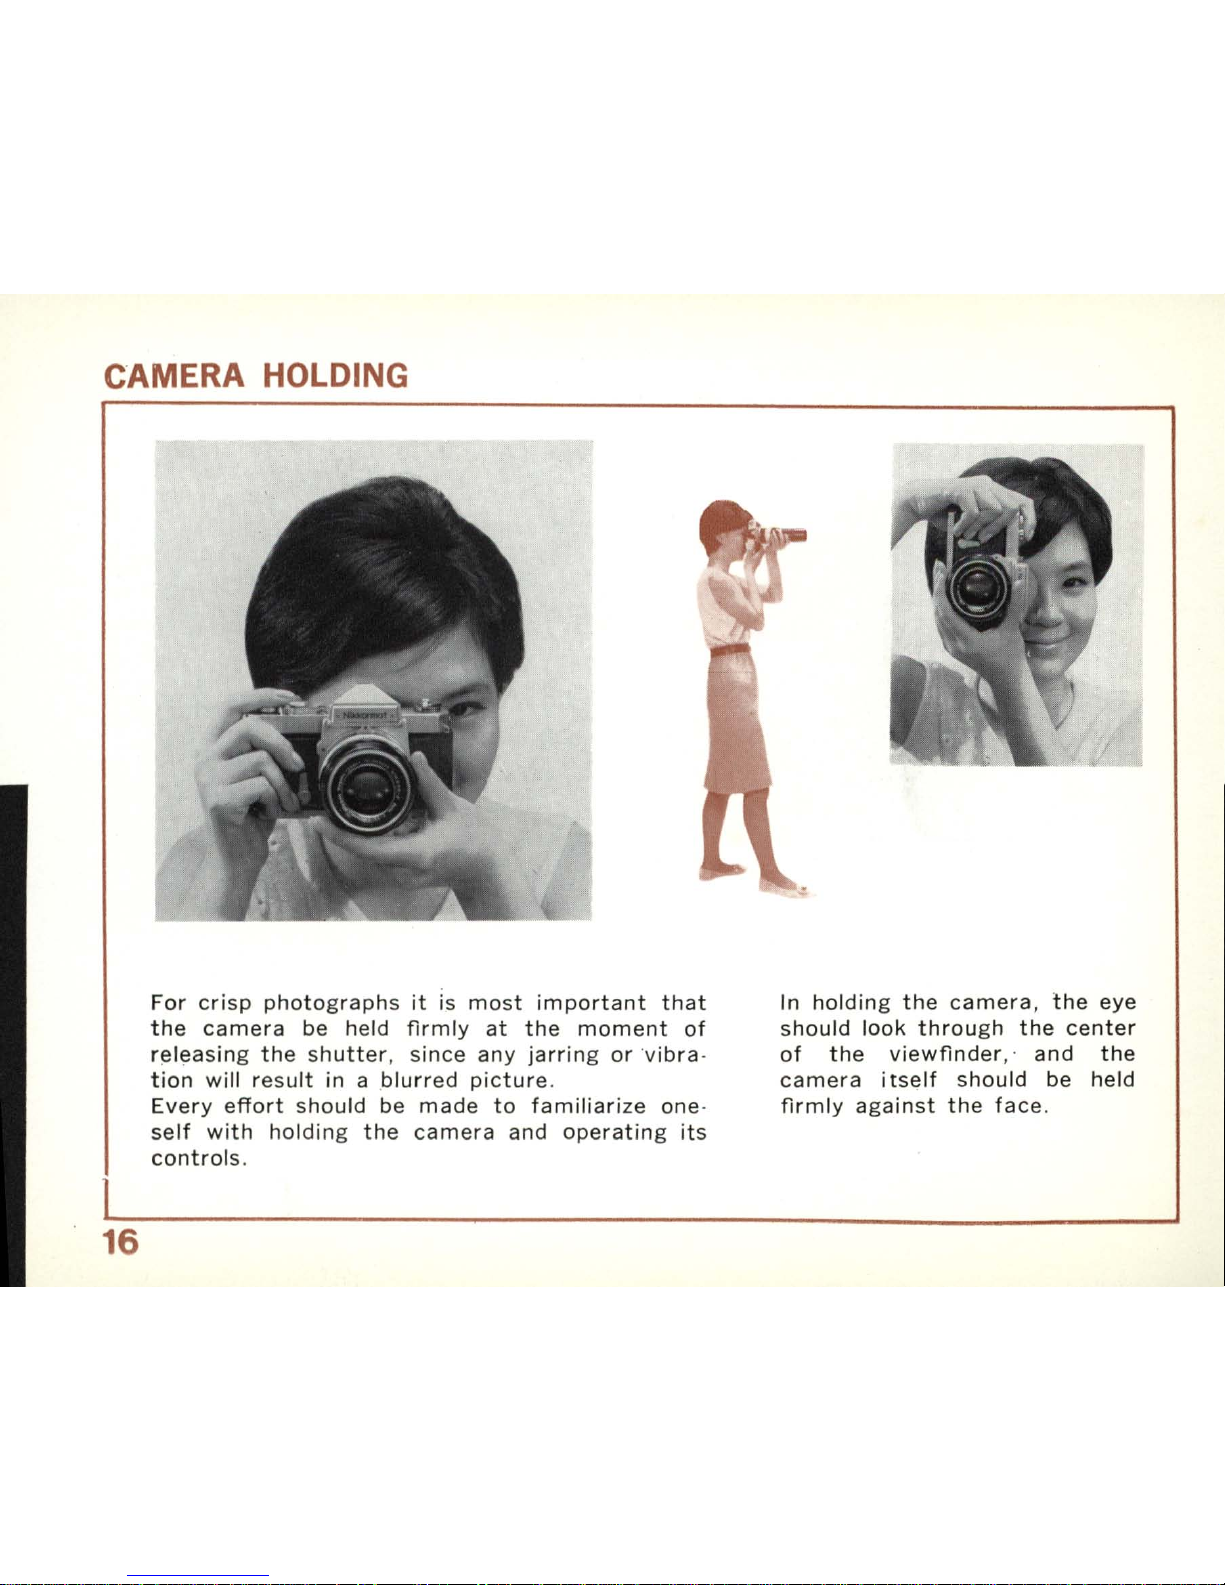
CAMERA HOLDING
16
For
crisp
photographs
it
is
most
important
that
the
camera
be held
firmly
at
the
moment
of
r~leasing
the
shutter
,
since
any
jarring
or
Vibra
-
tion
will
result
in a
blurred
picture
.
Every
effort
should
be
made
to
familiarize
one-
self
wi
th
holding
the
camera
and
operating
its
controls
.
In
holding
the
camera,
the
eye
should
look
through
the
center
of
the
viewfinder
,'
and
the
camera
itself
should
be held
firmly
against
the
face
.

FOCUSING
AND
COMPOSING
Nikkormat
Sinae
the
taking
lens is
at
the
same
time
the
viewing
lens in
this
single·lens
reflex
camera
,
the
viewfinder
shows
the
exact
picture
that
will
appear
on
the
film
.
There
can be no
parallax
problem,
no
matter
how
close
to
the
subject
the
picture
is
taken
.
The
subject
to
be
photographed
is
brought
into
sharp
focus
on
the
viewing. screen
by
turning
the
focusing
ring
of
the
lens. When
the
image
is
brought
into
focus
,
the
image
within
the
micro
·
prism
in
the
center
of
the
viewing
field
appears
crisp
and clear.
The
distance
between
the
camera
and
the
subject
can be
obtained,
after
focusing,
by
reading
the
number
engraved
on
the
focusing
ring
,
opposite
the
indicator
line
located
in
the
middle
of
the
depth·of
·field scale.
17
~
z
o
--'
o
J:
<
'"
w
~
<
u

DEPTH
OF
FIELD
18
)1
56
2:
I
When a
subject
point
is
brought
into
focus
by
a lens
at
a
specific
distance
from
that
point
,
the
actual
point
on
which
the
focus
is
made
is
considered
to
be
the
most
sharply
defined
in
the
picture
, and
the
s
harpness
of
other
points
which
lie in
front
of
and
behind
this
paint
of
focu
s
gradually
dimini
sh.
Within
certain
limits
,
howevet
,
these
may
appear
reasonably
and
acceptably
sharp
.
The
range
within
which
points
in
front
of
and
behind
the
point
of
focus
,
appear
acceptably
sharp
, is
called
the
depth
of
field
.
Depth
of
field
increases
as
the
aperture
of
the
lens
is
made
smaller.
Shortenin
g
the
lens
focal
length
or
increasing
the
distance
between
lens and
subject
also
increases
depth
of
field.
These
three
factors
can
operate
independently
or
in
conjunction
. One
factor
may
act
to
partially
cancel
the
effect
by
the
other
.
The
Nikkor
lens
has
a"
color
-
coded
depth
of
field
scale
engraved
on
the
lens
barrel
just
behind
the
focusing
ring.
This
color
code
permits
easy
reading
of
the
ct.epth
of
field
scale
for
any
selected
aperture
. Each
set
of
colored
lines
located
one on
either
side
of
the
middl~
line
represents
a
different
F-
number.
The
color
of
the
line
matches
that
of
the
F-
number
engraved
on
the
aperture
ring
.
For
example
,
when
using
the
50
mm
F(
1.4
lens,
with
the
distance
scale
set
-
ting
at
15
ft
and
with
an Fj
16
openin
g
(F
j
16
is
shown
in blue),
the
depth
of
field
indicated
by
the
blue-
colored
lines
on
either
side
of
the
black
index
will
be
between
8
ft
and
00
.
T~is
means
that
a
picture
taken
at
Fj
16
,
with
the
lens
focused
at
15
ft
will
show
a
range
of
acceptable
sharpness
be-
tween
8
ft
and
00
.
The
sharpest
point
will
be
at
15
ft
.
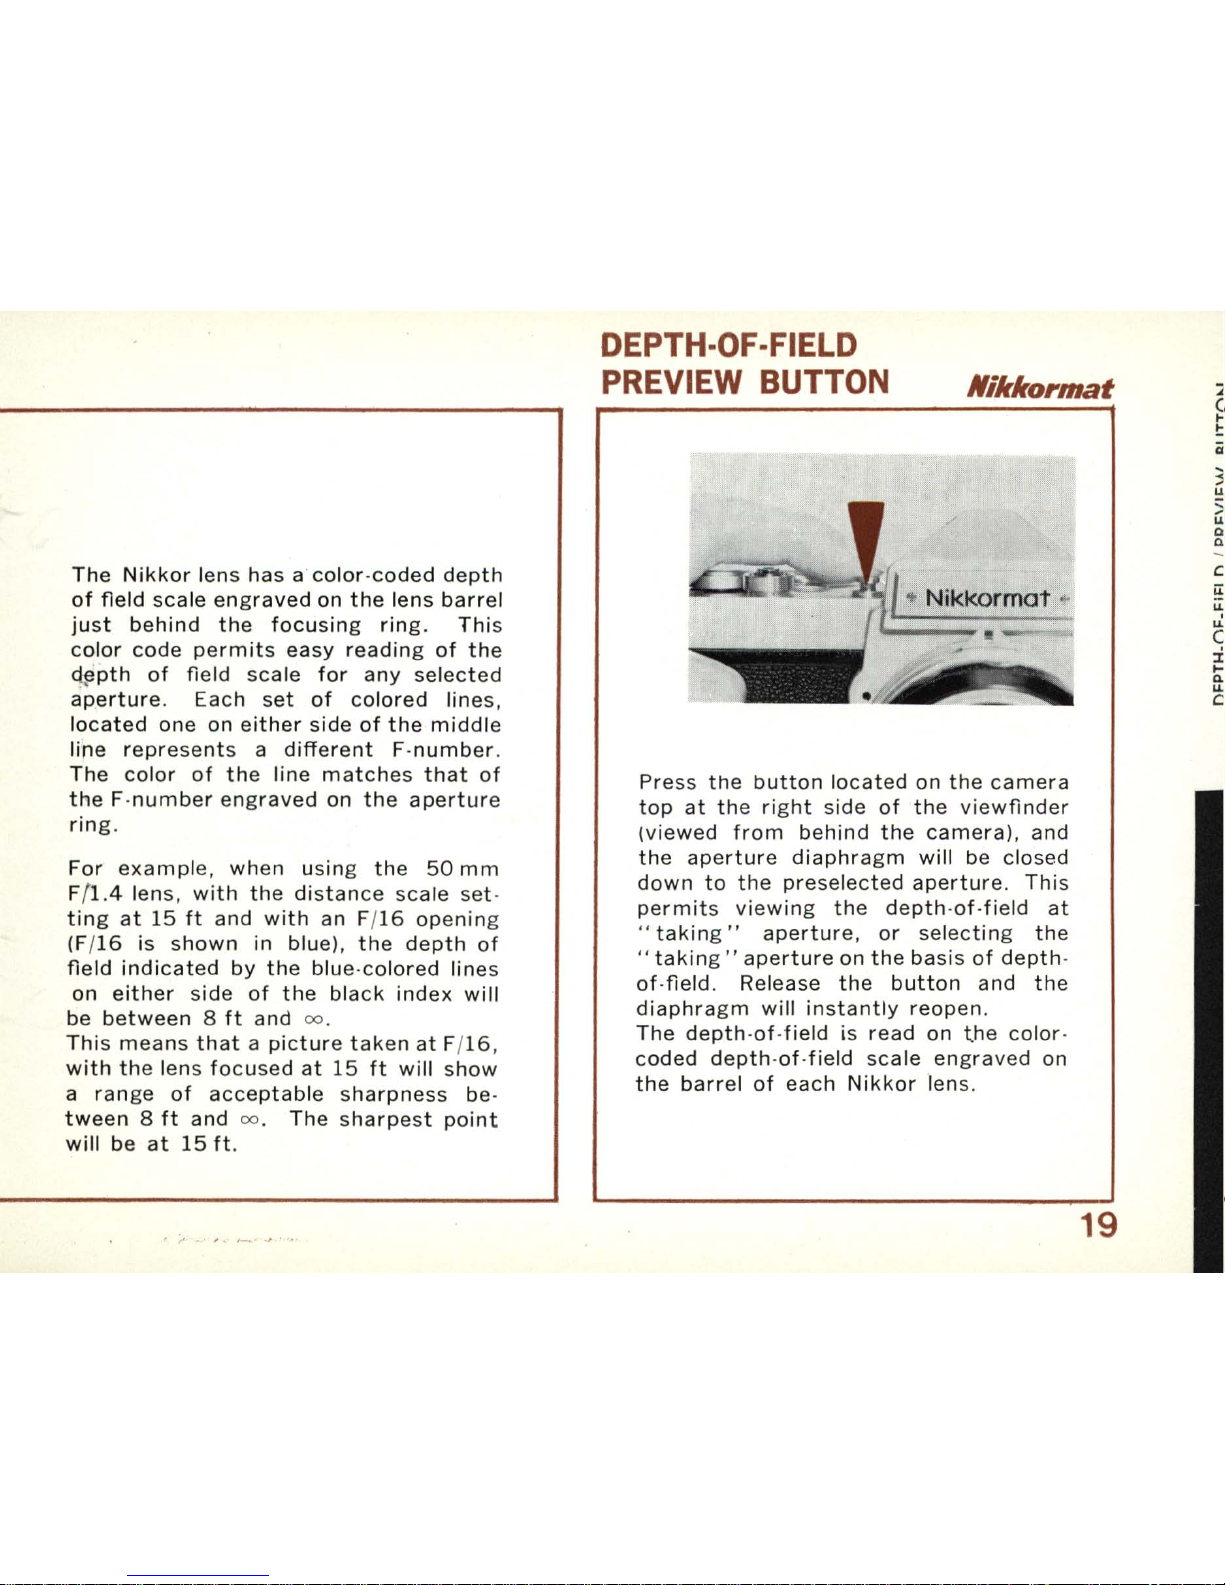
DEPTH·OF
·FIELD
PREVIEW
BUTTON
Nikko,mat
Press
the
button
located
on
the
camera
top
at
the
right
side
of
the
viewfinder
(viewed
from
behind
the
camera).
and
the
aperture
diaphragm
will
be closed
down
to
the
preselected
aperture.
This
permits
viewing
the
depth
-
of
-
field
at
..
takin
g"
aperture
,
or
selecting
the
..
taking"
aperture
on
the
basis
of
depth
-
of
-
field
. Release
the
button
and
the
diaphragm
will
instantly
reopen
.
The
depth
-
of
-
field
is
read
on
the
color
-
coded
depth
-
of
-
field
scale
engraved
on
the
barrel
of
each
Nikkor
lens.
19
3
LL
:;
LL
Q
"
c
u:
U;
LL.
C
:i.
...
"
LL.
C
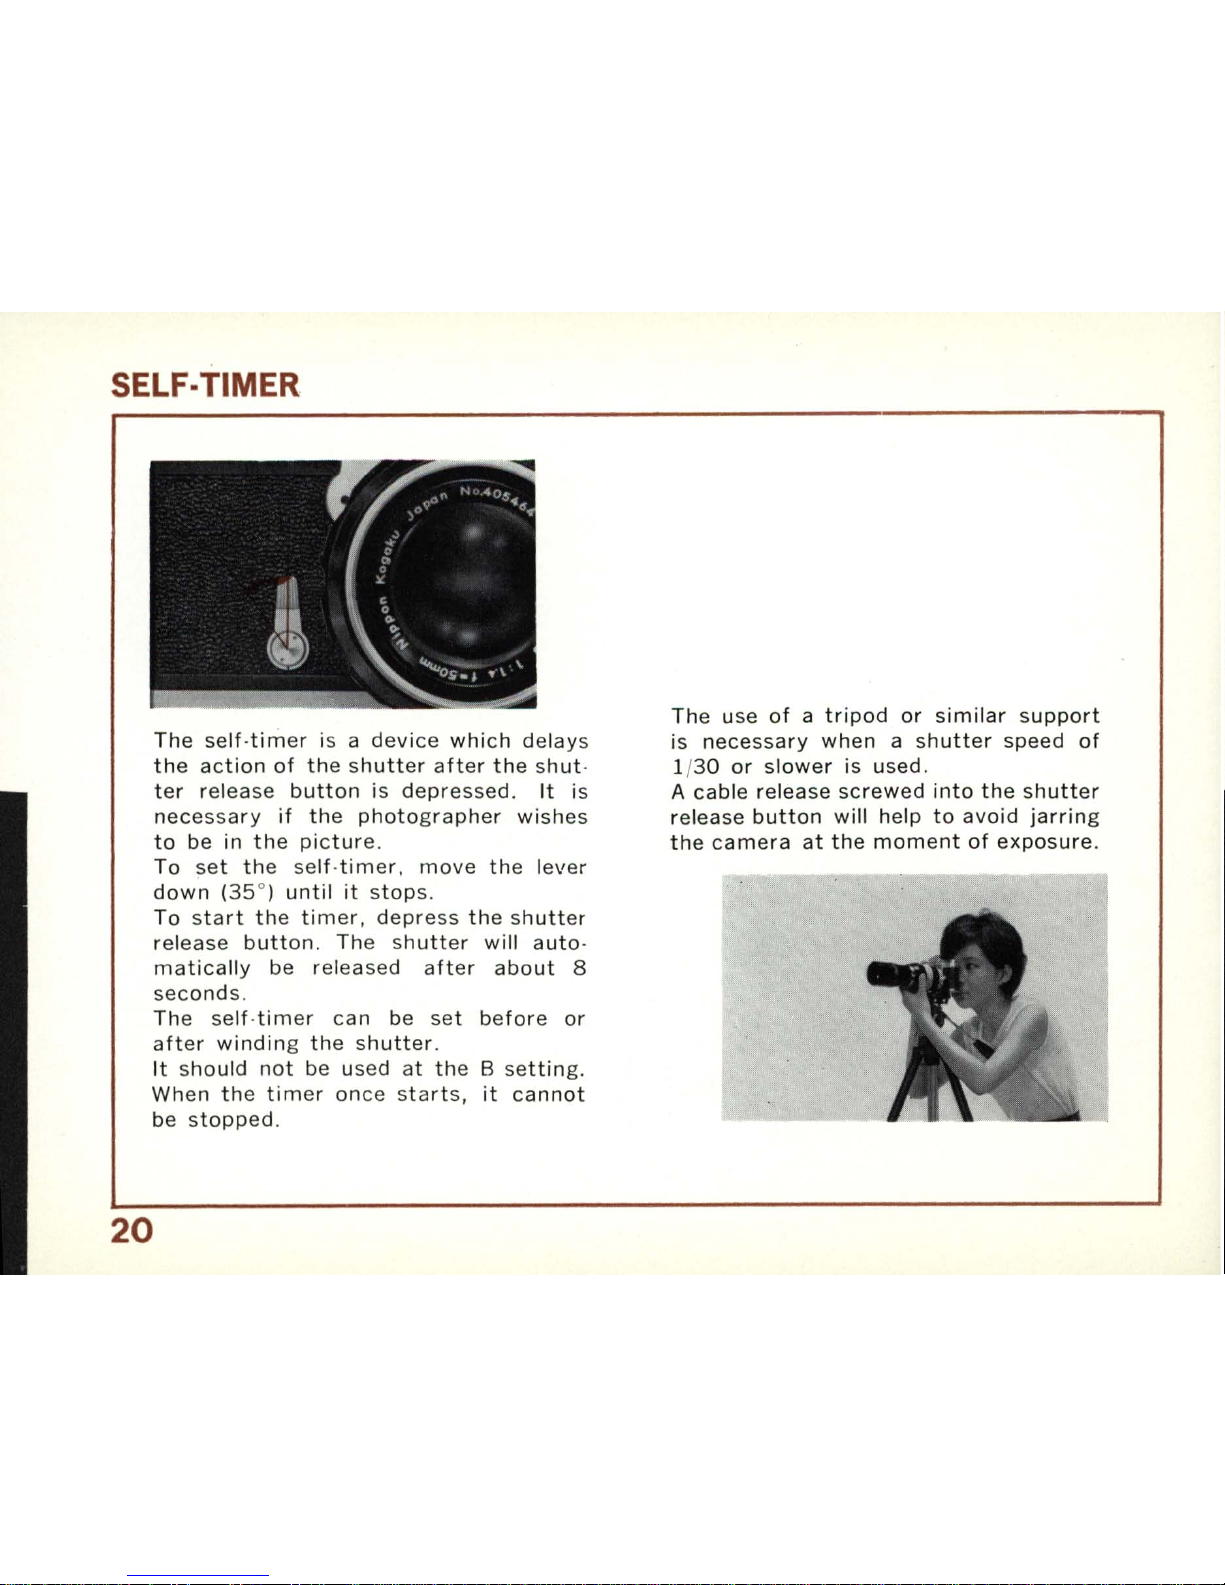
SELF·TIMER
The
self·
timer
is a
devi
ce
which
delays
the
action
of
the
shutter
after
the
shut
·
ter
release
button
is
depressed.
It
is
necessary
if
the
photographer
wishes
to
be in
the
picture.
To
set
the
self
·
timer
.
move
the
lever
down
(35°)
until
it
stops
.
To
start
the
timer,
depress
the
shutter
release
button.
The
shutter
will
auto·
matically
be
released
after
about
8
seconds
.
The
self
·
timer
can
be
set
before
or
after
winding
the
shutter
.
It
should
not
be used
at
the
B
setting.
When
the
timer
once
starts,
it
cannot
be
stopped
.
20
Th
e u
se
of
a
tripod
or
similar
support
is
necessary
when
a
shutter
speed
of
1/
30
or
slower
is
used.
A
cable
release
screwed
into
the
shutter
release
button
will
help
to
avoid
jarring
the
camera
at
the
moment
of
exposure
.
This manual suits for next models
1
Table of contents
Other Nikon Film Camera manuals

Nikon
Nikon Zoom Touch 400 Quartz Date User manual

Nikon
Nikon N55 User manual

Nikon
Nikon LITE TOUCH ZOOM 110S User manual

Nikon
Nikon 2170749 - Pronea S APS Camera User manual

Nikon
Nikon MD-14 User manual

Nikon
Nikon F75D - F75 QD = N75 35mm SLR Camera Body... User manual

Nikon
Nikon PhotomicF Tn Finder User manual

Nikon
Nikon F65 - F65 35mm SLR Camera Body Only User manual

Nikon
Nikon One-touch User manual

Nikon
Nikon ZoomTouch 500S User manual


