Nikro Industries PW10088 User manual
10 GALLON
HEPA FILTERED VACUUM
MODEL #PD10088 & PW10088
INSTRUCTION MANUAL

2
All Nikro Industries Inc. products that have rated efficiencies of 99.97% @ 0.3 microns and/or
99.99% @ 0.3 microns, have H.E.P.A. filters that have been individually tested to meet these
minimum efficiencies.
Although all the filters have been pre-tested, the possibility of leaks or filter failure due to
handling, transportation, punctures, loaded filters, moisture, wear and tear, etc., does exist.
Therefore, when using this equipment in highly sensitive areas or where any release of particles
above and beyond the minimum efficiencies would be detrimental and harmful to humans, plants
or property; it is strongly recommended that the units be individually tested prior to their use.
This is to assure that they are maintaining the efficiency levels, which they were designed to
filter out.
FAILURE TO DO SO COULD RESULT IN SERIOUS HARM TO HUMAN LIFE, PLANT LIFE
AND/OR PROPERTY.
RISK OF FIRE, ELECTRIC SHOCK, OR PERSONAL INJURY
1115 N. Ellsworth Ave., Villa Park, IL 60181
Telephone: 630-530-0558 FAX: 630-530-0740 Toll Free: 800-875-6457
“READ AND SAVE THESE INSTRUCTIONS”

3
IMPORTANT SAFETY INSTRUCTIONS
When using an electrical appliance, basic precautions should always be followed, including the following:
READ ALL INSTRUCTIONS
BEFORE USING (THIS APPLIANCE)
WARNING – To reduce the risk of fire, electric shock, or injury:
1. Do not leave appliance when plugged in. Unplug from outlet when not in use and before servicing.
2. Do not use outdoors or on wet surfaces
3. Do not allow to be used as a toy. Close attention is necessary when used by or near children.
4. Use only as described in this manual. Use only manufacturer’s recommended attachments.
5. Do not use with damaged cord or plug. If appliance is not working as it should, has been dropped,
damaged, left outdoors, or dropped into water, return it to a service center.
6. Do not pull or carry by cord, use cord as a handle, close a door on cord, or pull cord around sharp edges or
corners. Do not run appliance over cord. Keep cord away from heated surfaces.
7. Do not unplug by pulling on cord. To unplug, grasp the plug, not the cord.
8. Do not handle plug or appliance with wet hands.
9. Do not put any object into openings. Do not use with any opening blocked; keep free of dust, lint, hair, and
anything that may reduce air flow.
10. Keep hair, loose clothing, fingers, and all parts of body away from openings and moving parts.
11. Turn off all controls before unplugging.
12. Use extra care when cleaning on stairs.
13. Do not use to pick up flammable or combustible liquids, such as gasoline, or use in areas where they may
be present.
14. “Connect to a properly grounded outlet only. See Grounding Instructions.”
15. “Do not pick up anything that is burning or smoking, such as cigarettes, matches, or hot ashes.”
16. “Do not use without dust bag and/or filters in place.”
17. Do not wrap the cord around the dome. Wrapping the cord around the dome will restrict the motor from
exhausting properly and will result in overheating and damaging the motor
18. This vacuum cleaner should never be used in explosion-hazardous areas or to pick up combustible or
flammable liquids such as gasoline, etc.
19. This vacuum should never be operated without the proper filters installed in the manner described in the following
pages of this manual.
20. This machine should never be serviced by anyone other than an authorized technician.
21. This vacuum is for commercial use only.
22. Use only original NIKRO replacement parts and attachments.
4
OPERATING INSTRUCTIONS
INSPECTION
Thoroughly inspect your machine for any shipping damage. Your machine has already been thoroughly tested at
the Nikro Industries manufacturing plant prior to shipping.
ELECTRICAL SPECIFICATION
This machine is designed to operate on a 15 amp. 115V., 60 hz., AC circuit. A deviance of this could cause serious
damage to the unit.
GROUNDING INSTRUCTIONS
This appliance must be grounded. If it should malfunction or breakdown, grounding provides a path of least
resistance for electric current to reduce the risk of electric shock. This appliance is equipped with a cord having an
equipment-grounding conductor and grounding plug. The plug must be inserted into an appropriate outlet that is
properly installed and grounded in accordance with all local codes and ordinances.
WARNING – Improper connection of the equipment-grounding conductor can result in a risk of electric shock.
Check with a qualified electrician or service person if you are in doubt as to whether the outlet is properly grounded.
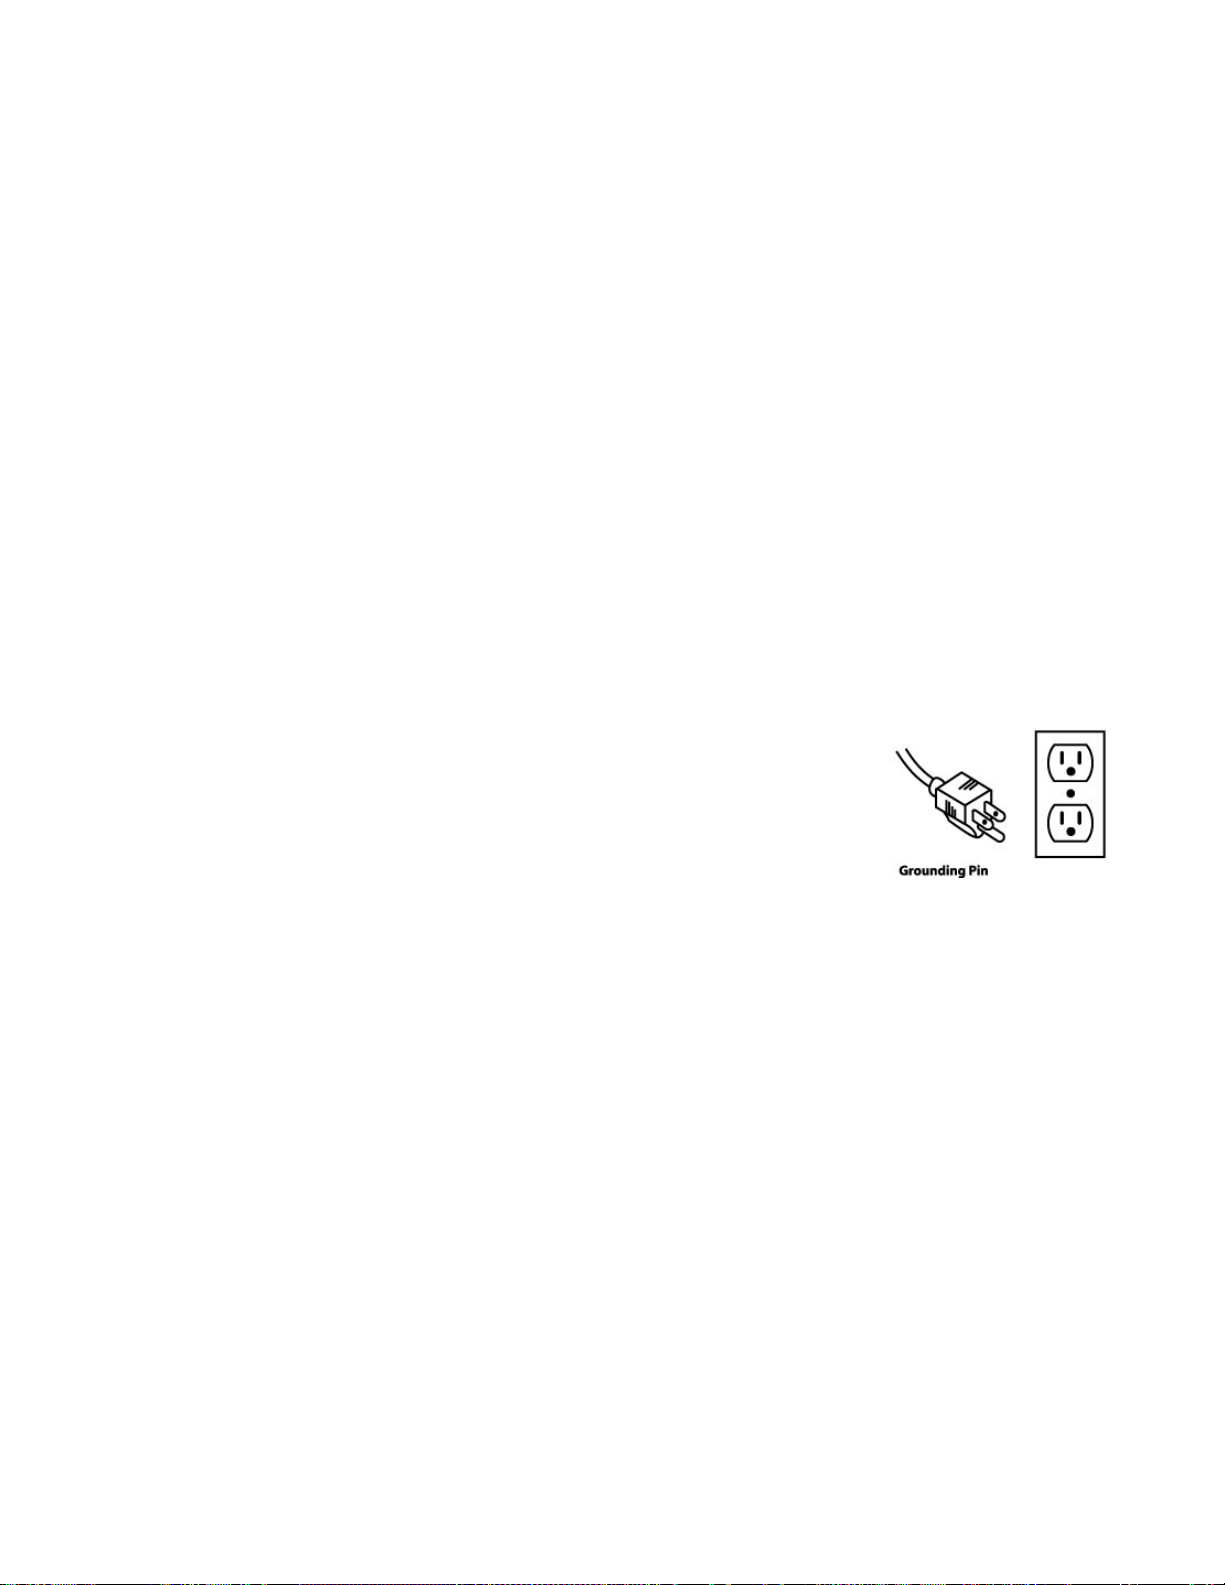
Do not modify the plug provided with the appliance – if it will not fit the outlet, have a
proper outlet installed by a qualified electrician.
This appliance is for use on a nominal 120-V circuit and has a grounding attachment
plug that looks like the plug illustrated in sketch A in Figure 20. Make sure that the
appliance is connected to an outlet having the same configuration as the plug. No
adaptor should be used with this appliance.
MAINTENANCE
Lubrication of this motor is not required as it is equipped with sealed bearings.
Always keep the air cooling intake screen free, not allowing any restriction of airflow. Airflow restriction will over and
damage the motor.
To prolong the life of the HEPA filter, empty, clean, and replace bags and filters regularly as described in the
following sections.
STORAGE
Before storing your Nikro vacuum disconnect from electrical outlet.
The tank should be emptied and cleaned.
The cord should be coiled and stored so as not to create a tripping hazard.
The vacuum should be stored indoors.
Sketch A Fi
g
. 20
5
PACKAGING
Please do not discard any of the packaging until you have inspected the vacuum and it is operational.
Make sure the contents are intact and complete. If there are any missing parts please contact Nikro
immediately.
CONTENTS
1 - #PD10088 – 10 Gallon HEPA Filtered Vacuum
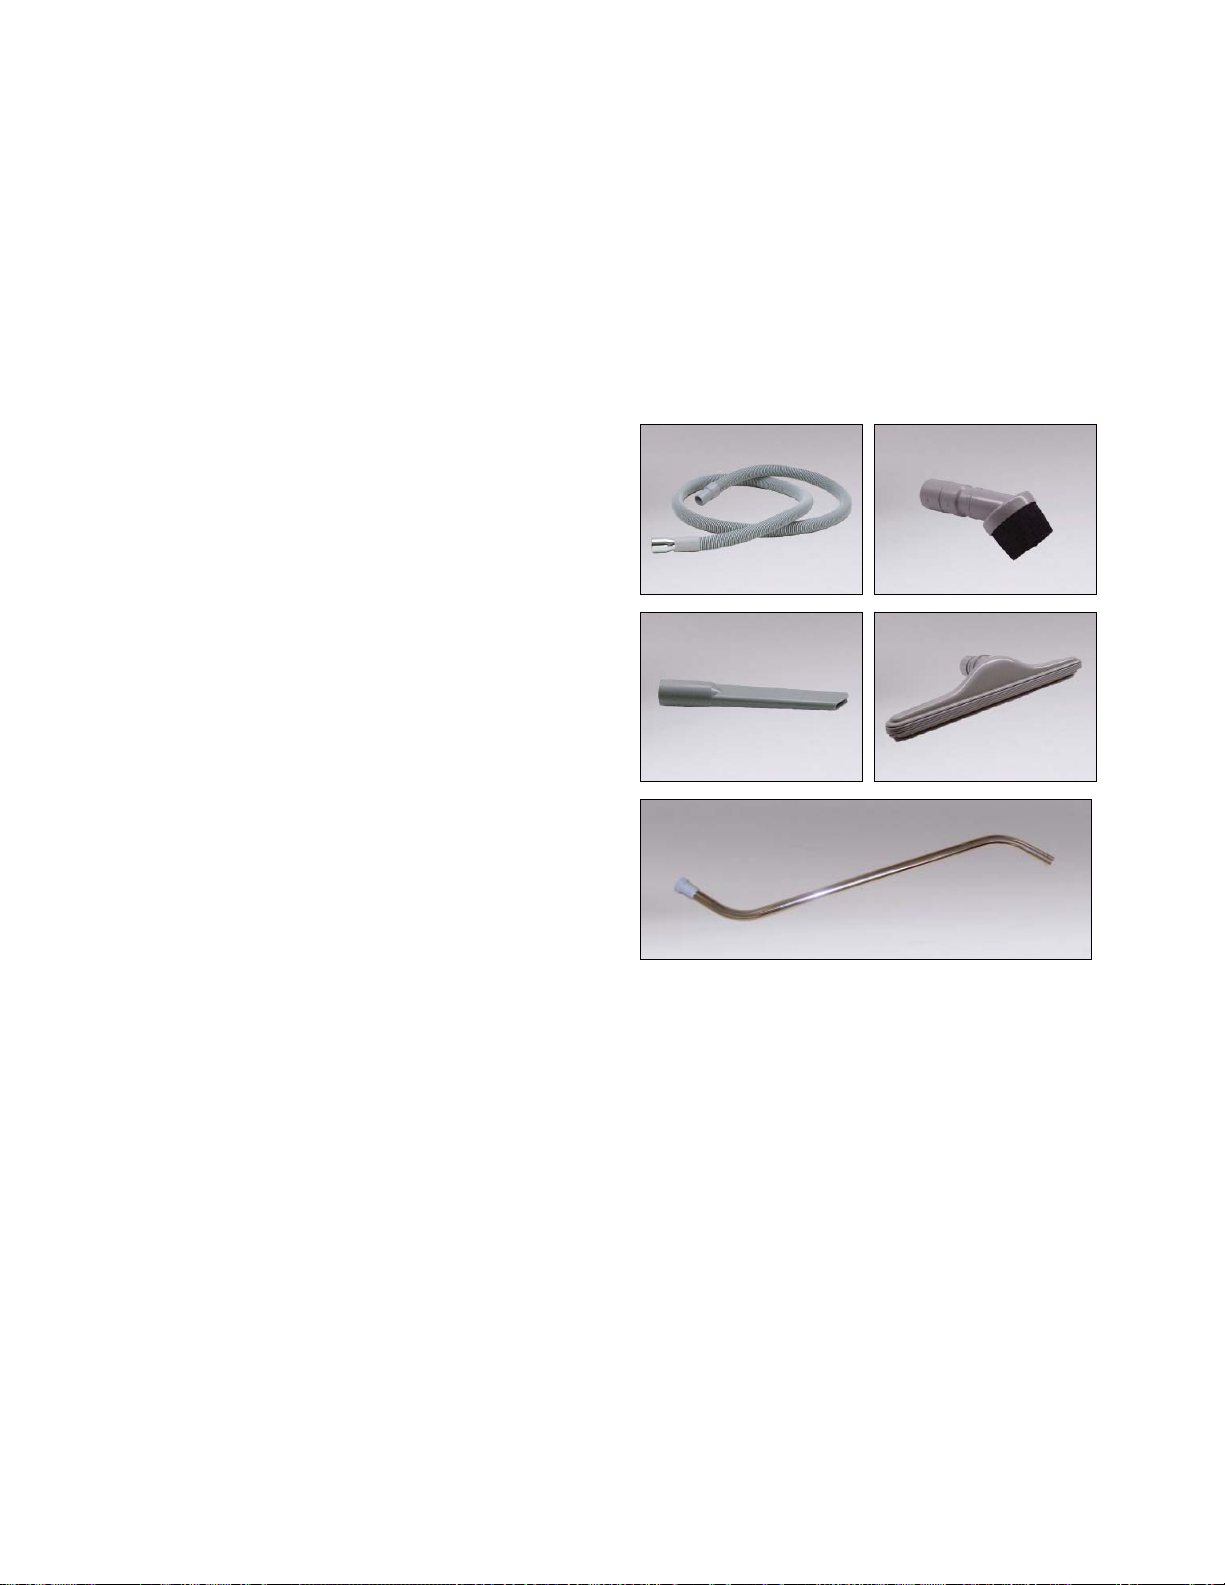
1 - #PKD100 Tool Kit:
#520332 – 1 ½” x 10’ Hose Assembly
#520454 – Double Bend Wand
#520112 – 3” Round Plastic Dust Brush
#520455 – 11” Crevice Tool
#520649 – 14” Plastic Gulper Tool
Replacement Filters:
6 - #520033 – Collection Bags (1 installed in vacuum)
6 - #520035 – Filter Protectors (1 installed in vacuum)
1 - #520037 – Dacron Filter Bag (Installed in Vacuum)
6 - #862006 – Impaction Filters (1 installed in vacuum)
1 - #861969 – HEPA Filter (Installed in vacuum)
6
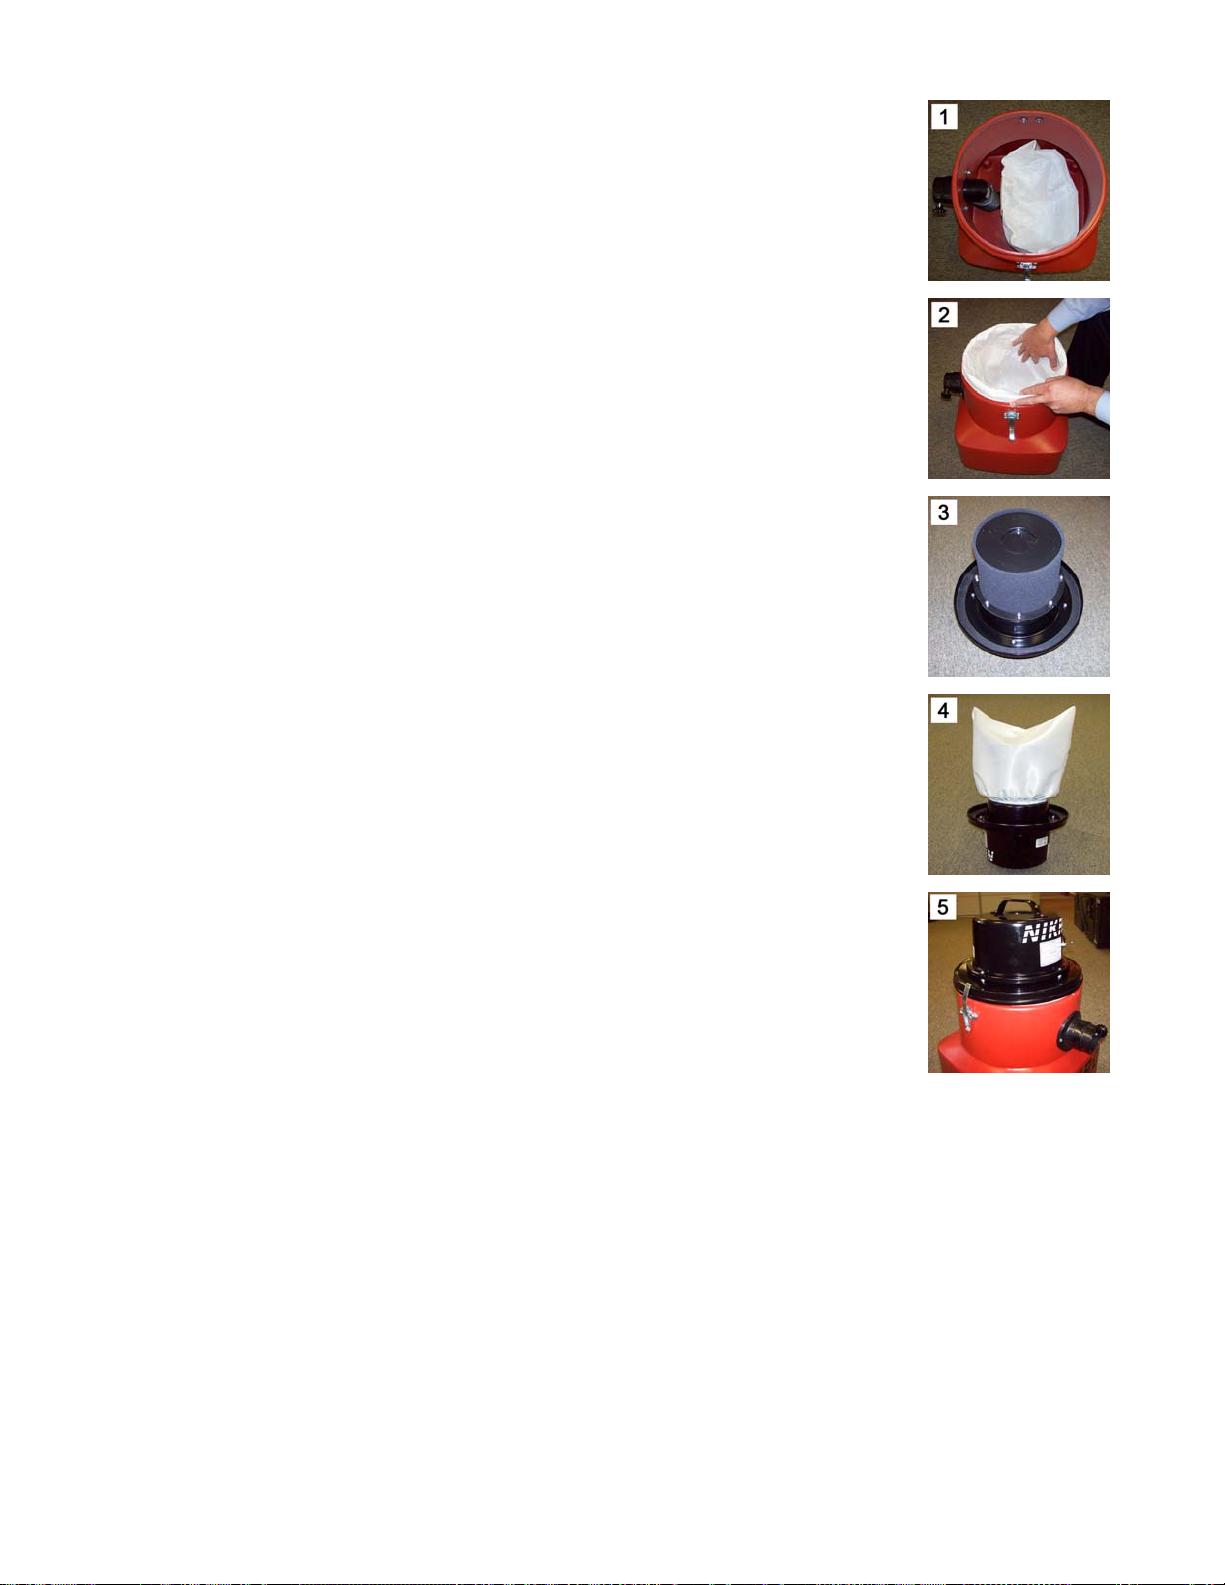
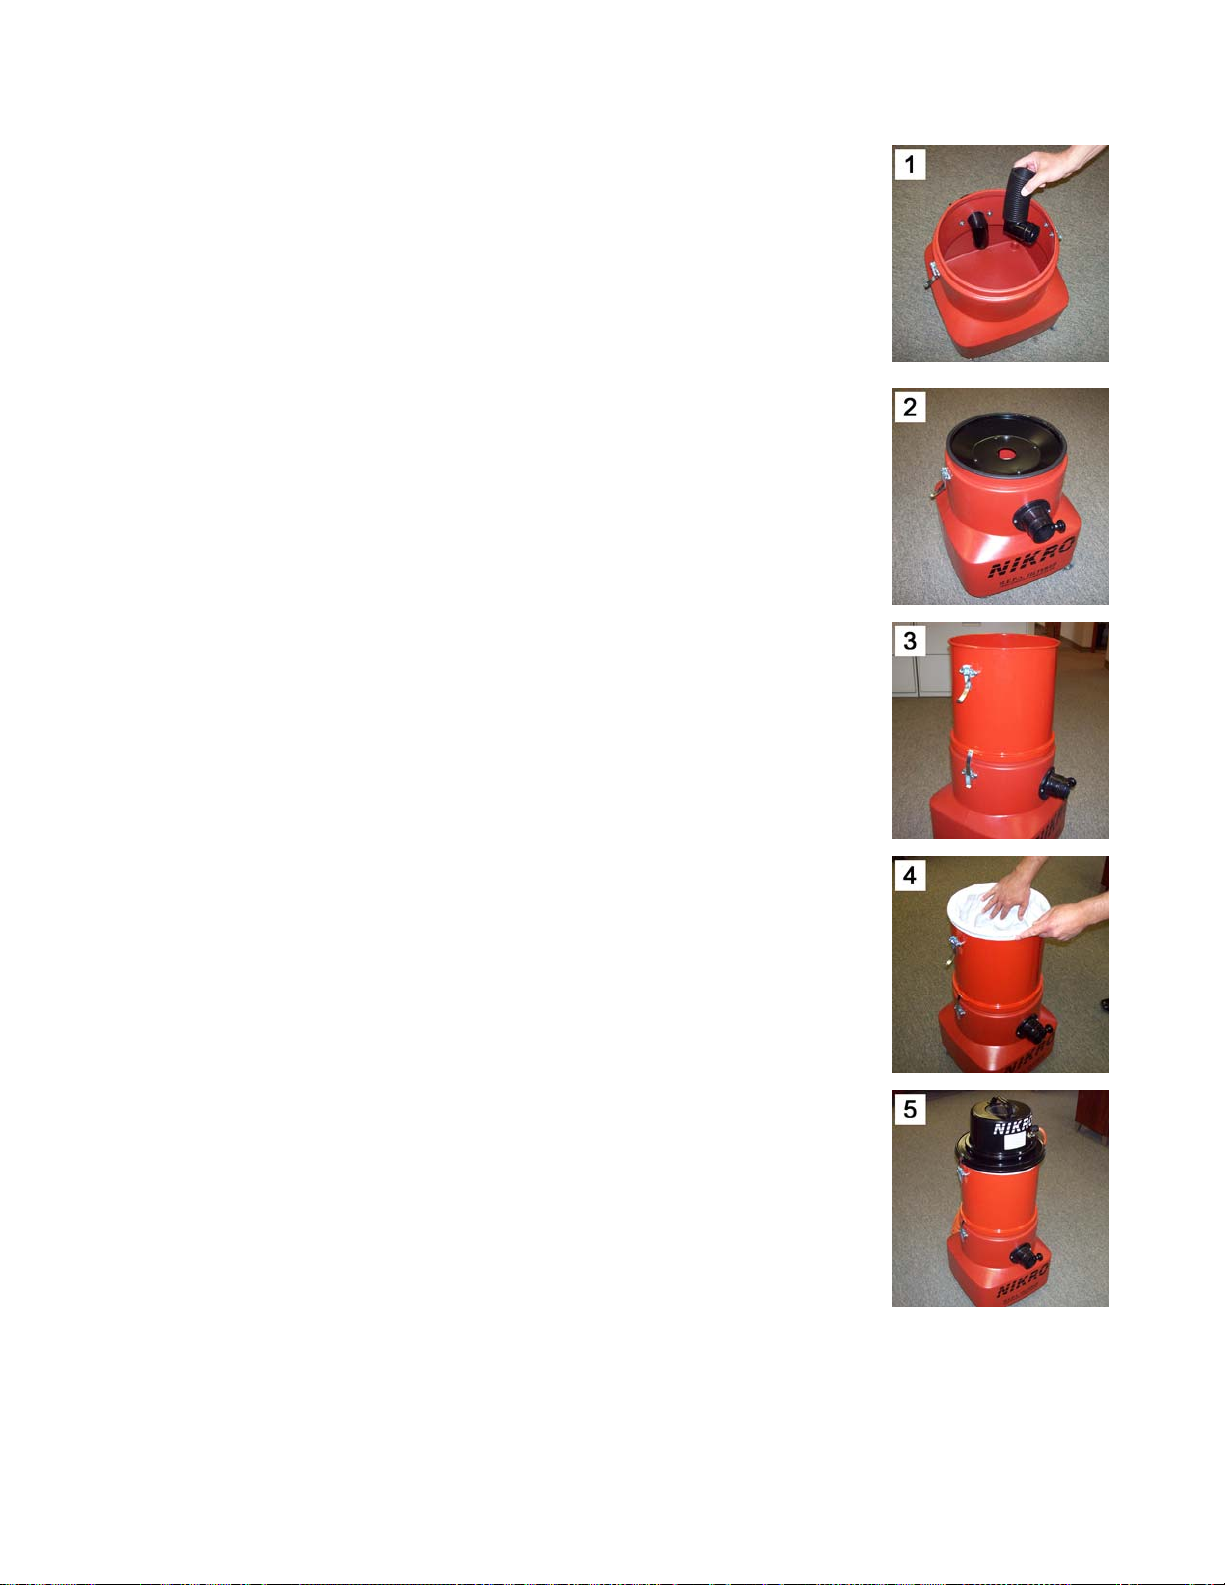
TANK AND FILTER PREPARATION
1. Place the paper collection bag (#520033) into the bottom of the tank.
Pull the cardboard / rubber collar over the down tube, pulling it just
above the rib on the down tube. Then gently pull apart the accordion-
like pleats so that the bag is open. (See Photo 1)
2. Open the filter protector bag (#520035) and push it down into the
tank. Take the elastic bag and pull it over the top of the tank. The
elastic band should rest on the outside of the tank below the rim.
(See Photo 2)
3. Make sure the impaction prefilter (#862006P) is in proper placement
over the HEPA filter, make sure that it covers the entire surface area
of the HEPA filter. (See Photo 3)
4. Take the non-clinging dacron bag (#520037) and pull the elastic
band up over the HEPA filter, and let the elastic band rest securely
on the motor port of the lid assembly, above the HEPA filter flange.
(See Photo 4)
5. Place the lid assembly (with the HEPA filter securely bolted in place)
onto the tank and snap the latches into place. (See procedure for
changing the HEPA filter section of this manual) (See Photo 5)
6. Vacuum is ready for use. Plug in vacuum. On/Off switch is located
on the motor dome.
FILTER MAINTENANCE AND REPLACEMENT INSTRUCTIONS
Warning: When a loss of vacuum power is detected, the vacuum should be turned off immediately. Continued use
of the machine could result in severe damage to the motor and/or HEPA filter. This loss of vacuum power could be
caused by one of the following:
A. The paper collection bag may be full and needs to be replaced.
B. The tank may be full and needs to be emptied.
C. The wand, hose, or down tube may be clogged and needs to be cleared.
D. The impaction prefilter may be clogged and needs to be replaced. (Never try to clean the
impaction prefilter, it should be discarded.) See section on changing the impaction prefilter.
E. The Dacron bag may be clogged and needs to be cleaned or replaced.
F. The HEPA filter may be clogged and needs to be replaced.
To prolong the life of the HEPA filter and motor, the paper collection bag should be changed when it is 1/2 full. The filter
protector and impaction prefilter should be changed at least every other time that the collection bag is changed

7
PROCEDURES FOR REMOVING CONTAMINATED FILTERS
Caution:
When removing contaminated filters or using this machine, you should always wear gloves, clothing and a
respirator approved for the particular contaminant that you are working with.
FILTER REMOVAL PROCEDURES
1. Turn off and unplug machine
2. Slowly and carefully lift one side of the lid assembly from the tank. Holding the lid with one hand, reach
under the lid and gently tap all around the dacron filter bag, allowing any loose dust particles to drop into
the tank.
3. Carefully lift the lid assembly off the tank. With a damp rag, wipe underside of the lid assembly. Set aside
and dispose of rag properly. (Never set the lid assembly down on the HEPA filter).
4. Remove the impaction prefilter. (by sliding it off the end of the HEPA filter). Dispose of contaminated filters
properly.
5. Carefully pull the paper filter protector bag over the rim of the tank and remove it from the tank. Dispose of
contaminated filters properly.
Caution: Be careful not to create any airborne dust by snapping the elastic bag
6. Take the collar of the paper collection bag and carefully slide it down and off the down tube and remove the
collection bag from the tank. Dispose of properly.
7. Take a damp rag and wipe down the inside of the tank. Dispose of contaminated rag properly.
8. All hazardous waste must be disposed of properly. Never put contaminated debris in a regular trash
container. All debris must be placed in a properly labeled bag or container, and should be removed by a
licensed waste hauler. Check with Federal, State, and Local officials for proper handling and disposal of the
waste you are handling.
CONSULT PROPER AUTHORITIES FOR REGULATIONS REGARDING DISPOSAL OF FILTERS AND DEBRIS
PROCEDURE FOR CHANGING THE HEPA FILTER
1. The precautionary steps described in this manual should be used
when changing the HEPA filter.
2. NOTE: You must follow Local and or Federal guidelines when
working with contaminated filters.
3. Remove the eight (8) bolts holding the HEPA filter to the filter
mounting plate, using a Phillips screw driver and a 11/32" wrench.
4. Carefully remove the HEPA filter from the filter mounting plate, being
careful not to create any airborne dust.
5. This filter cannot be cleaned, and should be disposed of in an
appropriate manner.
6. Re-install the new HEPA filter securely tightening the eight screws,
nuts, lock washers, and flat washers.
7. Replace the impaction filter, on the HEPA filter.

8
LID ASSEMBLY
PC NO PART NO PART NAME QTY
1 861313 MOTOR 1
2 520302 LID 1
3 520009 FILTER MOUNTING PLATE 1
4 861969 HEPA FILTER 1
5 520215 SMALL SPACER 4
6 520002 MOTOR HOLD DOWN 1
7 520214 LARGE SPACER 4
8 520001 DOME 1
9 861761 8-32 X 1 SCREW 4
10 862092 10-32 X 5/8 HEX HEAD
FLANGE BOLT 8
11 861537 8-32 NYLON LOCKNUT 4
12 861770 10-32 NYLON LOCKNUT 8
13 520015 SWITCH 1
14 860170 SWITCH ON/OFF LABEL 1
15 520222 HANDLE 1
16 862006 IMPACTION FILTER 1
17 520013 ELECTRICAL CORD STRAIN
RELIEF 1
18 520010 ELECTRICAL CORD 1
19 520037 DACRON FILTER BAG 1
20 520016 FOAM RING 1
21 861742 1/4-20 X 5/8 BUTTON HEAD 2
22 861777 HANDLE NUT 2
23 861422 RIVET 4
862386 MOTOR & LID ASSY
COMPLETE 1

9
TANK ASSEMBLY
#PD10088 WIRING DIAGRAM
PC NO PART NO PART NAME QTY
1 861127 TANK 1
2 861128 SMALL CASTER 4
3 520220 INTAKE 1
4 860803 LATCH 2
NOT SHOWN 520217 INTAKE KNOB 1
NOT SHOWN 520216 INTAKE GASKET 1
NOT SHOWN 540001 UPPER DOWN TUBE
ELBOW 1
NOT SHOWN 860468 DOWN TUBE COUPLER 1
NOT SHOWN 861546 LOWER DOWN TUBE
ELBOW 1
NOT SHOWN 861101 DOWN TUBE ASSY
COMPLETE 1
861655 Tank Assembly Complete
10
OPTIONAL WET PICK-UP CONVERSION
1. Remove all paper filters from the vacuum tank assembly and remove
the lower portion of the down tube. (See Photo 1)
2. Place the water shut-off float assembly onto the tank. Make sure the
rubber gasket on the float plate is seated on the top rim of the tank
(See Photo 2)
3. Next place the water pick-up sleeve assy. on top of the tank assy.
Align the latch strikes on the sleeve with the latches on the tank and
securely snap latches into place. (See Photo 3)
4. Take the paper filter protector and push it down into the water pick-
up sleeve. Take the elastic band and pull it over the top of the tank.
The elastic band should rest on the outside of the tank below the rim
of the sleeve. (See Photo 4)
5. Place the motor & lid assembly with the Dacron bag onto the water
shut-off sleeve. Snap the two lid latches into place. (See Photo 5)
6. Unit is ready for wet/pick-up.
WARNING:
For safe and proper water pick-up, the conversion assy. must be assembled
exactly as shown.
IMPORTANT:
When converting for wet pick-up, the upper clamp on the down tube coupler
(located in the tank assy.) must be loosened and bottom half of the tube
removed; this will prevent water from splashing up on the HEPA filter. (See
Photo 1)
NOTE:
The #861119 WET PICK-UP CONVERSION KIT IS NOT INCLUDED WITH
THE PD10088 HEPA VACUUM AND MUST BE ORDERED SEPARATELY.

11
WARRANTY
Nikro HEPA Vacuums are warranted for 2 years from the date delivered to the original end user
and may not be assigned or transferred.
Parts, which become defective due to faulty workmanship or materials during normal use in this
period will be repaired or exchanged at no charge if returned and approved by an authorized
Nikro service center. All replaced or repaired parts shall only be warranted for the remainder of
the original two year warranty period.
After the expiration of the two year warranty. All warranties on this unit including fitness for a
proposed usage or purpose will become void.
The end user shall be responsible for freight charges incurred to deliver warranted product to an
approved Nikro service center. Nikro shall be responsible for freight charges incurred in
returning unit to customer, but not to exceed the original freight charges to customer.
It shall be wholly Nikro’s decision to repair, replace or refund the purchase price of any such
defective goods.
This warranty does not apply to normal wear and tear, neglect, misuse, abuse or incorrect
installation. If any other replacement parts, filters or attachments are used other than original
Nikro parts, this warranty will become void.
Nikro disclaims responsibility for loss of production, profits, goodwill or any other costs that may
indirectly occur due to the failure of this product.
H.E.P.A. FILTER STANDARDS AND CERTIFICATION
Nikro H.E.P.A. filtered vacuums are built in accordance with ANSI Z9.2 standards.
All Nikro H.E.P.A. filters are manufactured and individually tested using the MIL-STD 282 D.O.P.
test, or the IEST-RP-CC-001.3 test method.
Each filter is tested and certified to have a minimum efficiency of 99.97% @ 0.3 micron
particles. All filters are then individually labeled and registered by the manufacturer.
All H.E.P.A. filters used in Nikro equipment meet, and in most cases, exceed the minimum
standard of 99.97% efficiency @ 0.3 micron particles, and comply with OSHA and EPA
standards for cleaning the air of toxic and nuisance dust such as mold, lead and asbestos.
ELECTRICAL CERTIFICATION
ETL LISTED
CONFORMS TO UL STD 1017
CERTIFIED TO CAN/CSA STD C22.2 NO. 243
This manual suits for next models
1
Table of contents
Other Nikro Industries Vacuum Cleaner manuals


