domoova DHV51 User manual

EN
Stick vacuum cleaner
User manual
DHV51

EN
User Manual
Thank you for choosing DOMOOVA! We hope you are fully satised
using your appliance as part of your day-to-day routine.
If you should encounter situations that have not been properly
addressed in this User Manual or were to have any queries, do not
hesitate to contact us and a member of our Technical Customer
Service Department will be more than happy to answer your
questions.
For more information, you can visit the ocial DOMOOVA website:
www.domoova.com
We reserve the right to make technical alterations to the appliance
without prior notice with the objective of continually improving our
products and customer satisfaction.
Please carefully read all instructions in this manual before using this
appliance. DOMOOVA will not be liable for damage due to incorrect
use.

1
Contents
EN
Recommendations................................................................. 2
Product overview................................................................... 3
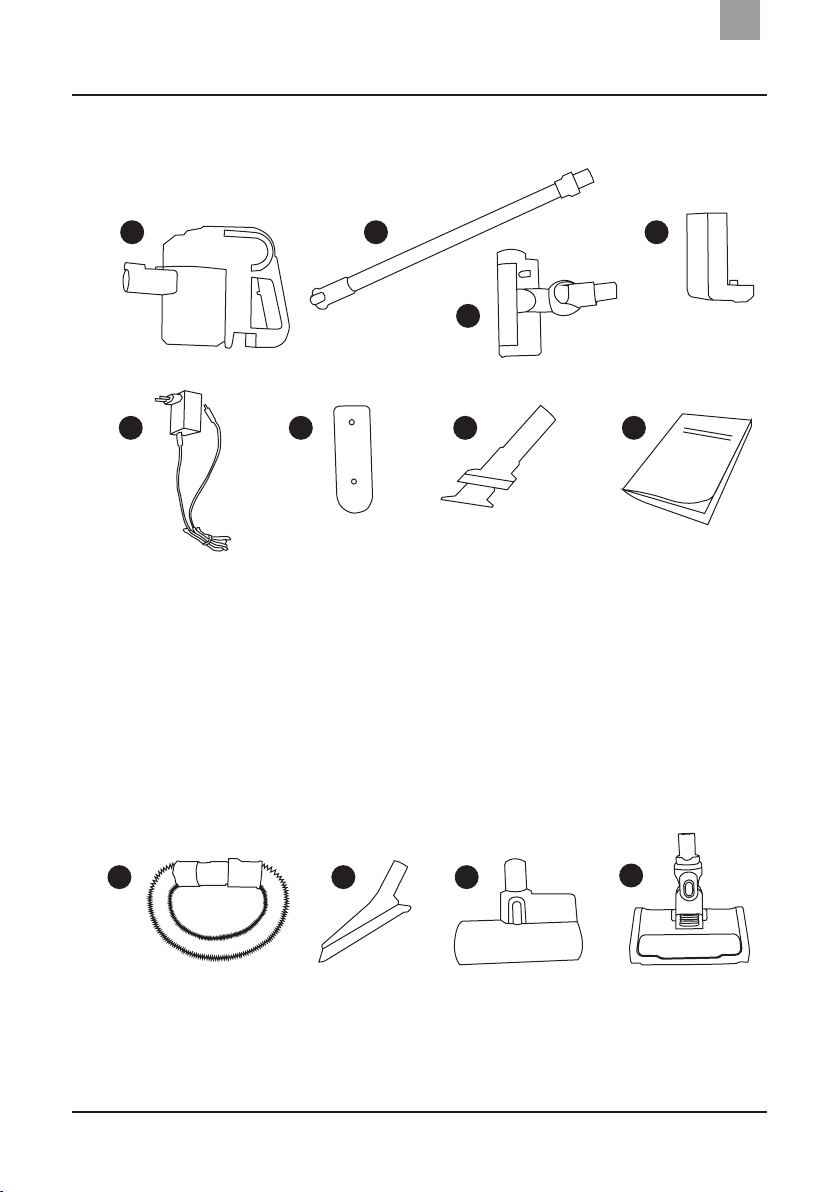
Product contents ..................................................................................... 3
Product diagram ..................................................................................... 4
Operating the appliance ........................................................... 7
Charging the battery ............................................................................... 7
Starting the appliance ............................................................................ 9
Operating modes .................................................................................. 10
Stopping the appliance ........................................................................ 11
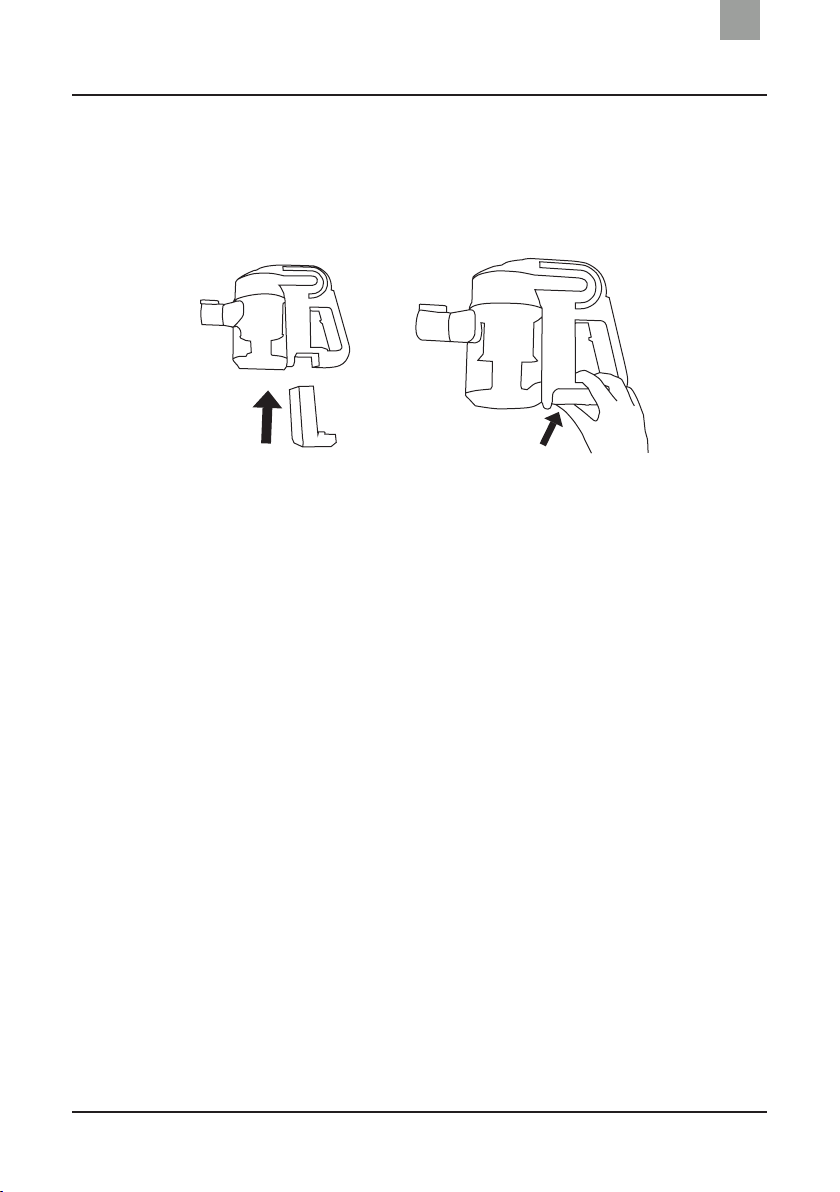
Installing the wall mount ..................................................................... 12
Maintenance......................................................................... 13
Dust bin and lter ................................................................................. 13
Turbo brush ........................................................................................... 15
Suction pipes ......................................................................................... 16
Accessories ............................................................................................ 16
Indicator lights..................................................................... 17
Troubleshooting................................................................... 18
Table: Malfunctions and possible causes .......................................... 18
Warranty and after-sales service....................................... 20
Technical specications ...................................................... 21
Safety instructions and precautions ................................. 22
Operating conditions ............................................................................ 22
Recycling instructions ......................................................... 24

2
Recommendations
EN
• Before using DHV51 for the rst time, it must be charged for 3
hours.
• DHV51 must be unplugged before it is used.
• The DHV51 Turbo brush is not designed to be used on long-pile
carpets, which could block or damage the appliance.
• DHV51 is designed for domestic indoor use only.
• DHV51 is not designed to vacuum water or other liquid products.
• Do not use the appliance on wet surfaces.
• Empty the dust bin after each use.

3
Product overview
EN
Product contents
1
1. Motor unit
2. Cleaning wand
3. Turbo brush
4. Removable Lithium-ion
battery
5. Mains charger
6. Wall mount (2 screws
included)
7. 3-in-1 precision brush
8. User manual
2 4
3
5 6 7 8
Optional tools
9 10 11
9. Flexible hose
10. Soft brush
11. Animal Power brush
12. Soft Active brush (for
delicate oors)
12

4
Product overview
EN
Product diagram
Motor unit
1. Power socket
2. Suction level button
3. ON/OFF button
4. Indicator lights
5. Vacuum nozzle
6. Cyclone technology
7. Dust bin
8. Ergonomic handle
9. Removable battery
Turbo brush
1. Turbo brush LED light
2. Side head
3. Castor
4. Rotating brush release latch
5. Electric rotating brush
1
2
3
4
5
1
2
6
7
8
9
3
5
4

5
Product overview
EN
3-in-1 precision tool
1. Upholstery brush head
2. Nooks connector
3. Brush strip connector
1 2 3
Dust bin
1. Dust bin
2. Dust bin opening
3. Filter cover
4. Dust bin release button
1
2 4
3
Filter
1. HEPA 13 lter attachment
2. HEPA 13 lter
1
2
Cleaning wand
1. Cleaning wand
2. Connector head
1
2

6
Product overview
EN
Soft brush (optional)
1. Lining for furniture and
delicate surfaces
2. Soft bristles
1 2
Animal Power brush (optional)
1. Motor unit
2. Electric rotating brush
1
2
Suction hose (optional)
1. Suction hose
2. Accessory connector head
(brushes and tools)
1 2
Soft Active brush (optional)
1. Brush pivot
2. Rotating brush release latch
3. Soft Active brush with soft
lining
2
1
3

7
Operating the appliance
EN
Insert the battery in the motor unit. Connect the power cable to the
motor unit using the power adapter.
NOTES:
• The stick vacuum battery may already be charged when you receive it. However,
you are recommended to charge the appliance for 3 hours (usual charge time)
before using the appliance. Battery charge time will be 3 hours thereafter.
• While DOMOOVA stick vacuum is being charged, the indicator lights on the
handle will start to ash. Once the battery is fully charged, the other three (3)
indicator lights will turn on for around 50 seconds, and then turn o.
Charging the battery
Inserting the battery

8
Operating the appliance
EN
Place the handheld vacuum on the oor (Figure 1) or x it to the wall
mount (Figure 2). For information about installing the wall mount,
see page 11.
While the appliance is being charged, the indicator lights on the
handle start to ash. When the battery is charged the indicator lights
turn o.
When the appliance is in use, the indicator lights turn o one by one
to indicate that the battery is weak.
NOTES:
• The battery may heat up while charging. If the vacuum temperature goes
above 55°C or below 0°C, the vacuum goes into safety mode until it returns to
a temperature between 0°C and 45°C. During this period, the battery will stop
charging.
• If the battery temperature exceeds 70°C while the vacuum is in use, the
indicator lights and power light (ON) will ash for 5 seconds. The appliance will
go into safety mode until the temperature reduces to around 65°C.
• If the vacuum is not used for a long period of time, you are recommended to
fully charge the battery, unplug it and store it in a cool, dry place.
Figure 1 Figure 2
Plugging in and charging the appliance

9
Operating the appliance
EN
Starting the appliance
After attaching the cleaning head of your choice to the vacuum, press
the ON/OFF button on the top of the handle once to switch on the
appliance.
NOTES:
• Unplug the stick vacuum before you use it.
• Once in operation, the power light (ON) and the charge indicator lights on the
vacuum unit will turn on.
• Do not use the Turbo brush, Soft Active brush (optional) or Animal Power brush
(optional) on long-pile carpets to avoid any damage.
• When the battery is fully charged, it has a runtime of up to 40 minutes at
minimum power and 20minutes at maximum power.
Turbo brush Animal Power brush
(optional)
Soft Active brush
(optional)

10
Operating the appliance
EN
Operating modes
Stick vacuum
Connect the wand to the vacuum unit and attach the Turbo brush
(Figure 1) or one of the accessories (Figure 2).
Handheld vacuum
Figure 1 Figure 2
Connect the Turbo brush
(Figure 1) 3-in-1 precision brush
(Figure 2) or one of the optional
accessories (Figure 3) to the
vacuum unit.
NOTE: Regularly check the state of the
Turbo brush and accessories to prevent
them from damaging ooring and
furniture.
Figure 1
Figure 2 Figure 3

11
Operating the appliance
EN
Power modes
The DHV51 has two suction levels. The appliance starts with minimum
suction. Press the suction level button (2) to switch to maximum
suction level. Press the same button to switch back to minimum
suction level.
1
2
1. ON/OFF button
2. Suction level button
Stopping the appliance
Press the ON/OFF button (1) to stop the appliance.

12
Operating the appliance
EN
Figure 3
To make storing DOMOOVA
DHV51 easier, you can safely
hang it using the wall mount.
Install the mount using the
screws provided (Figure 1).
You are recommended to install
the mount close to a socket to
make charging easier. Clip the
vacuum to the mount (Figures 2
and 3).
NOTE: You are recommended to x the
wall mount at the same height as the
vacuum so that it gently rests on the
ground and the screws do not have to
withstand its weight.
Installing the wall mount
Figure 1
Figure 2

13
Maintenance
EN
Dust bin and lters
Dust bin
Empty the dust bin after each
use.
Check that the vacuum is turned o and unplugged. Remove the
accessories and the removable wand from the motor unit for a
better grip. Open the lter cover on the bottom of the bin and empty
it (Figure 1).
NOTE: Take care when opening the cover as the dust could fall out on to the oor.
Motor unit
To clean the dust bin, release it by pressing on A (Figure 1). Then twist
the bin in an anti-clockwise direction. Empty the bin and carefully
remove the dust from the cyclone system (Figure 2) using a dry cloth.
Figure 1
Figure 1 Figure 2
A

14
Maintenance
EN
Open the top cover (Figure 1)
and remove the HEPA 13 lter
(Figure 2). Shake it outside to
remove any small dust particles
that could accumulate.
Figure 1 Figure 2
NOTE:
• The HEPA lter cannot be cleaned, otherwise it would become damaged. If the
HEPA lter is damaged, you are recommended to replace it to ensure that your
vacuum's lter performance is maintained.
Filter

15
Maintenance
EN
Turbo brush
Electric rotating brush
Please make sure to clean the brush regularly for optimum
performance.
Figure 1 Figure 2
Release the latch on the underside of the Turbo brush (Figure 1)
then remove the brush (Figure 2).
Remove debris (hair, dust) buildup on the brush and reattach the
brush. Make sure you reposition the release latch correctly.
Castor
Check that the castor under the Turbo brush is clean. Dust particles
can accumulate and prevent the Turbo brush from functioning
correctly.
NOTES:
• To reattach the brush, rst insert the left side into the notches and then the
right side.
• To remove the Turbo brush castor, take a small slotted screwdriver and gently
dislodge the castor's xing rod. Remove any debris and reattach the castor.

16
Maintenance
EN
Suction tubes
Wand
Regularly check that the cleaning wand is not blocked by dust buildup
or other debris.
Hose (optional)
Check that the hose is not blocked by dust buildup or other debris.
Accessories
The 3-in-1 precision brush, the Animal Power brush (optional), the
Soft Active brush (optional) and the Soft Brush (optional) must be
checked and cleaned regularly to maintain optimum performance.
NOTE: If the accessories are not cleaned regularly, the vacuum's performance could
deteriorate.

17
Indicator lights
EN
Vacuum status Indications
Charging Blue indicator lights ash from bottom to top.
Charging nished Blue indicator lights o.
In use Blue indicator lights ON.
Malfunction (error) All indicator lights ash for 5 seconds.
Weak battery Only ON button on.
1. ON indicator light
2. Top blue light
3. Middle blue light
4. Bottom blue light
5. Turbo brush LED light
1
2
3
4
5

18
Troubleshooting
EN
Please contact DOMOOVA technical department in the following
cases:
• If the appliance has been dropped, damaged or come into
contact with water.
• If the power cable is damaged.
• If the battery is defective.
Table: Malfunctions and possible causes
To prevent malfunctioning, regularly empty and clean the dust bin
and check accessories.
No. Malfunction Cause Solution
01 The appliance does
not respond.
1. Overheating.
2. The appliance is
in safety mode.
1. Clean the dust bin.
Check that nothing
is blocking the
accessories.
2. Wait a few minutes
so that vacuum
returns to a normal
temperature.
02 The appliance will not
turn o.
1. Battery level is
low.
2. Overheating.
1. Charge the appliance.
2. Wait for the
appliance to return to
a temperature below
65°C.
Table of contents
Languages:
Other domoova Vacuum Cleaner manuals

domoova
domoova DRV20 User manual

domoova
domoova DHV61 User manual

domoova
domoova DBV60 User manual

domoova
domoova DTV20 User manual

domoova
domoova DHV41 User manual

domoova
domoova DHV60 User manual

domoova
domoova DHV50 User manual

domoova
domoova DRV80 User manual

domoova
domoova DHV40 User manual

domoova
domoova DRV50 User manual