Nilox iCharge User manual

NILOX
iCharge Travel Multi-Charger
Instruction Manual

2
2
16
7
3
3
8
5
10
9
4
ⅠProduct Features
1. Applicable to 3.6/3.7 V & 7.2/7.4V lithium batteries used by all brands of Cell phone, Digital camera, PDA,
GPS, translator machine, game machine, MP3, iPod, and the like available on the market; 97% batteries
may be used with this iCharge Travel Multi-Charger, regardless of their shapes, number of connectors or
polarity.
2. Intelligent polarity-independent operation automatically detects the polarity of a battery before charging;
power shuts off upon completion of charge.
3. iCharge Travel Multi-Charger provides a total solution of Charge/Transform the power (Discharge)
system through the Power Energy Transform Technology (PETT) to 3 C Electronic Devices.
4. Charging in everywhere, no place limitation
ⅡMain unit and accessories
IUC-99 x1
AA Discharge Battery Case x 1
AC adapter x 1 (Input :100~240V, Output: 12V)
Car cigarette connector (charger) x 1
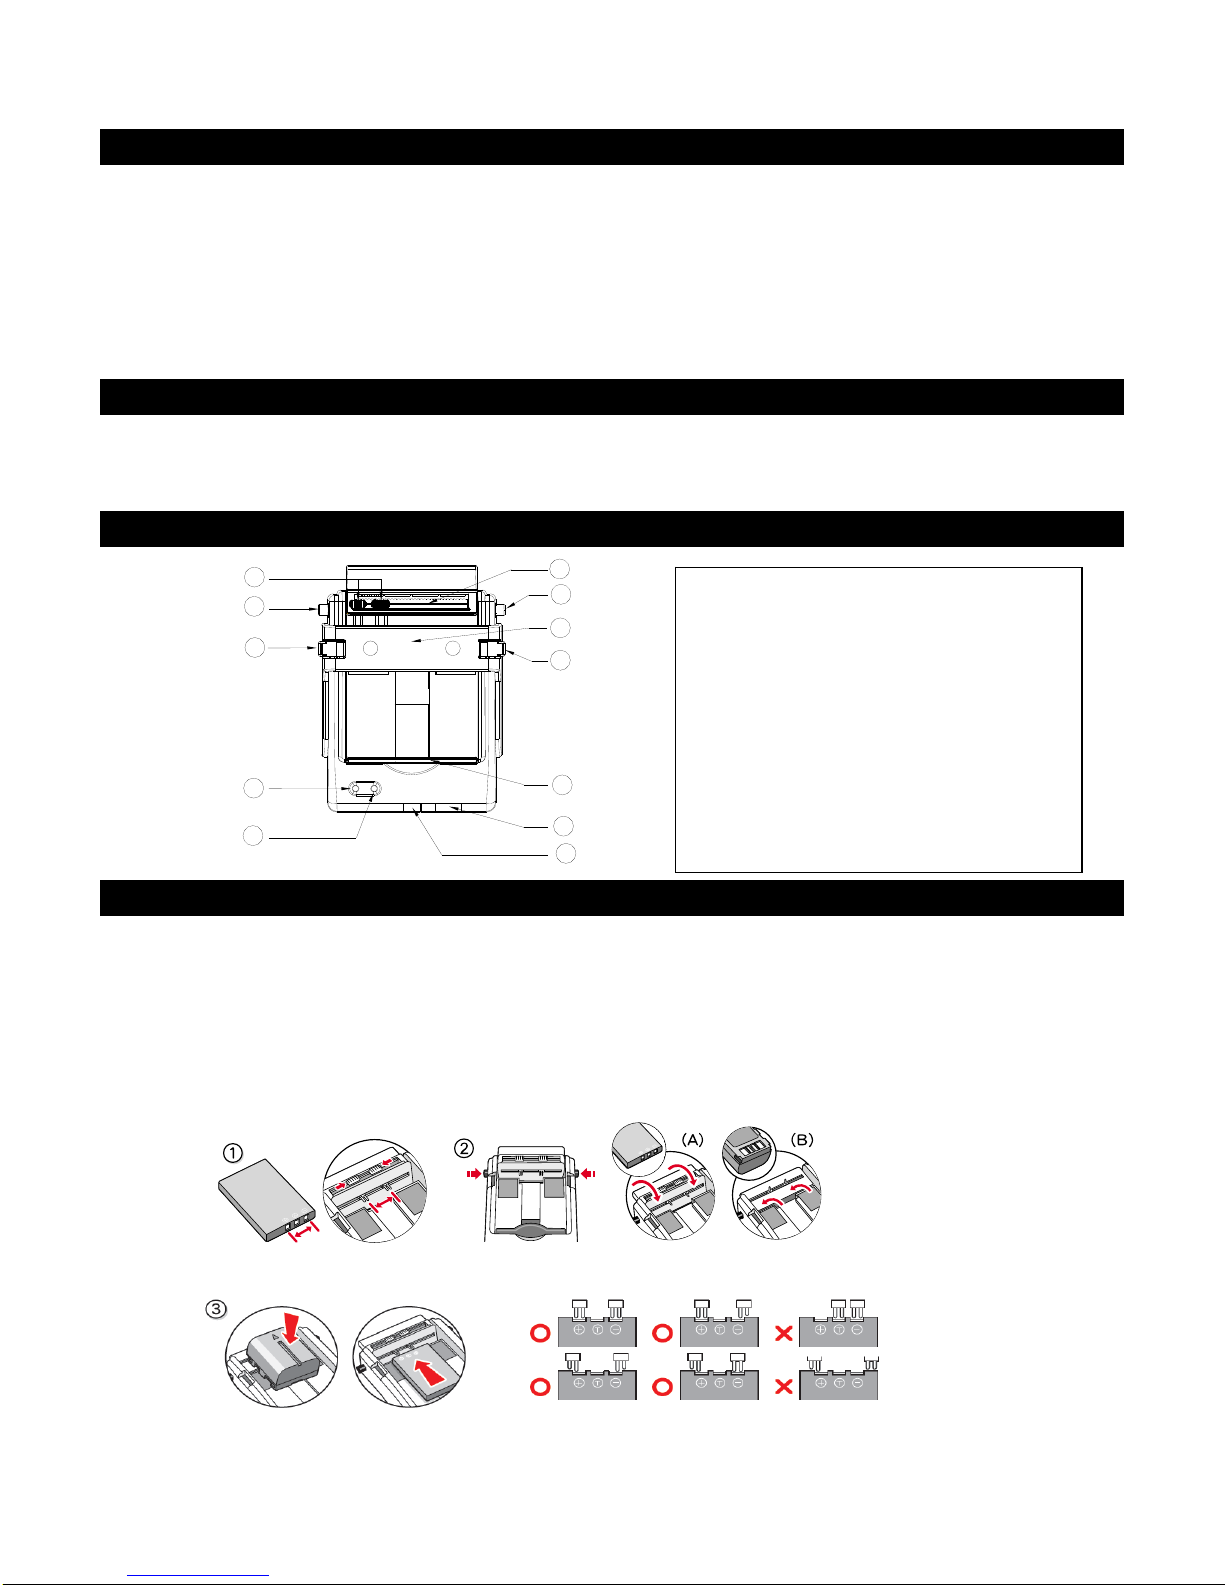
ⅢPartnames
ⅣCharging procedure
1. Remove the lithium battery from the cell phone, digital camera, PDAetc., put the battery into the IUC-99,
check polarity and location of the battery connectors, when the “Ready” Indicator turns yellow, fix the
battery then plug the provided AC adapter into “power input socket” to meet the main power.
2. Press down the "Direction Adjustment buttons" on both left and right sides of the unit for changing the
"Probe Rail direction" according to the battery connectors
(A) If the battery connectors are located on the side, pls. adjust the direction of the probes to
horizontal position.
(B) If the battry connectors are located on the top,pls. adjust the direction of the probes to
upwards position.
3. iCharge can automatic detect and swtich the polarity of battery connectors for charging, regardless of the
battery shape,models,numberof connectors or polarity.
5. A mobile phone, digital camera, or MP3 player equipped with USB charging capability may be connected
directly to the USB port for charging. User can charge a battery and a portable USB device
simultaneously.
6. For charging in the car (only for small vehicles with 12VDC output), simply plug one end of the provided
“Car cigarette connector” into the cigarette lighter of car, and the other end into “Power Input socket” of
Probe Connector
Probe Rail- DirectionAdjustment Button
Release Button of Fixing Plate
Battery Connected Indicator -Ready
Charging Indicator-Charge
Probe Rail Support
Upper Battery-Fixing Plate
Rear Plate- Fixing / Pressing the Battery
USB Port
Power Input Socket (Mini USB-5P)

Fi
g
.2-1 Fig.2-2
OR
iCharge.
7. When charging is completed, pull the (8) “Rear Plate “” backward as far as it will go, or press down the
(3) on both left and right sides of the unit; this will cause (7) to flip open and allow you to remove the
battery.
ⅤChargeIndicator
1. When the "Ready" Indicator turns yellow, it indicates that the probes are securely in contact with
the battery connectors and polarity has been correctly detected.
2. Charging will be started when the power source is connected. (fig.2-1)
3. When the "Charge" Indicator turns red, it indicates that charging is in process.
When Red LED turns to Green light (Yellow LED will turn off) indicates 95% charging complete.
**Suggested 30 minutes more charging time for reaching 100% power energy.(fig.2-2)
ⅥPower Transforming (Discharging) procedure
1. Put any spare 3.6/3.7 V & 7.2/7.4V of the lithium battery (with full power) into the iCharge, (pls.see the
operation method on the IV. Charging procedure- Point 1 .) When (4) “Ready” Battery connected indicator
turns yellow, pls. Plug in any mobile phone or USB devices to the (9) USB port for charging.
When (4) Battery connected indicator turns off, pls. change another spare lithium battery.
2. Put the provided “AA Discharge Battery case”(put 3 pcs of AA Ni-HM rechargeable battery or Alkaline
battery into the case first) into the IUC-99. Pls. Check the connector of “AADischarge Battery case” is
well connected with the probes.( Pls. See the operation method as IV. Charging procedure –Point 1.2),
When (4) “Ready” Battery connected indicator turns yellow, pls. Plug in any cell phone or USB devices to
the (9) USB port for charging. When (4) “Ready” Battery connected indicator turns off, pls. change
available AA batteries for further charging.
Ⅶ. Charging Procedure for Sony or other brands of Lithium batteries with ⒸMarkProtectionIC
1. If the Lithium battery of Sony or other brands with ⒸMark Protection IC, pls. see the following instruction to
contact battery connectors with probes in correct position to avoid battery damaged. When the ready yellow
light turns on, pls. follow the Charging Procedure Ⅳ.2 and.3.
ⅧSpecifications
1. Input Voltage: 100 V ~ 240 V (AC)
2. Output Voltage: 4.2V and 5V (AC or USB)
3. Applicable battery: 3.6/3.7 V & 7.2/7.4V (Lithium battery)
4. Maximum charging current: 0.65A
5. Charging time for typical battery: approximately 1.5~2.5 hours (depends on capacity of battery)
6. Material: Plastic (ABS) and (PC)
7. Dimensions: 11 x 8.5 x 4.7 (L x W x H) cm
8. Weight: 120 g
ⅨPrecautions
1. iCharge is only available for 3.6/3.7 V & 7.2/7.4V lithium batteries.
2. If ” Reday ” – Battery Connected Indicator always keep turn off, it means that the battery is totally empty.
pls. charge the battery with original (Standard) charger first.
This manual suits for next models
1
Table of contents
Popular Batteries Charger manuals by other brands

VITO
VITO VICB16S instruction manual

Johnson
Johnson DYNAMO Series instruction manual

IBM
IBM ThinkPad Battery Charger II user guide

Webasto
Webasto ProCore Edge 9 Installation, operation and maintenance manual

Schumacher
Schumacher SC1358 owner's manual

MGE UPS Systems
MGE UPS Systems EX RT CLA Installation and user manual