Ninety One Meraki E Series User manual


Table of Contents
1
27
17
32
13
30
24
32
6
30
18
32
16
31
26
43
I - Preface
Page No.
• How to Charge the Battery
• Riding Position
• Tools Required for Maintenance
III - Before Riding
• Schedule 1 - Lubrication
V - Operating Procedures
• Wheel Inspection
II - Parts Identication
VI - Maintenance/Repair
IV - Cycle Assembly
• Travel Tools
• Correct Frame Sizing
• Service Shecklist
• Monitor Display
VII - Troubleshooting

1© Alpha Vector India Private Limited | Ninety One
PREFACE
Congratulations on the purchase of your new E-bike! With proper assembly
and maintenance, it will offer you years of enjoyable riding!
Important
Carefully read and follow this manual (and any other materials included with this bike) before
riding. Please retain this manual for future use. If this bike was purchased for a child, it is the
responsibility of the purchaser to verify the bike has been properly assembled, and that the
user has been properly trained and instructed in use of the bike. Please refer to our Online
Videos for more information.
This manual is provided to assist you and is not intended to be a comprehensive manual
covering all aspects of maintaining and repairing your bicycle. The bicycle you have
purchased is a complex piece of equipment that must be properly assembled and maintained
in order to be ridden safely.
If you have any doubts about the assembly or your ability to properly assemble and maintain
the bicycle, you must have it assembled and maintained by a professional bicycle mechanic.
WARNING
Electric bikes are fun to ride but can be dangerous too if not used properly. The user or
consumer assumes all risk of personal injuries, damage, or failure of the bicycle or system and
all other losses or damages to themselves and others and to any property arising as a result
of using the bicycle.
DO NOT DISASSEMBLE, MODIFY OR REPLACE ELECTRICAL PARTS.
If you need to change any part, please consult a professional authorized “NINETY ONE”
mechanic or contact customer service at “cares@outdoors91.com”.
“cares@outdoors91.com”.

2© Alpha Vector India Private Limited | Ninety One
NOTE: YOUR INSURANCE POLICIES MAY NOT PROVIDE COVERAGE FOR
ACCIDENTS INVOLVING THE USE OF THIS BICYCLE. TO DETERMINE IF
COVERAGE IS PROVIDED, YOU SHOULD CONTACT YOUR INSURANCE
COMPANY OR AGENT.
DANGER!
Failure to properly assemble and maintain your bicycle could result in serious injury or can
even be fatal for the rider.
This manual contains important safety, performance and service information. The purpose of
this Owner’s Manual is to help you use your bike safely in the manner it is intended and allow
you to enjoy the benefits it offers for many years to come. Please read it before you take the
first ride on your new bicycle, and keep it for reference.
If you have any questions or do not understand something, take responsibility for your safety
and contact “NINETY ONE”customer service at “cares@outdoors91.com”
ALWAYS WEAR A PROPERLY FITTED HELMET WHEN YOU RIDE YOUR BICYCLE.
DO NOT RIDE AT NIGHT. AVOID RIDING IN WET CONDITIONS.
CAUTION:
For your safety you must carefully read this manual and follow its instructions. Your bicycle
may come with additional instruction sheets that cover features unique to your bike. Please
ensure that you read and become familiar with their contents and retain them with this
manual for future reference. Remember, bicycles, in most areas, are subject to the same laws,
rules, and regulations as motor vehicles.
“cares@outdoors91.com”.

3© Alpha Vector India Private Limited | Ninety One
Always wear an ISI approved helmet when riding your bike. Learn and follow local and state
traffic use laws.
Any major service or adjustments on your bike not covered in this manual should be carried
out by a professional bicycle mechanic. If you wish to make adjustments yourself, this manual
contains important tips on how to do it.
CAUTION:
Any adjustments you make are entirely at your own risk. Do NOT use your bike for freestyle
or stunt riding, jumping or competitive events. You should know that off-road use or any
similar activities can be dangerous, and you assume the risk for personal injury, damages or
losses incurred from such use. Do not ride your bike when any part is damaged or not working
properly. You must, for your safety and the safety of other users, consult a professional bicycle
mechanic for any questions on repairs or maintenance.
WARNING:
As with all mechanical components, the bicycle is subjected to wear and high stresses.
Different materials and components react to wear or fatigue in different ways. As your bicycle
ages, you should inspect it more frequently to look for deformed, cracked, bent, or loose
components. Such conditions may lead to sudden failure. This may possibly cause injuries to
the rider. If something is cracked or broken, do not ride until repairs have been made.
RESPONSIBILITY OF THE OWNER!
IMPORTANT: Reading and following the information and instructions in this manual are
essential to the ability of the owner or any other persons allowed to use this bicycle in order to
ride safely.
1.
It is the responsibility of the owner or in the case of a younger rider, the parents of the
rider to be certain all assembly instructions have been followed, even if the bike has
been assembled by the seller or a professional assembly company.

4© Alpha Vector India Private Limited | Ninety One
2.
Brakes are essential to safety. Be sure they are checked and working properly before
each use. Remember that every mechanical system changes condition during use and
must be maintained and checked before each use.
3.
Rules for bicycle use (bicycle laws) vary from location to location. So be certain the rider
knows and understands the rules that apply to bicycle usage in all areas where the
bicycle will be used. Wearing a helmet, light or reflective clothing, using lights and
reflectors are examples of rules which may exist and which make sense for rider safety
precautions at all times.
4.
Know how to operate the bicycle and all equipment on it before first use and be certain
anyone allowed to use the bike knows how to properly and safely use the bike as well.
5.
There are many different types of bicycles and often these types are designed for
different uses. Make sure you know what type unit you have and do not exceed its
service limitations
Be sure you check and understand the bicycle classifications set in this manual, including size
of the unit that is proper for the rider to insure good control during use.
Riders who are too small or large may have control problems. Do not overload a unit with a
rider that is too heavy or too large, and do not attempt to carry extra passengers, packages
or loads on the bicycle. Do not use street bikes for off road riding.
6.
Your electric bike is water-resistant, but must be properly maintained to preserve this
condition. Please do not submerge the bicycle or any electric components in water.
Water entering electric components can cause a short circuit and damage the electric
components with possible injury to the rider and others.
7.
The battery’s performance can be affected by its environment. Generally speaking,
battery’s discharge performance is better in a higher temperature. Electric power will
drop by more than 1/3 when the temperature is below 0ºC. Thus, this e-bike’s riding
distance per charge will become shorter in winter or cold areas. It returns to normal /
optimal when the temperature is higher than 20ºC.

5© Alpha Vector India Private Limited | Ninety One
8.
Do not put any metal objects in charge hole or battery circuit, it may cause a short
circuit, start a fire, or cause an explosion with personal injury or property damage.
NOTE: Max weight of Rider + Luggage + Bike = 110 Kg
NOTE: BEFORE TRANSPORTING THE BIKE AND/OR BATTERY, CONTACT
CUSTOMER SERVICE AT 7778001408 FOR SPECIFIC DETAILED INSTRUCTIONS.
ALWAYS WEAR A HELMET-IT COULD SAVE YOUR LIFE!
A properly fitting, ISI approved, bicycle helmet should be worn at all times when riding your
bicycle. The correct helmet should:
- have good ventilation
- cover the forehead and fit correctly
- be securely fastened on the rider
Forehead Covered Forehead Exposed

6© Alpha Vector India Private Limited | Ninety One
PARTS IDENTIFICATION
1.
Monitor Display
Circuit Diagram
1 - Monitor Display

7© Alpha Vector India Private Limited | Ninety One
2 - Handle bar
3 - Jandlebar Stem and Headset

8© Alpha Vector India Private Limited | Ninety One
4 - Fork
5 - Front Brake

9© Alpha Vector India Private Limited | Ninety One
6 - Pedal, Pedal Crank Arm & Chain
7 - Motor, Wheel & Tire

10 © Alpha Vector India Private Limited | Ninety One
8 - Rear Brake
9 - Saddle

11 © Alpha Vector India Private Limited | Ninety One
10 - Frame
11 - Charging Port (Opposite Side)
12 © Alpha Vector India Private Limited | Ninety One
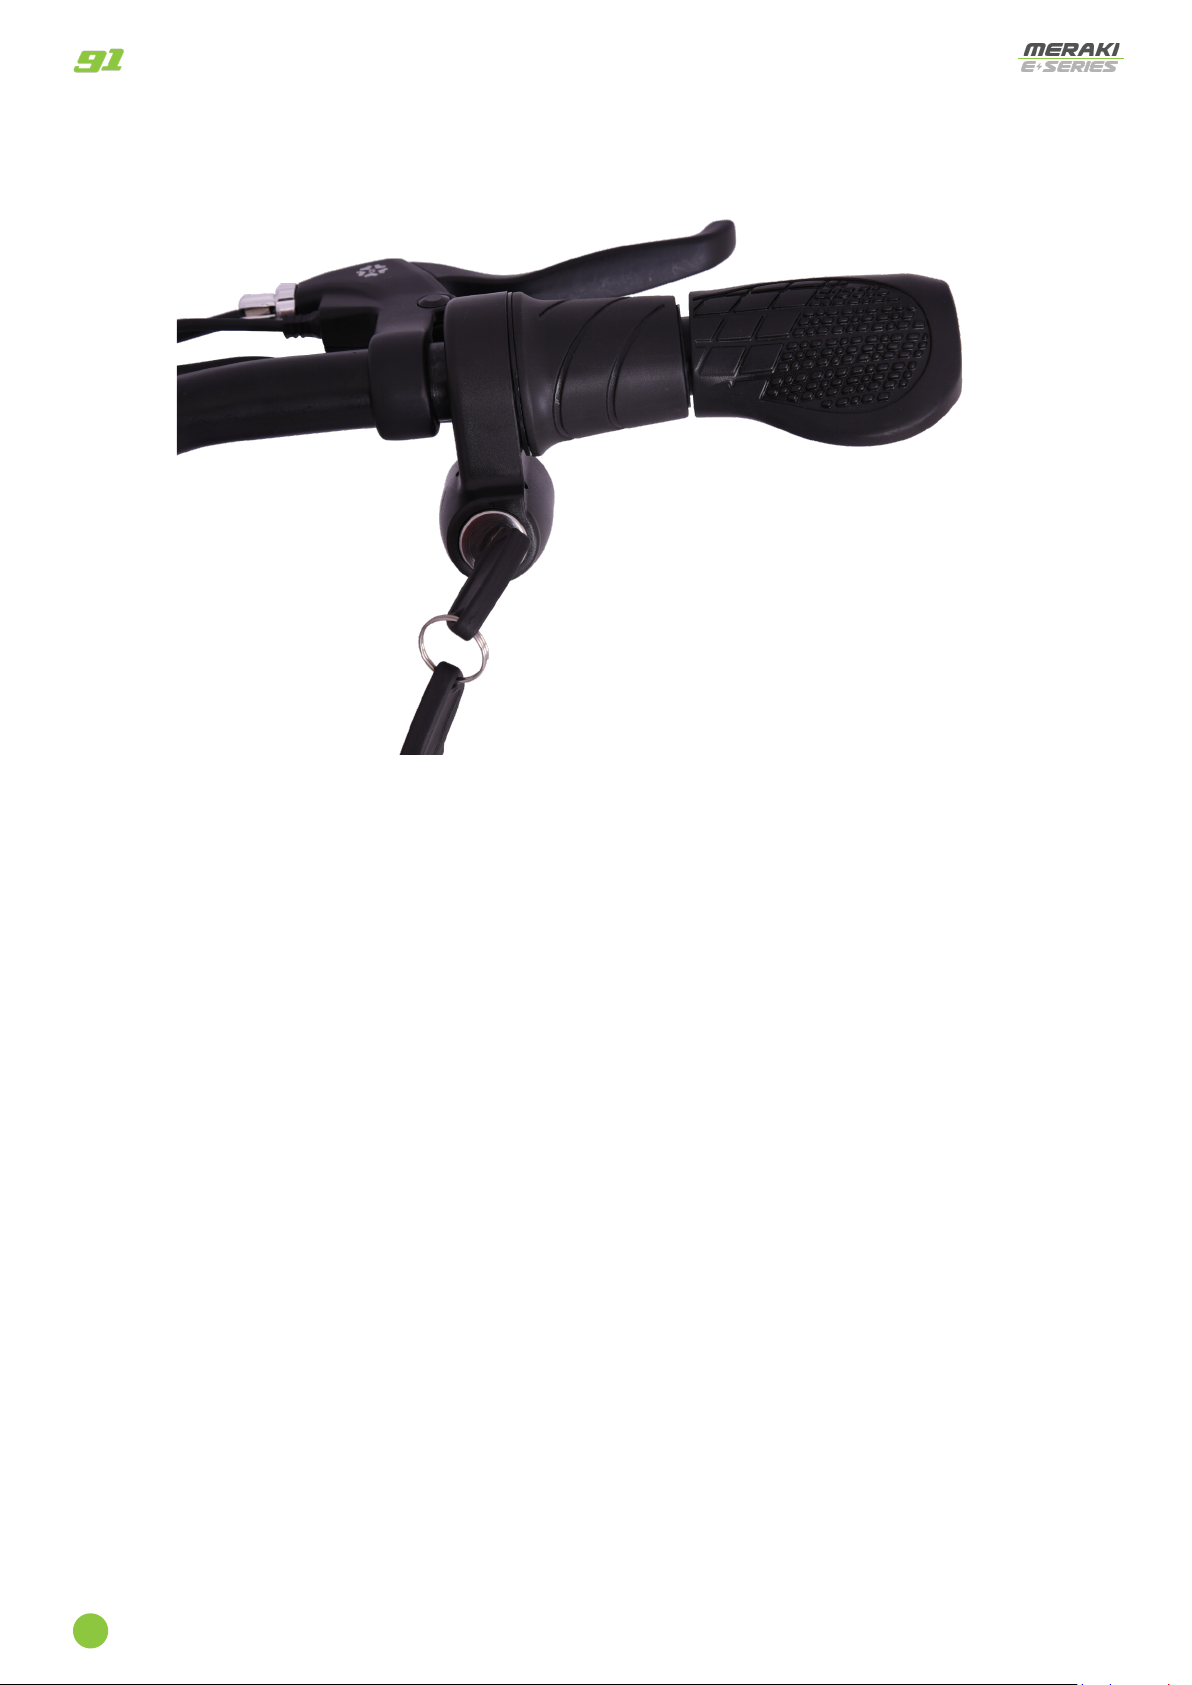
12 - KEY lock switch

13 © Alpha Vector India Private Limited | Ninety One
BEFORE RIDING
1. WARNING - ON AND OFF-ROAD CONDITIONS: The condition of the riding surface
is very important to your safety. If the surface is wet, or has sand, leaves, small rocks or
other loose debris on the surface where you plan to ride, carefully decrease the speed of
the bicycle and ride with extra caution. It will take a longer time and more distance to
stop. Apply the brakes sooner and with less force. Always apply the rear brake first
allowing time and distance for it to take effect. Then follow by cautiously applying the
front brake, in order to maintain control of the bicycle. Rapid front brake application first
may cause a front pitch over or fall. Learn to use your brakes properly under controlled
conditions until you learn proper braking under all road conditions.
2. NOTICE: Vision is quite limited at dawn, dusk and at night for bike riders, motorists and
by-standers. If you must ride at night, take extra precautions, use front and rear lights,
wear flashers on your arms, wear light-colored clothing, and plan your route to ride in
well lighted areas avoiding High speed traffic areas.
3. NOTE: Always wear shoes when riding a bicycle and avoid loose fitting clothes. Wear a
cuff band or trouser clip to keep pants or other loose clothing from getting caught in the
chain wheel. Long sleeves, long pants, gloves, eye protection, an ISI approved helmet,
elbow and knee pads are recommended.
4. CAUTION: WET WEATHER WARNING: Check your brakes frequently. The ability to
stop is critical to your safety. Roads are slippery in wet weather so avoid sharp turns and
allow more distance for stopping. Brakes become less efficient when wet. Leaves, loose
gravel and other debris on the road can also lengthen stopping distance. If possible,
avoid riding in wet weather as vision and control are impaired, thus creating a greater
risk of accidents and injury.

14 © Alpha Vector India Private Limited | Ninety One
5. CAUTION: A bicycle rider’s best defense against accidents is to be alert to road
conditions and traffic in the area. Do not wear anything that restricts your vision or your
hearing.
6. Obey all traffic regulations. Most traffic regulations apply to bike riders as well as
automobile operators. Observe all state and local traffic regulations, signs and signals.
Check with your local police station on bicycle licensing and inspection, and where it is
legal to ride your bike.
7. Keep to the LEFT SIDE of the road. Follow the traffic flow in a straight line close to the
curb. Watch out for opening car doors and cars moving in and out of traffic. Use caution
at intersections.
8. Never carry passengers. This is dangerous and it makes the bicycle harder to control.
Never carry anything that can inhibit your ability to control the bicycle or see the road.
9. When riding in pairs or in larger groups, form a single line along the right side of the road.
Set up a sensible distance between riders. Don’t follow too closely.
10. Always be alert. Animals or people may dart in front of you. Give pedestrians the right-
of-way. Don’t ride too close to pedestrians, and don’t park your bicycle where it can get
in the way of foot/vehicle traffic.
11. Be careful at all intersections. Slow down and look both ways before crossing.
12. Use hand signals. Always let other drivers and pedestrians know what you are going to
do. Signal 100 ft. before turning unless your hand is needed to control the bike.
13. Never hitch rides. Never hold onto moving vehicles while riding. Never stunt ride or jump
on your bike.

15 © Alpha Vector India Private Limited | Ninety One
14. ON AND OFF-ROAD OPERATION: Avoid the following road hazards: drain grills, pot
holes, ruts, soft road edges, gravel, leaves (especially when they are wet), uneven
pavement, railroad crossings, manhole covers, curbs, speed bumps, puddles, and debris
as all have an effect on your riding and may result in loss of control. Adjust your speed
and the way you use your brakes if you must ride in such areas.
15. If any components become loose while riding, STOP!! Immediately and tighten, or bring
to a mechanic for repair.
Just a minute spent before each ride can significantly improve your safety and the fun of the
ride. So, EACH TIME before you ride make a habit of performing the following safety checks:
Stand in front of the bicycle facing rearward and hold the front wheel securely between
your legs. Try to twist the handlebar and verify that they do not move. Then pull the
handlebars up, trying to lift the bike. There should be no movement.
Try to push the front wheel from side to side and confirm that it feels tight and will not
wobble. Lift the front wheel up by the handlebars and strike the wheel downward with
the heel of your hand to confirm that it is securely attached to the wheel. Spin the front
wheel and confirm that it does not wobble or contact the fork or brake pads.
Try to lift/push down on and twist the seat to confirm it is tight.
Look at the connection of the pedals to the crank arm. You should not see pedal screw
threads and the pedal should feel firm and be parallel to the ground.
Apply your brake(s) and make sure they feel firm to the touch, and then spin the wheel(s).
Apply the brakes. The brakes should stop the wheel(s).
Check to be sure that the fenders and accessories (if equipped) are firmly attached and
will not contact any moving parts. Make sure all reflectors are in position and not broken.
Now, put on your BICYCLE SAFETY HELMET and enjoy your ride. Your safety is well worth
just a minute. Also, be sure to read and follow the warnings and instructions in this manual

16 © Alpha Vector India Private Limited | Ninety One
CORRECT FRAME SIZING
:
When selecting a new bicycle, the correct choice of frame size is a very important safety
consideration. The ideal clearance will vary between types of bicycles and rider preference.
This makes straddling the frame when off the saddle easier and safer in situations such as
sudden traffic stops. Women can use a man’s bicycle to determine the correct size women’s
model.
THERE SHOULD BE A CLEARANCE OF approximately 1-2 INCHES BETWEEN THE
GROIN AREA OF THE
INTENDED RIDER AND THE TOP TUBE OF THE BICYCLE, WHILE THE RIDER
STRADDLES THE BICYCLE WITH
1-2” BOTH FEET FLAT ON THE GROUND.
THE SEAT POST “MINIMUM INSERTION” / “MAXIMUM HEIGHT” MARK SHOULD
NOT BE VISIBLE WHEN THE SEAT POST IS INSERTED INTO THE SEAT MAST OF
THE BIKE. DO NOT RAISE THE SEAT POST BEYOND THIS MARK. THE SEAT POST
OR FRAME MAY BREAK CAUSING YOU TO LOSE CONTROL AND FALL. ALWAYS
CHECK TO MAKE SURE THE SEAT POST ADJUSTING MECHANISM IS TIGHTENED
SECURELY BEFORE RIDING.

17 © Alpha Vector India Private Limited | Ninety One
RIDING POSITION
SADDLE HEIGHT
In order to obtain the most comfortable riding position and offer the best possible pedaling,
correct saddle height should not allow leg strain from over- extension, and the hips should not
rock from side to side when pedaling. While sitting on the bicycle with one pedal at its lowest
point, place the ball of your foot on the pedal. The correct saddle height will allow the knee to
be slightly bent in this position.
REACH
To obtain maximum comfort, the rider should not over extend his or her reach when riding.
There should be a slight bend in the rider’s elbows. Refer to the section regarding seat and
seat posts to learn how to adjust the seat post height.
Arms not over extended
Pedal bottom position
Handle bar stem height about the
same as seat height

18 © Alpha Vector India Private Limited | Ninety One
CYCLE ASSEMBLY
Your new bicycle was assembled and tuned in the factory and then partially disassembled for
shipping. The following instructions will enable you to prepare your bicycle for years of
enjoyable cycling. For more details on inspection, lubrication, maintenance and adjustment
of any area please refer to the relevant sections in this manual. We highly recommend that
you take “91 CARES” for installation or take help of NINETY ONE authorized mechanic and
Frog/NINETY ONE dealership near you.
TO AVOID INJURY, THIS PRODUCT MUST BE PROPERLY ASSEMBLED BEFORE
USE. WE STRONGLY RECOMMEND THAT YOU REVIEW THE COMPLETE
ASSEMBLY GUIDE AND PERFORM CHECKS SPECIFIED IN THE OWNER’S MANUAL
BEFORE RIDING.
Tools required for assembly:
5/6mm Allen Key
Multi Spanner
Assembly Instructions:
1. Place the packed box in the correct orientation and in an open space, and inspect for any
visible damage to the box from outside. In case of a damage, please contact your dealer
immediately.
2. Cut the packing cables using a cutter or any suitable tool and proceed to open the box.
3. Remove the seat, loose cardboard boxes and packing material inside the box. The tools
needed for assembly are provided inside.
4. Slowly remove the bicycle in the semi-assembled state and rest it on a horizontal support.
Please note that it may be difficult for one person to lift the cycle out of the box. Seek
help if needed.
5. Cut the cable ties holding the front wheel and handle bar on to the frame and keep the
components aside.
Table of contents


