Noaton DF 4123 User manual
Thank you for choosing this product.
Please read this instruction manual before using it.
DEHUMIDIFIER
User Manual
DYD-T23A431

Read the USER MANUAL carefully before operation.
Service personnel are required to carefully read the USER MANUAL and
SERVICE MANUAL before operation.
This unit uses a flammable refrigerant.
If refrigerant leaks and comes in contact with fire or heating part, it will create
harmful gas and there is risk of fire.
Recycle unwanted materials instead of disposing of them. All appliances and
packaging should be sorted and tendered at a regional recycling centre and
be
processed in an ecological manner.
Further information is available in the USER MANUAL, SERVICE MANUAL,
and the like.

Figure1
Figure2
1
2
3
4
5
8
7
6
10
11
13 16 18 2014 15 17 19 24 25 26 27
28 29 30222112
Figure3
31
32
1h 2h 4h 6h 8h
23
9

12. Humidity Reading
13. Defrost Indicator
14. Manual Dehumidifying Indicator
15. Tank Full Indicator
16. Laundry Drying Indicator
17. Anion Indicator
18. Air Purifying Indicator
19. Auto Indicator
20. Sleep Indicator
21. Fan Speed Indicators
22. Time Indicators
23. Child Lock Indicator
24. Up And Down Buttons
25. Anion Button
26. Auto Button
27. Mode Button
28. Fan Speed Button
29. Timer Off Button
30. Power Button
Components
Control Panel
Drainage
1. Handle
2. Air Inlet Grille
3. Drainage Outlet
4. Power Cord Bracket
5. Castors
6. Air Outlet
7. Rear Cover
8. Water Tank
10. Control Panel
11. Front Cover
9. Power Cord
31. Drainage Outlet Plug
32. Drainage Pipe
Product Description

Table of Contents
Product Instructions........................................................................1
Safety Instructions....................................................................... 1- 2
Prior to Operation........................................................................... 3
Continuous Drainage...................................................................... 3
Operation Instructions................................................................. 4-8
Cleaning........................................................................................9
Storage........................................................................................10
...................................................................... 10
Safety Precautions On Servicing............................................... 11-12
...........................................................................13
Display Error Codes
Trouble Shooting

1
Product Instructions
Safety Instructions
The dehumidifier is used to remove excessive moisture from the air. The resulting reduction in relative
humidity protects buildings and their contents from the adverse effects of excess humidity.
The environmentally friendly R290 is used as the refrigerant. R290 has no damaging influence on the
ozone layer (ODP), a negligible greenhouse effect (GWP) and is available worldwide. Because of its
efficient energy properties, R290 is highly suitable as a coolant for this application. Special precautions
must be taken into consideration due to the coolant's high flammability.
This appliance can be used by children aged from 8 years and above and persons with reduced
physical, sensory or mental capabilities or lack of experience and knowledge if they have been given
supervision or instruction concerning use of the appliance in a safe way and understand the hazards
involved. Children shall not play with the appliance. Cleaning and user maintenance shall not be made
by children without supervision.
The unit is designed only for use with R-290(propane) gas as the designated refrigerant.
THE REFRIGERANT LOOP IS SEALED. ONLY A QUALIFIED TECHNICIAN SHOULD ATTEMPT
TO SERVICE!
Do not discharge the refrigerant into the atmosphere.
R-290 (propane) is flammable and heavier than air.
It collects first in low areas but can be circulated by the fans.
If propane gas is present or even suspected, do not allow untrained personnel to attempt to find the
cause.
The propane gas used in the unit has no odor.
The lack of smell does not indicate a lack of escaped gas.
If a leak is detected, immediately evacuate all persons from the store, ventilate the room and contact
the local fire department to advise them that a propane leak has occurred.
Do not let any persons back into the store until the qualified service technician has arrived and that
technician advises that it is safe to return to the store.
No open flames, cigarettes or other possible sources of ignition should be used inside or in the vicinity
of the units.
Component parts are designed for propane and non-incentive and non-sparking. Component parts
shall only be replaced with identical repair parts.
If the supply cord is damaged, it must be replaced by the manufacturer, its service agent or similarly
qualified persons in order to avoid a hazard.
The appliance shall be disconnected from its power source during maintenance.
Ensure the unit is far away from fire, inflammable, or explosive objects.
Do not use means to accelerate the defrosting process or to clean, other than those recommended
by the manufacture.

2
Safety Instructions
The appliance shall be stored in a room without continuously operation sources (for example: open
flames, an operating gas appliance or an operating electric heater).
The appliance shall be stored so as to prevent mechanical damage from occurring.
Do not piece or burn, even after use.
Pipe-work shall be protected from physical damage and shall not be installed in an unventilated space,
if that space is smaller than 8 m².
Compliance with national gas regulations shall be observed.
Keep any required ventilation openings clear of obstruction.
The appliance shall be stored in a well-ventilated area where the room size corresponds to the room
area as specified for operation.
Warning
Failure to abide by this warning could result in an explosion, death, injury and property damage.
Any person who is involved with working on or breaking into a refrigerant circuit should hold a current
valid certificate from an industry-accredited assessment authority, which authorizes their competence
to handle refrigerants safely in accordance with an industry, recognized assessment specification.
Servicing shall only be performed as recommended by the equipment manufacturer. Maintenance
and repair requiring the assistance of other skilled personnel shall be carried out under the supervision
of the person competent in the use of flammable refrigerants.
Prior to Operation
3
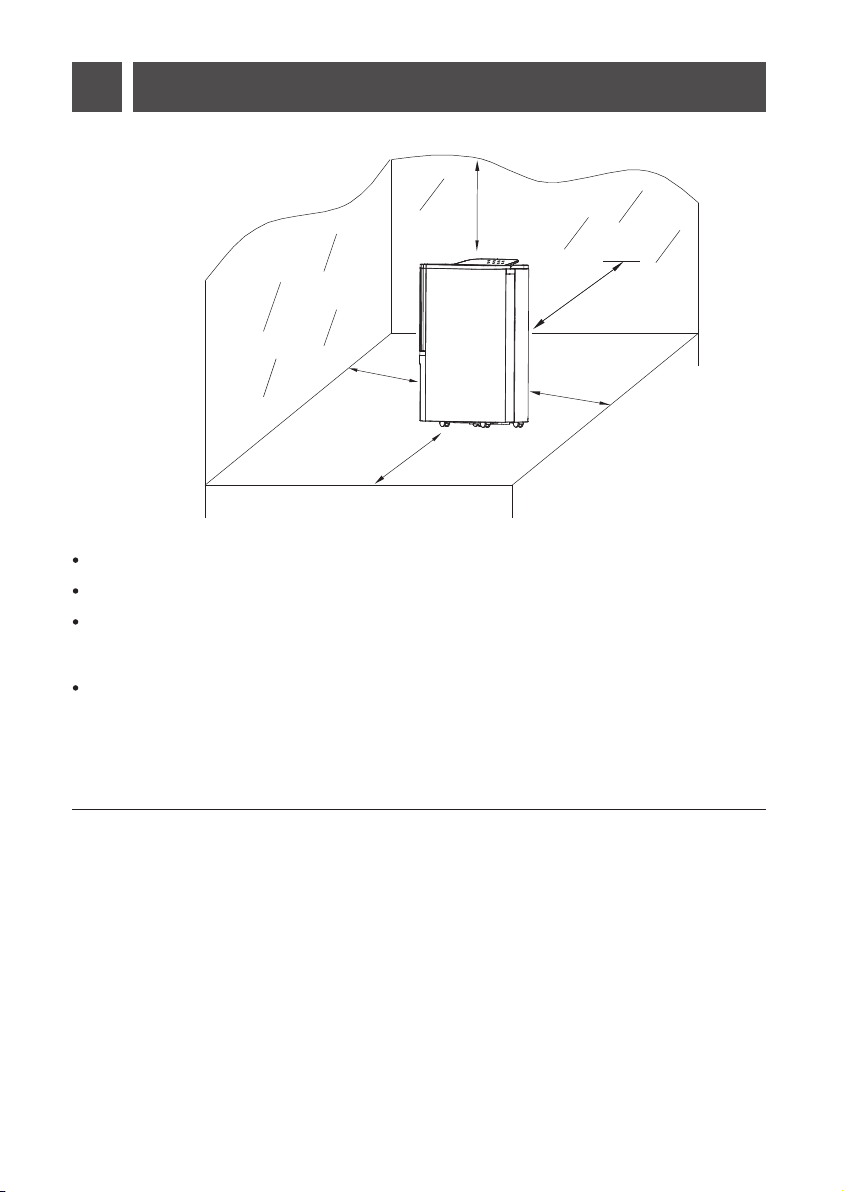
Place the dehumidifier in an upright position on a stable, flat surface.
Ensure the dehumidifier is at a safe distance at least 50cm away from a wall or furniture.
Supply power should be in correspondence with the value on the nameplate, power outlet needs to
be grounded.
Ensure the tank is correctly fitted, if the tank is full or not in place, the tank full light comes on and
the dehumidifier will stop working.
Continuous Drainage
In general, water will be collected by tank, if you want continuous drainage, please do steps as follows:
(refer to figure 3)
1. Unplug the drainage outlet plug.
2. Insert the drainage pipe with 14mm inner diameter into water outlet.
Please always make sure the pipe is going downhill, is not blocked or kinked.
≥20cm
≥50cm
≥20cm
≥20cm
≥20cm

Connect the power plug to the correct power supply; all indicators and buttons will light up and
then will be off.
Desired setting will be confirmed 3s after the operation.
Switch On / Switch Off The Unit [ Power button ]
Press the power button once to turn on the unit, the unit runs by default mode on manual continuous
dehumidifying with medium fan speed.
Auto Shut-off Timer Function [ Timer button ]
Press the timer button to select your preferred timer hour from 1h-2h-4h-6h-8h-cancel for automatic
shutoff by each press.
Auto timer off setting will be canceled if press timer button for 2 times in 3 seconds.
Auto timer off setting will be canceled if switch off the unit and switch on again.
Fan Speed Option [ Fan Speed button ]
Press the fan speed button to select your preferred fan speed setting of low, medium and high to
meet the different usage requirements.
Fan speed button is invalid at laundry drying mode, auto mode and defrost mode.
Operation Instructions
Press the power button to turn off the unit, it will stop working, fan will work for some seconds to
blow out the hot air inside the unit.
1h 2h 4h 6h 8h
1h 2h 6h 8h4h
1h 2h 4h 6h 8h
4

5
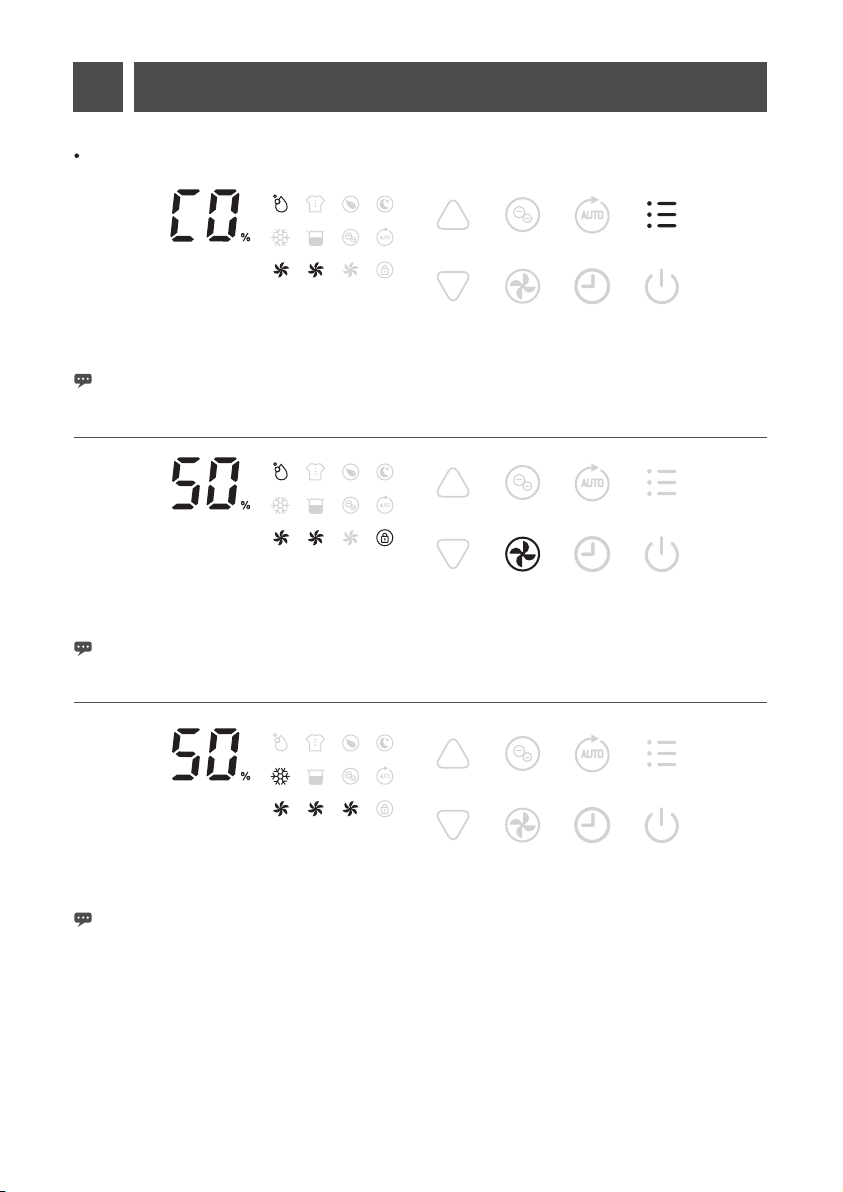
Humidity Setting [ Up and Down buttons ]
Press the up/down buttons to select your preferred humidity from CO-30%-35%-40%-45%-50%-55%
-60%-65%-70%-75%-80%-CO. CO means continuous dehumidifying regardless of ambient humidity.
Anion Function [ Anion button ]
Press the anion button to activate the anion function to fresh up the air quality.
Auto Dehumidifying Function [ Auto button ]
Press the auto button to select the auto dehumidifying mode, the unit runs automatically accordance
to the ambient humidity detected below.
Ambient RH% detected
RH%>65%
55≤RH%≤65
RH%<55%
Compressor
Woking
Woking
Stop working
Fan Speed Level
High
Medium
Low
Fan speed button and up/down buttons are invalid.
Operation Instructions
1h 2h 4h 6h 8h
1h 2h 4h 6h 8h
1h 2h 4h 6h 8h
Anion function will be off automatically when the fan stops working.

6
Multifunction Optional [ Mode button ]
Operation Instructions
Laundry Drying Mode
Press the mode button once to select Laundry Drying mode, the unit runs in continuous dehumidification
with high fan speed for 6 hours then switch off automatically.
Fan speed button and timer button are invalid.
Air Purifying Mode
Press the mode button 2 times to select Air Purifying mode, the unit runs with high fan speed without
dehumidifying.
Fan speed button is valid.
Sleep Mode
Press the mode button 3 times to select Sleep mode, the unit runs with a designated humidity setting
of 55% along with low fan speed. All indicators will be off 5s after the setting is completed. Touch
any button to activate the light, and to operate as usual.
Fan speed button is valid.
With no further operation after activate the light for 30s, lights will be off again.
When the water tank is full on sleep mode, water tank full indicator will always be on.
1h 2h 4h 8h6h
1h 2h 4h 6h 8h
1h 2h 4h 6h 8h
7
Operation Instructions
Press the fan speed button for 2s to lock all the buttons with a beeping sound, the same operation
can unlock it.
Safety childlock function can be set at standby mode and working mode.
When the ambient temperature is too low, dehumidifier will enter into the defrost mode, the unit runs
with high fan speed without dehumidifying.
Fan speed button is invalid.
Safety Childlock Function [ Fan Speed button-2 seconds ]
Low Temperature Defrost Mode
1h 2h 4h 6h 8h
1h 2h 4h 6h 8h
Press the mode button 4 times to select Manual mode, the unit runs by default continuous
dehumidifying with medium fan speed.
At manual mode all buttons are valid.
Manual Mode
1h 2h 4h 6h 8h

8
Memory Function:
a.When unplugged directly or power cut, then reconnected to the power supply, the dehumidifier will
run with the mode prior to the shutdown. The timer setting will be kept.
b.Press the power button to switch off the dehumidifier, and then press the power button to switch it
back on. The dehumidifier will run with the mode prior to the shutdown. The timer setting will be
canceled.
c.Switch off the device and unplug the power cord, then reconnect the power supply and switch on the
dehumidifier. It will run as factory preset mode the first time you received the dehumidifier.
Operation Instructions
The unit will go into standby mode when water tank is full
After emptying the tank the unit will go on
or the water tank is not installed properly.
or install the water tank properly, to the previous mode.
Except for the power button, all other buttons are invalid.
Auto Shut off with Water Tank Full Indicator
1h 2h 4h 6h 8h
9
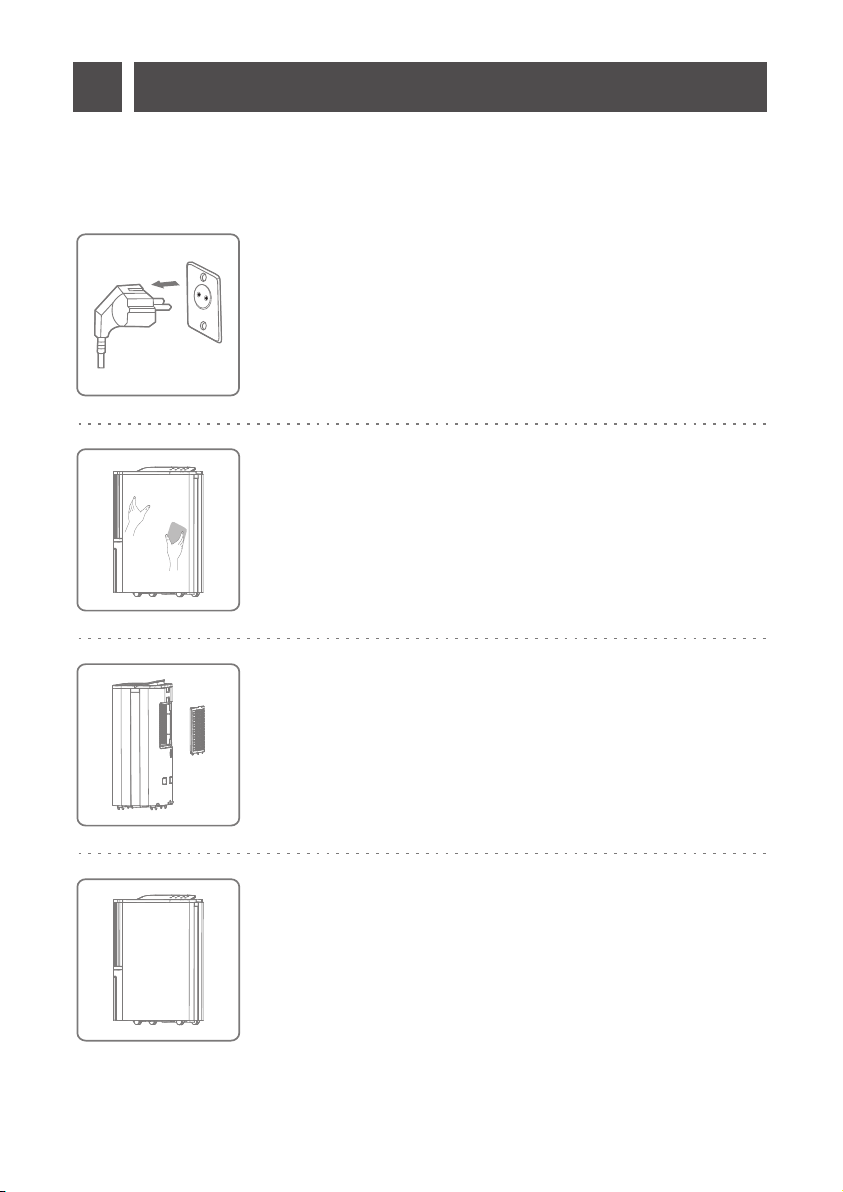
When used regularly , the filter may become clogged with dust and particles. Therefore the filter should
be cleaned at least every two weeks. Follow these steps:
1. Switch the device off and remove the plug from the socket before
cleaning.
2. Clean the housing with soft, dry cloth. If the device is extremely dirty,
use a mild cleaning agent. Wipe the dehumidifier with a slightly damp
cloth. Never spray the device with water.
3. Remove the filter, clean the filter with a vacuum cleaner or soapy
water
no hotter than 40℃.
4. Rinse and dry the filter completely before installing back to the
device.
Cleaning

10
If the dehumidifier will not be used for a long period of time, take the following steps:
1. Remove the plug from the socket and empty the tank, make the tank and the dehumidifier dry
completely, this may take a couple of days.
2. Clean the air filter .
3. Check the dehumidifier for perfect condition to ensure a safe use of it after a long period of storage.
4. Pack the device with the suitable packaging.
5. Store the dehumidifier in a dust-free and out of direct sunlight location, preferably covered with a
sheet of plastic.
Storage
Please contact local distributor if any of the error codes below appears.
Display Error Codes
E1 Temperature sensor error
Humidity sensor error
Flash every 30 seconds
Flash every 30 seconds
Machine works normally.
Machine works normally,
but can't set the humidity.
Display Code Error Display What is happening
Air inlet temperature is too
high ≥42ºC Slowly flash L3
Slowly flash L4
Compressor stop working,
fan works at low fan speed.
10mins later, if the
temperature decrease to
below 40 machine will
work normally.
ºC,
Air inlet temperature is too
low ≤0ºC
Compressor stop working,
fan works at low fan speed.
10mins later, if the
temperature increase to
above 2 machine will
work normally.
ºC,
E2
L3
L4

Checking for presence of refrigerant
The area shall be checked with an appropriate refrigerant detector prior to and during work, to ensure the
technician is aware of potentially flammable atmospheres. Ensure that the leak detection equipment being
used is suitable for use with flammable refrigerants, i.e. no sparking, adequately sealed or intrinsically safe.
Presence of fire extinguisher
If any hot work is to be conducted on the refrigeration equipment or any associated parts, appropriate
fire extinguishing equipment shall be available to hand. Have a dry powder or CO²fire extinguisher
adjacent to the charging area.
No ignition sources
No person carrying out work in relation to a refrigeration system which involves exposing any pipe work
that contains or has contained flammable refrigerant shall use any sources of ignition in such a manner
that it may lead to the risk of fire or explosion. All possible ignition sources, including cigarette smoking,
should be kept sufficiently far away from the site of installation, repairing, removing and disposal, during
which flammable refrigerant can possibly be released to the surrounding space. Prior to work taking
place, the area around the equipment is to be surveyed to make sure that there are no flammable
hazards or ignition risks. “No Smoking” signs shall be displayed.
Ventilated area
Ensure that the area is in the open or that it is adequately ventilated before breaking into the system or
conducting any hot work. A degree of ventilation shall continue during the period that the work is carried
out. The ventilation should safely disperse any released refrigerant and preferably expel it externally into
the atmosphere.
11
Safety Precautions On Servicing
Please follow these warnings when to undertake the following when servicing a dehumidifier with R290.
Prior to beginning work on systems containing flammable refrigerants, safety checks are necessary to
ensure that the risk of ignition is minimized. For repair to the refrigerating system, the following precautions
Work shall be undertaken under a controlled procedure so as to minimize the risk of a flammable gas or
All maintenance staff and others working in the local area shall be instructed on the nature of work being
carried out. Work in confined spaces shall be avoided. The area around the workspace shall be sectioned
off. Ensure that the conditions within the area have been made safe by control of flammable material.
Checks to the area
shall be complied with prior to conducting work on the system.
Work procedure
vapor being present while the work is being performed.
General work area

Safety Precautions On Servicing
12
Checks to electrical devices
Repair and maintenance to electrical components shall include initial safety checks and component
inspection procedures. If a fault exists that could compromise safety, then no electrical supply shall be
connected to the circuit until it is satisfactorily dealt with. If the fault cannot be corrected immediately but
it is necessary to continue operation, an adequate temporary solution shall be used. This shall be
reported to the owner of the equipment so all parties are advised.
Initial safety checks shall include:
-those capacitors are discharged: this shall be done in a safe manner to avoid possibility of sparking;
-that there no live electrical components and wiring are exposed while charging, recovering or purging
the system;
-that there is continuity of earth bonding.
Releasing refrigerant into atmosphere is strictly forbidden!
Checks to the refrigeration equipment
Where electrical components are being changed, they shall be fit for the purpose and to the correct
specification. At all times the manufacturer’s maintenance and service guidelines shall be followed. If in
doubt consult the manufacturer’s technical department for assistance.
The following checks shall be applied to installations using flammable refrigerants:
– The charge size is in accordance with the room size within which the refrigerant containing parts are
installed;
– The ventilation machinery and outlets are operating adequately and are not obstructed;
– If an indirect refrigerating circuit is being used, the secondary circuit shall be checked for the presence
of refrigerant;
– Marking to the equipment continues to be visible and legible. Markings and signs that are illegible
shall be corrected;
– refrigeration pipe or components are installed in a position where they are unlikely to be exposed to
any substance which may corrode refrigerant containing components, unless the components are
constructed of materials which are inherently resistant to being corroded or are suitably protected
against being so corroded.

13
Check the following before contacting technical support.
PROBLEM POSSIBLE CAUSE SOLUTION
The device does
not work
The power is not connected Insert the plug into the wall outlet
The water tank is full Empty the tank
The tank has not
been replaced correctly Replace the tank
Runtime is too short Be patient and wait
Ambient temperature or
humidity is too low
It is normal that the device does not dehumidify in
these conditions
The room is too big We recommend using a dehumidifier with a
greater capacity
Water removal
capacity is too low
There is too much ventilation Reduce ventilation(e.g. close windows and shut
doors)
The air filter is clogged Clean the air filter
Set humidity is higher than
the ambient humidity Set the humidity lower than ambient humidity
Dehumidifier is
blowing out warm air This is normal, a dehumidifier is not an air cooler
The device works,
but reduces the
relative humidity
insufficiently
The dried air is passed over
heating coils before it is blown
into the room as part of the
dehumidifying process
The display is not
showing the humidity
set point
The display shows the room
relative humidity not the set
point
Press the up or down button once to see the target
relative humidity
Water on floor
There is residual water in tank,
and the device is lurched too
much by moving
Be careful when move the tank
The dehumidifier is
noisy
The air filter is blocked or
the device is on an uneven
surface
Clean the filter or put the device on a flat surface
Trouble Shooting

This manual suits for next models
1
Table of contents
Other Noaton Dehumidifier manuals


