Nobu RG57B/BGE User manual

Wall Mounted Air-Conditioning Unit
Επιτοίχια Μονάδα Κλιματισμού
Aer Conditonat model Split de Perete
NBKU2VI32-09WFR/NBKU2VO32-09B
NBKU2VI32-12WFRB/NBKU2VO32-12B
NBKU2VI32-18WFR/NBKU2VO32-18
NBKU2VI32-24WFR/NBKU2VO32-24
MODELS/
ΜΟΝΤΕΛΑ/
MODELE:
For correct use of this unit, please read this manual carefully and keep it for future reference.
Για τη σωστή χρήση της μονάδας, παρακαλούμε διαβάστε προσεκτικά το εγχειρίδιο
και φυλάξτε το για αναφορά στο μέλλον.
Pentru o utilizare corecta, va rugam sa cititi cu atentie acest manual
si sa il pastrati pentru o consultare ulterioara.
English/Ελληνικά/Romana
Remote Controller
User’s Manual
Τηλεχειριστήριο
Εγχειρίδιο Χρήσης
Telecomanda
Manual de utilizare
2
CONTENTS
Remote controller Specications....................................................................................... 3
Operation buttons............................................................................................................... 4
Indicators on LCD................................................................................................................. 7
How to use the buttons....................................................................................................... 8
Auto operation..................................................................................................................... 8
Cooling/Heating/Fan operation ......................................................................................... 8
Dehumidifying operation.................................................................................................... 9
Adjusting air ow direction ................................................................................................ 9
Timer operation ................................................................................................................. 10
Handling the remote controller ....................................................................................... 14
NOTE:
• Buttons design is based on typical model and might be slightly dierent from the
actual one you purchased, the actual shape shall prevail.
• All the functions described are accomplished by the unit. If the unit has no this feature,
there is no corresponding operation happened when press the relative button on the
remote controller.
• When there are wide dierences between “Remote controller Illustration” and “ USER’S
MANUAL” on function description, the description of “USER’S MANUAL” shall prevail.
3
MODE
FAN
TEMP
LED
TURBO
ON/OFF
SHOR T
CUT
TIMER
ON
TIMER
OFF
Remote Controller Specications
Model RG57B/BGE
Rated Voltage 3.0V (Dry batteries R03/LR03X2)
Signal Receiving Range 8m
Environment -5°C~60°C
SWING DIRECT
TURBO LED
SLEEP
RG57B/BGE

4
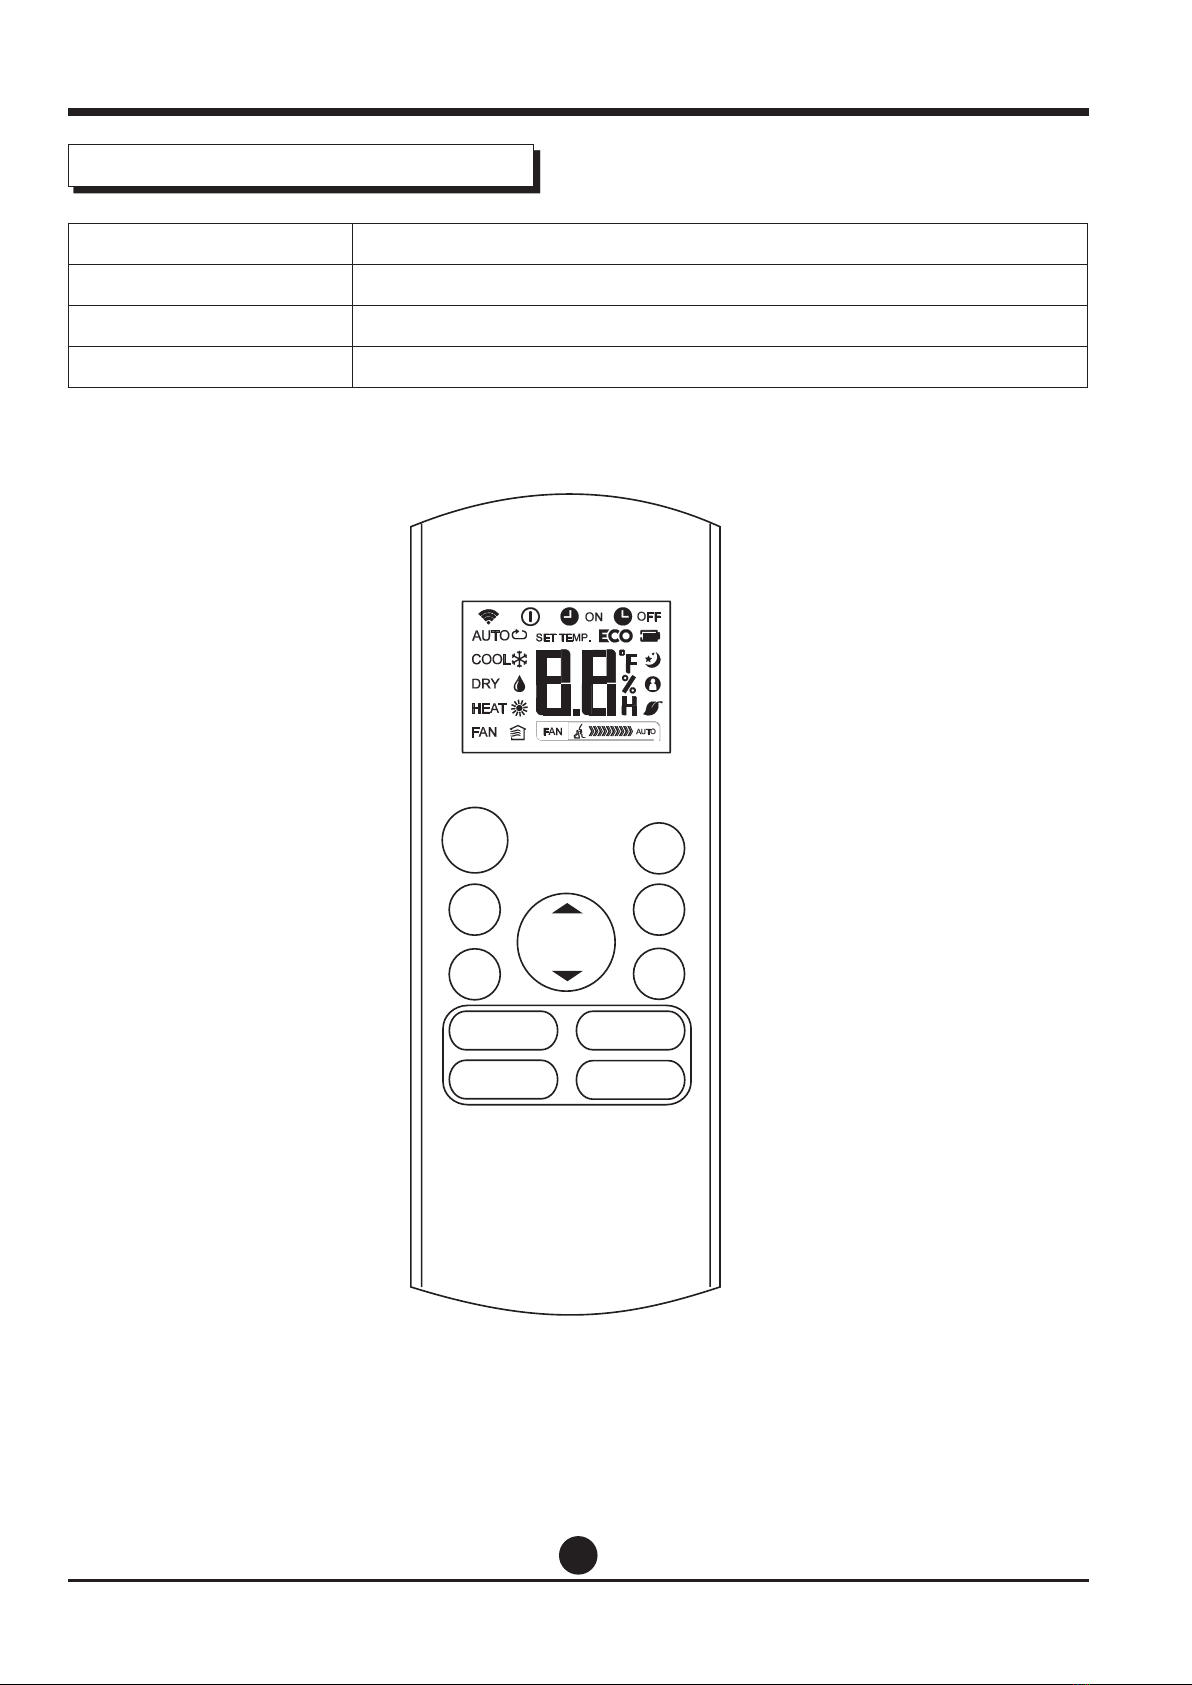
Operation of buttons
1ON/OFF Button
This button turns the air conditioner ON and OFF.
2MODE Button
Press this button to modify the air conditioner mode
in a sequence of following:
➝ AUTO ➝ COOL ➝ DRY ➝ HEAT ➝ FAN
NOTE: Please do not select HEAT mode if the machine you
purchased is cooling only type.
Heat mode is not supported by the cooling only appliance.
3FAN Button
Used to select the fan speed in four steps:
➝ AUTO ➝ LOW ➝ MED ➝ HIGH
NOTE: You can not switch the fan speed in AUTO or
DRY mode.
4SLEEP Button
• Active/Disable sleep function. It can maintain the
most comfortable temperature and save energy. This
function is available on COOL, HEAT or AUTO mode
only .
• For the detail, see “ sleep operation ” in “USER’S
MANUAL”
NOTE: While the unit is running under SLEEP mode, it
would be cancelled if MODE, FAN SPEED or ON/OFF button
is pressed.
5TURBO Button
Active/Disable Turbo function. Turbo function enables
the unit to reach the preset temperature at cooling
or heating operation in the shortest time (if the
indoor unit does not support this function, there is no
corresponding operation happened when pressing
this button).
MODE
FAN
TEMP
LED
TURBO
ON/OFF
SHOR T
CUT
TIME R
ON
TIMER
OFF
1
2
4
3
8
9
5
10
11
7
6
SWING DIRECT
SLEEP
5
Operation of buttons
6UP Button(
p
)
Push this button to increase the indoor temperature
setting in 1°C increments to 30°C.
DOWN Button(
q
)
Push this button to decrease the indoor temperature
setting in 1°C increments to 17°C.
NOTE: Temperature contol is not available in Fan mode.
7SHORTCUT Button
• Used to restore the current settings or resume
previous settings.
• On the rst time connecting to the power, if push
the SHORTCUT button, the unit will operate on AUTO
mode, 26°C, and fan speed is Auto.
• Push this button when remote controller is on,
the system will automatically revert back to the
previous settings including operating mode, setting
temperature, fan speed level and sleep feature(if
activated).
• If pushing more than 2 seconds, the system will
automatically restore the current operation settings
including operating mode, setting temperature, fan
speed level and sleep feature (if activated ).
8TIMER ON Button
Press this button to initiate the auto-on time
sequence. Each press will increase the auto-timed
setting in 30 minutes increments. When the setting
time displays 10.0, each press will increase the auto-
timed setting 60 minutes increments.
To cancel the auto-timed program, simply adjust the
auto-on time to 0.0.
9TIMER OFF Button
Press this button to initiate the auto-o time
sequence. Each press will increase the auto -timed
setting in 30 minutes increments.
When the setting time displays 10.0, each press
will increase the auto-timed setting 60 minutes
increments. To cancel the auto- timed program, simply
adjust the auto-o time to 0.0
MODE
FAN
TEMP
LED
TURBO
ON/OFF
SHOR T
CUT
TIME R
ON
TIMER
OFF
1
2
4
3
8
9
5
10
11
7
6
SWING DIRECT
SLEEP

6
10 SWING Button
Used to stop or start horizontal louver auto swing
feature.
DIRECT Button
Used to change the louver movement and set the
desired up/down air ow direction.
The louver changes 6° in angle for each press.
11 LED Button
Disable/Active indoor screen Display. When pushing
the button, the indoor screen display is cleared, press
it again to light the display.
Operation of buttons
MODE
FAN
TEMP
LED
TURBO
ON/OFF
SHOR T
CUT
TIME R
ON
TIMER
OFF
1
2
4
3
8
9
5
10
11
7
6
SWING DIRECT
SLEEP

7
AUTO
HEAT FAN
COOL DRY
Displayed when data transmitted.
Displayed when remote controller is ON.
Battery display (low battery detection)
Not available for this unit
Displayed when TIMER ON time is set.
Displayed when TIMER OFF time is set.
Show set temperature or room temperature, or
time under TIMER setting.
Displayed in Sleep Mode operation.
Indicated that the air conditioner is operating in
Follow me mode
Not available for this unit
Not available for this unit
Low speed
Medium speed
High speed
Auto fan speed
Information are displayed
when the remote controller is
powered up.
Indicators on LCD
Mode display
Fan speed indication
Note:
All indicators shown in the gure are for the purpose of
clear presentation. But during the actual operation only
the relative functional signs are shown on the display
window.
8
MODE
FAN
TEMP
LED
FOLLOW ME
TURB O SELF CLEAN
ON/OF F
SHOR T
CUT
TIMER
ON
TIMER
OFF
3
1
2
MODE
FAN
TEMP
LED
FOLLOW ME
TURB O SELF CLEAN
ON/OF F
SHOR T
CUT
TIMER
ON
TIMER
OFF
3
1
2
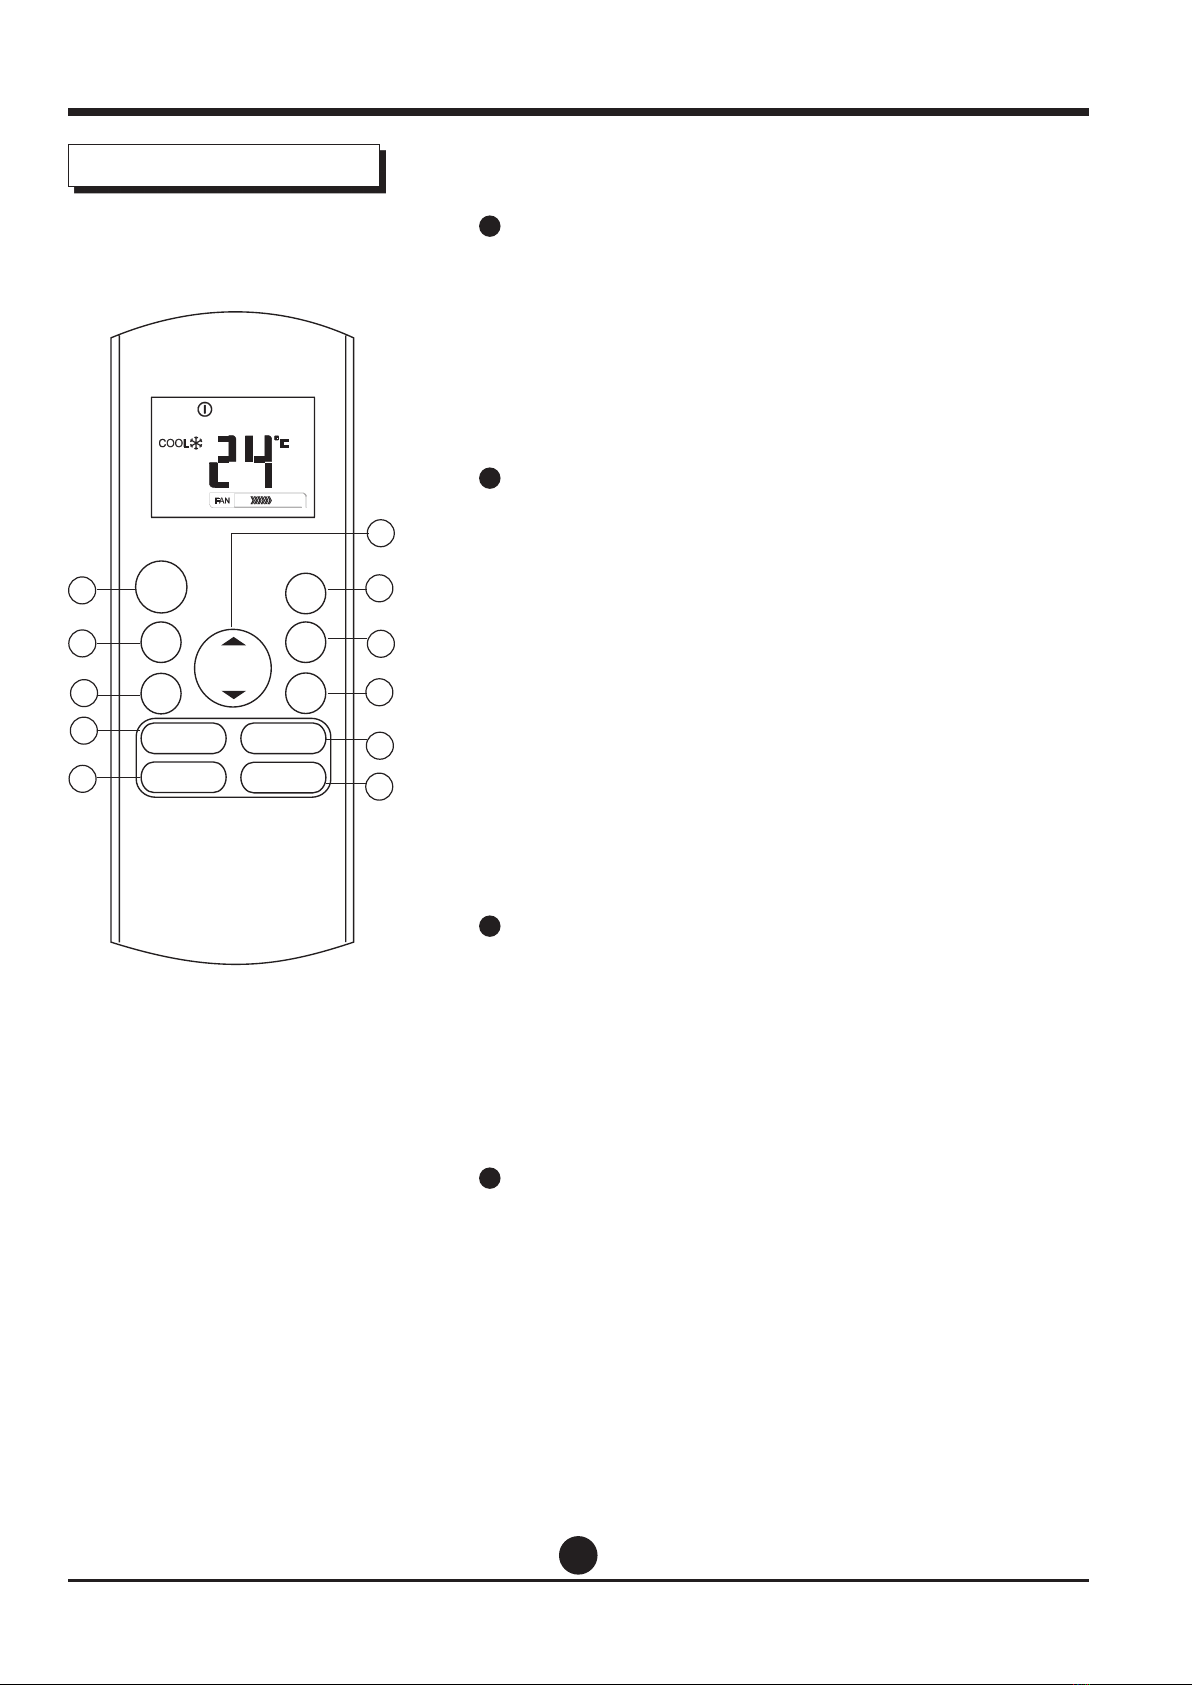
Auto operation
Ensure the unit is plugged in and power is available.
The OPERATION indicator on the display panel of the
indoor unit starts ashing.
1. Press the MODE button to select Auto.
2. Press the UP/DOWN button to set the desired
temperature. The temperature can be set within a
range of 17°C~ 30°C in 1 °C increments.
3. Press the ON/OFFbutton to start the air conditioner.
NOTE
1. In the Auto mode, the air conditioner can logically
choose the mode of Cooling, Fan, and Heating by
sensing the dierence between the actual ambient
room temperature and the setting temperature on the
remote controller.
2. In the Auto mode, you can not switch the fan speed. It
has already been automatically controlled.
3. If the Auto mode is not comfortable for you , the
desired mode can be selected manually.
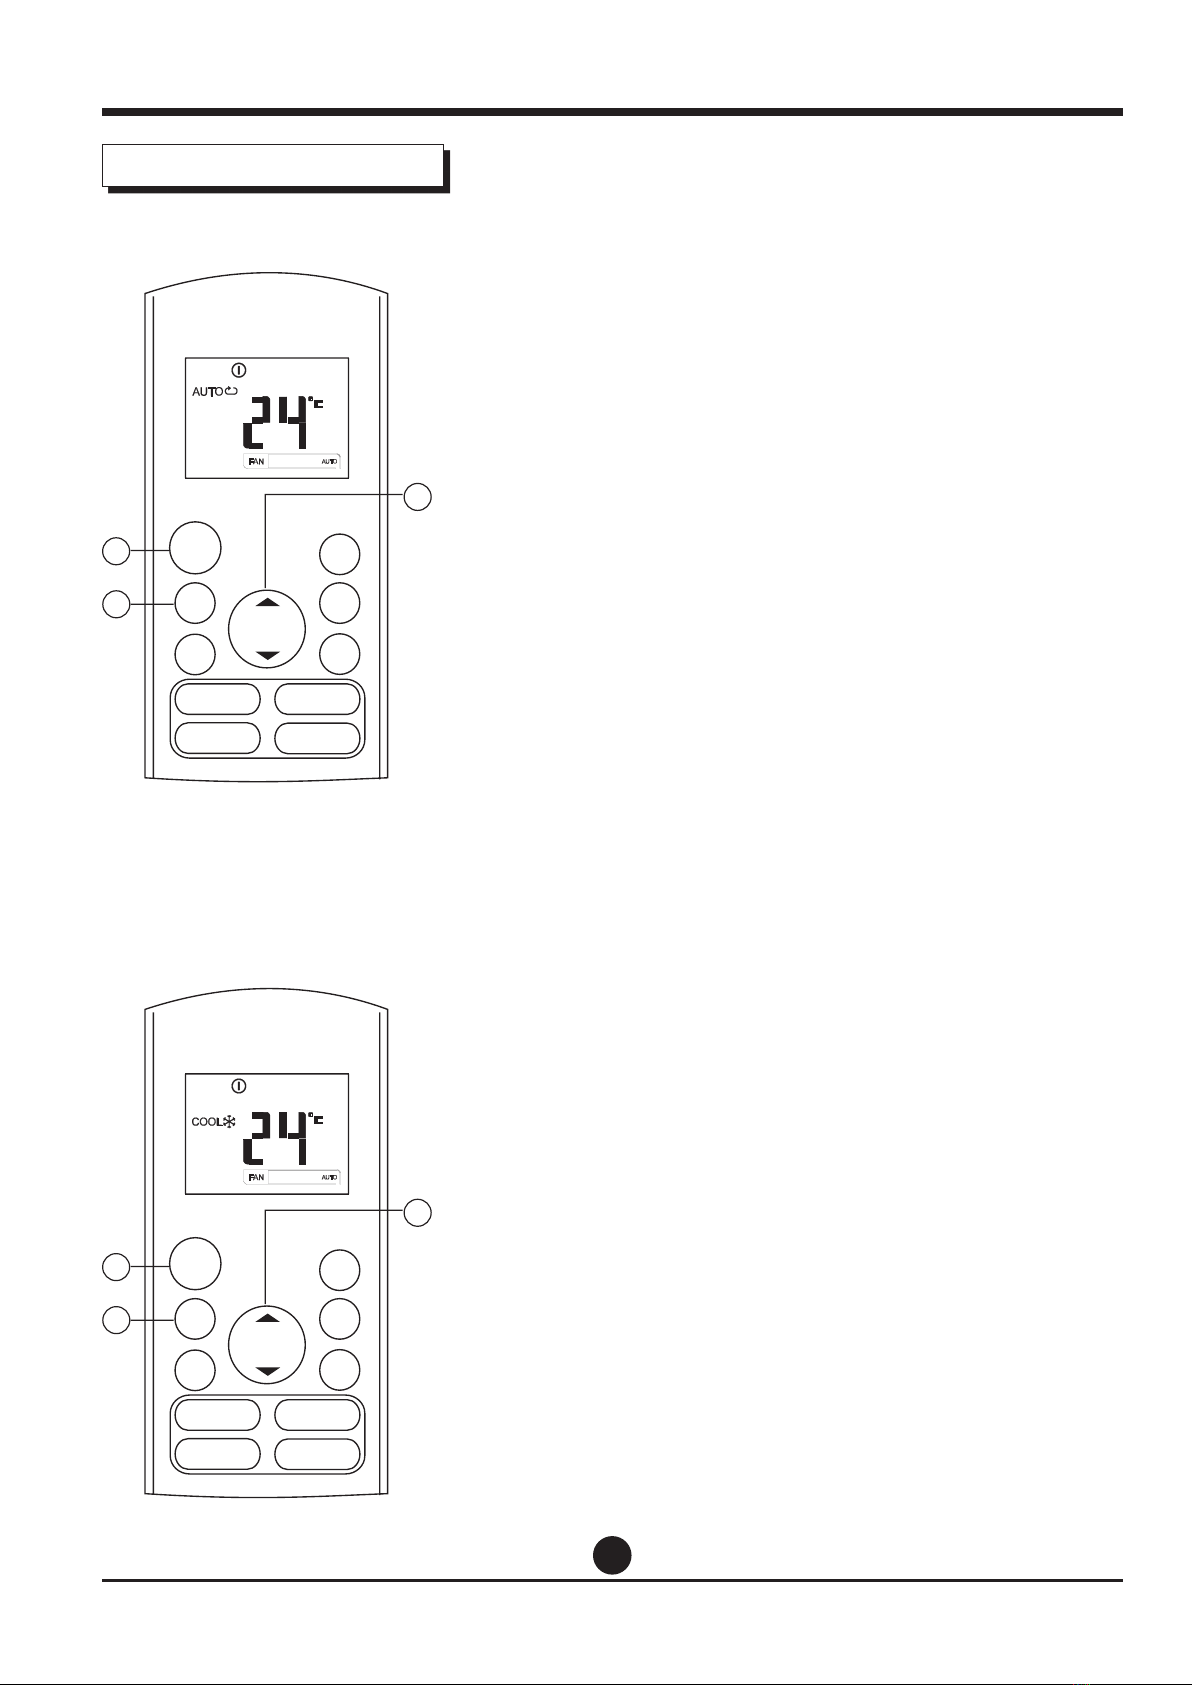
Cooling /Heatinq/Fan operation
Ensure the unit is plugged in and power is available.
1. Press the MODE button to select COOL,
HEAT(cooling & heating models only) or FAN mode.
2. Press the UP/DOWN buttons to set the desired
temperature. The temperature can be set within a
range of 17°C~ 30°C in 1 °C increments.
3. Press the FAN button to select the fan speed in four
steps-Auto, Low, Med,or High.
4. Press the ON/OFF button to start the air
conditioner.
NOTE
In the FAN mode, the setting temperature is not displayed
in the remote controller and you are not able to control
the room temperature either. In this case, only step 1, 3
and 4 may be performed.
How to use the buttons
SWING DIRECT
TURBO LED
SWING DIRECT
TURBO LED
SLEEP
SLEEP

9
MODE
FAN
TEMP
LED
FOLLOW ME
TURB O SELF CLEAN
ON/OF F
SHOR T
CUT
TIMER
ON
TIMER
OFF
3
1
2
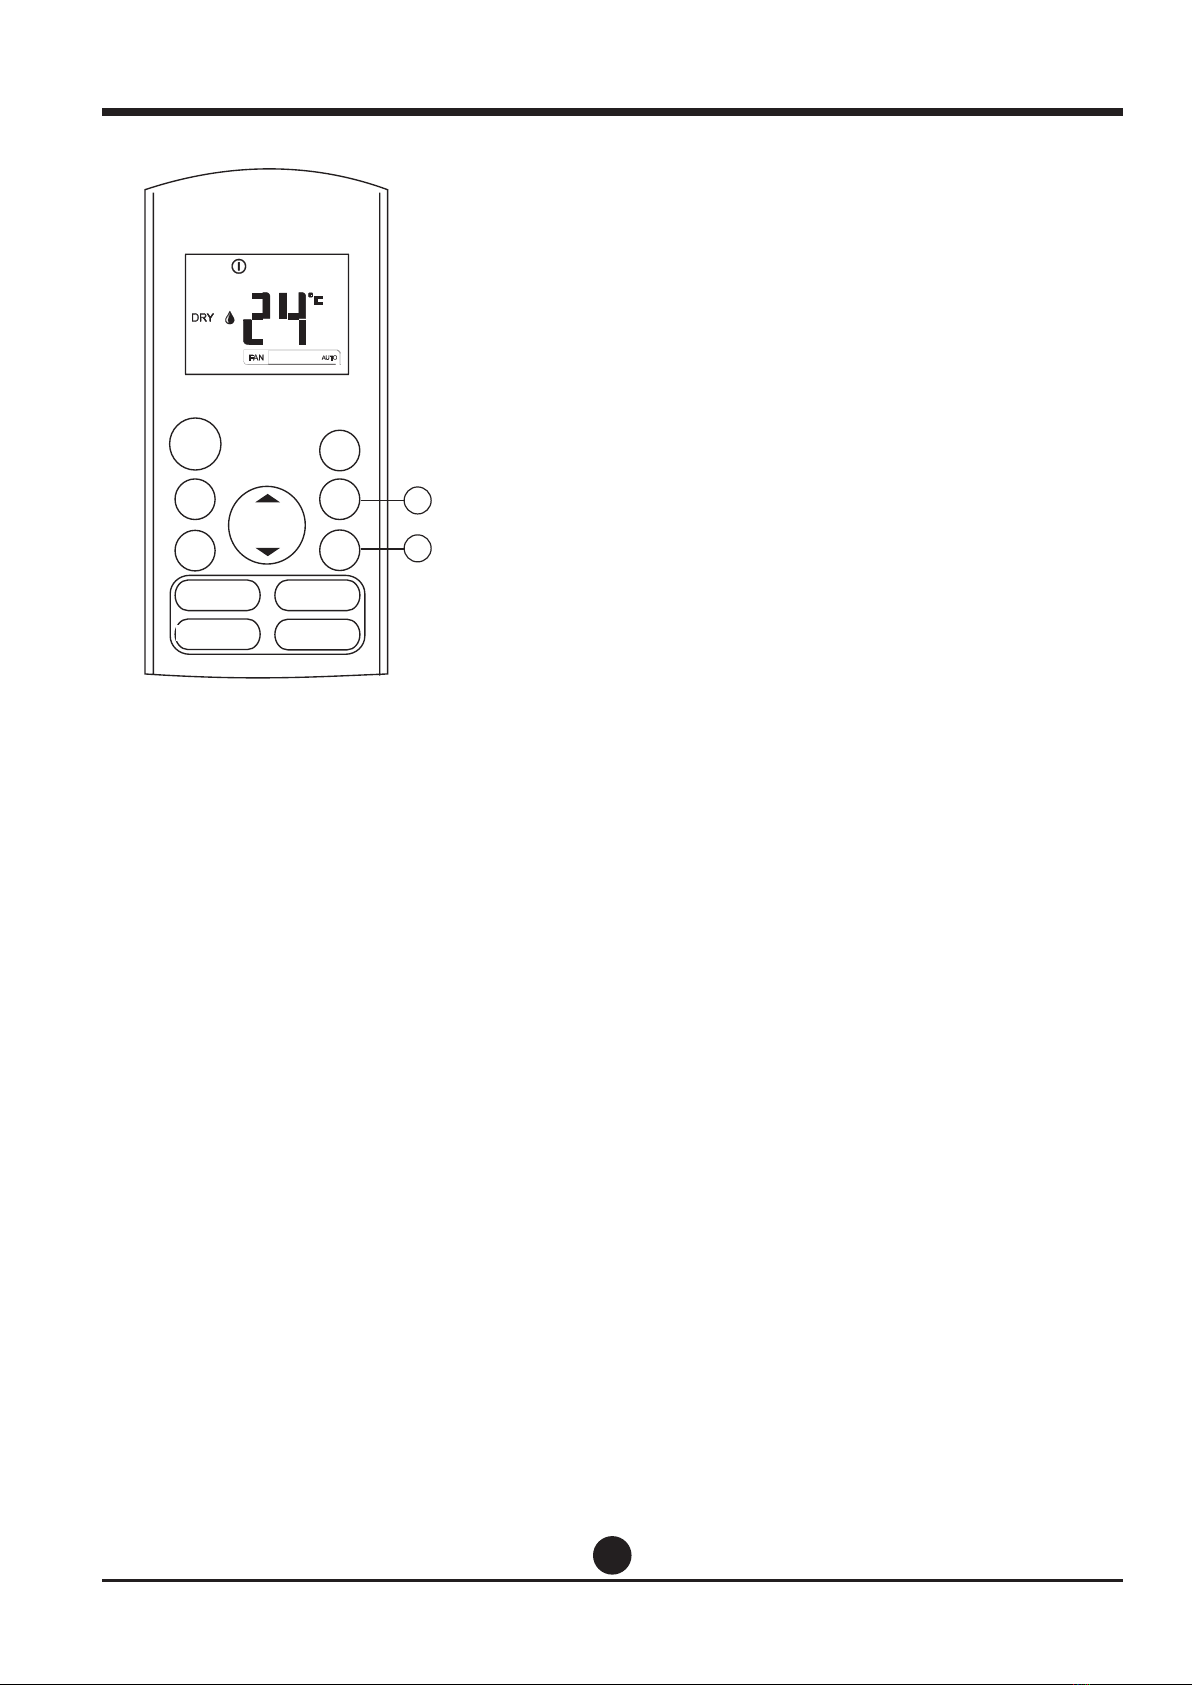
Dehumidifyinq operation
Ensure the unit is plugged in and power is available.
The OPERATION indicator on the display panel of the
indoor unit starts ashing.
1. Press the MODE button to select DRY mode.
2. Press the UP/DOWN buttons to set the desired
temperature. The temperature can be set within a
range of 17°C~ 30°C in 1°C increments.
3. Press the ON/OFF button to start the air conditioner.
NOTE
In the Dehumidifying mode, you can not switch the fan
speed. It has already been automatically controlled.
How to use the buttons
SWING DIRECT
TURBO LED
SLEEP
10
MODE
FAN
TEMP
LED FOLLOW ME
TURB O SELF CLEAN
ON/OF F
SHOR T
CUT
TIMER
ON
TIMER
OFF
1
2
Timer operation
Press the TIMER ON button can set the auto-on
time of the unit. Press the TIMER OFF button
can set the auto-o time of the unit.
To set the Auto-on time.
1. Press the TIMER ON button. The remote controller
shows TIMER ON, the last Auto-on setting time and
the signal “H” will be shown on the LCD display area.
Now it is ready to reset the Auto-on time to START
the operation.
2. Push the TIMER ON button again to set desired
Auto-on time. Each time you press the button, the
time increases by half an hour between 0 and 10
hours and by one hour between 10 and 24 hours.
3. After setting the TIMER ON ,there will be a one
second delay before the remote controller transmits
the signal to the air conditioner. Then, after
approximately another 2 seconds, the signal “h” will
disappear and the set temperature will re-appear on
the LCD display window.
To set the Auto-o time.
1. Press the TIMER OFF button. The remote controller
shows TIMER OFF, the last Auto-o setting time and
the signal “H” will be shown on the LCD display area.
Now it is ready to reset the Auto-o time to stop the
operation.
2. Push the TIMER OFF button again to set desired
Auto-o time. Each time you press the button, the
time increases by half an hour between 0 and 10
hours and by one hour between 10 and 24 hours.
3. After setting the TIMER OFF ,there will be a one
second delay before the remote controller transmits
the signal to the air conditioner. Then, after
approximately another 2 seconds, the signal “H “ will
disappear and the set temperature will re-appear on
the LCD display window.
SWING DIRECT
TURBO LED
SLEEP
Table of contents
Languages:
Other Nobu Remote Control manuals


