Nogueira ROTAFLOW-1300 User manual

Manual de Instruções


1
Dear Owner
Congratulations on the acquisition of the FERTILIZERS AND SEED
DISTRIBUTORROTAFLOWNOGUEIRA.
A product of the highest quality specially developed to meet your
needs.
This manual contains operation and maintenance instructions
which, if correctly followed, will guarantee de good work, safety and
durability of your ROTAFLOW. We recommend you read it carefully
before putting the machine into operation.
Nogueira S/A will always be at your disposal to answer any inquiry,
offering you efficient and permanent technical assistance.
An identification platelet is fixed to the machine, containing its
manufacturing serial number. Please write this number down on the
Warranty Certificate, on page 46 of this manual. This information will
be very important for the identification of your machine.
The images contained in this manual are for illustrative purposes only. To facilitate visualization,
the images can show open or disassembled safety protections. Under no circumstances the
machine should be used without the respective protections.

2
INDEX
Introduction 1
Environment 3
Safety 4
Safety stickers 8
Getting to know the ROTAFLOW 10
Application 11
Operation 11
Actuation 11
Items that come with the Rotaflow 11
Agitators 12
Coupling to the tractor 13
Leveling 14
Working height 14
Preparing and adding the Cardan shaft 15
Application rate adjustment 17
Discharge point adjustment 17
Using the adjustment table 18
Calibration test 19
Working width 21
Adjustments for low application rates 22
Regulation using the discharge device 24
Operation 25
Turn and distribution at the edges of the field 26
Distribution in the unilateral limit (with deflector plate) - method A 27
Distribution in the unilateral limit (with deflector plate) - method B 29
Maintenance 30
Lubrication 34
Accessories 35
Troubleshooting 36
Field trail test 37
Using the distribution charts 40
Tractor speed incompatible with the one required 42
Other brands or types of fertilizers 44
Technical specifications 45
Warranty certificate 46

3
Nogueira constantly worries about the environment preservation during the development
as well as with the use of ecologically appropriate processes and materials in the
manufacturing of our products.
PROTECTAND RESPECT THE ENVIRONMENT, bearing in mind that its preservation is a
social responsibility of all of us. Lubricant products, used fluids, old tires, packages etc
mustbegiventhecorrectdestination,predictedbylaw.Never discard remainder of products
or empty packages into springs, lakes, rivers, wells etc. Pass this advice on, inform other
people about the importance of environment preservation.
ENVIRONMENT

4
SAFETY
In this manual and in the safety stickers
affixed to the machine there are warnings
containing the safety alert sign and the
specific instructions, dedicated to maintain
the safety of the operator and other people.
Read all the instructions and keep alert
during operation.
Alert for situations where there is hidden
risk and may result in accident. Contains
instructions and recommendations to
avoid unexpected accidents from
happening.
WARNING!
Here at Nogueira we worry about the safety
of the people involved in the operation and
maintenanceoftheDistributor.Intheproject
development, we think about every detail to
avoid that unexpected accidents happen
during its utilization.
We developed safety protections and
eliminated risky situations. Nevertheless,
there are components that, due to their
functions, cannot be fully protected.
It’s very important to read the safety
recommendations carefully before turning
the machine on, and to keep an alert
posture during its utilization. It’s important
to remember that the preservation of
people’s health and physical integrity must
come first.
Incasethereareanydoubts, please contact
us through your reseller or our Technical
Assistance Department.
•The utilization of this equipment in
applications not mentioned by this
manual will be considered as
inadmissible work and is not
authorized by this manufacturer.
Adaptations or use of spare parts that
are not original will compromise the
operation and put the safety of the
operator at risk, and cause the loss of
the warranty offered.
•Operation and maintenance must be
performedonlybypeoplethatknowthe
machine.
•The launcher discs cannot be
completely protected due to their
functions. Keep a safe distance from
the machine when it’s on.
•Never approach the moving launching
discs with hands or feet.
•The permanence in any parts of the
Distributor when it’s on is forbidden.
Do not allow the presence of people
on the machine during transportation.
RECOMENDAÇÕESDESAFETY:
SAFETYALERTSIGN
Alert for situations that may result in severe,
life-threatening accident if the instructions
are not rigorously followed.
DANGER!
Alert for situation that can result in
accidents. Contains instructions and
recommendations for the operator and
other people that do not involve accidents.
CAUTION!

5
SAFETY
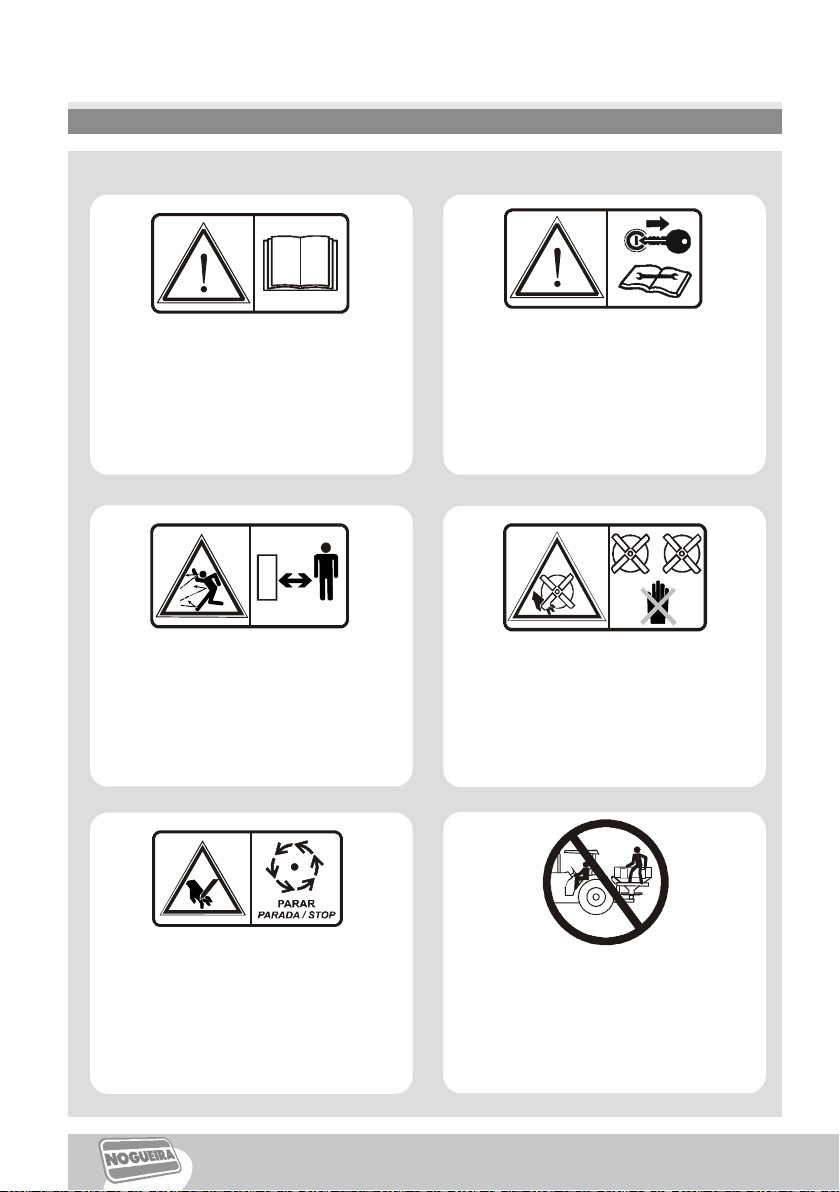
•Observe the machine surroundings
before putting it into operation. Keep
children, animals and watchers at safe
distance and out of the distribution
range. Be especially careful with
children. Check if there are no tools or
other objects on the machine before
turning it on.
•Tie long hair and do not use loose
clothes,orwithpartsthatmaygetstuck
in the mobile components. Remove
rings, necklaces etc.
•Keep hands and feet away from the
moving part.
•Never try to clean or clear the machine
when it’s on. Always turn the machine
off before performing any cleaning or
maintenance in the Extractor.
•Use personal protective equipment
when operating the machine. The
prolonged exposure to the noise can
cause hearing impairment or loss. Use
earplugs and safety goggles.
•Never operate with the Cardan shaft
without the safety protection. Keep the
protection in good conditions and
prevent it from spinning, locking it with
the existing chains.
•Before regulating, lubricating or
carrying out any maintenance service
in the Harvester, turn off the power take
off, the tractor engine and remove the
key from the ignition.Always be aware!
•Keep the safety stickers in good
conditions and readable. Substitute
them whenever necessary.
•Be especially cautious when coupling
and uncoupling the machine from the
tractor!
•Incaseyou observe vibrations,different
noises etc, turn the machine off
immediately. Check and eliminate the
cause before turning it back on.
•The hydraulic system liquid escape
may be unnoticeable. Use wood or
cardboardinsteadofyourhands to look
for leaking. Protect the hands and body
since fluids at high pressure can
cause severe injuries. In case of
accident, consult a doctor immediately.
•Due to inertia, the mobile components
will keep moving for a while after the
machine has been turned off. Before
substituting any component, turn of the
power supply, look and listen to check
if there are any movement evidences.
Only touch a component if you’re sure
it’s still. Always be aware!
•Never operate the machine without the
safety protections.
•Never operate the machine indoors or
in unventilated environments. The
fumes released by the tractor engine
are toxic and highly harmful to health.
•When driving the machine on public
places, observe the local traffic and
safety. Get information about the
current legislation in regards to the
maximum width and height permitted
for transportation. Beware of the
transportation height, especially under
bridges.

6
SAFETY
•Never leave the tractor with the
machine on. Stop the engine, turn off
thepowertakeoff,hittheparkingbrake
and remove the key from the ignition
first.
•Always adapt the tractor displacement
speed to the local conditions. Avoid
sudden maneuvers, especially in steep
places. When towing a load that is
heavierthan the tractor, donotgo above
16 Km/h.
•Redouble the attention when working
in inclined terrains. In case you notice
some sort of unbalance, reduce
acceleration. In the descents, always
keep the tractor geared.
•The tractor must always be
maneuverable. Add enough counter
weightstokeepthe front tires inenough
contact with the ground.
•If it is necessary to work on the
machine suspended by the hydraulic,
it should be supported in a safe way.
The hydraulic mechanisms may bridle
by themselves or due to leaks.
Do not support the machine on
concrete blocks, hollow bricks or other
supports that may collapse under the
effect of prolonged loads. Never work
under a machine that is only supported
by a jack.
•Machines raised by the tractor’s
hydraulic system have their
maneuvering and breaking efficiencies
reduced! Make sure there are enough
breaking and maneuvering conditions
and if necessary add weights to the
front of the tractor.
•When turning the machine around, pay
attention if there is enough space to
maneuver it!
•Only operate the machine when it has
the complete and intact protections in
the right place! The Distributor’s
protections prevent access the access
to dangerous areas. That’s why it’s
important to keep them in the
appropriate conditions. This is good
for your own safety and the others’ too!
•Redouble the attention when working
in inclined terrains. In case you notice
some sort of unbalance, reduce
acceleration. In the descents, always
keep the tractor geared.
•When towing the machine, reduce the
speed to avoid accidents.
•Fill up the Distributor with caution and
do not go above the indicated
maximum load capacity.
•Do a little recognition of the terrain
before starting work. Mark the
dangerous places or those with
obstacles that can put the operation at
risk.
•The incorrect fertilization can cause
severe damage to people, animals
and the environment. Consult your
fertilizer reseller and carefully read the
utilization instructions on the product’s
label.
•Before using a fertilizer, carefully read
the label and follow the manufacturer’s
instructions. Store it in an appropriate
place and discard of the empty
packages.

7
•Avoid the contact of the product with
skin, eyes etc. Wash your hands and
arms with abundant water and soap
at the end of each work shift,
especially before eating.
•Fertilizers with nitrate can cause risk
ofexplosionwhenincontactwith fire.
•After the use, carefully wash the
machine with water. Do not leave
fertilizer remainders inside the
machine to avoid risk of fire.
•Always be prepared for an accident.
Keep a first aid kit in an accessible
place and learn how to use it.
•Observe the safety
recommendations and be aware.
Thelackofattentionduringoperation
can result in accidents.
SAFETY

8
Keep away from the moving discs.
Risk of wounds by impact and torsion.
Not following this instruction may
result in severe accident.
SAFETY
Keep a safe distance from the
machine during operation.
Risk of wounds caused by launched
parts.
Notfollowingthisinstruction may result
in an accident.
Safetystickers:
Read the instruction manual before
turning the machine on.
Notfollowingthisinstruction may result
in severe accident.
Turn the tractor offandremovethekey
from the ignition before performing
regulations, maintenance or
lubrication.
Risk of wounds by mobile parts.
Not following this instruction may
result in severe accident.
It’s forbidden to stay in any part of the
machine during the operation and
transportation.
Risk of fall and running over.
Not following this instruction may
result in severe accident.
Before touching any part of the
machine, watch carefully if there is no
movement.
Risk of wounds caused by mobile
components.
Not following this instruction can result
in severe accident.

9
Nevertrytolocatea fluid leak with your
hands. Use cardboard or wood.
Risk of penetration on the skin, which
can cause infections and gangrene.
Not following this instruction can result
in severe accident.
540 rpm
Keep distance from the machine
during operation.
Risk of wounds caused by mobile
parts.
Not following this instruction can result
in severe accident.
Numbers of rotations per minute and
rotation direction at power take off.
Keep away from the articulation area
between the machine and the tractor.
Risk of wounds by impact.
Not following this instruction can result
in severe accident.
Safetystickers:
SAFETY
Keep distance from the moving
Cardan shaft.
Risk of wounds by torsion.
Not following this instruction can result
in severe accident.
Use earplugs and safety goggles
during operation. Risk of hearing loss
and eye wounds.

10
1Reservoir
2Structure
3Protection
4Launcher rotor (left)
5Transmission box (left)
6Transmission box (central)
7Transmission box (right)
8Launcher rotor (right)
9 Paddle
10 Control bar
11 Flow directing lever
12 Flow dosing lever
13 Coupling pins
14 Cardan shaft
1
2
3
4
6
7
GETTING TO KNOW THE ROTAFLOW
58
11
12
9
13
10
14
13
fig.1
fig.3
fig.2

11
APPLICATION
ROTAFLOW was designed to distribute
fertilizers and seeds with maximum
precision. It’s a double centrifugal
distributor adaptable to the hydraulic
system of agricultural tractors.
OPERATION
Fertilizers distribution:
It has a distribution system composed of 2
rotors with 8 paddles each. The paddles,
mountedhorizontally, distributethefertilizer
in the field, assuring a constant horizontal
flow.
Dosage:
A dosage plate mounted over the rotor
regulates the amount of fertilizer to be
launched. The opening of these dosage
plates is regulated by two graduated bars
located in the back of the distributor. Once
determined, the fertilizer’s flow through
these plates may be released or totally
interrupted directly from the tractor, via a
hydraulic system.
Launching:
The launching position is determined by a
chamber located inside the rotor, also
regulated by an alphabetical order lever.
Its position is determined by the
distribution tables, depending on the type
of fertilizer and the amount to be distributed
in Kg/min.
In case there is a need for a different
application rate or fertilizer, all you have to
do is adjust the dosage plates and the
launching position (in the same working
width and speed).
ROTAFLOW operates coupled to
agriculturaltractors,categoryII,with remote
command valve. It’s driven by through the
power take off with minimum power at 30
HP, 540 RPM.
ACTUATION
ITENSTHATCOMEWITHROTAFLOW
01 – Fertilizer graduation box.
01 – Instructions manual.
fig.4

12
Your Rotaflow comes standard with two options Agitators: SHORT and LONG. These
should be used according to the type of product to be distributed as follows:
SHORTAGITATOR: to distribute granular fertilizers and seeds (this follows Shaker factory
fitted);
LONGAGITATOR: to distribute Powdered Fertilizers and ammonium sulfate (also supplied
with the machine);
AGITATORS
Agitador CURTO Agitador LONGO
NOTE: The inappropriate use of agitator could result in damage to the product that will be
distributed.
SHORTAGITATOR LONGAGITATOR

13
COUPLINGTO THE TRACTOR
NOTE: For a standard distribution, the
Distributor must be coupled in the upper
position (fig. 2). In case it’s necessary to
have a distribution that is higher in relation
to the ground, couple in the lower position.
2.Carefully approach the tractor,
maintaining the power take off aligned
with the machine’s actuation axle.
To make it easier and safer, it’s
recommended to choose a plane place to
carry out the coupling of the Distributor to
the tractor.
PREPARAÇÃO
3.Couple the 3 arms of the hydraulic
system in the spots indicated above.
First, hitch the left arm and next the
right arm,
Depending on the tractor size that will be
used, it will be necessary to add frontal
weights.Always be aware for the fact that
when the Distributor has the product,
its total weight increases the pressure
in the front wheels of the tractor,
decrease the agility of the maneuvers.
1.Remove the 3 coupling pins from the
Distributor.
and lastly, the upper arm (3rd point),
locking the respective counter pins.
Adjust the lateral stabilizers of the inferior
tractor’s arms, as to restrict the lateral
movements of the machine after coupled.
Regulate the two inferior arms in the
same height.
Important!
fig.8
fig.7
fig.6
fig.5

14
LEVELING
The even distribution depends on an
adequate leveling of the machine.
Put the tractor with the Distributor coupled
in a plane place.
REARLEVELING
Observing the Distributor from the back,
check if it’s leveled (fig. 9). In case it’s
necessary, use the inferior arms of the
tractor’s hydraulic to correct the leveling.
PREPARAÇÃO
LATERALLEVELING
Now, observe the lateral leveling (fig. 10). If
necessary, use the upper arm of the 3rd point
to perform the adjustments.
WORKINGHEIGHT
The discs must launch the product at 75
cm from the ground. Using the tractor
hydraulic system, lift the Distributor until the
indicated height (fig. 11).
75 cm
fig.11
fig.10
fig.9

15
Before coupling the Cardan shaft you must
check if its length is appropriate to the
tractor that will be used.
Disassemble the two parts of the Cardan
shaft, couple the massive bar (male) in the
tractor and the tubular bar (female) in the
machine.
Put the two parts of the Cardan shaft side
by side (fig.12). There must be a clearance
of at least 25 mm in the tips of the MALE
and FEMALE, as shown below.
CLEARANCE:25 mm
CLEARANCE:25 mm
Remove it from the machine and the
tractor and perform the cut.
If there is no possibility of using it in the
original size, mark the Cardan shaft in the
spots where it must be cut.
fig.16
fig.15
fig.14
• The pieces cut from the male and
female of the Cardan shaft must have
the same length.
• See the instructions for the cut in the
brochure attached to the Cardan shaft.
PREPARAÇÃO
fig.13
Note:
PREPARINGANDADDINGTHE CARDANSHAFT
fig.12

16
•The length of the Cardan shaft must
be checked whenever using a different
tractor model.
•Clean and lubricate the power take off
axles (from the tractor and the
machine) before coupling the Cardan
shaft.
•After adding the Cardan shaft, lock the
safety chains, leaving a clearance for
the articulation in any additional
condition.
•It is the authorized Nogueira reseller’s
exclusive responsibility to execute the
preparation of the Cardan shaft and
the first coupling of the machine.
AFTER THE CUT:
After cutting, give finishing to the parts of
the Cardan shaft with a file. Lubricate with
a thin wax coating.
Fit the two parts of the Cardan shaft. Keep
the fork aligned.
RIGHT
WRONG
fig.18
fig.17
It’s recommended that under normal
operation conditions, with the machine
moving in straight line, the contact area
between the male and female parts is at
least 2/3 of the closed Cardan joint (L
distance in figure 20). In the most critical
condition, such as hairpin bends, this
distance cannot be inferior to 1/3 of the
length.
L
maximum 35o
(pto turned on, whitout
load)
2
3L (recommended)
PREPARAÇÃO
fig.20
Maximumangle when maneuvering, withthe machine
empty.
Turn off the power take off when
maneuvering with the machine coupled.
Note:
WARNING
Never use the Cardan shaft without the
safety protection. Keep a safe distance
from the machine during operation. The
contact may cause severe accident. Tie
long hair and do not use loose clothes or
with parts that can get stuck in the mobile
components.
fig.19
PREPARINGANDADDINGTHE CARDANSHAFT

17
PREPARAÇÃO
APPLICATIONRATEADJUSTMENT DISCHARGE PONT ADJUSTMENT
In the rear part of your Distributor there are
two control bars (fig. 21), graduated from 0
a 90. Each bar has a limiter, which, when
moved, determines the dimension of the
three outlets through which the product is
drained, resulting in the desired application
rate (kg/ha).
The application rate adjustment also
requires a determined launching point.
Through the TIMING (fig.23), it’s possible
to establish the exact location in which the
product will fall on the disc, before being
launched (fig.24). The position of this lever
over the alphabetical scale depends on the
type of fertilizer, the working width and the
discharge rate in kg/min.
The control bars are individually driven
through a hydraulic system, which
releases or interrupts the product flow
directly from the tractor.
LIMITER
CONTROL
BAR
DRAINAGE
OUTLETS
fig.24
fig.23
fig.22
fig.21
A
For adjust the discharge point, loosen the
key A and move the lever (fig. 23).
TIMING

18
The adjustments must be made from the characteristics of the adequate
fertilizer for your crop. Based in these information, you may adjust the
Distributor using the charts, as exemplified below.
Suppose you want to spread NITRATE (NITRAPRILL), in the following conditions:
Application of 174 Kg per hectare.
Working width of 18 m.
Speed of 6 Km/h.
Consult the table from the NITRAPRILL (illustrated below), with width of 18 meters (1).
Look in the column of 6 km/h (tractor speed) and find the desired output of 174 kg/ha (2).
GRANULESIZE
Observe thatthe CONTROL BARS mustbe regulated for the position 24 (3)and the TIMING
for the position E in the alphabetical scale (4).
After performing the adjustment according to the tables, do a calibration test as described
next.
Note:
Note:
USINGTHEADJUSTMENT TABLE
fig.25
GRANULE SIZE
DENSITY 1.0 Kg/l
WORKING WIDTH 18 meter
TRACTOR SPEED
APPLICATION RATE (Kg/ha)
TIMING Km/h
NITRAPRILL 34,5% N
This manual suits for next models
1
Table of contents
Other Nogueira Spreader manuals