Nomix Frontline Classic User manual

frontlineclassic
The original
low volume
TDC herbicide
application
system
INSTRUCTIONS

Contents
Section 1:
Introduction
3
Section 2:
Component List
4
Section 3:
Quick Start
6
Section 4:
Controls and Features
Battery and charger 8
Shaft 9
Trigger 9
Backpack and herbicide box 9
Pacing control 10
Spray width control 10
LCD readout 11
Onboard electronics 12
Flow rate 12
Section 5:
Preparing the Frontline Classic for Use
Personal Protective Equipment (PPE) 13
Inserting the battery 13
Connecting the herbicide box 14
Priming 14
Selecting a disc 15
Calibrating 16
Section 6:
Operating the Frontline Classic
Spraying 18
Avoiding spray drift 18
Optimum spray pattern 18
Section 7:
Cleaning the Frontline Classic 19
Section 8:
Storing the Frontline Classic 21
Section 9:
Safety Tips 22
Section 10:
Troubleshooting 23

Section 1: Introduction
The Frontline Classic is a lightweight hand-held low
volume herbicide applicator, designed for use with our
range of Nomix Total Droplet Control (TDC) herbicides.
Nomix TDC is a unique system, combining pre-mixed,
highly eective herbicides with easy to use,
ecient applicators.
Nomix TDC delivers a constant, uniform droplet size and
spray pattern, significantly reducing run-o and virtually
eliminating spray drift and droplet bounce. In times
of increased environmental and legislative pressure,
the Frontline Classic delivers ecient, compliant, cost
eective and accurate herbicide applications every time.
Nomix TDC herbicides are supplied in ready to use,
lightweight 5 litre packs that connect directly to the
lance, eliminating the risk of spillages and operator
exposure from mixing and measuring.
3

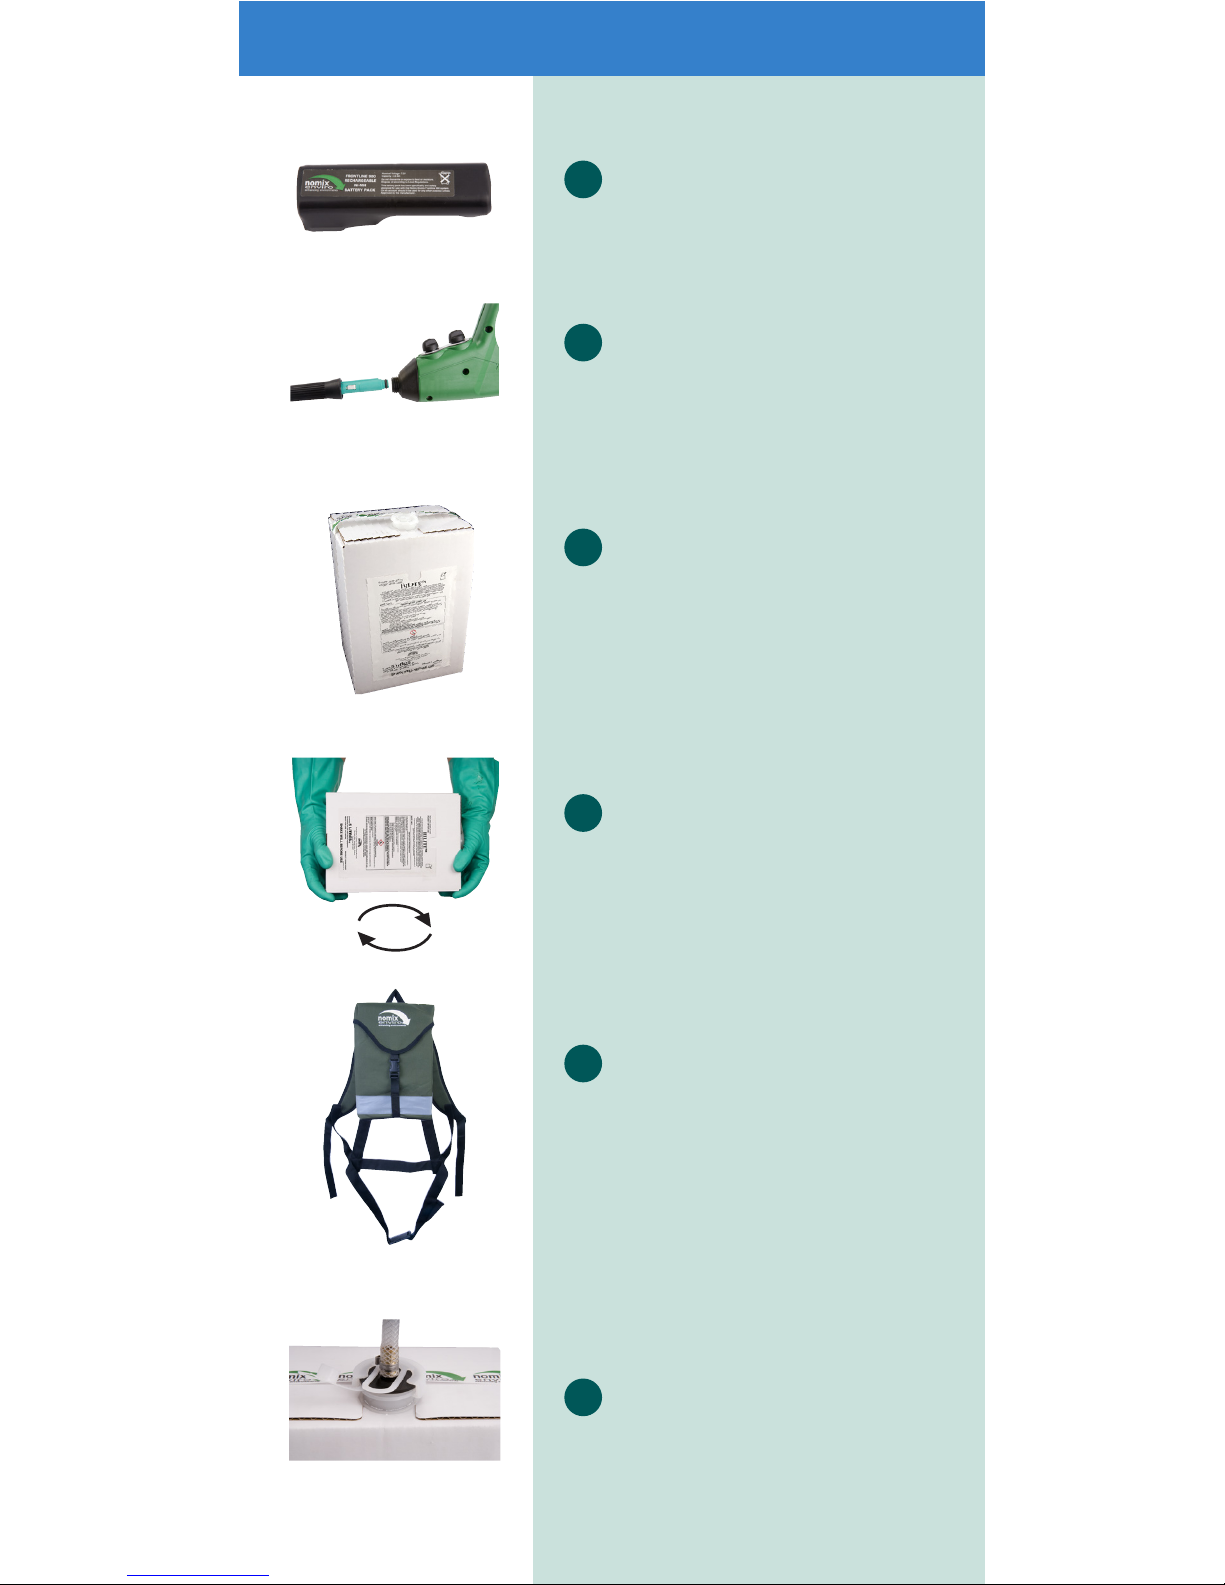
Section 2: Component List
1 Spray head
a) Flow rate window
b) Flow rate indicator
c) Flow rate control
2 Control panel
a) Spray width control
b) Pacing control
3 Trigger
4 LCD readout
5 Spiral disc
6 Square disc
7 Serrated disc
8 Disc ejector tool
b
a
c
a
b
4
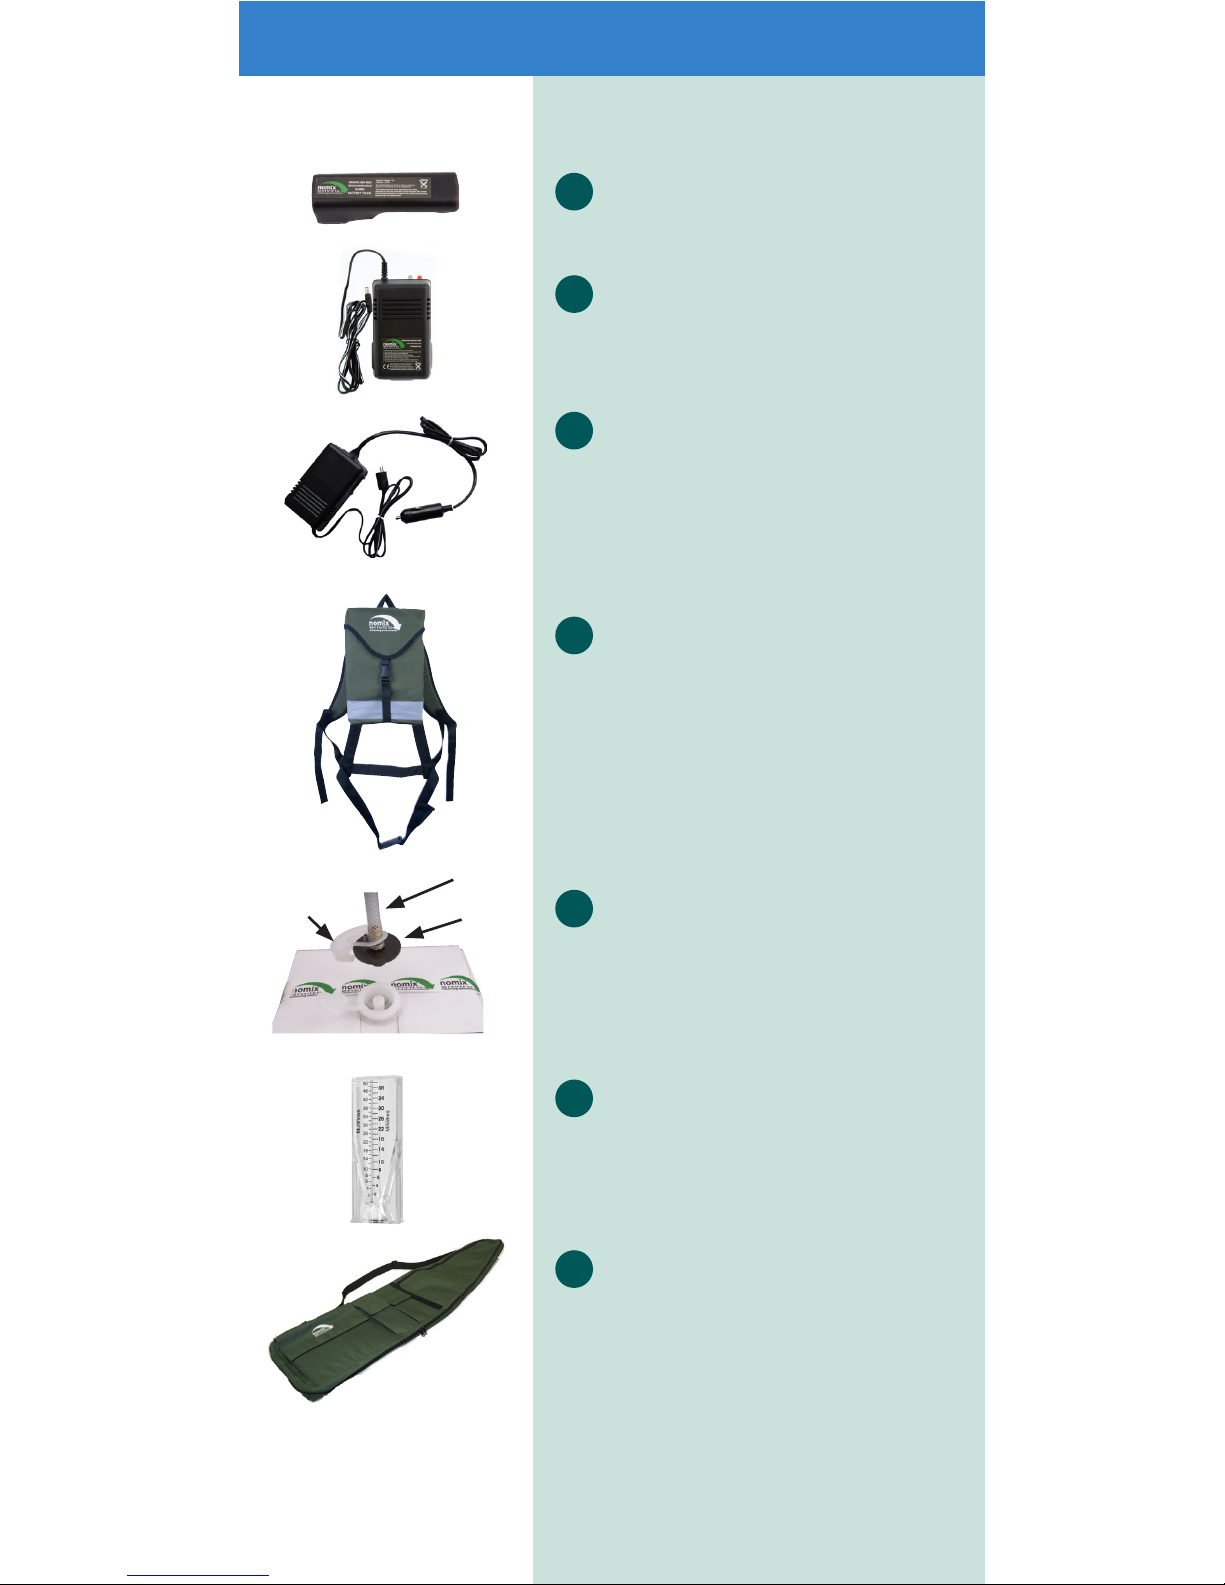
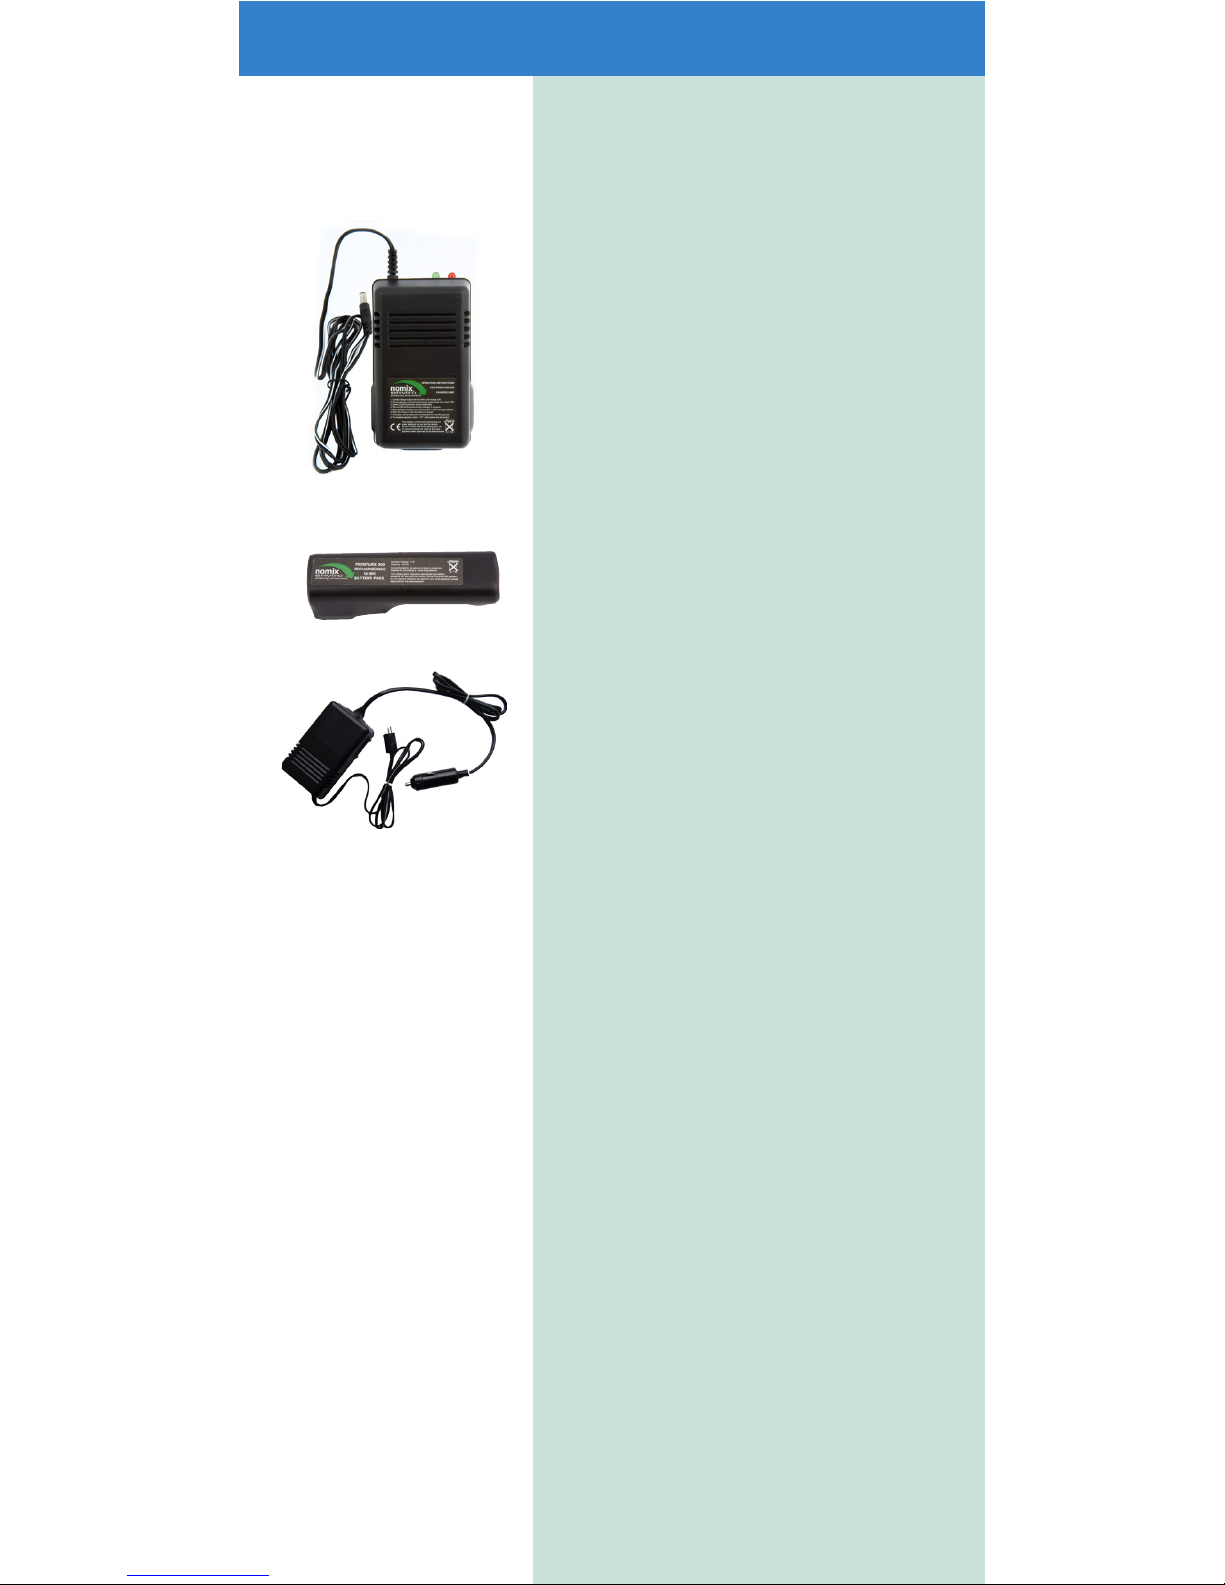
9 Rechargeable battery
10 Battery charger
11 Car charger*
12 Backpack
13 Box connector
a) Feed tube
b) C-clip
c) Connector
14 Calibration cup
15 Carry case*
* These items do not form part of our
standard components. They can be
purchased from Nomix Enviro.
Please telephone 01264 388050.
a
bc
5
Section 3: Quick Start
1 Charge the battery for a
minimum of eight hours
2 Attach the shaft
3 Select an approved Nomix
TDC herbicide
4 Shake the herbicide box
vigorously for at least
one minute, in a circular
motion
5 Place the herbicide box in
the backpack
6 Attach the lance to the
herbicide box, ensuring
the c-clip is in place
6
7 Prime your Frontline Classic
8 Before calibrating the Frontline
Classic you will need to select
a disc. Do not attach the disc
until calibration is complete
Spiral - Narrow spray
Square - Medium Spray
Serrated - Wide Spray
9 Calibrate your Frontline Classic
10 You are ready to spray
Please Note: For full operator
instructions, always refer to sections
5 and 6.
7
Section 4: Controls and Features
Battery and charger
Please Note: The battery must
be charged before connecting it
to the handset. Always connect
the battery before connecting the
herbicide pack.
• Plug the charger supplied into a
mains outlet (do not switch on).
• Connect the battery to the
charger.
• Switch the charger on at the
mains supply.
• Charge the battery for a
minimum of eight hours.
• The charger will monitor the
battery state. Whilst charging,
the red and green lights will
remain on. When fully charged,
the red light will go out and the
green light will remain on.
• We recommend that you charge
the battery after each full day’s
use.
• When the battery is fully
charged, switch o the charger
at the mains and disconnect the
battery from the charger.
• Check the handset controls are
in the ‘OFF’ position.
• Place the battery into the
handset (point the handset
downwards as you insert the
battery).
• Close the battery compartment.
• The state of the art nickel metal
hydride battery technology
allows the battery to receive a
part charge from a car charger,
without any detrimental battery
performance.
8

• Batteries should be fully charged
prior to storage through the
closed season. Store the batteries
in a clean and dry environment.
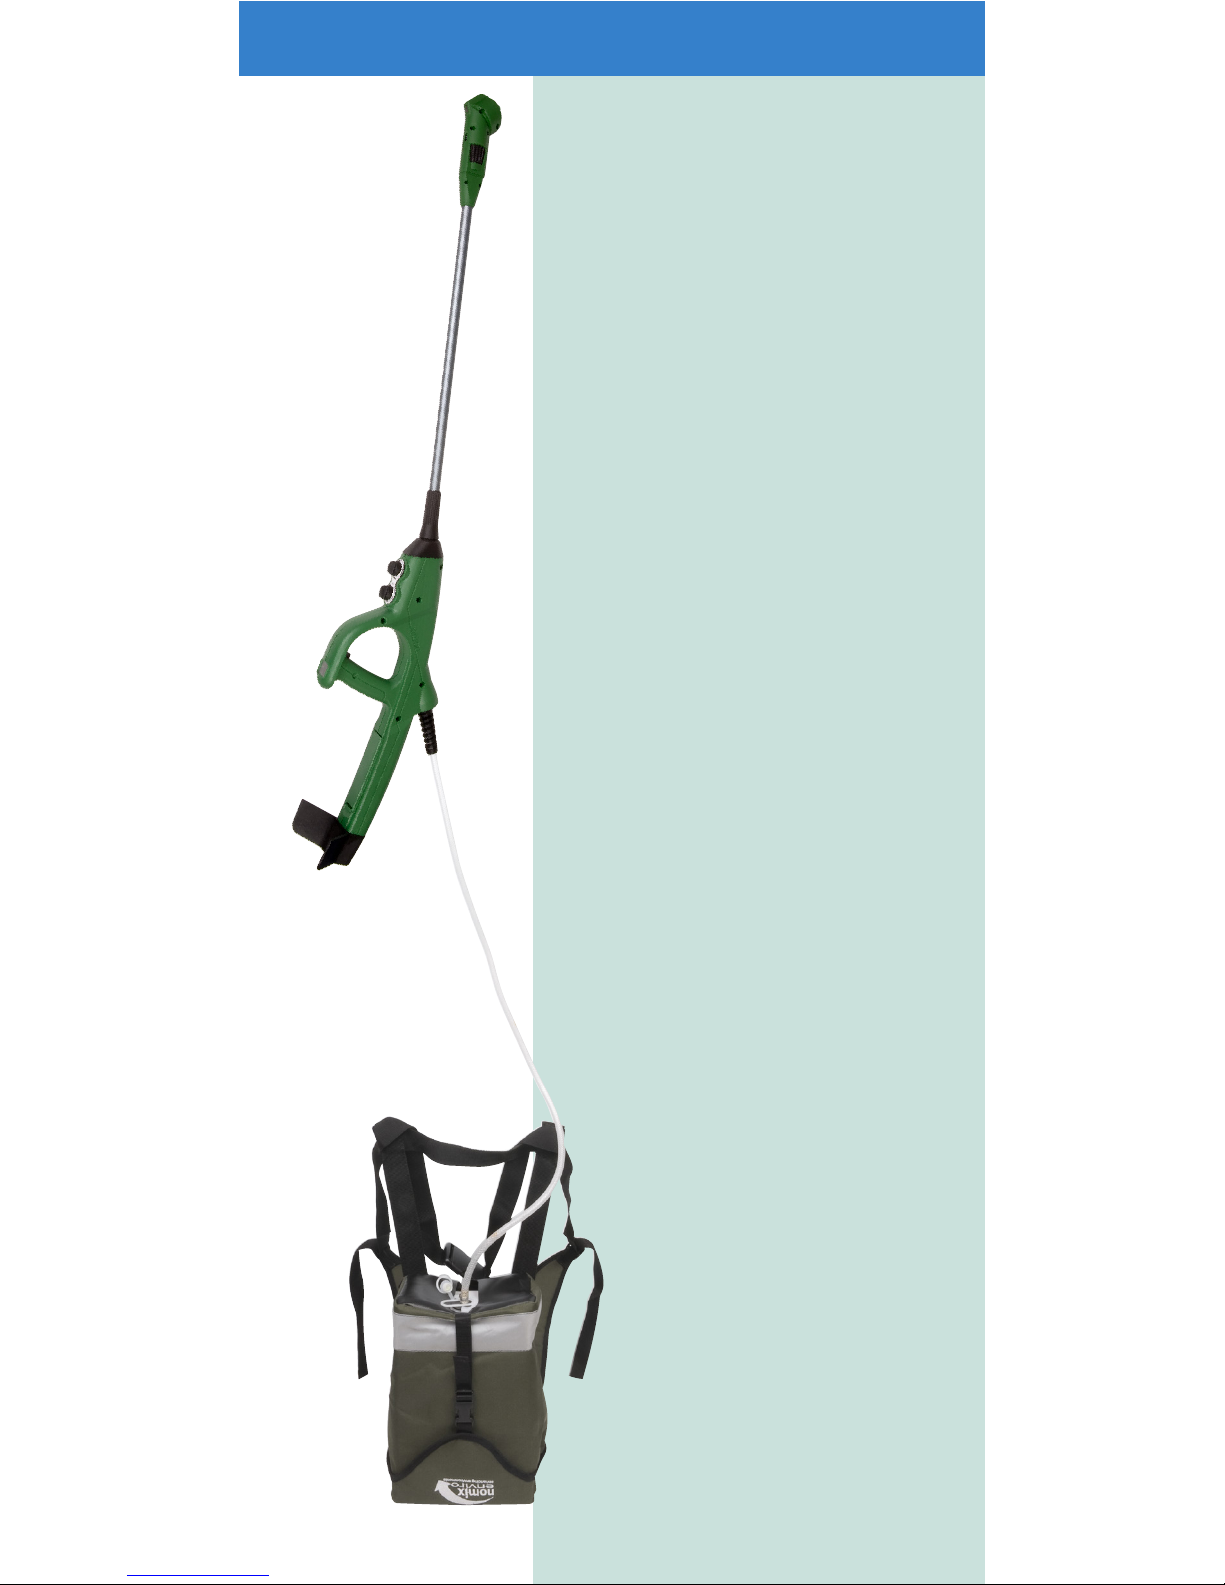
Shaft
• To insert the shaft into the
handset, align the shaft
connector’s raised spine with the
handset’s receptor.
• Push the shaft completely into
the handset.
• Screw the shaft nose cone fully
onto the handset. Take care
not to over tighten, screwing to
finger-tight only.
Trigger
• Press the trigger to power the
lance functions and allow the
chemical to flow to the spray
head.
• The electronic single function
(on/o) trigger mechanism
ensures fast and accurate
application. Press the trigger to
start spraying and again to stop.
Backpack and
herbicide box
The Frontline Classic should only
be used with approved Nomix TDC
herbicides, carried in a
Nomix backpack.
9

Section 4: Controls and Features (cont.)
Pacing control
• When in the ‘OFF’ position,
the usage clock is visible on
the LCD readout for a short
time.
• The calibrate position disables
the motor whilst calibrating.
• The other positions are used
to set the lance to beep,
indicating when to step to
maintain the walking pace.
• Using the pacer will ensure
the most accurate application.
However it is not essential for
it to be switched on during
operation and it can be turned
to the o position if preferred.
Spray width control
• When in the ‘OFF’ position
the lance will not activate,
although the power is still on.
• Disc positions indicate the
disc selection.
• Turn the control clockwise
to increase the spray width
available for the disc selected.
10

LCD readout
The LCD readout is activated when
the spray width control is set or
the trigger button is pressed. Press
the trigger to power the lance
functions and allow chemical to
flow to the spray head.
• Battery Information:
o The five battery segments
display the amount of battery
charge remaining
o The last two segments will
flash to warn of low battery
o When the last segment shows
as ‘LO’, the battery must be
charged or replaced
o Shortly after the ‘LO’ reading
displays, the processor will
shut down and herbicide
will not flow. This is a safety
precaution to make sure the
valve is not left in an open
position.
11

Section 4: Controls and Features (cont.)
• Clock:
o The clock enables you
to measure the hours of
operation
o To display the hours of
operation, set the spray
width and pacing controls
to ‘OFF’
o Hours will show on the LCD
readout for approximately 3
seconds
o The clock is activated when
the spray button is pressed
o ‘SER’ will appear when a
service is due
Onboard electronics
• The onboard processor is
activated when the trigger is
pressed and monitors:
o Battery condition
o Valve operation
o Spray width control
o Pacer control
o Usage time.
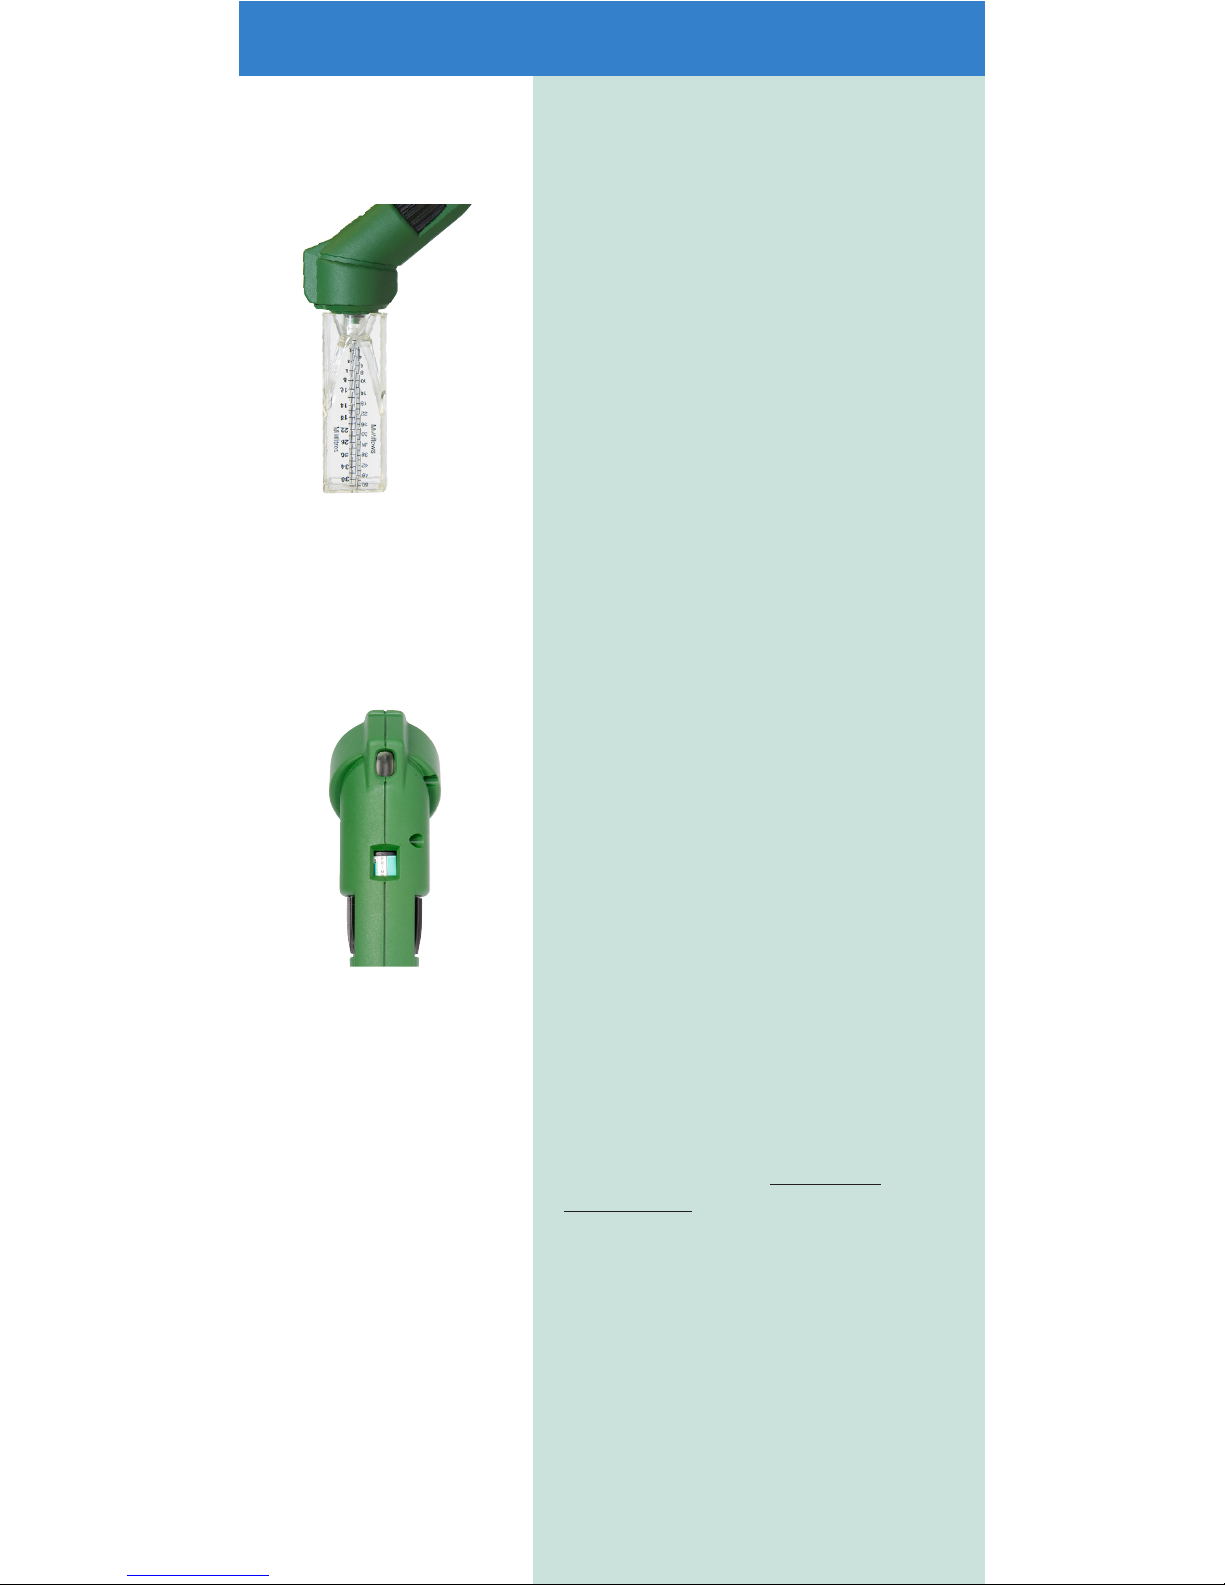
Flow rate
• Eight settings (A-G and
Prime) on the flow rate control
regulate the chemical flow.
• The flow rate window shows
the chemical flowing to the
spray head.
• Always refer to the herbicide
label for the correct flow rate
setting.
12

Section 5: Preparing for use
Personal Protective
Equipment (PPE)
The minimum PPE recommended
for use is:
• Coveralls
• Suitable protective gloves
• Wellington boots.
Always refer to the herbicide
product label for the recommended
PPE.
Inserting the battery
• Check the handset controls are in
the ‘OFF’ position.
• Place the fully charged battery
into handset (pointing the
handset downwards as you insert
the battery).
• Close the battery compartment.
13

Section 5: Preparing for use (cont.)
Connecting the herbicide
box to the lance
• Select an approved TDC
herbicide.
• Read the label for full product
information and application
rates.
• Shake the herbicide box
vigorously for at least one
minute in a circular motion.
• Place the herbicide box in
the backpack with the bung
positioned facing down and
fasten the pack clips.
• Return the backpack to an
upright position.
• Remove the bung stopper.
• Line the feed tube connector
up with the bung, placing your
fingers underneath the bung
and pushing the connector in
with your thumbs. The bung
will then be pierced.
• IMPORTANT: Ensure that the
c-clip fits securely over all
three flanges as shown. The
connector could pull out if it is
not fitted correctly.
• Position the backpack
comfortably on your back and
adjust straps as required.
Priming
ALWAYS PRIME THE LANCE
BEFORE USE
Priming fills the lance with
herbicide and removes air
bubbles, which could interrupt
the chemical flow or cause the
lance to drip.
14

• Ensure there is no disc attached.
If a disc is present, remove it
using the disc ejector tool.
• Turn the spray width control to
the ‘OFF’ position.
• Turn the pacer control to the
calibrate position.
• Set the flow rate indicator to
‘Prime’.
• Push the calibration cup on to
the spray head.
• Select the calibration setting on
the pacer control.
• Press the trigger ‘on’.
• Wait up to 20 seconds for
herbicide to appear in the flow
rate window.
• Press the trigger ‘o’.
• Press the trigger ‘on’ and
invert the lance to empty the
calibration cup.
• Press the trigger ‘o’ when the
calibration cup is empty.
Selecting a disc
Select a disc using the following
table. Before connecting the disc, you
must carry out the full calibration
procedure on pages 16 & 17.
15
Disc Spray Width Recommended areas of use
Spiral
15cm – 30cm
(6” – 12”)
Spot treatment, narrow
trim and edge work
Square
30cm – 75cm
(12” – 30”)
Trim and edge work, spot
treatment and fence lines
Serrated
75cm – 100cm
(30” – 40”) Broadcast spraying
Section 5: Preparing for use (cont.)
Calibrating
The Operator should carry out
a full calibration procedure
according to the corresponding
product label. This should take
account of:
• Walking Speed: This should
be accurately measured. The
Pacing Control on the applicator
will assist with determining
accurate walking speed.
Walking speed can be
accurately determined using the
following formula:
360 / time taken to walk 100m
(seconds) = Walking Speed
(kph)
• Product Application Rate: This
can be found on the product
label and will be the correct
approved rate for the product
and situation concerned.
• Spray Width: This will be
dependent on disc selection,
disc speed and height.
• Flow Rate: This is the rate of
herbicide flow through the
applicator, and is measured
using the Calibration Cup.
The correct Flow Rate for the
herbicide can be calculated using
the following formula:
Walking Speed (kph) x Product
Application Rate (l/ha) x Spray
Width (cm) / 120 = Flow Rate
(ml/30secs).
16

Example:
For a walking speed of 3.2 kph,
product application rate 10 litres per
hectare, spray width of 60cm:
3.2 x 10 x 60 / 120 = 16 ml/30
seconds
The product label will give a guide
as to the best applicator settings
to be used, in order to achieve the
correct flow rate, as determined
by the above formula. However,
the flow rate must be measured
using the Calibration Cup (having
measured walking speed and spray
width) and the applicator adjusted
as necessary, to achieve the
approved application rate.
Connecting the disc
Once calibration is complete,
connect the disc to the head of the
lance by placing it onto the spindle
and pushing it until secure.
17

Section 6: Operating
18
Spraying
• Hold the lance in a comfortable
operating position.
• Set the spray width control to
the required disc setting.
• Set the pacing control to your
desired walking speed.
• Press the trigger to begin
spraying.
• Press again to stop spraying.
• Always clean the lance at the end
of a day’s use. (Refer to section 7).
Avoiding Spray Drift
The Frontline Classic produces
uniform droplets and significantly
reduces spray drift. However, care
should always be taken to avoid
drift, particularly when using wider
spray width settings. If the spray
pattern is being aected by wind,
do not spray until the wind drops.
Optimum Spray Pattern
Just a few drops of Nomix TDC
herbicide will control weeds.
This is the optimum spray pattern.
• Under applied.
• Optimum spray pattern.
• Over applied.
Section 7: Cleaning
Please Note: You MUST clean the
Frontline Classic at the end of each
day’s spraying and also before
using a dierent herbicide. The
ONLY way to clean the lance is
with specially formulated Nomix
Universal Cleaner.
Always refer to the Code of Practice
for full instructions on the cleaning
of herbicide application equipment.
• Switch the spray width control to
the ‘OFF’ position.
• Place the backpack on the ground
and hold the lance up.
• Press the trigger to allow the
herbicide to drain back into the
box.
• Once all the herbicide is drained,
press the trigger again to stop the
flow and disconnect the box.
• Remember to replace the bung
cap in the herbicide box.
• Connect a box of Nomix Universal
Cleaner to the lance.
19

• Run cleaner through the lance
with the settings in the Prime
position until liquid runs clear.
Spray on an approved site or
collect the liquid for disposal.
DO NOT allow contaminated
cleaner to drain back into the
cleaner pack.
• Disconnect the cleaner box from
the lance.
• Press the trigger to empty the
lance of cleaner. When the flow
stops, press the trigger again.
• Wipe any herbicide residue from
the spray head with a paper towel
and dispose of safely.
• DO NOT forget to recharge the
battery.
THE LANCE WILL CONTAIN
HERBICIDE UNTIL CLEANED
20
Table of contents
Popular Paint Sprayer manuals by other brands


Earlex
Earlex ASG55 operating instructions

Ozito
Ozito ASG-7000 instruction manual

Task Force Tips
Task Force Tips PROTECTOR INSTRUCTIONS FOR SAFE OPERATION AND MAINTENANCE

Mesto
Mesto CLEANER 3275PP Instructions for use

ground logic
ground logic Pathfinder Operator's manual

Decoproyec
Decoproyec CP19 Instruction and maintenance manual


