manuals.online logo
Brands
  1. Home
  2. •
  3. Brands
  4. •
  5. Nora Lighting
  6. •
  7. Lighting Equipment
  8. •
  9. Nora Lighting NUD-88 User manual

Nora Lighting NUD-88 User manual

READ PRIOR TO ATTEMPTING INSTALLATION
ALWAYS TURN OFF MAIN POWER BEFORE INSTALLATION
INSTALLATION SHOULD BE CARRIED OUT BY YOUR LOCAL ELECTRICIAN
6505 Gayhart Street, Commerce, CA 90040
Tel 323.767.2600 | www.noralighting.com | e-mail: [email protected]
© 2019 Nora Lighting, Inc. All rights reserved. Instructions subject to change without notice.
Installation Instructions
NUD-88
LEDUR LED Undercabinet
050219P1
IS-NUTP12-CDR01
IMPORTANT - This equipment is intended to be installed only by qualified personnel. The installation must be made in accordance with the current edition of the National Electrical Code and all
applicable state and local building codes. The final installation must be approved by the appropriate, qualified electrical/building inspector(s). Improper installation may result in a fire or electrical hazard.
Be sure the electrical power to the circuit has been disconnected before installing this electrical system.
IMPORTANT - Cet équipement est destiné à être installé uniquement par du personnel qualifié. L’installation doit être faite conformément à l’édition actuelle du Code national de l’électricité et à
tous les codes de construction locaux et nationaux applicables. L’installation finale doit être approuvée par un ou plusieurs inspecteurs qualifiés en électricité / bâtiment. Une installation incorrecte peut
entraîner un incendie ou un risque électrique. Assurez-vous que l’alimentation électrique du circuit a été déconnectée avant d’installer ce système électrique.
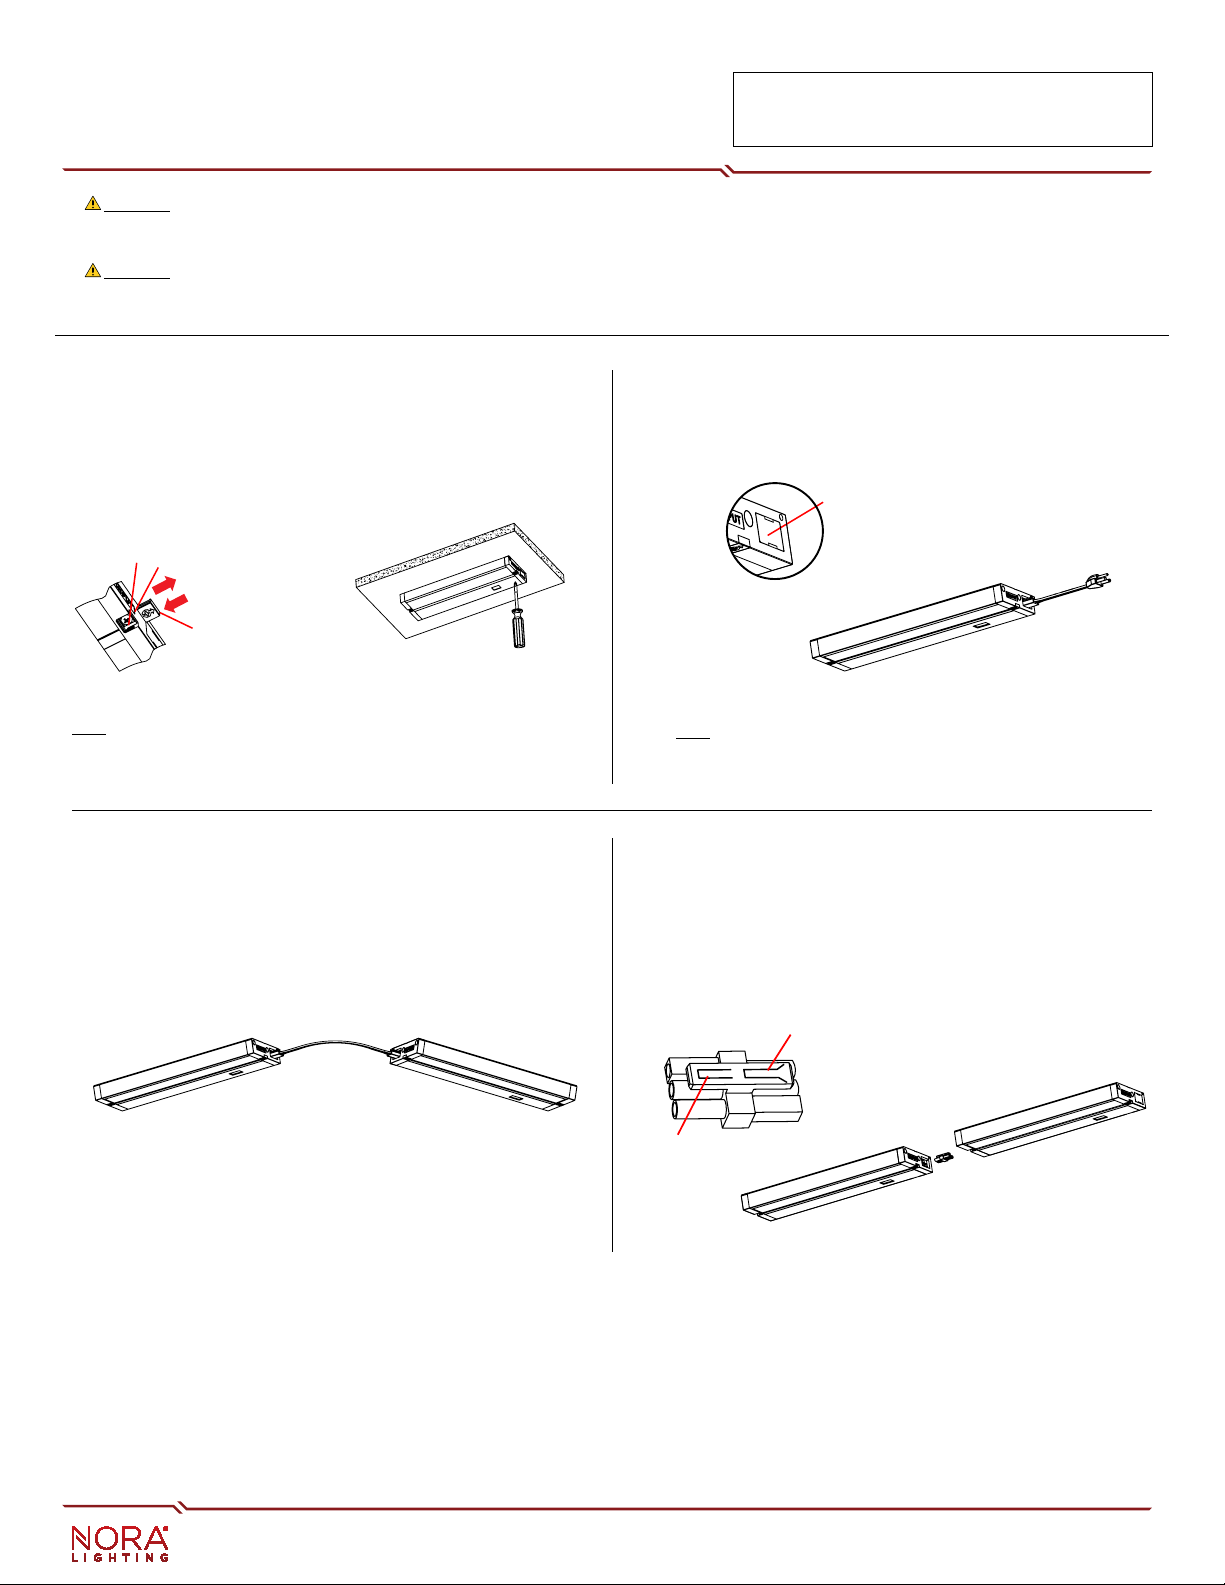
MOUNTING THE FIXTURE
1. Remove captive mounting screw covers.
2. Place fixture in desired position and drive Mounting Screws Securely.
In some installations it may be desired to drill a pilot hole for the screws.
3. Replace the Captive Mounting Screw Cover.
POWER CORD CONNECTION
Remove the Electrical Port Cover and insert the power cord into INPUT electrical port.
JOINING MULTIPLE FIXTURES:
ELECTRICAL PORT COVER
CAPTIVE MOUNTING SCREW
COVER
USING JUMPER CORD:
1. Remove Electrical Port Covers.
2. Connect INPUT of Jumper cord to INPUT of electrical port.
3. Connect OUTPUT of Jumper cord to OUTPUT of electrical port.
USING END-TO-END CONNECTOR:
1. Remove Electrical Port Covers.
2. Connect INPUT of End-to-End connector to INPUT of electrical port.
3. Connect OUTPUT of End-to-End connector to OUTPUT of electrical port.
JUMPER CORD
END-TO-END CONNECTOR
(PROVIDED WITH EACH FIXTURE)
INPUT
OUTPUT
NOTE: Should captive mounting not line up with application, there are key-
hole mounting holes under front cover. NOTE: Port covers are labeled “INPUT” and “OUTPUT”.
Use “INPUT” for power and “OUTPUT” when linking to another NUD unit.
READ PRIOR TO ATTEMPTING INSTALLATION
ALWAYS TURN OFF MAIN POWER BEFORE INSTALLATION
INSTALLATION SHOULD BE CARRIED OUT BY YOUR LOCAL ELECTRICIAN
6505 Gayhart Street, Commerce, CA 90040
Tel 323.767.2600 | www.noralighting.com | e-mail: [email protected]
© 2019 Nora Lighting, Inc. All rights reserved. Instructions subject to change without notice.
Installation Instructions
NUD-88
LEDUR LED Undercabinet
050219P2
IS-NUTP12-CDR01
WIRING CONNECTIONS THROUGH A SIDE ACCESS DOOR:
1. Loosen screw that secures the side access door and remove the door from key hole by just sliding the door. (Figure 1)
2. Assemble the 3/8" die-cast connector into side access door (Figure 2) and push the supply cable through the die-cast connector. (Figure 3)
3. Inside fixture, are three wires with push-in connectors. Carefully pull these out of the fixture.
NOTE: Do not pull with excessive force.
4. Insert each of the three wires from the supply cable into each of the three push-in connectors with respective color wires.
5. Neatly push wires and push-in connectors into opening in back of the fixture.
6. Close the side access door and tighten screw.
Armored cable (BX) or
Flat Non-Metallic Cable (NM)
3/8" Die-cast connector
Side Access Door
Push-in Connector
Screw
Figure 1
Figure 2 Figure 3
ALTERNATE POWER METHODS
There are knockouts on the top and rear should the side access not meet the requirements. If these knockouts are to be used, it will require you to open the front cover to complete wiring.
Gently pry open cover with tool provided or with a small regular screw driver. Make wiring connections. To close door, swing up next to unit and snap in place.
NUD can also be powered using “Input” ports with a cord and plug or hard wire accessories (not included).
OPEN FRONT COVER

Other Nora Lighting Lighting Equipment manuals

Nora Lighting NUTP1 Series User manual

Nora Lighting

Nora Lighting NUTP1 Series User manual

Nora Lighting NUTP3 Series User manual

Nora Lighting

Nora Lighting NUTP3 Series User manual

Nora Lighting NSPEC NE-602LEDHORC Series User manual

Nora Lighting

Nora Lighting NSPEC NE-602LEDHORC Series User manual

Nora Lighting NLOPAC-R6REGT24 User manual

Nora Lighting

Nora Lighting NLOPAC-R6REGT24 User manual

Nora Lighting NSPEC NE-602LED User manual

Nora Lighting

Nora Lighting NSPEC NE-602LED User manual

Nora Lighting NUTP13 Series User manual

Nora Lighting

Nora Lighting NUTP13 Series User manual

Nora Lighting NUTP51 Series User manual

Nora Lighting

Nora Lighting NUTP51 Series User manual

Popular Lighting Equipment manuals by other brands

PLG LINEA 3 user manual

PLG

PLG LINEA 3 user manual

Bayco 2218 operating instructions

Bayco

Bayco 2218 operating instructions

Recom RACD20-LP Installation and operating instructions

Recom

Recom RACD20-LP Installation and operating instructions

Enabling Devices 3199 user guide

Enabling Devices

Enabling Devices 3199 user guide

Espa Jardino Pool NEAT Series instruction manual

Espa

Espa Jardino Pool NEAT Series instruction manual

EuroLite LED TMH-75 user manual

EuroLite

EuroLite LED TMH-75 user manual

E2S BExBG21D-P instruction manual

E2S

E2S BExBG21D-P instruction manual

IN HOUSE LED SO26 user manual

IN HOUSE LED

IN HOUSE LED SO26 user manual

Nicols ULTIMATE user guide

Nicols

Nicols ULTIMATE user guide

involight PaintBar HEX12P user manual

involight

involight PaintBar HEX12P user manual

Equinox Systems EQLED65 Giga Bar System user manual

Equinox Systems

Equinox Systems EQLED65 Giga Bar System user manual

Robe Robin MMX Blade user manual

Robe

Robe Robin MMX Blade user manual

Matco Tools MWL40SMDC operating instructions

Matco Tools

Matco Tools MWL40SMDC operating instructions

Kind LED Grow Lights K5 Series instructions

Kind LED Grow Lights

Kind LED Grow Lights K5 Series instructions

LED World FA60M50-5M-24V-RGBW Important instructions

LED World

LED World FA60M50-5M-24V-RGBW Important instructions

American Lighting SPKPL-CTRL-W-RGBTW installation instructions

American Lighting

American Lighting SPKPL-CTRL-W-RGBTW installation instructions

COMPASS HEALTH Thera Lite Radiance user guide

COMPASS HEALTH

COMPASS HEALTH Thera Lite Radiance user guide

Home Accents Holiday TY008-2023 Assembly instructions

Home Accents Holiday

Home Accents Holiday TY008-2023 Assembly instructions

manuals.online logo
manuals.online logoBrands
  • About & Mission
  • Contact us
  • Privacy Policy
  • Terms and Conditions

Copyright 2025 Manuals.Online. All Rights Reserved.