Nora Lighting NSPEC NE-602LED User manual

6505 Gayhart St., Commerce, CA 90040 | Phone: 800.686.6672 | www.noralighting.com | e-mail: [email protected]
Instructions subject to change without notice. © 2018 100218P1
Installation Instructions
NE-602LED - Compact Size LED Emergency Light
READ PRIOR TO ATTEMPTING INSTALLATION
ALWAYS TURN OFF MAIN POWER BEFORE INSTALLATION
INSTALLATION SHOULD BE CARRIED OUT BY YOUR LOCAL ELECTRICIAN
IMPORTANT SAFEGUARDS:
READ AND FOLLOW ALL SAFETY INSTRUCTIONS
1. Review the diagrams thoroughly before beginning.
2. All electrical connections must be in accordance with local codes, ordinances and the National Electric code.
3. Disconnect power at fuse or circuit breaker before installing or servicieng.
4. Do not use outdoors.
5. Do not mount in hazardous locations, or near gas or electric heaters.
6. Do not let power cords touch hot surface.
7. Equipment should be mounted in locations and at heights where it will not be subjected to tampering by unauthorized personnel.
8. The use of accessory equipment not recommended by the manufacturer may cause an unsafe condition.
9. Do not use this equipment for other than intended use.
10. All servicing should be performed by a qualified personnel only.
11. Allow battery to charge for 24 hours before first use, for 2-battery models, need 48 hours to fully charge batteries.
MAINTENANCE:
None required. Replace the batteries as needed according to ambient conditions. However, we recommend that the equipment be tested regularly in accordance with local codes.
OPERATION:
Press the test button. The LED heads wil turn on and the LED indicator will turn off. Release the test switch and the LED indicator will turn on and the LED heads will turn off.
TROUBLESHOOTING GUIDE:
If LED heads or LED indicator does not illuminate, check the following:
1. Check AC supply - verify that unit has 24 hours AC supply.
2. Unit is shorted or battery is not connected.
3. Battery discharge. Permit unit to charge for 24 hours then re-test.
4. If the troubleshooting hints stated above do not solve your problem, contact factory for assistance.
Item # Description
NE-602LEDW Compact Size LED Emergency Light, White
NE-602LEDB Compact Size LED Emergency Light, Black
WARNING - This equipment is intended to be installed only by qualified personnel. The installation must be made in accordance with the current edition to the National Electric Code and all
applicable state and local building codes. The final installation must be approved by the appropriate qualified electrical/building inspector(s). Improper installation may result in a fire or electrical hazard.
Be sure the electrical power to the circuit has been disconnected before installing this electrical system.
AVERTISSEMENT - Cet équipement est destiné à être installé uniquement par du personnel qualifié. L’installation doit être faite en conformité avec l’édition actuelle du Code national de l’électricité
et toutes étatiques et locales codes du bâtiment applicables. L’installation finale doit être approuvée par l’ inspecteur en électricité / bâtiment qualifié approprié(s). Une mauvaise installation peut
entraîner un incendie ou un risque électrique. Soyez sûr de la puissance électrique vers le circuit a été coupée avant l’installation de ce système électrique.
6505 Gayhart St., Commerce, CA 90040 | Phone: 800.686.6672 | www.noralighting.com | e-mail: [email protected]
Instructions subject to change without notice. © 2018 100218P2
Installation Instructions
NE-602LED - Compact Size LED Emergency Light
READ PRIOR TO ATTEMPTING INSTALLATION
ALWAYS TURN OFF MAIN POWER BEFORE INSTALLATION
INSTALLATION SHOULD BE CARRIED OUT BY YOUR LOCAL ELECTRICIAN
Only narrow lens have an adjustable function.
Adjust the lamp head and lens direction
according to the direction needed.
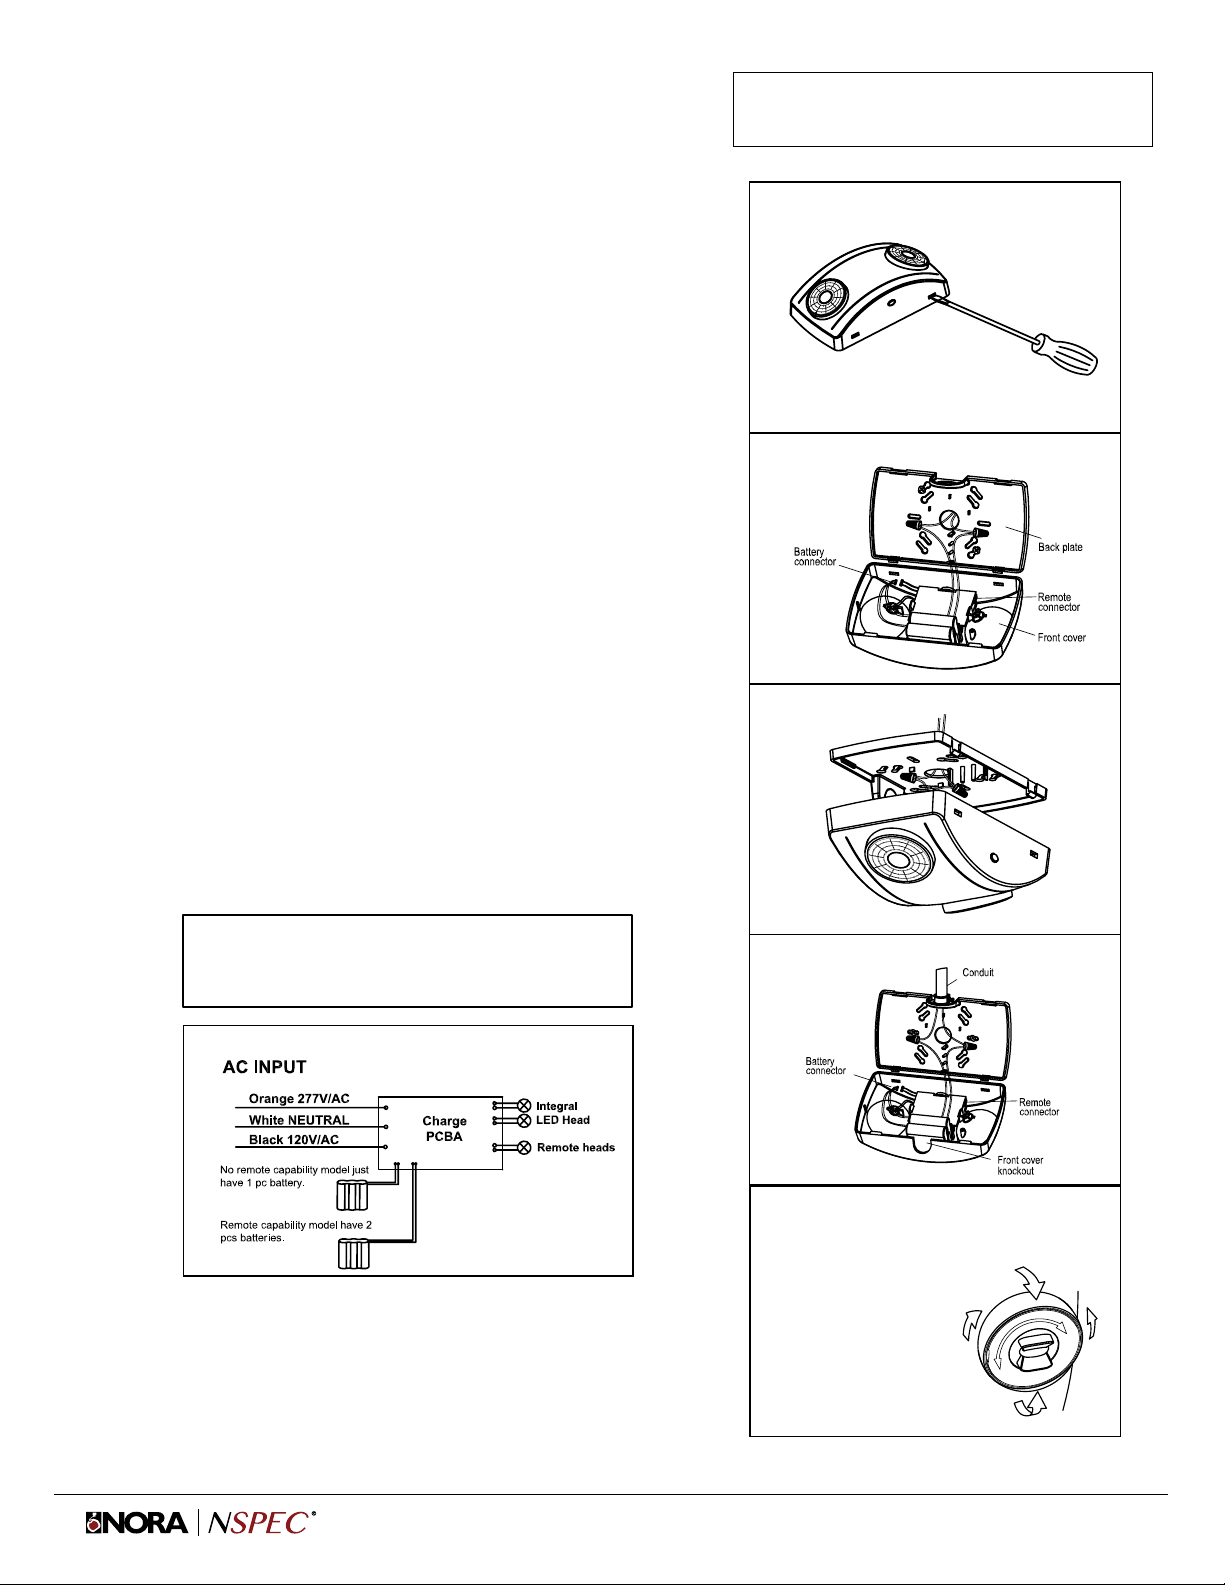
Figure 1
Figure 2
Figure 3
Figure 4
Figure 5
Open Fixture
Wall mount - Back Power Feed
Ceiling mount - Top Power Feed
Wall mount - Top Power Feed
Adjusting the lamp head and lens
Wiring Diagram
WALL MOUNT - BACk POWER FEED (FIGURE 2)
1. Use flat blade screwdriver. Insert the screwdriver to the slots and pry off front
cover from fixture. (Figure 1)
2. Remove the appropriate knock out from back plate and mount the back plate to the J-Box.
3. Remove the knockout located in the center of the back plate and feed the wires through the hole.
4. Secure the backplate to the J-Box
5. Connect the J-Box wires to the power supply wires using the wire nuts provided.
Connect the white wire to neutral.
If using 120V, connect the black wire to the hot lead.
If using 227V, connect the orange wire to the hot lead.
Cap the unused lead and press the wires into the J-Box. (Refer to the wiring diagram below)
6. Connect remote heads. Refer to the instruction for remote heads.
7. Connect the battery connector. (Figure 2)
8. Snap the front cover onto the back plate.
9. Restore power and press the test button and wait for the LED heads to turn on.
10. Adjust the lamp head and lens direction as needed. (Figure 5)
CEILING MOUNT - TOP POWER FEED (FIGURE 3)
Refer to the instructions above, (Wall mount - Back Power Feed)
Difference between Back power feed and Top power feed:
1. Mount the back plate on the ceiling surface instead of the wall surface.
2. Feed the building AC supply wire through the back plate then connect to the fixture power supply
using the wire nuts provided.
CONNECTING REMOTE HEADS (FIGURE 2)
1. Attach the remote wire onto the remote connector on the PCBA.
2. Connect the remote head’s extended wire to the remote wire.
Yellow = Positive (+)
Purple = Negative (-)
3. Connect the wires using the wire nuts provided.
Remote capability reference:
NE-602LEDHORC has max. 3.6V 2W remote capabilities
NE-602LEDRC has max 3.6V 4W remote capabilities.
WALL MOUNT - SURFACE WIRING (TOP POWER FEED) (FIGURE 4)
1. Open the front cover and remove the top knockout on the top flange of the fixture.
2. Secure the conduit (or the surface raceway) to the knockout and feed the wires.
3. Remove the keyhole knockout on the back plate and mount to the wall.
4. Refer to steps 5-10 in the Wall Mount - Back Power Feed instructions.
This manual suits for next models
2
Other Nora Lighting Lighting Equipment manuals

Nora Lighting
Nora Lighting NLOPAC-R6REGT24 User manual

Nora Lighting
Nora Lighting NUTP13 Series User manual

Nora Lighting
Nora Lighting NUTP3 Series User manual

Nora Lighting
Nora Lighting NUTP1 Series User manual

Nora Lighting
Nora Lighting NUD-88 User manual

Nora Lighting
Nora Lighting NUTP51 Series User manual

Nora Lighting
Nora Lighting NSPEC NE-602LEDHORC Series User manual


