NORAUTO START PLUS 2223450 User manual

Norauto
511/589 rue des Seringats 59262 Sainghin-en-Mélantois France
Distribué par/Distributed by/Vertrieben von:
Norauto France 511/589 rue des Seringats
59262 Sainghin-en-Mélantois
Auto 5 Bld Paepsem 20 -1070 ANDERLECHT BELGIQUE
A.T.U Auto-Teile-Unger Handels GmbH & Co.KG,
Dr.-Kilian-Str. 11, D-92637 Weiden i.d.OPf Deutschland
Noroto España SAU Centre Comercial Alban Carretera de Ademuz
km 2,9 46100 BURJASSOT
Norauto Italia SPA Corso Savona 85/10024 MONCALIERI
Norauto Portugal LDA Av. dos Cavaleiros,
n°49 Alfragide 2794-057 CARNAXIDE
Norauto Polska Sp z o.o., ul. Jubilerska 10, 04-190 Warszawa
www.norauto.com
www.atu.eu
Made in P.R.C/Fabricado en/na R.P.C/Fabriqué en R.P.C
ART : 2223450/NO6741
Mode d’emploi - Gebruiksaanwijzing
Bedienungsanleitung - Instrucciones de uso
Istruzioni per l’uso - Instruções de utilização
Instrukcja obsługi - Instruction manual (notice original)
FR: 1-17 NL: 18-31 DE: 32-45 ES: 46-59
IT: 60-74 PT: 75-88 PL: 89-103 EN: 104-117
START PLUS
20V0

2
Avant d’utiliser ce produit, veuillez lire attentivement ces instructions pour
connaître les fonctions et les capacités de Start Plus Booster et comment en tirer
pleinement parti.
Lees voordat u dit product gebruikt deze gebruiksaanwijzing zorgvuldig door.
Zo leest u meer over de mogelijkheden en kenmerken van de Start Plus Booster
en leert u hoe u de beste prestaties verkrijgt.
Bitte lesen Sie diese Bedienungsanleitung sorgfältig durch, bevor Sie das Produkt
verwenden, um die Funktionen und Fähigkeiten des Start Plus Starthilfe-
Boosters kennenzulernen und herauszufinden, wie das Gerät seine beste
Leistung erbringt.
Antes de usar este producto, lea estas instrucciones atentamente para conocer
las funciones y características del Start Plus Booster y cómo obtener el mejor
rendimiento.
Prima di utilizzare il prodotto, leggere attentamente le presenti istruzioni per
conoscere le caratteristiche e le funzionalità del Booster Start Plus e ottenere le
migliori prestazioni di funzionamento.
Antes de utilizar este produto, leia atentamente estas instruções para aprender
sobre as características e capacidades do Start Plus Booster e como obter o
melhor desempenho.
Przed użyciem tego produktu należy uważnie przeczytać niniejszą instrukcję, aby
poznać funkcje i możliwości urządzenia Start Plus Booster oraz dowiedzieć się,
jak uzyskać najlepszą wydajność.
Before using this product, please read these instruction carefully to learn about
the features and capabilities of the Start Plus Booster and how to get the best
performance.
3
AVANT PROPOS
Félicitations pour votre nouvel achat ! Start Plus de Norauto est un dispositif de
démarrage de secours compact mais puissant d’une capacité de 15 000 mAh
permettant de démarrer votre véhicule jusqu’à 20 fois avec une seule charge. Vous
pouvez l’utiliser sur des moteurs essence et diesel jusqu’à 4,0 litres et 3,0 litres,
respectivement.
Vous pouvez également utiliser Start Plus de Norauto comme accumulateur
d’énergie pour recharger votre smartphone à l’aide de deux sorties USB QC3.0 de
charge rapide. L’appareil est également équipé d’une lampe de travail LED brillante
pour les cas d’urgence, ainsi que d’un port de sortie de 12 V pour vous permettre de
brancher un compresseur, un refroidisseur ou tout autre appareil de 12 V.
Vous pouvez facilement vérifier le niveau de la batterie grâce à un pourcentage
clair qui s’affiche sur l’écran LCD. Vous pouvez recharger la batterie sur une prise
secteur.
Start Plus de Norauto est également équipé de pinces intelligentes dotées de
différents systèmes de protection pour garantir son utilisation en toute sécurité
quelle que soit la situation.
SPÉCIFICATIONS
Article n° 2223450/NO6741/01.39.400
Courant de démarrage 400 A
Courant de pointe 800 A
Compatibilité de la taille de moteur Moteurs essence 4,0 l
Moteurs diesel 3,0 l
Poids net du produit 0,7 kg
Dimension du produit 17,6 x 11,9 x 3,7 cm
Sortie USB 5 V, 3 A/9 V, 2 A
Sortie d’allume-cigare 12 V, 10 A
Port de démarrage de secours Démarrage du véhicule, 12 V
Capacité batterie 55,5 Wh
Entrée de charge 14 V, 0,9 A
Température de fonctionnement ambiante -20 °C à +55 °C
Température de stockage recommandée 0 °C à +40 °C

4
CONSIGNES DE SÉCURITÉ
●AVANT LA CHARGE, LIRE LES INSTRUCTIONS.
●POUR USAGE A L'INTERIEUR OU NE PAS
EXPOSER A LA PLUIE.
●DECONNECTER L'ALIMENTATION SECTEUR
AVANT DE BRANCHER OU DE DEBRANCHER LES
CONNEXIONS SUR LA BATTERIE.
●MISE EN GARDE: GAZ EXPLOSIF. EVITER
LESFLAMMES ET LES ETINCELLES. ASSURER
UNE AERATION SUFFISANTE PENDANT LA
CHARGE.
- Utiliser cet appareil comme décrit dans cette notice
d’emploi. Le fabricant ou le distributeur ne sauraient
être tenus pour responsables de votre mauvaise
utilisation de l’appareil ou de son utilisation en
violation des instructions contenues dans ce manuel.
- N’essayez jamais de modifier l’appareil de quelque
manière que ce soit. Les modifications peuvent
entraîner des dommages sur l’appareil, matériels ou
corporels, pour lesquels le fabricant décline toute
responsabilité.
- Les véhicules peuvent être équipés de systèmes
électriques et électroniques (par exemple : systèmes
de gestion du moteur, téléphones mobiles)
susceptibles d’être endommagés en cas d’exposition
à des tensions de démarrage élevées ou à des
tensions maximales. Avant de brancher l’appareil
sur le véhicule, veuillez lire le manuel d’utilisation du
véhicule pour vous assurer qu’il prend en charge le
système de charge externe.

116
CLEANING, MAINTENANCE AND STORAGE
A. Cleaning
WARNING! Do not use any abrasive or solvent-based cleaner. Do not immerse the
appliance in water.
Before cleaning, the appliance must be switched off, disconnected from mains and
cooled down.
From time to time, wipe the appliance with a dry and soft cloth.
B. Maintenance
No maintenance is necessary. The equipment is only to be repaired by qualified
specialists.
C. Storage
This unit can be used under at temperatures between -20°C and +55°C, away
from dust and water. We strongly recommend storing the product between 0°C and
+40°C (in house/truck etc.) before using the jump starter. For a better efficiency of
the battery, it is recommended to keep this unit indoors when outside temperatures
are below 0°C.
DISPOSAL OF THE PRODUCT
Selective collection of waste electrical and electronic equipment.
Electrical equipment must not be disposed of with household waste.
Pursuant to European Directive 2012/19/EU on waste electrical and
electronic equipment, and its transposition into national law, waste
electrical equipment must be collected separately and disposed of in
designated collection points. Contact the local authorities or the vendor for
advice on recycling.
5
- Le non-respect des consignes de sécurité et
d’utilisation peut provoquer un risque de choc
électrique, d’incendie et/ou des blessures aux
personnes.
- Veuillez respecter les instructions relatives au
branchement et au débranchement des câbles du
chargeur de batterie ou des bornes de la batterie.
- Cet appareil est destiné à un usage domestique et
intérieur uniquement.
- N’utilisez pas d’accessoires non recommandés par
le fabricant ! Ils peuvent endommager l’appareil et/ou
provoquer des blessures.
- DANGER D’ÉTOUFFEMENT ! Gardez le matériel
d’emballage hors de la portée des enfants.
- Cet appareil peut être utilisé par des enfants âgés d’au
moins 8 ans et par des personnes ayant des capacités
physiques, sensorielles ou mentales réduites ou
dénuées d’expérience ou de connaissance, s’ils
(si elles) sont correctement surveillées ou si des
instructions relatives a l’utilisation de l’appareil en
toute sécurité leur ont été données et si les risques
encourus ont été appréhendés.Les enfants ne doivent
pas jouer avec l’appareil. Le nettoyage et l’entretien
par l’usager ne doivent pas être effectués par des
enfants sans surveillance.
- Surveillez les enfants pour s’assurer qu’ils ne jouent
pas avec l’appareil.
- N’utilisez pas cet appareil dans un environnement
présentant des risques d’explosion ni en présence de
liquides, de gaz ou de poussières inflammables.

6
- Ne vous approchez pas des flammes nues, des
surfaces chaudes et des zones exposées aux
étincelles en cours d’utilisation de cet appareil. Ne
fumez pas lorsque vous utilisez l’appareil.
- Placez la batterie dans un endroit bien ventilé pendant
la charge.
- Gardez l’appareil au sec. N’exposez pas cet appareil
à des égouttements d’eau ou à des éclaboussures.
- N’utilisez pas l’appareil dans des endroits exposés à
l’humidité, aux intempéries ni dans des lieux mouillés.
- Ne manipulez pas l’appareil en milieu humide.
N’utilisez pas l’appareil dans des endroits humides.
- Gardez tout contenant avec un liquide à l’abri de
l’appareil.
- Ne couvrez pas l’appareil avec des objets comme du
papier, une serviette, des rideaux, etc.
- N’exposez pas l’appareil directement aux rayons du
soleil ni à de fortes chaleurs.
- Ne laissez pas le cordon d’alimentation pendre de la
table ou toucher les surfaces chaudes.
- Pour réduire le risque de dommages sur la prise
électrique ou le cordon, tirez toujours sur la fiche et
non sur le cordon pour débrancher l’appareil.
- N’utilisez pas l’appareil avec le câble ou les pinces
endommagés.
- Par mesure de précaution, faites remplacer tout
cordon d’alimentation endommagé par le fabricant,
son prestataire ou une personne similaire qualifiée.
115
TROUBLE SHOOTING
Error Reason Solution
1. “Clamps icon” on top left
blinks
Clamps might be wrongly
plugged.
Reverse the battery connections.
2. “COOLING icon” in the
bottom on
The unit’s temperature is
higher than 55˚C.
Bring the unit into a colder
enviroment and wait until the unit
to recover to 40˚C.
3. “COOLING” or
“OVERLOADCOOLING”
icon in the bottom and
10 minutes counting
show in the LCD
1) The unit’s power is not
enough.
2) The unit has been tried five
times in 10 minutes so the
internal battery is hot.
1) Double check your engine size if
it is suitable for this unit.
2) Allow the unit to cool. Bring the
unit into a colder enviroment.
4. “F1” on 1) The internal circuit is
broken.
2) The temperature is lower
than -20˚C.
1) Send the unit to the professional
place for repair.
2) Bring the unit to a warm
environment.
5. “READY” is not on after
all connecting well
Connected battery is below
2V or above 12.6V.
1) Make sure your car battery is
12V.
2) Charge your car battery.
3) Remove all the loads
(eg: heater, air conditioner,
light etc) and try again.
-20°C
%
+55°C
1 2
3
4
LCD
LCD LCD
LCD
LCD
COOLING
COOLING
COOLING
Repair
Solution
OVERLOAD COOLING
COOLING
10minutes COOLING
10minutes

114
ADDITIONAL FUNCTION
Charge Phone QC3.0:
QC 3.0
12V output:
10A
2 x USB ports (5) compatible with QC3.0 fast
charge technology is available on the side
of the jump starter. Connect the USB cable
to the USB output port of the device, press
and hold the power switch (4) for 3 seconds
to turn on the unit; the device will start to
charge. The USB output will be automatically
turned off after charging is completed.
WARNING: This port is not a charging interface!
It should not be connected to any other devices
than the female cigarette lighter adapter provided
with this product.
1. Plug one end of the equipped cigarette lighter
adapter into the product’s 12V 10A output.
2. Connect the 12V device to the other end of the
cigarette lighter adapter cable.
3. Press and hold the power switch (4) for
3 seconds to turn on the unit to start supplying
12V 10A for the car.
Wall Plug:
30%
LCD
%
LED Light:
OFF
To recharge the device, firstly, connect the
charger plug to the 220V power supply,
and then connect the charging output port
to the product input port. At this time, the
percentage in LCD will display the charging
status. After fully charged, the “Charging
icon” on the top right will be stopped blinking.
Press and hold the power switch (4) for
3 seconds to turn on the unit.
- 1st short press: Working light
- 2nd short press: Flashlight,
- 3rd short press: Light Off.
2MINS OFF
2 Mins OFF:
The device will be turned off automatically if it
is not be used within 2 minutes. Alternatively,
press and hold the power switch (4) for
3 seconds to turn off the unit.
7
- Ne modifiez ni le cordon d’alimentation ni la fiche.
Contactez un technicien qualifié si le cordon
d’alimentation et/ou la fiche ne correspondent pas à
vos installations électriques.
- N’utilisez la rallonge qu’en cas de nécessité absolue.
L’utilisation d’une rallonge inappropriée peut entraîner
des risques d’incendie et d’électrocution.
- Évitez tout contant entre les pinces rouges et noires,
car cela peut provoquer des étincelles, une explosion
et des dommages.
- Avant d’effectuer tout câblage électrique, vérifiez que :
4L’appareil et ses composants ne sont pas
endommagés. Dans ce cas-là, n’utilisez pas
l’appareil et rapportez-le à votre revendeur pour
toute inspection et réparation.
4La tension indiquée sur la plaque signalétique
correspond à celle de vos installations électriques.
- Installez le chargeur de batterie aussi loin de la
batterie que les câbles le permettent.
- Des gaz explosifs peuvent se former près du sol. Par
conséquent, veuillez installer le chargeur de batterie
aussi haut que possible au-dessus du sol.
- Ne démontez pas l’appareil vous-même. Confiez tout
désassemblage, vérification ou réparation uniquement
à un technicien qualifié.
- N’ouvrez pas l’enveloppe du boîtier de l’appareil. Il ne
contient aucune pièce réparable par l’utilisateur.
- N’installez pas le chargeur de batterie sur la batterie
ou au-dessus de celle-ci.
8
- La borne de la batterie non reliée au châssis doit être
connectée la première. L’autre connexion doit être
effectuée sur le châssis loin de la batterie et de la
canalisation de combustible. Le chargeur de batterie
doit alors être raccordé au réseau. Après l’opération de
charge, débrancher le chargeur de batterie du réseau
puis retirer la connexion du châssis et enfin la connexion
de la batterie, dans l’ordre indiqué.
CONSIGNES DE SÉCURITÉ CONCERNANT LES BATTERIES
- MISE EN GARDE : risque concernant les mélanges
gazeux explosifs. Travailler à proximité d’une batterie
au plomb-acide est dangereux. Les batteries génèrent
des gaz explosifs lors de leur utilisation normale.
Par conséquent, vous devez impérativement et
systématiquement lire ce manuel et suivre les instructions
qu’elle contient avant d’utiliser votre chargeur de batteries.
- Veillez à vérifier que votre batterie peut être rechargée
à l’aide de ce chargeur. Consultez à cet effet le
manuel d’instructions du fabricant de la batterie.
- Vérifiez que le taux de charge initial n’excède pas les
exigences du fabricant de la batterie.
- N’utilisez jamais la batterie pendant la charge ! Ne
démarrez jamais le véhicule pendant la charge.
- Évitez de recharger des batteries non rechargeables.
- N’essayez jamais de charger une batterie gelée !
- Portez des lunettes de protection complète et des
vêtements appropriés pour vous protéger de contacts
avec le fluide de la batterie. Évitez de vous toucher les
yeux lors de l’utilisation d’une batterie. De l’acide ou
des particules acides ou corrosives peuvent pénétrer
113
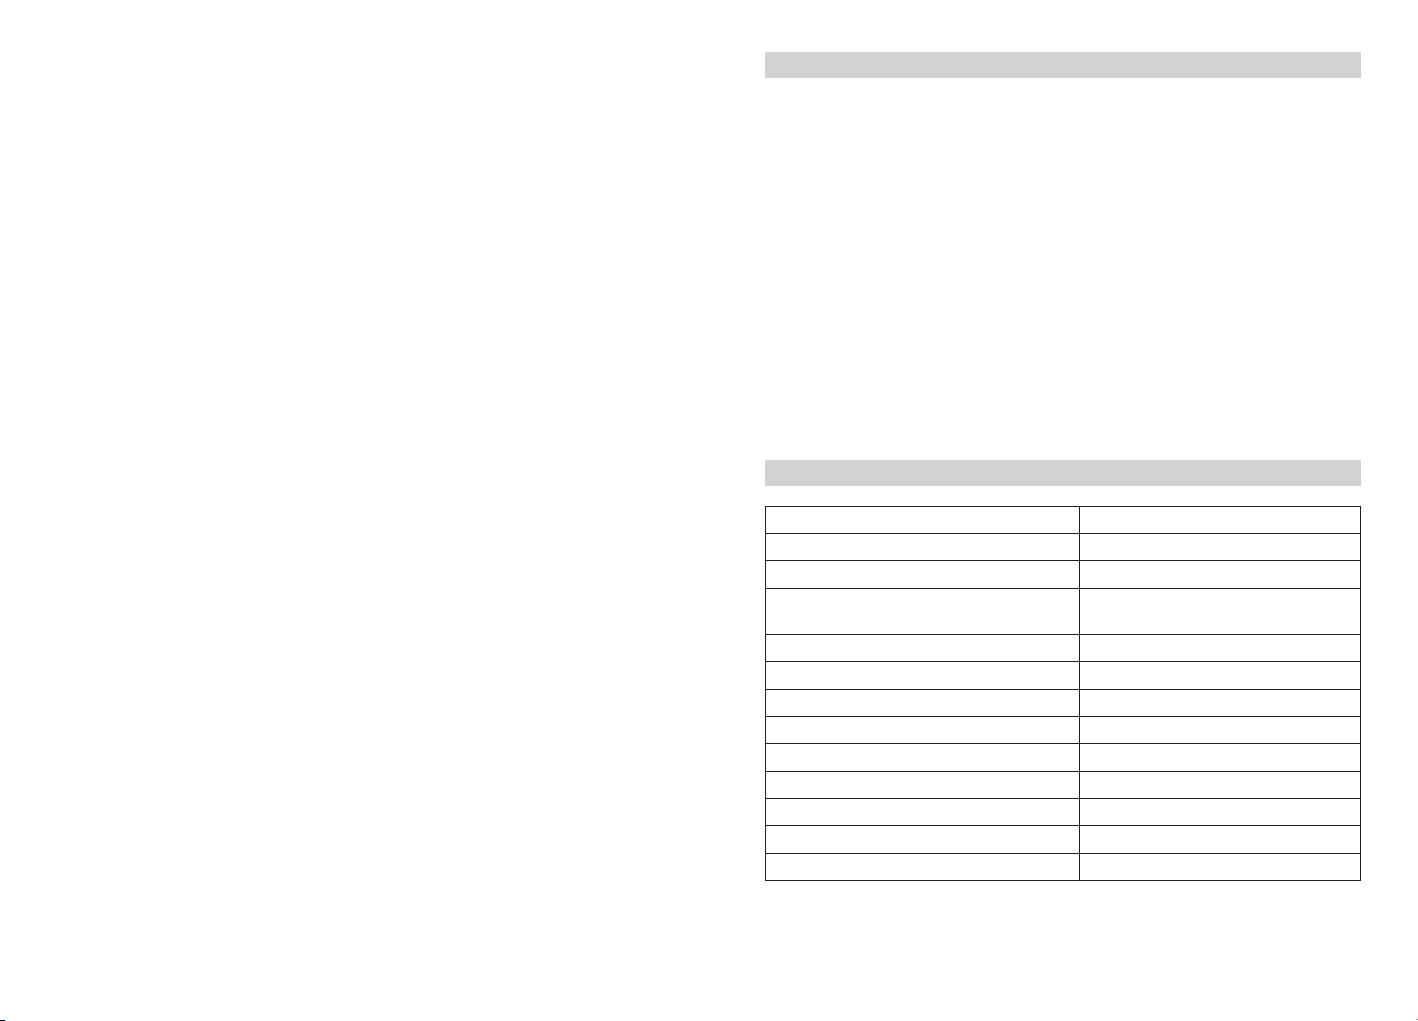
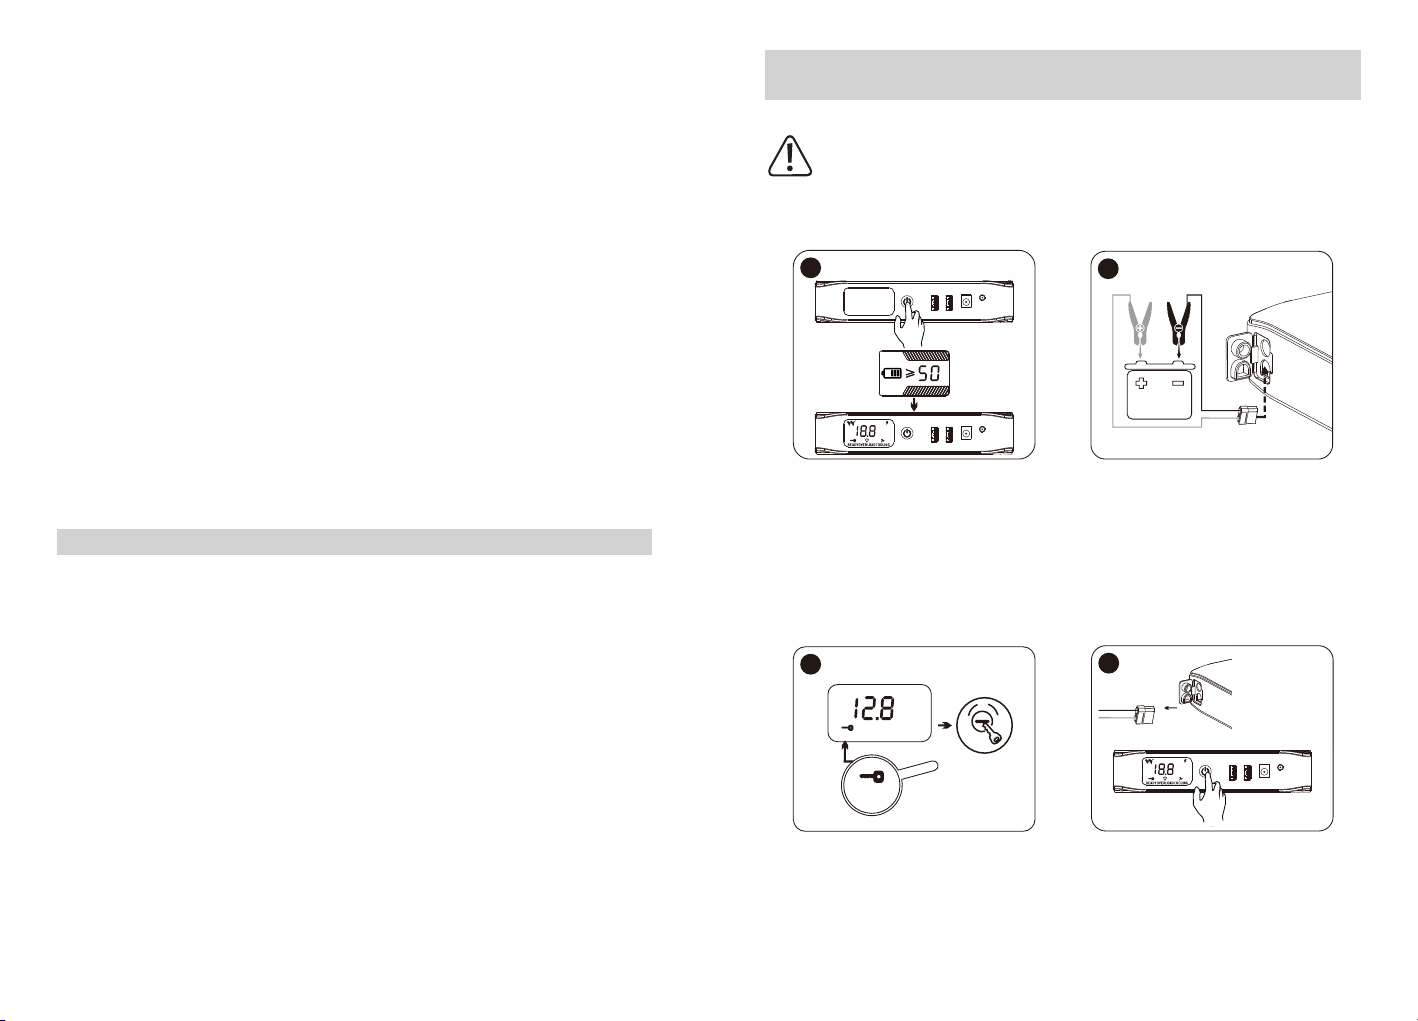
HOW TO JUMP START YOUR CAR
WE STRONGLY SUGGEST TO VERIFY THE VOLTAGE OF THE CAR
BATTERY IS 12V BEFORE STARTING. IF IT IS BELOW 2V OR ABOVE
12.6V, IT CAN'T BE JUMP STARTED.
WARNING: When using this unit to start, make sure the positive and negative
connections are correct, otherwise the battery may explode.
1
V
%
%
3 Seconds
2
Press and hold the power switch (4) for
3 seconds to turn on the unit. Make sure the
battery level is over 50%.
Follow the steps below for jump start, otherwise
it could be dangerous:
1. Insert the jumper cable (8) into the jump start
port (1) of the device.
2. Connect the red (+) clamp to the positive (+)
battery terminal.
3. Connect the black (-) clamp to the metal part
of the engine (negative ground) or to the
negative battery terminal.
3
READY
V
READY
LCD
OFF START
ON
4
V
%
3 Seconds OFF
After the connection is completed, “READY”
on LCD indicate a correct status to start jump
start. Start the car and do not crank over
5 seconds.
After the engine is successfully started, first
remove the jumper cable (8) from the car
battery and then long press the power switch
(4) to turn the unit off.

112
FEATURES
8
9
10
12
13
1
234
567
1. Jump-start port
2. LED light
3. LCD indicator
4. Power switch
5. USB QC3.0 output
6. 12V output
7. Charge input
8. Jumper cable
9. Type-C + Micro USB
cable
10.Wall charger
11.EVA bag
12.Female cigarplug
12V/10A
13.Cigarplug adapter
12V/10A
6-7h
READYOVERLOADCOOLING
V
%
1
7 5
3
4
6
2
Female cigar plug: You can use this accessory to power
most of 12V devices, such as GPS, DVD Player, air fan, air
compressor, vacuum cleaner or coolbox.
Wall charger: Norauto Start Plus comes with a 14V wall
charger, which ensures fast recharge of your booster. Full
recharge will take from 6 to 7 hours.
1. reverse connection
2. Lithium battery is being charged
3. Car Battery Voitage
4. Battery Percentage
5. Cooling Down
6. Overload protection
7. Ready to start
IMPORTANT: For a better lifetime, we recommand you to recharge your
jump start to 100% every 3 months. After use, if battery level is slow,
ALWAYS think of recharging your jump starter before storage.
9
dans vos yeux.
- Débarrassez-vous des objets personnels en métal tels que
bagues, bracelets, colliers et montres lors de l’utilisation
d’une batterie au plomb-acide. Soyez très prudent en
réduisant les risques de chute d’objets métalliques sur la
batterie. Cela peut causer des étincelles ou un court-circuit
de la batterie ou d’autres pièces électriques, et entraîner
une explosion ou des brûlures graves.
- Dans certaines circonstances, des liquides peuvent
s’échapper de la batterie. Ils peuvent provoquer
irritations et/ou brûlures. Évitez tout contact avec
ces liquides. En cas de contact accidentel, rincez
immédiatement la région concernée avec de l’eau. Si
de l’acide est entrée en contact avec vos yeux, cessez
de travailler et rincez les abondamment avec de l’eau
froide. Consultez immédiatement un médecin.
- Veillez à mettre correctement au rebut les batteries
usagées. Lisez la section « Mise au rebut du produit »
de ce manuel pour en savoir plus sur le recyclage
et la protection de l’environnement. - Respectez les
spécifications techniques des batteries à charger, ainsi
que les recommandations spécifiques respectives (par
exemple :comment installer et connecter la batterie, le
taux de charge, etc.) concernant celles-ci.
- Ne rechargez pas les batteries sèches couramment
utilisées dans les appareils ménagers, car cela peut
causer un incendie et des dégâts corporels.
- Cet appareil ne doit être utilisé que sur des batteries
automobiles avec une tension de 12 VCC. Ne
connectez pas l’appareil à d’autres systèmes (6 VCC,

10
24 VCC, etc.).
- N’utilisez l’appareil qu’avec l’unité d’alimentation qui
l’accompagne.
- MISE EN GARDE : utilisez uniquement l’unité
d’alimentation amovible fournie avec l’appareil pour
recharger la batterie.
- Cet appareil contient des batteries qui ne doivent être
remplacées que par des personnes qualifiées.
- Cet appareil contient des batteries qui ne sont pas
remplaçables.
111
Complies with appropriate safety standards.
Warning! To reduce the risk of injury, the user must read the
instruction manual.
Do not throw away electrical appliances with household waste.
A specific separate supply unit is required for connecting
electrical equipment to the supply mains.
Li-ion Battery
110
- Do not recharge dry-cell batteries commonly used in
household appliances. It may cause a fire and damage
to persons.
- This appliance must be used exclusively on
automotive car batteries with 12Vdc voltage. Do not
connect the appliance to other types of systems (6Vdc,
24Vdc, etc.).
- The appliance is only to be used with the power supply
unit provided with the appliance.
- WARNING: For the purposes of recharging the battery,
only use the detachable supply unit provided with this
appliance.
- This appliance contains batteries that are only
replaceable by skilled persons.
- This appliance contains batteries that are non-
replaceable.
11
Conforme aux normes de sécurités appropriées.
Avertissement ! Afin de réduire les risques de blessures, vous
devez lire ce manuel d’utilisation.
Ne pas jeter les appareils électriques avec les déchets
ménagers.
Une unité spécifique distincte est requise pour connecter
l’équipement électrique au secteur.
Batterie lithium-ion

12
CARACTÉRISTIQUES
8
9
10
12
13
1
234
567
1. Port de démarrage de
secours
2. Voyant LED
3. Écran LCD
4. Commutateur d’alimentation
5. Sortie USB QC3.0
6. Sortie de 12 V
7. Entrée de charge
8. Câble de démarrage
9. Type-C + câble
micro USB
10.Chargeur mural
11.Sacoche EVA
12.Fiche femelle d’allume-
cigare, 12 V/10 A
13.Adaptateur d’allume-
cigare 12 V/10 A
6-7h
READYOVERLOADCOOLING
V
%
1
7 5
3
4
6
2
Fiche femelle d’allume-cigare : Vous pouvez utiliser cet
accessoire pour alimenter la plupart des appareils de 12 V, par
exemple des dispositifs GPS, des lecteurs DVD, des ventilateurs,
des compresseurs d’air, des aspirateurs ou des glacières.
Chargeur mural : le dispositif Start Plus de Norauto est fourni
avec un chargeur mural de 14 V pour la recharge rapide de
votre survolteur. La recharge complète dure 6 à 7 heures.
1. inversion de connexion
2. Batterie au lithium en cours de
charge
3. Tension de la batterie automobile
4. Pourcentage de niveau de la
batterie
5. Refroidissement
6. Système antisurcharge
7. Prêt pour le démarrage
IMPORTANT : Pour une durée de vie optimale du démarreur de secours,
il est recommandé de le recharger à 100 % tous les trois mois. Après
utilisation, si la batterie est faible, veillez à TOUJOURS recharger l’appareil
avant de le stocker.
109
- Do not put batteries in use during the charge! Do not
start the engine during the charge.
- Non-rechargeable batteries must not be recharged.
- Never attempt to charge a frozen battery!
- Wear complete eye protection and suitable clothing to
give protection from contact with battery fluid. Avoid
touching the eyes while working with a battery. Acid,
acid particles or corrosion may get into the eyes.
- Remove personal metal items such as rings,
bracelets, necklaces and watches when working with
a lead-acid battery. Be extra cautious to reduce the
risk of dropping a metal object onto the battery. This
might cause sparks or short-circuit the battery or other
electrical parts, and lead to an explosion or severe
burn.
- In wrong circumstances, some fluid can be ejected
from the battery. Battery fluid can cause irritations
and/or burns. Avoid any contact with it. In case of
accidental contact, immediately rinse the spot with
water. If fluid enters your eye, immediately rinse the
eye with plenty of fresh water and contact a doctor.
- Worn-out batteries must be safely scrapped. Read
the "Disposal of this product" chapter in this manual to
learn more about recycling and environment protection.
- Respect the technical specifications of the batteries
that you want to charge, along with the corresponding
specific recommendations (for example: how to insert
and connect the battery, charge rate, etc.).
108
- Explosive gases may collect near the ground. Locate the
battery charger as high as possible above ground level.
- Do not proceed to any maintenance operation by
yourself. Any check, disassembling or fixing has to be
performed exclusively by a qualified person.
- Do not open body casing. There are no user-serviceable
parts inside.
- Do not place the battery charger above or stand the
battery charger on top of the battery.
- The battery terminal not connected to the chassis has
to be connected first. The other connection is to be
made to the chassis, remote from the battery and fuel
line. The battery charger is then to be connected to the
supply mains. After charging, disconnect the battery
charger from the supply mains. Then remove the
chassis connection and then the battery connection.
SAFETY INSTRUCTIONS REGARDING BATTERIES
- WARNING: Risk of explosive gas mixtures. Working
in the vicinity of a lead-acid battery is dangerous.
Batteries generate explosive gases during normal
battery operation. For this reason, it is of utmost
importance that each time, before using your
battery charger, you read this manual and follow the
instructions exactly.
- Thanks to check that your batteries can be
recharged with this charger. To know this, refer to the
manufacturer's instruction manual of the battery.
- Make sure that the initial charging rate does not
exceed the battery manufacturer's requirement.
13
COMMENT EFFECTUER LE DÉMARRAGE DE SECOURS DE VOTRE
VÉHICULE
NOUS VOUS RECOMMANDONS FORTEMENT DE VÉRIFIER QUE LA
TENSION DE LA BATTERIE DE VOTRE VÉHICULE EST DE 12 V AVANT
DE DÉMARRER. SI ELLE EST INFÉRIEURE À 2 V OU SUPÉRIEURE À
12,6 V, LE VÉHICULE NE PEUT ÊTRE DÉMARRÉ À L’AIDE DE L’APPAREIL.
MISE EN GARDE : Lorsque vous utilisez cet appareil pour démarrer, assurez-vous que
les connexions positives et négatives sont correctes, sinon la batterie peut exploser.
1
V
%
%
3 secondes
2
Appuyez pendant 3 secondes sur le
commutateur d’alimentation (4) pour allumer
l’appareil. Assurez-vous que le niveau de la
batterie est supérieur à 50 %.
Suivez les étapes ci-dessous avant de
procéder au démarrage de secours, sinon
vous pouvez causer un danger :
1. Branchez le câble de démarrage (8) sur le
port de démarrage de secours (1) de l’appareil.
2. Branchez la pince rouge (+) sur la borne
positive (+) de la batterie.
3. Branchez la pince noire (-) sur la partie
métallique du moteur (masse négative) ou
sur la borne négative de la batterie.
3
READY
V
READY
LCD
OFF START
ON
4
V
%
3 secondes DÉSACTIVÉ
Une fois le branchement terminé, « READY »
s’affiche sur l’écran LCD pour indiquer que
le système est prêt pour le démarrage de
secours. Démarrez le véhicule, pendant
5 secondes au plus.
Lorsque vous avez démarré le véhicule,
retirez d’abord le câble de démarrage de
secours (8) sur la batterie automobile, puis
appuyez longuement sur le commutateur
d’alimentation (4) pour arrêter l’appareil.
14
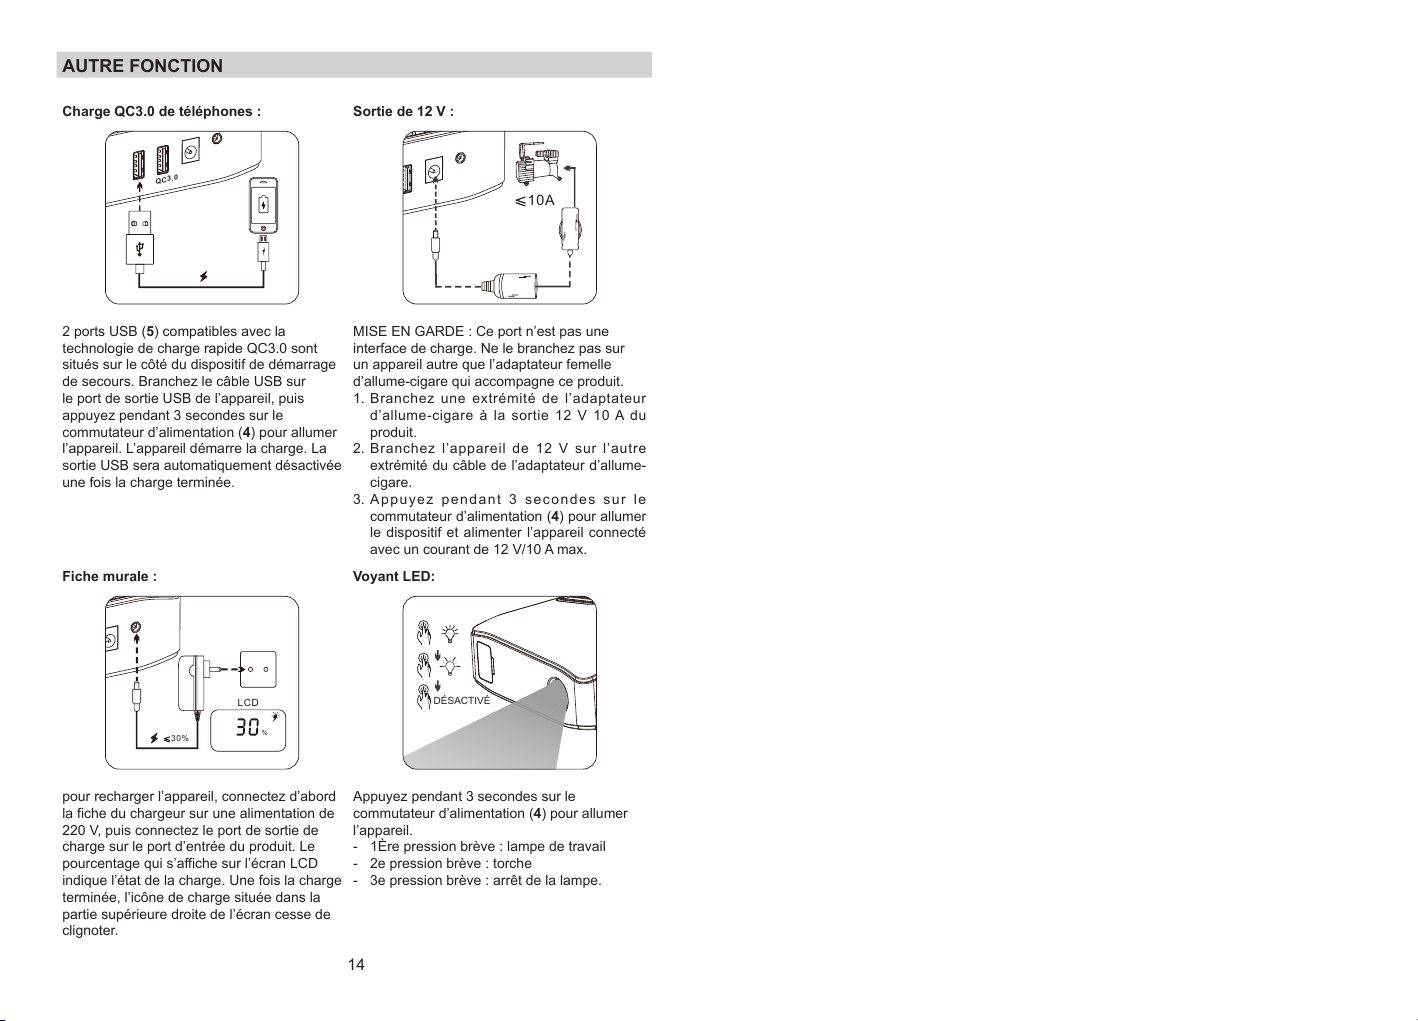
AUTRE FONCTION
Charge QC3.0 de téléphones :
QC 3.0
Sortie de 12 V :
10A
2 ports USB (5) compatibles avec la
technologie de charge rapide QC3.0 sont
situés sur le côté du dispositif de démarrage
de secours. Branchez le câble USB sur
le port de sortie USB de l’appareil, puis
appuyez pendant 3 secondes sur le
commutateur d’alimentation (4) pour allumer
l’appareil. L’appareil démarre la charge. La
sortie USB sera automatiquement désactivée
une fois la charge terminée.
MISE EN GARDE : Ce port n’est pas une
interface de charge. Ne le branchez pas sur
un appareil autre que l’adaptateur femelle
d’allume-cigare qui accompagne ce produit.
1. Branchez une extrémité de l’adaptateur
d’allume-cigare à la sortie 12 V 10 A du
produit.
2. Branchez l’appareil de 12 V sur l’autre
extrémité du câble de l’adaptateur d’allume-
cigare.
3. Appuyez pendant 3 secondes sur le
commutateur d’alimentation (4) pour allumer
le dispositif et alimenter l’appareil connecté
avec un courant de 12 V/10 A max.
Fiche murale :
30%
LCD
%
Voyant LED:
DÉSACTIVÉ
pour recharger l’appareil, connectez d’abord
la fiche du chargeur sur une alimentation de
220 V, puis connectez le port de sortie de
charge sur le port d’entrée du produit. Le
pourcentage qui s’affiche sur l’écran LCD
indique l’état de la charge. Une fois la charge
terminée, l’icône de charge située dans la
partie supérieure droite de l’écran cesse de
clignoter.
Appuyez pendant 3 secondes sur le
commutateur d’alimentation (4) pour allumer
l’appareil.
- 1Ère pression brève : lampe de travail
- 2e pression brève : torche
- 3e pression brève : arrêt de la lampe.
107
- Do not cover the appliance with objects like paper,
towels, curtains,etc.
- Do not expose the appliance directly to the sun, nor to
hot temperatures.
- Do not let the supply cord hang from a table edge, do
not let it touch any hot surface.
- When you unplug the appliance, always pull on the
plug itself, never pull on the supply cord.
- If the supply cord or the clamps are damaged, do not
use the appliance.
- If the supply cord is damaged, it must be replaced
by the manufacturer, its service agent or similarly
qualified persons in order to avoid a hazard.
- Do not modify the supply cord nor the plug. If the
cord and/or the plug do not match your electrical
installations, contact a qualified technician.
- An extension cord should not be used unless
absolutely necessary. Use of an improper extension
cord could result in a risk of fire and electric shock.
- Do not let the red and black clamps touch each
other, as it may lead to sparks, explosion and cause
damages.
- Before making any electrical connection, check that:
4The appliance and its components are not damaged.
In which case, do not use the appliance but bring it
back to your reseller for inspection and fixing.
4The indicated voltage on the rating label matches
with your electrical installations.
- Position the battery charger as far away from the
battery as the leads will allow.

106
the manufacturer/reseller! They may damage the
appliance and/or cause injuries to persons.
- CHOCKING HAZARD! Keep the appliance and its
packaging elements out of reach of children.
- This appliance can be used by children aged from
8 years and above and persons with reduced physical,
sensory or mental capabilities or lack of experience
and knowledge if they have been given supervision or
instruction concerning use of the appliance in a safe
way and understand the hazards involved. Children
shall not play with the appliance. Cleaning and user
maintenance shall not be made by children without
supervision.
- Children should be supervised to ensure that they do
not play with the appliance.
- Do not operate the appliance in explosive
atmospheres, such as in presence of flammable
liquids, gases or dust.
- Avoid naked flames, hot surfaces and sparks area
during the use of this appliance. Do not smoke when
using the appliance.
- During charging, the battery must be placed in a well-
ventilated area.
- Keep the appliance dry. Do not immerge it into water
nor into any other liquid.
- Keep the appliance away from water and spatters.
- Do not operate the appliance in a humid environment.
Do not use in wet places.
- No object containing liquid should be kept around this
appliance.
15
2MINS OFF
Arrêt après 2 min :
L’appareil s’arrête automatiquement en cas
d’inutilisation pendant 2 minutes. Vous pouvez
également appuyer pendant 3 secondes sur le
commutateur d’alimentation (4) pour l’arrêter.
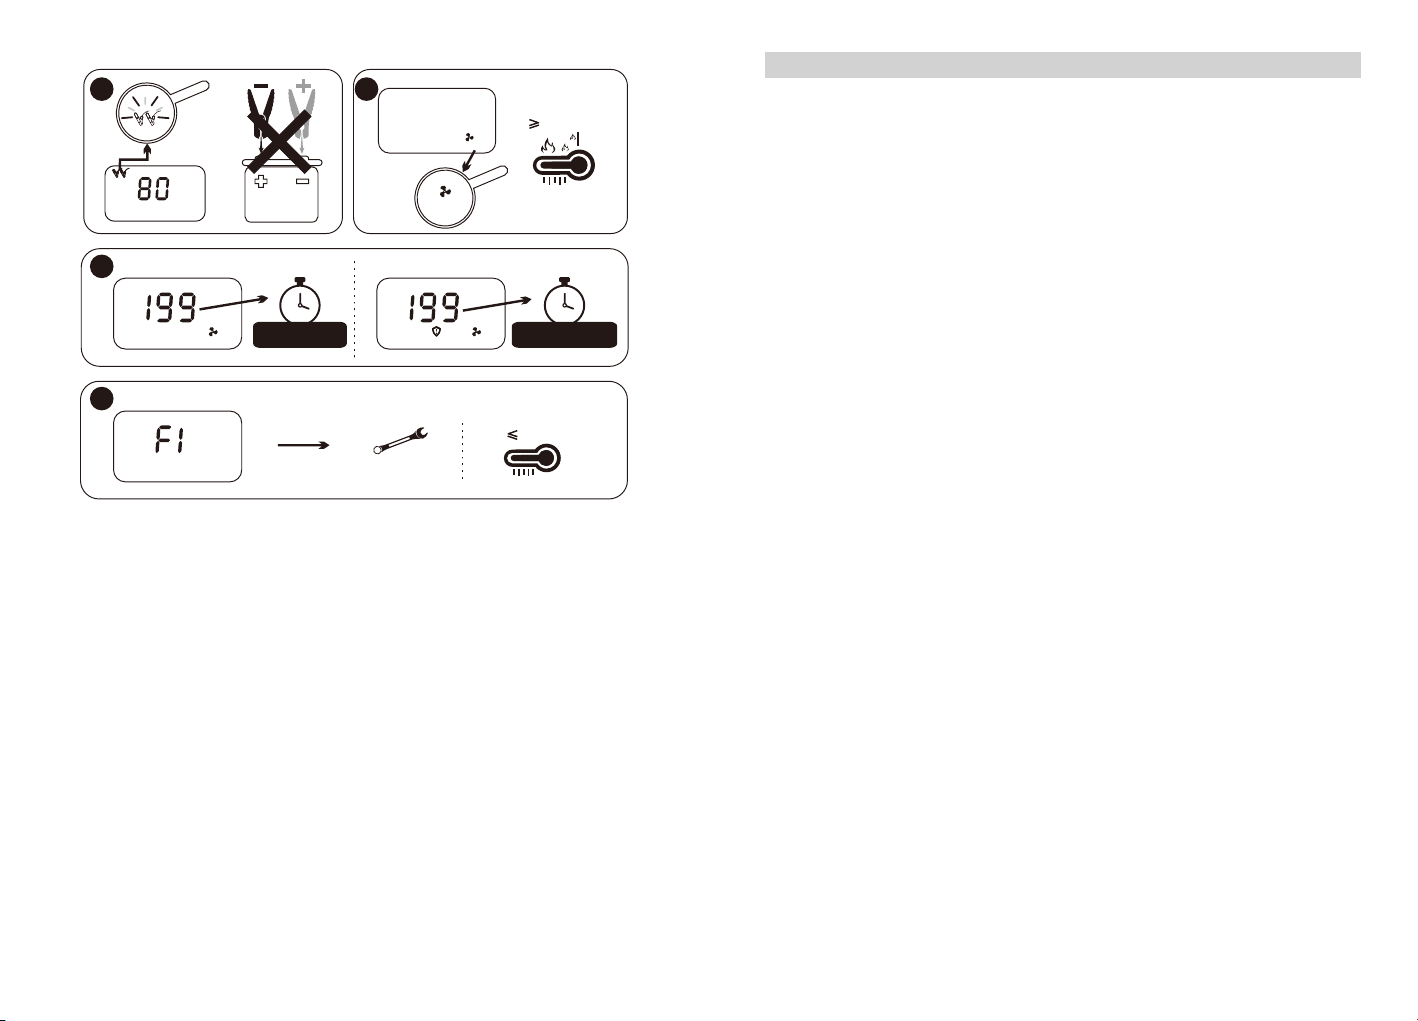
GUIDE DE DÉPANNAGE
Erreur Cause Solution
1. L’icône des pinces clignote
dans la partie supérieure
gauche de l’écran
Les pinces sont mal fixées. Inversez les connexions de la
batterie.
2. L’icône de « COOLING »
s’allume dans la partie
inférieure de l’écran
La température de
l’appareil est supérieure à
55 °C.
Placez l’appareil dans un endroit
plus froid et laissez-le refroidir
jusqu’à 40 °C.
3. L’icône de
« COOLING » ou de
« OVERLOADCOOLING »
s’affiche dans la partie
inférieure de l’écran LCD
avec un décompte de
10 minutes
1) L’énergie de l’appareil
est insuffisante.
2) Vous avez effectué cinq
tentatives de démarrage
de secours en
10 minutes ; la batterie
interne de l’appareil
surchauffe.
1) Assurez-vous que la taille de
votre moteur est adapté pour
cet appareil.
2) Laissez l’appareil refroidir.
Placez l’appareil dans un
endroit plus froid.
4. F1 s’affiche à l’écran 1) Le circuit interne est en
panne.
2) La température est
inférieure à -20 °C.
1) Envoyez l’appareil chez
un technicien aux fins de
réparation.
2) Placez l’appareil dans un
endroit chaud.
5. Tous les branchements
sont corrects, mais l’icône
« READY » ne s’allume
pas
La tension de la batterie
branchée est inférieure
à 2 V ou supérieure à
12,6 V.
1) Assurez-vous que la tension
de la batterie du véhicule est
de 12 V.
2) Chargez votre batterie
automobile.
3) Débranchez toutes les charges
électriques, par exemple le
radiateur, la climatisation, les
lampes, etc., et réessayez.
16
-20°C
%
+55°C
1 2
3
4
Écran LCD
Écran LCD Écran LCD
Écran LCD
Écran LCD
COOLING
COOLING
COOLING
Réparation
Solution
OVERLOAD COOLING
REFROIDISSEMENT
de 10 minutes REFROIDISSEMENT
de 10 minutes
105
SAFETY PRECAUTIONS
●BEFORE CHARGING, READ THE INSTRUCTIONS.
●FOR INDOOR USE. DO NOT EXPOSE TO RAIN.
●DISCONNECT THE SUPPLY BEFORE MAKING OR
BREAKING THE CONNECTIONS TO THE BATTERY.
●WARNING: EXPLOSIVE GASES. PREVENT
FLAMES AND SPARKS. PROVIDE ADEQUATE
VENTILATION DURING CHARGING.
- Use this appliance only as described in this instruction
manual. Any misuse of the appliance, or use different
from what is explained in the manual, will not engage
the liability of the manufacturer nor of the reseller.
- Do not attempt to modify the appliance in any way.
Modifications might lead to damage of the appliance,
property damage or personal injury for which the
manufacturer will accept no liability.
- Cars may have electrical and electronic systems (e.g.
engine management systems, mobile phones) that
maybe damaged if subjected to high starting voltages
and voltage peaks. Before connecting the appliance to
the car, read the car's owner's manual to confirm that
external charging is allowed.
- The disrespect of the safety instructions can cause
electric shock, fire and/or injuries to persons.
- Follow the instructions for connecting and
disconnecting the battery charger leads or battery
terminals.
- This appliance is meant for domestic and indoor use
only.
- Do not use any accessory not recommended by
104
FOREWORD
Thank you for purchasing this product! The Norauto Start Plus is a compact but
powerful jump-starter of 15,000mAh capacity, which can jump-start your car up to
20 times on a single charge. It can be used on petrol engines up to 4.0 litres and
diesels up to 3.0 litres.
Norauto Start Plus can also be used as a Powerbank to recharge your smartphone,
thanks to the 2xUSB QC3.0 Fast Charge Output. There is also a bright LED working
light for emergency issues, as well as a 12V output port, to allow you to use a
compressor, cooler or any other 12V device.
You can easily check the level of the battery, thanks to the clear percentage in the
LCD display. The battery will recharge from a mains outlet.
Norauto Start Plus also offers smart clamps with various protections to provide a
safe use to consumers in any situation.
SPECIFICATIONS
Art. No. 2223450/NO6741/01.39.400
Start current 400A
Peak current 800A
Engine size compatibility Petrol engines 4.0L
Diesel engines 3.0L
Product net weight 0.7kg
Product size 17.6x11.9x3.7cm
USB output 5V 3A/9V 2A
Cigarette socket output 12V 10A
Jump start port 12V Engine start
Battery capacity 55.5Wh
Charge input 14V 0.9A
Ambient operating temperature -20°C to +55°C
Recommended storage temperature 0°C to +40°C
17
NETTOYAGE, MAINTENANCE ET STOCKAGE
A. Nettoyage
AVERTISSEMENT ! N’utilisez pas de nettoyants abrasifs ou à base de solvants.
N’immergez pas l’appareil dans l’eau.
Veillez à éteindre l’appareil, à le débrancher du secteur et à le laisser refroidir avant
de le nettoyer.
Essuyez de temps en temps l’appareil avec un chiffon sec et doux.
B. Entretien
Aucune maintenance n’est requise. L’appareil ne doit être réparé que par des
techniciens qualifiés.
C. Stockage
L’appareil peut être utilisé à des températures comprises entre -20 °C et +55 °C, à
l’abri de la poussière et de l’eau. Nous vous recommandons fortement de stocker
l’appareil à des températures comprises entre 0 °C et +40 °C (dans une maison,
un camion, etc.) avant d’utiliser le dispositif de démarrage de secours. Pour une
efficacité optimale de la batterie, il est recommandé de stocker l’appareil à l’intérieur
lorsque la température à l’extérieur est inférieure à 0 °C.
MISE AU REBUT DU PRODUIT
Collecte sélective des déchets électriques et électroniques.
Les produits électriques ne doivent pas être mis au rebut avec les produits
ménagers.
Selon la Directive Européenne 2012/19/UE pour le rebut des matériels
électriques et électroniques et de son exécution dans le droit national, les
produits électriques usagés doivent être collectés séparément et disposés
dans des points de collecte prévus à cet effet. Adressez-vous auprès des autorités
locales ou de votre revendeur pour obtenir des conseils sur le recyclage.
18
VOORWOORD
Bedankt voor het aanschaffen van dit product. De Norauto Start Plus is een
compacte maar krachtige jumpstarter met een capaciteit van 15.000 mAh die met
één lading uw auto tot wel 20 keer kan starten. Deze kan worden gebruikt voor
benzinemotoren met een maximale inhoud van 4,0 liter en dieselmotoren met een
maximale inhoud van 3,0 liter.
De Norauto Start Plus kan ook gebruikt worden als powerbank om uw smartphone
op te laden dankzij de 2 USB QC3.0-aansluitingen voor snel laden. Het apparaat
beschikt ook over een heldere led-werklamp voor noodgevallen, evenals een
12V-uitgang, zodat u een compressor, koeler of andere 12V-apparaten kunt
gebruiken.
Dankzij het duidelijk aangegeven percentage op het lcd-display kunt u het
batterijniveau eenvoudig controleren. De batterij wordt opgeladen aan een
stopcontact.
De Norauto Start Plus biedt ook slimme klemmen met verschillende types
bescherming zodat ze in alle omstandigheden veilig kunnen worden gebruikt door
de consument.
SPECIFICATIES
Art. nr. 2223450/NO6741/01.39.400
Startstroom 400 A
Piekstroom 800 A
Compatibele motorafmetingen Benzinemotoren 4,0 L
Dieselmotoren 3,0 L
Nettogewicht product 0,7 kg
Productafmetingen 17,6 x 11,9 x 3,7 cm
USB-uitgang 5 V, 3 A / 9 V, 2 A
Uitgang sigarettenaansteker 12 V 10 A
Jumpstart-poort 12 V motorstart
Batterijcapaciteit 55,5 Wh
Laadingang 14 V 0,9 A
Bedrijfstemperatuur -20 °C tot +55 °C
Aanbevolen bewaartemperatuur 0 °C tot +40 °C
103
CZYSZCZENIE, KONSERWACJA I PRZECHOWYWANIE
A. Czyszczenie
OSTRZEŻENIE! Nie należy używać żadnych środków ściernych ani czyszczących
na bazie rozpuszczalników. Nie należy zanurzać urządzenia w wodzie.
Przed czyszczeniem należy wyłączyć urządzenie, odłączyć od sieci zasilającej
i poczekać, aż ostygnie.
Od czasu do czasu należy przetrzeć urządzenie suchą i miękką ściereczką.
B. Konserwacja
Nie jest konieczna żadna konserwacja. Urządzenie może być naprawiane tylko
przez wykwalifikowanych specjalistów.
C. Przechowywanie
Urządzenia można używać w zakresie temperatur od -20°C do +55°C. Chronić
je przed pyłem i wodą. Przed rozruchem zaleca się przechowywanie urządzenia
w temperaturach od 0°C do +40°C (w domu/pojeździe itd.). Aby zapewnić
lepszą wydajność akumulatora, zaleca się przechowywanie tego urządzenia
w pomieszczeniach, gdy temperatura na zewnątrz jest poniżej 0°C.
UTYLIZACJA PRODUKTU
Oddzielna zbiórka odpadów elektrycznych i elektronicznych.
Urządzeń elektronicznych nie należy wyrzucać razem z odpadami
domowymi.
Zgodnie z Dyrektywą Parlamentu Europejskiego i Rady 2012/19/UE
w sprawie zużytego sprzętu elektrycznego i elektronicznego oraz jej
wdrażania w prawie krajowym, zużyte produkty elektryczne muszą być
gromadzone oddzielnie i oddawane do punktów zbiórki przewidzianych specjalnie
do tego celu. W celu uzyskania informacji na temat recyklingu należy zwrócić się do
władz lokalnych lub swojego sprzedawcy.

102
-20°C
%
+55°C
1 2
3
4
LCD
LCD LCD
LCD
LCD
COOLING
COOLING
COOLING
Naprawa
Rozwiązanie
OVERLOAD COOLING
Chłodzenie
10 minut Chłodzenie
10 minut
19
VEILIGHEIDSMAATREGELEN
●LEES VOOR HET LADEN DE GEBRUIKSAANWIJZING
●VOOR GEBRUIK BINNENSHUIS OF NIET
BLOOTSTELLEN AAN REGEN.
●DE VOEDING AFKOPPELEN VOORDAT U DE
CONNECTIES MET DE BATTERIJ VERBINDT OF
UITSCHAKELT.
●OPGEPAST: ONTPLOFBAAR GAS. VERMIJD
VLAMMEN EN VONKEN. ZORG VOOR VOLDOENDE
VERLUCHTING TIJDENS HET OPLADEN.
- Gebruik dit apparaat alleen zoals beschreven in deze
gebruiksaanwijzing. Bij een verkeerd gebruik van
het apparaat of een ander gebruik dan zoals in deze
gebruiksaanwijzing wordt beschreven, zijn de fabrikant
noch de verkoper aansprakelijk.
- Probeer het apparaat op geen enkele manier te
wijzigen. Wijzigingen kunnen leiden tot schade aan
het apparaat, materiële schade of persoonlijk letsel.
De fabrikant wijst alle aansprakelijkheid hiervoor af.
- Auto’s beschikken soms over elektrische en
elektronische systemen die gevoelig kunnen zijn voor
hoge startspanningen en spanningspieken (zoals
motormanagementsystemen of mobiele telefoons).
Lees de handleiding van uw auto voordat u het
apparaat aansluit op het voertuig en controleer of
extern opladen is toegestaan.
- Het niet-naleven van de veiligheidsinstructies kan
elektrische schokken, brand en/of persoonlijk letsel
veroorzaken.
- Volg de instructies voor het aansluiten en loskoppelen

20
van de batterijladerkabels en batterijpolen.
- Dit apparaat is uitsluitend bedoeld voor privégebruik
binnenshuis.
- Gebruik geen accessoires die niet zijn aanbevolen
door de fabrikant of verkoper! Deze kunnen het
apparaat beschadigen en/of persoonlijke letsel
veroorzaken.
- VERSTIKKINGSGEVAAR! Bewaar het apparaat en de
verpakking ervan buiten het bereik van kinderen.
- Dit toestel kan worden gebruikt door kinderen vanaf 8
jaar en door mensen met een lichamelijke,zintuiglijke
of verstandelijke vermogens of gebrek aan ervaring
of kennis,indien ze goed worden bewaakt of de
instructies voor het gebruik van het apparatuur
worden gegeven en als de risico’s werden aangepakt.
Kinderen mogen niet met het apparaat spelen.De
schoonmaak en het onderhoud door de gebruiker mag
niet worden gemaakt door kinderen zonder toezicht.
- Kinderen moeten onder toezicht staan om ervoor te
zorgen dat ze niet met het apparaat spelen.
- Gebruik het apparaat niet in een explosieve omgeving,
zoals in de buurt van brandbare vloeistoffen, gassen
of stof.
- Vermijd open vuur, hete oppervlakken en vonken
tijdens het gebruik van het apparaat. Rook niet tijdens
het gebruik van het apparaat.
- Tijdens het opladen moet de batterij in een goed
geventileerde ruimte worden geplaatst.
101
2MINS OFF
Wyłączenie po 2 minutach:
Urządzenie zostanie wyłączone automatycznie,
jeżeli nie będzie używane przez dwie minuty.
Alternatywnie nacisnąć przycisk zasilania
(4) i przytrzymać go przez trzy sekundy, aby
wyłączyć urządzenie.
ROZWIĄZYWANIE PROBLEMÓW
Błąd Przyczyna Rozwiązanie
1. Ikona zacisku w lewym
górnym rogu ekranu
miga.
Zaciski mogą być źle
podłączone.
Odwrócić połączenia
akumulatora.
2. Komunikat „COOLING”
na dole ekranu
Temperatura urządzenia jest
wyższa niż 55°C.
Przenieść urządzenie do
miejsca o niższej temperaturze
i poczekać, aż jego temperatura
spadnie do 40°C.
3. Na dole wyświetlany
jest komunikat
„COOLING” lub
„OVERLOADCOOLING”,
a na wyświetlaczu
pokazywany jest zegar
odliczający 10 minut.
1) Urządzenie ma
niewystarczającą moc.
2) Urządzenie zostało użyte
pięć razy w ciągu 10
minut, dlatego akumulator
wewnętrzny ma wysoką
temperaturę.
1) Zmienić na urządzenie
o większej mocy i spróbować
ponownie.
2) Poczekać, aż urządzenie
ostygnie. Przenieść urządzenie
do miejsca o niższej
temperaturze.
4. Wyświetlany jest
komunikat „F1”.
1) Wystąpiła usterka
wewnętrznego obwodu.
2) Temperatura urządzenia
jest niższa niż -20°C.
1) Oddać urządzenie do naprawy
wykwalifikowanej osobie.
2) Przenieść urządzenie
do miejsca o wyższej
temperaturze.
5. Po odpowiednim
podłączeniu urządzenia
na ekranie nie wyświetla
się komunikat „READY”.
Podłączony akumulator ma
napięcie poniżej 2 V lub
powyżej 12,6 V.
1) Upewnić się, że akumulator
samochodu ma napięcie 12 V.
2) Naładować akumulator
samochodu.
3) Odłączyć wszystkie odbiorniki
(np. nagrzewnica, klimatyzacja,
światła itd.) i spróbować
ponownie.
This manual suits for next models
1
Table of contents
Popular Extender manuals by other brands

Techly
Techly IDATA EXT-E70POE user manual

weBoost
weBoost DRIVE 4G-X RV user manual

Digitus
Digitus DS-55522 Quick installation guide

Maxview
Maxview GAZELLE Installation & user's instructions

Command access
Command access PM300UNIV installation instructions

NTI
NTI XTENDEX ST-C5USBV Installation and operation manual


