Norden NVS-90170061MA User manual

NVS-90170061MA / NVS-90180121MA /
NVS-90010251MA / NVS-90190351MA
10 Input Mixer Amplifier with Equalizer
User Manual
1
.
Thank you for using our public address system. Please read this User Manual
carefully to make better use of this equipment
Attention
This equipment is not waterproof. To prevent fire or electric shock, please do
not place any liquid filled containers (such as vases or flowerpots) near the
equipment or expose the equipment to dripping, splashes, rain, or moisture.
Please hold the plug when moving the power cord. Do not pull the power cord
when pulling out the power plug. Do not touch the power cord when your hands
the device, please be sure to place it on a horizontal and stable surface.
Please keep this User Manual in good custody for future use.

2
Contents
1. General Description.........................................................................................3
1.1 Power Amplifier of PA Conference System.........................................3
1.2 Performance Features.........................................................................3
2. Brief Description of Product............................................................................4
2.1 Description of Front Panel...................................................................4
2.2 Description of Rear Panel....................................................................6
3. Operating Instructions.....................................................................................7
3.1 System Connection Diagram…………….................................................7
3.2 Connection Diagram of Speaker………………………………………………………8
3.3 Equalizer Adjustment……………………....................................................9
3.4 Selection of Channel…………………........................................................9
3.5 Volume Control…………………….............................................................9
3.6 Microphone and Priority Function.....................................................10
4.Safety Precautions…………............................................................................10
4.1 Precautions for Safety Operation......................................................10
4.2 Matters Requiring Attention……….....................................................11
5. Performance Specifications...........................................................................12

3
1.General Description
1.1 Power Amplifier of PA Conference System
NVS Mixer amplifiers are a type of Public Address conference equipment’s that
integrate the equalizing function, frequency shift function, front, and backstage
amplification function. The products provide 4 audio source input ports, 6 microphone
input ports, a line output port and 4 power amplifier’s output terminals, etc. Among
them, you can select one audio input from 4 channel audio input ports and control its
volume. The volume of the 6 microphones can be controlled independently. A master-
volume control is provided for controlling the total output volume. The 7-band
equalizers (EQ) have been provided to adjust the output. The shifted frequency of
microphones is 0-5Hz higher than the original frequency.
These products have rated voltage outputs of 100 V, 70 V, and rated resistance
outputs of 4 Ω, 8 Ω, 16 Ω. They are split into separate kinds of models like, 60W (NVS-
90170061MA), 120W (NVS-90180121MA), 250W (NVS-90010251MA) and 350W (NVS-
90190351MA). The products are designed according to the requirements of the
conference hall having no whistle, with the tone loud and clear and the volume
adjustable. The products provide with multiple protection, well-found function and
with the stable operating state and can meet the requirements of conference site for
the sound amplification and the background music.
1.2 Performance Features
•Suitable and reliable operation mode with integrated functional design.
•4-line inputs, a line output, 6 microphone inputs (balanced with 24V phantom
power supply).
•4 number of audio source channels can be selected automatically by their
priority level.
•Mute function, easy to override the normal playing.
•Microphone frequency shift function, and the range of shifted frequency can
be adjusted.
•Built-in chime generator, and adjustable chime output volume.
•The volume of microphones and the audio source channels can be controlled
independently.
•Master controller to control the total volume.
•7-band equalizer, and the adjustment is convenient.
•With 100 V and 70 V rated voltage output, 4-16 Ω rated resistance output.

4
2. Brief Description of Product
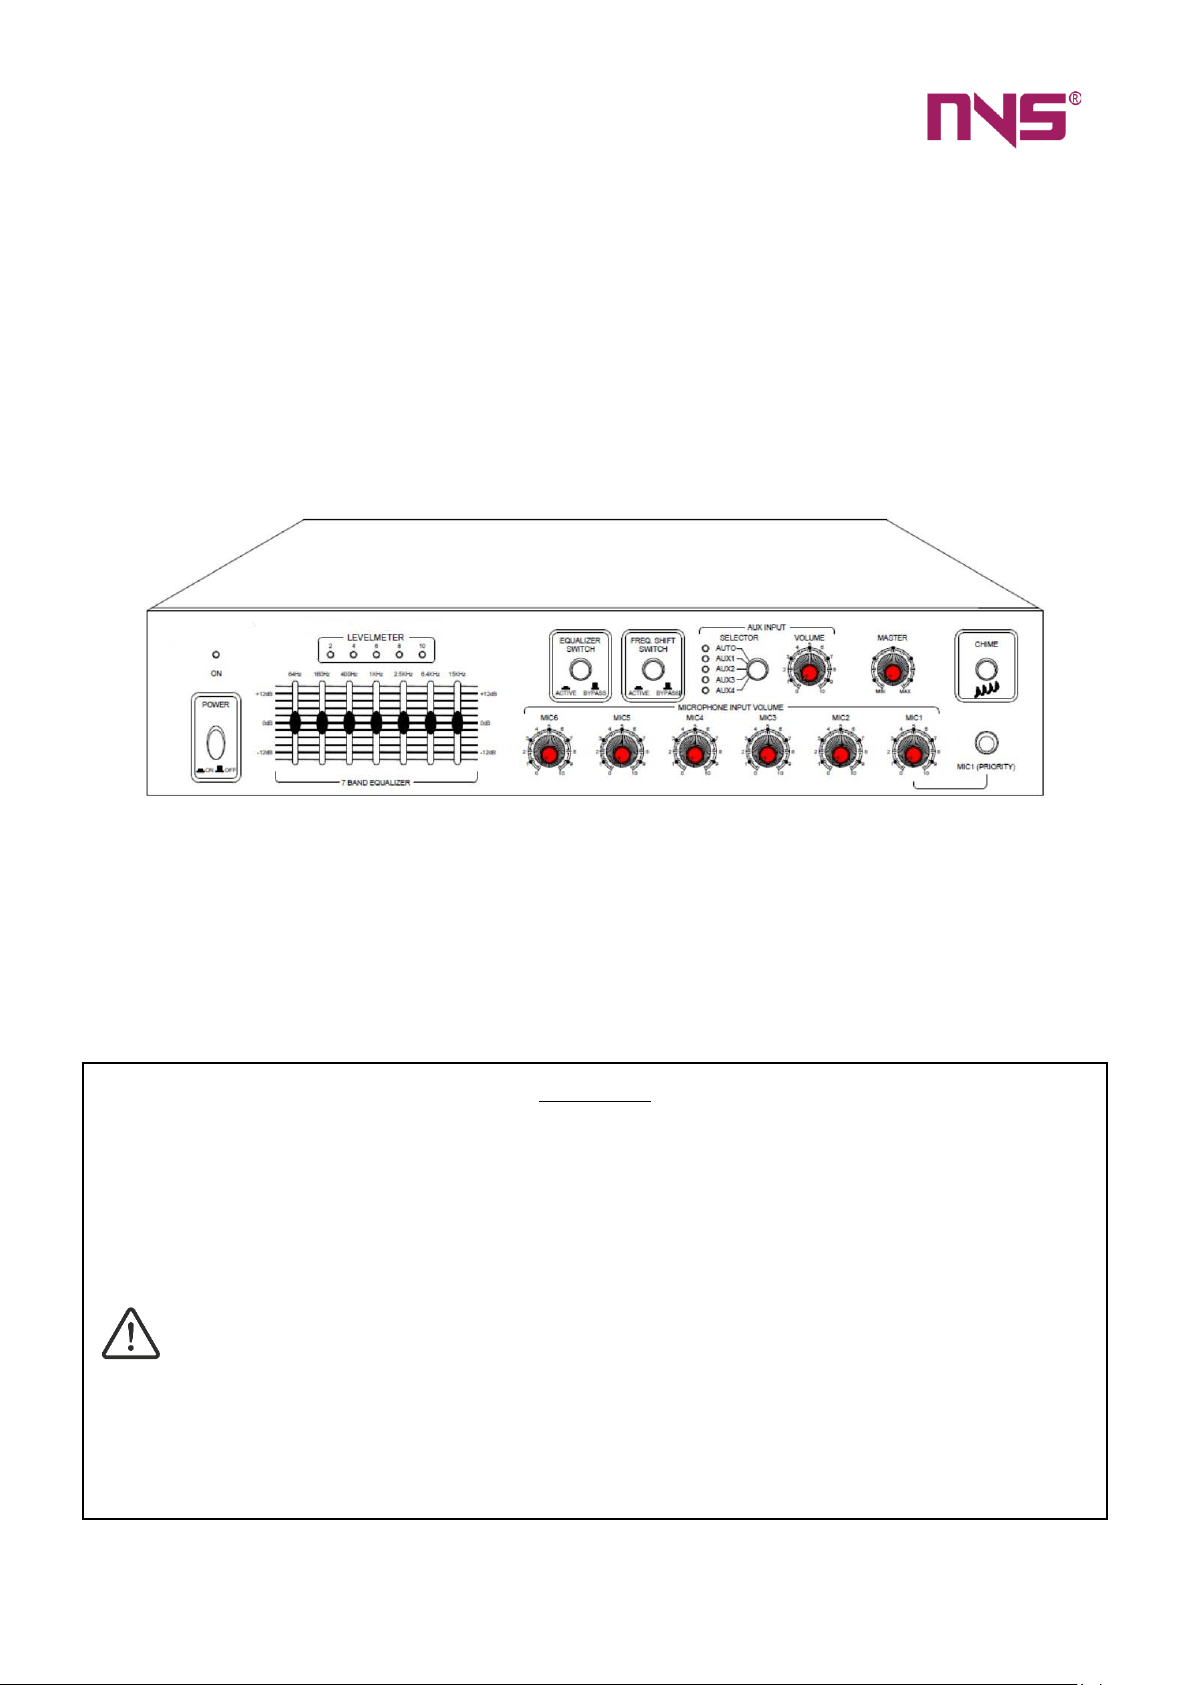
2.1 Description of Front Panel
(1) Power switch and power indicator
Press down the power switch button to turn on the power, and the power
indicator is lit when the power is turned on; If press down the power switch button
again to pop up the switch, the power is turned off, and the power indicator is
distinguished when the power is turned off.
(2) 7-band equalizer adjustment slider
With the slider sliding up to increase the gain of frequency band and sliding
down to attenuate the gain of frequency band.
(3) Microphone 6 volume adjustment knob
To adjust clockwise to increase the volume, and to adjust counter clockwise to
decrease the volume.
(4) Microphone 5 volume adjustment knob
To adjust clockwise to increase the volume, and to adjust counter clockwise to
decrease the volume.
(5) Microphone 4 volume adjustment knob
To adjust clockwise to increase the volume, and to adjust counter clockwise to
decrease the volume.

5
(6) Microphone 3 volume adjustment knob
To adjust clockwise to increase the volume, and to adjust counter clockwise to
decrease the volume.
(7) Microphone 2 volume adjustment knob
To adjust clockwise to increase the volume, and to adjust counter clockwise to
decrease the volume.
(8) Microphone 1 volume adjustment knob
To adjust clockwise to increase the volume, and to adjust counter clockwise to
decrease the volume.
(9) Microphone 1 port
With the No.1 priority function, to facilitate the inserting of an emergent PA.
(10) Output volume level meter
If the 4th and the 5th indicators of the level meter are normally lit, it means
that the output has a top chopping distortion, and the adjustment should be given to
the corresponding volume control knob to decrease the volume, making the 4th and
the 5th indicator flash.
(11) Equalizer/bypass mode change over switch
Press down the switch for the equalizer adjustment mode; Press the switch
again to pop up for the direct mode.
(12) Microphone frequency shift switch
Press down the switch for the frequency shift function; Press the switch again
to pop up for the direct mode.
(13) Channel status display indicator
When the channel selection button selects a certain audio source input
channel, the indicator of the corresponding channel will be lit and display.
(14) Channel selection button
A certain audio source channel can be selected for play by clicking the
selection button. The selection is carried out among AUTO, AUX1 to AUX4
respectively, among them AUTO status is for the auto detection.
(15) Channel volume adjustment knob
It is used to adjust the volume magnitude for AUX1 to AUX4 channels, and the
object adjusted is according to the gating condition of the channel selection switch.
6
(16) Total volume adjustment knob
Adjust clockwise to increase the volume and adjust counter clockwise to
decrease the volume. That knob can also be used to control the chime output volume.
(17) Chime output trigger button
Touch it lightly once to trigger the chime output, and after the end of playing
the tone signs of '1-3-5-i', it will stop automatically.
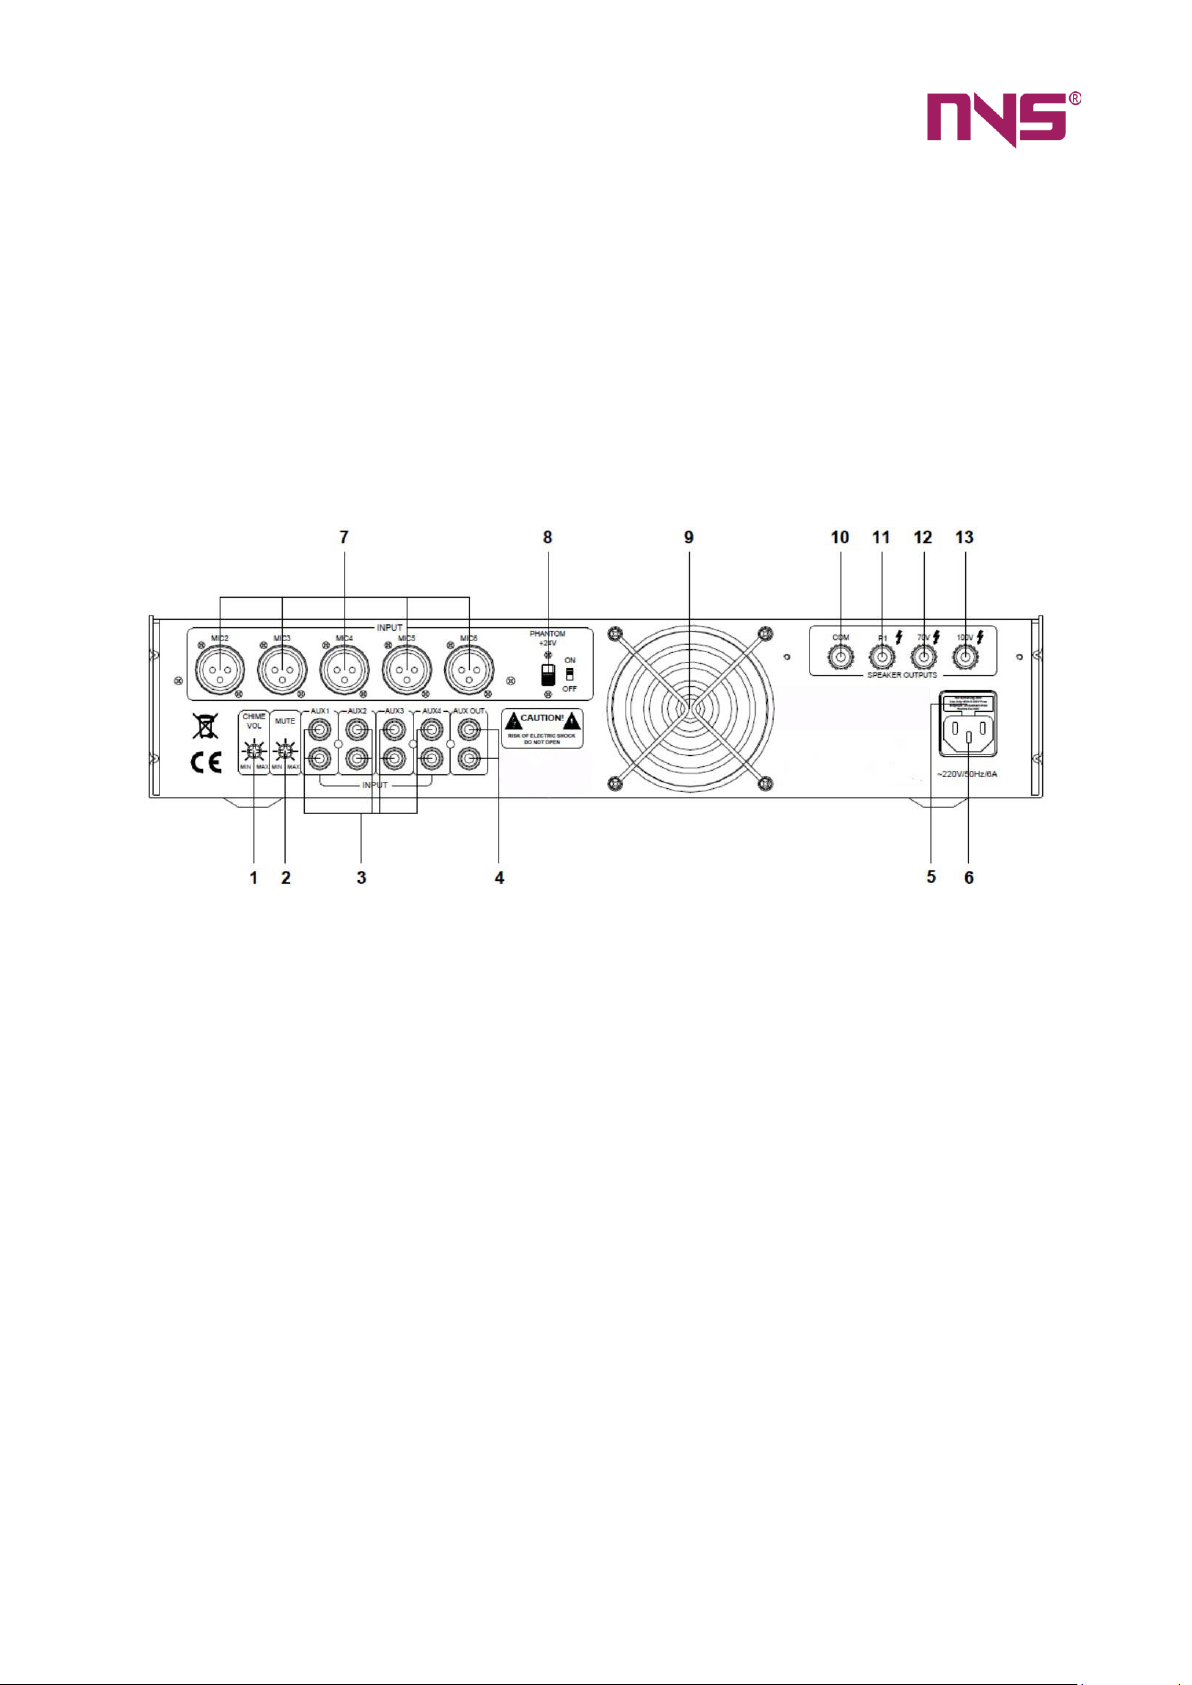
2.2 Description of Rear Panel
(1) Chime adjustment knob
Turn the knob clockwise to increase chime volume and counter clockwise to
decrease chime volume.
(2) Mute adjustment knob
Reduce the mute extent by rotating clockwise, and raise the mute extent by
rotating counter clockwise.
(3) Auxiliary 1, 2, 3 and 4 input ports
Those four input ports are used to connect external audio source devices and
are all for input line signals.
(4) Auxiliary output port
It is used to connect the external amplifier.
(5) AC220V power supply fuse
If the fuse is destroyed, replace it with a fuse that meets the same criteria.
(6) AC220V power outlet
When the power is on, do not pull out or plug in the power plug.
(7) Microphone 1,2,3,4,5,6 sockets
They are XLR sockets.
7
(8) 24V phantom power switch
The microphone will have a 24V phantom power supply if the switch is turned
to "ON," and the phantom power supply will be turned off if the switch is turned to
"OFF."
(9) Built-in cooling fan
The working voltage is 12V.
(10) Output common terminal
(11) P1 output terminal
It is possible to connect multiple speakers in parallel, but the overall impedance
must not be less than 4 ohms.
(12) 70V rated voltage output terminal.
(13) 100V rated voltage output terminal.
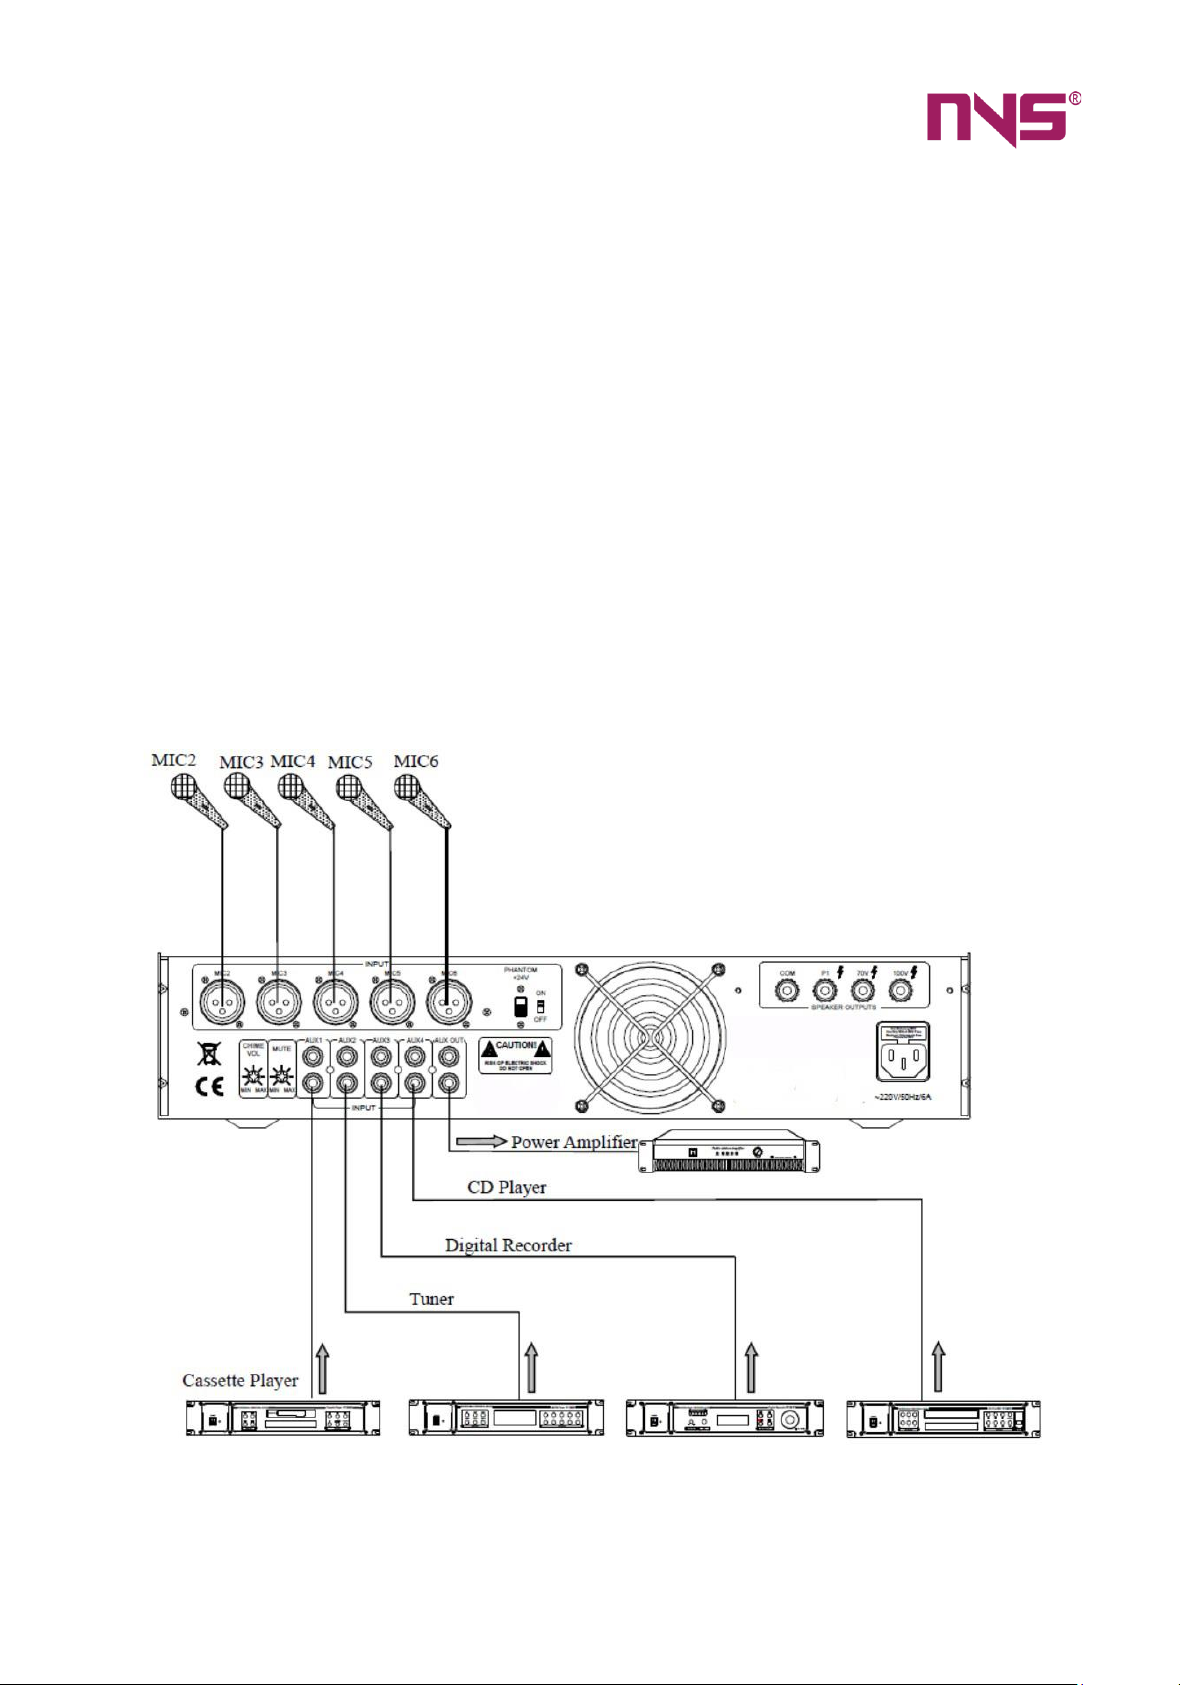
3. Operating Instructions
3.1 System Connection Diagram

8
3.2 Connection Diagram of Speaker
Note: The four outputs are connected using the following methods: COM-P1, COM-
70V, and COM-100V. Only one set of output terminals can be connected, and the

9
speaker connected to COM-P1 cannot be linked to COM-70V and COM-100V;
otherwise, the speaker may be burned.
3.3 Equalizer Adjustment
The device features two output modes: EQ and Bypass, and the "EQUALIZER
SWITCH" button on the front panel may switch between them. The gadget is in
equaliser output mode when this button is pressed. Slide the 7 faders in the 7-band
frequency adjustment area up or down to increase or decrease the amplitude of the
corresponding frequency band at this time; when the "EQUALIZER SWITCH" button is
popped up, the device is shifted to bypass mode, and the operation of the 7-band
frequency adjustment faders is invalid in this case.
3.4 Selection of Channel
Auto Selection
The "SELECTOR" button on the front panel is used to pick the audio source input
channel. You can pick your choice based on the indicator on the button's left side.
When the "AUTO" indicator is turned on, the device will recognise signals from the
four audio source input channels automatically, which takes a few seconds. When a
signal is detected, the relevant channel's indicator will always be on. If two or more
signal inputs are discovered, the device will automatically play the higher-priority
audio source signal. The four input channel signals have priority levels of AUX1, AUX2,
AUX3, and AUX4. When a signal is detected and played, the indicator corresponding
to “AUTO” and the indicator corresponding to the current channel will both be on.
Manual Selection
If a specific input channel signal must be specified as the audio source to be
played, press the "SELECTOR" button to do so. If you want to use the AUX1 channel
input signal as the audio source, for example, click the "SELECTOR" button to turn on
the AUX1 channel indicator, and the device will play the programmed signal input from
that channel. The "AUTO" indication will not be on when you manually pick the playing
channel, but the indicator for the selected channel will always be on.
3.5 Volume Control
Each microphone channel has a volume control knob that is used to
control the output volume of that microphone channel. The knob "VOLUME"
controls the volume of four audio source input channels equally. The
"MASTER", master volume control knob is used to control the amplifier's total
output volume. The "MASTER" knob or the "CHIME VOL" knob on the back panel
can be used to control the chime output volume. Adjust the volume with a

10
"cross-head" screwdriver clockwise to increase volume and counter clockwise
to decrease volume.
The "MASTER" volume control knob will be invalid if the volume control
knobs for each microphone, four channels, and the chime are all closed
completely. The other volume control knobs are also invalid if the "MASTER"
volume control knob is closed.
The "MUTE", mute adjustment knob is used to control the device's mute
extent. By adjusting the knob, the signal input from the chime or MIC1 can
totally override or only weaken other input signals. The adjustment range is 0 to
-30 dB, with the factory setting being -30dB. The device is equipped with a
frequency shift mechanism to avoid microphones from howling excessively: To
turn on the frequency shift function, hold down the selection switch "FREQ.
SHIFT SWITCH," and the frequency shift function will be cancelled when the
selection switch is showed up.
3.6 Microphone and Priority Function
MIC1, MIC2, MIC3, MIC4, MIC5, and MIC6 are among the device's six
microphone ports. The MIC1 and the chime signals, for example, have the same
priority purpose and can override all other signals. For condenser microphones, a 24V
phantom power supply is available.
•Please turn the switch "PHANTOM" to "ON" while using the condenser
microphone.
•Turn the "PHANTOM" switch to "OFF" while using the dynamic microphone.
4. Safety Precautions
4.1 Precautions of Safety Operation
•Please do not connect this item to a power supply until the system has been
properly wired.
•It is critical to ensure that the device's input voltage matches the device's
needed voltage; otherwise, the gadget may be damaged.
•The device contains dangerous voltage that could cause personal electric shock.
To avoid the risk of electric shock, please do not open the casing without
permission.
•When the gadget is switched to "OFF," it is not totally unplugged from the
power supply. If the device is not in use, please detach it from the socket for
safety reasons.
•Please do not place the gadget in an extremely cold or hot environment.

11
•The device's working area must have adequate ventilation to avoid extreme
temperatures during operation, which could cause harm to the equipment.
•Please unplug the device from the power socket on rainy or wet days, or if it
has been inactive for an extended period of time.
•Please disconnect the power plug from sockets to ensure the device has been
completely disconnected from the power source, before any component is
removed from or reinstalled in the device, or before any electric connector of
the device is disconnected or reconnected.
•If any failure of the device, do not open the case and attempt to fix it without
first seeking authorization from a specialist. This will prevent an accident or
further damage to the equipment.
•Please avoid putting corrosive chemicals near or on the gadget.
4.2 Matters Requiring Attention
•The Company offers a one-year free guarantee (including free replacement
components) on quality faults starting from the date of purchase, as long as the
equipment is installed and used according to the User Manual's specifications.
At any time for the repair guarantee, the consumer should present the Card of
Guarantee and the sales invoice as a proof.
•The following criteria are not included in the provision of the free service.
1. Damage to the product as a result of improper installation, application, or
handling;
2. Product damage as a result of an abnormal condition (such as excessive
voltage or humidity, for example);
3. Product damage caused by a force majeure event such as a natural disaster
or an accident;
4. The product body number has been converted, changed, or eliminated;
5. The product has previously been repaired or modified by non-authorized
persons.
•Please keep the Operation Manual and Card of Guarantee carefully.
•As to the subjects or precautions not mentioned in the manual, please contact
the distributor, or visit the web page of our company:
“https://www.nordencommunication.com”when necessary.
•• If any failure phenomena occur during the time of guarantee, please contact
the business's service employees (or the distributor), as the company will not
assume obligation to repair free of charge if the damage is caused by self-
assembly or repair by non-company technical personnel.

12
5. Performance Specifications
Model
NVS
90170061MA
NVS
90180121MA
NVS
90010251MA
NVS
90190351MA
Rated output power
60W
120W
250W
350W
Output voltage adjust
rate
From full load to no load, ≤3dB
Minimum power emf
Microphone ≤3mV (unbalance input)
Microphone ≤3mV (balance input)
LINE: ≤300mV
Frequency response
80Hz -16KHz (±3dB)
Total harmonic
distortion
≤0.5% (1 KHz, under normal working condition)
S/N ratio
Line: ≥70dB
7-band equalizer
64Hz: ±12dB
160Hz: ±12 dB
400Hz: ±12 dB
1KHz: ±12 dB
2.5KHz: ±12 dB
6.4KHz: ±12 dB
15KHz: ±12 dB
Protection function
DC, overload, short-circuit.
Mute function
Microphone 1 and chime input covering other inputs
Phantom power
DC24V
Frequency
0-5 Hz higher than the input signal frequency
Rating power
AC 220V / 50Hz
Power consumed
120 W
250 W
500 W
650 W
Dimensions
430×368×88 mm
Gross weight
12.5 kg
16 kg
15.5 kg
16.5 kg
Net weight
11 kg
14.9 kg
14 kg
15 kg
Note: No prior notice will be given for modification of specifications in any.

13
CAUTION
•When the power switch is "OFF", the machine is not completely disconnected from the power
grid. For the sake of safety, please pull the power cord plug out of the socket when not using the
equipment.
•The equipment shall not be subject to water drops or splashes, and objects such as vases filled
with water shall not be placed on the equipment.
•To reduce the risk of electric shock, do not remove the cover. If necessary, please ask
professional personnel to repair.
•The symbol on the rear panel indicates hazardous live. The connection of these terminals
must be operated by the instructed person.
•The equipment is connected to the power grid through the power cord plug. In case of
equipment failure or danger, the connection between the unit and the power grid can be
disconnected by pulling out the power cord plug. Therefore, it is required to place the power
socket to a position where the power cord can be plugged and unplugged conveniently.
This manual suits for next models
3
Table of contents


