Norman BP320 User manual

ALLURE BP320 by Norman
DC POWER PACK
FOR ALLURE DP320 STUDIO FLASHES
OPERATION INSTRUCTIONS
1. INTRODUCTION
This DC Power Pack for Studio Flashes is primarily designed for use with the Allure
DP320 studio flash in DC mode, a Norman product from Photo Control Corporation,
4800 Quebec Ave. N., Minneapolis, MN 55428.
If it is intended to use this power pack on DC or AC/DC dual power source studio
flashes produced by other manufacturers, consult your dealer or the manufacturer for
suitability first.
2. BASIC FEATURES OF THE PACK
2.1. The pack has a built-in rechargeable battery. It can be recharged with an AC/DC
adaptor (included) which provides a DC output of 18V, 600mA.
2.2. The output from the pack is approximately DC 305V, 500mA. An optional DC
power cord (part no. R6000) plugs into the pack on one end and the flashhead on
the other end.
2.3. A brand new and fully-recharged power pack will be able to support
approximately 90 - 115 full power flashes of the Allure BP320 studio flash,
which will have an energy capacity of about 270WS when used with this battery
pack, without the modeling lamp.
Note: The modeling lamp, if there is one, will be disabled automatically when
the studio flash is switched into the DC mode.
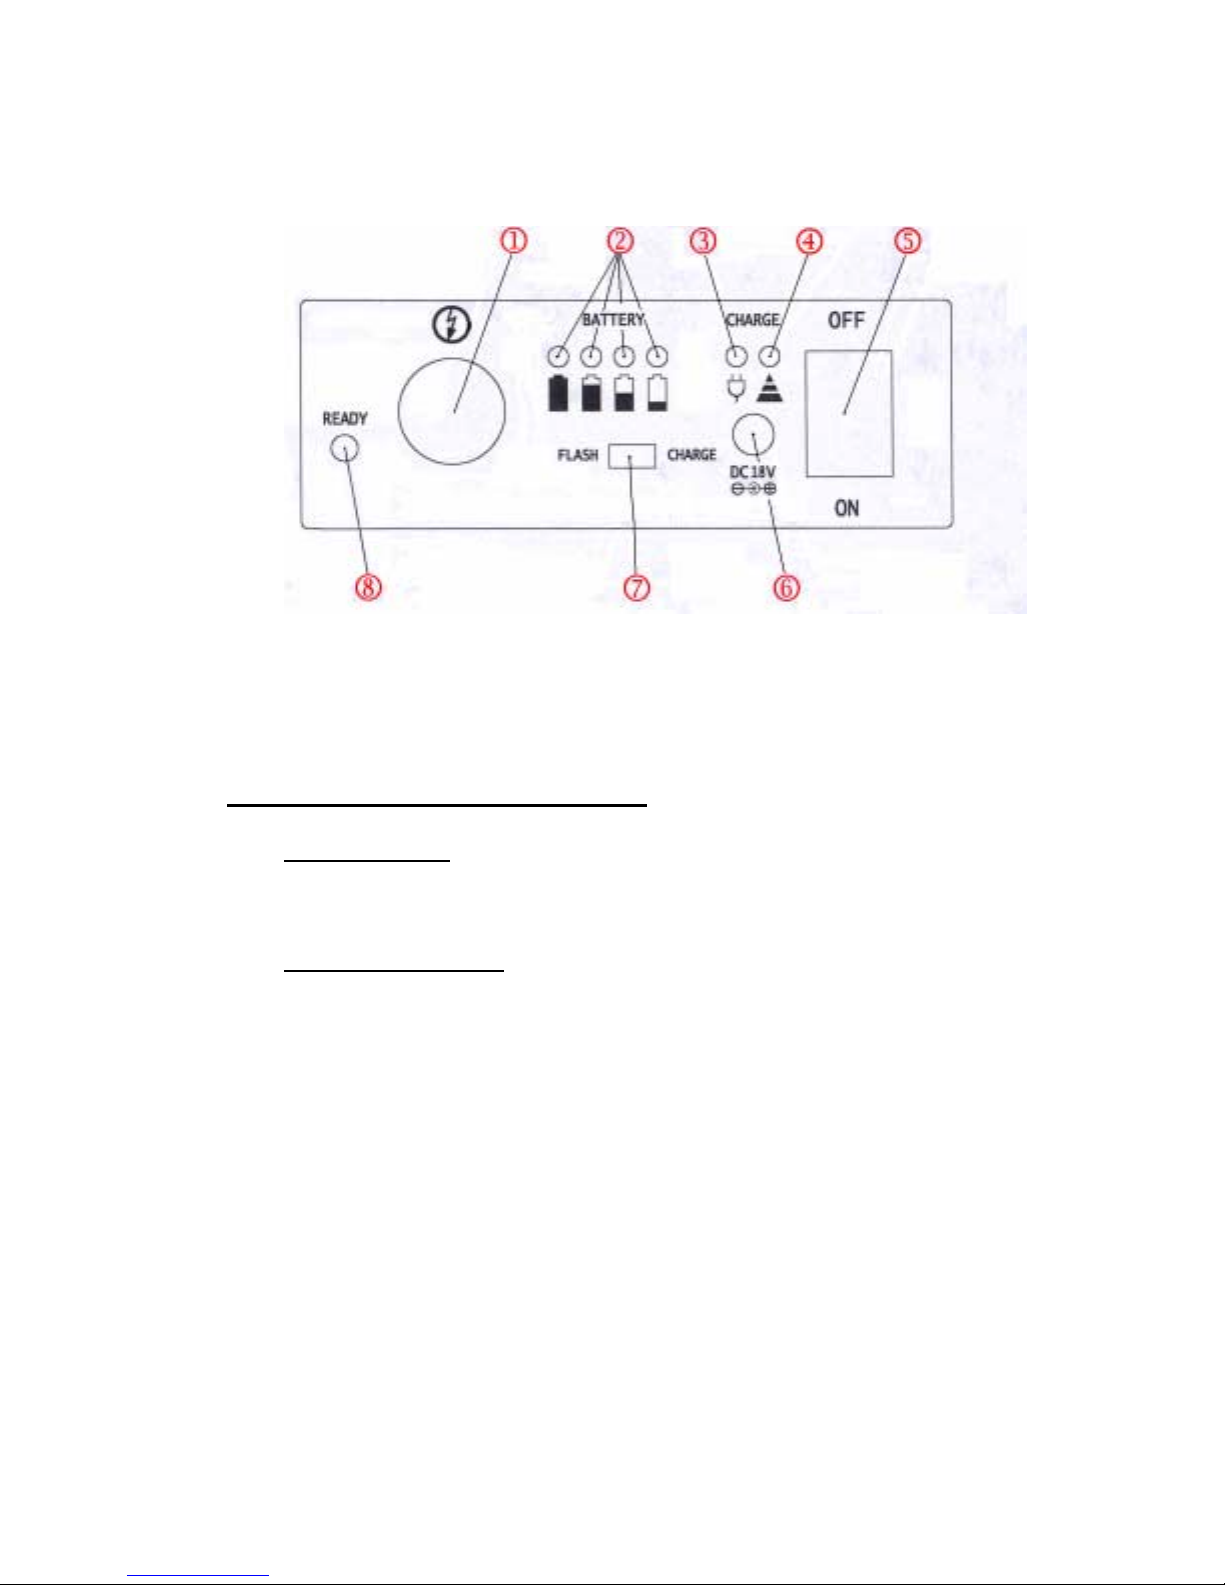
2.4. There are the following indicators, switches and sockets on the front panel of the
pack –
1. Flash Socket 5. Main ON/OFF Switch
2. Battery Level Indicator Lamps (4X) 6. Charger Socket
3. Input Circuit Pilot Lamp 7. Charger/Flash Selection Switch
4. Input Status Indicator Lamp 8. Output Status Indicator Lamp
3. RECHARGING THE BATTERY PACK
3.1. Initial Charging
Before starting to use the pack, it must be charged for not less than three hours.
3.2. Charging Procedures
(a) Check the front panel to make sure that the Main ON/OFF Switch is off.
(b) Plug the jack of a 18V, 650mA output AC/DC adaptor/charger to the
Charger Socket.
(c) Flip the Charge/Flash Selection Switch to the “CHARGER” side.
(d) Flip the Main ON/OFF Switch on. Then,
(i) the Input Circuit Pilot Lamp, which is RED in color, will come on to
indicate that the input circuit and connection to the charger are both in good
working condition; and
(ii) the Input Status Indicator Lamp, which is GREEN in color, will come
on as a steady light to show that the charging function is in progress.

(e) When the pack has been fully recharged, the green Input Status Indicator
Lamp will blink, instead of remaining steady, to indicate completion of the
process.
(f) Flip the Main ON/OFF Switch off. Disconnect the unit from the charger.
Note: The front panel of the pack may become warm during the charging
process. This is normal.
3.3. Regular Recharge
Even if the pack is not expected to be used, it is strongly recommended to
recharge the pack at least two to three times a month, at approximately equal
intervals if possible. This will help maintain the pack in good condition.
4. OUTPUT TO STUDIO FLASHES
To power a studio flash, take following procedures -
(a) Make sure that both the DC Power Pack and the studio flash to be powered are
off.
(b) Flip the AC/DC selection switch, if there is one, on the studio flash to the “DC”
side.
(c) Connect the DC Power Pack to the studio flash with the DC power cord.
(d) Flip the Charge/Flash Selection Switch of the DC Power Pack to the “FLASH”
side.
(e) Flip the Main ON/OFF Switch of the DC Power Pack on. The power switch on
the studio flash should remain off.
Note: If the input power switch on the studio flash is on when the DC Power
Pack is turned on, the DC Power Pack will NOT charge the studio flash. This is
a built-in protection feature. In such a case, turn off both the studio flash and the
DC Power Pack, and then switch on only the DC Power Pack again.
(f) Output to the studio flash begins. The Output Status Indicator Lamp will come
on as a steady light indicating that the output is in progress charging the studio
flash. The first re-charge may take a little longer. Subsequent re-charges will be
quicker.

(g) When the studio flash has been fully re-charged, the Output Status Indicator
Lamp will change from a steady light to blinking.
Note: The blinking of the indicator lamp actually is the result of the DC Power
Pack constantly re-charging the studio flash to keep the energy level at the
predetermined level to ensure a correct flash output at all times. This consumes
battery power. Thus, if the studio flash is not in use, it is strongly recommended
to switch off the DC Power Pack to save battery power.
IMPORTANT NOTES:
(A) All Battery Level Indicator Lamps Going Off
As protection against overheating resulting from rapid flashing, the pack will shut
itself down after a series of quick successive flashes, the number of which will
depend on the power level being used and the rest time between every two flashes
(it is approximately 36 full power quick flashes in the case of Allure DP320 studio
flash). When this happens, the Battery Level Indicator Lamps will be turned off.
This is not a failure. When the temperature returns to the pre-determined level,
the Battery Level Indicator Lamps will come on again. At this point, turn off the
pack and then switch it back on. The pack is now back to normal operation. If
the pack is used again immediately, the number of flashes to the next shut down
will be less than the previous one.
(B) Output Status Indicator Lamp Not Blinking or Not Coming On
As a safety measure, the pack will inhibit itself from outputting to the studio flash
if it should detect a no-load condition. If the DC power cord becomes
disconnected while the unit is on, the pack will detect a no-load condition. This
would activate the safety circuit, which will cause the Output Status Indicator
Lamp either not to come or not to blink, depending on the state of the charging
process when the interruption occurs. When this occurs, switch the pack off and
then back on and the pack will resume normal operation.
5. BATTERY LEVEL INDICATION
5.1. Battery Level Indicator Lamps
There are four LED lamps on the Front Panel to indicate very roughly the levels,
from full to one-quarter, of battery power remaining. The full to half indicator
lamps are green whereas the one-quarter indicator lamp is red. The DC Power
Pack must be re-charged as early as possible if only the red lamp has come on.
Extended usage at low battery power levels may affect adversely the life of the
pack despite the Insufficient Voltage Protection feature (see (6)(b) below)

5.2. Condition of Indicator Lamps during Studio Flash Recharge Cycle
When the recharge of a studio flash is in progress, the Battery Level Indicator
Lamps may flicker or even go off. This is a normal phenomenon and should not
cause any alarm. When the re-charge is complete, the light of the indicator
lamps will return to a steady condition and the indicator lamps will restore
themselves as a correct reference for the approximate level of battery power
remaining.
6. PROTECTION FEATURES
This DC Power Pack has the following built-in protection features -
(a) Zero-Load Protection - The output of high voltage is inhibited when it detects a
zero-load condition.
(b) Insufficient Voltage Protection - When battery power level is getting close to
the lower limit, the pack will be inhibited to charge the studio flash to prevent
adverse effects on the life of the battery.
(c) Over-Charging Protection - The blinking of the Input Status Indicator Lamp
when the re-charge of the DC Power Pack itself is complete is a manifest of this
feature, which prevents damage to the circuit even if the charging voltage is not
removed immediately.
(d) Shock Protection - The output circuit has been designed such that output to the
studio flash will not begin unless the switching sequence as described in Sections
4.(a) to (e) above are followed. This helps prevent the possibility of electric
shock at the Flash Socket or the end of the connection cord.
7. MAINTENANCE TIPS AND PRECAUTIONS
(a) Do not touch the Flash Socket or the end of the cord which connects to the studio
flash.
(b) Do not attempt to disassemble or repair any part of the electrical circuit inside.
(c) Do not leave the unit in hot and/or humid environment or under direct sunshine.
(d) Do not spill water or any liquid over the unit.
(e) Do not drop the unit onto hard surfaces.
(f) Use only chargers of the required specification.

(g) Recharge the unit at least two to three times a month (see (3.3.) above).
(h) Recharge as early as possible when battery level is low (see (5.1.) above).
8. SPECIFICATIONS
Charge Input Requirement DC18V, 600mA
Charger Input Socket Round coaxial type with centre -ve and perimeter +ve
Output Voltage/Current Approx. DC305V/500mA
Output-to-Flash Socket Din Type (Female)
Battery Capacity DC12V, 2.3Ah at room temperature
(may decrease with lower temperatures)
Battery Type Sealed lead acid type
Accompanying Accessory Cord for connection to studio flash
Physical Dimensions 220mm(L) x 110mm (W) x 47mm(H)
Weight Approx. 1,360 gm. Net
Rev. Nov., 2002
Table of contents
Other Norman Power Supply manuals


