NORMARC Rapala CRUZER M1 User manual

Operator's Manual
Original Operating Instructions
CRUZER M1
Flip-Style Sled Shelter
1350 Phillip Murray Ave.
Oshawa ON, Canada
L1J 6Z9
Visit us at:
www.rapala.ca www.facebook.com/rapalaarmy
Find us on
CRUZER M1
RSS1

2
Operator's Manual
Cruzer M1 Flip-Style Sled Shelter
Visit us at: www.rapala.ca
www.facebook.com/rapalaarmy
INTRODUCTION
Thank you
for purchasing a Rapala® Ice Shelter from Normark Inc. We have worked to ensure that this ice shelter meets high
standards for usability and durability. With proper care, your ice shelter will provide many years of service. Please take the
time to read this manual carefully to learn how to correctly operate and maintain your ice shelter. Congratulations on your
investment in quality. Save these instructions for future reference. Normark Inc reserves the right to change or alter this manual
without notice.
CONTENTS
Registration .....................................................................................................................................................................................................................................................................2
Important Safety Precautions...................................................................................................................................................................................................................................3
Assembly......................................................................................................................................................................................................................................................................4-7
Wind Break Position......................................................................................................................................................................................................................................................8
Set-up & Take-down Instructions............................................................................................................................................................................................................................8
Long-Term Storage .......................................................................................................................................................................................................................................................8
Parts............................................................................................................................................................................................................................................................................. 9-10
Warranty ........................................................................................................................................................................................................................................................................ 11
REGISTRATION
Record the model number and serial number (if applicable) in the space provided for easy reference. Fill out and mail the
registration card located in the parts packet. Warranty is valid only if the completed registration card is received by Normark Inc.
within 30 days of purchase.
OWNERSHIP RECORDS
Place of Purchase:
Place of Purchase Address:
City: State/Province: Zip Code/Postal Code:
Model Number: Serial Number (found next to warning tag):
Date of Purchase:
Notes:

3Visit us at: www.rapala.ca
Operator's Manual
Cruzer M1 Flip-Style Sled Shelter
www.facebook.com/rapalaarmy
IMPORTANT SAFETY PRECAUTIONS
This shelter is made with ame resistant fabric which meets
CPAI-84 specications. It is not re proof. The fabric will burn if
left in continuous contact with any ame source. The applica-
tion of any foreign substance to the shelter fabric may render
the ame resistant properties ineective.
Fuel-based heat sources burn oxygen and emit carbon monoxide
(an odorless, colorless, poison gas). Breathing carbon monoxide
can cause headaches, drowsiness, nausea, dizziness, confusion
and eventually death. Use caution with heaters. Be sure you
have adequate fresh ventilation, including open windows and
doors. All vents must be opened when using fuel-based heaters
in your shelter.
• Do not use candles, matches or open ames of any kind in
or near an ice shelter.
• Do not cook inside the shelter.
• Exercise extreme caution when using fuel-powered
lanterns or heaters inside a tent. Use battery-operated
lanterns whenever possible.
• Do not refuel lamps, heaters or stoves inside a tent.
• If you are shing and falling asleep intermittently, turn o
all lanterns and heaters.
• Do not smoke in shelter.
• Do not store ammable liquids inside of the shelter
.
WARNING
READ, UNDERSTAND AND FOLLOW ALL ASSEMBLY,
SAFETY, SETUP & USE INSTRUCTIONS PROVIDED
BEFORE USE. FAILURE TO FOLLOW ALL WARNINGS
AND INSTRUCTIONS COULD RESULT IN SERIOUS IN
JURY OR DEATH.
DO NOT USE OPEN FLAME HEATERS IN YOUR ICE
SHELTER.
WARNING: KEEP ALL FLAME AND HEAT SOURCES AWAY
FROM THIS TENT FABRIC. THIS TENT IS MADE WITH FAB
RICTHAT MEETS CPAI84 SPECIFICATIONS FOR FLAME RE
SISTANCE. IT IS NOT FIRE PROOF. THE FABRIC WILL BURN
IF LEFT IN CONTINUOUS CONTACT WITH ANY FLAME
SOURCE.
DUE TO TRAFFIC ON LAKES, ICE FISHING CAN BE
HAZARDOUS AT NIGHT. IF YOU CHOOSE TO FISH AT
NIGHT OR IN CONDITIONS WITH POOR VISIBILITY, BE
SURE TO TAKE PRECAUTIONS.
NEVER LEAVE THE ICE SHELTER UNATTENDED.
SECURELY ANCHOR THE ICE SHELTER TO THE ICE IN
HIGH WIND CONDITIONS.

4
Operator's Manual
Cruzer M1 Flip-Style Sled Shelter
Visit us at: www.rapala.ca
www.facebook.com/rapalaarmy
4
ASSEMBLY INSTRUCTIONS
Tools needed – (2) 7/16” wrenches, a Phillips head screwdriver,
rubber mallet (optional), and a cordless drill (optional).
Assembly Note: This ice shelter should be assembled in a
garage or basement setting due to the time and length of
assembly. Identify and familiarize yourself with all parts and
hardware before assembly. Allow 1-3 hours for assembly.
Assembly Note:The use of a cordless drill with socket will
make assembly of your ice shelter much quicker. Be sure to
set the drill speed on low so you do not over tighten any nut
and bolt combination.
Assembly Note:If a tracking kit is purchased with the
shelter it should be mounted to the sled before assembly
of the ice shelter for convenience.
Important Assembly Tip: Do NOT fully tighten any nut and
bolt combination until instructed in later notes. This will
help hole alignment of all parts.
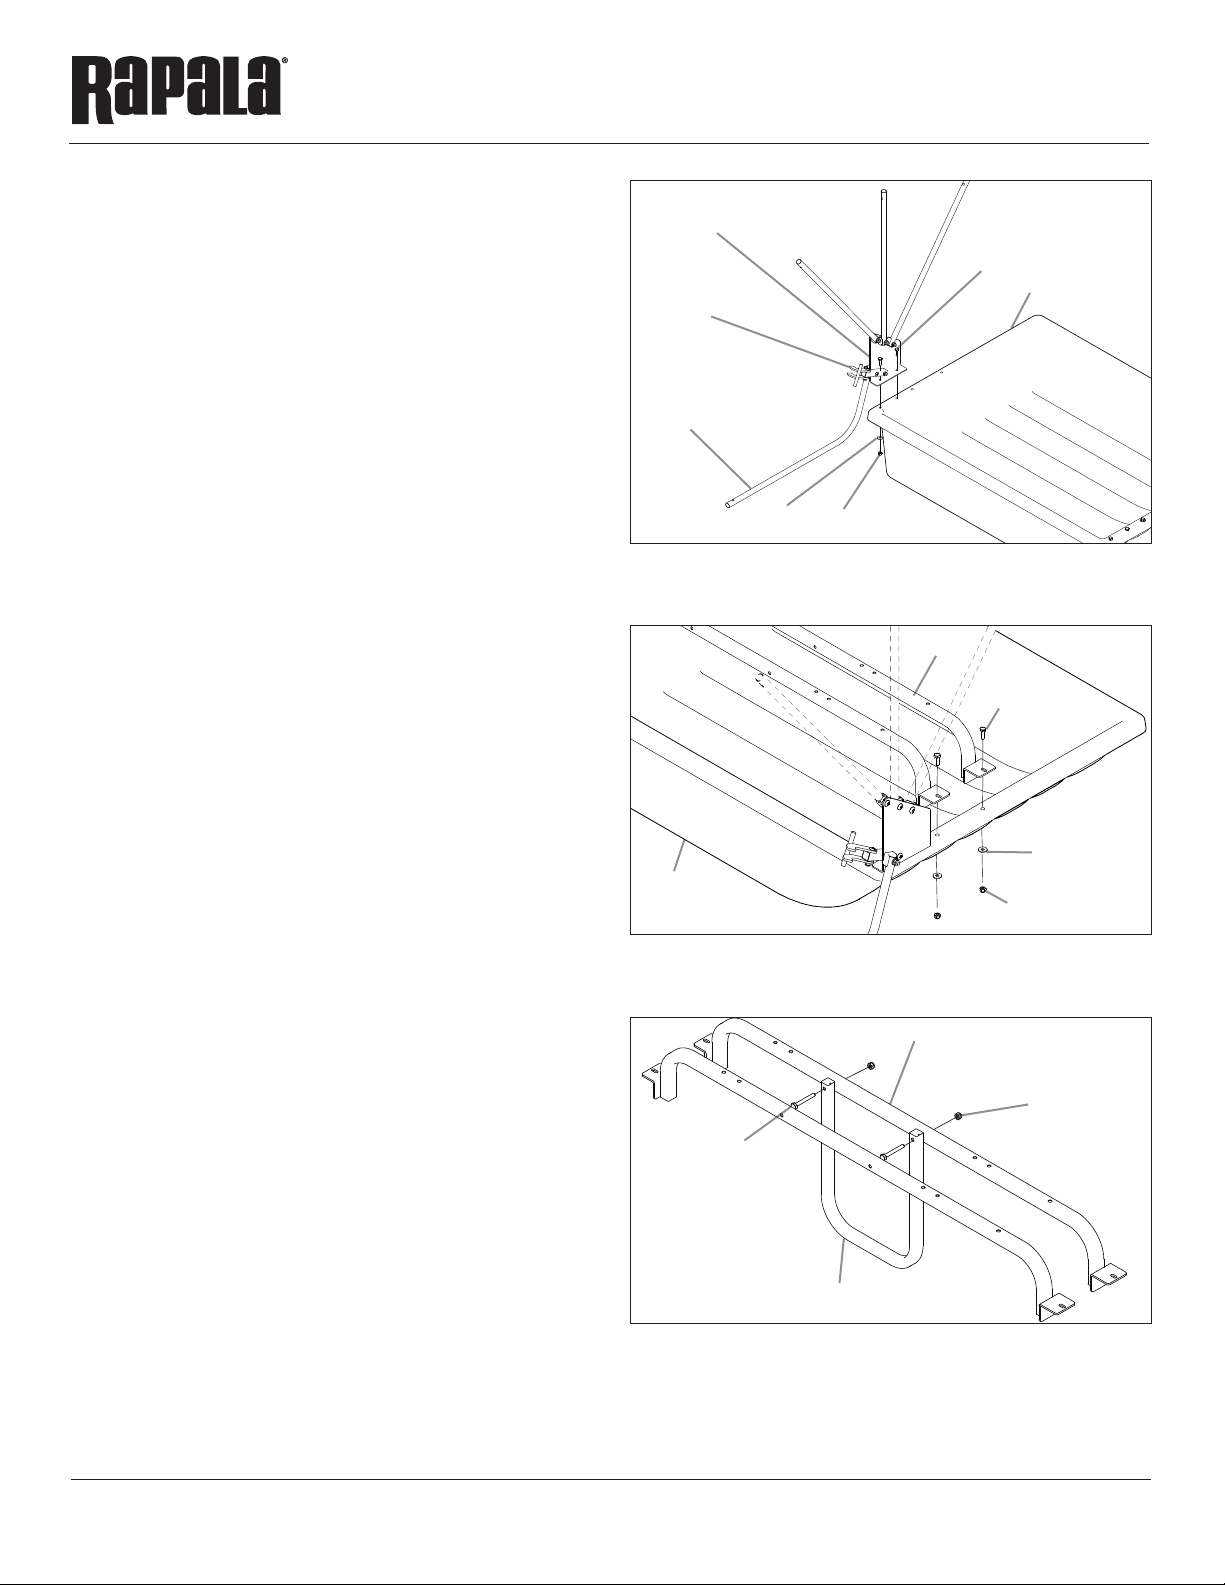
1. Attach the left hinge assembly (11180) to the sled using (2)
1/4-20 x 7/8”bolts, (2) 1/4-20 nyloc nuts and (2) 1/4”washers.
To make assembly easier, the two bolts that hold on the lock
block (11178) are loose; you will need to remove the lower
bolt and lift the lock block up. Insert the front hinge bolt and
return the lock block to the original position. Put the lower
bolt back through lock block and hinge plate and then tighten
the upper and lower lock block bolts. SEE FIGURE 1
Note: Do not over-tighten the upper lock block bolt. The
J-Pole (11187) needs to pivot on this bolt. You can also
tighten down the hinge bolts at this time.
2. Repeat step 1 on opposite side using right hinge assembly
(11182). SEE FIGURE 1
Note: Be sure the hinge assembly is on correctly with the
high side of the hinge placed towards the front of the sled.
3. Attach the chair support frame (11300) to the sled using
(2) 1/4-20 x 2” bolts, (2) 1/4-20 nyloc nuts and (4) 1/4”
washers. Repeat this step and use of the hardware for the
second chair support frame (11300). SEE FIGURE 2
4. Attach the chair vertical support (11305) to the back
chair support frame (11300) using (2) 1/4-20 x 2” bolts,
(2) 1/4-20 nyloc nuts, and (2) 1/4”washers. SEE FIGURE 3
nyloc nut
washer
1/4-20 x 7/8”bolt
left hinge assembly
lock block
J-pole
sled
chair support frame
washer
1/4-20 nyloc nut
1/4-20 x 2”bolt
sled
chair support frame
chair vertical support
1/4-20 x 2”bolt
1/4-20 nyloc nut
FIGURE 1: Left Side Shown
FIGURE 2: Right Side Shown
FIGURE 3

5Visit us at: www.rapala.ca
Operator's Manual
Cruzer M1 Flip-Style Sled Shelter
www.facebook.com/rapalaarmy
5. Attach chair back mount left (11312) to the chair support
frame (11300) using (2) 1/4-20 x 2”bolts, (2) 1/4-20 nyloc nuts
and (2) 1/4“ washers. SEE FIGURE 4
Note: To determine the chair back mount left (11312) from
the chair back mount right (11313) reference the welded
rod brace in the corner of the chair back mounts. When
assembled the rod brace will be to the outside of the seat
frame. SEE FIGURE 4
6. Repeat step 5 on the opposite side using right chair back
mount (11313). SEE FIGURE 4
7. Attach the chair back frame (11288) to both left and right
chair back mounts (11312) and (11313) using (2) 1/4-20 x 2”
bolts, (2) 1/4-20 nyloc nuts, (2) 1/4”washers and (2) 5/16”black
nylon washers. SEE FIGURE 4
Note: When assembling this step remember to place a nylon
washer between chair back frame and both left and right
chair back mounts.
8. Attach assembly table (11331) to both chair support
frames (11300) using (2) 1/4-20 x 1-1/4” bolts and (2)
1/4” washers. Locate the mounting holes for the table on
the support frames. From under the chair support insert
bolts up through the tubing to mount the table. The holes
in the table have threads that will allow the table to tighten
down to the frame. SEE FIGURE 5
9. Attach seat base (11303) and the assembly chair seat
cushion (11330) to both chair support frame (11300) using
(4) 1/4-20 x 2-1/4”bolts and (4) 1/4” washers. SEE FIGURE 5
Note: When assembling the seat base and seat cushion to
the chair support frame insert bolts from under the chair
support frames up through the tubing, seat base and into
the cushion. The holes in the seat base have threads that will
allow the seat base to tighten down to the frame.
10.Tighten all hardware used to complete this portion of
assembly instructions.
chair support
frame
chair vertical support
chair back
mount right
chair back support
washer
1/4-20 x 2”bolt
1/4-20 nyloc nut
chair back
mount left
chair back frame
chair support
frame
table
1/4-20 x 2-1/4”bolt
seat base
assembly chair
seat cushion
FIGURE 4
FIGURE 5
1/4-20 x 1-1/4”bolt
6
Operator's Manual
Cruzer M1 Flip-Style Sled Shelter
Visit us at: www.rapala.ca
www.facebook.com/rapalaarmy
FRAME SUPPORT POLE ASSEMBLY
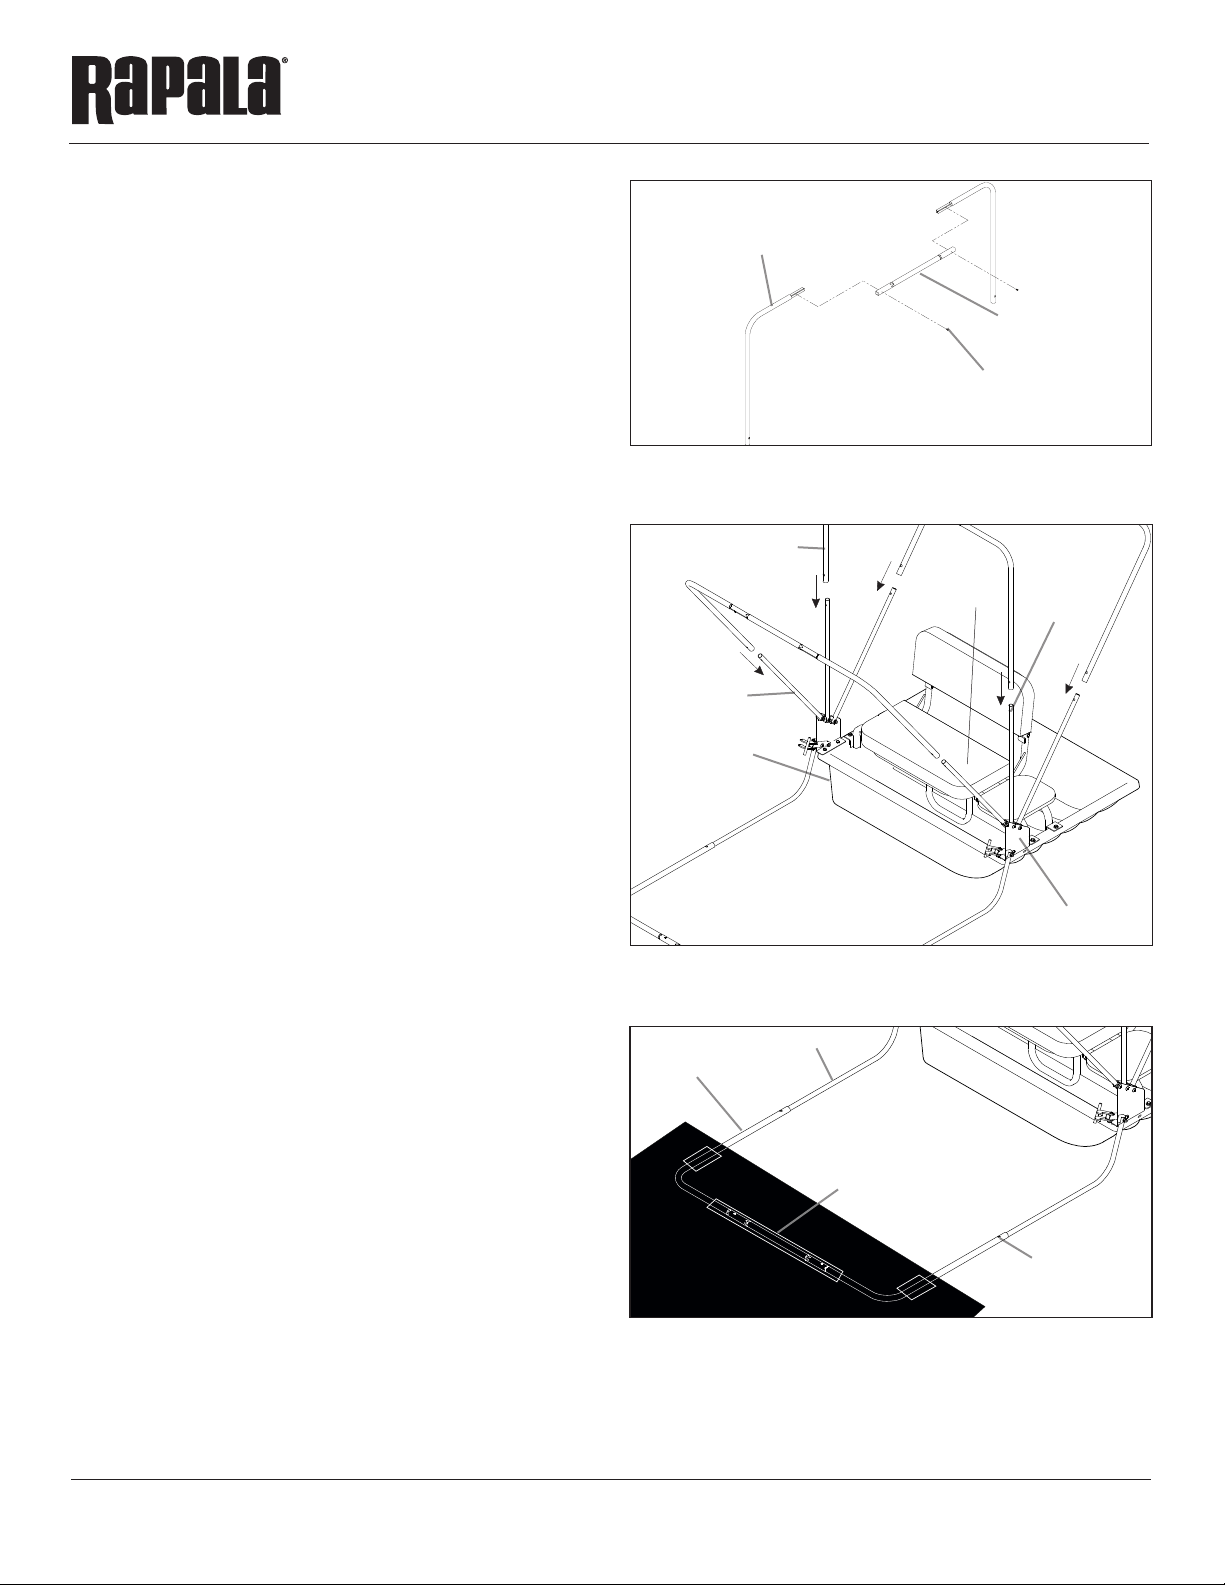
11.Start the assembly by locating (2) upper corner frame poles
(11239) and frame cross pole (11238). Insert swedged ends
of both upper corner frame poles into the frame cross
pole. Line up the screw holes provided in both parts and
fasten them together using (2) M4 x 18mm screws. Repeat this
step and use of hardware to assemble the other two upper
frame support poles. SEE FIGURE 6
Note: A cordless screw driver and Phillips head bit may be
helpful for this step.
12.Assemble the lower frame pole by locating the (2) lower corner
poles (11240) and frame cross pole (11238). Insert swedged
ends of the lower corner poles into the frame cross support
pole. Line up the screw holes provided and fasten them to-
gether using (2) M4 x 18mm screws.
Note: Make sure you have assembled the upper and
lower frame poles with the correct swedged corner poles.
Reference the identication stickers on the corner poles
when assembling.
FRAME SUPPORT POLE TO SLED ASSEMBLY
13.Insert the (3) hinge poles from each hinge into the (3) upper
frame support poles. Push the snap button inward to allow
upper frame support pole to slide over hinge poles and adjust
to their lowest height (transport position). SEE FIGURE 7
14.Unfold the skin and locate the Rapala® logo near the zippered
door, which is in the front of the sled. With the outer part of
the shelter skin laying face down locate the (3) fabric sleeves
on the ground in the bottom front, right side and left side of
the shelter. Slide the lower frame support pole through the
(3) fabric sleeves. SEE FIGURE 8
15.Insert a hinge J-Pole from each hinge into the lower cross
frame pole. Push the snap button inward to allow lower cross
frame pole to slide over hinge J-poles. Snap lower cross frame
pole into place for the in-use position. SEE FIGURE 8
snap button
fabric sleeve
sled
hinge assembly
snap button
corner frame pole
frame cross pole
M4 x 18mm screw
FIGURE 6
FIGURE 7
FIGURE 8
lower cross
frame pole
hinge J-pole
hinge poles
upper frame
support poles

7Visit us at: www.rapala.ca
Operator's Manual
Cruzer M1 Flip-Style Sled Shelter
www.facebook.com/rapalaarmy
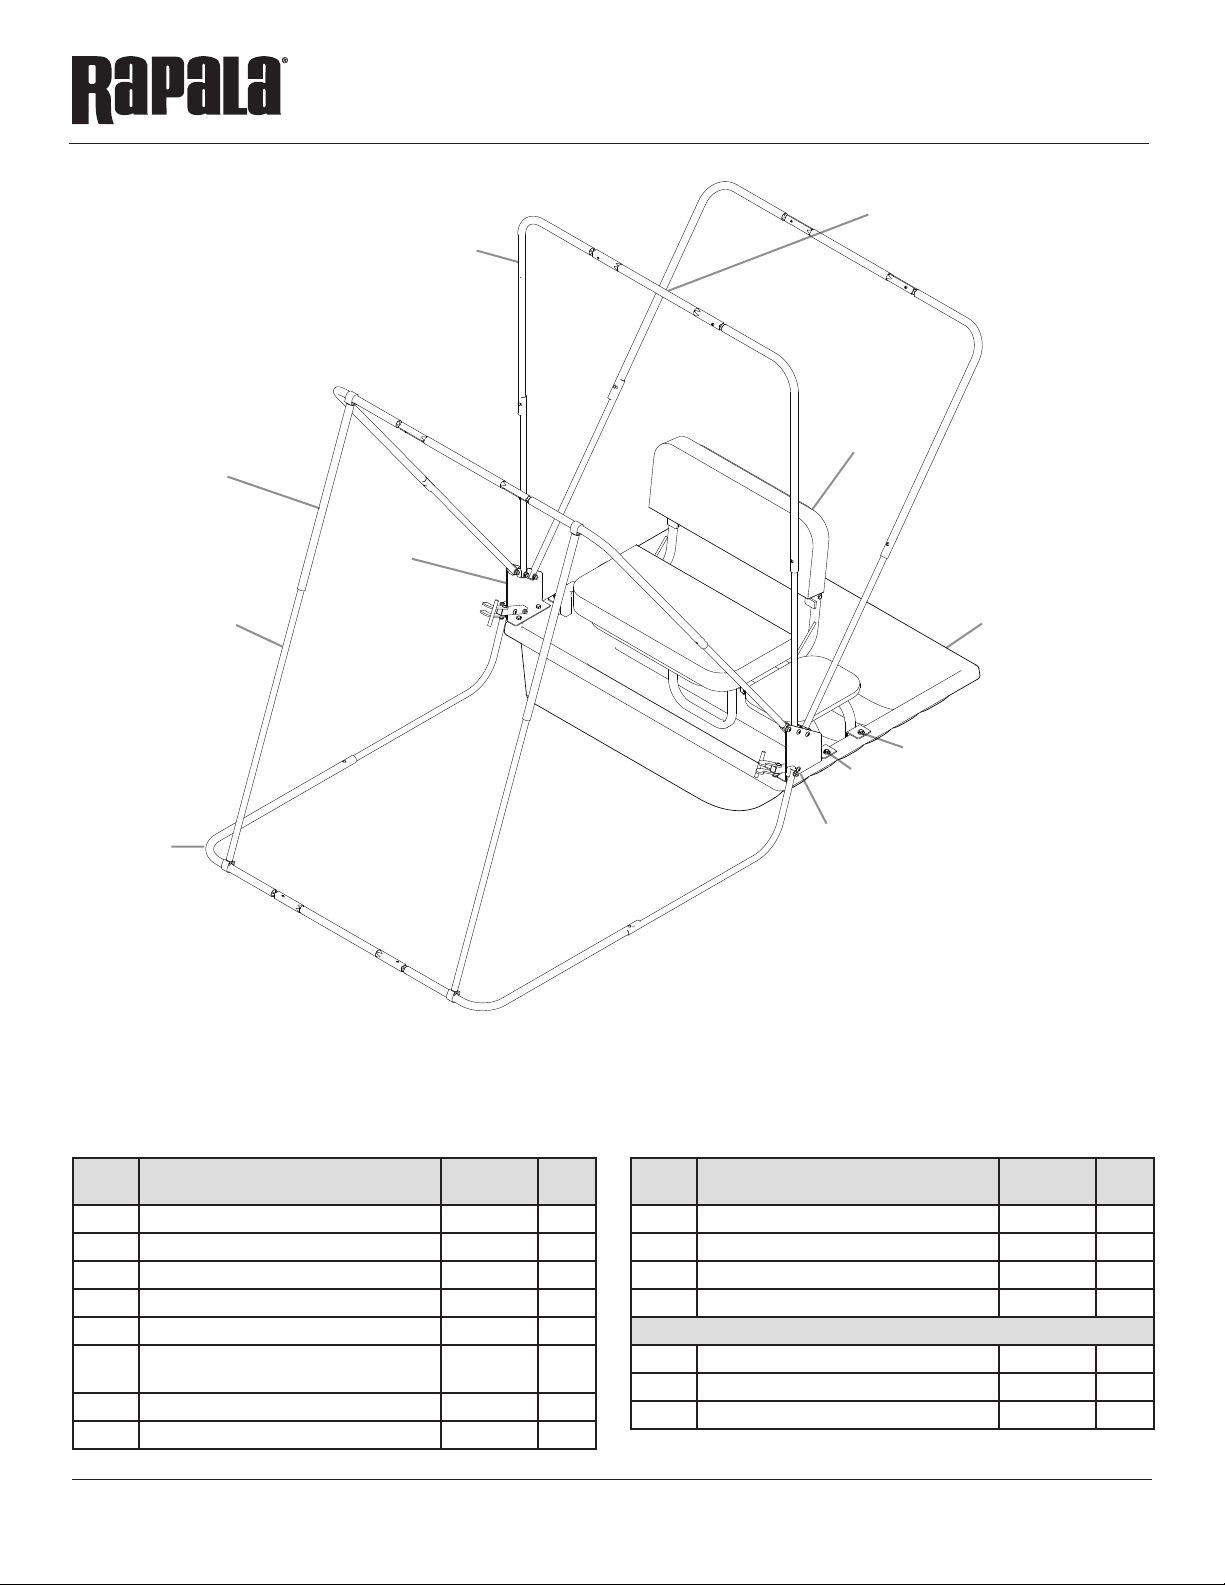
16.Assemble the two sets of door spreader poles by sliding male
half (69357) into female half (69356) and snapping in place
with snap button. These parts are required for up coming st
eps.
17.Install the door spreader poles between the lower frame
support and the front upper frame support. Extend the front
upper frame support and snap it into the in-use position.
Finish by locking the (2) spreader poles as far out to the
corners as possible. SEE FIGURE 9
18.Drape the shelter skin over the shelter sled and poles, posi-
tioning it the best you can. Unzip door and move to the inside
of the shelter, extend the remaining upper frame support to
the in-use position and lift the frame support poles one at a
time. Attach all the Velcro loops on the inside of the shelter
skin to the upper frame poles.
19.Go to the outside of the shelter and position the skin to the
upper frame poles of the shelter, aligning corners of the skin
to the corners of the pole frame.
20.Move to the back of the shelter and the center of the edge
trim (69654). Line it up with the center of the sled lip on the
back side of the shelter. Pull down on the skin evenly over the
sled lip until snug.
Note: When pulling skin tight, do NOT, lift the lower frame
pole o the ground. Make sure you have all the spreader
poles in place before applying edge trim to assure proper
tension to the skin fabric. Start in the middle of the edge trim
and work around the edges. Using a rubber mallet may be
helpful. SEE FIGURE 10
21.Secure edge trim in place using #6-3/8” sheet metal screws
provided. A cordless drill and Phillips bit may be helpful with
this step. SEE FIGURE 11
Note: Screws should be spaced evenly apart. This step does
mean you will put very small holes in your shelter skin to
keep the edge trim and skin securely attached to sled lip.
This will in no way aect the performance of your shelter.
22.Push ends of 8’tow rope through the holes in the front of the
sled and knot each end to secure. This tow rope is designed
for manual pulling by hand only. Do NOT tow behind a
motorized vehicle with rope. For high-speed towing, you
should purchase the Rapala® tow hitch accessory (12640).
Important Note: If purchasing a tow hitch for your Rapala®
ice shelter, it is highly recommended that you also purchase
a high-speed tracking kit (12597) to help extend the life of
your sled and to prevent unnecessary damage. Failure to
do so may result in your warranty becoming void.
spreader
pole
J-Pole
lower frame support
upper frame support
FIGURE 9
skin
sled
edge trim
#6 - 3/8”screw
FIGURE 11
skirt
edge trim
FIGURE 10
8
Operator's Manual
Cruzer M1 Flip-Style Sled Shelter
Visit us at: www.rapala.ca
www.facebook.com/rapalaarmy
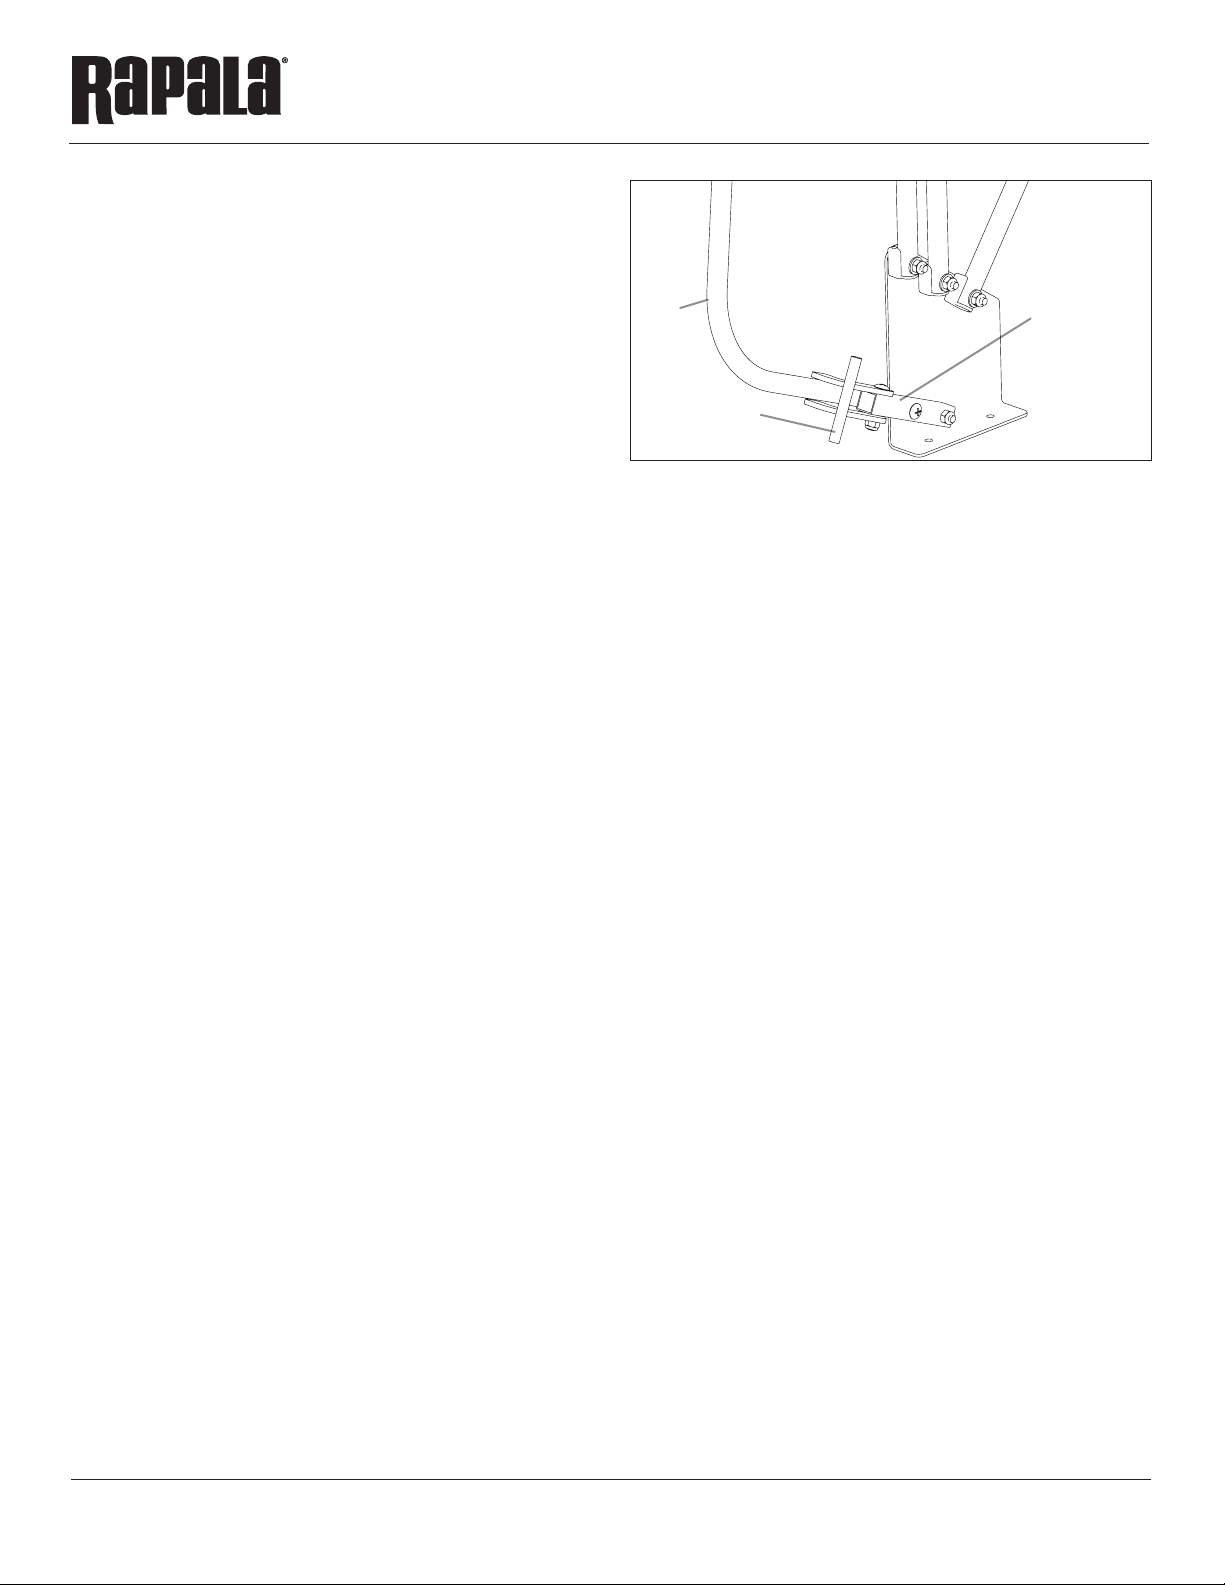
WIND BREAK POSITION
This shelter is equipped with a locking system that positions
the shelter to be used as a wind break on colder days. The wind
break lock pivots over onto the J-Pole as shown in FIGURE 11.
SETUP AND TAKEDOWN INSTRUCTIONS
SETUP: From the outside or inside of the shelter depending on
your preference, start with the bottom cross brace pole and
pull out all cross brace poles and snap into place. As you
extend out each cross brace pole and snap into place, ip
all cross braces over to the in use position. Secure all
spreader poles in between front cross brace poles by
snapping C-clips over cross brace poles.
TAKEDOWN: Close all window covers, vent covers and zip
door shut. Remove all spreader poles and place in bottom
of sled. Starting with the rear cross brace, push snap
buttons in and retract all cross brace poles to their shortest
length. Work from the rear cross brace to the front cross
brace that lies on the ground/ice. Flip all poles back. Use
extreme caution when ipping poles for transport
position and make sure no part of the skin gets pinched,
caught or stuck between any poles or in any pinch points.
Fold excess skin inside sled when complete.
Note: Use extreme caution so you don’t rip or tear any
portion of the skin, especially around the hinges or any
pinch point areas.
hinge assembly
wind break lock
J-pole
FIGURE 11
LONG-TERM STORAGE
• Always make sure your ice shelter is completely dry before
storing for long periods of time. Storing your ice shelter
when damp or wet may cause mold and mildew damage.
• Remove skin from ice shelter sled and poles.
• Clean all salt, moisture and debris from your shelter skin,
sled and poles. Wipe down poles with a wet rag.
Note: Lubricate the slide poles with a silicon spray at
least seasonally. Do not use oil or grease as a lubricant.
Note: Before attaching skin for use, spray silicon spray
inside of poles for ease of sliding.
• Store skin, poles an sled in a cool, dry place away from
rodents.
9Visit us at: www.rapala.ca
Operator's Manual
Cruzer M1 Flip-Style Sled Shelter
www.facebook.com/rapalaarmy
REF.
NO. DESCRIPTION PART NO. QT Y.
1SLED RAPALA ONE MAN FLIP STYLE 11314 1
2ASSEMBLY HINGE LEFT 11180 1
3ASSEMBLY HINGE RIGHT 11182 1
4ASSEMBLY CHAIR BASE 11306 1
5CORNER FRAME POLE LOWER 11240 2
6ASSEMBLY POLE SPREADER FEMALE
22.75
69356 2
7ASSEMBLY POLE SPREADER MALE 35.75 69357 2
8 BOLT 1/420 x 7/8”HHCS GR5 ZN 67541 8
REF.
NO. DESCRIPTION PART NO. QT Y.
9WASHER 1/4 IN FLAT ZN 48261 12
10 NUT 1/420 HNYLK ZN 67538 8
11 CORNER FRAME POLE UPPER 11239 6
12 FRAME CROSS POLE 11238 4
ITEMS BELOW NOT SHOWN
EDGE TRIM1/4 x 81.5 IN 11657 1
#6 x 3/8”PTH SCREW 69629 13
TOW ROPE 8 FT 67589 1
5
7
6
3
11
12
4
1
9
8
2
PARTSEXPLOSIONS
CRUZER M1
CRUZER M1 PARTS LIST
10
Operator's Manual
Cruzer M1 Flip-Style Sled Shelter
Visit us at: www.rapala.ca
www.facebook.com/rapalaarmy
REF.
NO. DESCRIPTION PART NO. QT Y.
1CHAIR SUPPORT FRAME 11300 2
2SEAT BASE 11303 1
3CHAIR VERTICAL SUPPORT 11305 1
4ASSEMBLY CHAIR SEAT CUSHION 11330 1
5ASSEMBLY TABLE 11331 1
6CHAIR BACK MOUNT RIGHT 11313 1
7CHAIR BACK MOUNT LEFT 11312 1
8ASSEMBLY CHAIR BACK SUPPORT 11290 1
9 BOLT 1/420 x 2 HHCS GR5 ZN 48153 8
10 BOLT 1/420 x 11/4 HHCS GR5 ZN 8909 4
11 BOLT 1/420 x 21/4 HHCS GR5 ZN 12503 4
12 NUT 1/420 HNYLK ZN 67538 8
13 WASHER 5/16 IN BLACK NYLON WN516 2
14 CHAIR BACK FRAME 11288 1
PARTS EXPLOSIONS
CRUZER M1 BENCH
CRUZER M1 BENCH PARTS LIST
2
1
8
10
11
7
3
5
9
6
4
9
12
14
13

11Visit us at: www.rapala.ca
Operator's Manual
Cruzer M1 Flip-Style Sled Shelter
www.facebook.com/rapalaarmy
ONE-YEAR LIMITED WARRANTY
Normark, Inc., warrants this Rapala®Ice Shelter under a one-year limited warranty to be free from defects in materials
or workmanship or both for a period not exceeding twelve consecutive months from the date of original purchase by
the rst retail consumer or commercial end user. “Consumer use”means personal recreational use by a retail consumer.
“Commercial use”or“commercial application”means all other uses, including use for commercial, income producing or
rental purposes. Once a product has experienced commercial use, it shall thereafter be considered as a commercial use
engine product for purposes of this warranty. This warranty does not cover cracked windows, tent tears, or bent poles
due to use in high wind, inclement weather conditions, unattended use or uses other than those listed in the owner’s
manual. This warranty applies to the original owner that provides a proof of purchase of the shelter. The warranty is
not transferable. The warranty period begins on the date of purchase by the rst retail consumer or commercial end
user, and continues for the twelve month consecutive period thereafter. Any unit used in a commercial application is
covered for a period of 90 days after purchase. For the warranty to be valid, the product must be registered online
at www.rapa.ca, or the warranty card must be lled out and received by Normark, Inc., within 30 days of purchase.
Ardisam, Inc. shall not be obligated to ship any repair or replacement product to any location outside of Canada or the
United States of America.
*This warranty applies only toproducts which havenot been subjected to negligent use, misuse, uses otherthan those indicated
in the product’s owner’s manual, alteration, accident, use of unauthorized parts, failure to perform periodic maintenance
as specied in product’s owner’s manual, normal wear and tear, use of unauthorized parts or repairs performed at non-
authorized service centers. There is no other expressed warranty. Implied warranties, including those of merchantability and
tness for a particular purpose, are limited to one year from purchase, or to the extent permitted by law. All other implied
warranties are excluded. Liability for incidental or consequential damages are excluded to the extent exclusion is permitted
by law. Normark, Inc. does not assume, and does not authorize any other person to assume for us, any liability in connection
with the sale of our products.
To obtain warranty service, you must have prior approval by calling our customer service department at 1-905-571-
3001. If you choose to ship your product to Normark for warranty repair, you must rst have prior approval from Normark
by calling our customer service department for a return material authorization number (RMA#). Under these circumstances,
all items must be shipped prepaid. Normark will at no charge, repair or replace, at their discretion, any defective part which
satises all conditions stated above. Normark retains the right to change models, specications and price without notice.
Normark, Inc. shall not be obligated to ship any repair or replacement product to any location outside of Canada or the
United States of America.
1350 Phillip Murray Ave.
Oshawa ON, Canada
L1J6Z9

All weights, specications and features are approximate and are
subject to change without notice. Due to continuous product
improvements, product images may not be exact. Items used
for props not included. Some assembly may be required.
Visit us at: www.rapala.ca
1350 Phillip Murray Ave.
Oshawa ON, Canada
L1J 6Z9

Manuel d’utilisation
Mode d’emploi original
CRUZER M1
Abri à bascule pour
traîneau
Visitez-nous au
www.rapala.ca
1350 Phillip Murray Ave.
Oshawa ON, Canada
L1J 6Z9
www.facebook.com/rapalaarmy
Trouvez-nous sur
CRUZER M1
RSS1

14
Manuel d’utilisation
Cruzer M1 Abris à bascule pour traîneau
Visitez-nous au: www.rapala.ca
www.facebook.com/rapalaarmy
INTRODUCTION
Normark vous remercie d’avoir acheté un abri Rapala® pour la pêche blanche. Nous vous assurons que cet abri répond à des
standards élevées de fonctionnalité et de durabilité. Avec de soins appropriés, votre abri vous orira plusieurs années de service.
Veuillez prendre le temps de lire attentivement ce manuel an que vous puissiez opérer et entretenir correctement votre abri. Nous
vous félicitons pour votre investissement dans la qualité. Normark se réserve le droit de modier les modèles les caractéristiques et
les prix sans préavis.
TABLE DES MATIÈRES
Enregistrement...............................................................................................................................................................................................................................................................2
Avertissements et mesures de sécurité.................................................................................................................................................................................................................3
Assemblage.................................................................................................................................................................................................................................................................4-7
Position brise-vent .......................................................................................................................................................................................................................................................8
Instructions pour montage et démontage .........................................................................................................................................................................................................8
Entreposage à long terme..........................................................................................................................................................................................................................................8
Liste de pièces ........................................................................................................................................................................................................................................................ 9-10
Garantie ......................................................................................................................................................................................................................................................................... 11
ENREGISTREMENT
Inscrivez le numéro de modèle et le numéro de série (si applicable) dans l’espace prévu pour pouvoir le consulter facilement.
Complétez et postez le formulaire d’inscription qui ce trouve dans l’emballage des pièces. La garantie est valable seulement
si la carte d’enregistrement est dûment remplie et reçue par Normark Inc. dans les 30 jours suivant l’achat.
RENSEIGNEMENTS SUR L’ACHAT
Lieu de l’achat:
Adresse du lieu de l’achat:
Ville: Province/État: Code Postale:
Numéro de modèle: Numéro de série (trouver à côté de l’autocollant d’avertissement):
Date d’achat:
Note:

15Visitez-nous au: www.rapala.ca
Manuel d’utilisation
Cruzer M1 Abris à bascule pour traîneau
www.facebook.com/rapalaarmy
PRÉCAUTIONS DE SÉCURITÉ IMPORTANTE
Cet abri est fabriqué en tissu étanche aux ammes qui satisfait
aux exigences d’inammabilité de la norme CPAI-84. Il n’est pas
ignifuge. Le tissu peut brûler s’il est laissé en contact continu
avec toute source de amme. L’application de toute substance
étrangère à la tente peut rendre ses propriétés ignifuges inef-
caces.
Les sources de chaleur à base de combustibles brûlent
l’oxygène et émettent du monoxyde de carbone. Le monoxyde
de carbone est un gaz mortel, incolore, insipide et inodore. Si
inhalé, le monoxyde de carbone peut causer des maux de tête,
de la somnolence, des nausées, étourdissements, confusion et
éventuellement la mort. Soyez prudent avec les appareils de
chauage. Soyez sûr que vous avez une ventilation adéquate
fraîche, y compris portes et fenêtres ouvertes. Tous les orices
d’aération doivent être ouverts lors de l’utilisation de carburant
à base de radiateurs dans votre abri.
• Ne jamais utiliser de chandelles, allumettes ou ammes
nues de quelque sorte que ce soit près de l’abri.
• Il est dangereux de faire de la cuisson à l’intérieur de l’abri.
• User de précautions extrêmes en utilisant des lanternes et
des chauerettes alimentées au carburant à l’intérieur d’un
abri. Utiliser de l’équipement alimenté par piles chaque fois
que c’est possible.
• Ne jamais recharger de lampes, chauerettes ou poêles à
l’intérieur de l’abri.
• Si vous pêchez et s’endort de façon intermittente, éteignez
toutes les lanternes et appareils de chauage.
• Éviter de fumer à l’intérieur de l’abri.
• Ne jamais ranger de liquides inammables à l’intérieur de
l’abri.
AVERTISSEMENT
VEUILLEZ LIRE, BIEN COMPRENDRE ET SUIVRE
TOUTES INSTRUCTIONS FOURNI CONCERNANT
L’ASSEMBLAGE, LA SÉCURITÉ, LE MONTAGE ET
MODE D’EMPLOI AVANT UTILISATION. LE FAIT DE
NE PAS RESPECTER TOUTES MISES EN GARDE ET
INSTRUCTIONS POURRAIT CAUSER DES BLESSURES
GRAVE OU MORTELLES.
NE JAMAIS UTILISER UN RÉCHAUD À FLAMME OUVERTE
À L’INTERIEUR DE VOTRE ABRI.
ATTENTION : GARDER TOUT FLAMME ET SOURCES DE
CHALEUR ÉLOIGNÉE DU TISSU DE L’ABRI. CET ABRI
EST FABRIQUÉ EN TISSU ÉTANCHE AUX FLAMMES QUI
SATISFAIT AUX EXIGENCES D’INFLAMMABILITÉ DE LA
NORME CPAI84. IL N’EST PAS IGNIFUGE. LE TISSU PEUT
BRÛLER S’IL EST LAISSÉ EN CONTACT CONTINU AVEC
TOUTE SOURCE DE FLAMME. L’APPLICATION DE TOUTE
SUBSTANCE ÉTRANGÈRE À LA TENTE PEUT RENDRE SES
PROPRIÉTÉS IGNIFUGES INEFFICACES
EN RAISON DE LA CIRCULATION SUR LES LACS, LA
PÊCHE BLANCHE PEUT ÊTRE DANGEREUSE LA NUIT.
SI VOUS CHOISISSEZ DE PÊCHER PENDANT LA NUIT
OU DANS DES CONDITIONS AVEC UNE MAUVAISE
VISIBILITÉ, ASSUREZVOUS DE PRENDRE DES
PRÉCAUTIONS.
NE JAMAIS LAISSER L’ABRI SANS SURVEILLANCE.
ANCRER SOLIDEMENT L’ABRI À LA GLACE DANS DES
CONDITIONS DE VENT ÉLEVÉES.
16
Manuel d’utilisation
Cruzer M1 Abris à bascule pour traîneau
Visitez-nous au: www.rapala.ca
www.facebook.com/rapalaarmy
INSTRUCTIONS POUR ASSEMBLAGE
Outils requis : (2) clés 7/16 po, un tournevis à tête Phillips, un
maillet en caoutchouc (facultative) et une perceuse sans fil
(facultative)..
Notez Bien:Cet abri doit être assemblé dans un garage
ou une cave en raison du temps requis pour l’assemblage.
Identifier et se familiariser avec toutes les pièces et la
quincaillerie avant le montage. Temps d’assemblage
approximatif : 1 à 3 heures.
Notez Bien:L’utilisation de perceuse sans fil avec une
douille fera l’assemblage de votre abri beaucoup plus
rapide. Mettre la perceuse à basse vitesse an de ne pas
trop serrer les écrous et les boulons.
Notez Bien:Si un ensemble de lames pour le traîneau a été
acheté, il est recommandé de l’installer avant l’assemblage
de l’abri.
Remarque Importante: Ne pas serrer les systèmes boulon-
écrou jusqu’à ce que toutes les parties boulonnées soient
assemblés! Serrer avec les doigts seulement! Cela aidera
l’alignement de tous les trous.
1. Fixer l’assemblage charnière gauche (11180) au traîneau à
l’aide de (2) boulon 1/4-20 x 7/8 po, (2) écrou nyloc 1/4-20 et
(2) rondelle ¼ po. Pour faciliter le montage, les deux boulons
qui maintiennent le bloc de verrouillage (11178) sont desser-
rés. Vous devez enlever le boulon inférieur et soulever le
bloc de verrouillage. Insérez le boulon de la charnière avant
et retourner le bloc de verrouillage à sa position originale.
Remettre le boulon inférieur à travers le bloc de verrouillage et
la plaque de charnière, ensuite serrer les boulons supérieurs et
inférieurs du bloc de verrouillage. VOIR ILLUSTRATION 1
Notez bien : Vous pouvez maintenant serrer les boulons de
la charnière.
2 Répétez l’étape 1 sur le côté opposé en utilisant l’assemblage
charnière droite (11182). VOIR ILLUSTRATION 1
Notez bien: S’assurer que l’assemblage à charnière est cor-
rectement positionné et le côté haut de la charnière est placé
à l’avant du traîneau.
3. Fixer le support transversal de chaise (11300) au traîneau en
utilisant (2) boulons 1/4-20 x 2 po, (2) écrous nyloc 1/4-20
et (4) rondelles ¼ po. Répétez cette étape pour le deuxième
support transversal de chaise (11300). VOIR ILLUSTRATION 2
4. Fixer le support vertical de chaise (11305) au support trans-
versal de chaise (11300) en utilisant (2) boulon 1/4-20 x 2
po, (2) écrou nyloc 1/4-20, (2) rondelle ¼ po. Boulonner le
support vertical de chaise à l’avant de la deuxième support
transversal de chaise. VOIR ILLUSTRATION 3
1/4-20 écrou nyloc
rondelle
boulon 1/4-20 x 7/8 po.
assemblage
charnière gauche
bloc de verrouillage
poteau“J”
traîneau
support transversal
de chaise
rondelle
1/4-20 écrou nyloc
boulon 1/4-20 x 2 po.
traîneau
support transversal de chaise
support vertical de chaise
boulon 1/4-20 x 2 po.
ILLUSTRATION 1 : Côté Gauche Illustré
ILLUSTRATION 2 : Côté Droite Illustré
ILLUSTRATION 3
1/4-20 écrou nyloc

17Visitez-nous au: www.rapala.ca
Manuel d’utilisation
Cruzer M1 Abris à bascule pour traîneau
www.facebook.com/rapalaarmy
5. Fixer la monture dossier gauche (11312) au support
transversal de chaise (11300) en utilisant (2) boulon 1/4-
20 x 2 po, (2) écrou nyloc 1/4-20, (2) rondelle ¼ po. VOIR
ILLUSTRATION 4
Notez Bien: Pour distinguer la diérence entre la monture du
dossier gauche (11312) et la monture dossier droite (11313),
référez-vous à la tige stabilisatrice soudée dans les coins
des montures du dossier de la chaise. Une fois assemblée,
la tige stabilisatrice sera à l’extérieur du cadre de la chaise.
VOIR ILLUSTRATION 4
6. Répéter l’étape 5 sur le côté opposé utilisant la monture
dossier de chaise droite (11313). VOIR ILLUSTRATION 4
7. Fixer le cadre dossier de la chaise (11288) à la monture
dossier de chaise gauche (11312) et la monture dossier de
chaise droite (11313), en utilisant (2) boulon 1/4-20 x 2 po.,
(2) écrou en nylon 1/2-20, (2) rondelle ¼ po. et (2) rondelle en
nylon 5/16 noir. VOIR ILLUSTRATION 4
Notez bien : Lors de l’assemblage n’oubliez pas de placer une
rondelle en nylon entre le cadre dossier et les montures du
dossier gauche et droite
8. Fixer la table (11331) aux (deux) supports transversaux de
chaise (11300) utilisant (2) boulon 1/4-20 x 1-1/4 po., (2)
rondelle ¼ po. Trouver les trous de xation de la table localisé
sur les supports transversaux. Insérer les boulons par le
dessous des supports transversaux à travers les tuyaux pour
xer la table en place. Les trous de la table sont enlés qui
permet la table aux supports. VOIR ILLUSTRATION 5
9. Fixer la base du siège (11303) et l’assemblage coussin du si
(11330) aux supports transversaux de chaise (11300) utilisant
(4) boulon 1/4-20 x 2-1/4 po, (4) rondelle 1/4 po. VOIR ILLUS-
TRATION 5
Notez Bien: Lors de l’assemblage de la base siège et cous-
sin du siège aux supports transversaux de chaise, insérer
les boulons par le dessous des supports transversaux, à
travers les tuyaux et la base du siège jusqu’à l’assemblage
coussin du siège. Les trous de la base du siège sont enlés
qui permettent de xer solidement la base du siège aux
supports.
10.Serrer toutes les pièces utilisées pour compléter cette partie
des instructions d’assemblage. VOIR ILLUSTRATION 6
support transversal de chaise
support vertical, chaise
monture du dossier de
chaise - gauche
dossier de
chaise
rondelle
boulon 1/4-20 x 2 po.
monture du dossier
de chaise - droite
cadre dossier de chaise
support
transversal
de chaise
boulon 1/4-20 x 1-1/4 po.
boulon 1/4-20 x 2-1/4 po.
base du
siège
assemblage coussin
du siège
ILLUSTRATION 4
1/4-20 écrou nyloc
table
ILLUSTRATION 5

18
Manuel d’utilisation
Cruzer M1 Abris à bascule pour traîneau
Visitez-nous au: www.rapala.ca
www.facebook.com/rapalaarmy
ASSEMBLAGE DE POTEAUX SUPPORT :
11. Commencer par trouver (2) poteau coudé supérieur (11239)
et (1) poteau transversal (11238). Joindre le bout serti des
poteaux coudé supérieur avec le poteau transversal. Aligner
les trous prévus sur les deux pièces et les xer à l’aide de (2)
vis M4 x 18mm. Répéter cette étape pour assembler les deux
autres poteaux support supérieur. VOIR ILLUSTRATION 6
Notez bien : Une perceuse sans l avec une mèche Phillips
peut être nécessaire.
12.Pour assembler le poteau support inférieur, trouver (2) pote-
aux coudé supérieur (11240) et poteau transversal (11238).
Insérez les bouts sertis des poteaux coudés inférieur dans le
poteau transversal. Aligner les trous de vis prévus et attacher-
les utilisant (2) vis M4 x 18mm.
Note: S’assurez que vous avez joindre correctement les
poteaux support supérieur et inférieur avec les poteaux
à bout sertis correspondants. Référer aux étiquettes
d’identication sur les poteaux coudés lors de l’assemblage.
ASSEMBLAGE DES POTEAUX À LA TRAÎNEAU:
13.Insérer les (3) poteaux vertical de chaque charnière dans les (3)
poteaux support supérieur. Pousser le bouton-pression vers
l’intérieur pour permettre que le poteau supérieur glisse sur
les poteaux de charnière et ajuster à la hauteur la plus basse
(position de transport). VOIR ILLUSTRATION 7
14.Déplier le tissu de l’abri et trouver le logo Rapala® à proximité
de l’ouverture à fermeture éclair, ce qui est le devant du
traîneau. Étendre le côté extérieur du tissu vers le sol et trouver
les (3) manches en tissus (au sol à l’avant), du côté droite et
du côté gauche de l’abri. Glisser le poteau inférieur à travers
les (3) manches en tissus. VOIR ILLUSTRATION 8
15.Insérer un poteau-J de chaque charnière dans le poteau
inférieur. Pousser le bouton-pression vers l’intérieur pour
permettre que le poteau transversal inférieur glisse sur les
poteaux-J. Enclencher le poteau transversal inférieur en
position d’utilisation. VOIR ILLUSTRATION 8
16.Assembler les deux ensembles de poteaux d’écartement en
glissant la partie mâle (69357) dans la partie femelle (69356)
et xer en place à l’aide du bouton-pression. Ces pièces sont
nécessaires pour suivre les prochaines étapes.
17.Allonger le poteau supérieur arrière et enclencher en
position d’utilisation. Installer le poteau d’écartement
arrière dans le trou pré-percé sur la lèvre arrière du traîneau.
Accrocher l’autre bout au poteau supérieur arrière. VOIR
ILLUSTRATION 9
poteau coudé
poteau transversal
vise M4 x 18mm
traîneau
assemblage
charnière
bouton-pression
ILLUSTRATION 6
ILLUSTRATION 7
ILLUSTRATION 8
bouton-pression
manches en tissu
poteau
transversal
inférieur
poteau charnière
’’J’’
poteau de
charnière
poteau support
supérieur

19Visitez-nous au: www.rapala.ca
Manuel d’utilisation
Cruzer M1 Abris à bascule pour traîneau
www.facebook.com/rapalaarmy
18.Faites passer le tissu au-dessus de l’abri et les poteaux et
positionner le mieux possible. Ouvrer la fermeture éclaire de
la porte et placez-vous à l’intérieur de l’abri. Allonger les (2)
derniers poteaux support supérieur et enclencher en place.
Maintenant installer les poteaux d’écartement. Prenez le
poteau d’écartement (68331) et accrocher un bout du poteau
d’écartement au poteau support supérieur arrière et accrocher
l’autre bout au milieu du poteau supérieur. Ensuite, accrocher
un bout du poteau d’écartement (60679) au milieu du poteau
supérieur et accrocher l’autre bout au poteau supérieur avant.
Les (2) poteaux d’écartement qui reste sont les poteaux pour la
porte. Accrocher un bout au poteau supérieur avant et l’autre
bout au poteau inférieur. Attacher toutes les boucles enVelcro
à l’intérieur du tissu de l’abri aux poteaux supérieur.
Notez bien : Placer les poteaux d’écartement de la porte près
des coins des poteaux inférieur.
19.Placez-vous à l’extérieur de l’abri et positionner le tissu aux
poteaux supérieur et aligner les coins du tissu avec les coins
des poteaux coudé.
20.Procéder vers l’arrière de l’abri et au centre de la moulure de
bord (69654). Aligner le tissu avec le centre de la lèvre du
traîneau à l’arrière de l’abri. Abaisser le tissu uniformément
sur la lèvre du traîneau jusqu’à ce qu’il soit bien en place.
Notez bien : Lorsque vous tirez le tissu, NE PAS serré jusqu’à
l’avant de l’abri soulève du sol. S’assurer que vous avez
tous les poteaux d’écartement en place avant d’appliquer
la moulure de bord pour assurer une tension approprié
du tissu. Commencer au centre de la moulure de bord et
travailler autour vers les rebords. Un maillet en caoutchouc
peut être utile. VOIR ILLUSTRATION 10
21.Fixer en place la moulure de bord en utilisant des vis à tôle #6-
3/8 po fournis. Une perceuse sans l avec une mèche Phillips
peut être utile pour cette étape. VOIR ILLUSTRATION 11
Notez bien : Les vis doivent être uniformément espacées.
Dans cette étape vous devez faire de petits trous dans le
tissu de votre abri pour maintenir la moulure de bord et le
tissu solidement xées au traîneau. Ceci n’aectera pas la
performance de votre abri.
22.Pousser les bouts du câble de traction 8 pieds à travers les
trous à l’avant du traîneau et bien attacher chaque bout avec
un nœud. Ce câble de traction est conçu pour tirer à la main
seulement. NE PAS remorquer avec un véhicule motorisé et un
câble. Pour remorquage à haute-vitesse, vous devez acheter
un attelage de remorque Rapala® (12640).
Note Importante : Si vous achetez un attelage de remorque
pour votre abri Rapala®, il est fortement recommandé que
vous achetez aussi un ensemble de lames haute-vitesse
(12597) pour augmentez la durée de vie de votre traîneau et
pour prévenir des dommages inutiles. La non-observation
de ces directives peut annuler la garantie.
poteau
d’écartement
poteau de
charnière“J”
poteau support inférieur
poteau support supérieur
ILLUSTRATION 9
tissu
traîneau
moulure de bord
vis #6 - 3/8 po
ILLUSTRATION 11
skirt
moulure de bord
ILLUSTRATION 10
JUPETTE

20
Manuel d’utilisation
Cruzer M1 Abris à bascule pour traîneau
Visitez-nous au: www.rapala.ca
www.facebook.com/rapalaarmy
POSITION BRISEVENT
Cet abri est équipe d’un système verrouillage qui le permet
d’être utiliser comme un brise-vent lors des journées plus
froides. Le verrouillage pivote au-dessus le poteau-J tel que
démontré à ILLUSTRATION 11.
INSTRUCTIONS POUR MONTAGE
ET DÉMONTAGE
MONTAGE: De l’extérieur ou de l’intérieur de l’abri, dépendant
votre préférence, commencer avec le poteau transversal
inférieur, ensuite retirer tous les poteaux transversaux et
enclencher-les en place. Lorsque que vous retirer chaque
poteau transversal pour le mettre en place, pivoter tous les
poteaux transversaux à la position d’utilisation. Fixer tous
les poteaux d’écartement entre tous les poteaux transver-
saux à l’aide des agrafes“C”.
DÉMONTAGE: Fermer toutes couvres-fenêtres, panneaux
aération et la fermeture éclaire de la porte. Enlever tous les
poteaux transversaux and placer-les au fond du traîneau.
En commençant avec le poteau transversal arrière, pousser
les boutons-pression vers l’intérieur et rétracter tous les
poteaux transversaux à leur longueur minimale. Travailler
à partir du poteau transversal arrière jusqu’au poteau
transversal avant qui est déposé sur la sol/glace. Pivoter
tous les poteaux vers l’arrière. Soyez extrêmement
prudents lorsque vous pivoter les poteaux pour la
position du transport and s’assurer que le tissu n’est pas
tordu, resté pris ou coller entre les poteaux ou dans les
pointes de pincement. Une fois terminée, plié le tissu en
excès dan le traîneau.
Notez Bien : Soyez extrêmement prudents pour empêcher
que vous déchirer le tissu, spécialement autour des
charnières ou des pointes de pincement.
ENTREPOSAGE À LONG TERMES
• Assurez-vous que votre abri pour pêche blanche est com-
plètement sec avant de l’entreposé à long termes. An
d’éviter l’apparition de moisissures, s’assurer que votre abri
n’est pas humide ou mouillé lors que vous l’entreposer.
• Enlever le tissu du traîneau et les poteaux.
• Enlever le sel, l’humidité et les débris du tissu de votre abri,
traîneau et poteaux. Essuyer les poteaux avec un linge
mouillé.
Notez Bien : Lubrier les poteaux glissants avec un
spray silicone au moins chaque saison. Ne pas utiliser
de l’huile ou graisse comme lubriant.
Notez Bien : Avant d’installer le tissu, appliquer du
spray silicone à l’intérieur des poteaux pour faciliter le
glissement.
• Ranger le tissu de l’abri, les poteaux et le traîneau dans un
endroit frais et sec et loin des rongeurs.
assemblage de
charnière
verrouillage brise-vent
poteau de charnière ’’J’’
ILLUSTRATION 11
This manual suits for next models
1
Table of contents
Languages:


