North Edge Smart bracelet User manual
Instrucon for Smart bracelet


1
ENGLISH———————————————2
РУССКИЙ ——————————————8
ESPAÑOL ——————————————16
FRANÇAIS——————————————23
IN ITALIANO—————————————30
日本語————————————————37
DEUTSCH ——————————————43
中文—————————————————49
CONTENTS
2
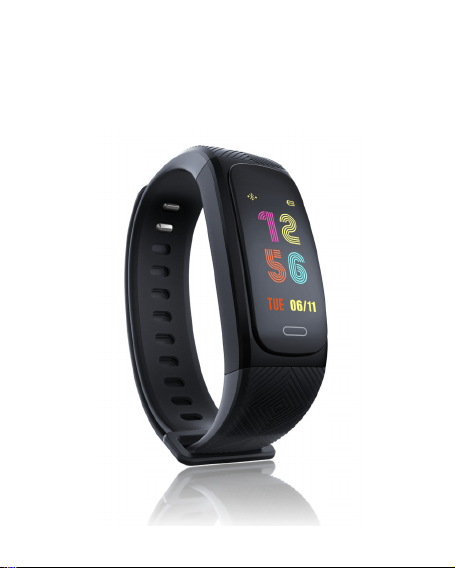
Thanks for selecting the health watch from our company,
please be sure to read the instrction manual carefully before
using.In-Proper operations will cause measurement accuracy
problems and less comfortable experience,After you received
the product,please turn on to check if it has power, or you will
need to have it on charged.
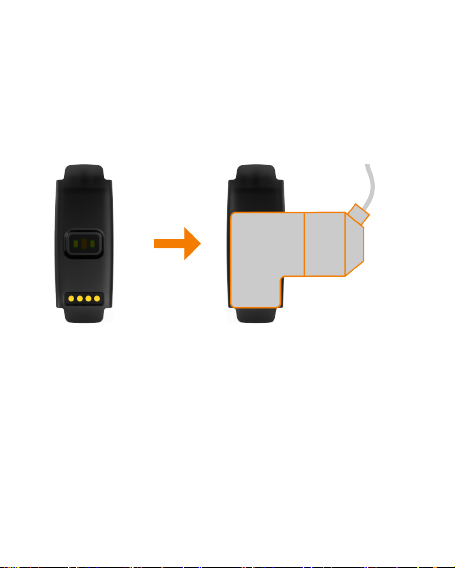
Instruction photos by using charing clamp as blew:
Note:
1. Before charging,please dry the charging port, so as to avoid
short circuit or other risks as a result of dirty or wet metal
contacts.
2. The charging clip caught on the host of the smart bracelet
during the charging,the palping foot on the charing lip align to
the palping foot on the main body untill the charge icon
display on the brascelet Short press the touch area to light the
brascelet,long press the touch area to enter the dial style
setting function, click to switch the style, long press to confirm
setting.
3. The brascelet supply for raise to wake function.

3
Key functions
touch area button:1、short press to select;
2、long press to confirm or return and turn
on or shutdown the brascelet.
APP&PAIRING
1. Scan the QR code with your mobile
phone or go to the App Store to search
for”Uwear” to download and install the
APP.
2. Chose the ‘bluetooth’ function to enter
and check the brascelet name ‘UW XX XX’.
3.Run the APP. After registration, click ‘Connect Device’in
the ’MY’ interface.Find the brascelet name in the device list
and click to pair. After pairing,”Connected” appears on the
right of the “Connect Device”.
Note:mobile phone requirements:Iphone5 with IOS8.0 or
above; Android 4.4(factory setting)or above OS.
Main interface
As shown in the figure,it is the main interface of
the bracelet.The interface displays the bluetooth
connection status,battery capacity information,
time and date contents.Long press buttons 3S to
start selection of clock page.Click the key to
select, then long press key 3S and it will be
setting successfully.
Note:You can have a setting of alarm、dial

4
style、alert heart rate in the mobile phone APP after
connecting the brascelet.
My day
As shown in the figure,it is My day interface of
the bracelet.It records daily number of steps、
sleep-time、calorie consumption and heart rate
value. This interface is refreshed every minute.
You can also check the data of My day after
connecting the brascelet.
Note:Without setting of sleep-time,it
recognites sleep status automaticlly and records
times.
Stopwatch
As shown in the figure,it is Stopwatch interface
of the bracelet.Long press button 3S to enter
function.Click the key to start record,and click
the key again to create a time record. It can
totally created 5 time records. Long press button
3S to end record and exit the function. Enter the
function again to check the record and click
button to restart a new recording.
Heart rate
As shown in the figure,it is heart rate
interface of the bracelet.Long press button 3S to
enter function and start to detect.The heart rate
value indicates in this interface. Tip: the
brascelet automatically detects your heart rate
every half an hour.

5
Bluetooth
As shown in the figure,it is bluetooth
interface of the bracelet.Long press button 3S to
enter function and check the device name and
version information.
GPS
As shown in the figure,it is GPS
interface of the bracelet. Long press button 3S to
enter function and check the value of
latitude,longitude and altitude.
Weather
As shown in the figure,it is weather
interface of the bracelet. Long press button 3S to
enter function and Check the weather
information. In the current interface,click the key
once to check the weather for the next day; and
click the key twice to check the weather for the
third day.

6
Messages
When the brascelet connected to the phone,turn
on the message function,the brascelet can
receive text messages, telephone,WeChat and
other three way instant messaging push and tips.
Tips:Smart brascelet need to connect with
phone, and in the phone app-open the prompts
swithch in “setting”->”push application
selection”.
Sport
Enter the Sport function,there are six sports
to supply :Running,Riding, Treadmill,
Hiking,Mountaineering,Skiing.
Operation in the sport mode:
1. After enter one of the sport,the GPS
postioning interface will appear.The brascelet
will start postioning(if positioning fails after 10
minutes, it automatically returns back ) Sport
without GPS postioning function, it directly starts.
2. When the postioning finished,an interface will appears to
indicate the postioning succeeded.Click the key to start the
sport.
3. Long press the key to end the sport.
4. Check the sport history: choose the sport function and long
press key to enter function, choose “history” long press key to
enter and select a record to have a check.Long press key
return back to the main interface. Sport details can be viewed

7
in the mobile phone APP after connecting the brascelet.
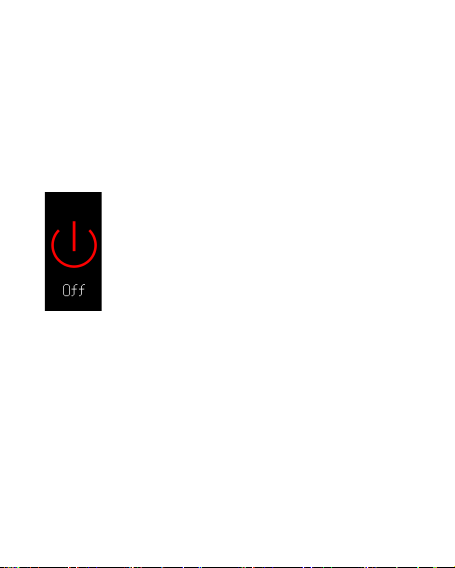
Shutdown interface
In shutdown interface ,long press key 3S to
turn on the brascelet. When the brascelet is
turned on, long press key 3S to turn off it.
Precautions
1. The APP compatibility with different mobile
phone models may be different. In case of a
connection problem in the use, restart your
phone or re-download and re-install the APP.
2. When the watch is connected with your
mobile phone APP, the APP will prompt
"whether to update to the latest firmware" in
case there is an updated watch firmware. You
may click to confirm the update and the watch will
automatically upgrade the firmware. During firmware
upgrading, ensure that your watch is near to your phone and
it is better when they are put together. Make sure the battery
level of your watch has at least two bars, in order to avoid
upgrading error. When there is a new firmware version, users
may also click "firmware upgrade" in the "My" menu of the
APP for upgrading.
3. You cannot have a bath with it.(The temperature should be
under 35°C)
Android mobile phone system memory management
will be forced to turn off the backgroud APP,you need to
turn off the power saving mode or pull the APP into the
system housekeeping green backgroud inside, APP will not be
forced to chose. APP must be running in the
background,bluetooth will not automatically disconnected.

8
Благодарим вас за приобретение нашего умного
здорового браслета. При первом использовании этого
устройства внимательно прочитайте руководство, чтобы
избежать неправильной эксплуатации, влияющей на
точность измерений и хороший опыт. Когда вы получаете
этот продукт, сначала нажмите и удерживайте сенсорную
кнопку в течение 3 секунды, чтобы включить его. Если у
устройства закончился заряд, зарядите устройство.
Зарядник и зарядный способ устройства приведен ниже:
Внимание:
1. Вытрите гнездо зарядки перед зарядкой, чтобы
избежать загрязнения металлических контактов,
короткого замыкания или других рисков, вызванных
попаданием воды. 2. При зарядке зарядный зажим
закрепляется на корпусе браслета, а щупальца зарядного
зажима совмещен с контактом основного корпуса
браслета до тех пор, пока значок питания главного
интерфейса батареи не будет заряжен. 3. Данный браслет

9
поддерживает функцию для того, чтобы поднимать руку,
чтбы зажечь экран.
Функция кнопки
Сенсорная клавиша: 1. короткое касание означает
прокрутка страницы;
2. Длинное касание - подтверждение
и возврат (включение/выключение).
APP(приложение) & спаривание
1. Мобильный телефон сканирует QR-код на
вышеуказанное или ищет приложение
«UWEAR» в App store (магазине
приложений) для загрузки и установки
приложения.
2.Выберите функцию bluetooth(блютус)
в браслете, чтобы войти в меню,
просмотреть и отметить название устройства «UW XX XX».
3.Откройте приложение, после регистрации нажмите
«соединительное устройство» в интерфейсе «Мой».
Найдите «устройство браслета» в списке устройств и
нажмите, чтобы соединить. После спаривания на
соединительном устройстве появится сообщение
«Подключено».
Внимание: Требования к мобильному телефону: система
IOS8.0 и выше; тип телефона: iphone 5 или выше; система
Android 4.4 (заводская настройка) и выше.Главный

10
интерфейс Как показано на изображении, главный
интерфейс циферблата браслета отображает
состояние соединения Bluetooth(блютус),
информацию о мощности батареи, время и
дату. В этом интерфейсе нажмите и
удерживайте сенсорную кнопку в течение 3
секунд, чтобы начать выбор страницы с
часами. Коротко нажмите сенсорную кнопку,
чтобы перевернуть страницу. После выбора
и долгого нажатия сенсорной кнопки в течение 3 секунд
настройка будет успешной.
Напоминание: в приложении можно установить
будильник, стиль циферблата и частоту сердцебиений.
Мой день
Как показано на изображении, интерфейс
«Моего Дня» записывает количество шагов в
день, время сна, калории и частоту сердцебиений.
Данные обновляются каждую минуту, а «Мой
день» также можно просмотреть в мобильном
приложении после подключения браслета.
Напоминание: Запись сна не требует никаких
настроек, состояние сна автоматически
распознается ночью и рассчитывается время сна.

11
Секундомер Как показано на изображении, это
интерфейс секундомера для браслета.
Нажмите и удерживайте сенсорную кнопку в
течение 3 секунды, чтобы войти в функцию.
Коротко нажмите сенсорную кнопку, чтобы
начать отсчет времени. Нажмите сенсорную
кнопку еще раз, чтобы создать запись
времени, можно создать всего 5 записей
времени. Нажмите и удерживайте
сенсорную кнопку в течение 3 секунды,
чтобы закончить отсчет времени и выйти из функции
секундомера. Когда вы просматриваете запись, вам нужно
повторно ввести функцию секундомера, чтобы
просмотреть запись. В этом интерфейсе коротко нажмите
сенсорную кнопку, чтобы начать новый раунд отсчета
времени.
ЧСС Как показано на изображеии, это
интерфейс частоты сердцебиений браслета.
Нажмите и удерживайте сенсорную кнопку в
течение 3 секунды, чтобы войти в функцию и
начать тест. Напоминание: Браслет
автоматически определяет частоту
сердцебиений каждые полчаса.

12
Bluetooth
Как показано на изображении, это
Bluetooth-интерфейс браслета. Вы можете
ввести функцию для просмотра имени
устройства и информации о версии.
GPS
Как показано на изображении, это
интерфейс GPS браслета, к которому можно
ввести фукцию, чтобы просмотреть долготу,
широту и высоту.
Погода
Как показано на изображении, это погодный
интерфейс браслета. Нажмите и удерживайте
сенсорную кнопку в течение 3 секунды,
чтобы войти в функцию и просмотреть
информацию о погоде. В текущем погодном
интерфейсе коротко нажмите сенсорную
кнопку один раз, чтобы просмотреть
информацию о погоде во второй день,
коротко нажмите сенсорную кнопку еще раз,
чтобы просмотреть информацию о погоде на третий день.

13
Информация
После того, как браслет подключен к
мобильному телефону, функция
push-сообщения активирована, и браслет
получит продвигание и напоминание от
сторонних сообщений, таких как короткие
сообщения мобильного телефона, телефоны
и вичат.
Напоминание: Вам нужно открыть
«Настройку» -> «Выбор программного
обеспечения» на стороне мобильного приложения, когда
телефон подключен к телефону.
Спортивный режим
Вступая в спортивный режим, есть 6 видов спорта:
бег, езда на велосипеде, походы, скалолазание,
беговые дорожки и лыжи.
Эксплуатация спортивного режима:
1.После входа в спорт появится интерфейс
позиционирования GPS. Часы будут
позиционировать(если он не позиционировает
более 10 минут, он автоматически вернется в
список спорта), и спорт без
GPS-позиционирования автоматически запустит
спорт.2. Когда позиционирование будет
завершено, интерфейс отобразит успешное
позиционирование, коротко нажмите сенсорную
кнопку, чтобы открыть запись спорта.3. Нажмите
и удерживайте сенсорную кнопку, чтобы
закочить спорт.
14
4. Просмотрите запись спорта: выберите спортивный режим и
нажмите и удерживайте сенсорную кнопку, чтобы войти в
функцию. Выберите «История» и нажмите сенсорную кнопку,
чтобы войти в историю; коротко нажмите кнопку, чтобы
выбрать одну запись для просмотра. Нажмите и удерживайте
сенсорную кнопку, чтобы выйти и вернуться к интерфейсу
циферблата. Детали спорта должны быть синхронизированы с
приложением для просмотра.
Интерфейс выключения
Долго нажмите сенсорную кнопку в течение
3 секунд в этом интерфейсе – выключение. В
выключенном состоянии нажмите и
удерживайте кнопку в течение 3 секунды –
включение.

15
Особые положения
1. Совместимость различных моделей мобильных телефонов и
приложений несовместима. Если во время использования возникает
проблема с подключением, перезагрузите телефон или повторно
загрузите установку приложения.
2. Когда браслет и приложение мобильного телефона подключены,
когда обновляется прошивка браслета, приложение выведет запрос
«Будет ли обновляться до последней прошивки». После того, как
пользователь нажимает «ОК», браслет автоматически обновит
прошивку. Убедитесь, что расстояние между мобильным телефоном и
браслетом близкое и браслет имеет минимум две сетки, чтобы
избежать ошибки обновления. Если есть новая версия прошивки,
пользователь может также щелкнуть «Обновление прошивки» в
приложении «Мой» для выполнения операции обновления
прошивки.
3. Не рекомендуется носить при ванне. (Температура не может
превышать 35 ° C)
4. Управление системной памятью телефона Android принудительно
отключит фоновые приложения. Вам нужно отключить режим Ультра
или потянуть приложение на зеленый фон экономкинга. Приложение
не будет принудительно закрыт. Приложение должен работать в
фоновом режиме, и Bluetooth не будет автоматически отключен.

16
Muchas gracias por comprar nuestra pulsera inteligente de
actividad. Lea por favor detenidamente este manual antes de
su primer uso para evitar una operación incorrecta que
afectará la precisión de la medición y su experiencia con el
producto. Después de recibir el producto, primero presione y
mantenga presionado el botón táctil durante 3 segundos para
encenderlo. Si el producto no tiene energía, cargue primero el
producto. El método de carga es como lo que se muestra en el
dibujo:
Advertencia:
1. Limpie primero el puerto antes de cargar para evitar que
riesgos como cortocircuitos causados por las suciedades de
los puntos de contacto metálicos, o por la entrada de agua. 2.
Al cargar, mantenga el clip de carga sujetado al cuerpo de la
pulsera, y fije bien los puntos de tacto del clip con puntos de
contacto del dispositivo hasta que el icono de batería en la
pantalla principal de la pulsera demuestre un estado de carga.
3. Esta pulsera tiene la función de levantar para reactivar la
pantalla.

17
Funciones de los Botones
Botón táctil: 1. Un toque rápido es para deslizar; 2. Un toque
largo es para confirmar y volver (encender o apagar el
dispositivo).
Aplicación&Emparejamiento
1. Escanee con el teléfono móvil el código QR o busque en
App Store la aplicación "UWEAR" para descargar e instalarla.
2.Seleccione la función Bluetooth de la pulsera y entre en el
menú para ver y anotar el nombre del dispositivo "UW XX XX".
3.Abre la aplicación para registrarse, seleccione “Conectar
con el dispositivo” en la pantalla “Mío”, y busque en el
listado de los dispositivos el nombre de su pulsera para
emparejarse. Después del emparejamiento, va a aparecer una
indicación de “Conectado”.
Nota:requisitos para los teléfonos móviles: IOS8.0 o sistemas
superiores, Iphone 5 o modelos superiores; Android 4.4
(configuración de fábrica) o sistemas superiores.
Pantalla Principal
Lo que demostrado en la figura es la pantalla
principal de la pulsera, en ella se muestran el
estado de la conexión Bluetooth, información
de la batería, el tiempo y la fecha. En esta
pantalla, mantenga presionado el botón táctil
durante 3 segundos para comenzar a
seleccionar la página del reloj. Toque
brevemente el botón táctil para pasar a otras
pantallas. Después de su selección,mantenga
presionado el botón táctil durante 3 segundos, la
configuración se realizará correctamente.

18
Nota: el reloj de alarma, el estilo de la esfera, la frecuencia
cardíaca con alerta se pueden configurar directamente en la
aplicación.
Mi día
Como se muestra en la figura, la pantalla de
“Mi día” tiene registrados el número de los
pasos del día, el tiempo de sueño, las calorías y
la frecuencia cardíaca. Los datos se actualizan
cada minuto y las informaciones de la pantalla
de "Mi día" también se puede ver en la
aplicación del móvil después de ser conectado
con la pulsera.
Nota: la función de registro de sueño no se
necesita configurar, puede reconocer automáticamente el
estado de sueño durante la noche y calcular el tiempo de su
sueño.
Cronómetro
Lo que demostrado en la figura es la pantalla
del cronómetro de la pulsera.Presione y
mantenga presionado el botón táctil por 3
segundos para activar la función,presione el
botón táctil brevemente para comenzar a
cronometrar, y toque otra vez el botón táctil
brevemente para crear un registro de tiempo,se
pueden crear un total de 5 registros de tiempo.
Mantenga presionado el botón táctil durante 3
segundos para desactivar la función de cronómetro. Para ver
los registros de tiempo, se necesita volver a activar la de
función de cronómetro. En esta pantalla, toque brevemente el
botón táctil para comenzar nuevamente los cronometrajes.
Table of contents
Languages:
Other North Edge Pedometer manuals


