North Shore Racks NSR-6 Series User manual

RACK ASSEMBLY (See RACK ASSEMBLY VIDEOS on our website)
www.northshoreracks.com North Vancouver, British Columbia North Shore Racks Inc.
Congratulations on the purchase of your North Shore Racks NSR-2, NSR-4 and NSR-6 series bike rack. The rack designed by mountain bikers for mountain
bikers. Your rack is intended to be used with mountain bikes as there needs to be sufficient room around the crown of the fork for the rack to fit. Road bikes
generally do not have enough clearance in this area. Almost all suspension forks are compatible. This manual covers the NSR series of racks and as such the
illustrations are for all three. Once you've assembled your rack and used it a few times you'll quickly appreciate just how easy it is to use and how neatly it carries
mountain bikes. Please read all instructions carefully.
STEP 1 Insert the zinc plated Hitch Tube into a vehicle hitch and secure with the Anti-Slop device as shown in Figure 1.
Note: 1 1/4” receiver models have an integrated anti-slop device. Secure the hitch bolt tightly. (75 ftlbs for
2” models and 65 ftlbs for 1 1/4” models)
NSR-2, NSR-4 AND NSR-6 SERIES
STEP 2 Assemble the Lower Pivot Assembly as per Figures 2 and 2A. Tighten the two Locknuts/Hex Bolts to the
hitch tube tightly (about 40-70 ftlbs). Do not use washers on the NSR-6. Notes: 1) Use the forward most setting
here for almost all vehicles. 2) Apply grease to the mating surface between the Hitch Tube and the Base
as shown.
STEP 3 Attach the Lower Mast to the Lower Pivot Assembly as shown in Figure 2A. Notes: 1) Apply grease
thoroughly to the pivot area as shown. 2) Use the second hole from the bottom of the Lower Mast for most
vehicles and tighten the Locknut/Hex Bolt snugly (about 20-40 ftlbs) allowing for the rack to pivot. Do not
use washers on NSR-6 models.
Figure 2.
UPPER MAST
LOWER MAST
CRADLE CRADLE BAR
PIVOT PLATE
NYLON SPACERS
TORQUE PIVOT
HEX BOLT
TO 15 FTLBS
GREASE
Figure 1.
(2" models use 15/16” wrench- torque to 75 ftlbs)
(1 1/4" models use 3/4" wrench- torque to 65 ftlbs)
2"
RECEIVER
HITCH
HITCH TUBE
ANTI-SLOP
DEVICE
Note: We recommend building the rack from the bottom up, using a vehicle hitch as a mounting point to assemble the rack from.
HEX BOLT
LOWER PIVOT
ASSEMBLY
DOUBLE U-BAR
D-HANDLE PIN
LOCK NUT
Figure 2A.
HEX BOLT
CLEAT PLATE
HEX BOLT
LARGE METAL WASHER
(NSR-2 & NSR-4 ONLY) -
REGULAR WASHER
(NSR-6 ONLY)
APPLY GREASE
IN HERE BASE
APPLY
GREASE HERE
HITCH TUBE
Figure 2B.
APPLY
GREASE HERE APPLY
GREASE HERE
CRADLE BAR
LOWER MAST
HEX BOLT
WASHERS NOT USED
ON NSR-6 MODELS
WASHERS NOT USED ON
NSR-6 MODELS
WASHERS NOT USED
ON NSR-6 MODELS
1 1/4” HITCH MODELS
FOR FOLDING
MODELS ONLY
D-HANDLE PIN
D-HANDLE PIN
BRIDGE PIN
07-2019
www.northshoreracks.com North Shore Racks Inc.North Vancouver, British Columbia
07-2019
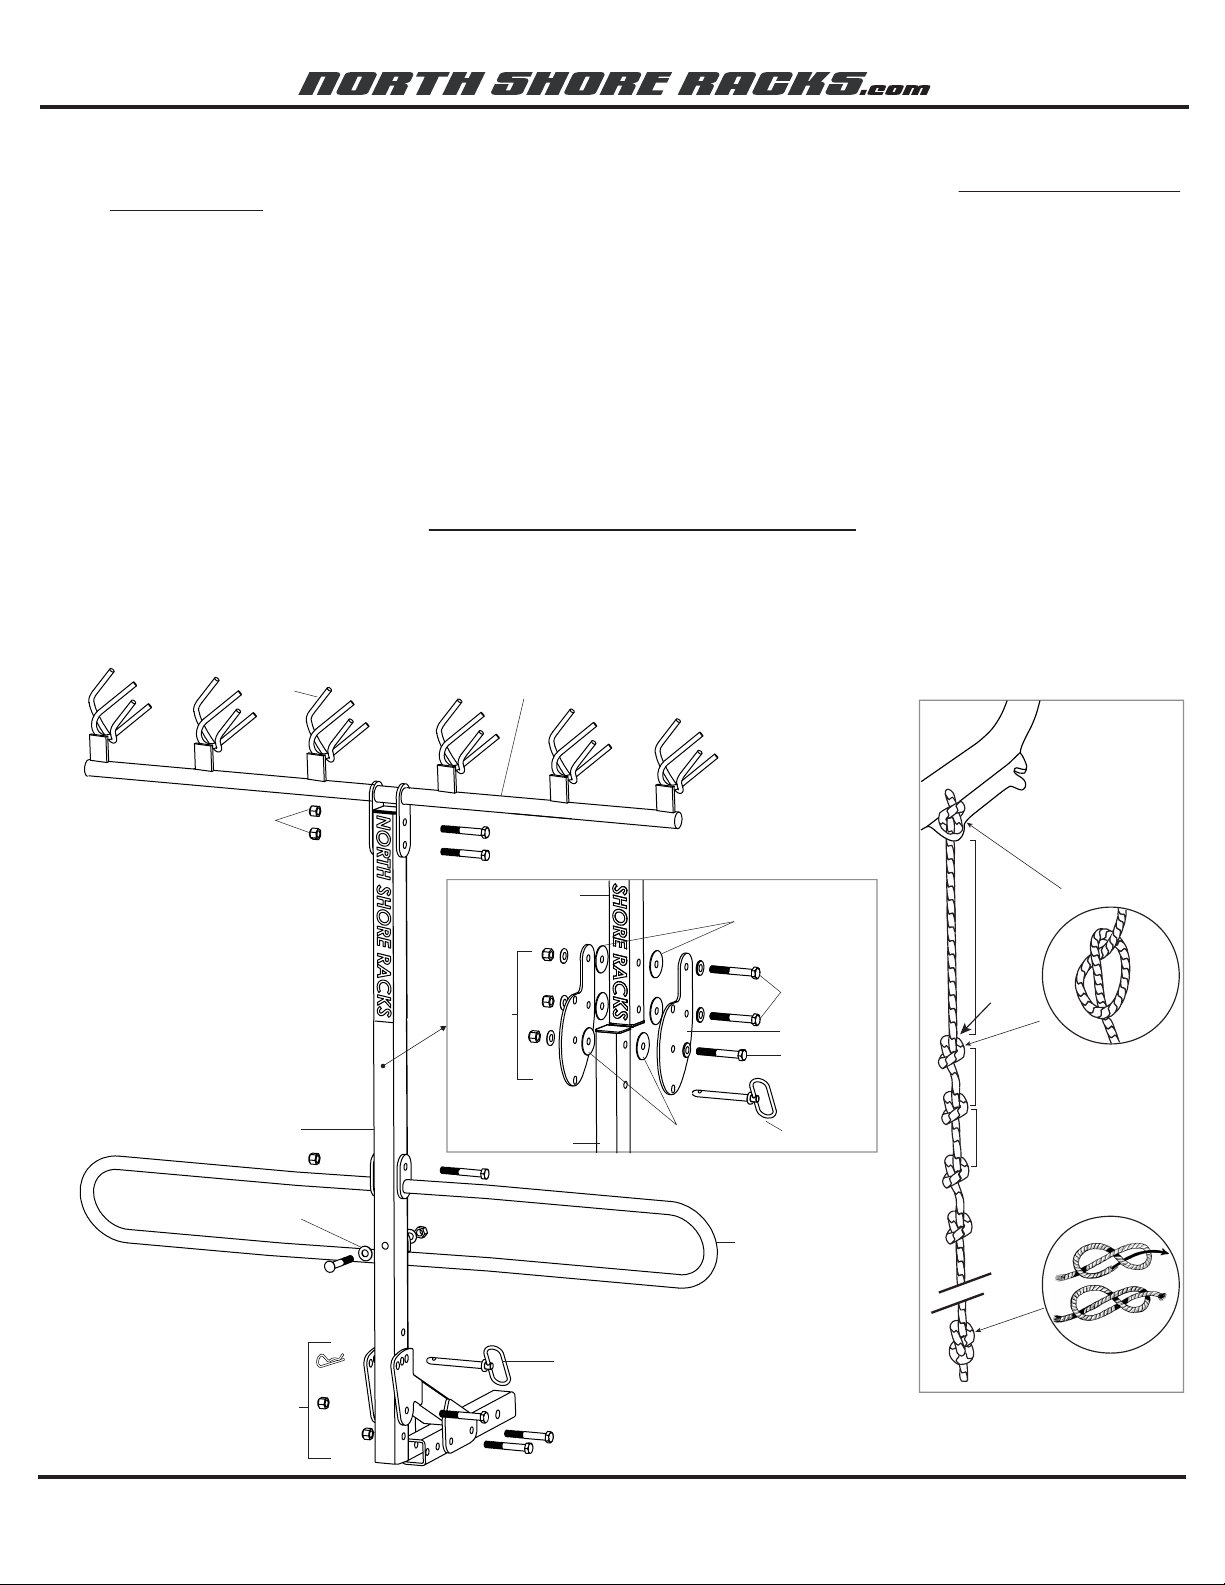
ROPE
SETUP
PUT FIRST
KNOT HERE
1 INCH
9 INCHES
ADD KNOTS AS
NECESSARY
1 INCH
FIGURE 8 KNOT
AT END FOR HANDHOLD
HITCH KNOTS
FIGURE 8 KNOT
RACK ASSEMBLY continued
STEP 4 Attach the Double U-Bar exactly as shown in Figure 2A. Notes: 1) Orient the Double U-Bar such that the Cleat Plates are pointing towards the front
of the vehicle. 2) NSR-2/ NSR-4- use the Hex Bolt and Large Metal Washer as shown and torque this bolt to 15 ftlbs, do not over-tighten as damage
to the rack may result. NSR-6- use a regular Hex Bolt and washers for the lower bolt and torque to 40ftlbs. Torque the upper Hex Bolt to 40 ftlbs
(NSR-6 models do not use washers on the upper Hex Bolt).
STEP 5 The following instruction only applies to models with a folding centre hinge.
Attach the Upper Mast to the Lower Mast as shown in Figure 2B. Notes: 1) The Nylon Spacers go in between the Pivot Plates and the Mast.
2) Apply grease to both sides of the Nylon Spacers for the pivot (the other Nylon Spacers do not need to be greased) and torque the pivot Hex
Bolt to about 20-40 ftlbs, allowing for the rack to pivot. 3) Torque the remaining Hex Bolts to 40 ftlbs.
STEP 6 Attach the Cradle Bar to the rack as shown in Figures 2 and 2B. Notes: 1) Pay close attention to the direction of the Cradles (they must point to the
right as viewed from behind). 2) Torque the Hex Bolts to 40 ftlbs. NSR-6 models do not use washers.
SETUP AND ADJUSTMENT
HEIGHT ADJUSTMENT- The rack can be raised or lowered by moving the Mast on the Lower Pivot Assembly. To lower the rack beyond the second hole
from the bottom of the Lower Mast, the end of the Lower Mast will need to be trimmed off with a hacksaw to allow the rack to fold
down. When cutting off, ensure there is 1 hole left below the Lower Pivot Assembly.
SETBACK ADJUSTMENT- The rack can be moved further away from the vehicle as necessary by moving the Base on the Hitch Tube.
Note: The forward most position will work best for the majority of vehicles, including those with rear mounted spare wheels.
ASSEMBLED NSR-6
MAST
CRADLE CRADLE BAR
LOWER PIVOT
ASSEMBLY
DOUBLE U-BAR
D-HANDLE PIN
LOCK NUT
WASHER
UPPER MAST
LOWER MAST
PIVOT PLATE
NYLON SPACERS
TORQUE PIVOT
HEX BOLT
TO 15 FTLBS
GREASE
HEX BOLT
FOR
FOLDING
MODELS
ONLY
D-HANDLE PIN

www.northshoreracks.com North Shore Racks Inc.North Vancouver, British Columbia
LOADING BIKES
1. Unfold and set the rack as per Figures 3 and 4.
2. Position a bike as shown in Figure 5. Grasp the seat tube area with one hand and grasp
the fork low down (near the bottom) with your other hand.
3. Approach the rack from the right hand side, lift the bike and place the fork crown into the
left-most cradle of the rack (see Figure 6A). Do not try and lift the bike over the rack from
behind. It is much easier to load from the side.
4. Secure the rear wheel with the rope and cleat as shown in Figure 6B and 6C. Pull the
rope tightly and secure by placing one of the Detent Knots into the cleat. Follow this with
a wraparound hitch-knot as shown in Figure 6C. Additional Detent Knots may be added
as needed.
5. To load another bike repeat steps 2-4.
SETTING
2
SETTING
3
SETTING
1
Figure 4.
Figure 5.
Figure 6.
ADD KNOTS
HERE AS
NEEDED
PULL
TIGHTLY
DETENT KNOTS
Figure 6A.
Figure 6B.
Figure 6C.
Figure 3.
07-2019

www.northshoreracks.com North Shore Racks Inc.North Vancouver, British Columbia
TIPS AND PRECAUTIONS
1. Load bikes one at a time from the left most position of the rack to the right; remove bikes in the opposite order.
2. Do not support bikes from the rack in any other way than what is shown.
3. Place bikes with shorter stems (DH/ Freeride) in the left positions and longer stemmed bikes (Cross-country) in the right positions to minimize handle
bar interference.
4. Fork crowns must be free of any accessories. ie: fork-mounted fenders are not compatible.
5. Do not use this rack for anything other than the transport of mountain bikes.
6. Excessively high speeds or rough roads may overstress the rack and/or hitch/vehicle.
7. Check with the hitch manufacturer to ensure the hitch is capable of withstanding the stress of this rack.
8. Check all fasteners and retorque as needed before each use.
WARNING
BE MINDFUL OF CLEARANCE BETWEEN THE BIKES AND THE GROUND WHEN DRIVING (IE: STEEP DRIVEWAYS). CONTACT WITH THE GROUND
MAY CAUSE DAMAGE TO BIKES AND/OR THE RACK OR OTHER VEHICLES BEHIND YOU AS A RESULT OF TRYING TO AVOID FALLEN BICYCLES
AND/OR THE RACK.
BE AWARE THAT BIKES ON THE RACK MAY PROTRUDE ABOVE THE TOP OF YOUR VEHICLE AND CONTACT OVERHEAD STRUCTURES
CAUSING DAMAGE (IE: PARKING GARAGES).
NOT RECOMMENDED FOR USE ON RECREATIONAL VEHICLES, ESPECIALLY THOSE WITH LONG
OVERHANGS.
WARRANTY
North Shore Racks Inc. products carry a two-year limited warranty (6 months for commercial use) from the date of purchase to
the original purchaser against defects in materials or workmanship. This warranty is void if the product has been used off-road,
on a Recreational Vehicle, modified, damaged or used for anything other than its intended purpose. In no event shall North
Shore Racks Inc. be liable for incidental or consequential damages. This warranty is non-transferable.
WEIGHT CARRYING CAPACITIES
MODEL
WEIGHT
NSR-2 (1 1/4” Hitch)
NSR-2 (2” Hitch)
NSR-4
NSR-6
NSR-6 Folding
100lbs
120lbs
200lbs
300lbs
300lbs
Maximum bicycle weight: 60lbs
07-2019
This manual suits for next models
2


