North Star Design Linestage SE User manual

Linestage SE Preamplifier
Operating Manual
North Star Design®
LINESTAGE SE
Line Preamplifier

Rev. 1.0 April 08

WARNING: TO REDUCE THE RISK OF FIRE OR ELECTRIC SHOCK, DO
NOT EXPOSE THIS APPLIANCE TO RAIN OR MOISTURE.
The lightning flash with arrowhead symbol, within an equilateral triangle, is intended to
alert the user to the presence of uninsulated “dangerous voltage” within the product’s enclosure
that may be of sufficient magnitude to constitute a risk of electric shock to persons.
The exclamation point within an equilateral triangle is intended to alert the user to the
presence of important operating and maintenance (servicing) instructions in the literature
accompanying the appliance.
Marking by the “CE” symbol (shown left) indicates compliance of this device with the EMC
(Electromagnetic Compatibility) and LVD (Low Voltage Directive) standards of the
European Community.

Important Safety Instructions
Please read all instructions and precautions carefully and completely before operating your North Star
Design® Linestage SE preamplifier.
1. ALWAYS disconnect your entire system from the AC mains before connecting or disconnecting
any cables, or when cleaning any component.
2. This product must be terminated with a three-conductor AC mains power cord which includes
an earth ground connection. To prevent shock hazard, all three connections must ALWAYS be
used.
3. AC extension cords are not recommended for use with this product.
4. NEVER use flammable or combustible chemicals for cleaning audio components.
5. NEVER operate this product with any covers removed.
6. NEVER wet the inside of this product with any liquid.
7. NEVER pour or spill liquids directly onto this unit.
8. NEVER block air flow through heatsinks.
9. NEVER bypass any fuse.
10. NEVER replace any fuse with a value or type other than those specified.
11. NEVER attempt to repair this product. If a problem occurs, contact your North Star Design® retailer.
12. NEVER expose this product to extremely high or low temperatures.
13. NEVER operate this product in an explosive atmosphere.
14. ALWAYS keep electrical equipment out of the reach of children.
15. ALWAYS unplug sensitive electronic equipment during lightning storms.

Introduction
Welcome to the North Star Design “family” and congratulations on your purchase of what is
unquestionably one of the world’s finest audio preamplifier. With its combination of features,
precision electronic circuitry and accurately machined chassis components throughout, your
Linestage SE Preamplifier will offer you many years of musically satisfying enjoyment. Please take
a few moments to read the remainder of this Operating Manual. A thorough understanding of the
operational features will allow you to gain the maximum performance and ease of use for which this
Preamplifier was designed.
Enjoy the music!
North Star Design s.r.l.
Via Lenin, 132
56010 San Giuliano Terme (PI)
ITALY
Phone: +39-050-859945
Fax: +39-050-859166
e-mail: [email protected]
website: www.northstar.it
Initial Inspection
Inspect the shipping container for damage. If the shipping container, packing material, Preamplifier
or accessories are damaged or missing, notify your dealer and the shipper (if a claim is to be
made). Note: Many shippers require notification and an inspection within twenty-four (24) hours of
delivery to ascertain the nature of damages incurred.
Your Linestage SE Preamplifier has undergone extensive performance evaluations, listening tests,
quality control inspections and a minimum forty-eight (48) hour burn-in period prior to shipment and
should be in a perfect operational condition upon receipt. If the Preamplifier does not operate
correctly, please notify your dealer immediately.
We strongly suggest that you save all packing materials. If the Preamplifier is returned to your
dealer the original packing materials must be used for shipment. Neither North Star Design nor the
shipper can be held responsible for damages incurred during transit if the original factory packing is
not used. All factory returns require that a Return Authorization number be issued by North Star
Design prior to shipment.
Contents
Ensure that all of the auxiliary components listed below are enclosed into the box.
1 One (1) Operating Manual
2 One (1) AC power cable
3 One (1) warranty card (in some countries warranties are provided by the respective importer)
4 One (1) remote control
5 Two (2) link cable (Monoblock Amplifier connection)

Installation
Locate the Preamplifier as close as possible to its final installation point. Allow access to the rear
panel for making connections.
Front & Rear Panel Function Controls
Before attempting any system interconnection, please familiarize yourself with the front and rear
panel controls of the Linestage Preamplifier. The descriptions below refer to the numbers and
letters associated with the features in the diagram above.
Front Panel
1 VOLUME KNOB
This control is normally used to adjust the listening volume, and does not effect the level of the
signal being sent to the Record Outputs. The Volume knob is remoted controlled.

2 INDICATOR LED
The indicator led shows the operational status of your Linestage SE Preamplifier:
Blue brightness indicates that the Preamplifier is on and ready to be used.
Red brightness indicates that the Preamplifier is in standby.
Completely off indicates that the rear panel AC mains switch has been
turned off.
If the Preamplifier will not turn on, you may want to check the rear panel AC
mains switch , your AC connections, or have your dealer inspect the rear panel
fuses.
3 INPUT INDICATOR LED
The input led shows the active input. The same input is sent to tape output and volume controlled
output.
4 INFRARED SENSOR
An Infrared Sensor for the Remote Control is present rear the window.
5 STANDBY BUTTON
When power is applied to the Preamplifier, and assuming the rear panel AC mains switch is set to
its on position, the amplifier remains in standby. You need to press the stand-by button to for switch
on the Preamplifier. If a North Star Design Monoblock Amplifier is connected to Linestage SE
Preamplifier with the trigger connection (15) you can switch on-off the entire system from the
Preamplifier Standby button.
Subsequent pressing of the Standby button will toggle the Linestage SE between standby mode
and fully on.
6 INPUT BUTTONS
You can change the active input source pressing the Input+ Input- buttons. If you press the Input+
button the input number will increase; If you press the Input- button the Input number will decrease.
Rear Panel
Caution!
Switch Off the Preamplifier when you need to connect or disconnect any cables.
7-11 UNBALANCED INPUT
The RCA connectors accepts five unbalanced input from a line level source with single-ended
(RCA) outputs.
Select the Unbalanced inputs with the front panel input button.
12 BALANCED AUDIO INPUT
Accepts a signal from a line level source with balanced outputs via a high quality XLR connector.
Select the Balanced input with the front panel input button.
The pin assignments of this XLR-type female input connector is:
3
Pin 1: Signal ground
Pin 2: Signal + (non-inverting)
Pin 3: Signal – (inverting)

These pin assignments are consistent with the standards adopted by the Audio Engineering
Society. Refer to the operating manual of your balanced output source to verify that the pin
assignments of its output connectors correspond to your Linestage SE Preamplifier. If not, wire the
cables so that the appropriate output pin connects to the equivalent input pin.
13 TAPE SWITCH
The Tape Switch allows to connect RCA Tape Out connectors to the active input. Switch off the
Tape Out to preserve the quality of output signal.
14 TAPE OUT
At this output you can connect the input of a Tape Recorder. The output signal is not affected by
the volume level.
15 TRIGGER OUT
The Linestage SE Preamplifier can control a pair of “linked” North Star Design “Monoblock”
Amplifier when the trigger communication port of Preamplifier is connected to the trigger input
port of the Monoblock.
For the proper operation you need to:
- power off the Linestage SE Preamplifier and the two Monoblock Amplifier
- connect the two trigger cables (supplied with the Linestage SE) between the
Linestage and the two Monoblock
- Power On the Linestage SE (now the Linestage SE is in Standby and send the
Standby signal to Monoblock)
- Power On the two Monoblock (now the Monoblock receive the Standby signal from
Linestage SE)
- Now the system is ready to be controlled by the Linestage SE (front panel or Remote
control). The Monoblock Standby button functionality is not available. You can use
the Linestage SE Preamplifier Stand-by button to control the complete system.
16 BALANCED OUT
The Linestage SE Preamplifier is equipped with a pair of original Neutrik balanced connectors. To
take full advantage of the Linestage SE sonic quality, we recommend using high-quality
interconnection cables; ask your North Star Design dealer.
17 UNBALANCED OUT
The Linestage SE Preamplifier is equipped with two pair of original WBT single ended connectors.
The presence of two pair of output connectors allows the passive bi-amplification of your
loudspeaker system.To take full advantage of the Linestage SE sonic quality, we recommend using
high-quality interconnection cables; ask your North Star Design dealer.
18 AC MAINS INLET AND AC MAINS SWITCH
Standard IEC power cords is provided with the Linestage SE Preamplifier. High quality power
cords will improve the sonic performances; ask your North Star Design dealer.
The North Star Design Linestage SE Preamplifier has been safety-tested and is designed for
operation with a three-conductor power cord. Do not defeat the “third pin” or earth ground
of the AC power cord.
An AC mains switch is located adjacent to the power cord on the rear panel of the amplifier. This
switch may be used to disconnect the power supply from the AC mains without having to actually
unplug the amplifier from the wall outlet. If you plan to be away for an extended period, or have any
other reason to turn the amplifier completely off, you may use the AC mains switch.

Two slo-blow 315mA (220-240V), 630mA (100-120V) fuses are located inside a small drawer in the
AC main inlet. If you suspect that your AC fuses have blown, disconnect the Linestage SE from the
AC mains and contact your North Star Design dealer for assistance.
Danger! Potentially dangerous voltages and current capabilities exist within the Linestage
SE Preamplifier, when connected to the AC mains. Do not attempt to open any portion of the
Linestage SE cabinet.
There are no user-serviceable parts inside the Linestage SE preamplifier. All service of this
product must be referred to a qualified North Star Design dealer or distributor.
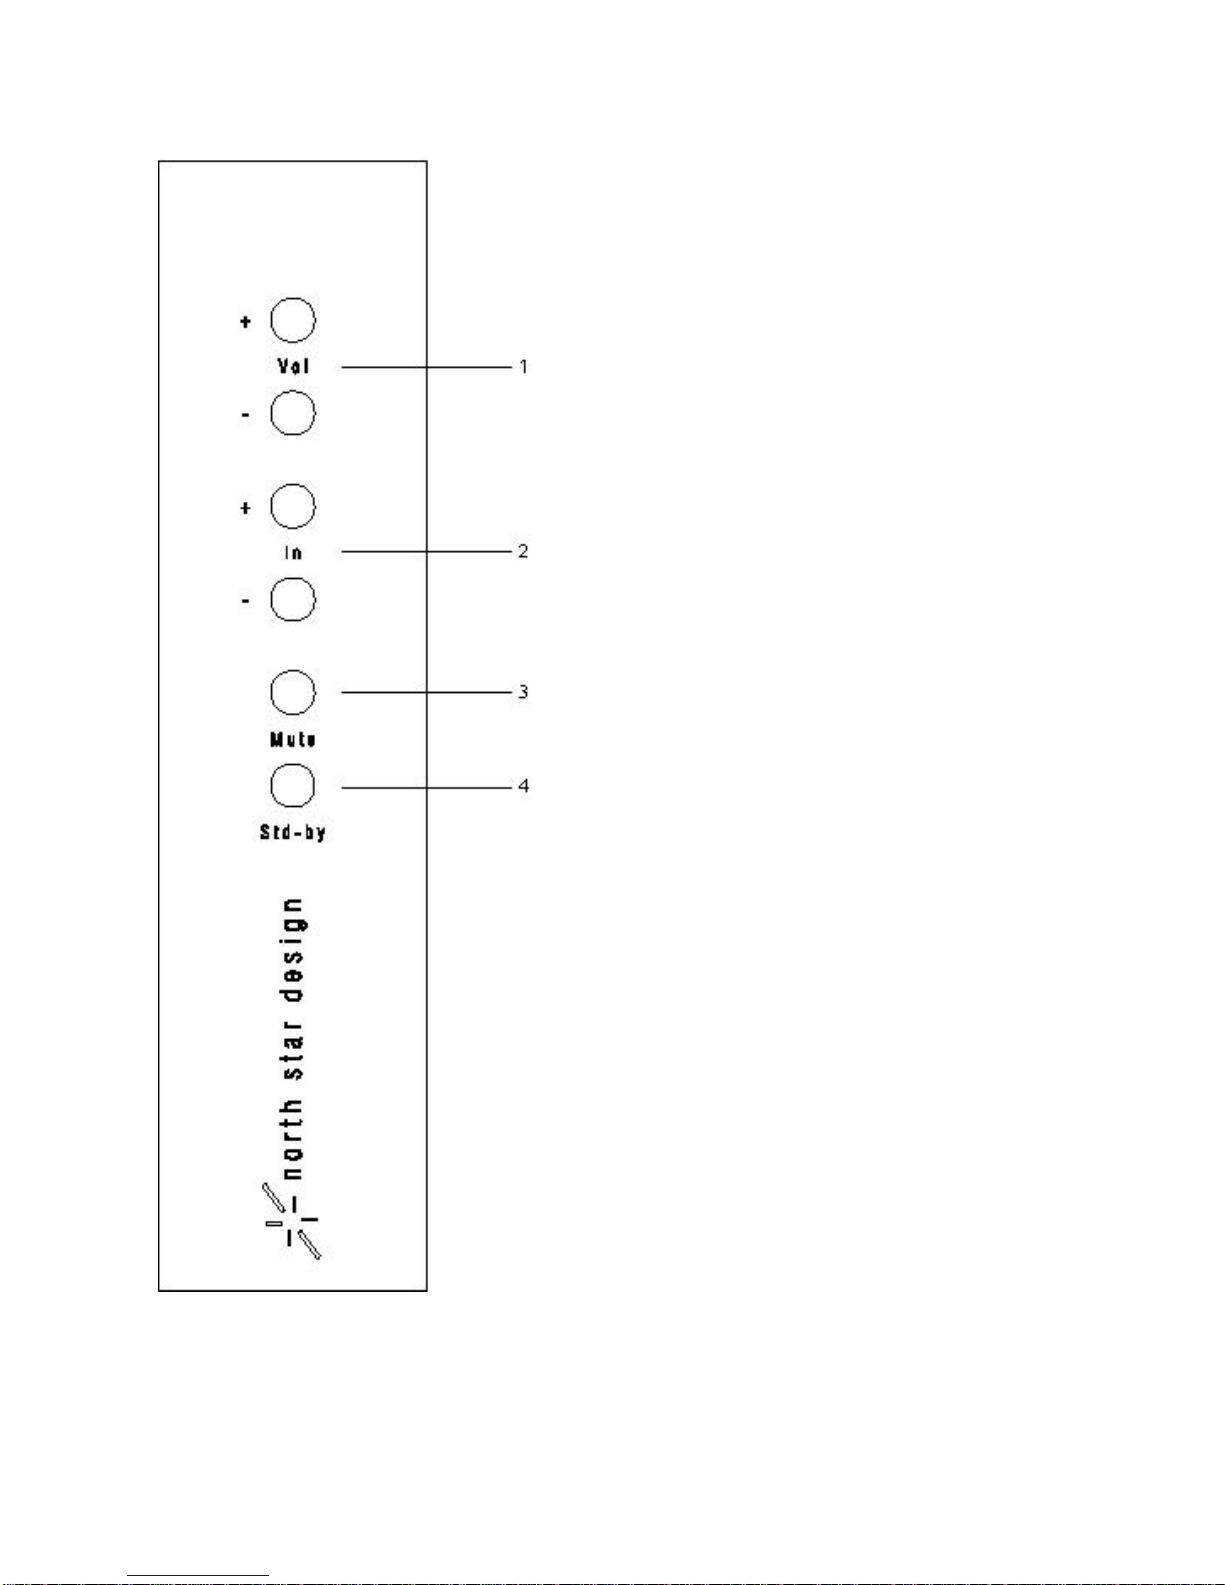
REMOTE CONTROL

1. Volume UP/DOWN; use the +/- Volume button to change the output level of Linestage SE
2. Input UP/DOWN; use the +/- Input button to change the input source.
3. Mute button; use this button to mute (output disconnection) the Linestage SE output. The
muting state don’t allows any other function (volume or input change). Press newly the
Mute button to restore the normal operation.
4. Standby button; use this button to toggle the Linestage SE between the standby and operation
state. If a North Star Design pair of Monoblock Amplifier is connected to Linestage SE
Preamplifier with the trigger connection (15) you can switch on-off the entire system from the
Preamplifier Standby button.
5 Replacing remote control batteries. Unscrew the 3 screws indicated in the figure. Gently pull the
battery holder and insert a fresh set of batteries. Be careful to follow the + and – polarity
indications at the bottom of the battery compartment. Battery: 2 x LR03 / AAA: 1.5Volts.

TECHNICAL SPECIFICATIONS
BANDWIDTH 2 Hz to 700 kHz, -3 dB
THD less than 0.05% at 1Vrms/47kOhm 1kHz
MAXIMUM OUTPUT VOLTAGE 7.5Vrms (47KOhm load)
OVERALL GAIN 20dB
INPUT IMPEDANCE
BALANCED
UNBALANCED
50k
47k
POWER CONSUMPTION 30 watts
INPUTS
BALANCED
UNBALANCED
1 pair per channel (XLR)
5 pair per channel (RCA)
OUTPUT
BALANCED
UNBALANCED
1 pair per channel (XLR)
2 pair per channel (RCA)
SIGNAL TO NOISE RATIO > 80dB Unweighted
CHANNEL SEPARATION > 80dB @1kHz L-R and R-L (other inputs
shorted)
DIMENSIONS 17 in (W) x 15.5 in (D) x 3.35 in (H)
43.5 cm (W) x 35 cm (D) x 8.5 cm (H)
WEIGHT 22 lbs. (10 Kg)
NOTES

north star design
NORTH STAR DESIGN s.r.l.
VIA LENIN, 132
56017 S.GIULIANO TERME (PI)
ITALY
PHONE: +39-050-859945
FAX: +39-050-859166
E-MAIL: [email protected]
WEB: www.northstar.it
Table of contents
Other North Star Design Amplifier manuals


