North Star MultiStar User manual

Trailer Assembly
Instructions
MultiStar
FamilyGoKarts.com

2 Place ATV Trailer Parts List
Trailer Parts Hardware
No. Description QTY No. Description QTY
A1 Trailer Frame 1 1 M14 x 5 Bolt 6
A2 Trailer Tongue 1 2 M14 Jam Nut 6
A3 Trailer Side Rails 2 3 M10 x 20 Bolt 16
A4 Rear Rail Bracket 2 4 M10 Lock Nut 24
A5 Front Rail 2 5 M10 x 25 Bolt 30
A6 Rear Gate 2 6 M10 Lock Washer 30
A7 Wheel/Hub Assembly 2 7 M10 Flat Washer 30
A Leaf Spring 2 10 U-Bolt 4
A9 Axle 1 9 Spring Plate 2
A10 Fender 2 10 3 x 35 Pin 6
A11 Spare Tire Bracket 1 11 Latch Bolts 4
A12 Trailer Rear Light 1 12 Latches 4
A13 Safety Chain 1 13 Latch Pins 4
A14 Tongue Side Brace 2
A15 Tail Light Bracket 2
A16 License Plate Bracket 1
A17 Running Lights 2
A1 Wiring Harness 1
A13
A3
A4
A7
A2
A
A12
A10
A14
A11
A9
A15
A16
A1
A17
A1
A6
FamilyGoKarts.com

Trailer Assembly Instructions
•The 2 place ATV Trailer comes with the
following:
Trailer Frame and Parts
Accessories and Fasteners
2 Wheels with Hub Assemblies
Ensure that you have everything
Remove all Shipping materials and lay
out all parts and hardware. Check for
correct uantities as listed on parts list
Axle
Springs
Tongue
Tongue Angle
Braces
Trailer Frame
Tail Lights
Fenders
Side Rail Pins
Marker
Lights
U-bolts
Spring Plates
Tongue and Spring Bolts
License Plate Bracket
Tail Light Brackets
Accessory
Fasteners
Latches
Wheels, Tires
and Hub
Assemblies
Accessories
and Fasteners
Trailer Frame
and Parts
Side Rails
Rear Gate
FamilyGoKarts.com

•Assemble axles.
Lay Axle on a table or some flat surface
with the Spindles or threaded portion
hanging off each side. The Springs will
attach toward each end of the Axle. Set
the Springs, curving upward, by placing
the head of the Spring Bolt into the
Locating Hole.
Attach Leaf Springs to the Axle. Use the
four U-bolts (two per side), Lock Nuts
and Spring Plates. The U-bolts will
wrap around the Axle on either side of
the Spring (one to the left, the other to
the right). Lay the Spring Plate on top of
the Spring and feed the U-bolts through
it, placing the Lock Nuts.
Tighten U-bolt nuts alternately (do not
tighten one all the way before the others
are snug) until all four nuts per spring
are tight. Torque nuts to 40 ft-lbs.
Note: Before tightening the
nuts on the U-bolts, use a
s uare to make sure that the
springs are s uare to the axle.
Locating hole
Spindle
Axle
U-Bolts
Leaf Spring
Eye
Axle
FamilyGoKarts.com

•Install Hub Assembly to Axle.
Hubs come attached to the wheels.
Remove Dust Covers from Hubs. This
can be done by inserting a long bolt or
punch into the hole of the hub and
driving the dust cap off. A screwdriver
can also be used on the face side of the
Hub to gently pry the dust cover off. Be
careful to not drop the bearings or get
them dirty. Bearings are pre-lubricated.
After carefully sliding the Hub
Assembly and Wheel onto the threaded
end of the Axle, make sure that the
Bearings are slid into the Hub. Be
careful to not remove the grease from
the Bearings.
Place the two washers onto the axle flat
washer first. Align the flat surface of the
axle with the flat of the washers.
Tighten Axle nut to 35 ft-lbs. Loosen
the nut 2 notches of the crown nut.
Align a notch with the one of the tabs of
the tabbed washer. Using a screwdriver,
bend only one of the tabs of the tabbed
washer into the notch of the crown nut.
Replace dust covers by tapping gently
with a rubber mallet. Be careful to not
damage dust covers.
Note: It is the owner's responsibility to
re-pack and adjust the bearings within
the first 100 miles
Dust Cover
Axle Washers
and Bearing
FamilyGoKarts.com

•Assemble Axle, Tongue Coupler,
Fenders.
Lay Trailer Frame flat upside down on a
table.
Align the holes in the Fenders with the
Fender Bolt Holes on the Trailer Frame.
They are located alongside the Axle
Channels. Using two Bolts and Lock
Washers on each Fender, attach and
tighten both Fenders.
Install Axle Assembly into Axle
Channels. The Eye in the Springs should
point toward the front of the tailer.
Install four Bolts and four Nuts in the
Frame member to secure the Axle.
Tighten nuts to where Cotter Pins can be
slipped through the holes in the Bolts
and then bend at least one leg of the
Cotter Pin.
Bolt Trailer Tongue to trailer using the
longest two Bolts as shown. Tighten
Nuts to where Cotter Pins can be
inserted through holes in Bolts and then
bend at least one leg of the Cotter Pin.
Fender
Fender
Leaf Spring
Eye
Bolt hole
FamilyGoKarts.com

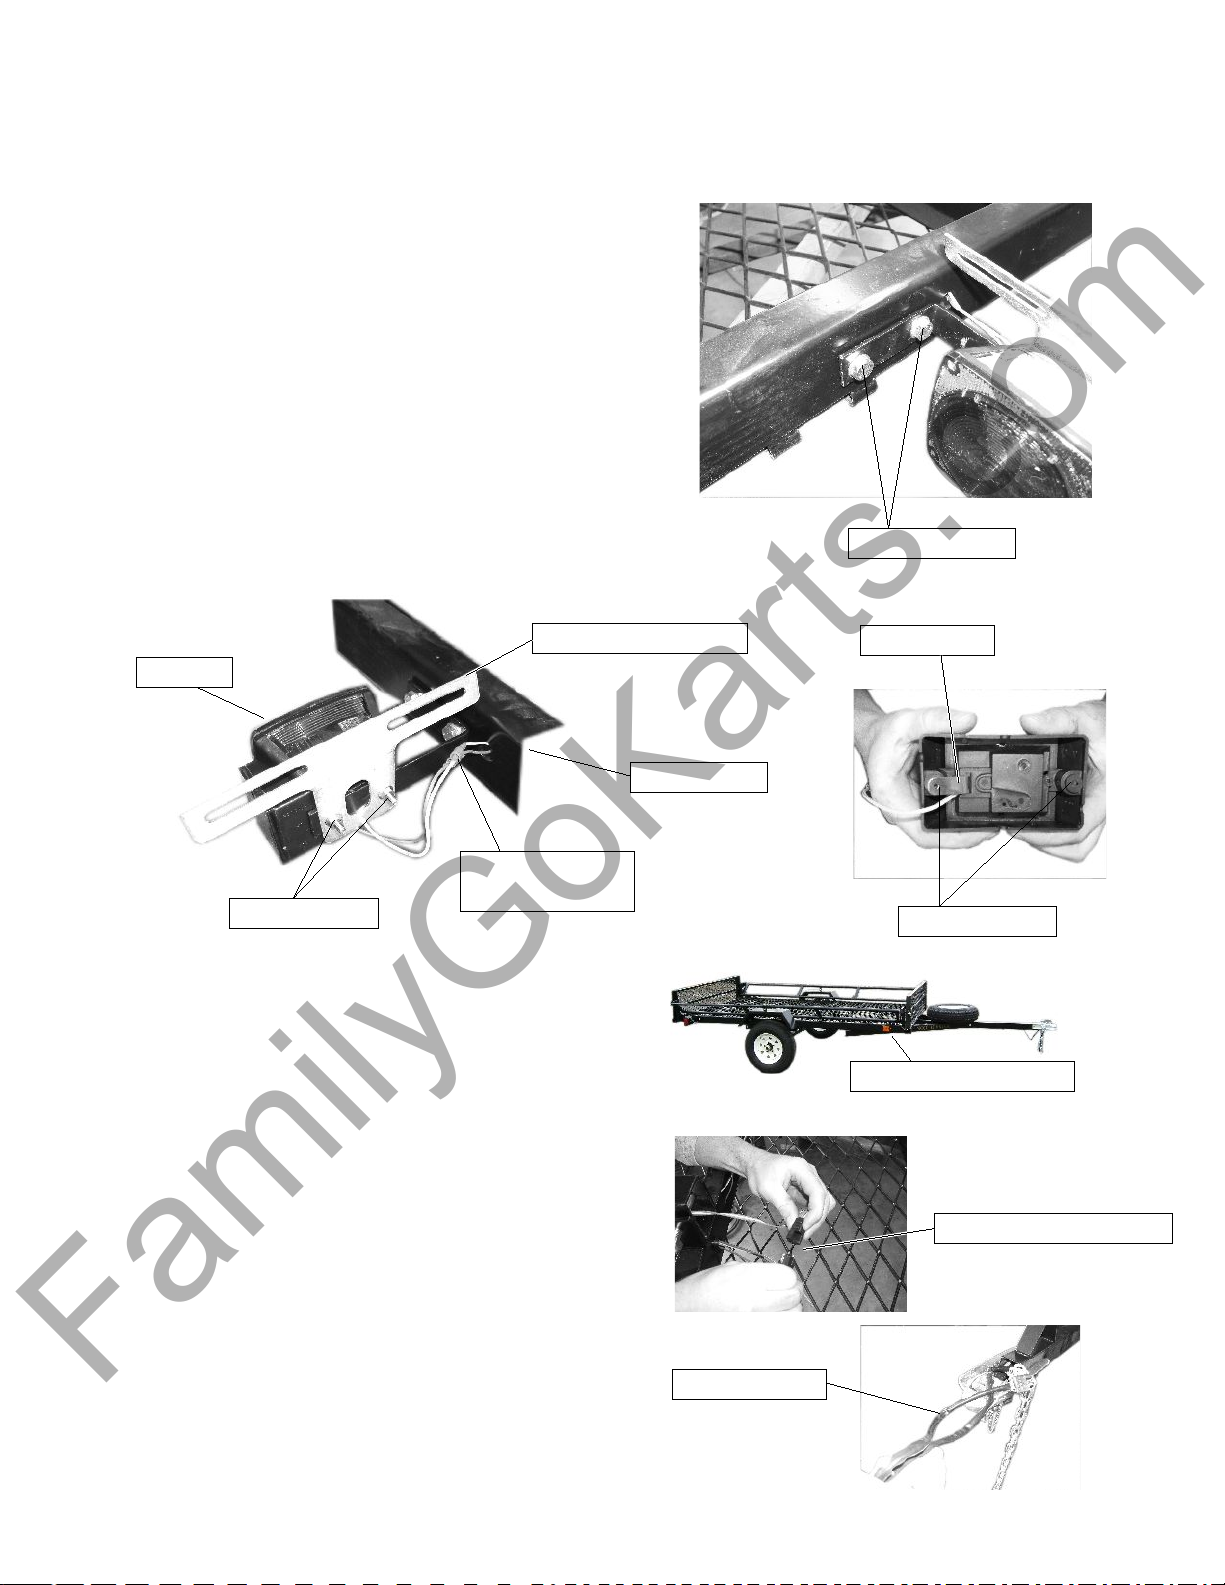
•Electrical E uipment
Attach Taillight L-Brackets using two
short bolts and lock washers. Place
License Plate bracket under the tail light
for the driver's side of the trailer. The
studs on the light go through the License
Plate Bracket and then through the
Taillight L-Bracket. Wiring on the
taillights is color coded. Make sure that
the wiring for the Taillights is run
through the loops and holes on the
trailer. After mounting the taillights,
connect the wiring with the bullet
connectors. Press firmly to ensure a
good connection.
Connect the Running Lights to the side
of the trailer. Before fastening the lights
to the trailer, start one screw through the
Mounting Hole and through the Ground
Lead on the same side. Do this with
both Running Lights. The Running
Lights can be used on either side of the
trailer. Using a Phillips Screwdriver
fasten the Running Lights to the Trailer.
Connect the wires by pressing firmly.
With all the wires connected firmly
tighten the wiring away from the lights
towards the Tongue. Connect the wiring
to the wires that are in the Tongue. Pull
this slack in the wiring from the Trailer
Coupler as well.
L-Bracket Bolts
Tail Light Bolts
Tail Light
Tail Light Wiring
Connectors
Lisence Plate Bracket
Trailer Frame
Ground Lead
Mounting Holes
Mounted Running Light
Wiring Main Connection
Wiring Harness
FamilyGoKarts.com

•Side Rails
With the Trailer right side up you can
install the Side Rails. First install the
Ramp Pins on the front, rear and middle.
The Side Rails are first located with the
pins on the lower edge. The Side Rail
has a Threaded insert on one end. This
end aligns with the back of the trailer.
Once the Ramp Pins are inserted, insert
the Cotter Pins into the Ramp Pins and
bend one leg of the Cotter Pin.
With the Side Rails both in place,
position the Rear Braces. Two bolts will
be used to secure the lower portion of
the Braces. One bolt will be used in the
Threaded Insert at the back of the Side
Rail.
Note: In an effort to reduce
costs, the two Braces are made
the same so on of the upper holes
will be left without a bolt.
With the Rear Braces installed, locate
the Front Rail. The Front Rail is held in
place with two bolts to the Trailer
Frame and the Latches on each side. The
Latch is bolted to the Side Rail and the
Latch Pin is bolted to the Front Rail.
The Front Latch Pins are the shorter two
of the four Latch Pins.
Threaded
Insert
Ramp Pins
Side Rail
Ramp
Retaining
Pin Slot
Bracket Bolts
Side Rail
Latch
Latch Pin
Front Rail
Front Rail Bolts
Gate Pins
Front Latch Pins
Rear Latch Pins
FamilyGoKarts.com

Note: It is owner's responsibility to tighten all bolts and nuts on trailer to ensure safe operation.
Coupler Adjustment
It is customer's responsibility to perform
final adjustments to the Hitch Coupler
before operation. Adjust after all other
assembly. Remove Coupler Pin, unlock
Coupler Latch and place coupler over a 2
inch Ball. Use a wrench to tighten the
Coupler Latch Nut to where the Latch
securely locks the Coupler to the Hitch. Do
not over-tighten to avoid premature wear to
the Ball
Coupler Latch Nut
FamilyGoKarts.com
Other North Star Utility Vehicle manuals