7342102 (Rev. B 4/22/16)
IMPORTANT NOTICE
FOR INSTALLATION
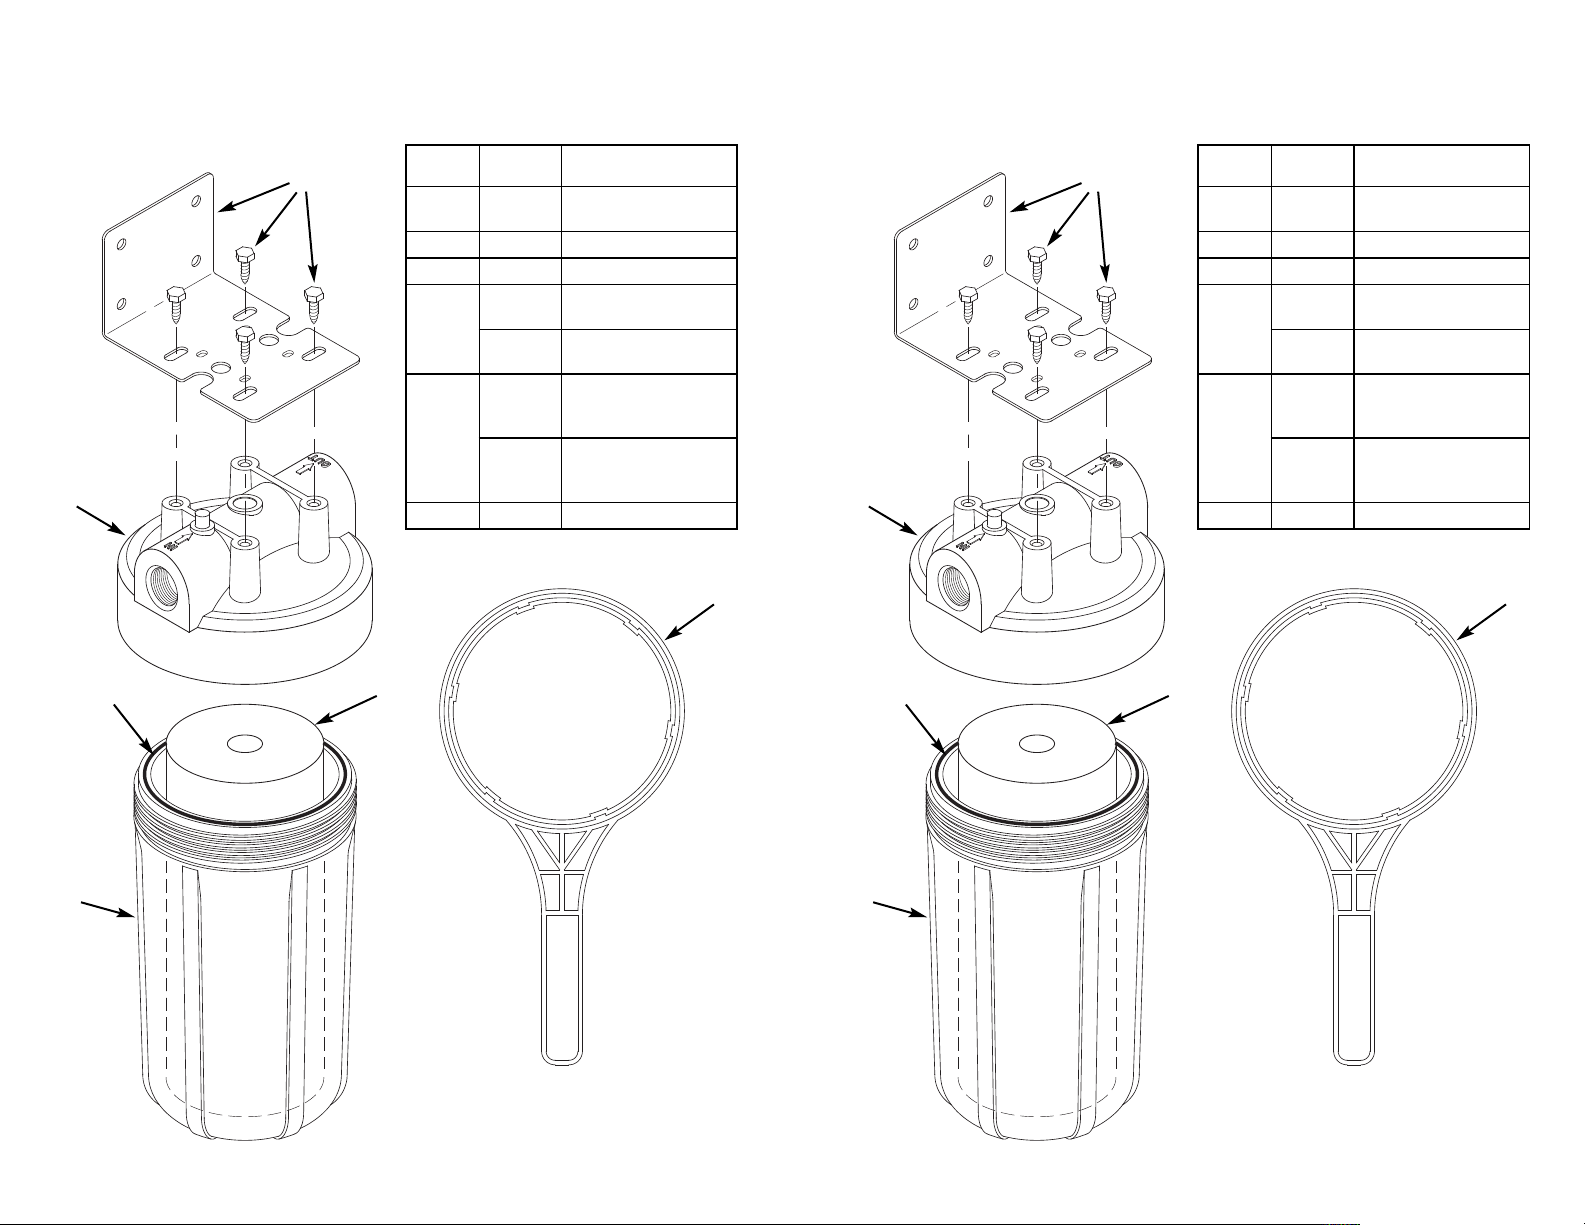
This bracket must be tightly secured with four screws in the cap, and
four screws in a stable surface. Provide a minimum 3 inch clearance
below the filter housing to allow cartridge changes.
To C ange Filter Cartridges
1. Turn off water supply to filter. If unit is Valve-In-Head style, rotate handle on top of housing to OFF
position.
2. Depress pressure release button (if present) to relieve pressure in filter housing.
3. Unscrew housing using spanner wrench.
NOTE: When opening filter housing to change cartridge, it is common for O-ring/Gasket to lift out
of housing and stick to cap.
4. Remove used cartridge and discard. Rinse out housing and fill about 1/3 full with water. Add
about 2 to 3 tablespoons of bleach and scrub thoroughly with brush or sponge. Rinse thoroughly.
5. Remove O-ring/Gasket from sump and wipe groove and O-ring/Gasket clean. Lubricate O-
ring/Gasket with a coating of clean silicone grease. ut O-ring/Gasket back in place and press O-
ring down into the groove with two fingers (or place gasket on rim of sump).
NOTE: This step is important to ensure proper filter seal. Make sure the O-ring is seated level in
the groove (or gasket is on rim of sump).
CAUTION: If O-ring/Gasket appears damaged or crimped it should be replaced at this time. See
your local dealer for replacement parts.
6. Insert a new cartridge into the sump making sure that it slips down over the sump stand-pipe.
7. Screw the sump onto the cap and hand tighten. DO NOT OVER-TIGHTEN. Make sure cartridge
slips over the cap standpipe.
8. Turn on the water supply slowly to allow housing to fill with water. When using a Valve-In-Head,
rotate handle slowly to the ON (Filter) position.
9. Depress the pressure release button (if present) to release trapped air from filter.
10. Check for leaks before leaving installation.
WARNING: Do not use with water that is microbiologically unsafe or of unknown quality without
adequate disinfection before or after the unit.
NOTE: An activated carbon cartridge (Taste/Odor) may contain a small amount of carbon fines (very
fine black powder) and a new cartridge, after installation, should be flushed with sufficient water to
remove the fines before using the water.
Each time you use water from your filtered water tap for drinking or cooking purposes, it is
recommended that you run (flush) the tap at least 10 seconds prior to using water. This is particularly
important if the water tap is not used daily.
NOTE: Certain types of harmless bacteria will attack cellulose material. Cartridges containing
cellulose may seem to disintegrate, produce a "musty" or "moldy" odor, or form a black precipitate
due to the bacteria. If you notice any of the above problems while using the cellulose media
cartridges, switch to a synthetic media cartridge or consult the manufacturer.
NOTE: This replacement cartridge has a limited service life. Changes in taste, color and flow of the
water being filtered are signals that replacement of the cartridge is or soon may be necessary.
CAUTION: Filter must be protected against freezing. Failure to do so may result in cracking of the
filter and water leakage.
CAUTION: All filtration systems contain other parts that have a limited service life. Exhaustion of the
service life of those parts often cannot be easily detected. Commonly, it is only after leakage has
been observed or water damage has occurred that one is made aware that the service life has been
exhausted.
IMPORTANT NOTICE: To prevent costly repairs or possible water damage we strongly recommend
that the bowl or sump of all plastic housings be replaced periodically: every five years for clear
sumps, and every ten years for opaque sumps. If your sump has been in use for more than the
recommended period, it should be replaced immediately. Be sure to date any new or replacement
sump for future reference and indicate the next recommended replacement date.
7342102 (Rev. B 4/22/16)
IMPORTANT NOTICE
FOR INSTALLATION
This bracket must be tightly secured with four screws in the cap, and
four screws in a stable surface. Provide a minimum 3 inch clearance
below the filter housing to allow cartridge changes.
To C ange Filter Cartridges
1. Turn off water supply to filter. If unit is Valve-In-Head style, rotate handle on top of housing to OFF
position.
2. Depress pressure release button (if present) to relieve pressure in filter housing.
3. Unscrew housing using spanner wrench.
NOTE: When opening filter housing to change cartridge, it is common for O-ring/Gasket to lift out
of housing and stick to cap.
4. Remove used cartridge and discard. Rinse out housing and fill about 1/3 full with water. Add
about 2 to 3 tablespoons of bleach and scrub thoroughly with brush or sponge. Rinse thoroughly.
5. Remove O-ring/Gasket from sump and wipe groove and O-ring/Gasket clean. Lubricate O-
ring/Gasket with a coating of clean silicone grease. ut O-ring/Gasket back in place and press O-
ring down into the groove with two fingers (or place gasket on rim of sump).
NOTE: This step is important to ensure proper filter seal. Make sure the O-ring is seated level in
the groove (or gasket is on rim of sump).
CAUTION: If O-ring/Gasket appears damaged or crimped it should be replaced at this time. See
your local dealer for replacement parts.
6. Insert a new cartridge into the sump making sure that it slips down over the sump stand-pipe.
7. Screw the sump onto the cap and hand tighten. DO NOT OVER-TIGHTEN. Make sure cartridge
slips over the cap standpipe.
8. Turn on the water supply slowly to allow housing to fill with water. When using a Valve-In-Head,
rotate handle slowly to the ON (Filter) position.
9. Depress the pressure release button (if present) to release trapped air from filter.
10. Check for leaks before leaving installation.
WARNING: Do not use with water that is microbiologically unsafe or of unknown quality without
adequate disinfection before or after the unit.
NOTE: An activated carbon cartridge (Taste/Odor) may contain a small amount of carbon fines (very
fine black powder) and a new cartridge, after installation, should be flushed with sufficient water to
remove the fines before using the water.
Each time you use water from your filtered water tap for drinking or cooking purposes, it is
recommended that you run (flush) the tap at least 10 seconds prior to using water. This is particularly
important if the water tap is not used daily.
NOTE: Certain types of harmless bacteria will attack cellulose material. Cartridges containing
cellulose may seem to disintegrate, produce a "musty" or "moldy" odor, or form a black precipitate
due to the bacteria. If you notice any of the above problems while using the cellulose media
cartridges, switch to a synthetic media cartridge or consult the manufacturer.
NOTE: This replacement cartridge has a limited service life. Changes in taste, color and flow of the
water being filtered are signals that replacement of the cartridge is or soon may be necessary.
CAUTION: Filter must be protected against freezing. Failure to do so may result in cracking of the
filter and water leakage.
CAUTION: All filtration systems contain other parts that have a limited service life. Exhaustion of the
service life of those parts often cannot be easily detected. Commonly, it is only after leakage has
been observed or water damage has occurred that one is made aware that the service life has been
exhausted.
IMPORTANT NOTICE: To prevent costly repairs or possible water damage we strongly recommend
that the bowl or sump of all plastic housings be replaced periodically: every five years for clear
sumps, and every ten years for opaque sumps. If your sump has been in use for more than the
recommended period, it should be replaced immediately. Be sure to date any new or replacement
sump for future reference and indicate the next recommended replacement date.