Northern Industrial Tools 3343109 User manual

PowerTools
Made in China
Read carefully and understandRULES FOR SAFEOPERATION and instructions
before operating. Failureto follow thesafety rules andother basic safety
precautions may resultin serious personal injury.
AssemblyandOperationInstructions
Item#3343109
3"VARIABLESPEEDBENCHGRINDER
USER'SMANUAL

For technicalquestions and replacementparts, please call 1-800-222-5381.
Thank you very much forchoosing a NORTHERNTOOL +EQUIPMENT CO., Product!For future
reference, please complete the owner's record below:
Model: _______________ PurchaseDate: _______________
This product isdesigned for certainapplications only.Northern Tool+ Equipment strongly
recommends that thisproduct is not modified and/orused for any application otherthan that
for which itwas designed. Ifyou haveany questionsrelative toa particular application, DONOT
use the productuntil you have first contactedNorthern Tool+ Equipment to determine ifit can
or should beperformed on theproduct.
Before using thisproduct, please readthe followinginstructions carefully.
SPECIFICATIONS
SAVETHISMANUAL
You willneed this manualfor the safety warnings, operatingand maintenance procedures, parts
list and diagram.Keep yourinvoice withthis manual. Write the invoice number onthe inside ofthe
front cover. Keep themanual and invoice in asafe and dryplace for futurereference.
SafetyWarningsandPrecautions
WARNING:
When using thistool, basic safety precautions shouldalways befollowed toreduce the riskof
personal injury and damageto equipment. Read all instructionsbefore using thisproduct.
1.Avoidworkingalone.Should an accidentoccur, anassistant can bringhelp.
2.Disconnectpower.Unplug toolwhen not inuse, before servicingand when changingaccessories
such as grindingwheels. Neverwalk awayand leavethe tool running.
3.Keepworkareaclean.Cluttered areas invite injuries.
4.Keepchildrenandpetsaway.Children must never be allowedin the workarea. Do notlet them
handle machines, tools,or extensioncords. Neverallow unsupervised oruntrained personnel to
operate the machine.
5.Storeidleequipment.When not inuse, tool mustbe stored ina dry location to inhibit rust.
Always lockup tools andkeep out ofreach of children.
6.Dressproperly.Do not wearloose clothing orjewelry as theycan be caughtin moving parts.
Protective electricallynonconductive clothes andnonskid footwearare recommended when
working. Wearrestrictive hair covering tocontain long hair. Wear anANSI-approved dustmask
or respirator.
7. Useeyeprotection.Always wearANSI-approved impact-resistantsafety goggles.
8.Donotoverreach.Keep properfooting andbalance at alltimes. Do notreach overor across
electrical cables orframes.
9.Maintaintoolswithcare.Inspect grinding wheelsand powercord periodically for cracks and
other damage. ifnecessary, havethem repaired byan authorized technician.
10. Usetherighttoolforthejob.Do not attempt to force a smalltool or attachmentto do thework
of a largerindustrial tool. Thereare certain applications for which thistool was designed.Do not
modify this tooland do notuse this toolfor a purpose for whichit was notintended.
11.Stayalert.Watch what you are doingand use commonsense. Do notoperate anytool when
you are tiredor under theinfluence of alcoholor drugs. Readwarning labels onprescriptions to
determine if your judgment orreflexes areimpaired while takingdrugs. If thereis any doubt,do
not operatethe tool.
Save thereceipt, warranty andthese instructions.It isimportant you readthe entire manualto
become familiar withthis product before you beginusing it.
!
1 of 5
ElectricalRequirements
Speed
GrindingWheel
BuffingWheel
ArborSize
Power Input:110V AC/ 60Hz
Power CordLength: 70-7/8" (180cm)
Power CordPlug Type:3-Prong, Grounded
Variable speed0 ~ 10,000 RPM
3" Diameter x3/4" Thick
3" Diameter x3/4" Thick
1/2" (12mm) Diameter

12.Checkfordamagedparts.Before using thistool, anypart that appears damagedshould be
carefully checked to determine thatit will operateproperly and performas intended. Checkfor
alignment and bindingof moving parts,broken parts ormounting fixtures andany otherconditions
that may affectproper operation. Any part that isdamaged should beproperly repaired or
replaced by aqualified technician. Donot use thetool if any switch doesnot turn onand off
properly.
13. Replacementpartsandaccessories.When servicing use only identical replacementparts.
Use of otherparts will voidthe warranty.Only use accessoriesintended foruse with thistool.
14. Usepropersizeandtypeextensioncord.If an extension cord isrequired. It mustbe of the
proper size andtype to supplythe correct currentto the tool without heatingup; otherwise, the
extension cordcould melt andcatch fire orcause electrical damagedto the tool. This tool
requires use ofan extensioncord of 0to 10Amps capability (upto 50 feet), with wiresize rated
at 18 AWG. Longer extension cordsrequire a largersize wire. Ifyou are usingthe tool outdoors,
use an extension cord rated for outdooruse (signified by"WA" on thejacket).
15. Takecautionassomewoodscontainpreservativessuchascopperchromiumarsenate(CCA) whichcan
betoxic.When using thesematerials, extracare should betaken toavoid inhalation
and minimize skincontact. Wear anapproved duskmask or respirator.
16. Maintenance.For yoursafety, serviceand maintenance shouldbe performed regularlyby a
qualified technician.
ADDITIONALSPECIFICSAFETYINSTRUCTIONSFORBENCHGRINDERS
1. When grindingany metals, thegrinder can producesparks which mayland on yourclothing or
hit your face.You shoulduse a fullface mask andappropriate protective clothing. Alsoensure
that you arenot operating thegrinder around flammablematerials of liquids. Alwaysmake sure
the safetyshields and wheelguards are inplace at alltimes. Keep guards in placeand in good
working order.
2. Make surethe grinding wheelsare of theproper speed (RPM)rating for thegrinder.
3. Frequentlyquench the workpiecein waterto preventoverheating; becareful not toget water
on the benchgrinder.
4. Use thetool rest to steady theworkpiece. If thetool rest isnot used thetorque ofthe spinning
grinding wheel maypull the workpiecefrom yourhands.
5. Do notuse aluminum oxidewheels when grindingnonferrous metalssuch as aluminumand
brass. Use siliconcarbide wheels fornonferrous metals.
6. When buffing material, alwayshold the materialon the lower side ofthe buffing wheel. Always
keep fingers clearof the grindingwheel and thetool rest.
Note:Performance of thistool mayvary depending onvariations in localline voltage. Extension
cord usage may also affecttool performance.
WARNING
The warnings, cautions,and instructions discussedin this instructionmanual cannot cover all
possible conditions andsituations that mayoccur. Itmust be understoodby the operator that
common sense andcaution are factors which cannotbe built intothis product, butmust be
supplied by theoperator.
UNPACKING
When unpacking, checkto makesure the following parts are included:
(1) 3" BenchGrinder
(1) Flex Shaft
(1 ) Wrench
(1) Grinder wheel
(1) Fiber Wheel
(2) Grinding StoneBits
OPERATION
Turning theBench Grinder ONand OFF
1. Insert the pluginto an electricaloutlet.
2. Turnthe speed controlknob (46) clockwiseto turn themotor ON andadjust its speed.
3. Toturn OFF, turn theknob counterclockwiseuntil it clicks.
4. Neverleave thebench grinder runningunattended. Alwaysturn off the tool when notin use.
!
2 of 5

USINGTHEGRINDER
WARNING
The grinding wheelcan fly apart andcause injury. Grindingwheels must always be checkedfor
cracked forcracks or imperfections.This is donewith the "ringtest". Tap the wheelgently near
the outer rimwith the handleof a screwdriver. You should heara clear bell-likering. If adull thud
occurs, do notuse the wheel.The wheel maybe damaged andcould come apart duringoperation.
CAUTION:Always wearANSI-approved safetyglasses when grinding.
1. Alwaysbring the workpieceinto the wheelgently, withoutjarring.
2. The workpiecewill quickly becomeheated; therefore,frequent quenching inwater isrequired.
3. When grindinghigh speed steelssuch as drilland tool bits,avoid hightemperature buildupas
this can affectthe temper ofthe steel.
4. For smallworkpieces such asdrill bits orchisels, avoidapplying pressure tothe wheel ata high
angle that couldcause the workpieceto become lodgedbetween the tool rest andthe wheel.
5. When usingthe Flexible Shaft,be sure theGrinder is turnedOFF and waitfor it to stop before
setting down theFlexible Shaft.
MAINTENANCE
Dressing the GrindingWheel
Note:New wheels frequentlyare not trueand during operationwill often becomegrooved, glazed
(build up), outof round, ormisshapen. Youwill need agrinding wheel dresserfor this operation.
1. Stand tothe side ofthe wheel for this operation.
2. If thewheel is newlet it runfor a minute with noload. If thewheel runs straightand true youwill
not need todress it priorto operation. Ifit dose not,proceed with thefollowing instructions.
3. If youare using a"pistol grip" dresser, grip thehandle firmly withone hand andthe arm oft
he dresser withthe other.Allow the wheelto reach fullspeed. Use thetool rest to support your
hand and thedresser, andevenly applythe dresser toall surfaces ofthe wheel. Thewheel can be
dressed in afew minutes.
4. If youare using an"inline" dresser,hold the handlefirmly, putthe dresser onthe tool test so
that its wheelscan movefreely (i.e., theexposed part ofthe wheel shouldbe facing up). Let the
wheel reach fullspeed and applythe dresser evenly to allsurfaces.
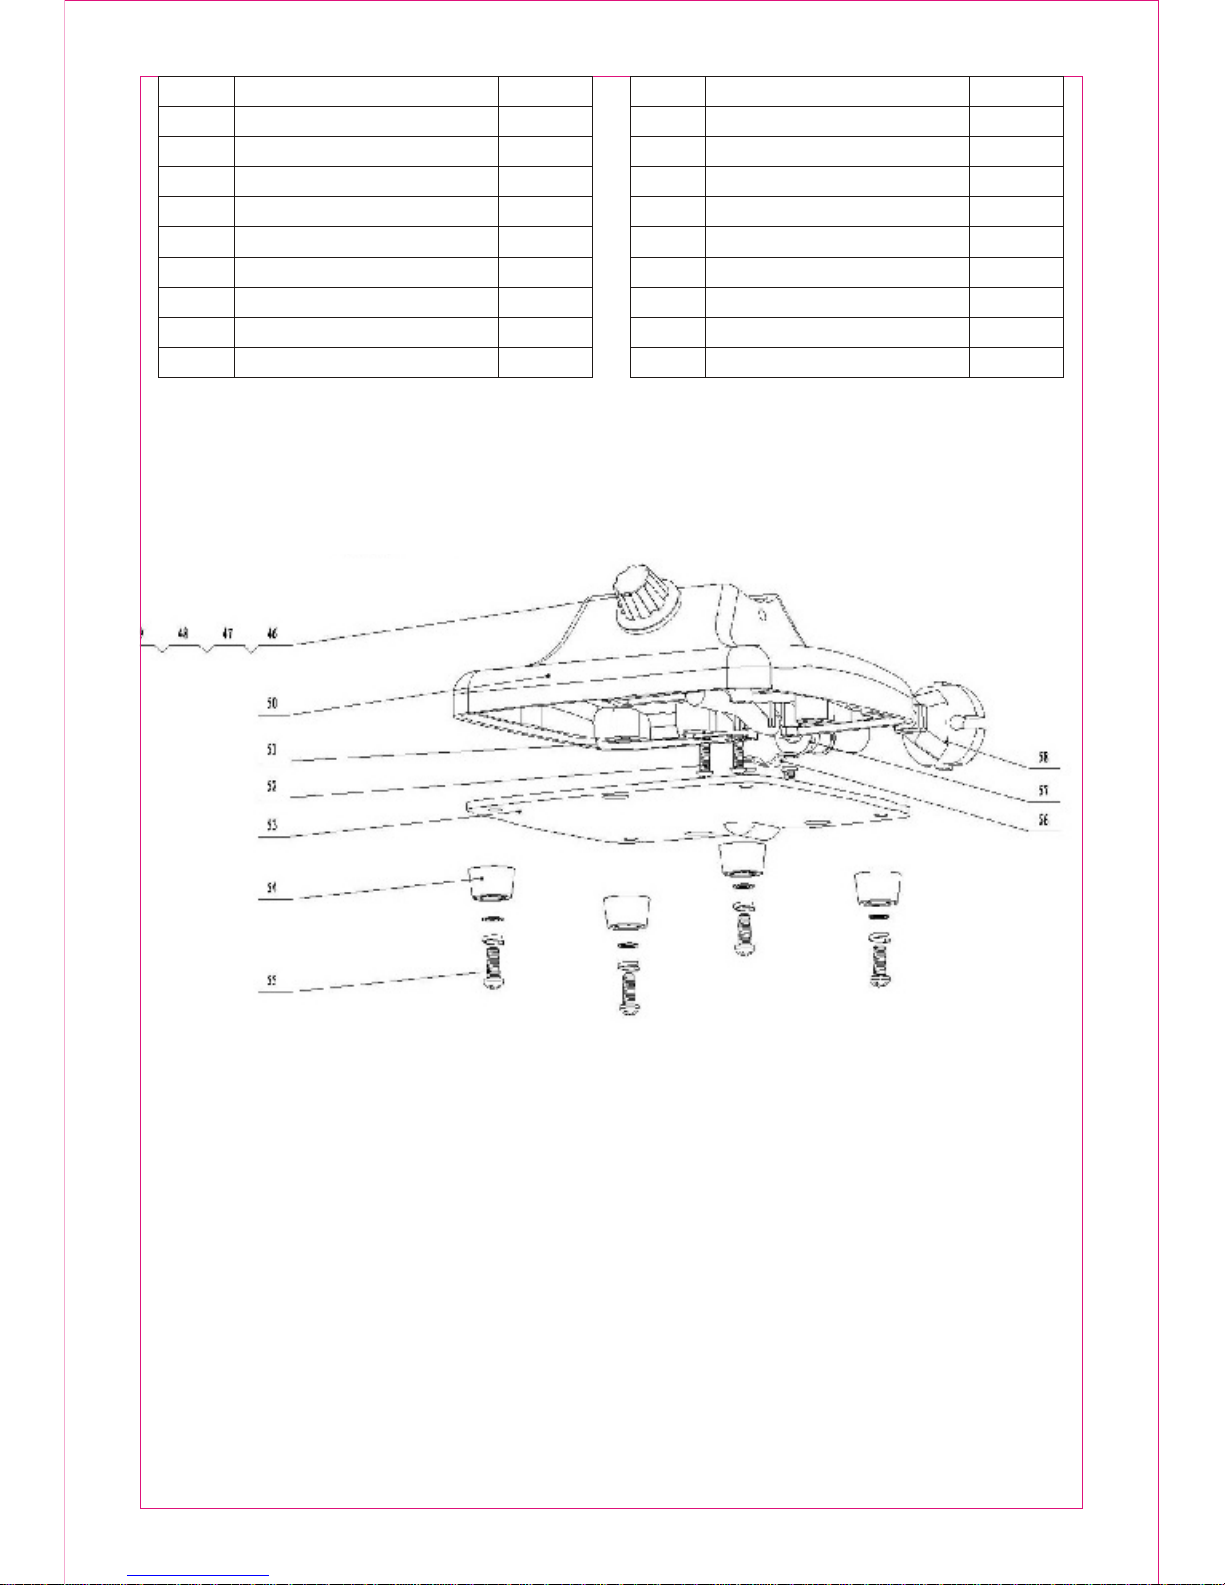
PARTLIST
!
Part No. Quantity
Description Part No. Quantity
Description
1
2
3
4
5
6
7
8
9
10
11
12
13
14
15
16
17
18
19
20
Left Nut M10
Wheel Pushing Ring
Polishing Wheel
Nut M4
Spring Washer M4
Flat Washer (4.3x12x1)
Steel Sleeve
Wheel Cover
Bearing Cover
Brush Cover
Bearing
Brush
Motor Housing
Flat Washer (4.3x8x0.5)
Short Sleeve
Brush Holder
Long Sleeve
Stator
Stator Bolt
Snap Ring
30
31
32
33
34
35
36
37
38
39
40
41
42
43
44
45
46
47
48
49
Plastic Shield
Lock Nut M4
Plastic Shield Mounting Plate
Flat Washer
Spring Washer
Pan Head ScrewM6x20
Pan Head ScrewM4x40
Cover
Grinding Wheel
Gasket
Nut M10
Flexible Shaft Connector
Rotating Guard
Wheel Cover
Pan Head ScrewM5x10
Flexible Shaft Connector Nut
Knob
Nut M10
Washer
Switch
2
2
2
2
2
2
2
1
1
2
1
1
1
1
1
1
1
1
1
1
1
4
1
6
13
4
2
1
1
2
1
2
1
9
2
1
2
1
2
2
3 of 5
21
22
Fan Shroud
Rotor
50
51
Base
Circuit Board
1
1
1
1
Part No. Quantity
Description Part No. Quantity
Description
24
25
26
27
28
29
Workpiece Holder
Pan Head ScrewM5x8
Spring Washer M5
Flat Washer
Bearing
Grinding Wheel Cover
53
54
55
56
57
58
Plastic Cover
Rubber Feet
Pan Head ScrewM5x18
Sleeve Plate
Circuit Sleeve
Cord
1
4
4
1
1
1
2
11
16
16
1
1
23 Rubber Gasket 52 Pan Head ScrewM4x10 5
2
4 of 5
Table of contents
Other Northern Industrial Tools Grinder manuals


Popular Grinder manuals by other brands


Meterk
Meterk S1M-GW20-115 Translation of the original instructions

U.S.SAWS
U.S.SAWS SX65000C operating manual

Parkside
Parkside PWS 230 C3 Translation of the original instructions

SUHNER ABRASIVE
SUHNER ABRASIVE ASC 9 Technical document

PTA
PTA P1322 Operation manual

Craftsman
Craftsman CMCG400 instruction manual


