Northern Tool and Equipment Ironton Series User manual

READ &SAVE THESE INSTRUCTIONS
1500 PSI Pressure Washer
Owner’s Manual
WARNING: Read carefully and understand all ASSEMBLY AND OPERATION
INSTRUCTIONS before operating. Failure to follow the safety rules and other basic safety
precautions may result in serious personal injury.
Items #60727

Page 2 of 30
Thank you very much for choosing an Ironton®product!
For future reference, please complete the owner’s record below:
Serial Number/Lot Date Code: ________________________________
Purchase Date: ____________________________________________
Save the receipt, warranty, and this manual. It is important that you read
the entire manual to become familiar with this product before you begin
using it.
This pressure washer is designed for certain applications only. Northern
Tool and Equipment is not responsible for issues arising from
modification or improper use of this product such as an application for
which it was not designed. We strongly recommend that this product not
be modified and/or used for any application other than that for which it
was designed.
For technical questions, please call 1-877-234-6869.

Page 3 of 30
Table of Contents
Intended Use..........................................................................................................................................4
Technical Specifications......................................................................................................................4
Important Safety Information...............................................................................................................4
Specific Operation Warnings...............................................................................................................5
Main Parts of Pressure Washer...........................................................................................................6
Assembly Instructions..........................................................................................................................6
Before Each Use....................................................................................................................................7
Operating Instructions........................................................................................................................12
After Each Use.....................................................................................................................................18
Maintenance ........................................................................................................................................19
Troubleshooting..................................................................................................................................22
Parts Diagram of Pressure Washer...................................................................................................22
Parts List of Pressure Washer...........................................................................................................23
Parts Diagram of Pump ......................................................................................................................24
Parts List of Pump ..............................................................................................................................25
Parts Diagram of Engine ....................................................................................................................26
Parts List of Engine ............................................................................................................................27
Replacement Parts..............................................................................................................................28
Limited Warranty.................................................................................................................................29
Page 4 of 30
Intended Use
The Ironton 1500 PSI Pressure Washer is designed for long life, dependability, and top performance.
It produces a high-pressure water spray and incorporates cleaning chemicals into a low-pressure
water spray. The pressure washer is powered by a gasoline engine.
Technical Specifications
Property
Specification
Engine
Ironton 79cc
Maximum Pressure
1500 PSI
Maximum Flow
1.5 GPM
Max Water Temp
140° F
Overall Dimensions
.25”×20’
Dry Weight
41.89 lb.
Important Safety Information
⚠WARNING
Read and understand all instructions. Failure to follow all instructions may result in serious injury
or property damage.
The warnings, cautions, and instructions in this manual cannot cover all possible conditions or
situations that could occur. Exercise common sense and caution when using this tool. Always be
aware of the environment and ensure that the tool is used in a safe and responsible manner.
Do not allow persons to operate or assemble the product until they have read this manual and
have developed a thorough understanding of how it works.
Do not modify this product in any way. Unauthorized modification may impair the function and/or
safety and could affect the life of the product. There are specific applications for which the product
was designed.
Use the right tool for the job. DO NOT attempt to force small equipment to do the work of larger
industrial equipment. There are certain applications for which this equipment was designed. This
product will be safer and do a better job at the capacity for which it was intended. DO NOT use
this equipment for a purpose for which it was not intended.
Industrial or commercial applications must follow OSHA requirements.
⚠WARNING
Do not use the product where there is a risk of causing a fire or an explosion; e.g., in the presence
of flammable liquids, gases, or dust. The product can create sparks, which may ignite the
flammable liquids, gases, or dust.
Keep children and bystanders away from the work area while operating the tool. Do not allow
children to handle the product.

Page 5 of 30
⚠CAUTION
PRESSURE WASHER USE AND CARE
Do not force the pressure washer. Products are safer and do a better job when used in the
manner for which they are designed. Plan your work, and use the correct product for the job.
Check for damaged parts before each use. Carefully check that the product will operate properly
and perform its intended function. Replace damaged or worn parts immediately. Never operate the
product with a damaged part.
Store the pressure washer when it is not in use. Store it in a dry, secure place out of the reach of
children. Inspect the tool for good working condition prior to storage and before re-use.
Use only accessories that are recommended by the manufacturer for use with your product.
Accessories that may be suitable for one product may create a risk of injury when used with
another tool. Never use an accessory that has a lower operating speed or operating pressure than
the tool itself.
Keep guards in place and in working order. Never operate the product without the guards in place.
Do not leave the tool running unattended.
Specific Operation Warnings
⚠WARNING
CO Poisoning: Exhaust from engine contains carbon monoxide, a poisonous gas that can
cause carbon monoxide poisoning and possible death if inhaled. ONLY run pressure washer
OUTDOORS and at least 20 feet from the home, away from windows, vents and air intakes, to
allow proper ventilation. If you start to feel sick, dizzy, or weak while using the pressure
washer, shut off the engine and get to fresh air RIGHT AWAY.
Injection Injury: High-pressure spray can pierce skin and underlying tissues, leading to serious
injury and possible amputation. Such an injection injury can result in blood poisoning and/or
severe tissue damage.
Flying Debris: High-pressure spray can cause flying debris and possible surface damage.
Electric shock: Operating equipment in wet conditions or near water can cause electric shock.
Chemical Exposure: Cleaning chemical vapors or contact with skin may be hazardous.
Fire/Explosion: Engine sparking can ignite fuel or other flammable liquids or vapors in the
vicinity. Hot exhaust from engine can ignite combustible materials.
Burns: Pressure Washer pump and engine are hot surfaces that can cause burn injuries.
Page 6 of 30
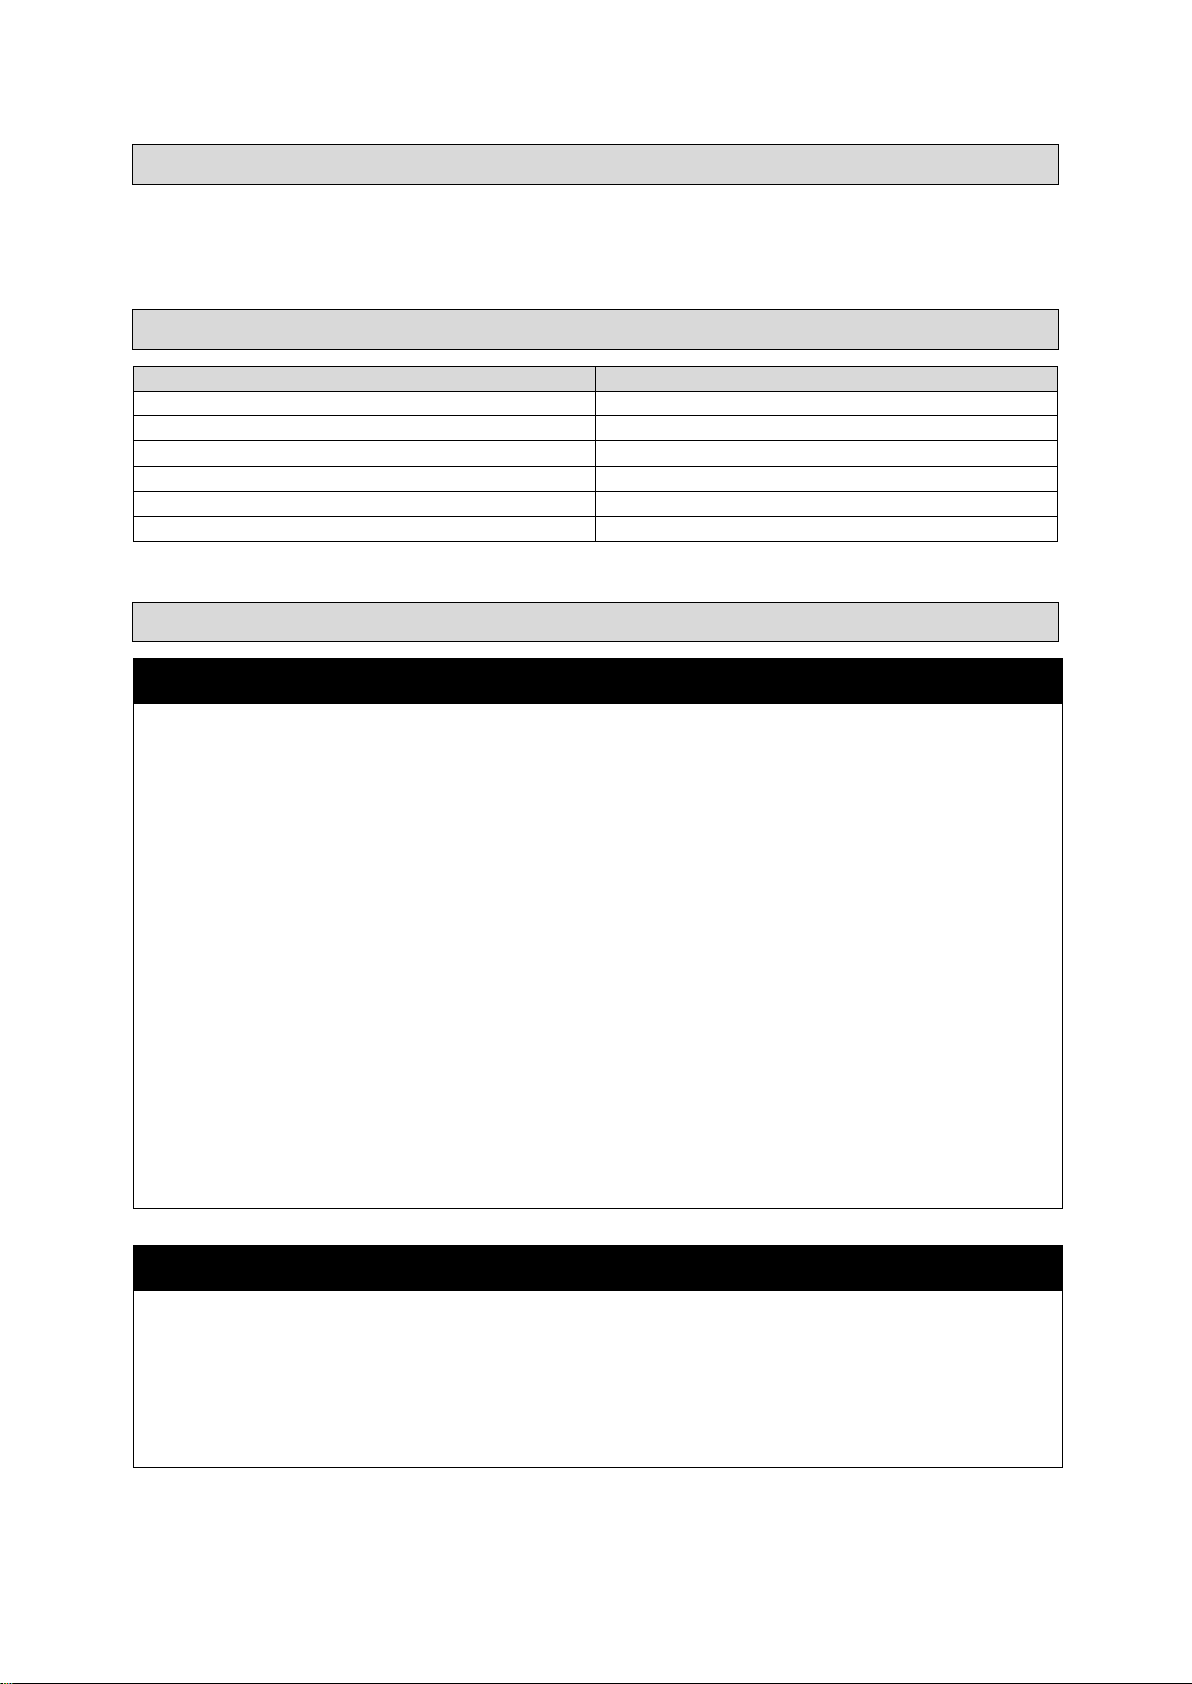
Main Parts of Pressure Washer
Reference
Subassembly
1
Pressure Washer Pump
2
Pump (Water) Inlet
3
Thermal Protector
4
Chemical Injector
5
Pump (Water) Outlet
6
Hose Ribbon
7
Engine
8
Handle
9
Upper Gun Holder
10
Spray Lance
11
Spray Gun
12
Trigger
13
Hose
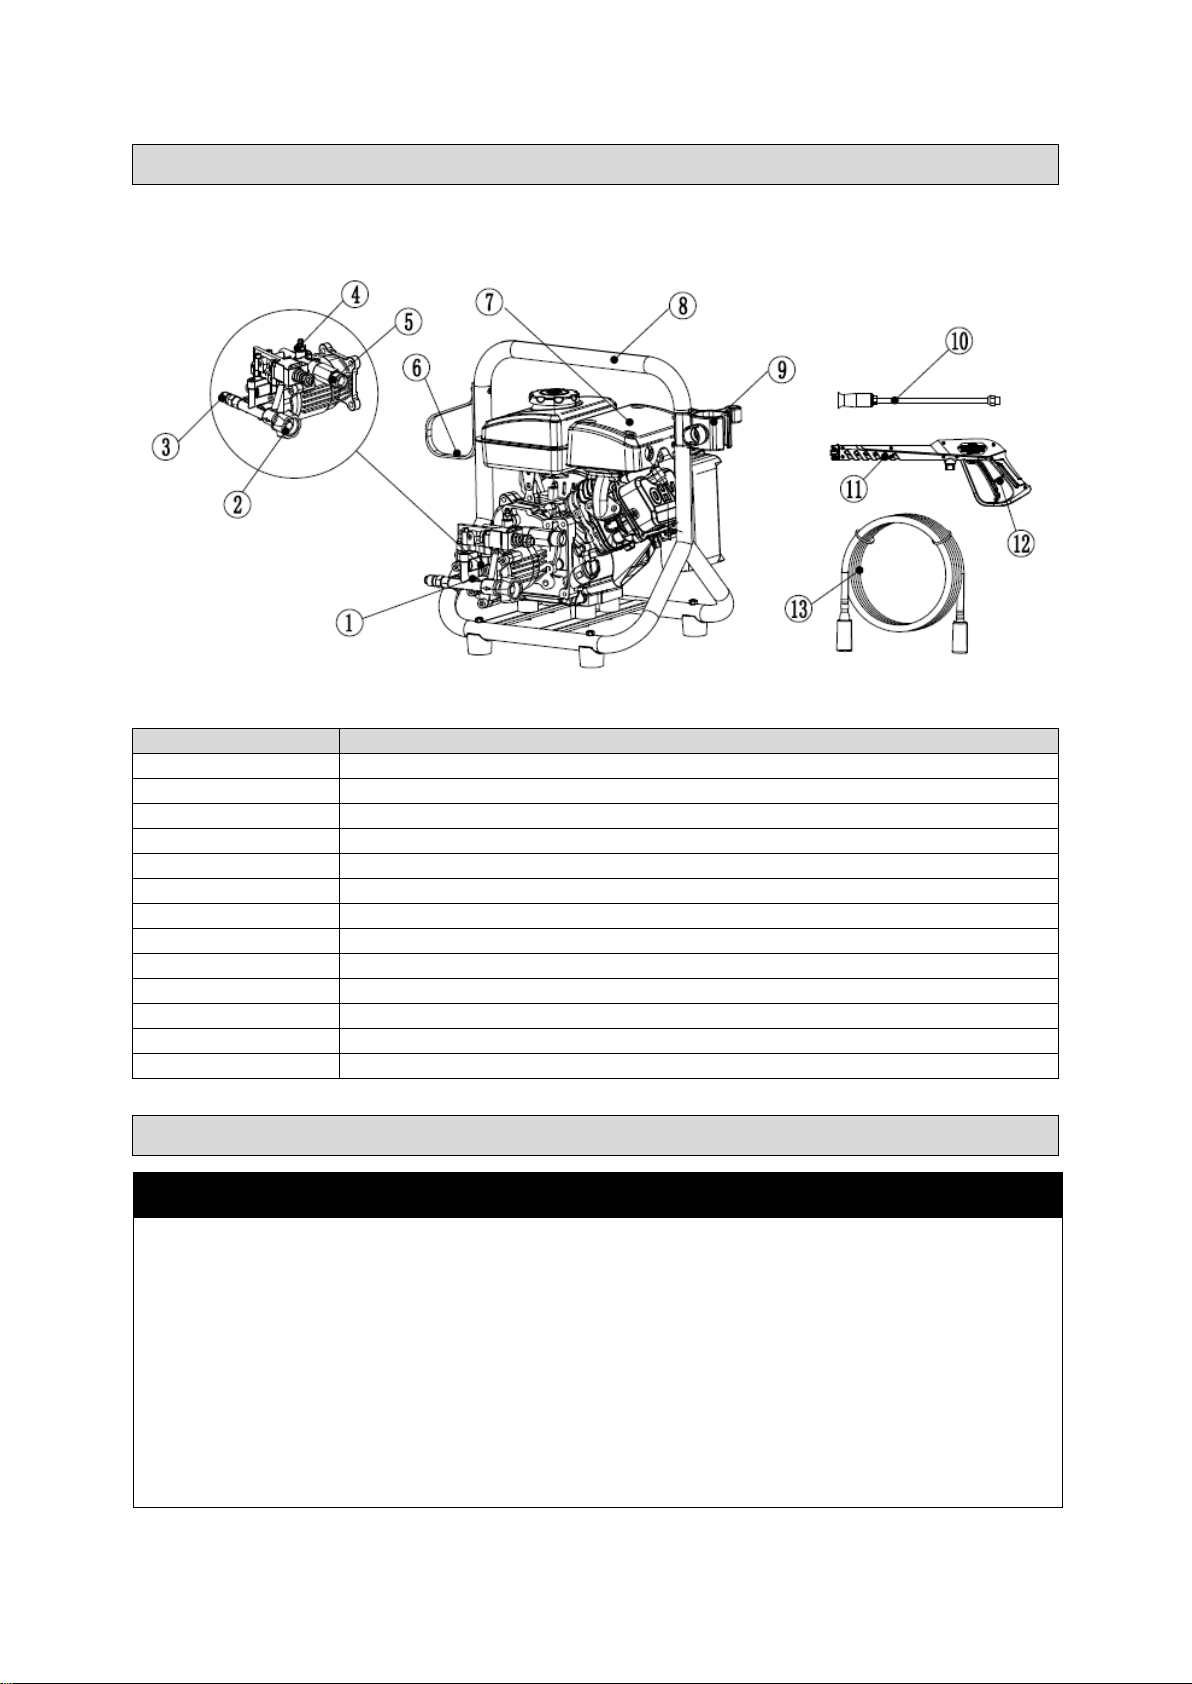
Assembly Instructions
⚠WARNING
High-pressure fluid discharge from leaks (even pin-sized) or ruptured components can pierce skin and
inject fluid into the body. Injection injury can result in blood poisoning and/or severe tissue damage
leading to infection, gangrene, and possibly amputation.
Never use a finger or skin to check for leaks.
Never operate machine with damaged or missing hoses/parts.
Never attempt to repair a high-pressure hose or component – Always replace it with a part that is
rated at or above the pressure rating of this machine.
The pressures washer is heavy. It can crush and cause serious injury if it rolls out of control or tips
over. Follow the instructions below for safely moving the pressure washer.
Page 7 of 30
Tools Required for Assembly
Open-end wrenches:S10 and S8
Bolts:M6
Flat Gasket: Φ6.6
Installation Steps
1. Ensure the upper gun holder hole fits the base of the mounting holes.
2. Insert the bolt and flat gasket in the holder by hand.
Tighten the nut with an S10 open-end wrench and then tighten the bolt with an S8 open-end wrench.
Before Each Use
Step 1. Inspect & Unpack
Upon receiving the pressure washer check for missing or damaged parts.
See the Main Parts of Water Pump section of this manual for a diagram of the pressure washer and
its components.
● For missing components, contact Product Support at 1-877-234-6869.
● For damaged components, contact the freight company that delivered the unit and file a claim.
● If complete, fill out the product serial number information. See the warranty section in the back of
this this manual.

Page 8 of 30
Step 2. Select Suitable Location
Moving and Handling
● Use the handles to manually move the pressure washer.
● Push the pressure washer in front of you as you walk.
● To turn, push down slightly on the handles and pivot the pressure washer on its wheels.
Elevating or Lowering the Pressure Washer
● To reduce risk of injury, it is recommended that two adults lift the pressure washer.
● Only lift the pressure washer by the bumper and handle. Do not use the pump or engine as a lifting
point.
Outdoor Use Only
1. Never run the pressure washer in an enclosed or partially enclosed location such as a building,
garage, barn, shed, or house. These spaces can trap poisonous gasses. Running a fan or opening
windows will not provide adequate ventilation to prevent dangerous CO build-up.
2. Only use the pressure washer outdoors and far away from open windows, doors, and building or
vehicle vents.
3. Place the pressure washer so that the exhaust fumes will not be directed towards people or
building air intakes.
4. Do not locate and use the pressure washer in the presence of flammable vapors, dust, gases, or
other potentially combustible materials.

Page 9 of 30
5. Note that this pressure washer is NOT designed or approved for use in vehicles or marine
applications. Never run the pressure washer inside RVs or other vehicles, on boats, or on pick-up
truck beds.
Positioning
1. The pressure washer should be positioned on a firm, level (less than 3 degree slope), heat-
resistant surface with good drainage and a nearby water supply.
2. The pressure washer should be placed within garden hose distance of a continuous water supply.
Ensure that the pressure washer sits level and will not slide or shift during operation. If applicable,
block the pressure washer's wheels to prevent movement.
3. Situate so there is adequate pulling room for starting the engine using the recoil starter. Attempting
to pull at an odd angle could rip off grip cord and/or cause muscular injuries to the operator.
Airflow
1. Situate so there is adequate clearance around pressure washer to allow for airflow –at least 7 feet
from any non-combustible wall or obstruction.
2. Do not operate with a tarp, blanket, or cover surrounding the machine.
3. Do not place any objects against or on top of the unit.
4. The pressure washer needs adequate, unobstructed flow of air to allow for proper combustion and
adequate cooling. Proper combustion can only be obtained when there is a sufficient supply of oxygen
available for the amount of fuel being burned. Cooling ventilation is required to prevent overheating of
the pressure washer and possible fire.
Exhaust
⚠WARNING
Carbon Monoxide Hazard
Exhaust fumes from the engine contain carbon monoxide (CO), a poisonous gas you cannot see,
smell, or taste. The CO generated by the engine can rapidly accumulate, even in areas that appear
to be well ventilated, resulting in dangerous and fatal concentrations within minutes. NEVER run
pressure washer inside any enclosed or semi-enclosed spaces, including homes, garages,
basements, sheds, boxes, pick-up truck beds, RVs, or boats. These spaces can trap poisonous
gases, EVEN if you run a fan or open windows. If you start to feel sick, dizzy, or weak while using the
pressure washer, shut off the engine and get to fresh air RIGHT AWAY. See a doctor. You may have
carbon monoxide poisoning.
Exhaust Modification Hazard
Never attempt to attach ductwork to the muffler system to allow for installation inside an enclosure.
This could cause heat build-up and increased exhaust backpressure, resulting in possible exhaust
leakage or damage to the pressure washer.
1. The exhaust gas from your pressure washer is extremely hot and can cause combustible materials
to catch on fire.
2. Make sure the engine is at least 7 feet from all combustible materials and buildings/structures
during operation.

Page 10 of 30
3. Keep a fire extinguisher rated "ABC" nearby. Keep it properly charged and be familiar with its use.
4. Place the unit so that the exhaust fumes will not be directed towards people or building air intakes.
Step 3. Check/Add Engine Oil
⚠WARNING
Never open the oil port while the engine is running. Hot oil can spray over your face and body. Engine
is shipped without oil. You must add oil before first use.
Use the recommended oil type for your engine and expected ambient conditions. (See the Engine
Manual section of this manual for the oil type and capacity, and more detailed oil check/fill
instructions.)
Step 4. Add Fuel
⚠WARNING
Fuel Fire/Explosion Hazard
Gasoline is highly flammable and explosive. Heat, sparks, and flames can ignite fuel vapors, which
can become widespread during fueling. A flash fire and/or explosion could result and cause serious
injury or death. Always use extreme care when handling fuels. Carefully follow all instructions to avoid
the following conditions which could result in fuel ignition:
gas vapor collection inside enclosures
static electric sparks
sparks from electric wiring, batteries, or running engines
sources of heat (such as a hot engine exhaust)
open flames, including pilot lights
Always follow these general safety rules when fueling:
1) Turn pressure washer off and allow to cool for at least two minutes before removing any fuel cap.
Note: A running or still-hot engine is hot enough to ignite fuel.
2) Fill fuel tank OUTDOORS –never indoors. Fuel vapors can ignite if they collect inside and
enclosure and explosion can result.
3) Stay away from all sources of heat, sparks, and flames. Do not smoke.
4) Never pump fuel directly into the gas tank at a gas station –it could cause a static electric spark.
Follow these steps to avoid static electric sparking during fueling:
● Use an approved portable container to transfer fuel to the pressure washer's tank. (A portable
container made of metal or conductive plastic is preferred because it dissipates charge to ground
more readily.)
● Always place container on the ground to be filled. Never fill the portable gas container while it is
sitting inside a vehicle, trailer, trunk, or pick-up truck bed.

Page 11 of 30
● Dissipate static charge from your body before beginning the fueling process by touching a grounded
metal object at a safe distance from fuel sources.
● Keep nozzle in contact with container while filling. Do not use a nozzle lock-open device.
5) Clean up fuel spills/splashes immediately.
● If possible, move the pressure washer away from spilled fuel on the ground.
● Wipe up spilled fuel and wait 5 minutes for excess fuel to evaporate before starting engine.
● Fuel soaked rags are flammable and should be disposed of properly.
● If fuel is spilled on your skin or clothes, change clothes and wash skin immediately.
Step 5. Fill Engine Fuel Tank
Check the gasoline tank level. If needed, fill tank with fresh unleaded gasoline from a portable
container:
1) Remove engine gas cap.
2) Add gasoline through the fill opening:
● Use only a UL listed portable gasoline container to transfer the gasoline to engine's tank.
● Do NOT overfill the gasoline tank. Allow at least 1/2" of empty space below the fill neck to allow for
fuel expansion.
3) Replace gas cap securely before starting engine.
4) Store extra gasoline in a cool, dry place in a UL listed tightly sealed container.
Step 6. Inspect Fuel System/Check for Leaks
⚠WARNING
Gasoline fuel is highly explosive and fuel leaks can result in fire or explosions. You can be burned and
seriously injured if the fuel system is not properly hooked up or there is a fuel leak when you start the
engine.
Inspect the engine fuel system and check for leaks before each use.
Do not start pressure washer until all needed repairs have been completed.
Inspect the entire fuel system. Look for:
● signs of leaks or deterioration
● chafed or spongy fuel hose
● loose connections
● loose or missing fuel hose clamps
● damaged fuel tank

Page 12 of 30
● defective gasoline shut-off valve
Step 7. Inspect Spray System
Always inspect spray system for damage and leaks before each use. Do not start pressure washer
until all needed repairs have been completed.
Operating Instructions
⚠WARNING
After you have checked and fueled the equipment and positioned it in a suitable worksite, it is time to
start your pressure washer. The following are the procedures necessary for safe, successful operation
of the pressure washer.
Instruct Operators. Owner must instruct all operators in safe set-up and operation. Do not allow
anyone to operate the pressure washer who has not read the Owner’s Manual and been instructed on
safe use practices.
Safety Equipment/controls. Always operate with all safety covers, guards, and barriers in place and
in good working order, and all controls properly adjusted for safe operation.
Moving Parts. Keep hands, feet, hair and apparel away from moving parts. Air vents may cover
moving parts and should be avoided as well. Never remove any guards while the unit is operating.
Ear Protection. Hearing can be damaged from prolonged, close-range exposure to the type of noise
produced by this pressure washer. The use of ear plugs or other hearing protection device is
recommended for persons working within 15-20 feet of the running pressure washer for an extended
period of time.
Eye Protection. Wear OSHA required ANSI “Z87.1” safety glasses when operating or servicing the
pressure washer. Pressurized spray from this unit can cause severe injury to the eyes. Small objects
can become airborne as the spray contacts them.
⚠CAUTION
HIGH ALTITUDE OPERATION
Operating at an altitude of greater than 2000 feet (610 meters) may affect your engines performance,
fuel consumption, and emissions. To remain emissions compliant and improve engine performance
at higher altitudes, a high-altitude kit is required. A high altitude kit includes a carburetor jet resized
to help correct air / fuel mixture at altitude. To order a high altitude kit or if you have additional
questions, go to www.northerntool.com or contact us at 1-877-234-6869. Please note, engines with
the high-altitude kit installed operated at lower altitudes could cause severe engine damage and
affect emissions compliance. When modified, a tag or decal should be added to the product stating
that a high-altitude kit was installed and to remind you to re-service the carburetor (re-jet) when
operating in lower altitude environments.

Page 13 of 30
Step 1. Connect Hoses and Water Supply
Position Pressure Washer for Use
● For detailed instruction on positioning the pressure washer for use, see the Before Each Use
section of this manual and reference Step 2: Select Suitable Location.
● In a location free of flammable vapors, dusts, and gases.
● In a location with adequate, unobstructed ventilation airflow.
● In a location with clearance from combustible materials.
● On a firm, level, heat-resistant surface with good drainage and nearby access to a continuous water
supply.
Step 2. Attach Garden Hose to Water Inlet
1.) Make sure the water supply is clean. Debris can cause excess pump wear and reduce
performance.
2.) The water supply garden hose must have an inside diameter of at least 5/8’’. If the hose is more
than 100 ft. long, the diameter must be at least 3/4’’.
3.) Never use a reservoir tank as a water source. Drawing water out of a tank may cause pump
cavitation and damage to your pump. This pressure washer is designed for a pressurized water
source such as a city water faucet. The water source pressure must not exceed 115 psi (8 bar).
4.) Always use a flexible rubber hose for your water supply. Do not use rigid piping.
Step 3. Attach High Pressure Hose to Spray Gun and Water Outlet
⚠WARNING
NEVER operate this pump with components (such as hose, connections, and spray gun) rated for
lower pressure and/or temperature limits than the machine's maximum rated pressure and
temperature, or component could rupture and cause serious personal injury from escaping high
pressure fluids.
1) See the Main Parts of Pressure Washer section of this manual for location of the pressure washer's
water outlet.
2) To attach the pressure hose to the spray gun, spin the pressure hose’s 22mm coupler onto the
spray gun’s inlet and hand tighten.

Page 14 of 30
Step 4. Start the Engine to Power the Pump
1. Make sure a water supply is connected and primed.
Note: Running the pump dry will cause damage and void the warranty.
2. To prevent accidental spraying, engage the safety latch on the spray gun trigger by rotating it to the
locked position.
3. Follow these instructions for starting the engine:
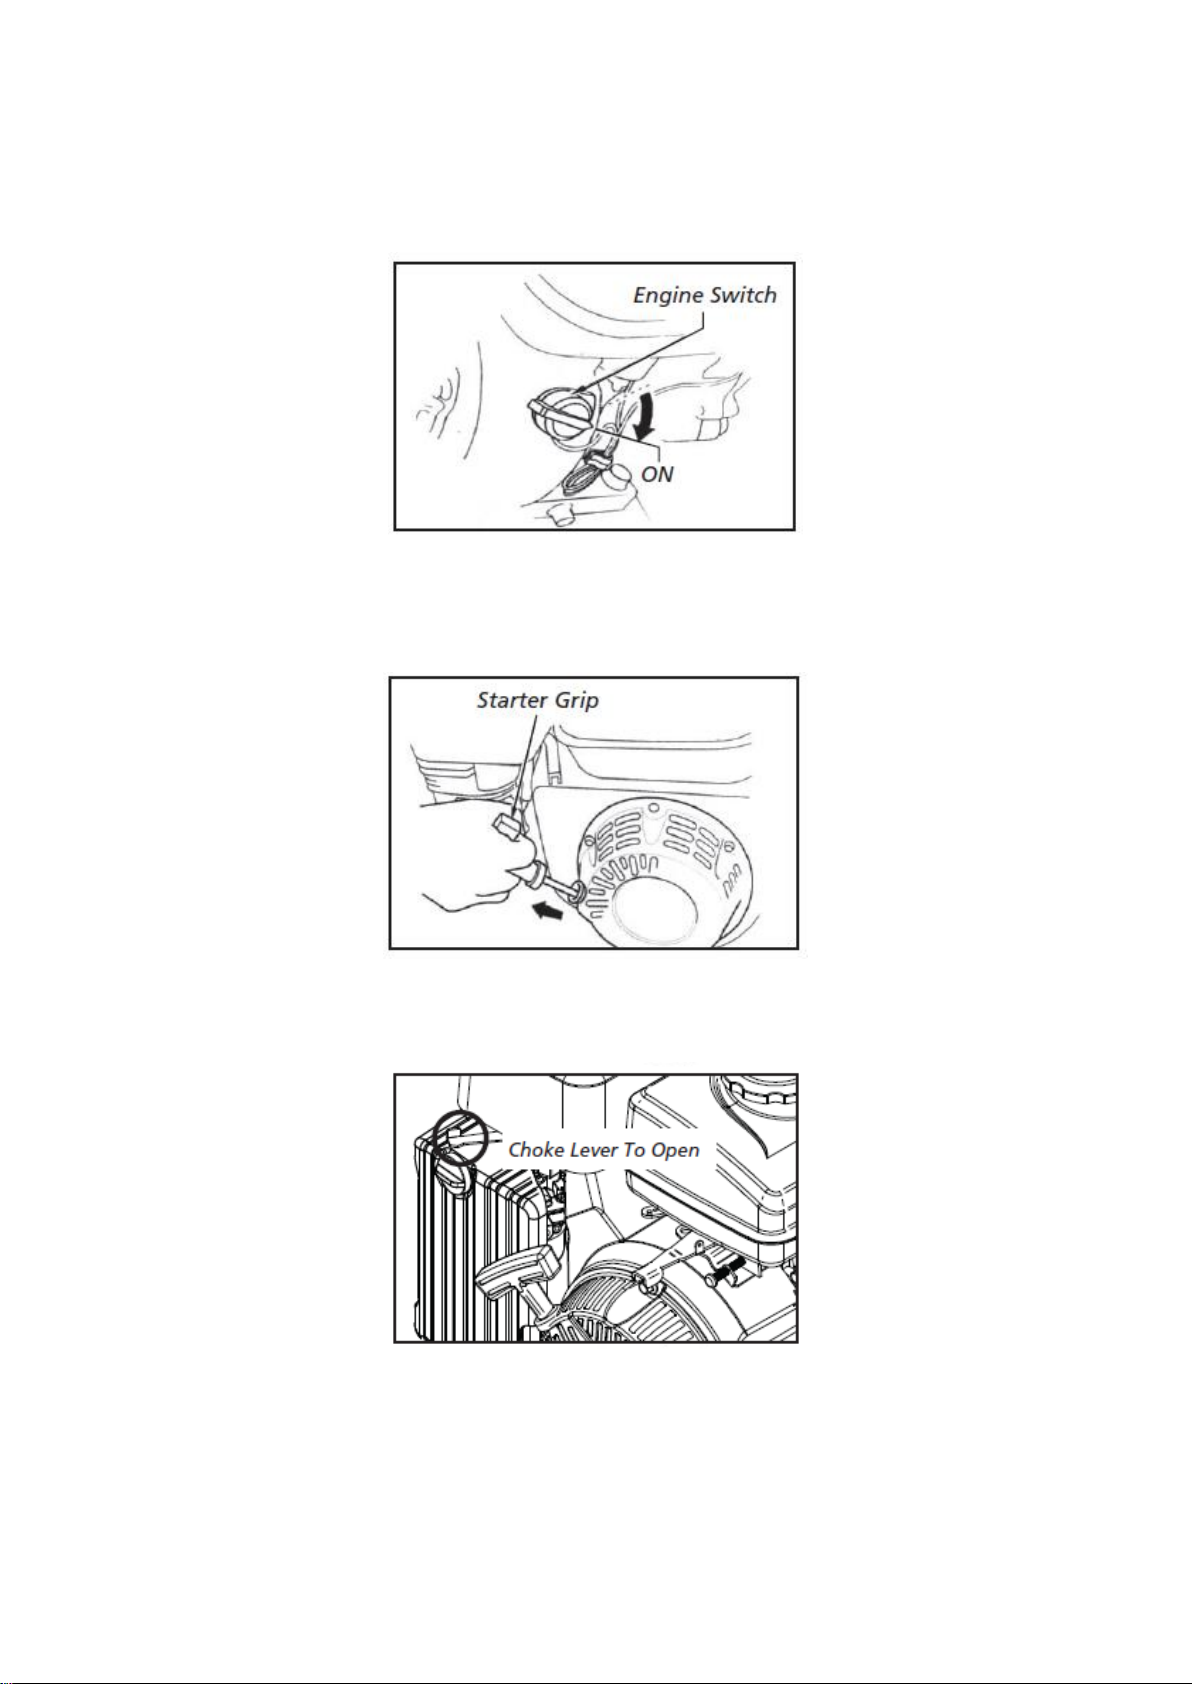
a) To start a cold engine, move the choke lever to the close position. To restart a warm engine,
leave the choke lever in the open position. The choke lever opens and closes the choke valve
in the carburetor. The close position enriches the fuel mixture for starting a cold engine. The
open position provides the correct fuel mixture for operation after starting, and for restarting a
warm engine.
b) Move the throttle lever away from the SLOW position, about 1/3 of the way toward the FAST
position. The throttle controls the engine speed. Moving the throttle lever in one direction or
the other makes the engine run faster or slower.
Page 15 of 30
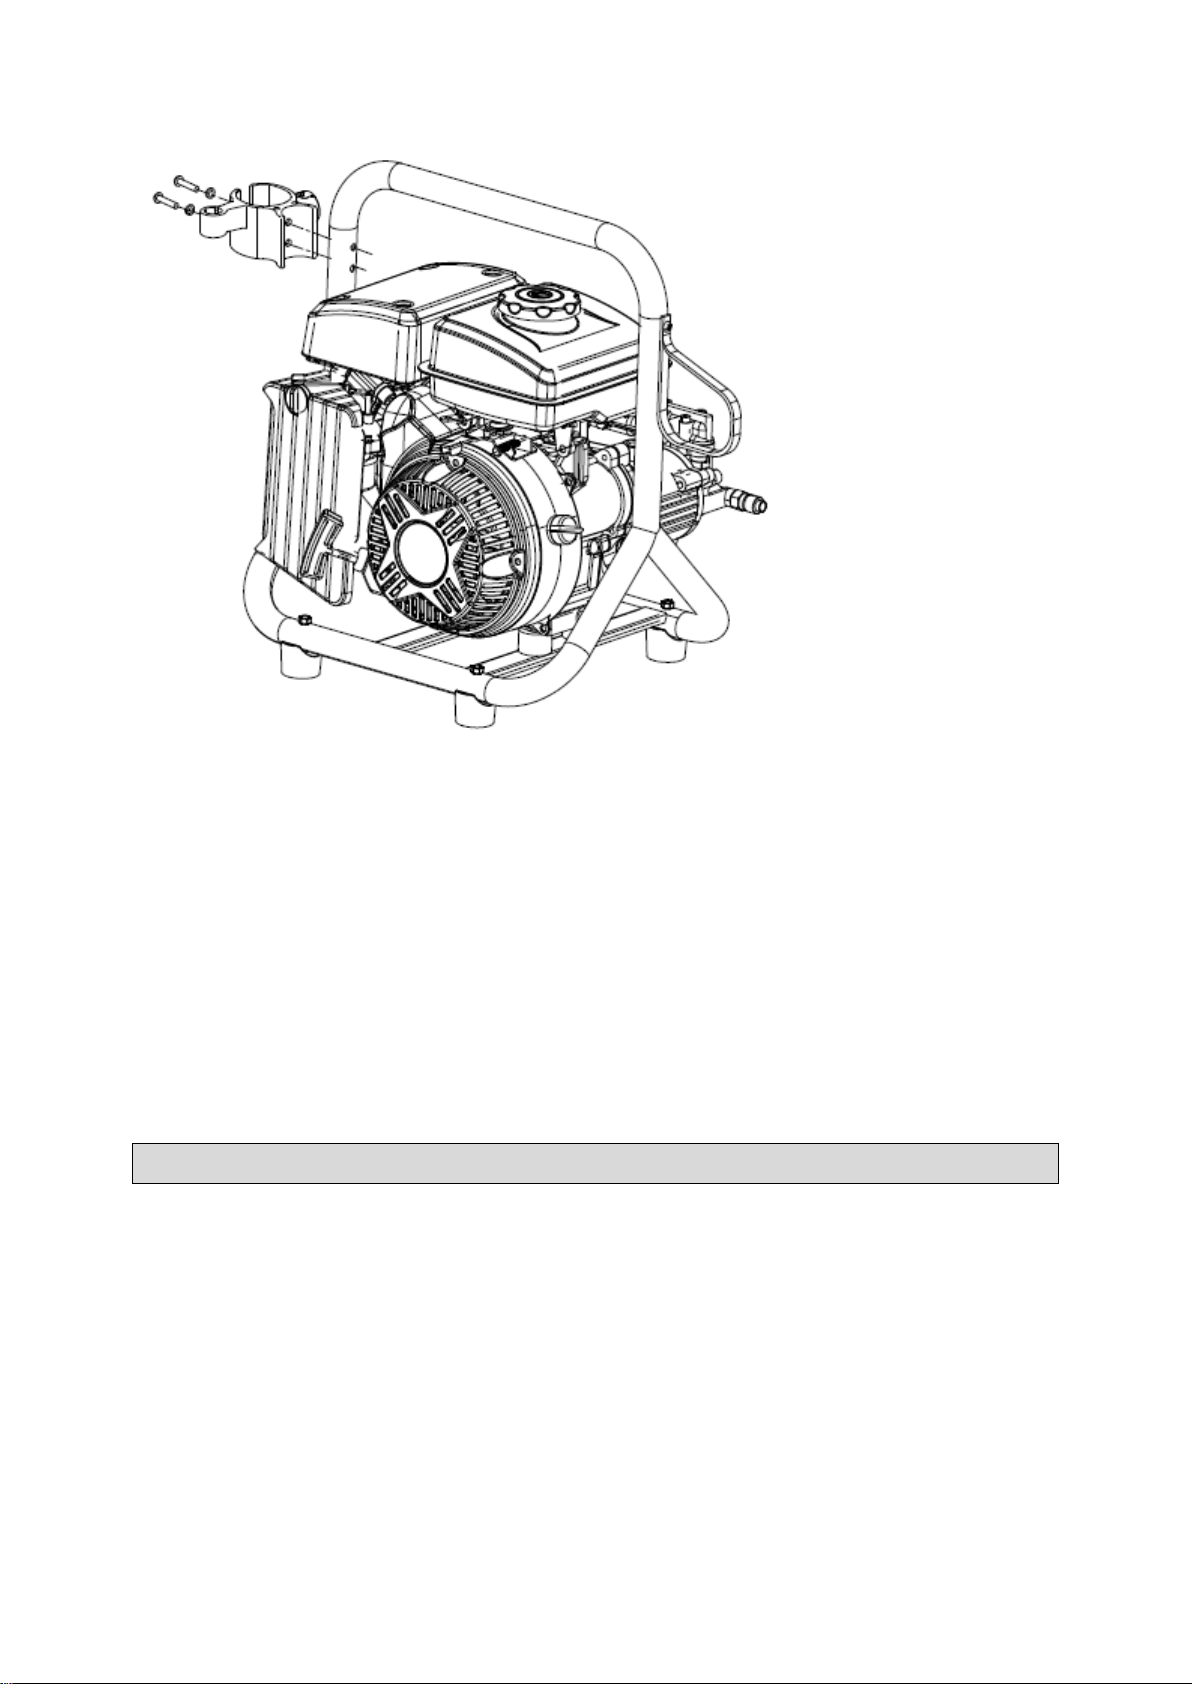
c) Turn the engine switch to the ON position. The engine switch enables and disables the
ignition system. The engine switch must be in the ON position for the engine to run. Turning
the engine switch to the OFF position stops the engine.
d) Operate the Recoil Starter: Pull the starter grip lightly until you feel resistance, and then pull
briskly. Return the starter grip gently. Pulling the starter grip operates the recoil starter to
crank the engine.
e) If the Choke lever has been moved to the closed position to start the engine, gradually move
it to the open position as the engine warms up.
Page 16 of 30
Setting the Engine Speed
Position the throttle lever for the desired engine speed. Moving the throttle lever in the directions
shown makes the engine run faster or slower.
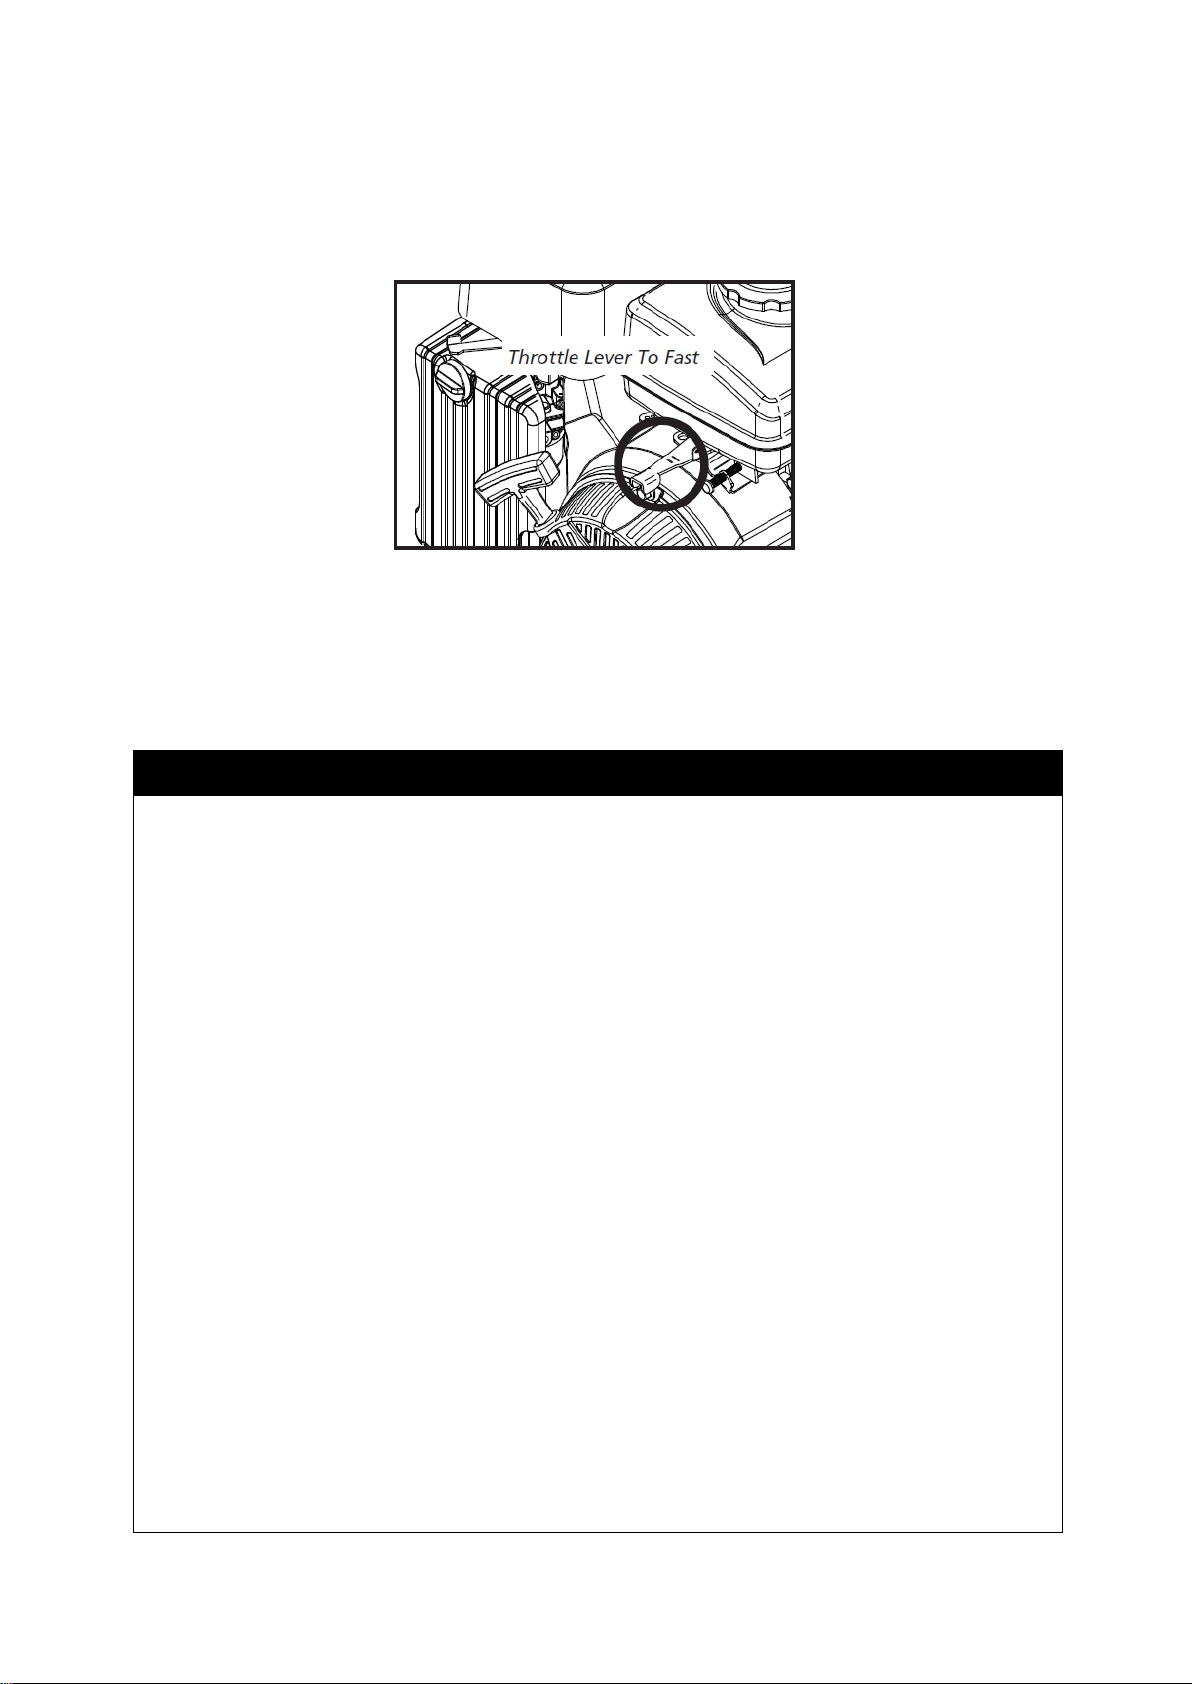
After starting the engine, move the throttle lever to the FAST position and check the pump output. The
pump output is controlled by adjusting the engine speed. Moving the throttle lever in the FAST
direction will increase the pump output, and moving the throttle lever in the SLOW direction will
decrease the pump output.
Beginning the High Pressure Spraying
⚠WARNING
Keep spray away from people. Never direct discharge stream at or near any person. Do not
allow any part of the body to come in contact with the fluid stream. High-pressure spray can cause
serious skin, eye, or falling injuries. Injection injury will occur if high-pressure spray pierces the
skin, injecting liquid under the skin. Injection injury can result in blood poisoning and/or severe
tissue damage leading to infection, gangrene and possibly amputation. Seek medical attention.
Do not secure trigger open. To reduce risk of injury, do not attempt to secure the spray gun open
by blocking or tying the spray gun in the open position.
Prevent slips / loss of balance. High-pressure spray could cause you to lose balance from
kickback forces, and wet surfaces can be slippery.
Keep good footing and balance at all times. Do not overreach.
Do not stand on unstable support when spraying.
If spraying from an elevated surface, use fall protection because spray gun kickback can
propel you off the elevated surface. When spraying from a ladder or scaffolding, ensure it is
firmly anchored from sway or tip-over.
Be aware of puddles and slippery surfaces. Ensure there is adequate drainage to prevent
pooling of water. Wear proper nonslip footwear.
Prevent surface damage and flying debris - Surfaces being sprayed must be strong enough to
with stand high-pressure spray or damage may result. In addition, high-pressure spray will
dislodge unsecured objects as well as surface chips and debris, resulting in hazardous flying
objects that can cause personal injury or property damage. Do not spray brittle surfaces or
breakable, fragile, or unsecured objects such as:
stucco or laminar flagstone

Page 17 of 30
some painted surfaces
windows or glass doors (because they may break)
light fixtures, flowerbeds, mailboxes
unsecured, lightweight objects
1). Be sure people and pets are not in the area, especially children.
2). Hold the spray gun firmly with two hands. Have a sturdy stance; the gun will kick back when
triggered.
3). Wash from the bottom to the top using side-to-side motions. This washes away heavy dirt and
allows the detergent to soak as you work toward the top.
4). Use the width of the spray pattern to wash a wide path. Overlap the spray paths for complete
coverage.
5). Small parts should be washed in a basket so the pressure does not push them away. Larger,
lightweight parts should be clamped down.
6). Always turn off the engine and activate the spray gun trigger to relieve system pressure when:
the sprayer is unattended, or
disconnecting hoses and servicing the pump.
Shutting Down the Pressure Washer
⚠WARNING
Never disconnect the high-pressure hose from the pump or spray gun while the system is
pressurized.
Relieve pressure by squeezing the spray gun trigger after the engine is turned OFF.
Stopping the Engine
Turn the engine OFF.
To stop the engine in an emergency, simply turn the engine switch to the OFF position. Under normal
conditions, use the following procedure:

Page 18 of 30
a) Move the throttle lever to the SLOW position.
b) Turn the engine switch to the OFF position.
c) Turn the water supply OFF.
d) Actuate the spray gun trigger to relieve system pressure.
e) Remove the garden hose.
f) Remove the pressure hose.
g) Cool the engine at least five minutes before storing; a hot engine is a fire hazard.
After Each Use
When you are finished using the pressure washer, you must prepare the sprayer for storage and store
it in a proper location.
1. Make sure the engine start switch is OFF.
2. Disconnect the engine spark plug wire if you haven't already done so.
3. Disconnect the high-pressure hose, garden hose, and spray gun.
4. Let the engine cool for 5 minutes before moving the pressure washer to its storage location.

Page 19 of 30
Maintenance
⚠WARNING
ALWAYS shut off the water supply, bleed the water pressure, turn off the engine, and disconnect the
spark plug wire before cleaning, adjusting, or servicing the pressure washer. After servicing, make
sure all guards and cover shields are replaced before using.
Maintenance Schedule
Each
Whichever comes first
Items
First
month or
20 hours
Every 3
months
or 50 hours
Every 6 months
or 100 hours
Every year
or 300 hours
Engine oil check
Oil level
●
Oil change
●
●
Air cleaner
Check
●
Check
Spark plug
●1
●2
Valve clearance adjustment
Clean combustion chamber
Spark eliminator
Every 100 hours running lean
Fuel supply pipe
Replace every 2 years
Clean inlet filter
●
Check tire pressure
●
Key
1. If used in extremely dusty areas, this maintenance should be done more often.
2. Should only be done by an authorized service technician, unless you are equipped with proper
repair tools.
Engine Oil Replacement
⚠WARNING
Burn Hazard. Never open oil port while engine is running. Hot oil can spray over face and body.
A warm engine can ensure quick oil draining.
Remove the oil filler cap and oil drain plug and drain the oil.
Reinstall the oil drain plug and tighten it. Put the oil filler cap in place.
Fill specified fresh engine oil to the level index mark.
Note: Oil capacity is 0.35L.

Page 20 of 30
Air Cleaner Maintenance
A dirty air cleaner will decrease the airflow quantity through the carburetor. To avoid issues with the
carburetor, clean the air cleaner regularly. In extremely dusty areas, this should be done more often.
⚠WARNING
Never clean the air cleaner in gasoline or low-flash point solvent, for gasoline and low-flash point
solvent may produce flames and even an explosion in certain conditions.
CAUTION
Never operate the water pump without the air cleaner installed. In the case that dirt and dust is
sucked into the engine, the engine will wear out more quickly.
1. Drive off the thumbnut and remove the air cleaner cover and filter element.
2. Replace the filter element with a factory approved filter.
3. Reinstall the removed parts.
Spark Plug Maintenance
To keep the engine in good, working condition, check the spark plugs regularly and keep them clean
and free of accumulated carbon.
1. Remove the spark plug cap.
⚠WARNING
When the engine has been running, the exhaust muffler is very hot and dangerously hot to the touch.
2. Check the spark plug visually. If there are signs of wear around it or the gasket is cracked, replace
it with a new one. Before reinstalling a spark plug, clean it with a wire brush.
3. Measure the spark plug gap with a feeler gauge and adjust it by bending the side electrode. The
spark plug clearance should be 0.70-0.80mm.
4. Check that the spark plug gasket is in good condition or replace it with a new one. Drive it into the
engine with a spark plug wrench to protect the thread from being damaged.
Note: When installing a new spark plug, after it touches and presses the gasket, twist a half turn; for a
used spark plug, twist 1/8-1/4 turn.
Table of contents


