Northland P Office J139 User manual

SYRACUSE
1 Dupli Park Drive, 5th Floor
Syracuse NY 13204
Tel: 315-671-6200
Fax: 315-671-0080
HOLLAND PATENT
9560 Main Street
Holland Patent NY 13354
Tel: 315-624-2000
Fax: 315-624-0288
IP Office J139 Phone
and
Preferred Voicemail
Quick Reference Guide
1
**MAILBOX INFORMATION** **ACCESS YOUR MAILBOX (LOG IN)**
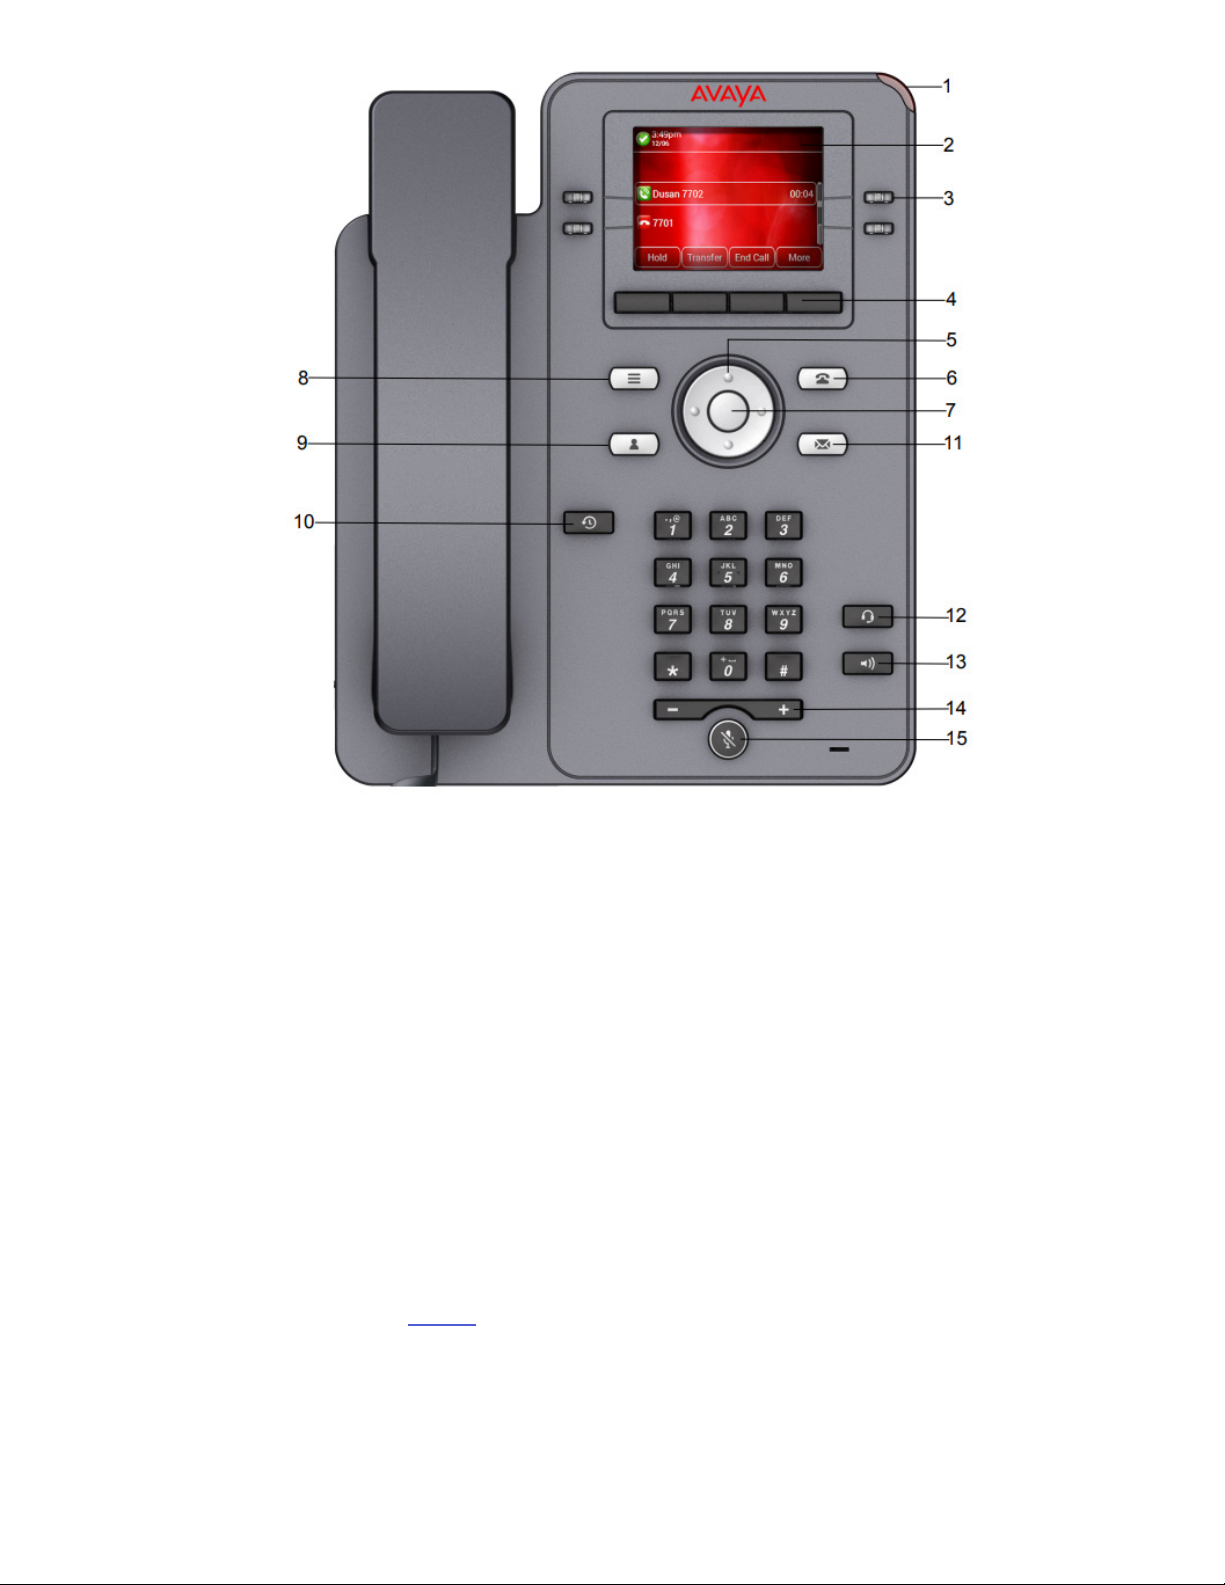
TELEPHONE KEYS AND FEATURES
1 MESSAGE LAMP /RINGING INDICATOR: ON: Indicates new messages in your voicemail box, flashing indicates a
ringing call.
2 DISPLAY: Shows call information, details on system features and call appearance keys.
3 CALL APPEARANCE OR FEATURE KEYS (12): Press left/right arrow keys to see additional screens.
These Keys have four roles
CALL APPEARANCE KEYS: Allow you to handle multiple calls.
Used to Make or Receive Internal and External Calls.
FEATURE KEYS: Features and menus are accessed by pressing these keys.
HUNT GROUP KEYS: Rings and/or flashes for “group” calls, ie: Departmental or main numbers.
USER KEYS: Show appearance of other users extensions and indicate status
Slow Flash indicates ringing call
Fast Flash indicates on a call
Solid Red indicates DND
4 SOFTKEYS/SOFTKEY LABELS: (See Page 2 For Softkey Functionality)
SOFTKEY LABELS: Appear on the display to indicate features that can be activated by pressing the keys directly
below.
SOFTKEYS: Appear below the Softkey labels on display and access features displayed on the label above
them.
These features change based on the current state of the phone. IE: ringing, on an active call, idle,
etc.

2
IDLE STATE the following Softkeys appear when your phone is idle
•REDIAL: Displays a list of outgoing numbers from your call log allowing you to dial from that list
•FEATURES: displays a scrollable list of available features and user settings.
RINGING STATE the following Softkeys appear when your phone is ringing
•ANSWER: Answers ringing call on hands free or turns a page call into a two–way conversation
•TO VM: Sends a ringing call to your voicemail
•IGNORE: Quiets the ringer for current ringing call. Call will continue to ash until answered goes to Voicemail
•DROP: When your phone is ringing DROP will send the caller directly to voicemail
PLACING AN EXTENSION CALL the following Softkeys appear when you are placing a call to an internal extension
•CALLBACK: Set an automatic Callback on the user set that you have called. When they next end a call, the telephone system will call you and when you
answer, automatically make a call to the user.
•DROP: When you are dialing, DROP will disconnect you
CONNECTED TO A CALL the following Softkeys appear when you are connected to a call
•HOLD: Places a call on an exclusive hold to your phone
•CONFERENCE: Puts your current call on hold and presents dial tone to add another party to a conference
•TRANSFER: Puts your current call on hold and presents dial tone so you can transfer the call to another extension
•DROP: When you are connected to a call, DROP will disconnect you
NOTE: as you complete the process of TRANSFER and CONFERENCE additional Softkeys appear as well as when you are in Menus and Lists on the display
5 6 NAVIGATION KEYS: Scrolls through Call Appearance, Feature Keys, menus, call logs and speed dial lists
Use Up/Down Arrow Keys to Scroll one key at a time or Left/Right arrows to scroll one Screen at a time
OK KEY: Conrms menu choices
7 PHONE KEY: Used to exit any menu, or return display to phone screen
8 MAIN MENU: Accesses a list of options and settings to customize your phone
9 CONTACTS: Accesses personal and shared directories
10 RECENTS (CALL LOG/HISTORY): displays a record of most recent answered, missed and outgoing calls. Illuminates when you have new missed calls.
When you have new missed calls, the number of missed calls will appear in the top of your display
11 MESSAGE: Accesses the voicemail system, illuminates when you have new messages
12 HEADSET: Switches calls from handset to headset. Key is illuminated when headset is active.
13 SPEAKER: Used to make or answer any call without lifting Handset. illuminated when speaker is active.
14 VOLUME: Controls Ringer, Speaker, & Incoming Voice Levels over Handset/Headset.
15 MUTE: Turns the Microphone o or on when you are on a call. Lamp is lit when in use, caller cannot hear you.
IDLE STATE: The following Softkeys appear when your phone is idle.
+REDIAL: Displays a list of outgoing numbers from your call log allowing you to dial from that list.
+FEATURES: displays a scrollable list of available features and user settings.
RINGING STATE: The following Softkeys appear when your phone is ringing.
+ANSWER: Answers ringing call on hands free or turns a page call into a two–way conversation.
+TO VM: Sends a ringing call to your voicemail.
+IGNORE: Quiets the ringer for current ringing call. Call will continue to flash until answered goes to voicemail.
+DROP: When your phone is ringing DROP will send the caller directly to voicemail.
PLACING AN EXTENSION CALL: The following Softkeys appear when you are placing a call to an internal extension.
+CALLBACK: Set an automatic Callback on the user set that you have called. When they next end a call, the telephone
system will call you and when you answer, automatically make a call to the user.
+DROP: When you are dialing, DROP will disconnect you.
CONNECTED TO A CALL: The following Softkeys appear when you are connected to a call.
+HOLD: Places a call on an exclusive hold to your phone.
+CONFERENCE: Puts your current call on hold and presents dial tone to add another party to a conference.
+TRANSFER: Puts your current call on hold and presents dial tone so you can transfer the call to another extension.
+DROP: When you are connected to a call, DROP will disconnect you.
NOTE: as you complete the process of TRANSFER and CONFERENCE additional Softkeys appear as well as when you
are in Menus and Lists on the display.
5/7 NAVIGATION KEYS: Scrolls through Call Appearance, Feature Keys, menus, call logs and speed dial lists.
Use Up/Down Arrow Keys to Scroll one key at a time or Left/Right arrows to scroll one Screen at a time.
OK KEY: Confirms menu choices
6 PHONE KEY: Used to exit any menu, or return display to phone screen.
8 MAIN MENU: Accesses a list of options and settings to customize your phone.
9 CONTACTS: Accesses personal and shared directories.
10 RECENTS (CALL LOG/HISTORY): displays a record of most recent answered, missed and outgoing calls. Illuminates
when you have new missed calls.
When you have new missed calls, the number of missed calls will appear in the top of your display.
11 MESSAGE: Accesses the voicemail system, illuminates when you have new messages.
12 HEADSET: Switches calls from handset to headset. Key is illuminated when headset is active.
13 SPEAKER: Used to make or answer any call without lifting Handset. illuminated when speaker is active.
14 VOLUME: Controls Ringer, Speaker, & Incoming Voice Levels over Handset/Headset.
15 MUTE: Turns the Microphone off or on when you are on a call. Lamp is lit when in use, caller cannot hear you.

3
CALL PROCESSING
ANSWERING AND PLACING CALLS
TO ANSWER INCOMING CALL: Phone rings-Indicator Flashes Slow.
Lift Handset or Press SPEAKER Key or Press ANSWER Softkey.
NOTE: To quiet a ringing call, Press IGNORE Softkey.
To send a ringing call to Voicemail, Press TOVM Softkey.
TO ANSWER SECOND CALL: Press Call Appearance Key of new call, first call automatically holds.
TO PLACE A CALL: Lift Handset or Press SPEAKER Key
Internal: Enter EXTENSION Number.
External: Enter dialing prefix (typically 8 or 9) 1 area code and number.
TO PLACE A SECOND CALL: Press available Appearance Key, first call automatically holds.
Enter Number.
SPEAKER: Press to make or answer any call without lifting the Handset.
TO SWITCH TO SPEAKER FROM HEADSET/HANDSET: Press SPEAKER Key. Replace Handset in Cradle.
TO RESUME PRIVACY: Lift Handset or Press HEADSET Key.
TO END SPEAKERPHONE CALL: Press SPEAKER Key or DROP Softkey.
MUTE: Turns off your Microphone (Speaker, Handset and Headset) to allow you to speak privately.
Caller cannot overhear office noise/conversation.
TO USE: Press MUTE Key Key lights, speak privately.
TO RESUME CONVERSATION: Press MUTE Key again.
HOLD: Places active call on hold. This is an exclusive hold to your telephone. No one else can retrieve it.
TO HOLD A CALL: Press HOLD Softkey. Indicator lamp flashes fast.
TO RETURN TO CALLER: Press Flashing Call Appearance Key.
AUTOMATIC HOLD: When you select another Call Appearance Key, or use certain features, the line that you are
already speaking on will be placed on hold automatically without pressing the HOLD Key.
TRANSFER: Allows you to connect your call to someone else (With call on line)
Press TRANSFER Softkey, call is automatically held.
Enter EXTENSION Number.
Blind Transfer: Press COMPLETE Softkey, call is connected.
Or
Announced: Wait for party to answer, (speak privately), Press COMPLETE Softkey.
TO COMPLETE TRANSFER: Press COMPLETE Softkey, call is connected, hang up.
TO RETURN TO HELD CALL: Press CANCEL Softkey, disconnects you from party and reconnects you to caller.
TO DROP A CALL PARTY: Press DROP Softkey disconnects you from called party, caller stays on hold.
TO CONFERENCE ALL PARTIES: Press CONFERENCE Softkey all three parties are joined in a conference call.
NOTE: If you do not know the extension number, after you press TRANSFER, you can search in the directory.
TRANSFER TO VOICEMAIL: Sends a caller directly to voicemail without ringing the phone.
Press TRANSFER Softkey, call automatically held.
Enter #sign and extension number.
Press COMPLETE Softkey immediately.

4
VOICEMAIL
FIRST TIME MAILBOX SET UP
The first time you use your mailbox, you must create a password and record your name.
IMPORTANT: THERE IS NO PASSWORD INITIALLY.
Your mailbox number may be your extension number or it may be a number assigned to you by
CREATE PASSWORD: REQUIRED
Press MESSAGE Key. (if your phone does not have a Message Key, Dial * 17 ).
Enter mailbox number (your ext) and Press #.
When prompted for password Press #. You do not yet have a password, so just press # when prompted
Enter your new password and Press #. Must be 6—15 digits and must be secure (can’t use 123456, etc)
Re-enter your new password again and Press #.
Stay on the line.
RECORD NAME: REQUIRED
NOTE: Pressing 1always starts and ends the record process.
If you hung up, Log in to your mailbox. (See page 4)
Press 1and at the tone: Record your name (and/or Title, Dept. and/or Ext Number)
Press 1to end Recording. System will replay your Name
Press #to Approve.
OR
Press 1to Rerecord.
NOTE: When recording the name for a general or group mailbox, use the Group name ie: Operator or Receptionist.
RECORD and ACTIVATE GREETINGS: OPTIONAL BUT RECOMMENDED
If you hung up, log in to your mailbox (See page 1)
Press 3To access greeting menu.
Press 1To create change delete a greeting.
Enter Greeting number (1-9).
NOTE: It is easiest to match your greeting number to the call type you will use as listed below.
Begin speaking after the tone.
Press 1To end recording.
Press 23 To listen.
NOTE: If you don’t like the greeting: Press *3 to delete then Press 1 to rerecord
Press #To APPROVE your greeting
IMPORTANT: A GREETING MUST BE ACTIVATED FOR IT TO PLAY TO CALLERS.
STAY ON THE LINE TO ACTIVATE YOUR GREETING BY FOLLOWING VOICE PROMPTS.
Voice prompt will tell you “to use this greeting for”:
ALL CALL Press 1 Plays to ALL callers and overrides all other greetings except Temporary
INTERNAL Press 2 plays to callers inside your organization Use in conjunction with EXTERNAL
EXTERNAL Press 3 plays to callers from outside your organization
BUSY Press 4 Plays when ALL extensions are busy use in conjunction with NO REPLY
NO REPLY Press 5 Plays when you do not answer your phone
Default Press 8 System greeting in synthesized voice (your recorded name is inserted into this greeting)
TEMPORARY Press 9 Takes over for ALL active greetings and can be deactivated by system (see page 2)
NOTE: It is recommended you record your ALL CALL or the INTERNAL and EXTERNAL Greeting. It is not necessary to
record all the greetings.

5
RECORD OR CHANGE GREETINGS (Log in to your mailbox)
NOTE: See page 4 for first time mailbox setup instructions
Press 3to access greeting menu.
Press 1to create, change, delete a greeting.
Enter Greeting number (1-9).
Voice prompt indicates if greeting is recorded.
When Greeting is already recorded, you hear a prompt to Press
1again to rerecord.
Begin speaking after the tone.
Press 1to end recording.
Press 23 to listen.
Press *3 to delete and rerecord.
Press #to APPROVE. Stay on line to activate greeting.
IMPORTANT: A GREETING MUST BE ACTIVATED. STAY ON
THE LINE AND FOLLOW VOICE PROMPTS TO ACTIVATE
THE GREETING.
Voice prompt will give you call type options. (see page 4)
NOTE: When activating as temporary, you will be prompted to
enter the number of days you wish greeting to remain active. (Be-
tween 0 – 30). If 0 is chosen, greeting remains active until you
deactivate it.
CHANGE PASSWORD (Log in to your mailbox)
Press 5for Personal Options.
Press 4to Change Password.
Enter your new password and #key.
Enter your new password again and #key.
CHANGE RECORDED NAME (Log in to your mailbox)
Press 5for Personal Options.
Press 5to Record Name
Speak your name after the tone.
Press 1to End Recording.
Press #to Accept Recording.
ACTIVATE A GREETING (Log in to your mailbox)
Press 3to access greeting menu.
Press 3to activate greeting.
Enter Greeting Number (1-9).
If you have not already recorded the greeting:
Record at the tone.
Press 1to end recording.
Press #to Approve.
If you have already recorded the greeting:
Press 0to listen to it.
Follow voice prompts to select required call type.
Press #to exit to the greeting menu.
DEACTIVATE A GREETING (Log in to your mailbox)
Press 3to access greeting menu.
Press 0to listen.
Enter Greeting Number (1-9) then Press *8.
WORK WITH MESSAGES WORK WITH MAILBOX OPTIONS
LEAVE MESSAGE: Leave a message without ringing the phone:
Internal: Press #and enter the mailbox number.
At tone: Leave your message and hang up.
CALL TRANSFER TO A MAILBOX: Transfer a caller to a mailbox.
With Caller on line:
Press TRANSFER Key.
Press #and Enter mailbox number.
Press TRANSFER Key or COMPLETE Softkey Immediately.
FORWARD MESSAGES TO ONE OR MORE MAILBOXES
While listening to a message:
Press 1to begin forward process.
Press 2to forward with comment.
Record at the tone.
Press #to end your recording.
Enter a list of extensions separated by #sign.
Press #at the end of list to indicate you have finished.
Press #to deliver the forwarded message.
MAILBOX OPTIONS When in a mailbox on the system
Press *7 to log in to your mailbox.
Press *8 to transfer to another extension.
Press #to return to previous menu.
CHANGE VOICEMAIL TO EMAIL OPTIONS
Press FEATURES Softkey.
Scroll to and Select VISUAL VOICEMAIL.
Scroll to EMAIL and press CHANGE Softkey.
Choices are:
OFF messages will be received on your desk phone.
COPY messages are received in both your email and on your
desk phone, you must manage them in both.
FORWARD messages are sent to your voicemail as a wave file
attachment and are not left on your desk phone.
ALERT messages are received on your desk phone and the system
will send you an email to alert you .
Once you have chosen your setting Press SAVE Softkey.
VISUAL VOICE TO CHECK MULTIPLE MAILBOXES
When your phone lights for multiple mailboxes, you can check mes-
sages for any mailbox assigned to you using Visual Voice.
TO USE: Press FEATURES Softkey,
Scroll to and Select VISUAL VOICEMAIL.
When asked for password, use your personal mailbox
password.
Display shows NEW/OLD/SAVED Messages for each
mailbox starting with your personal mailbox.
Scroll to and Select applicable mailbox.
Display shows NEW/OLD/SAVED Messages.
Scroll to and Select applicable message type.
Screen displays Message information and Softkeys.
NOTE: Once you are logged in via Visual Voice, all voicemail
commands are activated by pressing the Softkeys ie: DELETE.
Table of contents
Other Northland Telephone manuals


 user manual")


