Nothern Industrial tools 109635 User manual
14.4V CORDLESS GREASE GUN
OWNER’S MANUAL
WARNING:
Read carefully and understand all
INSTRUCTIONS before operating. Failure to follow the safety
rules and other basic safety precautions may result in
serious personal injury.
Item
#
109635

Page of 12
2
Thank you very much for choosing a NORTHERN TOOL + EQUIPMENT CO., INC. Product! For
future reference, please complete the owner’s record below:
Model: _______________ Purchase Date: _______________
Save the receipt, warranty and these instructions. It is important that you read the entire manual
to become familiar with this product before you begin using it.
This product is designed for certain applications only. Northern Tool + Equipment cannot be held
responsible for issues arising from modification. We strongly recommend that this product is not
modified and/or used for any application other than that for which it was designed. If you have
any questions relative to a particular application, DO NOT use the product until you have first
contacted Northern Tool + Equipment to determine if it can or should be performed on the
product.
For technical questions, please call 1-800-222-5381.
INTENDED USE
This rechargeable grease gun was exclusively designed to pump and dispense lubricant using
14.4V battery power. The maximum specification ratings should not be exceeded. Any other use
not in accordance with these instructions will result in loss of claim for warranty or liability.
TECHNICAL SPECIFICATIONS
Item Description
Operating power 14.4V
Maximum operating pressure 7000 PSI
Grease reservoir capacity 14.5 ounces
Operating temperature range 0°F–122°F
Operating current 4 Amps
Grease Output 3.0 oz. @ 1000 PSI
GENERAL SAFETY RULES
WARNING:
Read and understand all instructions. Failure to follow all instructions
listed below may result in electric shock, fire and/or serious injury. The term “power tool” in all of
the warnings listed below refers to your Cordless Grease Gun.
WARNING:
The warnings, cautions, and instructions discussed in this manual
cannot cover all possible conditions or situations that could occur. It must be understood
by the operator that common sense and caution are factors that cannot be built into this product,
but must be supplied by the operator.
Save these instructions.

Page of 12
3
WORK AREA
•Keep work area clean, free of clutter, and well lit. Cluttered and dark work areas can cause
accidents.
•Do not use your tool where there is a risk of causing a fire or an explosion; e.g. in the
presence of flammable liquids, gasses, or dust. Power tools create sparks, which may ignite
the dust or fumes.
•Keep children and bystanders away while operating a power tool. Distractions can cause
you to lose control, so visitors should remain at a safe distance from the work area.
•Be aware of all power lines, electrical circuits, water pipes, and other mechanical hazards in
your work area, particularly those hazards below the work surface hidden from the
operator’s view. These may be unintentionally contacted and can cause bodily injury or
property damage.
•Be aware of your surroundings. Using power tools in confined work areas may put you
dangerously close to cutting tools and rotating parts.
•Do not operate power tools in the presence of flammable liquids, gases or dust. The
rechargeable grease gun can create sparks that may ignite the dust or fumes. Keep
bystanders, children and visitors away during operation. Distractions can cause you to make
mistakes.
CHARGER & BATTERY
•A battery operated rechargeable grease gun with a spare battery pack must be recharged
only with the specified battery charger. A charger that may be suitable for one type of battery
may create a risk of fire when used with another. Use this battery-operated tool only with the
specifically designed battery pack. Use of any other batteries may create a risk of fire.
•Batteries are shipped in an uncharged state. Charge batteries for 1.5 hours before first use.
•Before using a battery charger, read all instructions and cautionary markings on the battery
pack, battery charger, battery and Rechargeable Grease Gun.
•Do not expose charger to rain, snow, or frost.
• Do not pull on or otherwise abuse cord. Never pull charger by the cord when disconnecting.
Replace a damaged or worn power cord immediately.
•Do not attempt to repair the power cord.
•Make sure cord is located so that it will not be stepped on, tripped over, or otherwise
subjected to damage or stress.
•Do not use an extension cord unless absolutely necessary. Use of improper extension cord
could result in a risk of fire and electric shock. If an extension cord must be used, make
sure:
A. The extension cord is properly wired and in good condition.
B. Wire size of cord is at least as specified in the following chart:
C. If an extension cord is used outdoors, it must be marked with the suffix W-A
following the cord type designations. For example, SJTW-A to indicate it is
acceptable for outdoor use.
•Do not operate charger with a damaged cord or plug. Have the cord replaced immediately to

Page of 12
4
avoid a hazard. Do not attempt to repair the power cord.
•Do not operate the charger if it has received a sharp blow, been dropped, or otherwise
damaged in any way. Take it to a qualified service provider for repair.
• Do not disassemble the charger or the battery pack. Take it to a qualified service provider
when service or repair is required. Incorrect reassembly may result in risk of electrical shock
or fire.
•Unplug charger from outlet before attempting any maintenance or cleaning to reduce risk of
electrical shock.
•Charge the battery pack in a well-ventilated place. Do not cover the charger and battery
while charging.
•Do not store the charger or battery packs in locations where the temperature may reach or
exceed 50°C (122F). This can lead to deterioration of the batteries.
•Do not charge the battery pack when temperature is below 0°C (32F) or above 40°C (104F).
This is very important for proper operation.
•Do not incinerate battery pack as it can explode in a fire.
•Do not charge battery in damp or wet locations.
•Do not short the terminals of the battery pack.
•Extremely high temperatures could cause injury or fire.
•Dispose of depleted batteries properly. This battery pack contains rechargeable,
nickel-cadmium (NiCad) batteries that must be recycled or disposed of properly.
PERSONAL SAFETY
•Stay alert, watch what you are doing, and use common sense when operating a power tool.
Do not use a power tool when tired or under the influence of drugs, alcohol, or medication. A
moment of inattention while operating power tools may result in serious injury.
•Dress appropriately. Do not wear loose clothing, dangling objects, or jewelry. Keep your hair,
clothing, and gloves away from moving parts. Loose clothes, jewelry or long hair can be
caught in moving parts. Air vents often cover moving parts and should be avoided.
•Proper safety apparel and equipment. Use safety goggles or safety glasses with side shields
that comply with current national standards. Use a face shield when necessary. Use a dust
mask in dusty work conditions. This applies to all persons in the work area. Also use
non-skid safety shoes, a hardhat, gloves, a dust collection system, and hearing protection
when necessary.
•Avoid accidental starting. Do not carry the power tool with your finger on the switch. Ensure
the switch is in the off position before plugging tool into power outlet. In the event of a power
failure, while using a tool, turn the switch to off to prevent a surprise start when power is
restored.
•Do not overreach. Keep proper footing and balance at all times.
•Remove adjusting keys or wrenches before connecting to the power supply or turning on the
tool. A wrench or key that is left attached to a rotating part of the tool may result in serious
injury.
•Always wear eye protection. The rechargeable grease gun can generate up to 7000PSI.
Grease injection injuries can be very serious.
•Avoid accidental starting. Be sure the switch is not depressed when inserting battery pack.
•Check the hose for kinks before operating.

Page of 12
5
TOOL USE AND CARE
•Do not force the tool. Tools do a better and safer job when used in the manner for which
they were designed. Plan your work, and use the correct tool for the job.
•Never use a tool with a malfunctioning switch. Any power tool that cannot be controlled with
the switch is dangerous and must be repaired by an authorized service provider before
using.
•Disconnect battery from the tool and place the switch in the locked or off position before
servicing, adjusting, installing accessories or attachments, or storing. Such preventative
safety measures reduce the risk of the power tool starting by accident.
•Secure work with clamps or a vise when practical. This safety precaution allows for proper
tool operation.
•Store idle tools. When tools are not is use, store them in a dry, secure place out of the reach
of children. Inspect tools for good working condition prior to storage and before re-use.
•Use only accessories that are recommended for use with the Rechargeable Grease Gun.
Accessories that may be suitable for one tool may create a risk of injury when used on
another tool.
•This tool is a fully rated portable power lubrication product. Only accessories that are
capable of handling 7000psi should be used.
•Keep guards in place and in working order.
•Never leave the tool running unattended.
•Release the trigger if the grease gun is stalled. Holding down the trigger could damage the
motor or cause a fire.
•When battery pack is not in use, keep it away from other metal objects like: paper clips,
coins, keys, nails, screws, or other small metal objects that can make a connection from one
terminal to another. Shorting the battery terminals may cause sparks, burns, or a fire.
CHARGING THE BATTERY PACK
Before using the Rechargeable Grease Gun for the first time, the battery pack should be
charged for a minimum of 1.5 hours. If the battery pack is already installed in the Rechargeable
Grease Gun, remove it by following the instructions under INSTALLING or REMOVING
BATTERY PACK. As the battery pack approaches the discharged state, you will notice a sharp
drop in tool performance. When the tool is unable to perform the task at hand, it is time to
recharge the battery pack. Recharging the battery pack before this condition is reached will
reduce the total work life of the pack. Discharging the pack beyond this point can damage the
pack.
NOTE:
Battery temperature will increase during and shortly after use. Batteries may not accept
a full charge if they are charged immediately after use. Allow the battery pack to cool to room
temperature before charging for best results.
CAUTION:
Vent slots in top and bottom of charger must not be obstructed.
Do not charge battery when temperatures are BELOW 32°
°°
°F or ABOVE 104°
°°
°F.

Page of 12
6
OPERATION
NORMAL CHARGING
Make sure the power circuit voltage is the same as that shown on the charger specification plate
before connecting to power source.
REMOVING THE BATTERY PACK
Depress the two battery release buttons (one button on each side of battery pack) and pull the
battery pack from the grease gun.
INSTALLING THE BATTERY PACK
Align battery pack with opening in handle, and push battery pack into handle until it locks into
place.
HOW TO USE THE DC TO AC CIGARETTE ADAPTOR AND EXTEND CABLE
If the battery has been depleted, and there isn’t any AC outlet available, use the DC to AC
Cigarette Adaptor to recharge the battery.
Insert the DC to AC Cigarette Adaptor into the cigarette socket of the vehicle. It will transform
DC voltage to AC voltage; you can insert the AC battery charger to recharge the battery.
NOTE:
Please pay attention all voltage parameters.
HOW TO USE THE ASSISTANT BELTS
There are two optional assistant belts: the shoulder belt, and the waist belt.
Please consult the illustration before using the assistant belts.
Note:
The DC to AC Cigarette Adaptor and Extend Cables and Assistant Belts are optional
parts and may not be included with your Grease Gun.

Page of 12
7
REMOVING EMPTY GREASE CARTRIDGE
1) Pull back on the follower handle (#11) until follower rod is fully extended and latched onto
the locking lever (# 10).
2) Unscrew the grease tube assembly from the Rechargeable Grease Gun.
3) Press the locking lever and carefully release the follower handle to eject the empty
cartridge from container tube.
INSTALLING GREASE CARTRIDGE
1) Pull back on the follower handle until the follower rod is fully extended and latched onto the
locking lever.
2) Remove the plastic cap from the grease cartridge and insert cartridge into the container
tube.
3) Remove the pull-tab from the grease cartridge and screw grease tube assembly into pump
assembly.
4) Press the locking lever to release the follower rod. Purge air from pump. See HOW TO
EXPEL AIR POCKETS instructions.
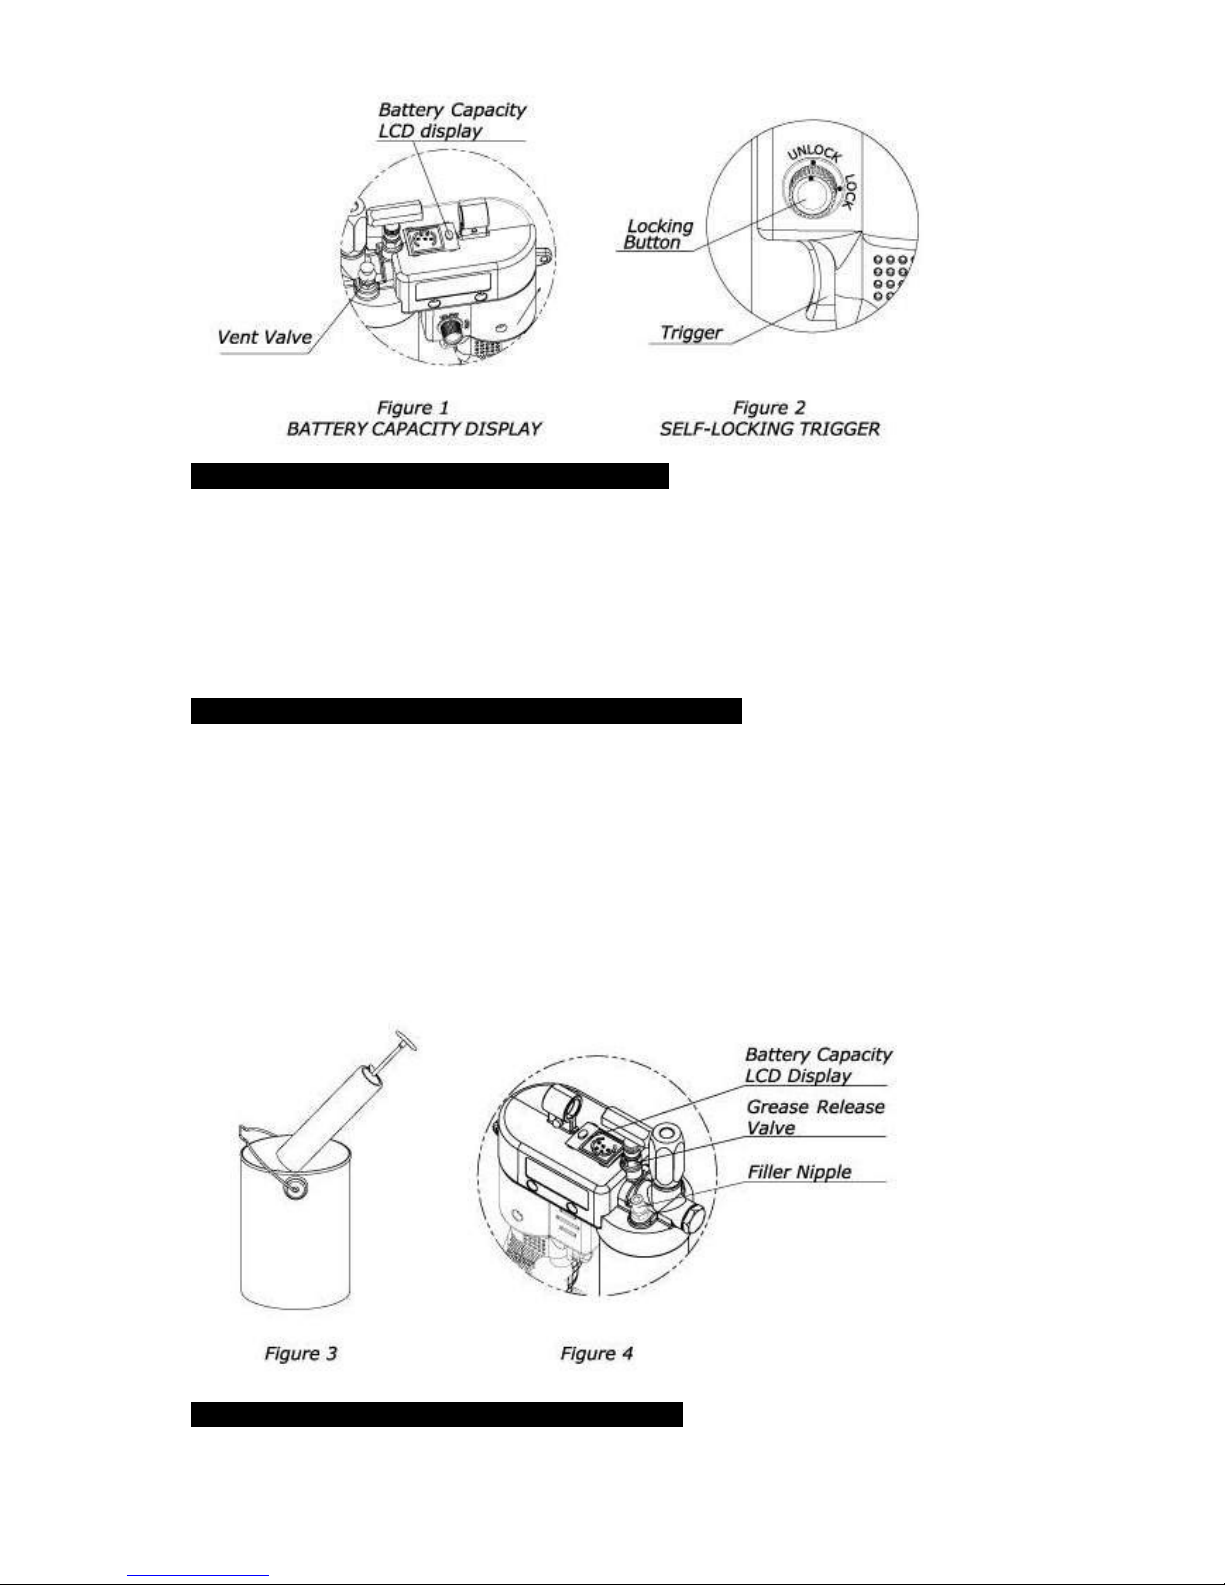
HOW TO READ THE BATTERY CAPACITY DISPLAY
The LCD display shows the battery capacity whenever the button is pressed. It has 5 segments;
each one representing 20% of the full capacity, i.e. three segments lit in the LCD display
indicates the battery is at 60% of its charge (See Figure 1).
Page of 12
8
HOW TO USE THE SELF-LOCKING TRIGGER
The Rechargeable Grease Gun comes with a self-locking trigger to help avoid having the trigger
pressed by accident, causing an unwanted grease spill. To stop unwanted spills,, turn the button
position from 'Unlock' to 'Lock' (See Figure 2).
NOTE:
Do not press the trigger when the button is in the 'Lock' position, this could destroy the
self-locking device.
HOW TO FILL THE GUN FROM A BULK CONTAINER
1) Remove pump assembly (#7) from grease tube assembly (#9).
2) Pack lubricant into cavity of the pump assembly.
3) Insert the open end of the grease tube assembly into lubricant. Slowly pull the follower
handle back while pushing the grease tube assembly deeper into the lubricant to prevent air
pockets from being pulled into the grease tube assembly (See Figure 3).
4) When the follower rod is fully extended, it will latch onto the locking lever.
5) Loosely assemble the pump assembly to the grease tube assembly. Press the locking lever
while pushing the follower rod into the grease tube assembly. Slowly unscrew the grease
tube assembly from the pump assembly until lubricant oozes from the interface. Tighten
grease tube assembly into the pump assembly.
HOW TO FILL THE GUN WITH A FILLER PUMP
1) Insert the gun filler nipple (# 7) into the filler pump socket (See Figure 4). Operate the filler

Page of 12
9
pump to fill the container. Stop the filler pump when the follower rod extends to
approximately 8 inches (20 cm).
2) Push the follower rod into the grease tube assembly by pressing the locking lever.
HOW TO EXPEL AIR POCKETS
1) Withdraw the follower rod from the grease tube assembly cap and engage it with the
follower by rotating the follower handle. Exert force on the follower handle while holding
down the vent valve (#8).
2) Pull the trigger in short bursts to operate gun until trapped air is expelled. Disengage the
follower rod from the follower by rotating the follower handle. Push the follower rod into the
grease tube assembly.
3) If step 2 fails, you can adjust the screw inside the grease release valve, and then both
grease and air will be expelled.
MAINTENANCE
WARNING: Make sure the tool is disconnected from its power source before attempting
any maintenance, cleaning, or inspection.
•Maintain your tools. It is recommended that the general condition of any tool be examined
before it is used. Keep your tools in good repair by adopting a program of conscientious
repair and maintenance in accordance with the recommended procedures found in this
manual. If any abnormal vibrations or noise occurs, turn the tool off immediately and have
the problem corrected before further use. Have necessary repairs made by a qualified
service provider.
•Use only soap and a damp cloth to clean your tools. Many household cleaners are harmful
to plastics and other insulation. Never let liquid get inside a tool.
•It is normal for nickel-cadmium batteries to gradually lose their power-retention capacity over
hundreds of charge cycles. When this happens, replacement of the battery pack will be
required.
•Motor polarity is important; the positive (red wire) must be connected to the positive terminal
on the motor, which is identified with the small plastic dot next to it.
•The green ground wire must be secured under the motor mounting screw.

Page of 12
10
DIAGRAM & PARTS LIST (1)
Part#
Description Part#
Description
1 Battery 7 Pump
Assembly
2 Handle assembly 8 Packing
3 Flexible Hose 9
Grease
Tube
Assembly
4 Self-locking trigger 10 Locking
Lever
5 Coupler 11 Follower
Handle
6 Relief Valve 12 Fast
Charger

Page of 12
11
DIAGRAM & PARTS LIST (2)
Part#
Description Part#
Description
1 Interference Blanker 8 Vent Valve
2 Motor Kit 9 Circuit Breaker
3 Gear Assembly Kit 10 Jiggle Switch
4 Yoke Block 11 Button
5 Plunger 12 Check Valve
Kit
6 Grease Release
Valve 13
Battery
Capacity
Display
7 Filler Nipple
Page of 12
12
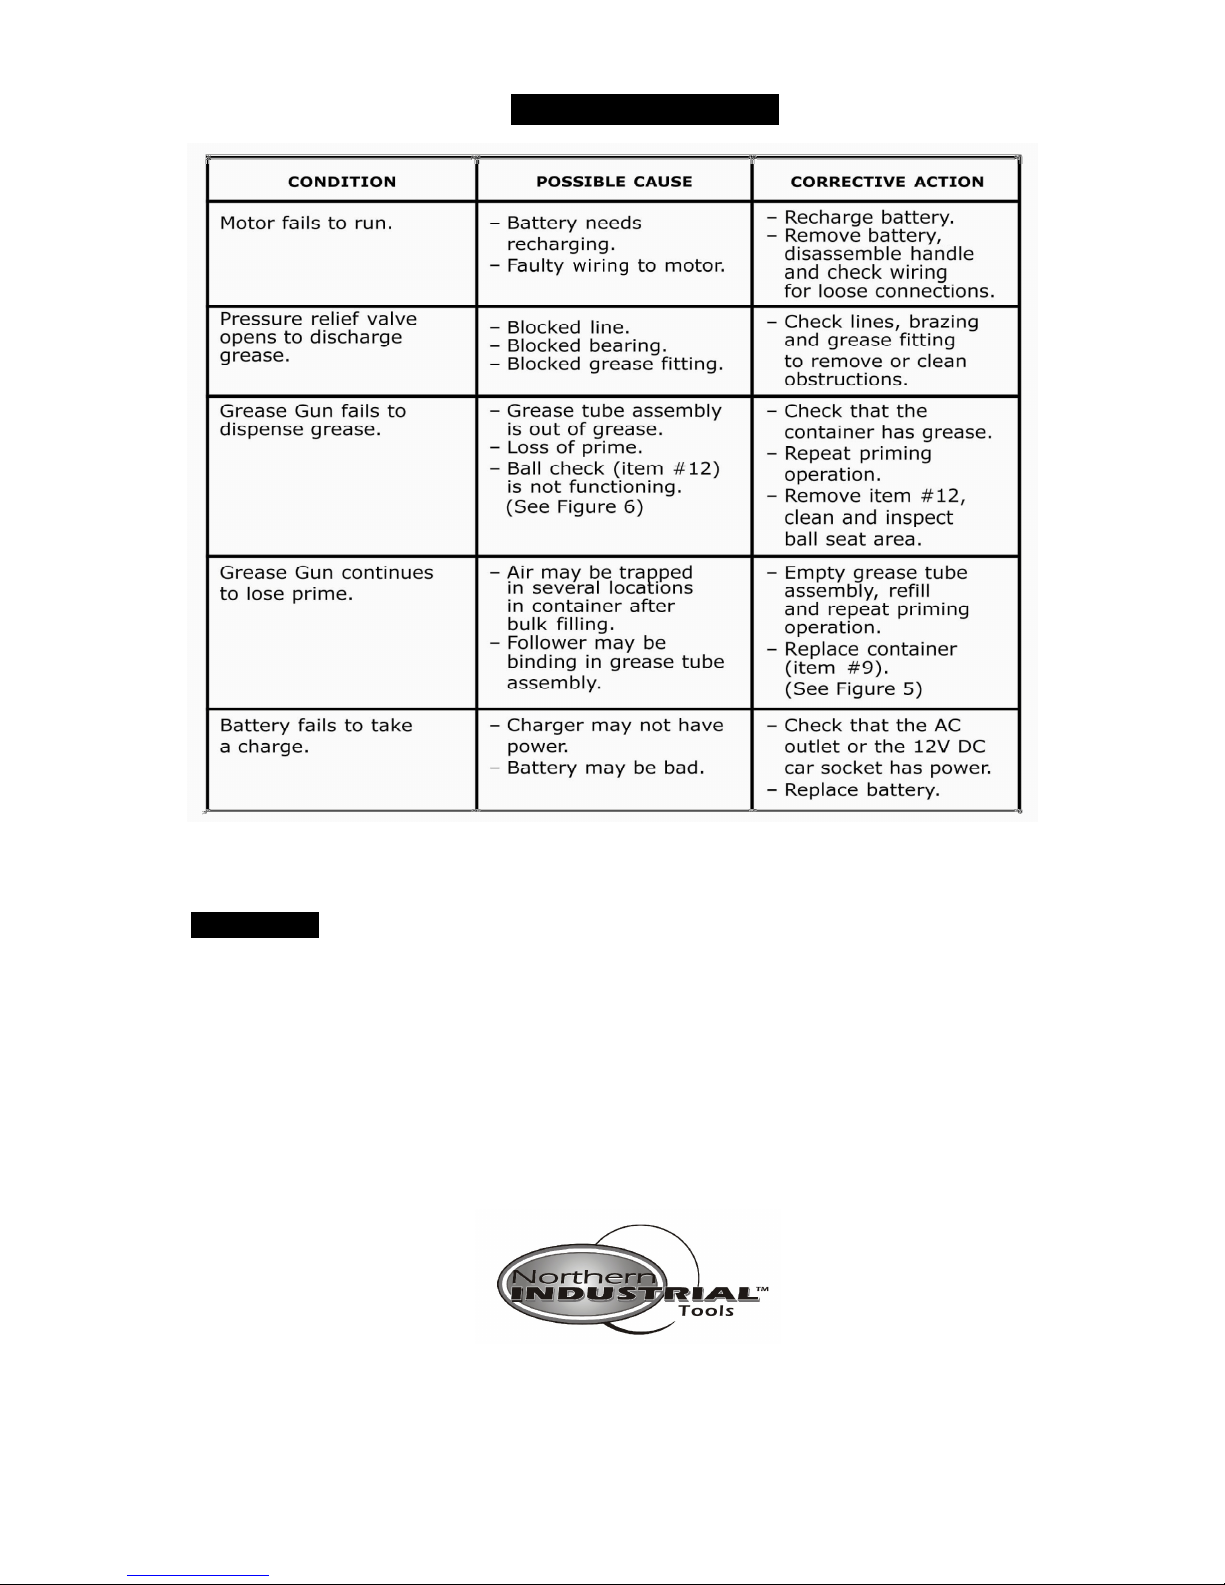
TROUBLESHOOTING
For replacement parts and technical questions, please call 1-800-222-5381.
WARRANTY
One-year limited warranty.
Northern Tool + Equipment Co., Inc.
2800 Southcross Drive West
P.O. Box 1499 Burnsville, MN 55337-0499
Made in CHINA
Table of contents


