Nova Steam Station Star Deluxe User manual

Nederlands 1
English 8
Français 14
Deutsch 20
Español 27
Steam Station Star Deluxe
Article 320300
• Gebruiksaanwijzing • User's instructions • Mode d'emploi
• Bedienungsanleitung • Instrucciones de uso
© NOVA 2008
1081656_nova_steam station_320300_cover.fm Page 1 Tuesday, August 26, 2008 10:46 AM

Nederlands 1
English 8
Français 14
Deutsch 20
Español 27
Steam Station Star Deluxe
Article 320300
• Gebruiksaanwijzing • User's instructions • Mode d'emploi
• Bedienungsanleitung • Instrucciones de uso
© NOVA 2008
1081656_nova_steam station_320300_cover.fm Page 1 Tuesday, August 26, 2008 10:46 AM

1
MAX
min
max
12
11
10
9
8
7
6
5
2
1
3
4
13
August 2008 V1
1081656_nova_steam station_320300_cover.fm Page 2 Tuesday, August 26, 2008 10:46 AM

1
Steam Station Star Deluxe Article 320300
Algemene informatie
Deze uitgebreide Nova Steam Station Star
Deluxe bestaat uit een strijkijzer met een
afzonderlijke stoomgenerator. Dit strijkijzer
is voorzien van een stoomknop voor het
geven van stoomstoten en een
temperatuurregelknop voor het instellen
van de gewenste temperatuur.
Gebruik en bediening
Zie figuur 1.
Het apparaat bestaat uit de volgende
onderdelen:
1 Stoomknop
2 Temperatuurregelknop
3 Controlelamp temperatuur
4 Dubbelgeïsoleerd stroomsnoer en
stoomslang naar strijkijzer
5 Controlelamp “Waterreservoir leeg”
6 Aan/Uit-schakelaar stoomgenerator
7 Controlelamp “Stoomaanmaak klaar”
8 Calc Clean-ontkalkingsdop
9 Aansluiting met stroomsnoer en stekker
voor het stopcontact
10 Afneembaar waterreservoir
11 Houder
12 Strijkijzer
13 Vergrendeling reservoir
Stoomknop
Door op deze knop te drukken, krijgt u een
stoomstoot.
Temperatuurregelknop
Hiermee stelt u de juiste temperatuur in
voor elk kledingstuk.
Controlelamp temperatuur
Geeft de temperatuur van het strijkijzer
weer. Het lampje gaat tijdens het strijken
aan en uit.
Controlelamp “Waterreservoir leeg”
Geeft aan dat u het waterreservoir
opnieuw moet vullen.
Aan/Uit-schakelaar stoomgenerator
(met controlelampje indien ‘Aan’)
Schakelt de stoomgenerator in en uit. Het
controlelampje in de schakelaar gaat altijd
branden als u de Aan/Uit-schakelaar van
de stoomgenerator in de stand ‘I’ plaatst.
Controlelamp “Stoomaanmaak klaar”
Geeft aan dat u gebruik kunt maken van de
stoom.
Voordat u het apparaat de
eerste keer gebruikt
• Lees deze instructies en voer die
nauwkeurig uit. Bewaar deze
handleiding voor toekomstig gebruik.
• Controleer of de netspanning
overeenkomt met de spanning die op
het typeplaatje van het apparaat
vermeld staat.
• Voordat u de stekker in het
stopcontact steekt of eruit haalt, moet
de temperatuurregelknop op de stand
‘min’ staan.
• Wees extra alert als u aan het strijken
bent met kinderen in de buurt. Laat
nooit een strijkijzer onbeheerd achter
als het aan staat, zelfs niet als het
strijkijzer zich op een strijktafel
bevindt.
• Het aanraken van hete metalen delen,
heet water of stoom kan brandwonden
veroorzaken. Wees voorzichtig met
het aanraken van hete delen van de
stoomgenerator en het strijkijzer.
1 Voordat u het strijkijzer de eerste keer
gebruikt, moet u controleren of de
1081656_nova_steam station_320300_V1.book Page 1 Tuesday, August 26, 2008 12:20 PM

2Steam Station Star Deluxe Article 320300
netspanning overeenkomt met de
spanning die op de voet van de
stoomgenerator vermeld staat.
2 Verwijder alle labels en stickers van het
strijkijzer.
Mogelijk komt er bij de eerste keer dat u
het apparaat in gebruik neemt een beetje
rook van het strijkijzer omdat sommige
delen licht zijn ingesmeerd met vet. Het
roken is geen aanduiding van een defect
en zal na enige tijd stoppen.
3 Aanslag op de zool van het strijkijzer
kunt u verwijderen door de
temperatuurregelknop op ‘max’ te
zetten en over een vochtige doek te
strijken.
Het apparaat gereed maken
voor gebruik
• Wij raden u aan het waterreservoir te
vullen met een mengsel van 50%
kraanwater en 50% gedestilleerd
water. Dit is vooral wenselijk in
gebieden met hard water omdat
daardoor hardnekkige kalkaanslag
wordt tegengegaan.
• Zorg ervoor dat, ook als u niet van
plan bent de stoomfunctie te
gebruiken, het waterreservoir altijd
gevuld is.
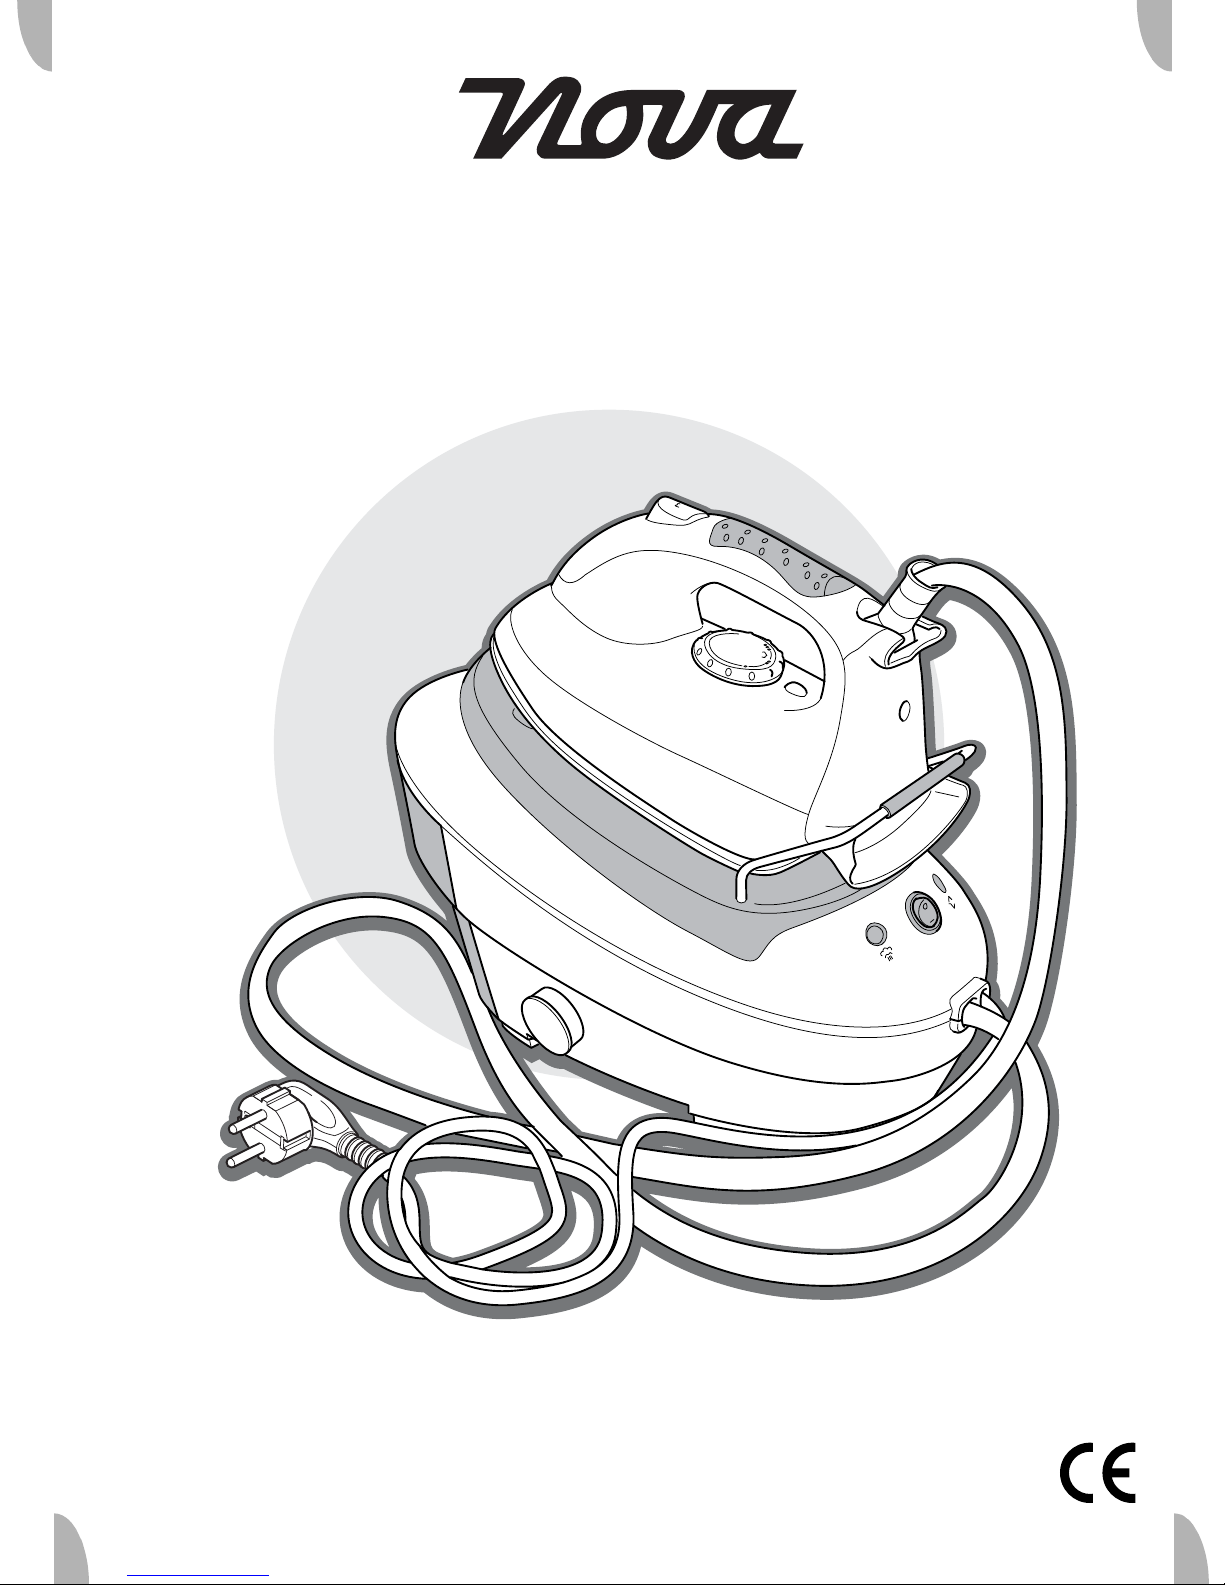
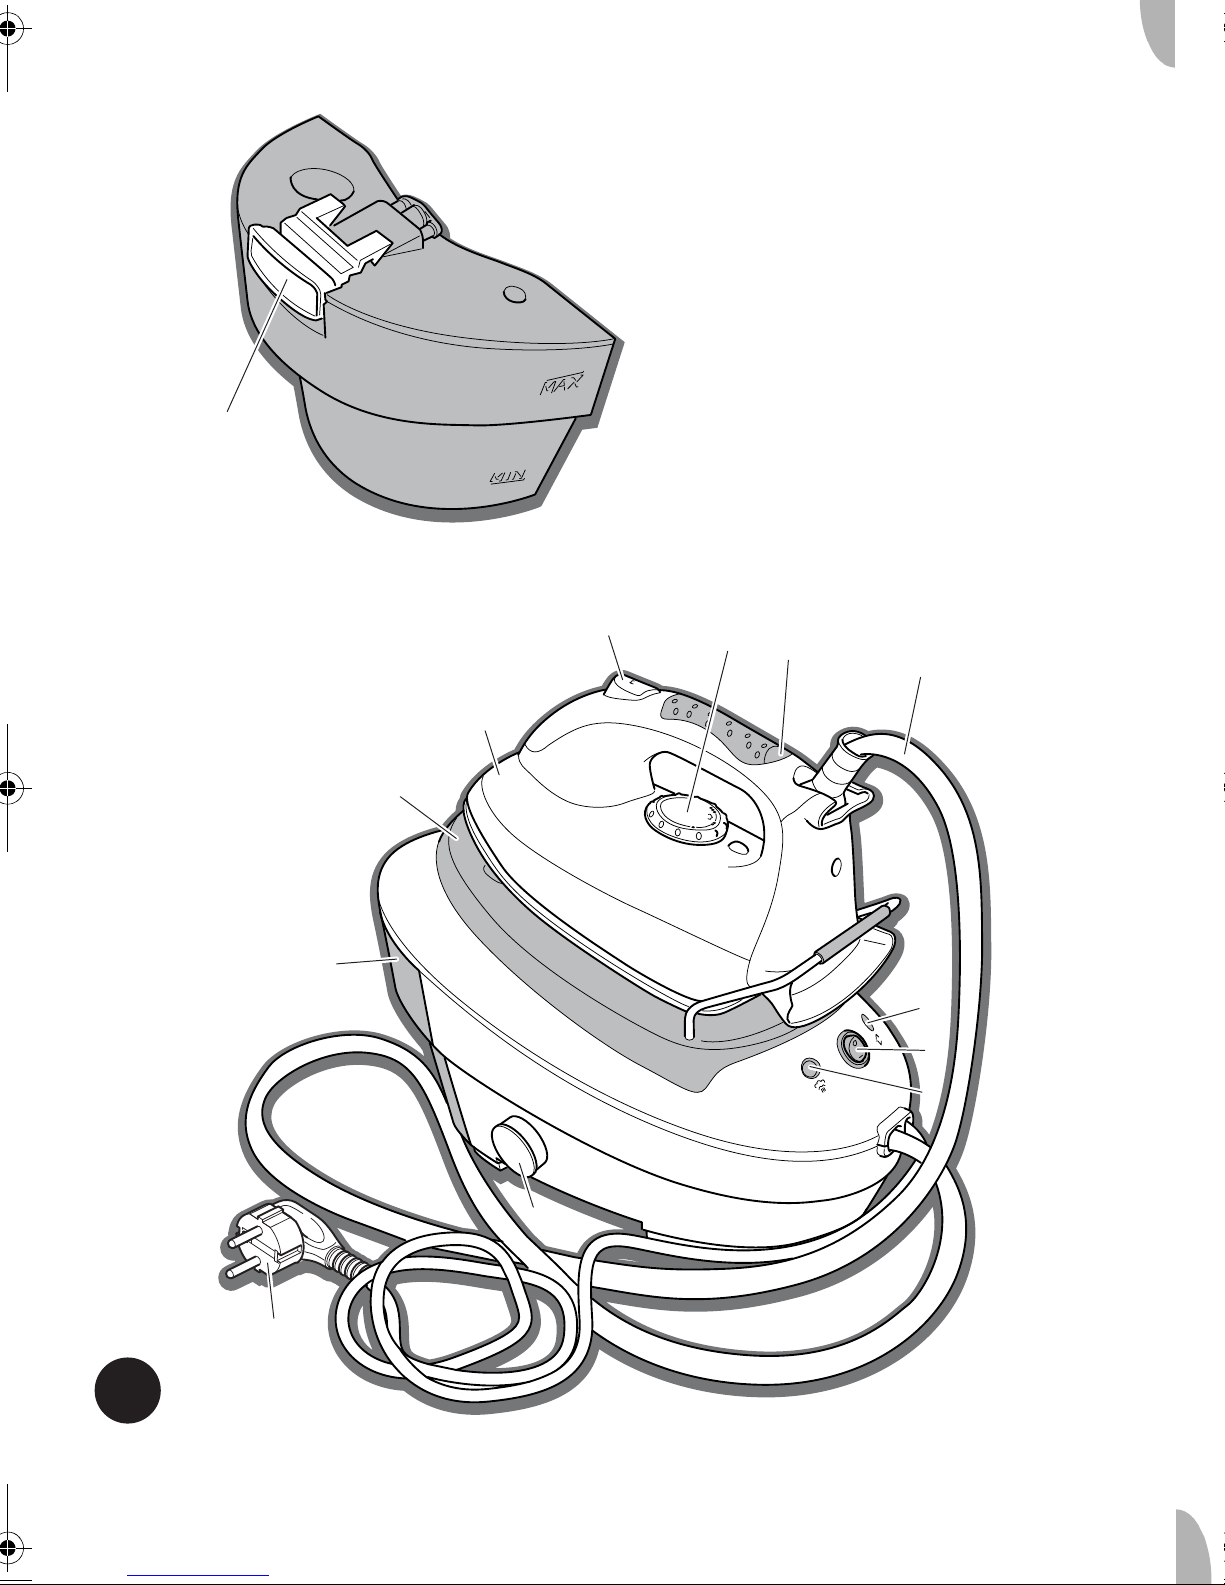
1 Plaats het apparaat op een vlakke
stabiele ondergrond.
2 Zorg ervoor dat de stekker van het
apparaat niet in het stopcontact zit.
3 Door met uw duim op de
reservoirvergrendeling (nr. 13) te
drukken, kunt u met uw vingers het
reservoir naar voren trekken.
4 Vul het waterreservoir met de
aangegeven hoeveelheid water (niet
verder dan het ‘max’-streepje).
5 Plaats het waterreservoir terug door de
bodem over de uitsparing te plaatsen
en dan de bovenkant vast te klikken.
Gebruik
• Strijk nooit over ritssluitingen, nagels
in spijkerbroeken, enz. De zool van het
strijkijzer kan hierdoor beschadigd
raken. Strijk om dergelijke
voorwerpen heen.
• De houder op de stoomgenerator voor
het strijkijzer zal heet worden. Raak
deze tijdens het strijken niet aan.
• Richt nooit het strijkijzer op anderen
tijdens het gebruik. De stoom is erg
heet.
• Controleer of er in de kleding
instructielabels voor het strijken
zitten. Neem dergelijke instructies
altijd in acht.
• De vulopening van het waterreservoir
mag tijdens gebruik niet open zijn.
• Verwijder tijdens gebruik nooit de Calc
Clean-ontkalkingsdop uit de behuizing
van de generator. Achter de dop
bevindt zich een waterafvoer die
tijdens gebruik erg heet is en die
direct verbonden is met de
stoomgenerator!
• Zorg er tijdens het gebruik voor dat
het apparaat niet kan vallen wanneer u
het strijkijzer op de houder plaatst.
Droogstrijken
1 Vul het waterreservoir (nr. 10).
2 Plaats het strijkijzer in de houder op de
stoomgenerator (nr. 11).
3 Steek de stekker in het stopcontact.
4 Druk op de Aan/Uit-schakelaar en draai
de temperatuurregelknop (nr. 2) om de
gewenste temperatuur in te stellen. Het
strijkijzer wordt warm.
5 Stel de temperatuur in volgens de
aanwijzingen in tabel 1.
6 Als de temperatuurcontrolelamp (nr. 3)
uit gaat, is de ingestelde temperatuur
bereikt. U kunt nu beginnen met
strijken.
1081656_nova_steam station_320300_V1.book Page 2 Tuesday, August 26, 2008 12:20 PM

3
Steam Station Star Deluxe Article 320300
Strijken met stoom
1 Vul het waterreservoir.
2 Plaats het strijkijzer in de houder op de
stoomgenerator.
3 Steek de stekker in het stopcontact.
4 Zorg dat er voldoende water in het
reservoir is.
5 Zet de Aan/Uit-schakelaar (nr. 6) van
de stoomgenerator in stand ‘I’. De
stoomgenerator begint met het
rondpompen en verwarmen van het
water. De controlelamp
“Stoomaanmaak klaar” gaat aan zodra
de stoom klaar is voor gebruik.
6 Stel de gewenste temperatuur door de
temperatuurregelknop op het strijkijzer
in de gewenste stand te draaien. Stel
de temperatuur in volgens de
aanwijzingen in tabel 1.
Tabel 1
7 Tijdens het opwarmen van het strijkijzer
brandt de temperatuurcontrolelamp
(nr. 3) en deze gaat uit zodra de
ingestelde temperatuur is bereikt. U
kunt nu beginnen met strijken.
8 Tijdens het strijken kunt u een
stoomstoot geven door op de
stoomknop (nr. 1) te drukken.
9 Als u even stopt met strijken, plaats dan
het strijkijzer in de houder op de
stoomgenerator.
10 Als u klaar bent met strijken, plaats dan
het strijkijzer in de houder op de
stoomgenerator, schakel de
stoomgenerator uit en trek de stekker
uit het stopcontact.
11 Laat het apparaat afkoelen.
Het waterreservoir bijvullen
• Het stoomstation is voor een beter
gebruiksgemak voorzien van een
waarschuwingssysteem: bij een te
lage waterstand in het reservoir klinkt
een waarschuwingssignaal en de
controlelamp “Waterreservoir leeg”
gaat aan.
1 Als u het waarschuwingssignaal hoort
of als u ziet dat de controlelamp
"Waterreservoir leeg" aan gaat, schakel
het apparaat dan uit, haal de stekker uit
het stopcontact.
2 Verwijder het waterreservoir uit de
stoomgenerator.
3 Vul opnieuw het reservoir, maar zorg
ervoor dat u niet boven het ‘max’-
streepje bijvult.
4 Zet het reservoir weer in de
stoomgenerator en zorg ervoor dat het
goed is geplaatst.
Label Soort stof Materiaal Temp.
De stof mag niet worden gestreken.
Synthetisch
Acryl
Modacryl
Polypropyleen
Polyurethaan
Synthetisch
Acetaat
Triacetaat
Synthetisch
Metaal
Cupro
Polyamide
(nylon)
Polyester
Modal
Viscose
Zijde Zijde
Wol Wol stoom of
droog
min
max
min
max
min
max
min
max
Katoen Katoen stoom of
droog
Linnen Linnen
Label Soort stof Materiaal Temp.
min
max
1081656_nova_steam station_320300_V1.book Page 3 Tuesday, August 26, 2008 12:20 PM

4Steam Station Star Deluxe Article 320300
Het apparaat uitschakelen en
opbergen
1 Schakel de stoomgenerator uit.
2 Haal de stekker uit het stopcontact.
3 Laat het apparaat helemaal afkoelen.
4 Reinig de buitenkant en laat al het
water uit het apparaat lopen. (zie
‘Onderhoud en reiniging’).
5 Berg het strijkijzer op in een droge,
vorstvrije omgeving en buiten bereik
van kinderen.
• Berg het strijkijzer vertikaal (rechtop)
op. Hiermee voorkomt u schade aan
de strijkplaat.
Onderhoud
en reiniging
• Verplaats nooit een nog hete of een
nog ingeschakelde stoomgenerator.
Schakel de apparatuur uit en wacht
totdat die is afgekoeld voordat u hem
verplaatst.
• Dompel het apparaat, het stroomsnoer
of de stekker nooit onder in water of
andere vloeistoffen. Mocht dit
gebeuren dan mag u het apparaat niet
meer gebruiken en moet u het
afvoeren.
• Gebruik nooit bijtende of schurende
reinigingsmiddelen.
• Schraap nooit met metalen
voorwerpen over de zool van het
strijkijzer.
• Doe nooit tijdens het strijken azijn of
andere reinigingsmiddelen in het
waterreservoir. U kunt daarmee de
kleding aantasten.
• Reinig na gebruik het apparaat
grondig.
• Zorg ervoor dat de stekker van het
apparaat niet in het stopcontact zit als
u begint met het reinigen.
Onderhoud
1 Trek de stekker uit het stopcontact en
laat het apparaat helemaal afkoelen
voordat u begint met het reinigen.
2 Laat altijd na ieder gebruik al het water
uit het reservoir lopen.
3 Verwijder kalkvlekken en andere
verontreinigingen van de zool van het
strijkijzer met een vochtige doek of een
reinigingsmiddel dat niet schuurt.
4 Reinig de buitenkant met een zachte,
vochtige doek.
Ontkalken
• Klachten of problemen betreffende
kalkaanslag vallen niet onder de
garantie.
Om de vorming van kalkaanslag te
voorkomen en de levensduur van het
stoomstation te verlengen, moet u een
keer per maand het apparaat ontkalken.
1 Laat het apparaat afkoelen.
2 Spoel het reservoir met schoon water.
3 Open de Calc Clean-ontkalkingsdop
om het water uit de boiler te laten
lopen.
4 Plaats de Calc Clean-ontkalkingsdop.
5 Vul het reservoir met een mengsel van
water en azijn in een verhouding van
1:10 of met een speciaal
ontkalkingsmiddel uit de winkel.
Controleer altijd of het
ontkalkingsmiddel geschikt is voor
gebruik in strijkijzers! Volg de instructies
op de verpakking.
6 Steek de stekker in het stopcontact en
schakel het apparaat in.
7 Schakel de stoomgenerator in en wacht
tot de controlelamp “Stoomaanmaak
klaar” aangaat.
8 Laat het ontkalkingsmiddel door het
apparaat stromen door de stoomknop
2 minuten in te drukken.
1081656_nova_steam station_320300_V1.book Page 4 Tuesday, August 26, 2008 12:20 PM

5
Steam Station Star Deluxe Article 320300
9 Schakel het apparaat uit, trek de
stekker uit het stopcontact en laat het
apparaat 1 nacht staan zodat het
ontkalkingsmiddel zijn werk kan doen.
10 Spoel het reservoir met schoon water.
11 Open de Calc Clean-ontkalkingsdop
om het water uit de boiler te laten
lopen.
12 Plaats de Calc Clean-ontkalkingsdop.
13 Vul het reservoir vervolgens met
schoon water.
14 Steek de stekker in het stopcontact en
schakel het apparaat in.
15 Schakel de stoomgenerator in en wacht
tot de controlelamp “Stoomaanmaak
klaar” aangaat.
16 Laat het schone water door het
apparaat stromen door de stoomknop
in te drukken.
Herhaal deze handeling zonodig tot het
apparaat geheel gevuld is met schoon
water.
Veiligheid
Algemene informatie
• Lees deze instructies en voer ze
nauwkeurig uit. Bewaar deze
handleiding voor toekomstig gebruik.
• Het apparaat mag alleen
overeenkomstig deze instructies
worden gebruikt.
• Het apparaat is alleen bestemd voor
huishoudelijk gebruik.
• Het gebruik van dit apparaat kan
gevaarlijk zijn voor kinderen of voor
personen met een lichamelijke,
zintuiglijke, geestelijke, psychische of
motorische handicap of voor
personen met gebrek aan kennis en
ervaring. Personen die
verantwoordelijk zijn voor de
veiligheid van deze mensen moeten
duidelijke instructies geven of moeten
toezicht houden op het gebruik van
het apparaat.
• Reparaties mogen alleen door een
gekwalificeerde elektricien worden
uitgevoerd. Probeer nooit zelf het
apparaat te repareren.
• Gebruik alleen de door de leverancier
aanbevolen accessoires. Het gebruik
van andere accessoires kunnen
schade aanbrengen aan het apparaat
en daarmee een risico vormen voor de
gebruiker.
• Het apparaat mag niet worden
gebruikt met behulp van een externe
timer of een apart
afstandsbedieningsysteem.
• Gebruik het apparaat niet meer
wanneer het gevallen is, wanneer er
zichtbare sporen van schade zijn of
wanneer het apparaat water lekt.
Elektriciteit en warmte
• Controleer voor gebruik of de
netspanning overeenkomt met de
aangegeven spanning op het
typeplaatje.
• Gebruik een geaard stopcontact.
• Als u een verlengsnoer gebruikt dan
moet die geschikt zijn voor het
vermogen van het apparaat. Rol het
verlengsnoer helemaal uit en zorg dat
niemand er over kan struikelen.
• Trek de stekker altijd uit het
stopcontact als u het apparaat een
tijdje niet gebruikt.
• Als u de stekker uit het stopcontact
trekt, moet u aan de stekker trekken
en niet aan het snoer.
• Trek nooit aan het snoer als u het
apparaat verplaatst.
• Gebruik het apparaat niet als het
apparaat of het stroomsnoer
beschadigd is. Laat een
gekwalificeerde elektricien het
stroomsnoer vervangen.
1081656_nova_steam station_320300_V1.book Page 5 Tuesday, August 26, 2008 12:20 PM

6Steam Station Star Deluxe Article 320300
• Zorg ervoor dat het stroomsnoer en
de stekker niet in contact komen met
warmtebronnen (bijv. een warme
kookplaat of hete vlam).
• Zorg ervoor dat het apparaat, het
stroomsnoer en de stekker niet in
contact komen met water, andere
vloeistoffen of chemicaliën.
• Raap het apparaat niet op als het in
water is gevallen. Haal onmiddellijk de
stekker uit het stopcontact. Gebruik
het apparaat niet meer.
• Het apparaat en de onderdelen
kunnen heet worden tijdens het
gebruik. Om brandwonden te
voorkomen, moet u voorzichtig zijn
als u het apparaat en de onderdelen
aanraakt.
• Het apparaat moet zijn warmte kwijt
kunnen raken om het gevaar van
brand te vermijden. Zorg voor
voldoende ruimte om het apparaat
heen en zorg ervoor dat het niet in
contact komt met brandbaar materiaal.
Het apparaat mag niet worden
afgedekt.
Tijdens gebruik
• Gebruik het apparaat nooit
buitenshuis.
• Gebruik het apparaat nooit in een
vochtige kamer.
• Laat het stroomsnoer nooit over de
rand van een afdruiprek, aanrecht of
een tafel hangen.
• Zorg ervoor dat uw handen droog zijn
als u het apparaat, de voedingskabel
of de stekker aanraakt.
• Schakel het apparaat uit en/of trek de
stekker uit het stopcontact indien het
apparaat tijdens gebruik niet goed
meer functioneert, voor het
schoonmaken van het apparaat, voor
het opzetten of afhalen van een
accessoire en voor het opbergen van
het apparaat na gebruik.
• Laat het apparaat tijdens gebruik nooit
onbeheerd achter.
• Zorg ervoor dat kinderen niet bij het
apparaat kunnen.
• Bepaalde delen van het apparaat
kunnen heet worden. Raak de hete
delen van het apparaat niet aan in
verband met het gevaar voor
brandwonden.
• Voordat u het apparaat inschakelt,
moet u het waterreservoir met water
vullen. Gebruik alleen koud water.
• Vul nooit tot boven het streepje voor
het maximale niveau (‘MAX’).
• Reinig het apparaat na gebruik
grondig (zie het onderdeel
‘Onderhoud en reiniging’).
• Voor het opbergen, onderhoud en/of
reiniging moet het apparaat zijn
afgekoeld tot kamertemperatuur.
1081656_nova_steam station_320300_V1.book Page 6 Tuesday, August 26, 2008 12:20 PM

7
Steam Station Star Deluxe Article 320300
Het milieu
Voer verpakkingsmateriaal (bijv. kunststof
en dozen) in de daarvoor bestemde
afvalcontainer af.
Een nog goed werkend of een eenvoudig
te repareren apparaat kunt u recyclen.
Aan het eind van de levensduur dient u het
apparaat op een verantwoorde manier af
te voeren, waardoor het hergebruik van het
apparaat of de onderdelen daarvan
verzekerd is. Zet het apparaat niet bij
ongesorteerd afval. Lever het in bij de
winkel of breng het naar een erkend
inzamelpunt. Neem voor informatie over
het inzamelsysteem in uw regio contact op
met de gemeente.
CE-regelgeving
De van toepassing zijnde Europese
regelgeving:
2002/95/EC
2002/96/EC
1081656_nova_steam station_320300_V1.book Page 7 Tuesday, August 26, 2008 12:20 PM

8Steam Station Star Deluxe Article 320300
General information
This complete NOVA Nova Steam Station
Star Deluxe consists of an iron with a
separate steam generator. The iron is
equipped with a steam button to give a
shot of steam, and a temperature-control
dial to set the temperature to the required
level.
Operation and
controls
See figure 1.
The appliance includes the following
components:
1 Steam control button
2 Temperature-control dial
3 Temperature indicator light
4 Double-insulated power cord and
steam hose to iron
5 Indicator light “water reservoir empty”
6 On/off switch steam generator
7 Indicator light “steam ready”
8 Calc Clean descaling cap
9 Connector with power cord and plug to
mains
10 Removable water reservoir
11 Holder
12 Iron
13 Reservoir lock
Steam control button
Pressing this button delivers a steamblast.
Temperature-control dial
Sets the right ironing temperature for each
garment.
Temperature indicator light
Indicates the temperature of the iron. The
indicator goes on and off during ironing.
Indicator light “water reservoir empty”
Indicates you need to refill the water
reservoir.
On/off switch steam generator (with ‘on’
indicator light)
Switches the steam generator on and off.
The indicator light in the switch always
goes on when you set the on/off switch
steam generator to "I" position.
Indicator light “steam ready”
Indicates the steam is ready to use.
Before using for the first time
• Read and follow these instructions
carefully. Keep this manual for future
reference.
• Make sure that the mains voltage is
the same as that indicated on the type
plate on the appliance.
• Always turn the temperature-control
dial to ‘min’ before putting the plug in
the wall socket or removing the plug
from the socket.
• Always take care when ironing in the
vicinity of children. Never leave an
iron unattended when it is switched
on, even when the iron is standing on
an ironing board.
• Touching hot metal parts, hot water or
steam can cause burns. Take care
when touching hot parts of the steam
generator and iron.
1 Before using the iron for the first time,
verify that the mains voltage stated on
the base of the steam generator is the
same as your mains voltage.
2 Remove all labels and stickers that may
be attached to the iron.
1081656_nova_steam station_320300_V1.book Page 8 Tuesday, August 26, 2008 12:20 PM

9
Steam Station Star Deluxe Article 320300
Some parts of the iron are lightly greased,
and it is possible that the iron will emit a
little smoke when used for the first time.
This smoke will stop after a short period of
time, and is not indicative of a defect.
3 To remove residue from the soleplate,
set the temperature control dial to
‘max’, and iron over a damp cloth.
Preparing the appliance for use
• It is recommended that you fill the
water reservoir with a mixture of 50%
tap water and 50% distilled water. This
is particularly desirable in areas with
hard water, since this will prevent the
formation of excessive limescale.
• Make sure the water reservoir is
always filled, even if you do not plan
to use the steam function.
1 Place the appliance on a flat sturdy
surface.
2 Make sure the appliance is not plugged
in.
3 Use your thumb to press the reservoir
lock (No.13) downwards, and pull the
reservoir forwards with your fingers.
4 Fill the water reservoir with the
indicated quantity of water (no higher
than the ‘max’ level).
5 Replace the water reservoir by
positioning the base over the projection
and then clicking the top in place.
Use
• Never iron over zips, rivets in jeans,
etc. These will damage the soleplate.
Iron around any such objects.
• The steam generator’s holder for the
iron will become hot. Do not touch it
whilst you are ironing.
• Never point the soleplate at persons
during use, steam is very hot.
• Check whether ironing-instruction
labels are attached to clothing. Always
observe any such instructions.
• The filling aperture of the water
reservoir must not be opened during
use.
• Do not remove the Calc Clean
descaling cap from the body of the
generator at any time. Behind the cap
is a water outlet which connects
directly to the steam generator and it
is very hot during use!
• Make sure that the appliance can not
fall when you place the iron on the
holder.
Dry ironing
1 Fill the water reservoir (No.10).
2 Put the iron on the steam generator’s
holder (No.11).
3 Put the plug in the wall socket.
4 Turn on the ON/OFF switch and turn
the iron’s temperature-control dial
(No.2) to adjust the temperature to the
required setting. The iron starts heating.
5 Adjust the temperature in accordance
with the directions given in table 1.
6 When the indicator light on the iron
(No.3) turns off, the temperature is
reached. You now can start ironing.
Steam ironing
1 Fill the water reservoir.
2 Put the iron on the steam generator’s
holder.
3 Put the plug in the wall socket.
4 Make sure that there is enough water in
the reservoir.
5 Set the on/off switch steam generator
(No.6) to ‘I’. The steam generator starts
to pump the water and heat it. The
indicator light “steam ready” illuminates
when steam is ready.
6 Meanwhile adjust the temperature by
turning the iron’s temperature-control
dial to the required setting. Adjust the
temperature in accordance with the
directions given in table 1.
1081656_nova_steam station_320300_V1.book Page 9 Tuesday, August 26, 2008 12:20 PM

10 Steam Station Star Deluxe Article 320300
Table 1
7 The temperature indicator light (No.3)
on the iron is illuminated whilst the iron
is heating up, and is extinguished once
the iron has reached the set
temperature. You can now start ironing.
8 Whilst you are ironing you can give a
shot of steam by pressing the iron’s
steam control button (No.1).
9 When pausing during ironing, return the
iron to the holder on the steam
generator.
10 When you have finished ironing return
the iron to the holder on the steam
generator, switch the steam generator
off and remove the plug from the wall
socket.
11 Allow the appliance to cool.
Refilling the water reservoir
• The steam station is protected with a
warning system for your convenience:
when the waterlevel in the reservoir is
too low, a warning sounds and an
indicator light "water reservoir empty"
illuminates.
1 When you hear a warning sound or you
see the indicator light "water reservoir
empty" illuminate, turn off the on/off
switch and remove the plug from the
plug socket.
2 Remove the water reservoir from the
steam generator.
3 Refill the reservoir, but be careful not to
exceed the ‘max’ level.
4 Install the reservoir in the steam
generator and make sure it is
positioned correctly.
Turning off and storing the
appliance
1 Switch off the steam generator.
2 Remove the plug from the plug socket.
3 Let the appliance cool down completely.
4 Clean the housing and drain the
appliance. (see ‘Maintenance and
cleaning’).
5 Store the iron in a dry, frost-free location
where children can’t reach it.
• Store the iron vertically (upright), this
will prevent damage to the soleplate.
Maintenance
and cleaning
• Never move the steam generator
whilst it is switched on or is still hot.
Label Type of
fabric Material Temp.
The fabric may not be ironed.
Synthetic Acryl
Modacrylic
Polypropylene
Polyurethane
Synthetic Acetate
Triacetate
Synthetic Metal
Cupro
Polyamide
(nylon)
Polyester
Modal
Viscose
Silk Silk
Wool Wool steam or
dry
Cotton Cotton steam or
dry
Linen Linen
min
max
min
max
min
max
min
max
min
max
1081656_nova_steam station_320300_V1.book Page 10 Tuesday, August 26, 2008 12:20 PM

11
Steam Station Star Deluxe Article 320300
Switch off the appliance, and wait until
it has cooled down before you move it.
• Never immerse the appliance, the
power cord or the plug in water or
other liquids. If this happens do not
use the appliance any more; dispose
of the appliance.
• Never use corrosive or scouring
cleaning agents.
• Never scrape over the soleplate with
metal objects.
• Never add vinegar or other cleaning
agents to the water reservoir when
ironing. This could damage the
clothing.
• Clean the appliance thoroughly after
use.
• Make sure the appliance is not
plugged into the plug socket when
you are going to clean it.
Maintenance
1 Remove the plug from the wall socket
and allow the appliance to cool down
completely before cleaning it.
2 Always drain all the water from the
reservoir after each use.
3 Wipe limescale and other fouling from
the soleplate using a damp cloth and a
non-abrasive cleaner.
4 Clean the iron’s housing with a soft
damp cloth.
Descaling
• The guarantee does not cover
limescale complaints or problems.
To prolong the useful life of your steam
station and prevent limescale descale the
appliance once a month.
1 Allow the appliance cool down.
2 Rinse the reservoir with clean water.
3 Open the Calc Clean descaling cap to
empty the boiler.
4 Fit the Calc Clean descaling cap.
5 Fill the reservoir with water and vinegar
in a 1:10 mixture or with a special
descaling agent available from
(hardware) stores.
Always verify that the descaling agent
is suitable for use with irons! Follow the
directions given on the package.
6 Put the plug in the wall socket and
switch on the appliance.
7 Switch on the steam generator and wait
until the indicator light “steam ready”
illuminates.
8 Allow the descaling agent to flow
through the appliance by pressing the
steam button for about 2 minutes.
9 Switch off the appliance, remove the
plug from the wall socket and leave the
appliance one night over to have the
descaling detergent do its job.
10 Rinse the reservoir a few times with
clean water.
11 Open the Calc Clean descaling cap to
empty the boiler.
12 Fit the Calc Clean descaling cap.
13 Consequently fill the reservoir with
clean water.
14 Put the plug in the wall socket and
switch on the appliance.
15 Switch on the steam generator and wait
until the indicator light “steam ready”
illuminates.
16 Allow the clean water to flow through
the appliance by pressing the steam
button.
Repeat this step until the appliance is
completely filled with clean water.
Safety
General information
• Read and follow these instructions
carefully. Keep this manual for future
reference.
• Use this appliance only in accordance
with these instructions.
• This appliance is intended solely for
domestic use.
1081656_nova_steam station_320300_V1.book Page 11 Tuesday, August 26, 2008 12:20 PM

12 Steam Station Star Deluxe Article 320300
• The use of this appliance by children
or persons with a physical, sensory,
mental or motor disability or with a
lack of the necessary knowledge and
experience may cause a hazard.
Persons responsible for the safety of
such people must give explicit
instructions or supervise the use of
the appliance.
• Have the appliance repaired only by a
qualified electrician. Never try to
repair the appliance yourself.
• Only use accessories recommended
by the supplier. The use of other
accessories may result in damage to
the appliance, thereby creating
hazards for the user.
• The appliance is not intended to be
operated by means of an external
timer or separate remote control
system.
• Do not use the appliance when it is
fallen, shows visible signs of damage
or if it is leaking water.
Electricity and heat
• Verify that the mains voltage is the
same as that indicated on the
appliance’s type plate before use.
• Use an earthed plug socket.
• If you use an extension lead, use an
earthed extension lead that is suitable
for the appliance’s power rating.
Unwind the extension lead fully and
position it so that nobody can trip
over it.
• Always remove the plug from the wall
socket when the appliance is not
going to be used for a period of time.
• When you remove the plug from the
plug socket, pull the plug and not the
power cord.
• Never pull the power cord to move the
appliance.
• Do not use the appliance if the
appliance or the power cord is
damaged. Have a damaged power
cord replaced by a qualified
electrician.
• Make sure the appliance, the power
cord and the plug do not come into
contact with heat sources, such as a
hot hob or a naked flame.
• Make sure the appliance, the power
cord and the plug do not come into
contact with water, other fluids or
chemicals.
• Do not pick up the appliance if it falls
into water. Immediately remove the
plug from the wall socket. Do not use
the appliance any more.
• The appliance and its parts can
become hot while the appliance is in
use. To avoid being burnt, take care
when touching the appliance and its
parts.
• The appliance must be able to
dissipate its heat to avoid a risk of fire.
Make sure that the appliance has
sufficient space around it, and does
not come in contact with flammable
material. The appliance must not be
covered.
During use
• Never use the appliance outdoors.
• Never use the appliance in a humid
room.
• Never allow the power cord to hang
over the edge of the draining board,
work top or table.
• Make sure your hands are dry when
you touch the appliance, the power
cord or the plug.
• Turn off the appliance and/or remove
the plug from the plug socket in the
event of a malfunction during use,
before cleaning the appliance, before
fitting or removing an accessory and
before storing the appliance after use.
1081656_nova_steam station_320300_V1.book Page 12 Tuesday, August 26, 2008 12:20 PM

13
Steam Station Star Deluxe Article 320300
• Never leave the appliance unattended
when in use.
• Make sure that the appliance is
outside the reach of children.
• Certain parts of the appliance can
become hot. Do not touch the warm
parts of the appliance; these could
cause burns.
• Fill the water reservoir with water
before switching on the appliance. Fill
only with cold water.
• Never fill above the maximum-level
indication (’MAX’).
• Clean the appliance thoroughly after
use (see the ‘Maintenance and
cleaning’ section).
• Allow the appliance to cool to room
temperature before storage,
maintenance and/or cleaning.
U.K. WIRING INSTRUCTIONS
The wires in the mains lead are
coloured in accordance with the
following code:
• BLUE NEUTRAL
•BROWN LIVE
• GREEN/YELLOW EARTH
As the colours of the wire in the mains
lead of this appliance may not
correspond with the colour markings
identifying the terminals on your plug,
proceed as follows:
• The wire which is coloured BLUE
must be connected to the terminal
which is marked with the letter N or
coloured black.
• The wire which is coloured BROWN
must be connected to the terminal
which is marked with the letter L or
coloured red.
• The wire which is coloured GREEN/
YELLOW must be connected to the
terminal which is marked with the
letter E or (earth symbol) and is
coloured GREEN or GREEN/YELLOW.
WARNING: THIS APPLIANCE MUST BE
EARTHED
With this appliance, if a 13A plug is
used a 13A fuse should be fitted. If any
other type of plug is used, a 15A fuse
must be fitted either in the plug or at the
distribution board.
The Environment
Dispose of packaging material, such as
plastic and boxes, in the appropriate waste
containers.
If you wish to dispose of the appliance
whilst it still works properly or can be easily
repaired, then ensure that the appliance is
recycled.
When the appliance reaches the end of its
useful life, it should be disposed of in a
responsible manner, thereby ensuring the
reuse of the appliance or its parts. Do not
dispose of the appliance with unsorted
refuse; hand it in at the store, or take it to a
recognized collection point. Contact your
municipality for information about the
reception and collection systems in your
area.
CE conformity
Applicable European guideline:
2002/95/EC
2002/96/EC
1081656_nova_steam station_320300_V1.book Page 13 Tuesday, August 26, 2008 12:20 PM

14 Steam Station Star Deluxe Article 320300
Information générale
Votre NOVA Steam Station Plus Star
Deluxe complet est un fer à repasser
équipé d'un générateur de vapeur séparé.
Le fer à repasser a un bouton Vapeur pour
donner un coup de vapeur, et un sélecteur
de température pour régleur la
température du fer au niveau voulu.
Fonctionnement et
utilisation
Voir la figure 1.
L'appareil comprend les composants
suivants :
1 Bouton Vapeur
2 Sélecteur de réglage de la température
3 Témoin indicateur de température
4 Cordon d'alimentation à double
isolation et conduite de vapeur vers le
fer à repasser
5 Témoin lumineux « réservoir d'eau vide »
6 Interrupteur marche/arrêt du générateur
de vapeur
7 Témoin lumineux « vapeur prête »
8 Bouchon de détartrage Calc Clean
9 Connecteur d'alimentation avec cordon
et fiche
10 Réservoir d'eau amovible
11 Support
12 Fer à repasser
13 Verrouillage du réservoir
Bouton Vapeur
Permet de donner un coup de vapeur.
Sélecteur de réglage de la température
Sélection de la température appropriée
pour le repassage de chaque pièce.
Témoin indicateur de température
Indique la température du fer à repasser.
L'indicateur s'allume et s'éteint durant le
repassage.
Témoin lumineux « réservoir d'eau vide »
Indique qu'il est temps de remplir le
réservoir d'eau.
Interrupteur marche/arrêt du générateur
de vapeur (avec témoin lumineux
'marche')
Permet d'allumer et d'éteindre le générateur
de vapeur. Le témoin lumineux dans
l'interrupteur s'allume toujours au moment
où vous mettez l'interrupteur marche/arrêt
du générateur de vapeur sur 'I'.
Témoin lumineux « vapeur prête »
Indique que la vapeur est prête à être
utilisée.
Avant la première utilisation
• Lisez et suivez soigneusement ces
instructions. Conservez le manuel afin
de pouvoir vous y référer à l'avenir.
• Vérifiez que la tension d'alimentation
du réseau est identique à la tension
indiquée sur la plaquette type de
l'appareil.
• Mettez toujours le sélecteur de
température sur la position 'Min' avant
de brancher la fiche sur la prise ou de
la débrancher.
• Faites toujours très attention s'il y a
des enfants à proximité durant le
repassage. Ne laissez jamais un fer à
repasser branché sans surveillance,
même posé sur une planche à
repasser.
• Le contact avec les parties
métalliques échauffées, l'eau chaude
ou la vapeur peut causer des brûlures.
Faites très attention quand vous
touchez les parties échauffées du
générateur de vapeur et du fer à
repasser.
1081656_nova_steam station_320300_V1.book Page 14 Tuesday, August 26, 2008 12:20 PM

15
Steam Station Star Deluxe Article 320300
1 Avant la première utilisation de votre fer
à repasser, vérifiez que la tension
d'alimentation est identique à la tension
indiquée sur la plaquette type sur le
socle du générateur de vapeur.
2 S'il y a des étiquettes ou autocollants
sur le fer à repasser, enlevez-les.
Quelques parties du fer à repasser sont
légèrement graissées, ce qui fait qu'une
légère fumée peut se dégager quand vous
l'enclenchez pour la première fois. La
fumée disparaît en peu de temps et
n'indique pas un mauvais fonctionnement.
3 Pour enlever les résidus de la semelle
du fer, réglez le sélecteur de
température sur 'Max' et passez le fer
sur un torchon humide.
Préparation de l'appareil pour
l'utilisation
• Nous recommandons de remplir le
réservoir d'eau avec 50% d'eau du
robinet et 50% d'eau distillée. Surtout
dans les régions où l'eau est dure,
ceci préviendra un entartrage
excessif.
• Veillez à ce que le réservoir d'eau soit
toujours bien rempli, même si vous ne
prévoyez pas d'utiliser la fonction
vapeur immédiatement.
1 Posez l'appareil sur une surface plane
et stable.
2 Vérifiez que l'appareil est débranché.
3 Avec le pouce, enfoncez le verrouillage
(no. 13) du réservoir, et attirez le
réservoir en avant du bout des doigts.
4 Remplissez le réservoir d'eau de la
quantité d'eau indiquée (sans dépasser
le niveau maximum 'Max' indiqué).
5 Remettez le réservoir d'eau en place ;
pour ce faire, vous placez le fond par-
dessus la protubérance et vous
enfoncez le réservoir jusqu'au déclic.
Utilisation
• Ne passez jamais le fer à repasser sur
les fermetures à glissière, les clous
des jeans, etc. Vous pourriez
endommager la semelle. Passez le fer
autour de tels éléments.
• Le support du fer à repasser sur le
générateur de vapeur s'échauffe. N'y
touchez pas durant le repassage.
• Ne dirigez jamais la semelle vers une
personne quand le fer est allumé, car
la vapeur est brûlante.
• Avant de repasser un textile, cherchez
s'il a une étiquette donnant des
instructions de repassage. S'il y en a,
il faut les respecter.
• L'ouverture de remplissage du
réservoir d'eau ne doit jamais être
ouverte durant l'utilisation.
• Ne retirez jamais, en aucun cas, le
bouchon de détartrage Calc Clean du
corps du générateur de vapeur.
Derrière ce bouchon se trouve une
sortie d'eau qui débouche directement
dans le générateur de vapeur, et qui
est brûlante durant l'utilisation.
• Assurez-vous que l'appareil ne risque
pas de tomber quand vous placez le
fer à repasser sur le support.
Repassage à sec
1 Remplissez le réservoir d'eau (no. 10).
2 Placez le fer à repasser sur le support
(no. 11) prévu pour lui sur le générateur
de vapeur.
3 Branchez la fiche sur la prise.
4 Mettez l'interrupteur marche/arrêt sur
marche, et réglez le sélecteur de
température (no. 2) du fer à repasser
sur la température voulue. Le fer à
repasser commence à s'échauffer.
5 Choisissez la température d'après les
indications du tableau 1.
6 Lorsque le témoin lumineux (no. 3) sur
le fer à repasser s'éteint, la température
sélectionnée est atteinte. Vous pouvez
commencer à repasser.
Repassage à la vapeur
1 Remplissez le réservoir d'eau.
1081656_nova_steam station_320300_V1.book Page 15 Tuesday, August 26, 2008 12:20 PM

16 Steam Station Star Deluxe Article 320300
2 Placez le fer à repasser sur le support
prévu pour lui sur le générateur de
vapeur.
3 Branchez la fiche sur la prise.
4 Vérifiez que le réservoir contient
suffisamment d'eau.
5 Mettez l'interrupteur (no. 6) du
générateur de vapeur sur 'I'. Le
générateur de vapeur commence à
pomper l'eau et la réchauffer. Le témoin
lumineux 'vapeur prête' s'allume quand
la vapeur est prête à l'emploi.
6 Pendant ce temps, réglez le fer sur la
température voulue avec le sélecteur
de température. Choisissez la
température d'après les indications du
tableau 1.
Tableau 1
7 Le témoin lumineux de température
(no. 3) sur le fer à repasser reste allumé
pendant que le fer se réchauffe, et
s'éteint quand le fer atteint la
température sélectionnée. Vous pouvez
commencer à repasser.
8 Pendant le repassage, vous pouvez
donner un coup de vapeur en
enfonçant le bouton Vapeur (no. 1).
9 Si vous interrompez le repassage,
reposez le fer à repasser sur son
support sur le générateur de vapeur.
10 Si vous avez fini de repasser, reposez
le fer à repasser sur son support sur le
générateur de vapeur puis éteignez
l'appareil et débranchez la fiche.
11 Laissez l'appareil se refroidir.
Remplissage du réservoir d'eau
• Pour plus de facilité et de sécurité,
votre Steam Station est équipé d'un
système d'alerte : quand le niveau
d'eau dans le réservoir baisse trop, un
avertissement sonore retentit et le
témoin lumineux 'réservoir d'eau vide'
s'allume.
1 Lorsque l'avertissement sonore retentit
ou que le témoin lumineux 'réservoir
d'eau vide' s'allume, mettez
l'interrupteur marche/arrêt sur arrêt et
débranchez la fiche.
2 Retirez le réservoir d'eau du générateur
de vapeur.
3 Remplissez le réservoir, en veillant à ne
pas le remplir au-dessus du niveau
'max'.
Éti-
quette Type de
textile Matériau Temp.
Tissu non repassable
Synthétique Acrylique
Modacrylique
Polypropylène
Polyurethane
Synthétique Acétate
Triacétate
Synthétique Métal
Cupro
Polyamide
(nylon)
Polyester
Modal
Viscose
Soie Soie
Laine Laine à la
vapeur ou
àsec
min
max
min
max
min
max
min
max
Coton Coton à la
vapeur ou
àsec
Lin Lin
Éti-
quette Type de
textile Matériau Temp.
min
max
1081656_nova_steam station_320300_V1.book Page 16 Tuesday, August 26, 2008 12:20 PM

17
Steam Station Star Deluxe Article 320300
4 Remontez le réservoir sur le générateur
de vapeur, en veillant à le placer
correctement.
Pour éteindre et ranger
l'appareil
1 Éteignez le générateur de vapeur.
2 Débranchez la fiche.
3 Laissez l'appareil se refroidir
complètement.
4 Nettoyez le corps de l'appareil et videz
toute l'eau. (voir « Entretien et
nettoyage »).
5 Rangez l'appareil dans un endroit sec
et protégé du gel.
• Rangez le fer à repasser debout (à la
verticale) pour éviter d'endommager la
semelle.
Entretien
et nettoyage
• Ne déplacez jamais le générateur de
vapeur quand il est branché ou encore
chaud. Avant de déplacer l'appareil,
débranchez-le et attendez qu'il ait
refroidi.
• N'immergez jamais l'appareil, la fiche
ni le cordon dans l'eau ou tout autre
liquide. Si ceci se produit par
accident, l'appareil ne peut plus être
utilisé et vous devez le mettre au
rebut.
• N'utilisez jamais de produits de
nettoyage corrosif ou abrasifs.
• Ne grattez jamais la semelle du fer
avec un ustensile en métal.
• Ne mettez jamais de vinaigre ni aucun
produit de nettoyage dans le réservoir
d'eau pendant le repassage. Vous
risquez d'endommager vos textiles.
• Nettoyez soigneusement l'appareil
après l'utilisation.
• Assurez-vous que l'appareil est
débranché au moment où vous
commencez à le nettoyer.
Entretien
1 Débranchez la fiche et laissez l'appareil
se refroidir complètement avant de le
nettoyer.
2 Videz toujours toute l'eau du réservoir
après chaque utilisation.
3 S'il y a du tartre ou autre crasse sur la
semelle, essuyez-la sur un chiffon
humide avec un détergent non abrasif.
4 Nettoyez le boîtier du fer à repasser
avec un chiffon doux et humide.
Détartrage
• Les problèmes résultant de la
formation de tartre sont exclus de la
garantie.
Pour prolonger la durée de vie de votre
Steam Station, et pour prévenir la
formation de tartre, il faut détartrer
l'appareil une fois par mois.
1 Laissez l’appareil refroidir.
2 Rincez le réservoir à l'eau claire.
3 Ouvrez le bouchon de détartrage Calc
Clean pour vider la chaudière.
4 Remettez en place le bouchon de
détartrage Calc Clean.
5 Mettez dans le réservoir du vinaigre
dilué avec de l'eau, en proportion 1:10,
ou un détartrant approprié disponible
dans le commerce (spécialisé).
Vérifiez toujours que votre détartrant
convient pour les fers à repasser !
Suivez le mode d'emploi sur
l'emballage.
6 Branchez la fiche sur la prise et allumez
l'appareil.
7 Allumez le générateur de vapeur et
attendez que le témoin « vapeur prête »
s'allume.
8 Maintenez le bouton Vapeur enfoncé
pendant environ 2 minutes pour faire
circuler le détartrant dans l'appareil.
9 Éteignez l'appareil, débranchez la fiche
et laissez agir le détartrant pendant une
nuit.
1081656_nova_steam station_320300_V1.book Page 17 Tuesday, August 26, 2008 12:20 PM
This manual suits for next models
1
Table of contents
Languages:
Other Nova Iron manuals
Popular Iron manuals by other brands

Kiwi
Kiwi KSI 6319 instruction manual

Philips
Philips GC7715/80 quick start guide

TEFAL
TEFAL PRESSING COMPACT GV5010E0 manual

Black & Decker
Black & Decker PRESS 'N GO IR100 Use and care book

TriStar
TriStar ST-8910 user manual

Household Essentials
Household Essentials StowAway 18100 Series Instruction booklet