Novii FluxxLED IP54 Bulkhead User manual
AL87
吸顶灯说明书
折叠后尺寸
140*70
70g
书写纸
肖婷
2020.05.11
要求: 成品尺寸为420*210mm,材质为70g书写纸,单色双面印刷。
印刷成品必须按我司提供的文档1:1印刷,成品要印刷清晰,整洁,
不能有模糊,残缺、等现象.
LED CEILING LIGHT USER GUIDE
420mm
210mm
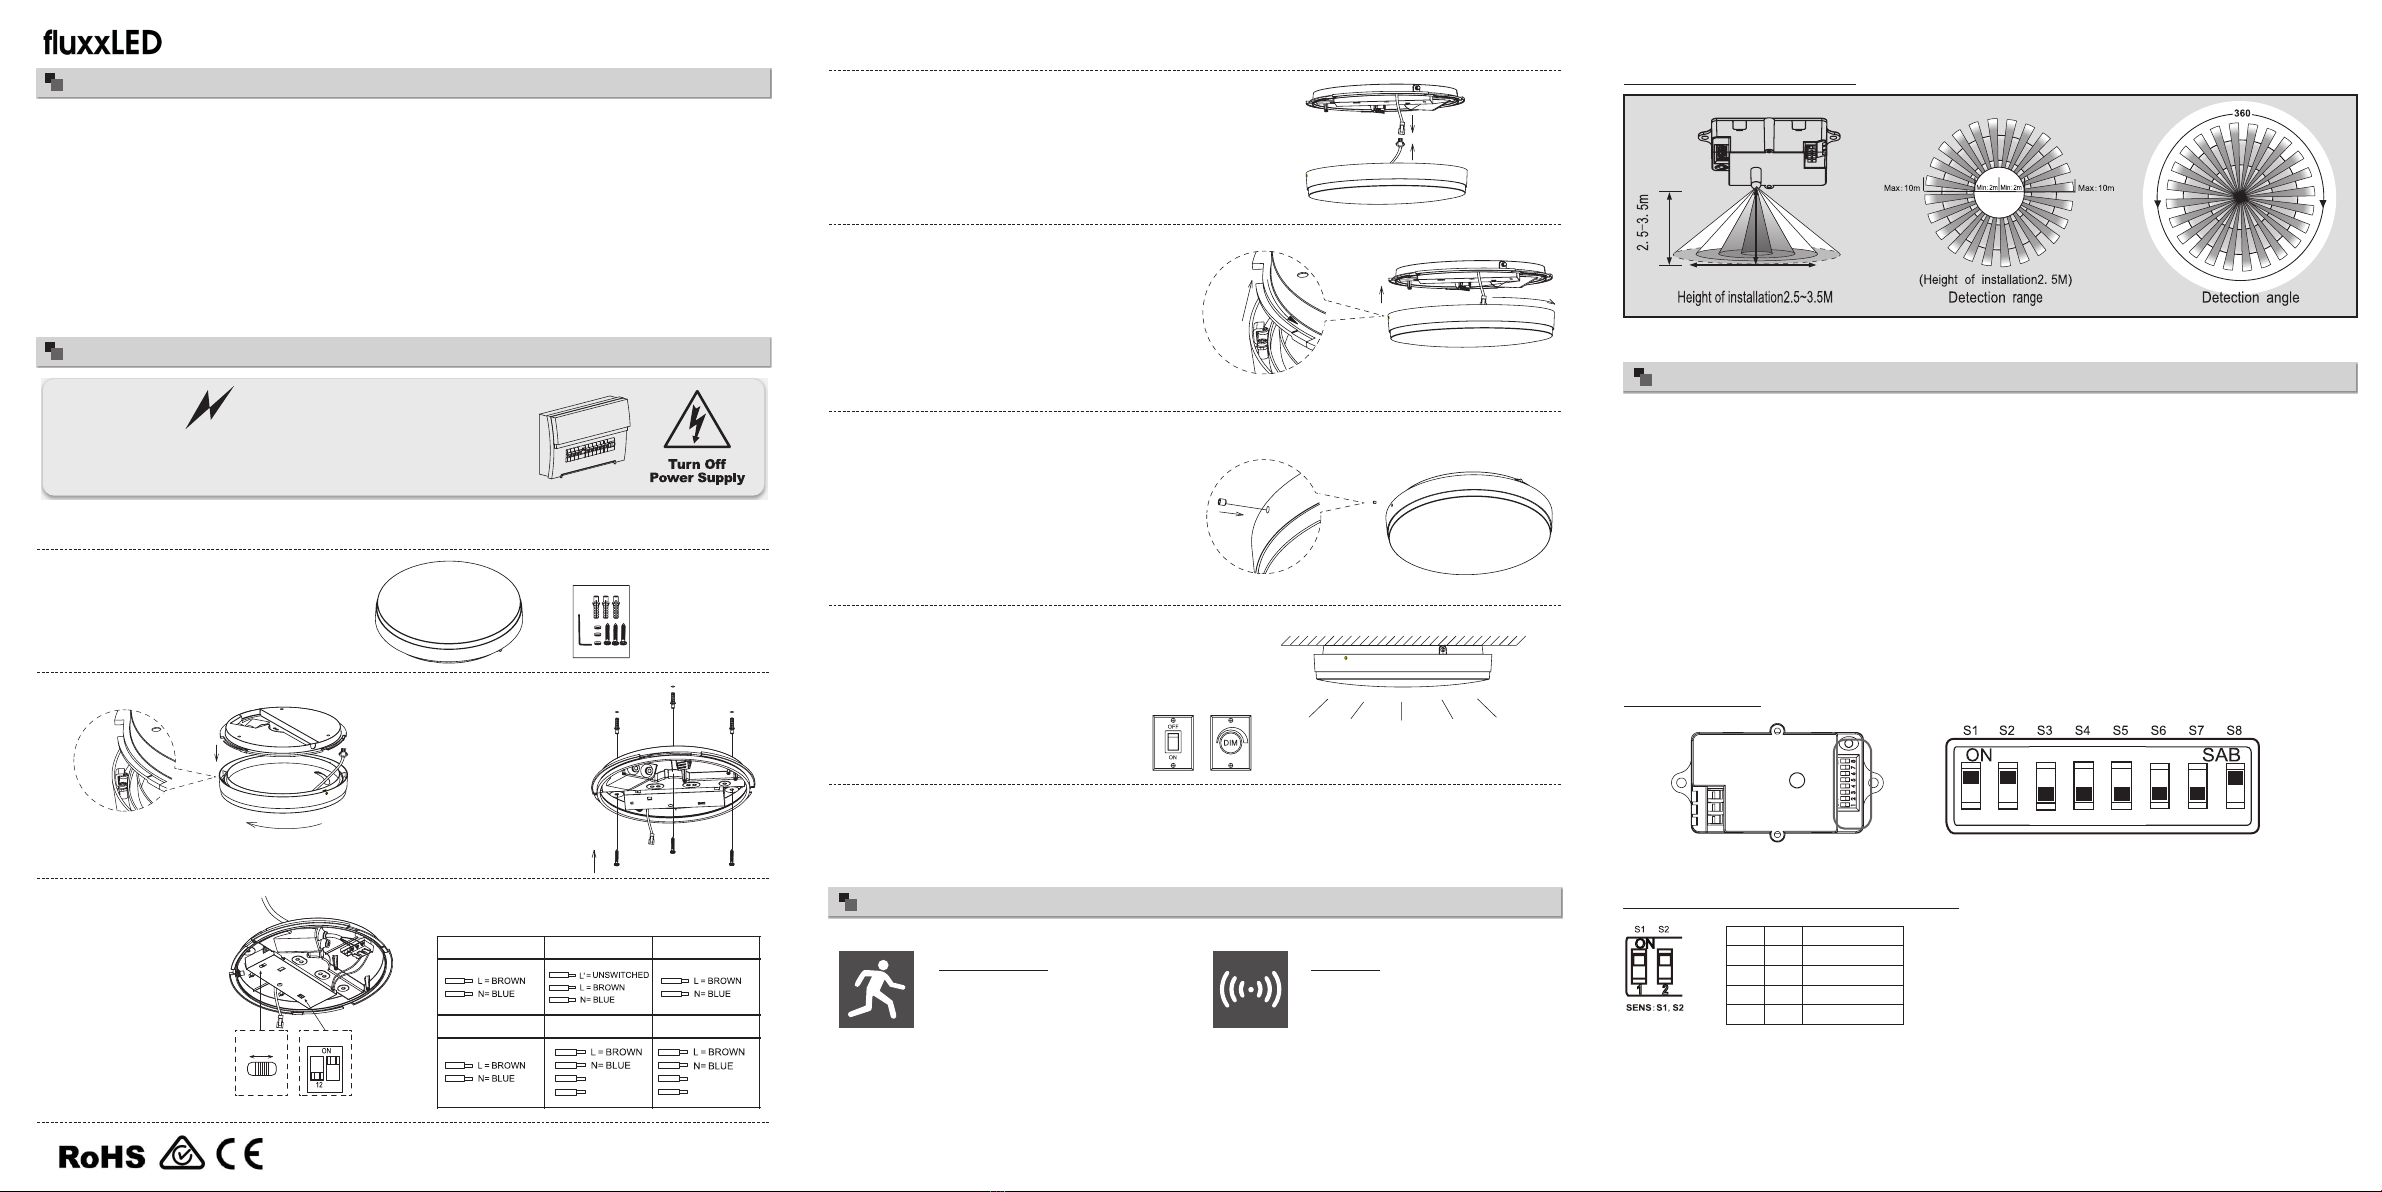
WARNING
1.Switch off before installation.
2.Switch on only after complete installation and examination of the circuit.
3.Professional electrician for installation and maintenance only.
Turn Off power supply before starting any installation. Read instructions & check you have all the tools & accessories
to complete the installation correctly.
L USER GUIDEED CEILING LIGHT
Safety Instructions
Step 1
The light source of this luminaire is not replaceable; when the light source reaches its end of life the whole luminaire
shall be replaced.
Step 8
Installation Procedure
Take out ceiling light and accessory pack from box.
Knock-in the plastic anchor
into ceiling, fix the base.
To ensure correct function and safety, please read and follow all instructions carefully before using the product:
1. Turn off power supply before installation or before doing any maintenance work.
2. Do not install any luminaire near the heat source.
3. IP grade please refer to product label, only IP65 can be used in damp locations.
4. Do not exceed the nominal supply voltage or amperage ratings.
5. Dimmable version could be compatible with a wide range of recommended TRIAC dimmers.
6. All wiring and installation of the light fitting must adhere to local and national wiring rules.
7. Take care not to pull any electrical wires during unpacking as this may damage the connection.
8. Lay out all the components on a smooth surface and make sure there are no components missing before
assembling.
9. To avoid injury or damage to the fitting, please ensure that power leads and screws are secure before connecting
the power.
10. Please keep instructions for future reference.
Step 3
Step 6
Step 7
Lock the anti-theft screws on the side of the
lamp body.
Functions Instruction (For specific function, please refer to actual model)
Emergency
Emergency function switches
automatically between power cut
and power restoration.
• Li battery, high efficiency
• Battery duration: 3 hours
• Charge period: 24 hours
Sensor
Detection area: 140 degree
wide detective beam angle
with 2-10 meters distance.
S1
0
0
1
1
S2
0
1
0
1
Detection range
2M
5M
8M
10M
Detection range setting (sensitivity)
Detection range is the term used to describe the radii of the more or less
circular detection zone produced on the ground after mounting the sensor light
at a height of 2.5m, pull switch to the ON position as "1", pull switch to the OFF
position as "0", switch location and detection range of the corresponding table is
as follows:
Note: the above detection range is gained if the detected person is between 1.6m~1.7m tall with middle figure and moves at a speed of
1.0~1.5m/sec. if person's stature, figure and moving speed change, the detection distance will also change.
ATTENTION: When use this product, please adjust the sensitivity to an appropriate position you need, please do not adjust the
sensitivity to maximum, in case the product works abnormally because of wrong motion detection, including blowing leaves & curtains
small animals, or even power grid & electrical equipment. All the above factors can lead to abnormal work. When the product does not
work normally, please try to lower the sensitivity appropriately, and then test it.
Working Pattern (3 different patterns)
Microwave sensor
•
• After presence left, light will continuously work within HOLD TIME, then switch off automatically.
• After presence left, any movement detected within HOLD TIME, the light will continuously work for another hold
time, then switch off until next movement detected.
• Hold time: Please refer to "HOLD TIME" on product label.
In any given lighting condition, the light switches on automatically when presence detected.
Daylight & Microwave sensor
• With sufficient natural light, when illuminance is more than 10lux, the light does not switch on when presence
detected.
• With insufficient natural light:
> When illuminance is less than 10lux, the light switches on automatically when presence detected.
> With presence detected, light will never switch off, even the nature light is sufficient.
> After presence left, any movement detected within HOLD TIME, the light will continuously work for another
HOLD TIME, then switch off automatically until next movement detected.
• Hold time: Please refer to "HOLD TIME" on product label.
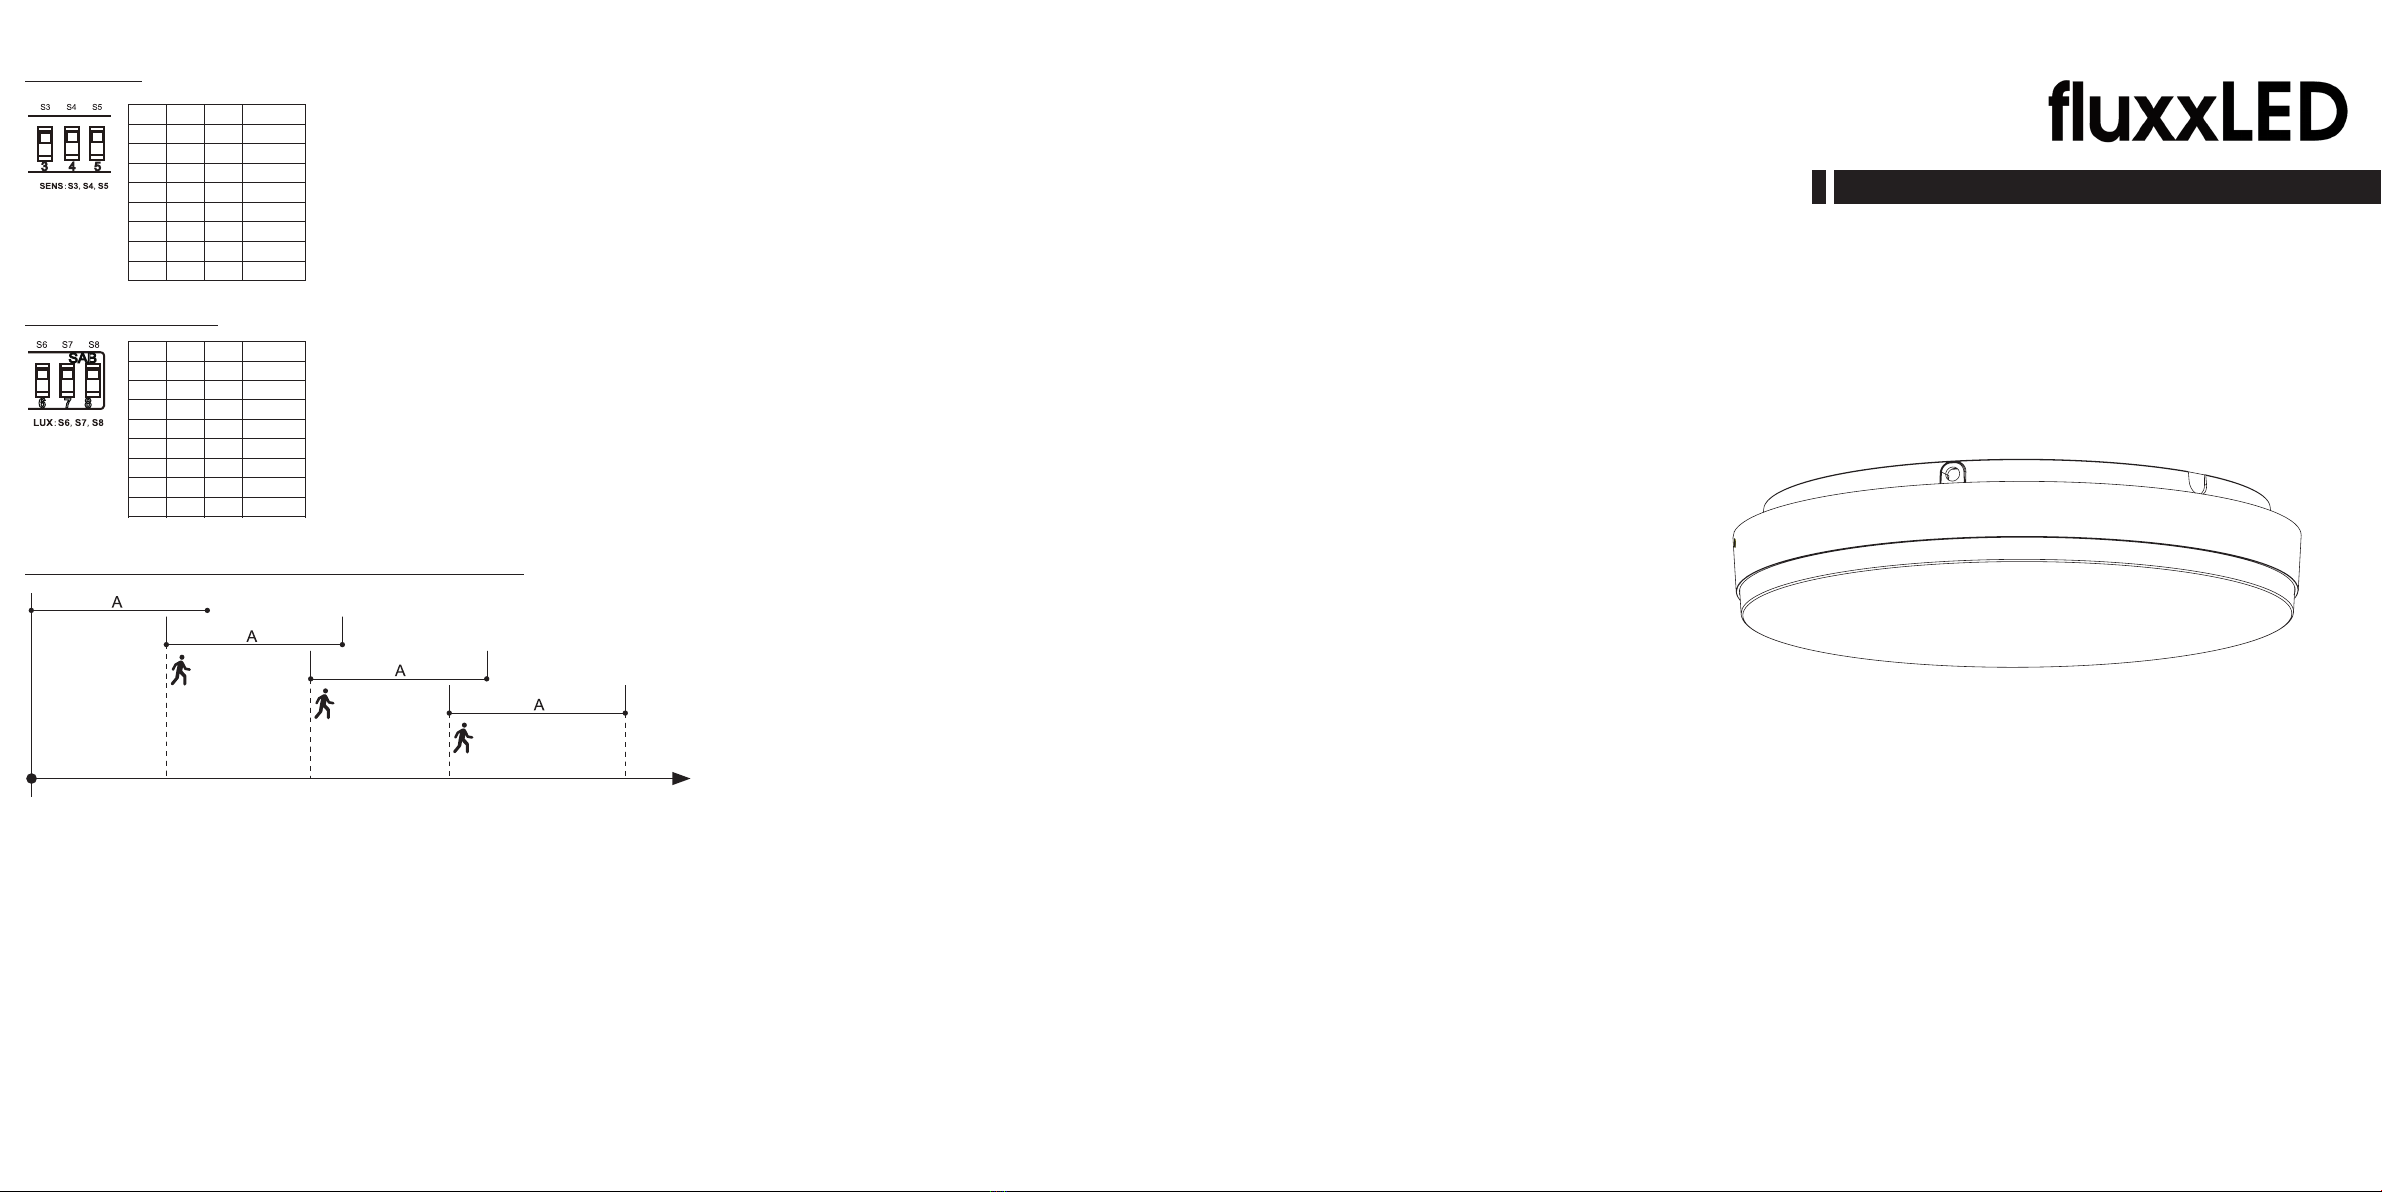
Hold time “A” please refere to “TIME SETTING” table
Outside of
detection
area
LED CEILING LIGHT USER GUIDE
L USER GUIDEED CEILING LIGHT
Step 4
Step 5
Take the lamp cover apart by rotating it in anti-clockwise
direction.
Step 2
Plug the male and female connector.
S3
0
0
0
0
1
1
1
1
S4
0
0
1
1
0
0
1
1
S5
0
1
0
1
0
1
0
1
TIME
10s
1min
5min
10min
15min
20min
25min
30min
S6
0
0
0
0
1
1
1
1
S7
0
0
1
1
0
0
1
1
S8
0
1
0
1
0
1
0
1
LUX
24H
10LUX
20LUX
50LUX
100LUX
200LUX
300LUX
500LUX
Time setting
The light can be set to stay ON for any period of time between approx. 10sec
and a maximum of 30min. Any movement detected before this time elapse will
re-start the timer. It is recommended to select the shortest time for adjusting the
detection zone and for performing the walk test.
Pull switch to the ON position as "1", pull switch to the OFF position as "0",
switch location and detection range of the corresponding table is as follows:
NOTE: after the light switches OFF, it takes approx. 4sec before it is able to
start detecting movement again. The light will only switch on in response to
movement once this period has elapsed.
Light-control setting
The chosen light response threshold can be infinlitely from approx. 10-500lux,
pull switch to the ON position as "1", pull switch to the OFF position as "0",
switch location and light-control of the corresponding table is as follows:
SENS:10M TIME:10S LUX:10lux
Default setting
1 2 3 4 5 6 7 8
SENSOR INFORMATION
※ Optimum installation height: 3M
page 2 page 3page 1
page 4
CCT changeable Adjustable power
Align the hooks on the lamp cover with the
notch of the base, rotate the lamp cover
clockwise until they match well.
Feed the AC wire into terminal
block respectively; If with
3CCT or changeable
power function, choose
preferred CCT or wattage by
slide switch.
3-CCT DALI 0-10V
Emergency Sensor
DALI+
DALI-
0-10V+
0-10V-
Standard
Installation finished, turn on the
switch.
7-123003-1000009
UP-AL87-0036B1
未注公差按此公差表
WW NW CW
B1 WW CW DL改为WW NW CW
IP54 Bulkhead Installation Manual
IP54 Bulkhead Installation Manual
AL87
吸顶灯说明书
折叠后尺寸
140*70
70g
书写纸
肖婷
2020.05.11
要求: 成品尺寸为420*210mm,材质为70g书写纸,单色双面印刷。
印刷成品必须按我司提供的文档1:1印刷,成品要印刷清晰,整洁,
不能有模糊,残缺、等现象.
LED CEILING LIGHT USER GUIDE
420mm
210mm
WARNING
1.Switch off before installation.
2.Switch on only after complete installation and examination of the circuit.
3.Professional electrician for installation and maintenance only.
Turn Off power supply before starting any installation. Read instructions & check you have all the tools & accessories
to complete the installation correctly.
L USER GUIDEED CEILING LIGHT
Safety Instructions
Step 1
The light source of this luminaire is not replaceable; when the light source reaches its end of life the whole luminaire
shall be replaced.
Step 8
Installation Procedure
Take out ceiling light and accessory pack from box.
Knock-in the plastic anchor
into ceiling, fix the base.
To ensure correct function and safety, please read and follow all instructions carefully before using the product:
1. Turn off power supply before installation or before doing any maintenance work.
2. Do not install any luminaire near the heat source.
3. IP grade please refer to product label, only IP65 can be used in damp locations.
4. Do not exceed the nominal supply voltage or amperage ratings.
5. Dimmable version could be compatible with a wide range of recommended TRIAC dimmers.
6. All wiring and installation of the light fitting must adhere to local and national wiring rules.
7. Take care not to pull any electrical wires during unpacking as this may damage the connection.
8. Lay out all the components on a smooth surface and make sure there are no components missing before
assembling.
9. To avoid injury or damage to the fitting, please ensure that power leads and screws are secure before connecting
the power.
10. Please keep instructions for future reference.
Step 3
Step 6
Step 7
Lock the anti-theft screws on the side of the
lamp body.
Functions Instruction (For specific function, please refer to actual model)
Emergency
Emergency function switches
automatically between power cut
and power restoration.
• Li battery, high efficiency
• Battery duration: 3 hours
• Charge period: 24 hours
Sensor
Detection area: 140 degree
wide detective beam angle
with 2-10 meters distance.
S1
0
0
1
1
S2
0
1
0
1
Detection range
2M
5M
8M
10M
Detection range setting (sensitivity)
Detection range is the term used to describe the radii of the more or less
circular detection zone produced on the ground after mounting the sensor light
at a height of 2.5m, pull switch to the ON position as "1", pull switch to the OFF
position as "0", switch location and detection range of the corresponding table is
as follows:
Note: the above detection range is gained if the detected person is between 1.6m~1.7m tall with middle figure and moves at a speed of
1.0~1.5m/sec. if person's stature, figure and moving speed change, the detection distance will also change.
ATTENTION: When use this product, please adjust the sensitivity to an appropriate position you need, please do not adjust the
sensitivity to maximum, in case the product works abnormally because of wrong motion detection, including blowing leaves & curtains
small animals, or even power grid & electrical equipment. All the above factors can lead to abnormal work. When the product does not
work normally, please try to lower the sensitivity appropriately, and then test it.
Working Pattern (3 different patterns)
Microwave sensor
•
• After presence left, light will continuously work within HOLD TIME, then switch off automatically.
• After presence left, any movement detected within HOLD TIME, the light will continuously work for another hold
time, then switch off until next movement detected.
• Hold time: Please refer to "HOLD TIME" on product label.
In any given lighting condition, the light switches on automatically when presence detected.
Daylight & Microwave sensor
• With sufficient natural light, when illuminance is more than 10lux, the light does not switch on when presence
detected.
• With insufficient natural light:
> When illuminance is less than 10lux, the light switches on automatically when presence detected.
> With presence detected, light will never switch off, even the nature light is sufficient.
> After presence left, any movement detected within HOLD TIME, the light will continuously work for another
HOLD TIME, then switch off automatically until next movement detected.
• Hold time: Please refer to "HOLD TIME" on product label.
Hold time “A” please refere to “TIME SETTING” table
Outside of
detection
area
LED CEILING LIGHT USER GUIDE
L USER GUIDEED CEILING LIGHT
Step 4
Step 5
Take the lamp cover apart by rotating it in anti-clockwise
direction.
Step 2
Plug the male and female connector.
S3
0
0
0
0
1
1
1
1
S4
0
0
1
1
0
0
1
1
S5
0
1
0
1
0
1
0
1
TIME
10s
1min
5min
10min
15min
20min
25min
30min
S6
0
0
0
0
1
1
1
1
S7
0
0
1
1
0
0
1
1
S8
0
1
0
1
0
1
0
1
LUX
24H
10LUX
20LUX
50LUX
100LUX
200LUX
300LUX
500LUX
Time setting
The light can be set to stay ON for any period of time between approx. 10sec
and a maximum of 30min. Any movement detected before this time elapse will
re-start the timer. It is recommended to select the shortest time for adjusting the
detection zone and for performing the walk test.
Pull switch to the ON position as "1", pull switch to the OFF position as "0",
switch location and detection range of the corresponding table is as follows:
NOTE: after the light switches OFF, it takes approx. 4sec before it is able to
start detecting movement again. The light will only switch on in response to
movement once this period has elapsed.
Light-control setting
The chosen light response threshold can be infinlitely from approx. 10-500lux,
pull switch to the ON position as "1", pull switch to the OFF position as "0",
switch location and light-control of the corresponding table is as follows:
SENS:10M TIME:10S LUX:10lux
Default setting
1 2 3 4 5 6 7 8
SENSOR INFORMATION
※ Optimum installation height: 3M
page 2 page 3page 1
page 4
CCT changeable Adjustable power
Align the hooks on the lamp cover with the
notch of the base, rotate the lamp cover
clockwise until they match well.
Feed the AC wire into terminal
block respectively; If with
3CCT or changeable
power function, choose
preferred CCT or wattage by
slide switch.
3-CCT DALI 0-10V
Emergency Sensor
DALI+
DALI-
0-10V+
0-10V-
Standard
Installation finished, turn on the
switch.
7-123003-1000009
UP-AL87-0036B1
未注公差按此公差表
WW NW CW
B1 WW CW DL改为WW NW CW
1. Turn off power before installation or before doing any maintenance work.
2. Do not install any luminaire near a heat source.
3. For Outdoor and Indoor use.
4. Do not exceed the nominal supply voltage or amperage ratings.
5. All wiring and installation of this luminaire must adhere to local and national wiring rules eg AS/NZS 3000:2007
Amendment 2:2012 Electrical Installation
6. Take care not to pull any electrical wires during unpacking as this may damage the connection.
7. Lay out all the components on a smooth surface and make sure there are no components missing before
assembling.
8. To avoid injury or damage to the tting, please ensure that power leads and screws are secure before connecting
the power.
9. Please keep instructions for future reference.
Other Novii Outdoor Light manuals


Popular Outdoor Light manuals by other brands

Urban Electric
Urban Electric CHARLESTON Assembly and mounting instructions

Kaper Kidz
Kaper Kidz Bedtime Buddy user manual

Vista
Vista 5203 Series installation instructions

Inspire
Inspire QUITO Assembly, Use, Maintenance Manual

Romus
Romus 96205 Instructions for use

Westinghouse
Westinghouse 61149 instruction manual


