NovoTouch EK Series User manual

NOVOTOUCH USER MANUAL
EK Series : EK655i / EK755i / EK865i

Table of Content
Chapter 1 Get to Know Your NovoTouch..................................................................... 3
1.1 What is NovoTouch EK series......................................................................... 3
1.2 Product Features............................................................................................... 4
1.3 Companion Software ........................................................................................ 5
1.4 Accessories........................................................................................................ 6
Chapter 2: Set up Your NovoTouch.............................................................................. 7
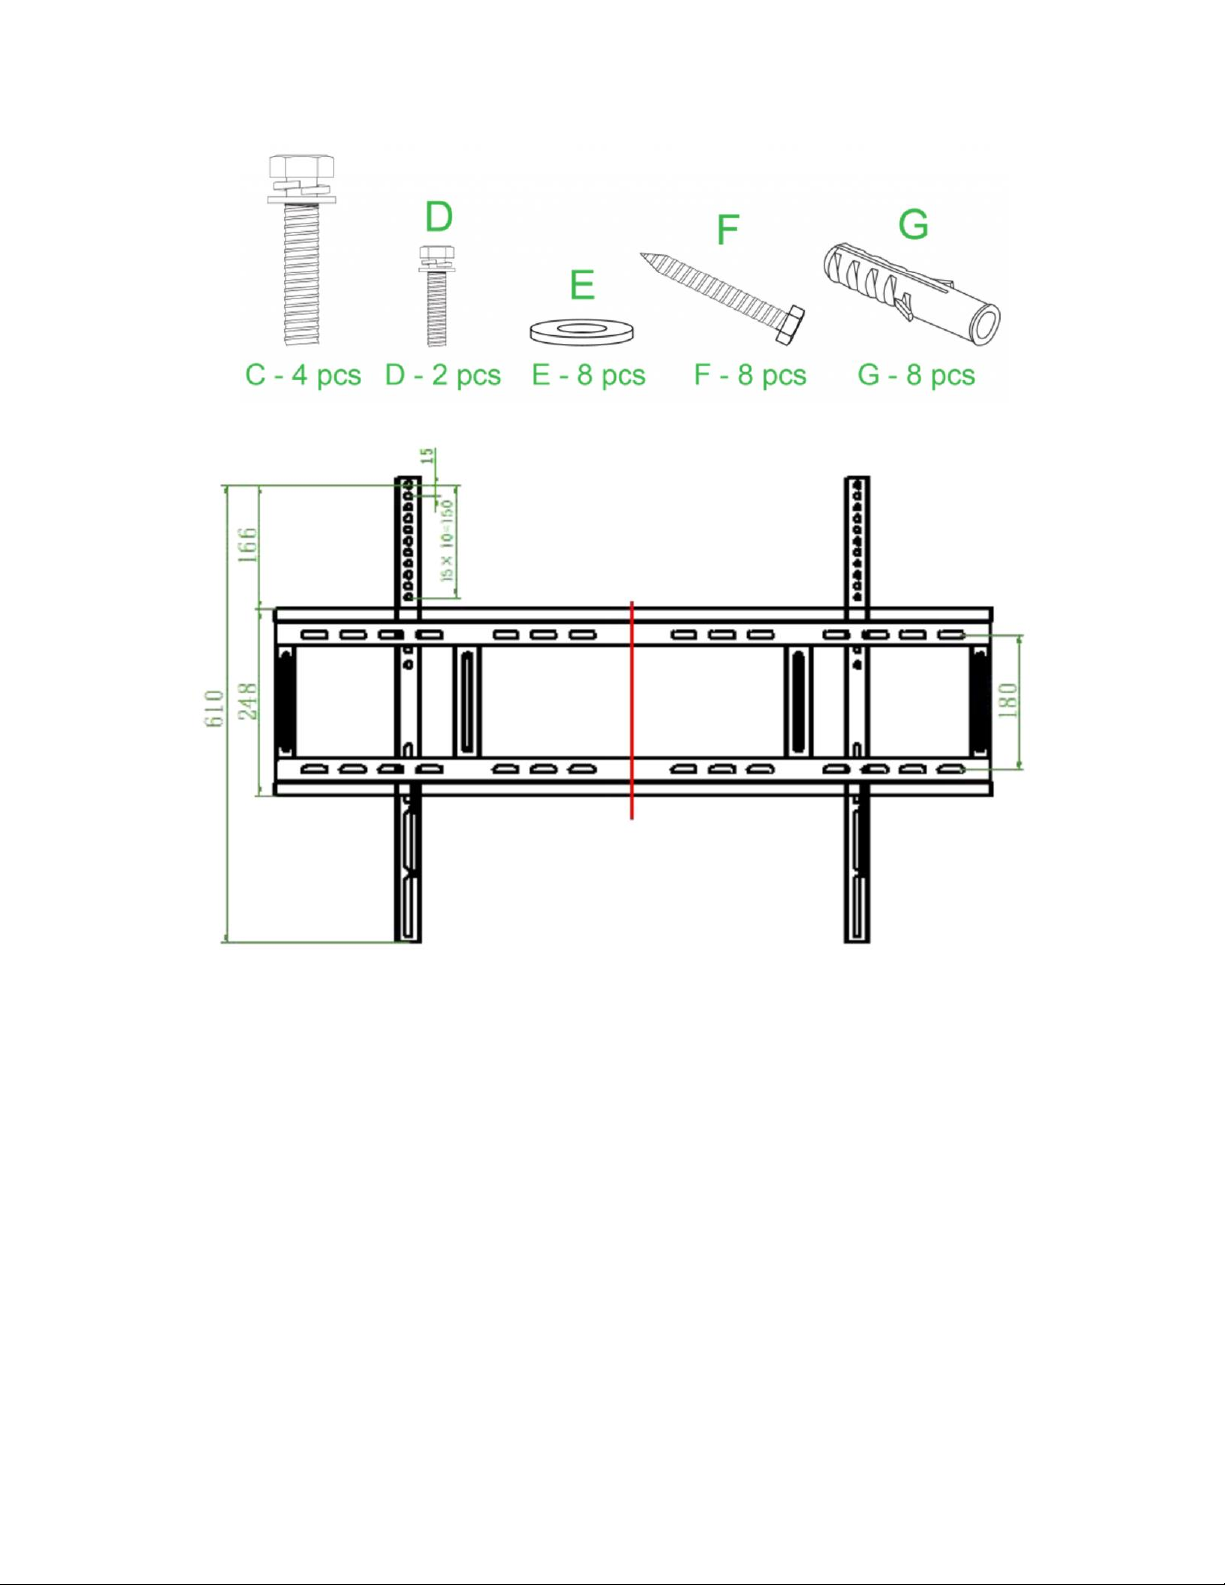
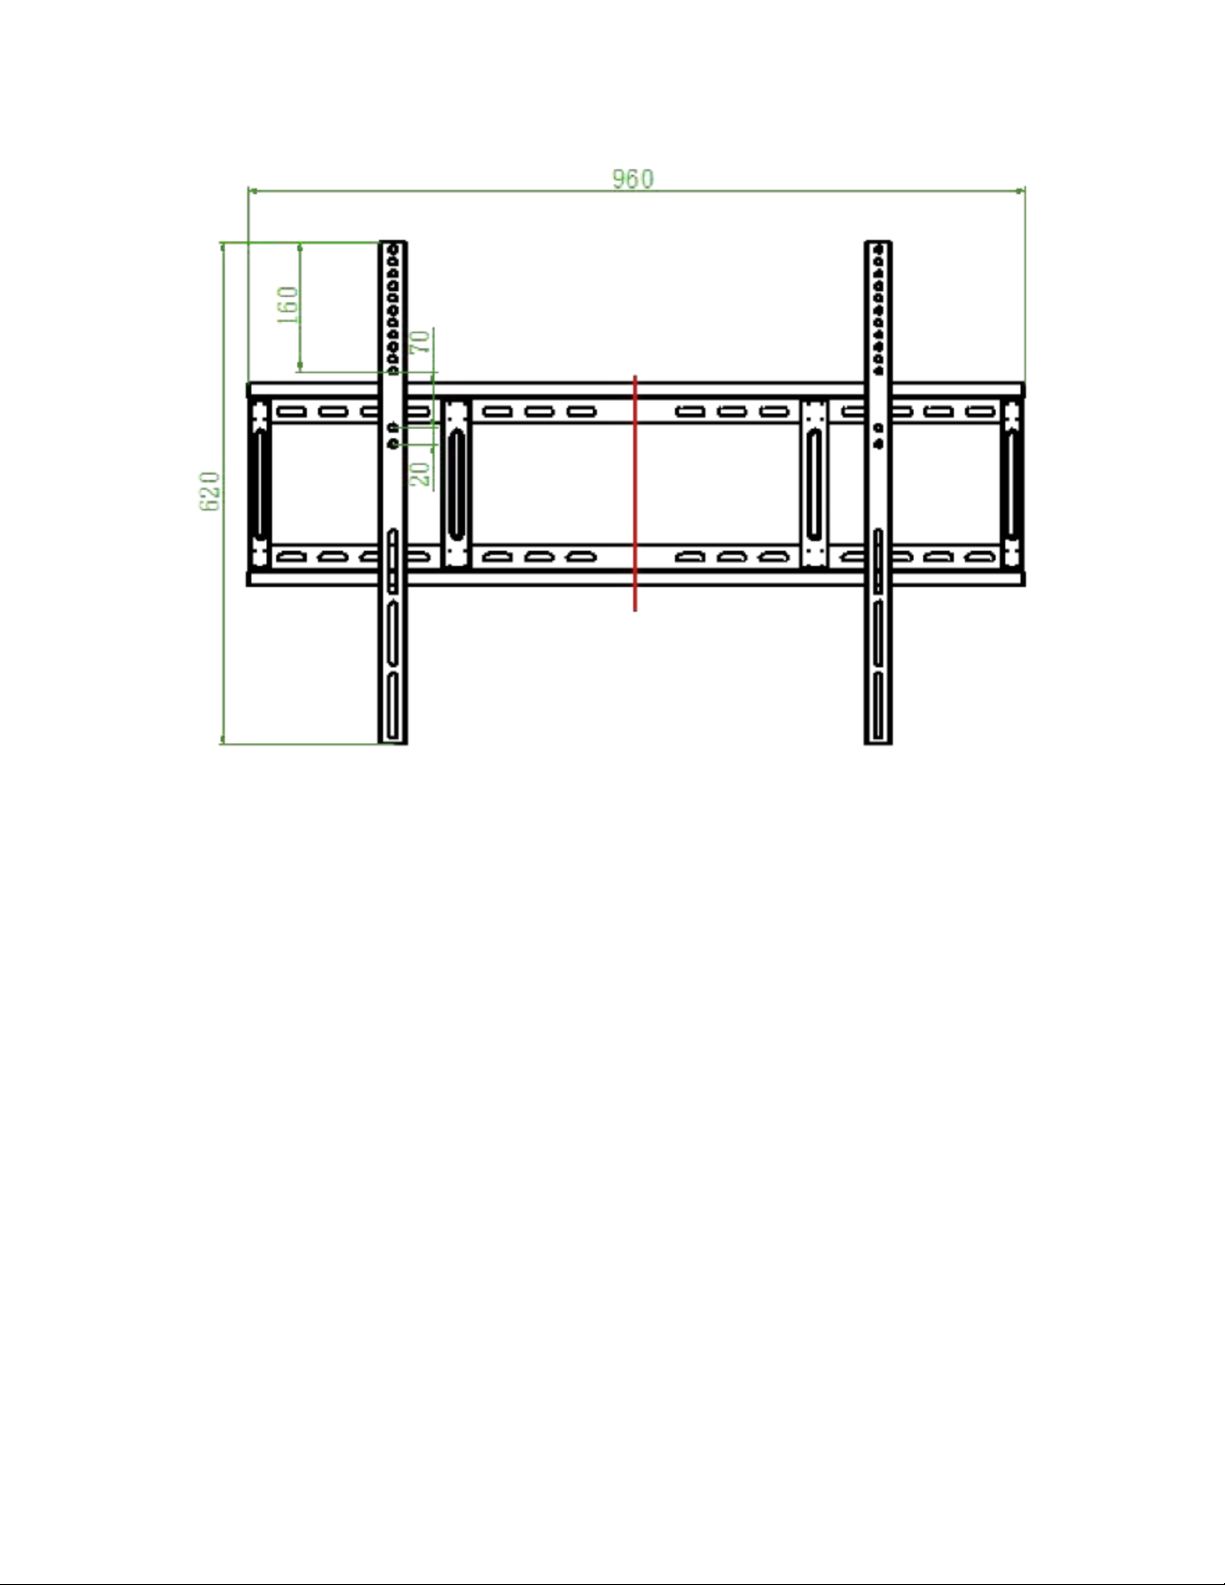
2.1 Installing the Wall Mount.................................................................................. 7
2.2 Get Started ....................................................................................................... 15
2.3 Direct power on/off.......................................................................................... 21
2.4 Connect your NovoTouch to your network.................................................. 24
2.5 Set up a Wi-Fi Hotspot.................................................................................... 28
2.6 Switch input source......................................................................................... 31
2.7 Use Remote Manager for installation........................................................... 33
2.8 Secure login by RFID/ NFC credentials....................................................... 36
2.9 Firmware Update with USB Drive................................................................. 45
Chapter 3 NovoTouch Basics ...................................................................................... 47
3.1 Home Screen ................................................................................................... 47
3.1.1 Changing the background image....................................................... 48
3.2 Side Bar Tools.................................................................................................. 50
3.3 NovoConnect.................................................................................................... 52
3.3.1 Using Native Mirroring......................................................................... 53
3.4 NovoDS............................................................................................................. 56
3.5 NT Live & NT Live Hub................................................................................... 57
3.6 Browser............................................................................................................. 63
3.7 Finder................................................................................................................. 64
3.8 Hiding/Showing NT App Store and Google Play Store ............................. 65
3.9 NT App Store.................................................................................................... 66
3.10 NT Minutes..................................................................................................... 68
3.11 Turn Wi-Fi Off and On.................................................................................. 72
3.12 Change Device Name .................................................................................. 75
3.13 Clear History................................................................................................... 77
3.14 Note................................................................................................................. 79
Chapter 4 Advanced Features..................................................................................... 81
4.1 NT Settings....................................................................................................... 81
4.1.1 Sleep Timer........................................................................................... 91
4.2 NT Live.............................................................................................................. 94
4.2.1 How to set up NT Live......................................................................... 95
4.2.2 NT Live Hub.......................................................................................... 96
4.3 Apps................................................................................................................. 100
Chapter 5 More of NovoConnect Software.............................................................. 101
5.1 How to extend your screen? (Windows).................................................... 101
5.2 Audio On/Off and Mirroring Modes............................................................. 104
5.3 Video Streaming............................................................................................ 110
5.4 AirNote............................................................................................................. 116
5.5 Touch-back and On-Screen Annotation .................................................... 119

5.6 Sharing File and Webpage (URL)............................................................... 121
5.7 Voting / Polling............................................................................................... 124
Chapter 6: BYOM......................................................................................................... 129
6.1 BYOM Installation and Activation................................................................ 130
6.1.1 Installation ........................................................................................... 130
6.1.2 Activation (First-Time Usage)........................................................... 130
6.2 How to use BYOM......................................................................................... 133
6.2.1 Microsoft Teams................................................................................. 133
6.2.2 Zoom.................................................................................................... 134
6.2.3 Microsoft Skype.................................................................................. 134
6.2.4 Cisco WebEx....................................................................................... 134
6.3 Supported USB Cameras............................................................................. 134
Chapter 7 FAQs and Troubleshooting...................................................................... 135
7.1 How to use remote control to disable front buttons or touch function... 135
7.2 How to Capture Log...................................................................................... 136
7.3 How to Rename Hotspot SSID and Encryption........................................ 137
Charpter 9...................................................................................................................... 138
9.1 NovoTouch Mobile Stand VKST03............................................................. 138

Chapter 1 Get to Know Your
NovoTouch
1.1 What is NovoTouch EK series
NovoTouch EK series is an All-in-One 4K touch panel ideal for conference rooms,
huddle space, and classrooms, which combines screen mirroring, wireless
collaboration, whiteboard, and digital signage and communications in one panel.
The EK series is available in three screen size, 65”, 75”, and 86”. All three
models come with the following hardware configuration.
Panel: 4K UHD resolution and wide viewing angle (178°/178°)
Touch: High-precision 20-point touch and common gesture interactivity
Surface Protection: 4mm-think toughened glass
Internal Storage:
oEK-2 series: 16GB in total (~ 9GB for users)
oEK-3 series: 64GB in total
Connectivity: Full suite of connectivity ports, including HDMI-Out, HDMI-
In, VGA-In, Audio-In/Out, RS232, USB, and LAN
Networking: Built-in WiFi and LAN
Audio Output: 16W × 2
Expansion: One standard Intel OPS slot

1.2 Product Features
The NovoTouch EK series is packed with powerful collaboration and productivity
tools, making it easy for users to share screen and content, open and annotate
documents, make video conference, and more.
NovoConnect solution: Wireless screen mirroring and collaboration for
Windows, Mac, Chromebook and mobile devices
Note: Whiteboard for sharing ideas
NT Minutes: Screen recording tool
NovoDS: Full-fledged digital signage capabilities to create impressive
visual communications
NT Live: Display synchronization among multiple NovoTouch panels and
NovoConnect devices
NT App Store: A suite of Apps available for one-click installation,
including video conferencing solution like Zoom
Remote Manager: Centralized management from a remote computer
Others: Web browser, MS Office document and PDF viewer, etc.
Firmware Update: Update your NovoTouch when connected to the
Internet, or push update packages through local network using Remote
Manager
All these features are available without any on-going subscriptions.

1.3 Companion Software
Two companion software tools are available.
(1) NovoConnect software
This is our flagship software that enables users to mirror screen, moderate
meeting, share document and video, and collaborate with each other.
For mobile devices, you can install it (NovoConnect App) from one of the
followings
Apple’s App Store for iPhone & iPad
Google’s Play Store for Android phones & tablets
Chrome Web Store (for Chromebook)
For Windows and Mac computers, you can download it from Vivitek website, or
from https://www.LaunchNovo.com.
Two versions, with the exact same functionalities, are available depending on
your needs
Portable version: Simply download and run it. No installation is needed.
Installer: This is a regular installation package.
(2) Remote Manager
This device management software enables system administrators to
manage Novo devices from a central location, making it ideal for
corporations, schools, and any other large and small institutions.
It is available for Windows computers and can be downloaded from Vivitek
website.
The above-mentioned software tools are free of charge, and, regular updates are
available for better user experience and enhanced features.

1.4 Accessories
Two Launcher accessories are available to further simplify the process for you to
connect to Novo devices, including NovoConnect, NovoDisplay, and NovoTouch.
Connecting a Launcher unit to your computer
(1) LauncherPlus
The LauncherPlus connects to any laptop, establishing a direct WiFi connection
to any NovoConnect device, including NovoTouch. Intended for guests,
LauncherPlus streamlines and secures the connection process, with zero impact
on the existing network.
(2) LauncherOne
LauncherOne is specifically designed for companies with strict Data Loss
Prevention (DLP) and IT security policies that lock USB ports for storage devices
and do not allow corporate network-based wireless presentation solutions.
LauncherOne includes a physical HID device and a portable application file. No
administrator rights needed.

Chapter 2: Set up Your NovoTouch
2.1 Installing the Wall Mount
Before installing the wall mount ensure the following:
• Installation should only be done by a certified professional.
• Maximum wall mount kit load capacity:150kg (330lbs).
• When setting the display down to install the wall mount, place it face down on a
flat and stable surface covered by a protective sheet or cloth and a table cushion
as shown in the illustration provided. DO NOT place the display on an uncovered
surface.
• Ensure that all the following parts are included in the wall mount kit:

wall mount bracket dimension / units of length are "mm"

Wall Mount Frame dimension / units of length are "mm"
A: Wall Mount Frame x1
B: Wall Mount Brackets x2
C: Bracket Screws x6 ( M8 x25mm , 4 pcs are recommended for installation )
D: Frame Screws x2 (M6x130mm)
E: Wall Screw Washers x10 ( Φ120 x 8.5x1.5 mm , 8 pcs are recommended for
installation )
F: Wall Screws x10 (Φ7 x 55 mm , 8H , 8 pcs are recommended for installation)
G: Anchor Screws x10 (Φ10x 50 mm , PP, 8 pcs are recommended for
installation)
To mount NovoTouch onto a wall follow the instructions below:
NOTE: This display only supports landscape display orientation. Do not mount in
portrait display orientation or mount facing up or facing down.

1. Install the two (B) the wall mount brackets onto the display using the four (C)
bracket screws.

2. Install the eight (G) anchor screws into the wall you want to mount NovoTouch
on.

3. Install the (A) wall mount frame onto the wall by securing the eight (F) wall
screws and (E) washers to the anchors.

4. Mount the displays’ wall mount brackets onto the wall mount frame.

5. Secure the wall mount brackets to the frame using the two (D) frame screws.

2.2 Get Started
Installing the Wi-Fi Module (EK-2 series)
In order for the display to have access to a wireless network or Internet, you must
first install the Wi-Fi module included with the product. To install the Wi-Fi
module:
1. Remove the two screws on the Wi-Fi module slot cover.
2. Remove the Wi-Fi module slot cover.

3. Insert the Wi-Fi module into the slot.
4. Install the two screws to secure the Wi-Fi module to the display, and then
install the antennas onto the Wi-Fi module.

Installing the Wi-Fi module (EK-3 series)
Take off the cover
2. Insert the WiFi module fully into the NovoTouch along the direction of the
arrow.
3. Complete assembly
Powering the Display
After mounting/installing the NovoTouch in the desired location you must supply
power to the display using the following steps:
1. Plug the supplied power cable into the display and a power source.
NOTE: Only use the power cable provided in the packaging with the display.

2. Turn the power switch located at the right side of the display on.
3. Press the power button on the display or the remote control to power on the
display.

Switching Input Source
After making a video input connection, open the input source menu to select
which input source to show on the display. To open the input source menu,
choose one of the following methods:
● Press the Input button on the remote control.
This manual suits for next models
3
Table of contents