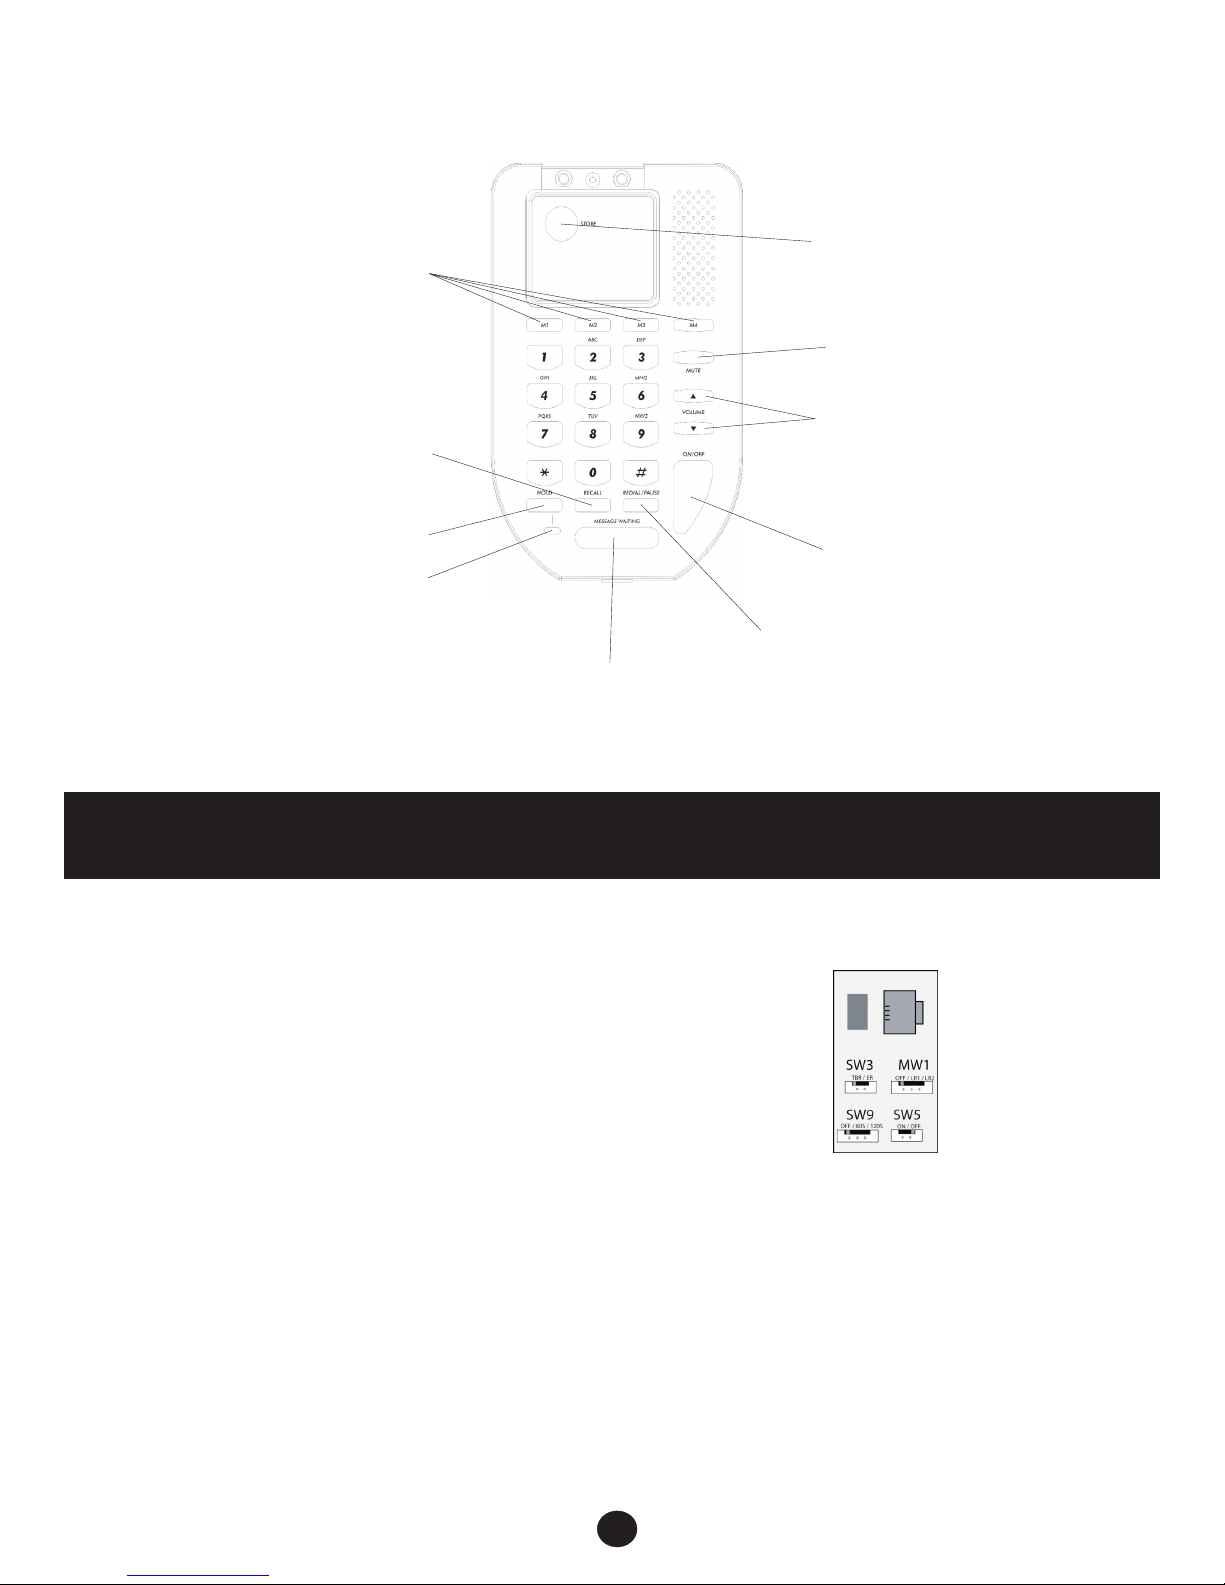
NRX FLATPHONE User manual

USER GUIDE
REF: NRXFLAT200106
Ist Floor
Amphenol Complex
Thanet Way
Whitstable
Kent
CT5 3JF
ENGLAND
Tel: (+44) (0)1227 275357 Fax: (+44) (0)1227 272932
e-mail: [email protected]
www.n x-telecom.comr
NRX FLATPHONE
•Solución completamente inalámbrica:
auricular sin cables hgjghjghjghj
•Totalmente convertible con tres estilos
de colocación
•Gancho
•Diadema
•Banda de sujeción en la nuca
(optativa)
•Micrófono con anulación de ruido
•Alcance de hasta 100 metros;
50 metros en normales
•9 horas de tiempo de conversación
y recarga rápida
•Control del volumen para establecer
un nivel de escucha cómodo
•Botón mute para poder consultar
a los compañeros sin que lo oiga
el interlocutor
•Botón de conversación para poder
contestar y poner a las llamadas
fácilmente
•La característica IntelliStand ™logra
que contestar a una llamada sea tan
fácil como descolgar el microteléfono
normal (dispositivo para descolgar el
teléfono HL10 necesario)
•Compatible con el dispositivo para
descolgar el teléfono HL10 para el
control automático del teléfono
•Tecnología DECT ™para un sonido
de alta calidad y seguro
•Compatible con la mayoría
de los sistemas telefónicos
de empresas (CS60)
•Compatible con la mayoría
de los dispositivos DECT
con GAP* y las PBX
inalámbricas (C65)
*GAP (del inglés Generic Access
de acceso genérico). La mayoría de los
dispositivos DECT son compatibles con GAP.
Características principales Datos técnicos
Auricular
TCEDaígolonceT ™de 1,8GHz
Alcance operativo 100 metros en espacio libre; hasta 50 metros
en normales
Con PBX inalámbricas DECT, itinerancia
del sitio total (C65)
Peso del auricular 27,5g (gancho)
Indicador LED del auricular Indicador de uso
Tiempo de conversación 9 horas
Tiempo en espera 60 horas
Tiempo de recarga Con 1 hora, se consiguen 5 horas de conversación;
con 3 horas, la recarga completa
Aviso de fuera de alcance Tono audible en el auricular
Control de volumen de recepción 14dB +/- 0,5dB
Control de mute Apagado/encendido momentáneo para bloquear
la recepción del interlocutor
oitil-nóiedoremíloPaíretaB
Unidad base (CS60)
TCEDaígolonceT ™de 1,8GHz
Control de volumen de transmisión 14dB +/- 0,5dB
3 indicadores LED en la unidad base Alimentación, conversación y carga del auricular
Apagado/encendido de IntelliStand™Interruptor de 2 posiciones para activar
o desactivar la característica IntelliStand
Cargador y soporte del auricular (C65)
2 indicadores LED en la unidad base Alimentación y carga del auricular
Estas están sujetas a cambios.
CS60/C65
© 2004 Plantronics Inc. Todos los derechos reservados. Plantronics, el diseño del logotipo, Plantronics y el diseño del logotip o combinados e
IntelliStand son marcas comerciales o marcas registradas de Plantronics Inc. DECT es una marca comercial de ETSI. SPA11/04
Plantronics Ltd
Wootton Bassett, UK
0800 410014
+44 (0)1793 842200
Plantronics B.V.
Hoofddorp, Nederland
(0)0800 PLANTRONICS
0800 7526876 (NL)
00800 75268766 (BE/LUX)
Plantronics Sarl
Noisy-le-Grand, France
No Indigo: 0825 0825 99
0 , 15 TTC / mn
+33 (0)1 41 67 41 41
Plantronics Acoustics
Italia S.r.l
Milano, Italia
Numero Verde: 800 950934
+39 039 685971
Plantronics GmbH
Hürth, Deutschland
Service: 0800 9323 400
Technik: 0180 5007996
Österreich: 0800 242 500
Schweiz: 0800 932 340
Plantronics Iberia, S.L.
Madrid, España
902 41 51 91
+34 91 640 47 44
Plantronics Middle East,
Eastern Europe, Africa
and India
+44 (0)1793 842443
Nordic Region
Finland:0201550550
Sverige:031289500
Danmark:44350535
Norge:23173770
Números de teléfono de Europa:
CS60C65/SPA/1104
8579 CS60_C65_SPA 25/11/04 9:32 AM Page 2
Via Caracciolo 20
20155 Milano
tel. +39 02 365 22 990
fax +39 02 365 22 991
58 Av de Rivesaltes
66240 St Esteve
tel. +33(0)468 929 322
fax +33(0)468 929 333
0 800 72 4000 902 30 32 32 02 365 22 990 800 780 300
Av Diagonal 618 8º D
08021 Barcelona
tel. +34 93 241 38 90
fax +34 93 241 37 92
Av. da Libertade nº 9 - 7º
1250-139 Lisboa
tel. 800 780 300
fax 800 780 301
www.onedirect.fr www.onedirect.es www.onedirect.it www.onedirect.pt
Numéro Vert
Appel Gratuit

1. INSTALLATION
1.1 Getting Connected
1.2 Wall Mounting
2. TELEPHONE SETUP
2.1 Microphone Sensitivity Setting
2.2 Message Waiting setup
2.3 Dial Mode setup
2.4 Recall setup
2.5 Auto Disconnect setup
2.6 AutoAnswer setup
2.7 Memory programming
2.8 Ringer Setup
3. OPERATION
3.1 Dialling
3.2 Redial
3.3 Pause
3.4 Speed Dialling
3.5 Recall
3.6 Volume Control
3.7 Mute
3.8 Hold
4. APPROVED USE
5. CE APPROVED
6. NUMBER OF PHONES THAT CAN BE CONNECTED
7. WARRANTY
Contents
The layout of your NRX Flatphone
1
MUTE BUTTON
DIGITAL VOLUME CONTROL
SPEAKER ON BUTTON
REDIAL/PAUSE BUTTON
MESSAGE WAITING INDICATION
HOLD INDICATION LED
HOLD BUTTON
RECALL BUTTON
M1, M2, M3, M4
MEMORY BUTTONS
STORE BUTTON
UNDER LABEL
In the manual, some parameters have to
be set up by moving some switches.
These switches are located into the cable
connection compartment at the back of
the phone.

3
1. INSTALLATION
1.1 GETTING CONNECTED
Insert the telephone plug into the telephone socket. If
this socket is not present contact your network
operator. Check the telephone is operating correctly
by pressing the 'SPEAKER ON' button and listening
for dial tone.
Also supplied with the telephone is a Stub Cable
which can be used to install the unit in locations
where a telephone socket is not practical.
This need to be connected as follows:
Yellow Wire - Earth
Green Wire - Line A Conductor
Red Wire - Line B Conductor
Black Wire - Shunt Wire
1.2 WALL MOUNTING
The NRX Flatphone is designed to be wall mounted
using the screws provided. The screws should be
fixed to the wall approx 100mm.
The excess line cord can be wrapped up using the
space provided at the bottom of the unit. If required
Installation & Setup
the cord can then run out the unit using the snap out
exit at the bottom of the unit.
If the unit is being placed in a bathroom you may
want to ensure a proper waterproof shield. This can
be achieved by applying silcone glue between the
unit and the wall.
2. TELEPHONE SETUP
2.1 MICROPHONE SENSITIVITY SETTING
The NRX Flatphone is design for use in a wide
variety of locations. To cater for these different
installation conditions it is possible to adjust the
microphone sensitivity of the unit using the following
procedure.
- Press the [SPEAKER ON] button
- Press the [STORE] button (located under the
memory label)
- Press the following sequence of keys:
[0][0][1][2][3][0][3]
- Select the sensitivity
(low to high 0,1,2,3,4,5,6,7,8,9,M1,M2,M3)
where 'M3' is the highest sensitivity
- Press the [STORE] button again
NOTE: We recommend that the microphone is set to
the highest sensitivity unless the location is
2
Setup
particularly noisy.
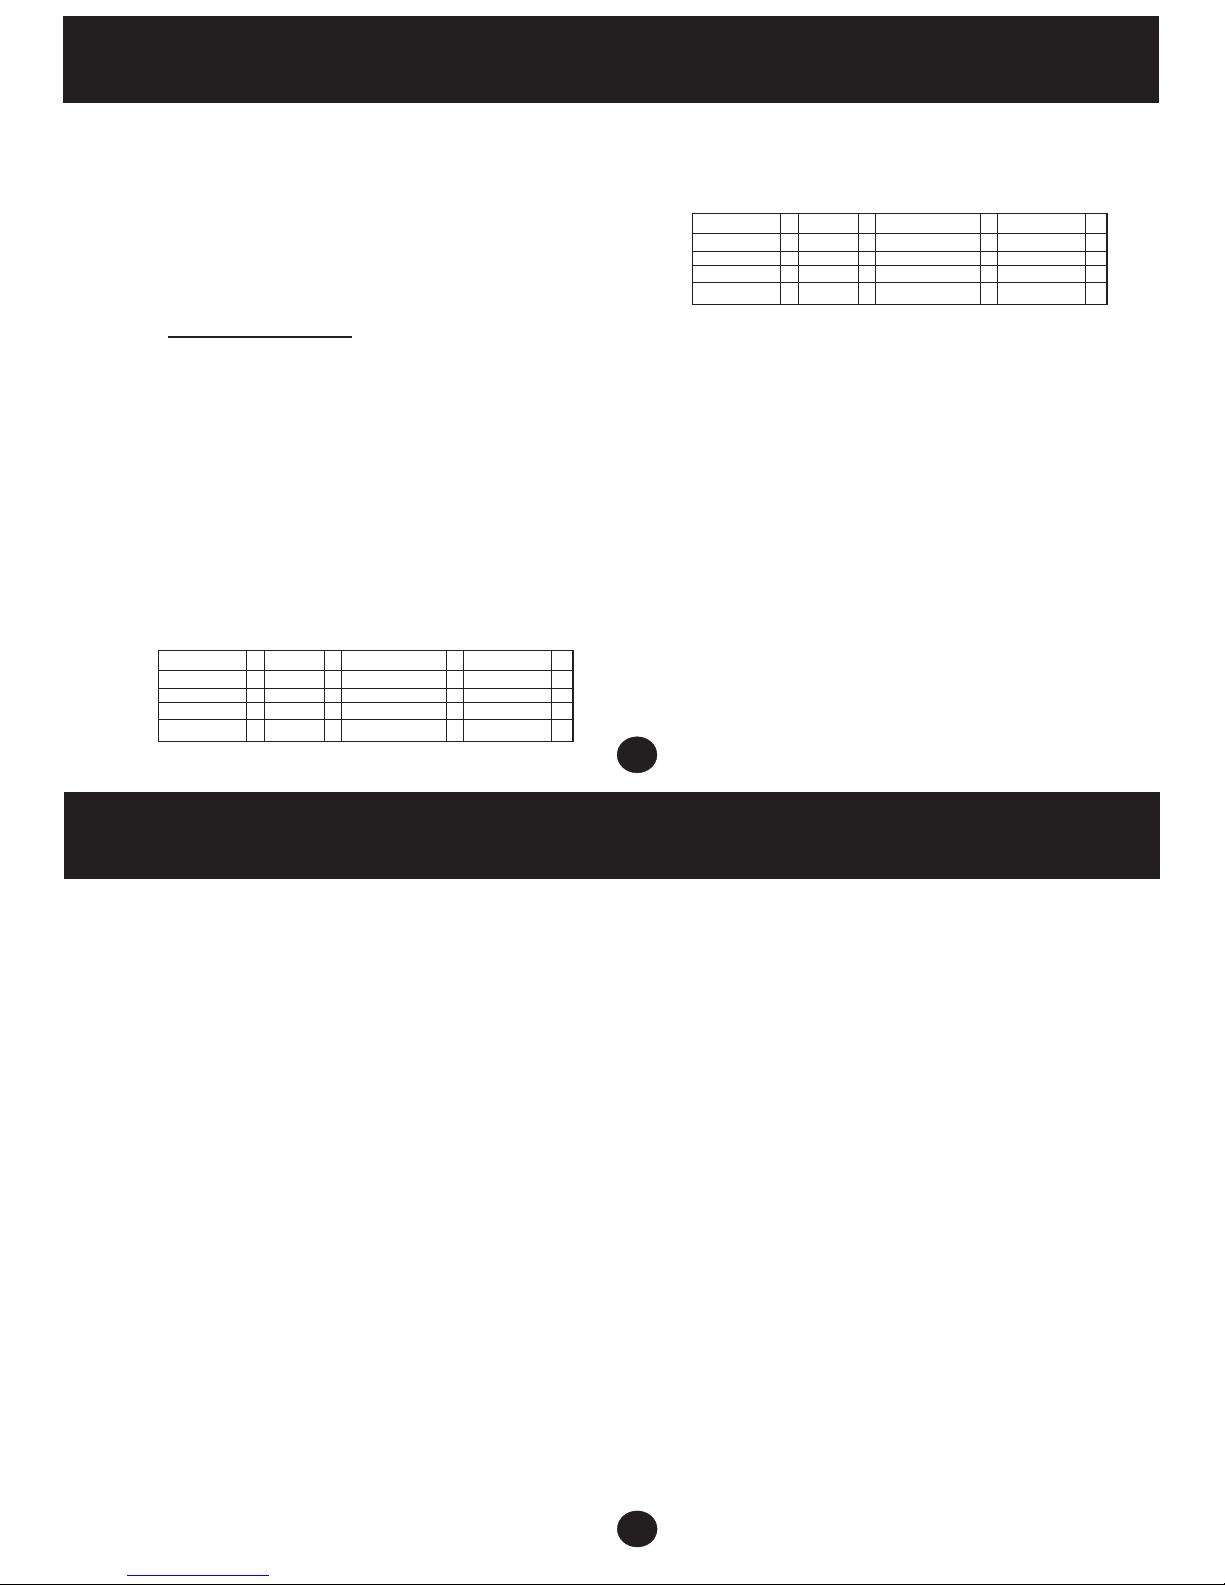
2.2 MESSAGE WAITING SETUP
The NRX Flatphone has two types of message waiting
indication, 90 Volt and Line Reversal.
To set the unit to 90V, switch MW1 (located in the
switch compartment on base of the unit) to LR1.
To set the unit to Line Reversal set the MW1 switch to
either LR1 or LR2 dependant on the wiring of your
telephone socket.
The switch should be set to OFF if no message waiting
is required on the installation.
2.3 DIAL MODE SETUP
To NRX Flatphone can be set to either Tone or Pulse
dialling as follows:
PULSE - Press [SPEAKER ON]STORE][3][0][STORE]
TONE - Press [SPEAKER ON][STORE][3][1][STORE]
STORE button is located under the memory label.
NOTE: As most installations require Tone dialling, this
is set as default on the unit.
2.4 RECALL SETUP
The NRX Flatphone can be set to either Earth or
Timed Break recall using the following procedure:
EARTH RECALL - Switch SW3 (located in the base of
the unit) to 'ER'
TIMED BREAK RECALL - Switch SW3 to 'TBR'
The default TBR setting is 300ms but can be set to
either 100ms or 300ms as follows:
100ms - Press [SPEAKER ON][STORE][2][0][STORE]
300ms - Press [SPEAKER ON][STORE][2][1][STORE]
2.5 AUTO DISCONNECT SETUP
The NRX Flatphone can be set to auto-disconnect the
line after either 60 seconds or 120 seconds if the user
is silent.
This can be set via switch SW9 located on the base of
the unit. To activate the facility switch SW9 to either
'60s' (60 seconds) or '120s' (120 seconds).
2.6 AUTO ANSWER
The NRX Flatphone can be set to auto answer a
telephone call after 5 rings. To select this option set
switch SW5 to 'ON'.

5
2.7 MEMORY PROGRAMMING
The one-touch memory buttons can be programmed as
follows:
- Press [SPEAKER ON]
- Press [STORE] (located under memory label)
- Press [M1], [M2], [M3] or [M4]
- Enter the telephone number to store
- Press [STORE]
- Press [SPEAKER ON] to end procedure.
2.8 RINGER SET UP
The ringer volume and ringer melody can be adjusted as
follows:
RINGER VOLUME
LOW - Press [SPEAKER ON][STORE][6][1][STORE]
MED - Press [SPEAKER ON][STORE][6][2][STORE]
HIGH - Press [SPEAKER ON][STORE][6][3][STORE]
RINGER MELODY
MELODY 1 - Press [SPEAKER ON][STORE][7][0][STORE]
MELODY 2 - Press [SPEAKER ON][STORE][7][1][STORE]
MELODY 3 - Press [SPEAKER ON][STORE][7][2][STORE]
MELODY 4 - Press [SPEAKER ON][STORE][7][3][STORE]
MELODY 5 - Press [SPEAKER ON][STORE][7][4][STORE]
Setup & Operation
RINGER ON/OFF
ON - Press [SPEAKER ON][STORE][9][1][STORE]
OFF - Press [SPEAKER ON][STORE][9][0][STORE]
3. OPERATION
3.1 DIALLING
To dial a new call first press [SPEAKER ON] and
listen for dial tone. Once you hear dial tone, dial the
number either using the keypad or by using one of
the three memory buttons. Once the other party
answers, speak clearly in the direction of the
microphone at the front of the unit. To terminate the
call press the [SPEAKER ON] button again.
3.2 REDIAL
After pressing the [SPEAKER ON] button, by
pressing the [REDIAL] button you can dial the last
number dialled on the unit.
3.3 PAUSE
Pressing the [PAUSE] button either during a dialling
sequence or when programming one of the memory
buttons will insert a 3 second pause.
4
Operation
3.4 SPEED DIALLING
When you are on line, pressing one of the memory
buttons [M1], [M2], [M3] or [M4] will dial the number
stored in that memory location.
3.5 RECALL
The [RECALL] button can be used to access
additional PBX or network operator services. The
telephone supports both Earth and TBR recall (See
section 2.4).
3.6 VOLUME CONTROL
While the telephone is on line, the receive volume
control can be adjusted by pressing the [+] and [-]
volume buttons. The volume level will be
remembered by the unit for the next call after the
telephone goes off line.
3.7 MUTE
If you wish to put the phone call on hold for a while or
pick up the call on another telephone connected in
parallel, this can be done by using the [HOLD] button.
Once the [HOLD] button is pressed the call is placed
on hold and the hold indicator is turned on. To
resume the call, press the [SPEAKER ON] button
and resume conversation.
Alternatively, pick up another telephone connected
in parallel with the NRX Flatphone and the hold
indicator will be turned Off.

7
4. APPROVED USE
The NRX Flatphone can be connected to the Public
Switched Telephone Network (PSTN) and
compatible to PABX's but not connected in the
following manner: -
1. As an extension to a payphone.
2. On shared service line or 1+1 carrier system.
Network Compatibility
The NRX Flatphone has been approved persuant to
commission decision 1999/303/EC for pan-
European connection to the public switched
telephone network (PSTN). However, due to
differences between the individual PSTNs provided
for in different countries, the approval does not, of
itself, give an unconditional assurance of successful
operation on every PSTN network termination point.
In the event of problems you should contact your
equipment supplier in the first instance.
The NRX Flatphone has been designed to interwork
with the following networks.
Austria üGermany üLiechtenstein üSpain ü
Belgium üGreece üLuxembourg üSweden ü
Denmark üIceland üThe Netherlands üSwitzerland ü
Finland üIreland üNorway üUK ü
France üItaly üPortugal ü
4. APPROVED USE
The NRX Flatphone can be connected to the Public
Switched Telephone Network (PSTN) and
compatible to PABX's but not connected in the
following manner: -
1. As an extension to a payphone.
2. On shared service line or 1+1 carrier system.
The NRX Flatphone has been approved persuant to
commission decision 1999/303/EC for pan-
European connection to the public switched
telephone network (PSTN). However, due to
differences between the individual PSTNs provided
for in different countries, the approval does not, of
itself, give an unconditional assurance of successful
operation on every PSTN network termination point.
In the event of problems you should contact your
equipment supplier in the first instance.
The NRX Flatphone has been designed to interwork
with the following networks.
Network Compatibility
Approved Use
This product may have interworking problems
with the following networks.
Austria Germany Liechtenstein Spain
Belgium Greece Luxembourg Sweden
Denmark Iceland The Netherlands Switzerland
Finland Ireland Norway UK
France Italy Portugal
5. CE APPROVED
This unit is fully compliant with the current
European EMC and Safety specifications.
6. THE NUMBER OF TELEPHONES THAT
MAY BE CONNECTED
If you connect too many telephones to your line
they may not ring correctly. To determine the
number of telephones that can be satisfactorily
connected to your line, add together the ringer
equivalent numbers (RENs) of all the equipment
you wish to connect. If this number exceeds four,
your telephones may not ring. Your NRX Flatphone
telephone has an REN of one (1). BT telephones
have an REN of one unless otherwise marked.
6
Blank Page

9
7. WARRANTY
Trojan Telecom has built the NRX Flatphone to a
high standard. Our warranty reflects our belief that
during it’s working life you should not experience
any mechanical failures.
However, on the rare occasion a breakdown occurs,
the Trojan telephone is covered by a two year
warranty.
Trojan Telecom will at all times use a sensible and
supportive attitude towards warrantable returns,
working with you in identifying ‘no fault found’.
The following terms and conditions apply:
1) Where we find a genuine warranty failure, Trojan
Telecom will replace the faulty instrument with a
one-for-one replacement.
2) It is the responsibility of the user to return the
faulty telephone to Trojan Telecom. We ask you to
cover this cost and we will return your replacement
telephone at our expense.
3) We reserve the right to repair the faulty item or
replace it with a similar telephone of the same make.
4) Discontinued models under warranty will be
replaced with a similar or more featured telephone.
5) We reserve the right to charge for items considered
Warranty
to be chargeable under fair wear and tear.
6) User misuse or any modification carried out to
the Trojan telephone by the customer is not
considered a manufacturing fault or component
defect. Therefore it is not covered by the warranty.
7) User damage will not be covered under the
terms of the warranty.
8) When returning the telephone please ensure you
fully complete the returns authorisation form,
failure to do so could cause you unnecessary delay.
The terms of this warranty do not effect your
statutory rights.
Warranty applies to UK customers only.
Faulty units should be returned to our service
centre at the following address, together with the
completed return form on the opposite page.
SERVISCOMM
UNIT 2
RED BARNES WAY
McMullen Road
Darlington
DL1 2RR
UK
8
Warranty
Date of Purchase Model No Details of Fault
Returns Authorisation Form
Customer Details
Address: ................................. Tel No: ...................... Returns Auth No: .....................
................................................. Fax No: ......................
................................................. Account No: ..............
Trojan Telecom's full liability will extend to the cost of repair
or complete replacement of the returned item only.
Table of contents
Other NRX Telephone manuals