NSR Marine NPT-100 User manual

NPT-100 UM-E. 20131201-02
USER’S MANUAL
Thermal Printer
NPT-100
NEW SUNRISE


NPT-100 UM-E. 20131201-02
Amendment Record
AMENDMENT
No.
INCORP.
BY
DATE
PARAGRAPH
VER
REASON FOR CHANGE
1
Q/A
2013/12/1
4 and 5
02
Add the description of
port settings.

NPT-100 UM-E. 20131201-02
NOTICE TO USERS
-Thanks for your purchasing this product NPT-100 Thermal Printer.
-Please read this manual carefully to ensure proper use before installation
and operation of the NPT-100.
-NSR will assume no responsibility for the damage caused by improper
use or modification of the product or claims of loss of profit by a third
party.
-Software version in your product may be some different from that
described as in this manual. Such difference will not affect the
performance of the product. NSR reserves the right on continuous
improvement of products both in software and hardware without any prior
notice.
-The copyright of this manual is owned by the manufacturer, NEW
SUNRISE CO., LTD (NSR). Prior written permission is required for
copying or reproducing the manual or part of the manual.
-Please keep the manual for your future reference.

NPT-100 UM-E. 20131201-02
SAFETY INSTRUCTIONS for the operator
Warning
Keep away from heater source or direct sunshine.
Prohibition
Don’t open the equipment. Only qualified personnel should work
inside the equipment. Don’t disassemble or try to modifiy the
equipment.
Dangerous
Turn off the power immediately when smoke or fire is emitted.
SAFETY INSTRUCTIONS for the installer
Warning
Connect the earthing cord to ship’s body.
Observe the compass safe distance to prevent deviation of an
onboard magnetic compass.
Prohibition
Don’t open the equipment unless you have fully understood the
structure and circuits of the equipment. Only qualified personnel
should work inside the equipment. Don’t disassemble or try to
modifiy the equipment.
Dangerous
Turn off the power at power distribution board before installation.


1 NPT-100 UM-E. 20131201-02
0. Brief Introduction
Thank you for purchasing the NPT-100 thermal printer.
This USER’S MANUAL explains how to handle NPT-100 thermal
printer (hereinafter referred to as printer),
NPT-100 thermal printer adopts Seiko printer head with the features of
high speed, high-quality,high reliability,low noise,compact size and easy
operation .
NPT-100 can be used for a wide range of marine applications, e.g.
Navtex receiver, Inmarsat C, and Anemometer.
Once you have opened the carton, make sure it contains the printer
and all accessories.
-Printer
-Thermal paper
-CD-ROM (manual)
-AC/DC adaptor
-Short connection cable with RS232 connector

2 NPT-100 UM-E. 20131201-02
1. Features
1.1 General Specifications
Printing Method
Thermal dot line printing
Printing width:
80 mm , 640 dot / Dot per line
Resolution:
8 dots /mm
Paper width
111.5±0.5 mm
Printing speed:
high or low speed
printing head life:
100 million pulse or more(at 25℃and at
rated power supply)
1.2 Printing paper : Thermal paper
Paper loading:
Easy lading of paper with a detachable
platen unit.
Paper parameters:
External diameter:Φ 40mm
Internal diameter:Φ12mm
Thickness 53~60g/111.5±0.5 mm
high or low speed
1.3 Character matrix :
·ASCⅡcharacter: 16 dot wide×24 dot high, 2.00 (W)×3.00 (H) mm
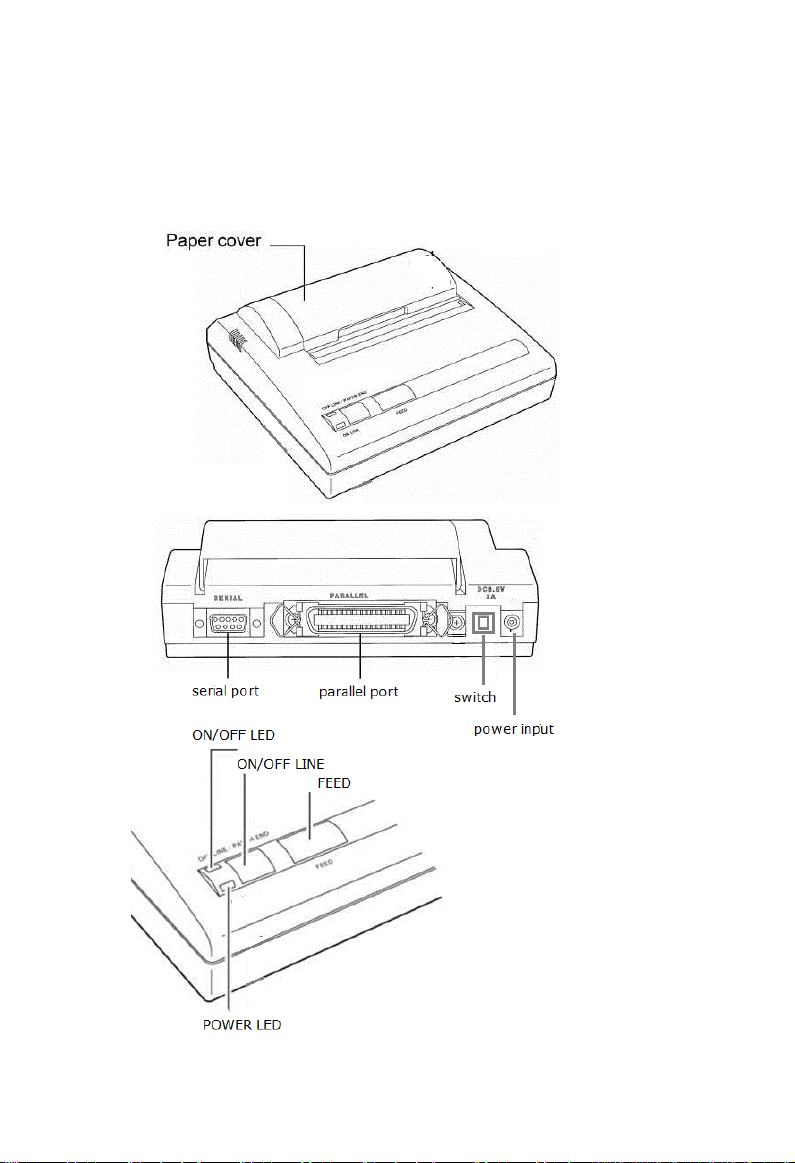
1.4 Interface:
Parallel port or serial port selectable.
Serial port can be set at the baud rate of 2400/4800/9600/19200bps.
1.5 Printing control command:
-The printing control command has a good compatibility with the
traditional printer
-Character printing command supports to print out ASCⅡcharacter
in double width and double high
-Graphics printing command supports to print out different graphical
dot array vertically and horizontally .
-Support the printing under the Windows 9x、Windows2000、
Windows XP Operation System.

3 NPT-100 UM-E. 20131201-02
1.6 Power Supply:
·
-DC8V or AC100V/50-60Hz (with adaptor)
-Mean current: 3(A) at DC8V
-Peak current: 5(A) at DC8V
1.7 Environmental conditions:
-Operating temperature : 0~40℃
-Relative humidity: ≤80%RH
-Storage temperature : -20~60℃
-Storage Relative humidity: 10~90%RH

4 NPT-100 UM-E. 20131201-02
2. External dimensions and part name
External dimensions (160×170×66mm)

5 NPT-100 UM-E. 20131201-02
3. Operation
3.1 Loading paper
-When the printer detects the signal of no paper, the ON/OFF LED
(green) will blink.
-Open the paper cover by pressing push–button on the right side.
-Put the paper roll into the paper holder as below photo.
-Close the paper cover.
-The ON/OFF LED stops blinking.
-If the paper deviates to one side, press the FEED button to correct
the error.
Attention:
The thermal surface of printing paper must towards the inside.
3.2 State indicators
The printer has two indicators, the POWER LED (red) as a power
indicator and the ON/OFF LED (green) as a state indicator.
ON/OFF LED states:
-light on, indicating the printer in on-line state.
-light off, indicating the printer in off-line state.
-blink, indicating the printer in unusual warning state or in setting
state.
3.3 ON/OFF LINE button
In the on-line mode, the ON/OFF LED is on.
Press the ON/OFF LINE button, then the ON/OFF LED is off and the
printer is off-line. In this state, the printer can not receive the data.
Press the ON/OFF LINE button again, and the printer is on–line again.
3.4 FEED button
In the on-line state, press the FEED button and the feed paper motor
will be started. The printer feeds the paper.
Press the FEED button again to stop feeding paper.

6 NPT-100 UM-E. 20131201-02
3.5 Self-test
The self-test procedure can examine whether the printer works normal
and what the current parameters are.
If a self-test list can be correctly printed out, the printer is in good state.
-Press ON/OFF LINE button to leave the printer into off-line state
(the ON/OFF LED off).
-Press the ON/OFF LINE button again and the ON/OFF LED will
blink once.
-Press the ON/OFF LINE button immediately to leave the printer
into self-test procedure.
-The printer can print out the ASCII character table and current
parameters of all setting items.

7 NPT-100 UM-E. 20131201-02
4. Function Setting
4.1 Items to be set
The below items can be set by different combination of buttons and
LEDs on the panel.
NO
ITEM
PARAMETERS
1
Interface
parallel or serial
2
Printing speed
low speed or high speed
3
Data control of serial port
DTR or Xon/X-off
4
Baud rate of serial port
19200 bps ,9600 bps,4800 bps,2400 bps
5
Printing resolution
standard printing or fine printing
6
Printing mode
row printing: Character matrix (8X16 dots)
or
page printing: Character matrix (16X24 dots
or 16X16 dots)
7
Character matrix
16X24 dots or 16X16 dots
4.2 Setting method
- Press the ON/OFF LINE button, then ON/OFF LED off and the printer
is off-line.
- Press the ON/OFF LINE button again until ON/OFF LED blinks twice
and then release the button. The printer is on–line and prints out the
current parameter of the first item.
- Press the ON/OFF LINE button step by step to print the current
parameter of the setting items in below order:
Interface→
Printing speed→
Data control of serial port→
Baud rate of serial port→
Printing resolution→
Printing mode→
Character matrix
- When printing the parameter of one item among above, press the
FEED button to change parameter of the item.
- Press the ON/OFF LINE button again to save the current parameter
and enter next setting item.
4.3 Setting example
In the below table, the middle column shows the current parameters (as
printed in self-test). The right column shows the target parameter you

8 NPT-100 UM-E. 20131201-02
expect to set into.
Item Name
Current Parameter
Target Parameter
Interface
Parallel
Serial
Printing speed
High speed
Low speed
Data control of serial port
X-ON/X-OFF
DTR
Baud rate of serial port
Baud rate 4800
Baud rate 19200
Printing resolution
Standard printing
Fine printing
Printing mode
Page printing
Page printing
Character matrix
Character 16X24 dots
Character 16X16 dots
Operation steps:
STEP 1:
Press the ON/OFF-LINE button to make the printer into off-line state
(ON/OFF LED off ).
Press the ON/OFF LINE button again until ON/OFF LED blinks
twice and then release the button. The printer is on–line and prints
out the current parameter of the first item “Parallel”following the title
Function Setting.
Press the FEED button to change the parameter. “Serial”is printed
out.
STEP 2:
Press the ON/OFF LINE button to enter next setting item. “High
Speed”is printed out.
Press the FEED button to change the parameter. “Low Speed”is
printed out.
STEP 3:
Press the ON/OFF LINE button to enter next setting item.
“X-ON/X-OFF”is printed out.
Press the FEED button to change the parameter. “DTR”is printed
out.
STEP 4:
Press the ON/OFF LINE button to enter next setting item. “Baud
rate 4800”is printed out.
Press the FEED button to change the parameter. “Baud rate 9600”
is printed out.
Press the FEED button to change the parameter. “Baud rate 19200”
is printed out.
STEP 5:
Press the ON/OFF LINE button to enter next setting item. “Standard

9 NPT-100 UM-E. 20131201-02
printing”is printed out.
Press the FEED button to change the parameter. “Fine printing”is
printed out.
STEP 6:
Press the ON/OFF LINE button to enter next setting item. “Page
printing”is printed out.
STEP 7:
Press the ON/OFF LINE button to enter next setting item.
“Character 16X24 dots”is printed out.
Press the FEED button to change the parameter. “Character 16X16
dots”is printed out.
STEP 8:
Press the ON/OFF LINE button to save all new parameters.
All new parameters can be printed out if self-test is carried out.

10 NPT-100 UM-E. 20131201-02
5. Port Connection
5.1 Port description of RS-232 connector
Pin No.
Description
Direction
Remarks
1
NC
NO USED
2
TXD
output
The printer sent out “X-on/X-off ”code
3
RXD
input
The printer receives data
4
…
…
Connected to pin 6
5
GND
…
6
…
…
Connected to pin 4
7
NC
NO USED
8
DTR
The printer can not receive data when
the signal in “Mark”(Busy), the printer
can receive data when it in “Space”
state.
9
NC
5.2 The connecting between the printer and PC
Pin No.
PC or Marine equipment
Printer
1
2
RXD
TXD
3
TXD
RXD
4
DTR
Connected to pin 6
5
GND
GND
6
DSR
Connected to pin 4
7
RTS
NC
8
CTS
DTR
9
Data format:
Parity: nothing, odd number, even number
Data control: : x-on / x-off
Data bit length: 8 bit
Stop bit length: 1 bit (fixed)
5.3 Baud rate:
2400/4800/9600/19200bps
(factory default 4800bps)

11 NPT-100 UM-E. 20131201-02
6. Control command
ASCⅡ
Function
NUL
End symbol
HT
Horizontal tab
LF
Print and line feed
VT
Vertical tab
CR
Print and carriage return
CAN
Cancel the character in current line
ESC ESC
Set West word printing mode
ESC FS
Set Chinese word printing mode
ESC ﹪
Permit /prohibit User-definable character
ESC &
Set Use-definable character
ESC +n
Set/Reset superscript line print
ESC -n
Set/Reset subscript line paint
ESC 1A
Set n- dot line feed
ESC @
Reset the Printer
ESC B
Set Vertical tab value
ESC D
Set horizontal tab value
ESC J
Print and feed paper n- dot line
ESC Q n
Set right margin
ESC… U n
Set character was printed in double-width
ESC V n
Set character was pointed in double-high
ESC W n
Set character was printed in double-high and double
width
ESC f m n
Print n-space/n-space line
ESC I
Set/cancel inverted colour pint
ESC 1n
Set left man gin
ESC m
Cutting paper command
Graphical printing command
ESC *
Set dot graphic command
ESC k
Set dot graphic command
ESC(
Set dot graphic command
ESC
Set dot graphic command
ESC
Set dot graphic command
ESC,
Print curve command
ESC x
Set bit image graphic printing in the ROM
G/ n
Print the bit image graphic in the ROM


Table of contents
Popular Printer manuals by other brands

Epson
Epson R320 - Stylus Photo Color Inkjet Printer Product information

Epson
Epson TM-T20 Quick reference guide

Printronix
Printronix SMARTLINE SL4M Programmer's reference manual

Ricoh
Ricoh SH-P1 M020 Field service manual

Canon
Canon BJC 6000 - Color Inkjet Printer Service manual

LabelTac
LabelTac Pro X user manual